Let me know if youd like some hood scoop tips (besides not to leave it 300 miles away )
Jeff
I snorted pretty loud when I read this tip. Thanks for the laugh.
The real answer is yes, I would love some tips if you have time. I know you have put it elsewhere in the forum and I was going to find those posts.
There is absolutely no rush since we won't get to the hood scoop for at least a month if not longer. What typically happens is that my brother and I get a week booked to spend a ton of time on the car. We get a ton done in that week, but then it sits for 1-2 months before the next stretch.
It might not feel like we got a lot accomplished today, but the doors are essentially finished. We still have to gap the driver's door, but otherwise they are mudded and sanded and the curves are flowing well.
We spent about 2.5 hours each today on the doors. It was a lot of sanding, then putting more body filler on, then sanding, then filler, etc. This sure is an expensive way to make dust!
We are quite pleased with how the body is turning out. Sadly, this is the last night we had to work on it for now. I don't expect much to happen during the next month.
Make sure you really look hard at the body where it meets the front of the doors...My body dove in a pretty good bit so please check yours with a straight edge to make sure it is okay...This was something Jeff really had me pay attention to and it made the final product come out really nice.
Make sure you really look hard at the body where it meets the front of the doors...My body dove in a pretty good bit so please check yours with a straight edge to make sure it is okay...This was something Jeff really had me pay attention to and it made the final product come out really nice.
Thanks for the tip. The door does dive down at that point. The passenger door isn't bad at all, but the driver's side body dove down quite a bit at the top of the front edge. We still need to build it up a bit but the body filler has really helped. You can see that we built up both sides at the top of the driver's door in this picture. I think it still needs more. (Ignore the large divots in the filler in the picture, we fixed those already)
We didn't have much dive on the passenger side. It was slightly high about 1/2" in front of the door. It was close enough I took a long durablock and sanded it down. It is pretty close now. Here is a picture of the passenger door front edge.
We still aren't finished with the doors. We still have to touch up the Rage Gold along the bottom rear corner of the driver's door. We also have to build up the gap on the bottom of both doors. The gap on the bottom edge has areas where it is about 1/4" wide and looks uneven. My question is if it is better to build up the door edge or the body side of the gap? We were planning on building up the body side since it would be stronger and less likely to break off than the door edge.
We also ended up putting in a few more hours on Saturday morning. I sanded the passenger door and my brother evened out the driver's front and lower edge. We also did some touch up on the parting lines, evened out around the head cap, and fixed the parting lines in the trunk and door gaps. I ended up finding a fairly big void at the trunk gap on the body. I built it up but ran out of time to finish fixing the void.
First question: I plan on using a PPG 2K urethane paint. From my research it looks like a P100 respirator isn't sufficient. Do you recommend a supplied air respirator system?
Second, I just stopped by my local paint shop (NCS). It looks like they only have Feather Fill and not Slick Sand. I live in a rural area so to get Slick Sand I would have to order it online. Is three difference with slick sand worth the hassle of dealing with online shipping or do I go with Feather Fill?
...We also have to build up the gap on the bottom of both doors. The gap on the bottom edge has areas where it is about 1/4" wide and looks uneven. My question is if it is better to build up the door edge or the body side of the gap? We were planning on building up the body side since it would be stronger and less likely to break off than the door edge.
I agree. I sometimes get cars that the owner has gotten a little carried away with trimming and my preference is to make the hole smaller rather than the hinged panel bigger. I do a certain amount of building up in the openings as a matter of course anyway because I like to sharpen up the exaggerated radius where the body side turns into the door jambs. If you look at some of the pics I posted earlier you can see the filler.
Originally Posted by hineas
I have been planning what I need for paint.
First question: I plan on using a PPG 2K urethane paint. From my research it looks like a P100 respirator isn't sufficient. Do you recommend a supplied air respirator system?
Second, I just stopped by my local paint shop (NCS). It looks like they only have Feather Fill and not Slick Sand. I live in a rural area so to get Slick Sand I would have to order it online. Is three difference with slick sand worth the hassle of dealing with online shipping or do I go with Feather Fill?
A P100 is just a dust mask for particulates and won't do anything for organic vapors or Isocyanates. You can never be TOO safe but my choice is to use a half face respirator with 3M 60921 or 60923 cartridges (60923 also protects against acid gas which we don't really need but since events of 2020 sometimes that's all that's available). Sure, supplied air offers more protection and would certainly be required in a production environment with all day, every day exposure. I don't go that far but we all make our choices...
After using both Slick Sand and Feather Fill my preference is SS. It builds more (4.0-6.0 mils per coat vs 2.0-4.0 for FeatherFill G2) and sands easier---with "easier" being a relative term . SS costs about 25% more and you'll use 2 gallons. Do the math and make your decision. If you buy on line you're going to need to get friendly with your paint supplier and maybe even slip him a couple of bucks to put it on his shaker before you use it---it's about 60% solids by volume (FF is similar) and all of that will be settled to the bottom. You'd have to dig and stir for days to get it fully mixed!
We moved onto the hood scoop this week as well as worked on the door gaps.
I put some Rage Gold on the body side of the door opening to make the gap smaller. The rear corner on the passenger door and the front corner on the driver door were cut too much from the factory and the gap was just over 1/4". I built those up and smoothed it out. I'm much closer, but it still needs a little more. I also found a few low spots on the parting seams and touched those up too.
I didn't assume time researching the hood scoop. I found a few threads on the forum where Jeff recommended not following the FFR instructions for the hood scoop hole. These are the measurements I found that he posted in a few other threads (this is Jeff Kleiner's picture):
We marked the hole and played with the scoop. Cutting that big of a hole is a little nerve racking! We chickened out and cut it 1/4" smaller. Hopefully that won't be a big deal.
We smoothed it all out and sanded all the gel coat that will needed sanding with 80 grit. I tried stuffing HSRF down between the layers to bind them together where it wasn't bonded well. Then we sanded that down then put rage gold along the edge to smooth it out a bit. I think it turned out fairly well.
We laid the hood back on. Funny how the hole, hood, engine, and body just don't like up. As Jeff said in other threads, the hole size is small enough you can move the scoop around enough so it is centered from the outside. The big benefit of doing the hole this way is that the hole is centered on the underside of the hood so it looks normal when the hood is up.
I'm quite pleased with how it turned out so far. Once the scoop is in place and the hood is closed, you can't see the hole is offset. When the hood is open and you look at the underside of the hood it looks centered as well. Another bonus was that this measurements from Jeff were a heck of a lot easier than the FFR instructions.
I assume the next part is to drill the holes for the hood scoop? This is my plan:
1) Reattach hood
2) Find the centerline. I plan on doing this by stretching a string from the center of the license plate housing to the center of the front between the headlights. From there I will adjust the center line to make sure it is centered between the dual roll bars. Then I'll look at it and make sure it looks centered. I have seen both Jeffs say that you have to trust your eye with these cars!
3) once I find the center of the body, I'll center the hood scoop then drill holes according to FFR instructions.
Does that plan sound right? We already have the gaps set and the final position of the hood figured out. I assume we still the holes for the hood scoop now instead of after paint.
Once we have the hood scoop position set and the door gaps finalized, we will take the body off. Then we will start sanding with a guide coat and prepping for slick sand.
A couple of tips: For the scoop fastener holes I start 1" back from the leading edge of the scoop then go 2 3/8" down both sides. Mark it out with a compass or caliper before drilling. It should get you to where the spacing down both sides intersects just about dead on the rear center as you come around; if not adjust your spacing on the last 2 or 3 just a tiny bit---like about 1/16" more or less as necessary. Your eye won't notice.
NOW THIS IS REALLY IMPORTANT BECAUSE IT'S SOMETHING YOUR EYES WILL NOTICE! If you are doing stripes do not drill the rear center hole until after paint. If you do it before and the stripes and fastener end up off center from one another it'll look like this one (not one of mine):
I don't know about you but that kind of thing would keep me up at night! If you're not doing stripes you can forget all about that part
Too bad that picture wasn't yours. I was going to ask the color. That is the exact color scheme we are looking for!
The owner used the exact same color that I used when I did this one for Scott Donnelly "Sdonnel" a couple of years ago:
It's "Randyapplered 3", a custom mix basecoat by Randy Borcherding at Painthouse in Texas www.painthousetx.com
I used Nissan Pearl White tricoat (QAC) for the stripes...not sure but I think the other car was done with a different white.
Thanks Jeff! That color is sure tempting. Do you remember if it is a hard color to paint and get doors to match.
I'm not sure which white we will do, but I don't think that will be a hard of a decision as the red.
Craig, I spoke to a guy that built a different brand kit (no longer available). His comment about the body work was, "it is fiberglass, you can always fans it down and try again." I feel like it is more of a test of patience than anything else. We are 57 hours into it and I think about 50 of those hours are sanding by hand... I have essentially no history of doing body work, but I feel like we are doing a pretty good job for our first time.
Thanks Jeff! That color is sure tempting. Do you remember if it is a hard color to paint and get doors to match.
I'm not sure which white we will do, but I don't think that will be a hard of a decision as the red.
I've done 2 roadsters with this color; Scott's with pearl white and the other with silver/gray color matched to the Halibrand wheel centers. It is indeed spectacular!
Although it appears to be a 3 stage candy it is in fact a special formula base/clear (my supplier and I kind of reverse engineered it and now know what Randy's secret is ) which is no more difficult to spray than any other modern color that has a lot of flake and pearl in the mix. That's the good news. Chewy alluded to the shocking news---it's currently >$3,200/gallon!
We put in a few hours today and made some good progress.
We finished the gaps on the doors. We built up the outer edge of the door opening some more to make up for the over-trimming from the factory. The gaps look so much better now. The pictures don't do it justice because the color difference between the body and the Rage Gold makes it look uneven.
We worked some more on the hood. We got the outer and inner layers bonded together and all smoothed out. Then we reattached the hood. We then spent some time finding the centerline of the body. Once that was done, we started figuring out where we wanted the hood scoop. While doing that we realized we made a mistake.
We all know the old adage, "measure twice and cut once." Well, in the hood scoop hole we measured 17 times and cut once. We were feeling pretty good about it until we were standing at the back of the car with the good open. The hole wasn't centered in the underside indentation!!! We honestly measured it at least a dozen times...
If you look closely at the above picture, you can see the hole is shifted to the left any 1/2". Luckily we cut the hole 1/4" smaller on each side than Jeff recommended. That meant we could widen the hole 1/2" to the right and it would be the size he recommended. We got lucky on that one!
Once we recut the hole we went back to figuring out placement of the hood scoop. We spent over an hour just looking at it and moving out an 1/8" at a time.
We then drilled the hood scoop and the hood and I think it looks great! We used the spacing Jeff recommended and it worked well.
We had to call it a night after we attached the hood scoop. I'm pleased with the progress. We are getting so close to the slick sand stage. It will be exciting to see it all one color again!!!
We are essentially done with body filler. We need to re-finish the edge of the hood scoop hole, but that is the last area of filler before we start prepping for the high build primer.
We are going to pull the body off, perhaps today, and progressively sand up to the recommended grit for the slick sand. Currently our body is completely sanded at 80 grit.
My question is if we need to do anything to the underside of the body?
I have seen several people do truck bed liner. I have seen people line the wheel wells with a thin foam. The big concern is rocks hitting the inner aspect of the body and causing stars in the paint. The other concern I have seen is that the body is partly transparent and if the sun is just right (basically if the sun or a bright light is shining on the inner side of the body, which I don't see being an issue) it can cause the paint to look strange.
How big of an issue are these concerns? Have people that left the underside of the body completely unfinished actually have these or other issues? The reason I ask is because if I need to coat the underside with something, I want to do it before I spray slick sand.
I used roll on truck liner stuff. IIRC I used a water based product from duplicolor. I put 2 coats on but did 3-4 in the wheel wells to prevent star cracks from below.
Last night we did a little more. We finished smoothing out the hood scoop hole and it looks so much better.
Next, we removed all the hardware from the body that was all in place. We removed the body mounts, hood, trunk, doors, gas cap, etc.
While removing the passenger door we had the same issue as the driver door. I'm convinced it was due to the acorn nuts not being deep enough for the length of the studs. I'm pretty sure we bottomed out the stud in the nut and then over torqued it. I suspect the pressure caused some severe galling. The front two studs had no issues but the rear two studs were completely seized. We didn't struggle putting them on and used just a normal sized ratchet. I don't remember having to use excessive force either. However, even with my big ratchet I was unable to remove the nuts. I had to use my air impact wrench. That removed the nuts easily, but it also twisted off the studs.
The good news is the top stud has just enough thread left to still use a nut and have all the threads engaged.
The bad news is that the bottom stud is only long enough for one thread to be engaged in the nut.
We debated what to do next. We already spent several hours building up the door, sanding, etc. We really didn't want to have to do that over again so decided that getting a new door would not be ideal. We talked about grinding the plate down to allow more threads to be engaged, but decided against that. We ultimately decided that once paint is finished, we will install the door then tack weld the stud to the hinge plate to hold it in place. We reattached the door and we could get the door positioned correctly and securely with just three of the nuts installed. This should allow for enough strength to make it work.
We bought some Herculiner to coat the underside of the body. That is our next step. Then we will sand the parts of the body we couldn't get to, use some glazing putty to fill in pinholes, then spray the slick sand!
The sad part is that our day jobs will get in the way and we might not be able to do any more work until end of May.
Yuck! Sorry to hear that. I've had that happen twice with the acorn nuts when cars have come to me with them installed. I don't trust the little bastages and wait to install them until assembly is done after paint. I just use regular open nuts during mockup and even when doing final assembly and adjustment then change them out---one at a time. Too late for you now unfortunately but for anyone who might see this in the future; if you feel it starting to gall stop! Break out the Dremel with a cut off wheel and split the nut down the middle, parallel to the stud. Once the two halves are off and the door is removed run a die over the stud to clean up the threads and you should be good to go.
As above, we are getting close to start the spraying process. It is looking like we will have 8 days at the end of May and beginning of June to work again. I am trying to get everything planned and ready so we don't hit as many snags and delays during that time, since the next window to paint will be July or August. I am going to stop by the paint supplier soon and discuss with them timing on when to actually buy the paint. I'd hate to be delayed due to not having the paint available...
Here is my current plan, but let me know if you recommend any changes. Also, I have bolded all of my questions that I am trying to figure out.
1) Coat the underside with Herculiner. I am going to do this on my own before my brother comes out.
2) Fix pinholes in the Rage Gold with some glazing putty.
3) Sand with progressively finer grits until 320.
4) Spray the Polyester Primer Surfacer (Slick Sand vs Feather Fill). From what I can see on the forum and on Jeff's previous comment in this thread, I will get 2 gallons.
Although I like the idea of the thicker build of Slick Sand, it is looking like we will might go with Feather Fill. The main reasons are that I can get Feather Fill locally, and more importantly, my primer spray gun is a 1.8mm tip. When I look at the TDS for both, the Feather Fill requires a 1.7mm-2.2mm tip but the Slick sand requires at least a 2.0mm tip. I'm going to see how much getting a different sized tip is going to cost, so we still might go with Slick Sand.
Prior to the polyester primer, do you clean with acetone, a wax and degreaser, or both? The TDS says to use acetone on bare fiberglass. It says for pre-painted surfaces to use a wax/degreaser. It says for body filler to just spray with an air gun.
5) Sand down the polyester primer surfacer and respray as needed. In another thread, Jeff K. recommended to block smooth with 150 grit? Is this correct? I figure I will look at the TDS for the 2K primer to see what grit to use.
6) Spray 3 coats of 2K catalyzed Urethane Primer Surfacer. Block smooth with 320 dry then 600 wet.
7) 1 full coat of catalyzed Urethane sealer. Sand off the nibs with 1000 grit.
8) Base coat (number of coats and type to be determine once we decide on exact color and line of paint). I am planning on using PPG. I know Jeff often uses Shopline, but my PPG distributor doesn't carry that line. Any recommendations on which line to use for the primer, base, and clear?
9) Clear coat
Now for a few more specifics. Our plan is that once we start spraying the 2K primer, we will be committed to getting the spraying done in the next several days. I want to make sure I have a good bond between the layers.
Does it make sense to spray the 2K primer and the 2K sealer on the same day, then the base coat the next day, and then the clear coat the next day?
In the past I have wet sanded the clear coat to get rid of the orange peel that happens from spraying. I started with 1000 grit, then 1500, then 2000, then buffed with great results. Do you recommend doing this? And if so, how long after the clear is sprayed before you cut and buff?
Yuck! Sorry to hear that. I've had that happen twice with the acorn nuts when cars have come to me with them installed. I don't trust the little bastages and wait to install them until assembly is done after paint. I just use regular open nuts during mockup and even when doing final assembly and adjustment then change them out---one at a time. Too late for you now unfortunately but for anyone who might see this in the future; if you feel it starting to gall stop! Break out the Dremel with a cut off wheel and split the nut down the middle, parallel to the stud. Once the two halves are off and the door is removed run a die over the stud to clean up the threads and you should be good to go.
Jeff
I'm glad I'm not the only one!!!
That trick sounds amazing and hopefully that will help somebody in the future. Luckily, we can still salvage the door and make it work. Not ideal, but not all is lost.
As above, we are getting close to start the spraying process. It is looking like we will have 8 days at the end of May and beginning of June to work again. I am trying to get everything planned and ready so we don't hit as many snags and delays during that time, since the next window to paint will be July or August. I am going to stop by the paint supplier soon and discuss with them timing on when to actually buy the paint. I'd hate to be delayed due to not having the paint available...
Here is my current plan, but let me know if you recommend any changes. Also, I have bolded all of my questions that I am trying to figure out.
1) Coat the underside with Herculiner. I am going to do this on my own before my brother comes out.
2) Fix pinholes in the Rage Gold with some glazing putty.
3) Sand with progressively finer grits until 320.
4) Spray the Polyester Primer Surfacer (Slick Sand vs Feather Fill). From what I can see on the forum and on Jeff's previous comment in this thread, I will get 2 gallons.
Although I like the idea of the thicker build of Slick Sand, it is looking like we will might go with Feather Fill. The main reasons are that I can get Feather Fill locally, and more importantly, my primer spray gun is a 1.8mm tip. When I look at the TDS for both, the Feather Fill requires a 1.7mm-2.2mm tip but the Slick sand requires at least a 2.0mm tip. I'm going to see how much getting a different sized tip is going to cost, so we still might go with Slick Sand.
Prior to the polyester primer, do you clean with acetone, a wax and degreaser, or both? The TDS says to use acetone on bare fiberglass. It says for pre-painted surfaces to use a wax/degreaser. It says for body filler to just spray with an air gun.
5) Sand down the polyester primer surfacer and respray as needed. In another thread, Jeff K. recommended to block smooth with 150 grit? Is this correct? I figure I will look at the TDS for the 2K primer to see what grit to use.
6) Spray 3 coats of 2K catalyzed Urethane Primer Surfacer. Block smooth with 320 dry then 600 wet.
7) 1 full coat of catalyzed Urethane sealer. Sand off the nibs with 1000 grit.
8) Base coat (number of coats and type to be determine once we decide on exact color and line of paint). I am planning on using PPG. I know Jeff often uses Shopline, but my PPG distributor doesn't carry that line. Any recommendations on which line to use for the primer, base, and clear?
9) Clear coat
Now for a few more specifics. Our plan is that once we start spraying the 2K primer, we will be committed to getting the spraying done in the next several days. I want to make sure I have a good bond between the layers.
Does it make sense to spray the 2K primer and the 2K sealer on the same day, then the base coat the next day, and then the clear coat the next day?
In the past I have wet sanded the clear coat to get rid of the orange peel that happens from spraying. I started with 1000 grit, then 1500, then 2000, then buffed with great results. Do you recommend doing this? And if so, how long after the clear is sprayed before you cut and buff?
Am I missing anything?
Lots going on here so I'll try to hit the high points.
#3 Three passes of Slick Sand will bury 80 grit scratches. Additionally I like the tighter bond and mechanical grip that the coarser tooth provides.
#4 If your supplier can get FF I would think that they can also get SS; both are made by Evercoat. As for tip size, yes you'll want to shoot either through at least a 2.0. Know what? You can turn your 1.8 (or anything else) into a 2.1-2.2 by running a #44 drill through it. The tapered needle will still seat. That's what I did years ago and am still using that same gun to this day. 2.2mm= .0866", #44 drill is .0860"---close enough! Prior to polyester I blow everything off, wipe with wax & grease remover---don't flood it; dunk a cloth in a container of W&G and wring it out. Give it at least a few hours of dry time.
#5 Yes, block 150 dry. Evercoat will recommend going to 400 but again I like the mechanical tooth to supplement the chemical bond between the Polyester and Urethane and three coats is plenty of build to bury the 150 scratch.
#6&7 Yes...BUT...the sealer goes on just before basecoat. It has to be covered with base within 72 hours (and I don't even wait that long) to assure a good chemical bond. Get outside of that window and you run the risk of adhesion issues.
#8 Shopline is exclusive to PPG's "Platinum Distributors" but is exactly the same as the Omni line of products sold by the regular distributors. It's just rebranded. Shopline JP202 2K primer surfacer is Omni MP282. Shopline JP335 or JP337 sealer is Omni MP235 or MP237. Shopline Plus basecoat is JBP; Omni Plus basecoat is MBP. PPG's high end Deltron base is DBC and is sold by all distributors. Some colors produce better results in Deltron, others are perfectly fine in Plus. You're going to do a minimum of 3 coats of base. The color of the undercoat/sealer can come into play for coverage and color accuracy---PPG has recommendations for what each color should go over and sometimes it seems counterintuitive (like putting a bright silver over black!). Ever since my long time favorite clear quit being produced last year (and I burned up the stash of it that my distributor set aside for me!) I've been using Deltron DCU2021 and like it. It sprays out well and cuts & buffs well. Like with the sealer you have a recoat window to be mindful of---PPG basecoats need to be under clear within 24 hours.
Hope that helps!
Jeff
Last edited by Jeff Kleiner; 03-24-2023 at 09:22 AM.
I haven't updated in a while, but life has been busy so no work has been done.
On a plus side, next week we are going to start spraying paint!
Per Jeff's recommendations, I found a dealer 45 minutes away that carries Slick Sand and I bought 2 gallons.
We have 7-8 days in a row that we can work on the car. We are going to get all the way to the clear. I hope that isn't too hasty, but I think it's is doable, especially since I have no plans and can put in 14-16 hour days for 7 days straight.
I will be buying paint on Monday. How much paint do you typically buy for the primer, sealer, base, and clear?
2 gallons polyester high build (Slick Sand or equivalent), 1 gallon 2K urethane primer surfacer + catalyst + reducer, 2 quarts urethane sealer + catalyst + reducer, 1 gallon basecoat + reducer (if doing stripes you'll need a quart of that color also), 1 gallon of clear + hardener and reducer as applicable. There will be some variation in the quantities of reducer and catalyst/activator depending on the manufacturer so check with your supplier. Be mindful of the time windows as you proceed; for example sealer often needs to be covered by base within 72 hours and base usually needs to be under clear within 24 hours but this too can vary among manufacturers.
We have 7 (potentially 8 if needed) days to get things done. I am hopeful that is enough time to get each step done in the time required. Thanks for the reminder, we will check with the MDS and the supplier to make sure we are staying in the correct time windows. Also, we don't have anything scheduled during those days so we can put in LONG days if needed to get it done. Weather is perfect and we are dying to get it back on the road, so that is great motivation as well!
We finally started work today. It was rough because I worked night shift and then put in a 14 hour day today on the car. I'm worn out but we got a ton done.
First we emptied out the garage. I still have a few things to take out, but it is mainly tools we are using.
Once we got the garage more or less empty we cleaned the garage floor. We then took the body off and put it upside down for bed liner. We ended up using Herculiner.
We cleaned the body, lightly scuffed with 80 grit, then cleaned with MEK. We laid down two coats of body liner and it looks great.
We spent a long time and taped the edges. It was a big fat pain but I highly recommend it. It definitely saved us from getting liner on the gel coat.
I don't know if this will come back and bite us, but we extended it all the way to the edge. I know when cars get sent to Jeff he recommends leaving a few inches and then fills it in himself. We had already done all our trimming and radiused the edges, so we rolled the dice and went to the edge. I think it looks great! Tomorrow we will flip out over and put it on the body buck.
We also went to Home Depot and bought stuff to build the jigs for the doors, trunk, and hood that Jeff recommended on other threads. We have only finished the door jig, but it turned out great. It feels nice and study too.
We also got a bunch of other small things done that aren't with mentioning. It is looking like we will be able to stay Slick Sand tomorrow! Wish us luck!
Total time actually worked today (not including meals and over an hour driving time for buying things) was about 10 hours for me, 10 hours for my brother, and 6 hours for my nephew.
For the door hangers, we used two 3/4" square aluminum tubes that were 36" in length. We did cut about 3" off of one end of each tube. This will be used later on the hood.
We drilled 3/8" hole an inch from each end. Through this hole we put a 6" long 3/8" - 16 thread bolt. This screwed into the same size coupler to attach to the door studs. We connected both doors to the aluminum tubes then screwed the tubes into the 4x4 post.
I built the structure to flip the trunk lid so we can do both sides each coat.
We used the longest eye bolt we could find that was 1/4" - 20 to screw into the hinge mount nuts. We then built two "T" mounts out of wood and drilled a hole for a wooden dowel. Thread the dowel through the eye bolts and the "T" pieces and that made the hinge.
For the kick stand we built another "T" and used a 12" threaded rod through it. It goes through the home for the latch to hold it up.
When you flipped the body over to prep and coat the underside, did you rotate it like a rotisserie? Any special watchouts while doing this?
Craig C
Ha ha ha, it sure felt like cooking a rotisserie chicken!
We put padding (cardboard) down before flipping it so it wouldn't scratch the body work at have done.
Nothing specific to watch out for. I highly recommend making all the edges. It was well with the effort and time. We did have to sand a few runs that got through our basic making tape (normal painters tape isn't great for fiberglass edges and curves) but I didn't want to use my expensive tape!
It wasn't too hard to sand off the bed liner that ran through the tape.
Today we finished up the prep work and tomorrow we will be spraying Slick Sand!
Today we did the trunk flipper (see previous post).
We also did the hood flipper. We took the 2" of 3/4" square aluminium tube and cut it so we could attach the eye bolt to it and attach that to the hood under the door the hood hinge mount attaches. We trimmed it down to ensure the spot that won't be painted will be hidden by the mount. We also drilled new holes so we didn't widen the rivet holes even more. It is hard to explain, but these pictures will show you. We found this idea from Jeff on another thread. We modified it a touch, but it is the same basic design.
We then made the kick stand with a 2' threaded rod and put it though the hood latch hole. We used a small washer that was just bigger than the hole. We then made some "T" pieces to hold up the rod.
I also put glazing putty on the seams to cover up all the pin holes. That sanded so much easier since I did the thinnest layer I possibly could. I wasn't shaping anymore so I took off as much excess as possible during application.
We then moved on to building the paint booth in my garage. We finished moving everything out of the garage (that takes awhile!).
We covered the walls with 4 mil plastic (I still have to cover the garage doors). We opened one garage door about 20" high and lined it with furnace filters. I then put two 12" explosion proof exhaust fans in the opposite window. They allegedly pull just under 3,000 cfm each. We opted to do a negative pressure booth and just deal with the billowing in of the plastic. I didn't expect our red rosin paper to billow up though. Not a big issue since all the stuff we will have on the floor holding it down.
The two exhaust fans pulled way more air than I expected. We could feel a nice steady breeze thought the entire booth. Hopefully it works well. We will also put filters on the fan so we don't blue as many droplets.
Don't worry, that isn't the final location of the body. We are going to move it away from the billowing plastic. I would hate to have the plastic hit fresh paint!
We are excited to get the body one color tomorrow! We have a few small things to finish and then we will stay. Hopefully we will stay spraying Slick Sand by about 10 am.
Today was a long day. We started at admit 9 am and finished at 11:30. We did take a few breaks to eat, but otherwise worked all day.
Today I worked about 11 hours total (including cleaning the garage), my nephew worked about 8 hours. My brother had to do some things for his day job so he worked about 6 hours.


 Thanks:
  Likes:


 Reply With Quote


 )
)

 . SS costs about 25% more and you'll use 2 gallons. Do the math and make your decision. If you buy on line you're going to need to get friendly with your paint supplier and maybe even slip him a couple of bucks to put it on his shaker before you use it---it's about 60% solids by volume (FF is similar) and all of that will be settled to the bottom. You'd have to dig and stir for days to get it fully mixed!
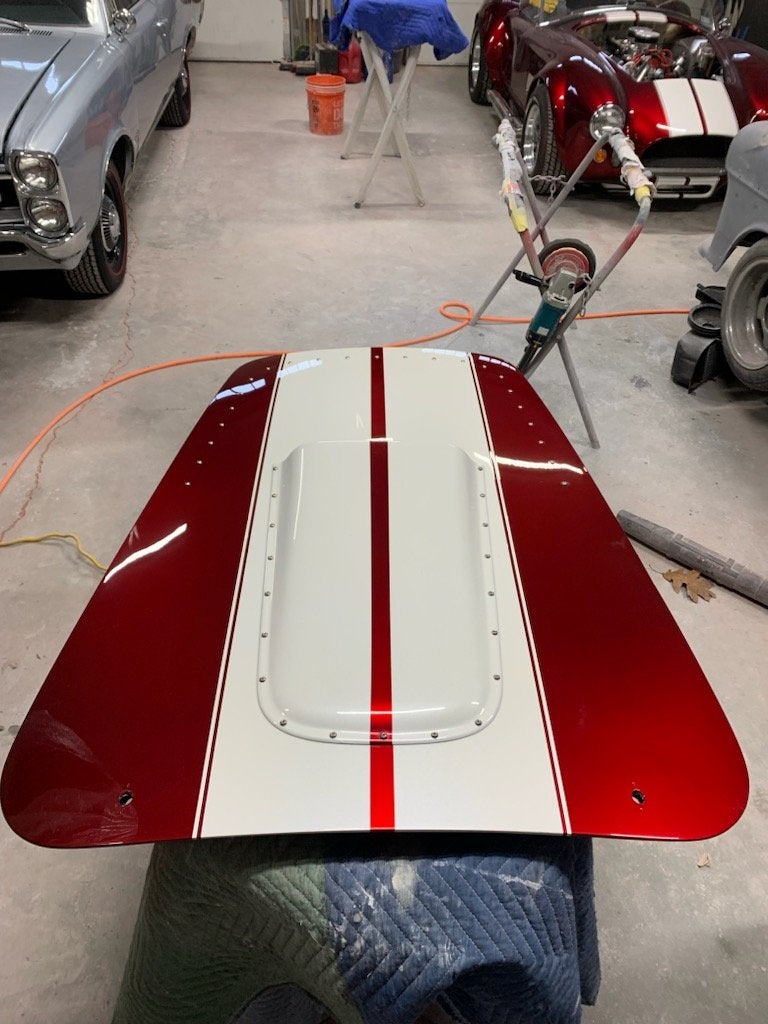


 ) which is no more difficult to spray than any other modern color that has a lot of flake and pearl in the mix. That's the good news. Chewy alluded to the shocking news---it's currently >$3,200/gallon!