-
Steves 289 Build
So my 289 kit has arrived. Ordered Jan 22 and delivered Feb 25th, 2023.
My goal is to build something resembling a 1964 Slab Side car with a USRRC body!
In order to do this I am planning Smiths instruments with a mechanical speedo and a 289 street dash from ACE.
Paint will be a single color probably in the silver/blue.
Kit options
Powder coat
15 Halibrands
Rear brakes
Instrument delete
Blank dash
Planned additions
Russ Thomson - Gas peddle, Turn signals, Dropped Trunk
Instruments - Smiths
Engine - probably Blueprint 302 ~ 360HP
Transmission - Modern Driveline T5Z with forward shift
A couple of pictures from delivery day
039E8687-F7BC-4BE3-952F-AE85AFDAC550.jpgB309A57E-9AAD-4EC4-8AA7-9A9F170DCB24.jpg0F19C733-16AC-4C9D-A681-B0AF5C962877.jpg
-

Steve >> aka: GoDadGo

Congratulations & Welcome To The Family!
-
Post Thanks / Like - 1 Thanks, 0 Likes
-
Welcome from North Carolina!
We odd ones need to stick together.
I just finished inventory and removing the body.
Hop to it!
-
Post Thanks / Like - 1 Thanks, 0 Likes
-
Congratulations and welcome!
-
Senior Member

Once upon a time, 289s were rare. Happy to see more builds in progress, congrats!
FFR #8833 289 FIA 3-link
1965 289, TKO600 from Forte's Parts Connection
Body and Paint by Mike's Auto Restoration
Picked up 3/5/2016, First start 4/22/2017, MA legal 7/11/2018
Build Thread
http://thefactoryfiveforum.com/showt...FIA-build-8833
"Insanity is contagious" - Joseph Heller
-
Senior Member

Jack
289 Roadster complete kit ordered 8/2/21. Delivered 3/14/2022. Chassis #10306. 17"x9" Halibrands, 3.55 IRS, PS, Wilwood brakes, BPE 306 with EFI and close ratio TKX. First start 7/20/2023. First Movement 9/24/2023. First go-kart 9/25/2023.
Build thread -
https://thefactoryfiveforum.com/show...rida-289-Build
-
Slow progress on my build. POL list is fairly short but 2 key items are missing - rivets and IRS fasteners.
Still undecided how to finish aluminum panels. Have Sharkhide on hand but may want to go black powder coat.
Passenger side panels fit together very well but as others have seen the drivers side footbox where it meets the center A panel needs some bending to make it fit well. Harbor Freight tools needed!
03E06E6D-185E-4BBA-BE48-BB2A949E0A45.jpgBAEEB47C-70F4-481E-B029-8B3E4E229860.jpgF207C9E0-9C93-4D58-8E1E-61F528AE29E1.jpg03E06E6D-185E-4BBA-BE48-BB2A949E0A45.jpgBAEEB47C-70F4-481E-B029-8B3E4E229860.jpgF207C9E0-9C93-4D58-8E1E-61F528AE29E1.jpg
-
Senior Member

Having built a 289 FIA car, I think brushed aluminum looks the best and original. I used 320 wet and used water. Sanded in one direction only.
Bill D
-
Post Thanks / Like - 0 Thanks, 3 Likes
-
-

Originally Posted by
2FAST4U

Having built a 289 FIA car, I think brushed aluminum looks the best and original. I used 320 wet and used water. Sanded in one direction only.
Bill D
HI Bill!
Just getting into my build and was curious about panel finish myself and thought brushed aluminum is what I wanted. Did you put a finish like clearcoat on it afterwards? I had not planned to.
Honestly I want my car to look like it has some wear on it.
Also .. got any pictures by anychance?
Thanks,
Fred
-
Senior Member
I did the brushed aluminum as well. No finish afterwards. It looks like a working car which is what I wanted.
FFR #8833 289 FIA 3-link
1965 289, TKO600 from Forte's Parts Connection
Body and Paint by Mike's Auto Restoration
Picked up 3/5/2016, First start 4/22/2017, MA legal 7/11/2018
Build Thread
http://thefactoryfiveforum.com/showt...FIA-build-8833
"Insanity is contagious" - Joseph Heller
-
Post Thanks / Like - 0 Thanks, 1 Likes
-
I used 220 grit sandpaper and an orbital sander to "scuff" my aluminum. Then coated it with Sharkhide.
-
Member

Congratulations and welcome to the 289 club!
289 FIA Complete Kit, ordered September 2021, received February 2022
My plan is to build a tribute to CSX2345 as it raced in Europe in 1964 (with a few personal touches). Follow along as I fulfill a lifetime dream.
Follow my build #10295
https://www.instagram.com/ffr289fia/
-
Senior Member
No clear coat. The goal was to allow the aluminum to age like an original
-
Post Thanks / Like - 0 Thanks, 1 Likes
-
Originally Posted by
2FAST4U
No clear coat. The goal was to allow the aluminum to age like an original
That is my goal as well. Thanks!
... and good luck this coming week. Peacful thoughts from North Carolina.
-
Originally Posted by
Namrups
I used 220 grit sandpaper and an orbital sander to "scuff" my aluminum. Then coated it with Sharkhide.
It looks great!!
-
Post Thanks / Like - 1 Thanks, 0 Likes
-
So I have been making steady progress on my build. All suspension completed. Fuel system and brake systems plumbed. Spent a lot of time on the parking brake and ended up getting new cables and hardware from Amazon because it had individual adjusters for the cables.
IMG_5959.jpegIMG_5960.jpeg
Installed the drop trunk from Russ Thompson (RIP).
IMG_5961.jpg
Starting work on the wiring and I need to make a final engine selection!
Really enjoying the process of building and all of the help and ideas from the forum
-
Working through the wiring. Decided to replace the plastic corregated cover with Flex mesh as I like the look.
Added connectors for front and rear lights/turn signals and tested all circuits. I did find one wire mislabeled on the steering column connector (green wire labeled as radiator fan instead of a turn signal). Used a bench power supply to power the system so I could current limit the supply in case of issues.
Footwell lights installed and functional from light switch.
Russ Thomson turn signal operational and wired to use stalk button for the horn.
A few pictures of the build
Dash wiring
IMG_6141.jpg
Brake clutch reservoirs
IMG_6140.jpg
Brakes have been successfully bled after replacing front cross brake pipe due to a poorly formed flare.
Trunk aluminum in place. The wire in the upper trunk area will provide USB charging power and a trunk light.
IMG_6138.jpg
Steve
-
Project continues to move forward.
Received my dashboard from Nick Acton and installed Smiths instruments.
IMG_6258.jpegIMG_6259.jpg
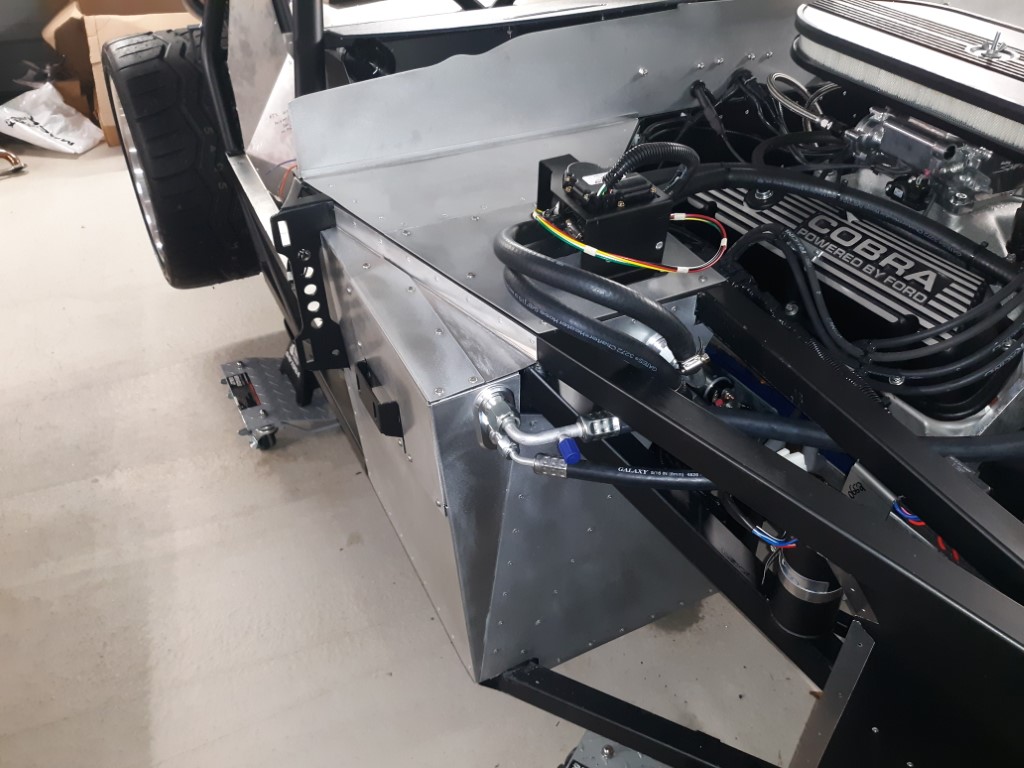
Decided on a Blueprint 302 Cruiser. Still a lot of HP for what is to be a cruiser!!
IMG_6197.jpgAttachment 19601IMG_6189.jpg
Adding a Holley Sniper 2.
Transmission is a TKX with a forward shift kit and hydraulic throwout bearing.
IMG_6252.jpgIMG_6251.jpg
Installed rear cubby kit from Breeze.
IMG_6200.jpg
This a great project!!
Last edited by SteveWorth; 02-26-2024 at 10:46 AM.
-
Post Thanks / Like - 0 Thanks, 1 Likes


 Thanks:
  Likes:


 Reply With Quote


