-
Hatch latch upgrade
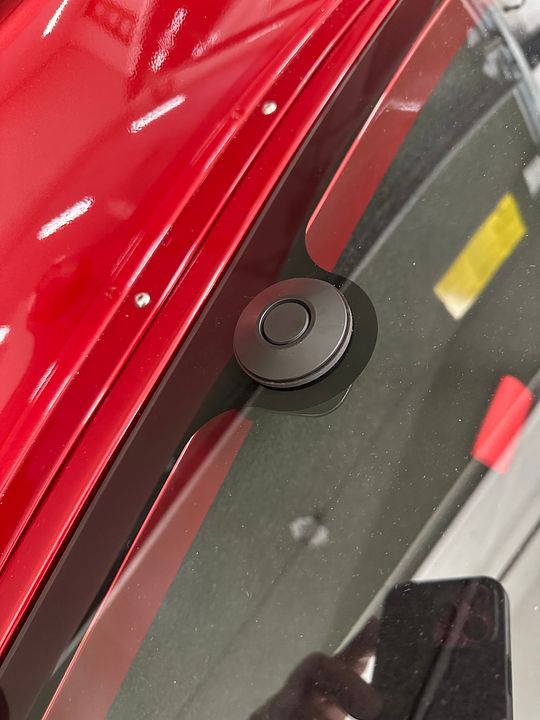
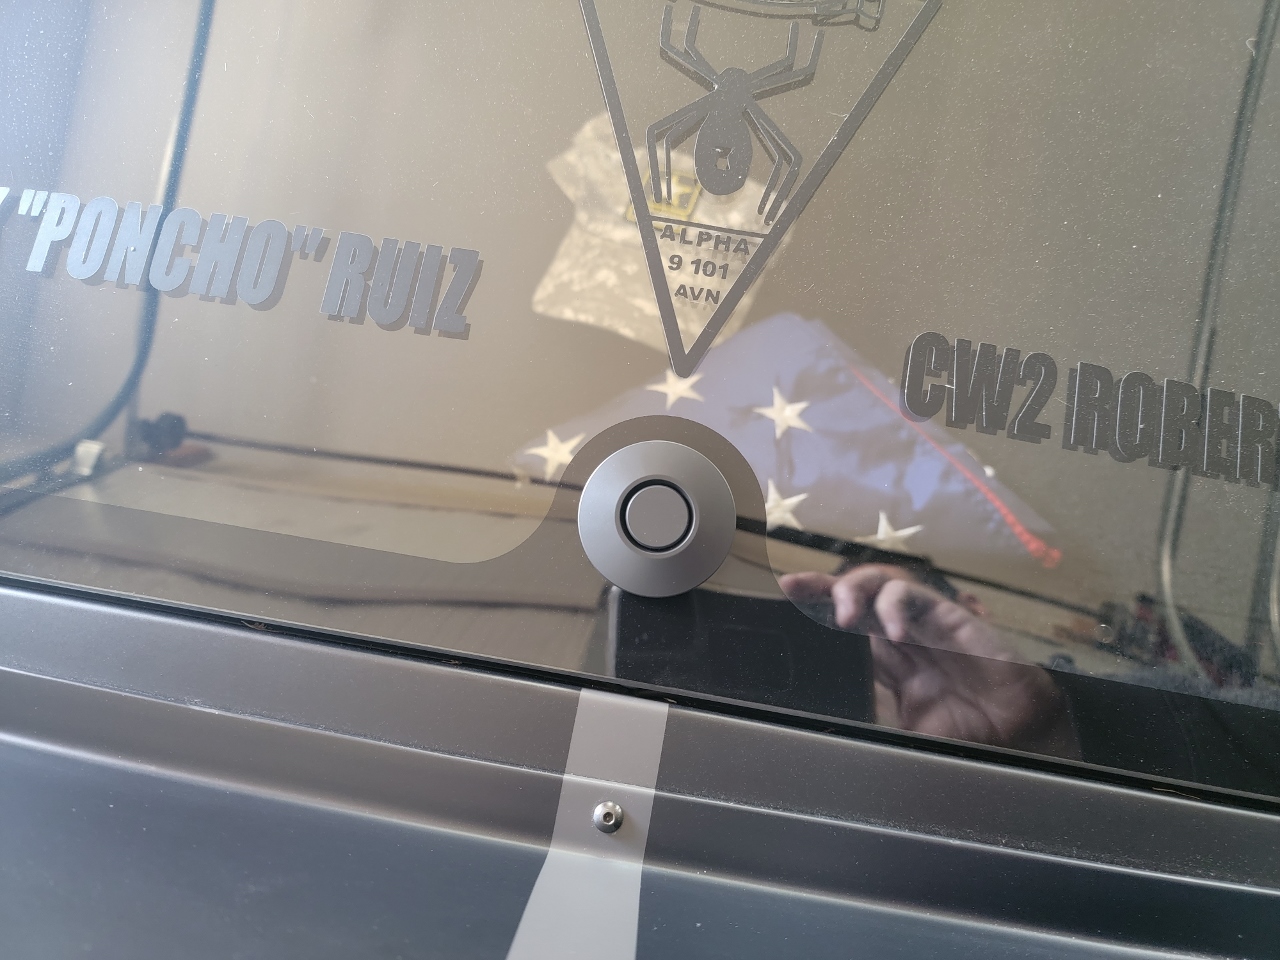
I did not like the cheesy plastic cabinet latch. I came up with this solution and thought I would share. This is what FFR should provide with the kit.
https://youtube.com/shorts/RjAMu-6QcEQ?feature=share
20230228_231850.jpg20230228_221011.jpg
-
Post Thanks / Like - 1 Thanks, 1 Likes
-

Originally Posted by
GT_Rich

Rich,
This looks GREAT, but very pricy, but then the design and quality is all there!! You may have found the "Holy Grail" of hatch latches!
-
Post Thanks / Like - 1 Thanks, 0 Likes
-
Rich,
I'm back. I see now that these are sold in pairs due their being designed for hood latches, so the per latch price isn't bad at all, if two people buy a pair and split the cost.
Might you want to sell your second/spare one?
I also see there's lockable same units offered but for about twice the price.
-
Hey Bob,
The PN in my picture is for one latch. It's about $75 for one and $140 for a pair. It's nice these can be purchased individually.
It's a quality piece and I don't think the pricing is out of line. Sure beats replacing broken glass. I will be racing mine and the risk of spinning the car and having that glass fly up was not a risk I wanted to take with the cabinet latch.
-
Hi Rich,
OH!! In my rush i guess I missed that you can buy them individually, just saw the pairs in photos on the Quick-Latch website & Facebook sites.
Yes, $75 is much better. The quality looks wonderful and worth it to me too.
I'd assume that you realize that you should add cushioning neoprene rubber (or similar) washers on either side of the glass. Either bought to size or cut/fabricated yourself.
OK, I'm placing an order.
Thanks for sharing this find of yours.
Bob
-
Rich,
I am going to try one as well since I am the one that shattered my glass on the autox course.
Does the latch push up on the glass so you can lift it up?
Thanks for the information
-
GT_Rick & Rsnake,
I've ordered mine just now. Found the Quick-Latch products and the specific single unit QL-38-SB (Black button), that I desire, available (12 units) on Amazon. Not a Prime offering, so shipping is added, but I'm willing to give it a good try. The great looking design in solid metal versus cheap plastic has me sold.
Bob
-
Post Thanks / Like - 0 Thanks, 1 Likes
-
Senior Member

Great for track car, not so great for street. I’m going to have to search for something similar and locking.
-
Senior Member

I ordered one too from Amazon
Build 1: Mk4 Complete Kit #9312 Ordered 1/27/18, Delivered 3/24/18, CA SB100 Registered 9/11/19 - Gen 2 Coyote TKO600, IRS, Power Steering, Wilwood Brakes, 17" Halibrand.
Build 2: Gen3 Coupe Complete Kit #309 Ordered 1/25/21, Delivered 6/9/21 - BluePrint GM 427 LS T56, IRS, AC, Power Steering.
Album Here
-
Hey Greg, the latch "pops" the hatch up a half inch or so. On mine, the struts take it from there and it almost raises on its own.
Another member was asking about the bracket I made. I will throw the design into CAD. I will modify the outer perimeter to better match the black edge treatment on the hatch. My bracket is slotted for adjustment and I think this is a convenient feature. I'll see how much it costs to have these made from a website like sendcutsend. Might be cheap enough to have a batch done if there is enough interest.
-
Senior Member

Thanks for the great video and clear part numbers. I like the color better and the more stout mechanism. Factory five should offer these with the kit. I looked for something myself earlier, but couldn’t find anything to match the glass hole size. Much appreciated. Will be buying one.
T.poe
-
Originally Posted by
Kbl7td
Great for track car, not so great for street. I’m going to have to search for something similar and locking.
Looks like they have that: QL-38L-BP
https://q-latch.com/page23.html
-
Senior Member
Originally Posted by
GT_Rich
Hey Greg, the latch "pops" the hatch up a half inch or so. On mine, the struts take it from there and it almost raises on its own.
Another member was asking about the bracket I made. I will throw the design into CAD. I will modify the outer perimeter to better match the black edge treatment on the hatch. My bracket is slotted for adjustment and I think this is a convenient feature. I'll see how much it costs to have these made from a website like sendcutsend. Might be cheap enough to have a batch done if there is enough interest.
Watch out for sendcutsend.com. I've used them and they had issues if the design had a bend in it.
Build 1: Mk4 Complete Kit #9312 Ordered 1/27/18, Delivered 3/24/18, CA SB100 Registered 9/11/19 - Gen 2 Coyote TKO600, IRS, Power Steering, Wilwood Brakes, 17" Halibrand.
Build 2: Gen3 Coupe Complete Kit #309 Ordered 1/25/21, Delivered 6/9/21 - BluePrint GM 427 LS T56, IRS, AC, Power Steering.
Album Here
-
Senior Member
Originally Posted by
Windsor
Perfect! Thanks
-
While I've commented above and have already ordered one of these QL-38-SB Quick Latches earlier today, the more I think about it, I have a growing concern.
The concern is with the rigidly mounted post with ball-end that is captured by the hatch glass mounted latch mechanism. If the capture is too tight and the hatch glass latch mechanism is also too tightly secured to the hatch glass, might some significant vibration or movement of the rear of the car body transmitted to and thru the post, twist or large horizontal movement on the latch mechanism mounted to the hatch glass and fracture the glass? The rod and its mount are firmly mounted to the body and the entire Quick-Latch is metal and very stiff.
Losing a hatch glass would be expensive, especially with mine now solar+tint film coated.
The FFR supplied cheap plastic latch and its contact method of two sliding plates on the horizontal plane, but slightly pressed together for vertical capture eliminates pretty much hazards of slight horizontal body to hatch glass movements as a problem.
Of course, having the car traveling fast backwards and not having good latch engagement can be a problem, as encountered at least once, a larger better engaging L bracket for that latch should be the solution.
Yes, the FFR supplied hatch latch is a cheap plastic unit, but that may serve as the weak "fuse or safety" link for most rough driving encounters. Better this plastic latch fails and the hatch opens (hopefully the car is moving forward) than the hatch glass cracks and is destroyed.
Of this forum's group, apparently only GT_Rich has the Quick-Latch in hand and can examine it more closely for us.
Mine should arrive in a few days and I'll examine it and report. Being an Amazon ordered item, I can easily return it if not too much time passes, etc.
Bob
-
Hey GT-Rich- I would be interested in going in on a bracket if it works out.
-
Originally Posted by
Windsor
Looks like those are only available in two packs. Id be willing to order a set and sell the other to split it 50/50, but I’m very curious what Bob is saying about the captive ball this design uses. I’ll defer any purchase till he pops back in to either confirm or alleviate the concern.
-
After sleeping on this last night, I am thinking this might not be a good idea as Bob said. The front of the glass mounts to the roll bar and yet the latch mounts to the body. The quick latch pins the hatch to an exact location when it's shut and if the body and chassis move it could end badly. And replacing the glass is no fun as I can attest to. If the glass was mounted to the body near the square opening I would be less concerned as they would both be on the same component. The factory five latch allow the glass to move side to side as things might twist. Someone needs to be the guinea pig and try this out as it looks like a possible solution. My fix after the glass issue was to make sure I have more engagement of the latch and I also installed weaker struts which barely keep the glass open. The provided struts from FF are too strong and lift the glass too fast and hard.
-
Originally Posted by
csmith
Looks like those are only available in two packs. Id be willing to order a set and sell the other to split it 50/50, but Im very curious what Bob is saying about the captive ball this design uses. Ill defer any purchase till he pops back in to either confirm or alleviate the concern.
I would be willing to split the cost for this to have a locking option. Would you be ordering the black ones? Be aware that they are having counterfeit issues as shown on their site: https://q-latch.com/page24.html. They have a list of authorized dealers: Summit, Jegs, Speedway, etc are all good sources. Amazon, Ebay, and others seems to be an issue.
If Sendcutsend is an issue, Protolabs (https://www.protolabs.com/) and Hubs are good options (https://www.hubs.com/) are good options. I use them for work and have had good luck. I have used Protolabs for 16 years.
Brent
-
I would be going with black. Let’s not put the cart before the horse though. If this results in an increase in stress on the glass the additional holding power might not be worthwhile. Rsnake’s video shows it doesn’t take much for the stock solution to fail, so definitely need some additional robustness here, but this may not be the solution. I don’t plan on driving backwards that quickly, but I don’t think his son was either.
-
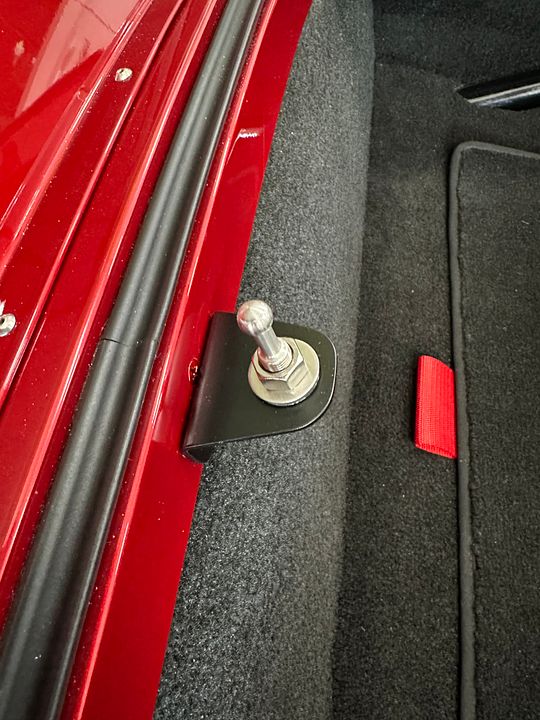
Well I guess this post has drawn some interest. Originally I installed this with an o-ring under the latch lip. There's an undercut on the threads, so even though this is designed for a 1.25" hole, there's slop when it's installed. The o-ring had a 1.00" ID and 3/32" section width. It made everything snug. After the concern mentioned here, I added flat rubber washers above and below the glass. One has a 1.75" OD and 1.00" ID. The other has a 1.13" ID and ends up stretching a little over the threads. The original o-ring is still sandwiched in this stack up and provides concentric location in the glass. I'm lucky enough to work at a place that has neoprene supported rubber sheet stock laying around along with a bunch of different punches. See pic.
The above solution feels really solid installed, looks basically no different than before, and completely isolates the glass from the metal latch.
Regarding this solution potentially breaking the glass, that's obviously up for debate. I'm comfortable with it. My car will be "done" at the end of this month and I'm going to start racing the heck out of it. I guess time will tell. What I will say is this: the latch is a very secure attachment. There is no side to side movement, but it does allow for a lot of angular misalignment. The bracket, as mounted on the fiberglass lip of the body, does not allow for any side to side movement, but there is up and down flex in the body which translates to both up/down and forward/aft movement in the glass.
I feel like the rear portion of the body is very rigidly mounted to the chassis. I don't see how it could shift side to side. Forward and aft movement in the body is predominantly controlled by the attachment to the chassis at the door sills. So, in theory, body flex between that point and the latch could try to pull on the glass, since it's mounted to the chassis. I still don't see that amount to be anymore than the amount the latch mount area can flex. Furthermore, this tempered hatch glass should have quite a bit of in plane strength. That's obviously my personal assessment and opinion. If you do this and the glass breaks, don't send me the bill!
20230302_123334.jpg20230302_123652.jpg
-
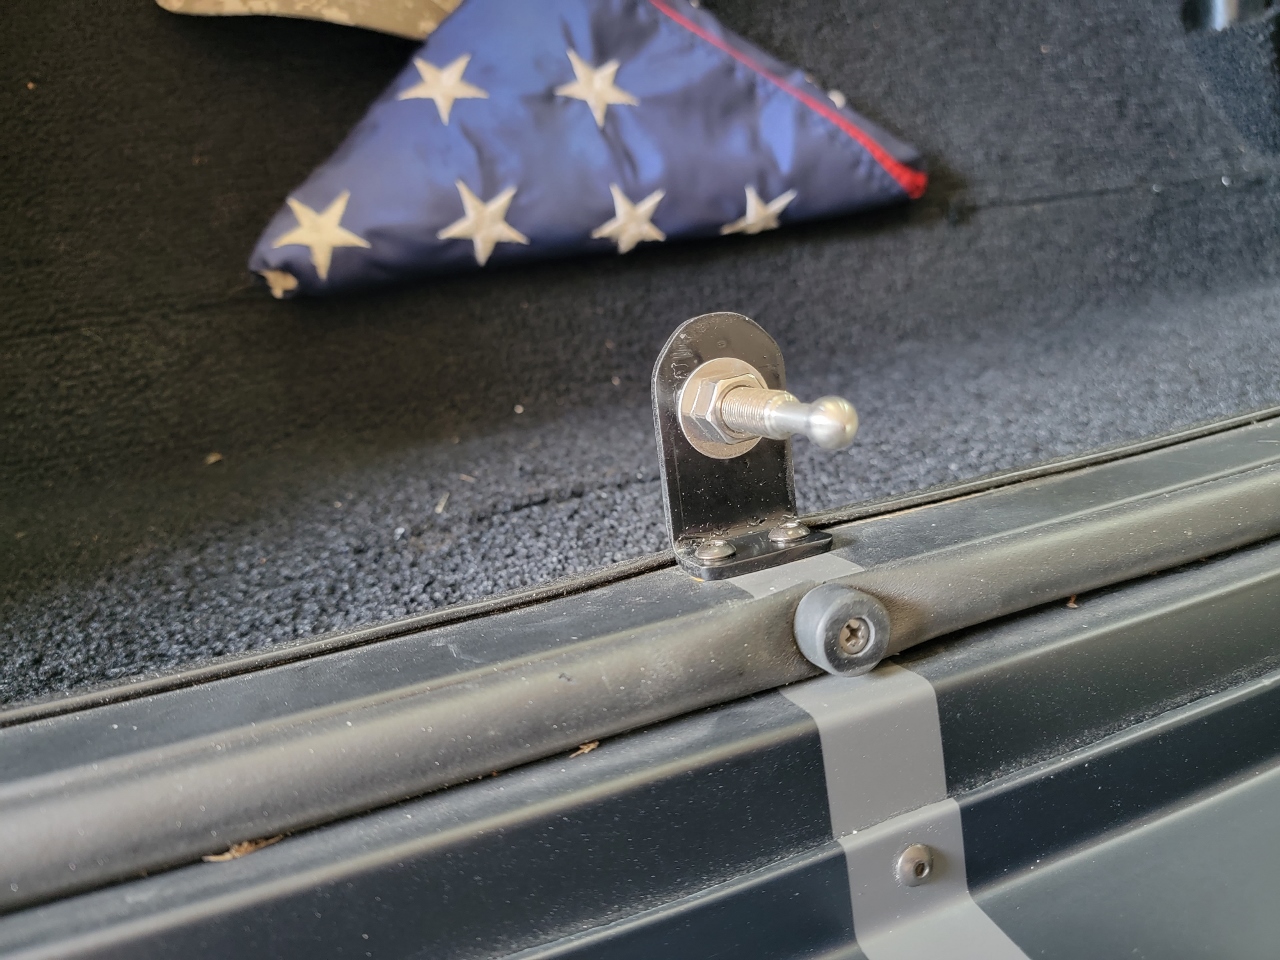
I put a design in CAD today and got it quoted at sendcutsend. It's not expensive but free shipping requires a $29 order. So, if I upload a CAD file and leave everyone on their own that's what you'll pay. This is for 3/16" thick aluminum in a shape that compliments the glass fritting. See pic. Green line represents a 90 deg bend.
Alternately, I can place an order for a few and ship these out to others. I'll do that for $25 (including shipping) if there's interest. I also think the neoprene washers I cut out are pretty nice and a good fit. I can buy a sheet of rubber off McMaster-Carr and cut out more if there's interest in that as well. Add $5 for that.
Is this all reasonable? It's honestly not worth my time but I feel like it gives people that want to do this an "easy button" for this solution. Payment would be a "gift" to my personal PayPal.
20230303_144200.jpg
-
Hey GT_Rich,
I appreciate and like your further thoughts, explanations and developments to this Quick-Latch application.
The use of neoprene/rubber washers is great.
Your clarification that the diameter of the latch body at both the outside of the threads and the neck are significantly smaller than the hole in the hatch glass is important information. If there was almost a press fit or extremely little difference, then this Quick-Latch probably would be too risky.
But you pointed out there's hope.
The use of the O-Ring to both center the latch body in the hatch glass hole and serve as direct separation and cushioning is a fortune and simple idea.
Thanks also for your post mounting bracket development and even the sendcutsend low volume manufacturing research and developing offer.
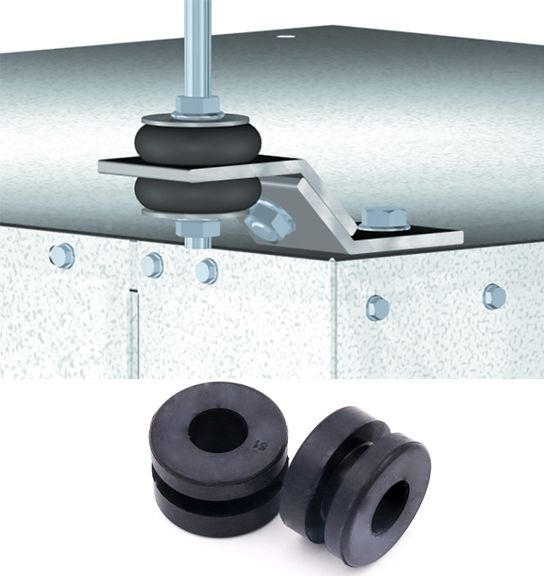
I've thought of an additional cheap modification idea to hopefully further mitigate damage from a still solidly mounted post.
How about mounting the post in a neoprene rubber grommet, both mounted on a further modified bracket to allow for some slight movement in all axis plus a bit of shaft angle movement and even some vibration dampening of the shaft?
A simple low-cost grommet is all that's additionally needed, plus allowance for it to be mounted in the mounting bracket. The threaded shaft with its washers and nuts sandwiching the grommet would hold it all together.
Although I haven't worked up a drawing, the stock images below, and a bit of imagination, should show what I'm thinking.
The threaded shaft wouldn't wobble around, but be stiff with just a bit of compliance.
Bob
-
I don't feel that's necessary. If anyone does feel it's necessary, it wouldn't be hard to add it.
-
Senior Member

I like this mod and even though mine has been on the road with the stock catch for three seasons and 6,000 with no issues, I can't unsee that video of the rear glass flipping up and shattering. May never happen with my driving, but still... I'm going to install it. Thanks for posting. My thoughts FWIW: I agree gaskets on the window portion are a good idea and plan to do that. As for the latch portion on the body, my non-engineering and uncalculated opinion is that it's not issue being rigidly mounted. Three reasons: The glass already lays in perimeter bed of relatively soft gasket material, the hinges at the top are not particularly rigid (with the hatch open they can be moved quite a bit), and the stock latch has little/no movement when adjusted properly. I just don't see the mod being much different. Add to that there seems to be a general concern mainly from new builders (not saying anyone in this thread fits into this generalization) that these cars vibrate a lot. Evidenced by multiple discussions about Loctite, etc. I just haven't found that to be the case. With everything set up and balanced properly, these cars are actually pretty smooth and solid. Yes, a racing style suspension with limited travel. But still the ride is surprisingly compliant and I just don't notice any excessive vibration. If any at all. People I take for rides seem to always be surprised. Certainly not saying to not use good building practices (proper torques, Loctite where appropriate, balance, set-up, cushioning, etc.) but especially for new owners I think you'll be surprised. Having said all that, the added cushions on the body side certainly don't hurt anything.
Last edited by edwardb; 03-04-2023 at 10:36 AM.
Build 1: Mk3 Roadster #5125. Sold 11/08/2014.
Build 2: Mk4 Roadster #7750. Sold 04/10/2017.
Build Thread
Build 3: Mk4 Roadster 20th Anniversary #8674. Sold 09/07/2020.
Build Thread and
Video.
Build 4: Gen 3 Type 65 Coupe #59. Gen 3 Coyote. Legal 03/04/2020.
Build Thread and
Video
Build 5: 35 Hot Rod Truck #138. LS3 and 4L65E auto. Rcvd 01/05/2021. Legal 04/20/2023.
Build Thread. Sold 11/9/2023.
-
-
https://youtu.be/3UaJGiaO0XM
Here's another video to help people make an informed decision. I struggled in the first half of the video but the second half shows all the flex that's already in this bracket. Also to note, the hinges have plenty of side to side flex, so one end can move side to side and the other end can move back and forth.
-
Originally Posted by
GT_Rich
https://youtu.be/3UaJGiaO0XM
Here's another video to help people make an informed decision. I struggled in the first half of the video but the second half shows all the flex that's already in this bracket. Also to note, the hinges have plenty of side to side flex, so one end can move side to side and the other end can move back and forth.
Thanks, that helps alot. I will be adding this to my build as well.
-
Senior Member

With concern for glass stress in mind and two structures potentially in motion, I have not seen a comment on what looks to me as the biggest displacement.
The hinges mount on the roll bar structure, a lever arm extending above the chassis.
The latch is attached to the body structure well aft of the roll bar.
Jacking the car from the front or rear puts the hatch glass in compression. Jacking from the side may put the hatch glass in tension. A dynamic like a speed bump may experience both which in sequence would be the worst case scenario for the hinge mounts and the latch. One good test can ruin a lot of theories. One could test at least compression by removing the latch and putting clay tell-tails in the gutters ahead of and behind the glass, or maybe in the glass hole around the post, in place of the latch. Cycle the jack points or run the speed bumps.
One analogy is my experience years ago buying a well worn (commercial box) Chrysler mini-van with a bad engine. I repaired the engine and tested it for a couple of months to evaluate if it was worthy of an interior.
What I noticed was the low frequency deflection response of the uni-body. On bumps, especially speed bumps and RXR tracks, I could feel the front bounce, the rear bounce and then the center of the structure would bounce.
It is rare to find a structure 14.4 feet long comprising two dissimilar longitudinal components that does not deflect.
jim
-
Senior Member
I just completed this mod to my Coupe and will share FWIW. First, thanks for the idea. Sharing ideas is one of the huge benefits of this forum. Whether you do each one or not.  I ordered the latch from Summit Racing and used a discount code Summit was passing out on flyers at the recent Detroit Autorama. Helped a little... I cut two large cushions from some 1/8" neoprene I had on hand. Two slightly different ID's as GT_Rich pointed out. I found an o-ring at my local Ace that centered the latch in the glass hole perfectly. I installed the latch without really clamping down on the mounting nut. Not exactly flexible but has some remaining dampening. On the body side, I mocked up a bracket using .040 aluminum as is my usual practice. Better than cardboard and quick/easy to do. During my original build, I did something a little different. I put a nutsert in the rear hatch panel and a flat head screw through the fiberglass lip into the nutsert. This held the panel in place without external rivets as the manual showed. The screw was under my previous latch piece. Now slightly visible (see picture) but not objectionable. A side effect of this screw was it made the fiberglass lip slight more rigid. Don't think that was a bad thing for the previous latch or for this one. I used the same two bracket mounting screw locations as I had previously, which are into a small plate on the backside of the lip also with nutserts. With the mock-up bracket, confirmed size and location of everything and made the final piece from 1/8" aluminum. My brake won't bend that thick, so used the vise/hammer method over the rounded edge of an aluminum block. So a nicely radiused bend. It received some rattle can satin black and today finished the assembly. I put neoprene washers under each washer of the SS ball joint latch piece. Didn't jam the nuts tight so it also has a little bit of flex. In addition to some from the fiberglass lip of the body. It closes with a resounding "click" and is rock solid. Certainly an improvement over the previous stock setup. Mine doesn't exactly pop up when the button is pushed. But moves far enough to grab the glass on each side. Based on the descriptions here, sounds like others have stronger gas shocks then mine. Mine holds the glass just fine once all the way up and makes it easy to lift. But not enough to travel on its own. Bottom line, nice improvement and I'm satisfied there's enough play in the setup and the glass mounting itself that the glass isn't in any danger. My build has been done for three seasons with 6,000 miles and I don't see any difference to where the glass is, the opening, etc. from when it was new.
Build 1: Mk3 Roadster #5125. Sold 11/08/2014.
Build 2: Mk4 Roadster #7750. Sold 04/10/2017.
Build Thread
Build 3: Mk4 Roadster 20th Anniversary #8674. Sold 09/07/2020.
Build Thread and
Video.
Build 4: Gen 3 Type 65 Coupe #59. Gen 3 Coyote. Legal 03/04/2020.
Build Thread and
Video
Build 5: 35 Hot Rod Truck #138. LS3 and 4L65E auto. Rcvd 01/05/2021. Legal 04/20/2023.
Build Thread. Sold 11/9/2023.
-
Post Thanks / Like - 1 Thanks, 1 Likes
-
East Coast Speed Machines

I just went over 8000 miles in my car with no issues on the stock latch - I do like this solution very much. I will probably do the upgrade myself - even with the stock latch the glass moves around a bit and I can hear it bounce on the rubber stops I have throughout the opening - I actually have rubber D-seal instead of the factory stuff and I slipped in those hard rubber pads (cut small slits in the D-seal) in about 8 places all around the opening so my window doesn't "tilt" side to side one bit. Your solution looks sound and I wouldn't worry about any stress on the window (my opinion anyway) - I think the rubber in there is a great idea and gives the mechanism something to bite into as an interface to the glass - so you don't need to overtighten the whole deal and create a stress point. Very nice and thanks for sharing!
FFR 1879, Blown DSS 306,REDLINE management, VeryCoolParts Tuned 460RWHP
FFR 818S, The Flash, Chassis #5, 2.0L, LSD, Electromotive TEC-S, VCP Tuned, 278RWHP 265 RWTQ
FFR 6651, Green Lantern, 408W Crate, Hellion 66mm Turbo, JGS Waste gate / Blowoff valve, Tec-GT management, VCP Tuned, 575 RWHP, 690 RWTQ
FFR 8335, Black Mamba, 289 FIA CSX 2001 tribute car, 347, 48 IDA webers, VCP Tuned, 311 RWHP 386 RWTQ, 3-link, Trigo's
FFR 0004, Gen 3 , Hawk Coupe, Coyote twin turbo, 683 RWHP 559 RWTQ, IRS, VCP Tuned. "not too shabby"
US ARMY Maintenance Test Pilot (CW4 Retired)
-
Originally Posted by
edwardb
I just completed this mod to my Coupe and will share FWIW. First, thanks for the idea. Sharing ideas is one of the huge benefits of this forum. Whether you do each one or not.
I ordered the latch from Summit Racing and used a discount code Summit was passing out on flyers at the recent Detroit Autorama. Helped a little... I cut two large cushions from some 1/8" neoprene I had on hand. Two slightly different ID's as GT_Rich pointed out. I found an o-ring at my local Ace that centered the latch in the glass hole perfectly. I installed the latch without really clamping down on the mounting nut. Not exactly flexible but has some remaining dampening. On the body side, I mocked up a bracket using .040 aluminum as is my usual practice. Better than cardboard and quick/easy to do. During my original build, I did something a little different. I put a nutsert in the rear hatch panel and a flat head screw through the fiberglass lip into the nutsert. This held the panel in place without external rivets as the manual showed. The screw was under my previous latch piece. Now slightly visible (see picture) but not objectionable. A side effect of this screw was it made the fiberglass lip slight more rigid. Don't think that was a bad thing for the previous latch or for this one. I used the same two bracket mounting screw locations as I had previously, which are into a small plate on the backside of the lip also with nutserts. With the mock-up bracket, confirmed size and location of everything and made the final piece from 1/8" aluminum. My brake won't bend that thick, so used the vise/hammer method over the rounded edge of an aluminum block. So a nicely radiused bend. It received some rattle can satin black and today finished the assembly. I put neoprene washers under each washer of the SS ball joint latch piece. Didn't jam the nuts tight so it also has a little bit of flex. In addition to some from the fiberglass lip of the body. It closes with a resounding "click" and is rock solid. Certainly an improvement over the previous stock setup. Mine doesn't exactly pop up when the button is pushed. But moves far enough to grab the glass on each side. Based on the descriptions here, sounds like others have stronger gas shocks then mine. Mine holds the glass just fine once all the way up and makes it easy to lift. But not enough to travel on its own. Bottom line, nice improvement and I'm satisfied there's enough play in the setup and the glass mounting itself that the glass isn't in any danger. My build has been done for three seasons with 6,000 miles and I don't see any difference to where the glass is, the opening, etc. from when it was new.
Awesome! Nice to see someone joining in on this mod. And one of the nicest Coupes in existence to boot!
-
Post Thanks / Like - 1 Thanks, 0 Likes
-
East Coast Speed Machines
Done.
FFR 1879, Blown DSS 306,REDLINE management, VeryCoolParts Tuned 460RWHP
FFR 818S, The Flash, Chassis #5, 2.0L, LSD, Electromotive TEC-S, VCP Tuned, 278RWHP 265 RWTQ
FFR 6651, Green Lantern, 408W Crate, Hellion 66mm Turbo, JGS Waste gate / Blowoff valve, Tec-GT management, VCP Tuned, 575 RWHP, 690 RWTQ
FFR 8335, Black Mamba, 289 FIA CSX 2001 tribute car, 347, 48 IDA webers, VCP Tuned, 311 RWHP 386 RWTQ, 3-link, Trigo's
FFR 0004, Gen 3 , Hawk Coupe, Coyote twin turbo, 683 RWHP 559 RWTQ, IRS, VCP Tuned. "not too shabby"
US ARMY Maintenance Test Pilot (CW4 Retired)
-
Post Thanks / Like - 0 Thanks, 1 Likes


 Thanks:
  Likes:


 Reply With Quote

