I noticed the current fuel setup in the car was an external fuel pump with a 5/16" supply line and a 1/4" return line. Both were hard lines and I was not a fan of the setup. My son joined me in the shop to remove the old system.
Congrats, and it was great meeting you last night! I'm excited about having another local builder. While I'm miles behind you with my progress, I look forward to watching both of our builds move forward!
For the rest of the forum...it's pretty wild that we live about 10 miles apart, in a tiny town of 6000 people in Tonganoxie, KS. I was blown away when I discovered we were basically neighbors.
Greg
Built an early MkIII years ago, sold years ago.
Got Corvettes out of my system, and now back after 18 years to build a MkIV.
MkIV Complete Kit Ordered 4/18/23, Delivered 7/11/23, 427 Stroker, Holley Sniper 2, Hyperspark, TKX, IRS, Wilwood Big Brakes
Here to learn, contribute, and have fun!
Thanks for stopping by Greg. Hopefully we can lean on each other as we build. The question will be who is going to finish first!! Even with my head start I think it may take me longer since this is my first build.
Thanks for stopping by Greg. Hopefully we can lean on each other as we build. The question will be who is going to finish first!! Even with my head start I think it may take me longer since this is my first build.
You're way ahead of me....We'll have fun for sure, though!
Built an early MkIII years ago, sold years ago.
Got Corvettes out of my system, and now back after 18 years to build a MkIV.
MkIV Complete Kit Ordered 4/18/23, Delivered 7/11/23, 427 Stroker, Holley Sniper 2, Hyperspark, TKX, IRS, Wilwood Big Brakes
Here to learn, contribute, and have fun!
I was waiting to attach the draft shaft as the individual I bought this from mentioned it was contacting the tab that held the E Brake cables. I nipped it with the disk on a dremel and ended up with enough clearance. This will be touched up later
I also went with a single 3/8" fuel line from the back of the car to the fuel rail and a GM style filter/regulator. I saw multiple other folks do this and also got some advice from Mike Everson on this. I looked at multiple mounting locations but ended up just putting this in the location that the filter would normally go. I had to remove the mounting bracket for the GM style filter/regulator. IMG_20230716_112806436.jpg IMG_20230716_112758909.jpg IMG_20230716_112820393.jpg
Installed the Malfunction indicator light in the dash. I centered this over the steering wheel and it snapped right in after drilling the location. I think i used a 3/8" bit but cant exactly remember.
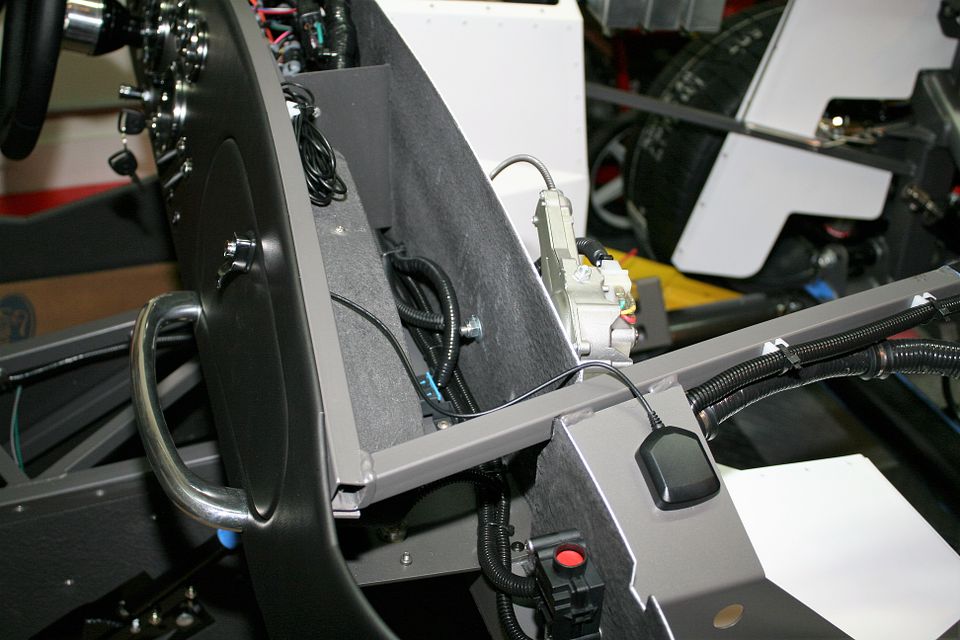
Most of the dash and gauge wiring is figured out at this point. I am using the HAAT (hot at all times) lead off the coyote harness to power both the clock and the GPS Speedo Unit. One question I have is where to mount the "antenna" for the GPS unit. Can it be underneath the fiberglass?
One question I have is where to mount the "antenna" for the GPS unit. Can it be underneath the fiberglass?
Yes. Many of us place it on the windshield mount on the RH side. Under the body. The magnet on the antenna holds it in place. Works fine there.
Build 1: Mk3 Roadster #5125. Sold 11/08/2014. Build 2: Mk4 Roadster #7750. Sold 04/10/2017. Build Thread Build 3: Mk4 Roadster 20th Anniversary #8674. Sold 09/07/2020. Build Thread and Video. Build 4: Gen 3 Type 65 Coupe #59. Gen 3 Coyote. Legal 03/04/2020. Build Thread and Video Build 5: 35 Hot Rod Truck #138. LS3 and 4L65E auto. Rcvd 01/05/2021. Legal 04/20/2023. Build Thread. Sold 11/9/2023.
I was working through the wiring between the coyote manual and the RF harness (both older and possibly outdated). I chose to let the coyote control pack engage the harness. I think I have this right but was able to connect the two wire in the photo below. These were the SMR and Ignition Request.
I have not tested this but hopefully I am correct. I have a knee surgery on 8/22 and my goal is to fire the motor before then.
I did not like the power block that came in the boxes of parts so I ordered one from Amazon. It is mounted in the engine bay. I saw where some folks had placed this behind the dash but like this being shown in engine bay. IMG_20230720_210205668.jpg
I have an upcoming knee surgery and I am trying hard to get to a first start before it happens. I ordered a couple of items from Mark at Breeze and Spent some time getting them installed.
Now for something I am not truly happy with. The center section for the IRS was installed but had not been painted or prepped. I chose to coat this without removing it from the chassis. In hindsight I don't really like it but my wife has convinced me that no one will be able to see it when it is complete.
I wanted to make sure I had the tach working so it was attached as shown below. I use a lot of liquid electrical tape when working on boats, etc. So used it here as well.
I had some questions about the vacuum system and got some great help from people on the forum. There is a small 7.5mm vacuum line on the passenger side of the motor that is not addressed in the manuals. Consensus is to tie this line to the half inch port on the front of the motor. I used some nylon fittings to make the size changes and put a piece of fuel hose between as a temporary until my vacuum line shows up. I tried the local auto parts store but the "gentleman" behind the counter needed to know the year of the car to provide me with some vacuum hose. When the manager stepped in she informed me they were out. IMG_20230814_203857701_HDR.jpg IMG_20230814_203638515_HDR.jpg
My wife was pushing me this weekend to start the car since my surgery is coming up on the 22nd and that was my goal. I filled the coolant system and the power steering system with fluid. I pulled the fuel pump relay and tried to turn the car over with the key and was met with failure. The starter acted like it wanted to engage but would NOT turn the motor over. I then tried to jump the starter to get it to turn over. It acted like it wanted to but still would not turn the motor over.
I checked all the connections and the battery and still had nothing. I was very frustrated and took a drive to clear my head and run an errand. About 10 minutes from the house I recalled that I did not see anything in the manuals about ground straps to the motor. I installed a strap from the passenger mount to the frame and SUCCESS. The motor turned over.
One last check of all my connections. I plugged in the fuel pump and cycled the key a couple of times to prime the system.
Then this!! https://photos.app.goo.gl/K3N2a581K8R7kFtd7
No start condition but things sounded good and I checked again for leaks. No fuel, no coolant, no power steering. Ok one more try. https://photos.app.goo.gl/G9e25Dn8ttHNN9NL6
Now I will be at a stopping point for a month or so.
Congrats on the first start! I remember my first start on my MkIII like it was yesterday...I was shaking like a leaf! Good luck on the knee surgery, and holler if you guys need anything!
Greg
Built an early MkIII years ago, sold years ago.
Got Corvettes out of my system, and now back after 18 years to build a MkIV.
MkIV Complete Kit Ordered 4/18/23, Delivered 7/11/23, 427 Stroker, Holley Sniper 2, Hyperspark, TKX, IRS, Wilwood Big Brakes
Here to learn, contribute, and have fun!
So knee surgery complete and still not able to do everything I want in the shop but I had temporarily connected the Vacuum line on the PS of the motor as suggested by some others here and was able to finalize it. I used some 3/8" vacuum tubing and heated one end to allow it to slip over the 1/2" nipple.
I had a couple of questions after my initial start for folks who have gotten there before.
1. I use FORSCAN to run codes on all my other ford vehicles but it will not read anything on this setup. Anybody have recommendations for another software?
2. The oil pressure seems really high at first start. It pushes to 85 ish lbs and then comes down slowly as the motor warms up to around 35 at idle. Is this anything to be concerned with?
With two kids in sports my shop time is less and less right now. But I was able to take some time to redo the coolant system. I used the UPR tank as others have suggested. I used 2 hoses others have suggested but ending up trimming both for length to connect the radiator to the engine.
Upper Hose: Gates 51350
Lower Hose: Dayco 70621
Misc Hoses: Mishimoto MMHOSE-MUS8-15ANCBK
Tank: UPR 2015-2020 Mustang Coolant Expansion Tank Aluminum Satin
I had the bracket custom made at my work out of .125 5052 Aluminum and connected it to the bottom of the 3/4" cross member. I had a 45 degree bend put in the aluminum and it seems to work just fine. I am not planning on connecting the the bottom of the tank to anything.
I was fortunate enough to get a turn signal switch from i.e.427 for my build. The quality looks awesome and I really like the way the internals of the switch work. It also has two accessory switches (one on the stalk and one a pull type on the opposite side).
I have this mocked up in my car but have not fully wired it yet. I may switch out the end of the stalk for a custom made aluminum something or other but have not decided.
I have the plastic dash so this flange had to go: image.jpg
Don has been a great customer to work with. We did run into a hardware issue with the mounting screws provided being a little short. Don, without skipping a beat, headed off to the local hardware store and got a few just a bit longer and boom, all done. Thanks for your support Don and thank you for being one of our beta testers. Frank
Cool build! But I'm struggling to accept that their are TWO members here from Tonganoxie...
Rock Chalk Jayhawk, from a former KU undergrad and KUMed grad and L-town resident.
I was shocked when I announced my build, and Don sent me a PM and said "Hey, I'm in Tonganoxie". I've been to his house a couple of times, and he's got a great setup, and a great family. He has helped me on my MkIV build already, and I look forward to his progress. He's a very smart dude; despite building my 2nd FFR, I feel like a newbie compared to his skills. I have a lot to learn from him!
Oh, and ROCK CHALK! I'm a 97 grad, in Physics!
Last edited by gbranham; 09-29-2023 at 08:28 PM.
Built an early MkIII years ago, sold years ago.
Got Corvettes out of my system, and now back after 18 years to build a MkIV.
MkIV Complete Kit Ordered 4/18/23, Delivered 7/11/23, 427 Stroker, Holley Sniper 2, Hyperspark, TKX, IRS, Wilwood Big Brakes
Here to learn, contribute, and have fun!
I was shocked when I announced my build, and Don sent me a PM and said "Hey, I'm in Tonganoxie". I've been to his house a couple of times, and he's got a great setup, and a great family. He has helped me on my MkIV build already, and I look forward to his progress. He's a very smart dude; despite building my 2nd FFR, I feel like a newbie compared to his skills. I have a lot to learn from him!
Oh, and ROCK CHALK! I'm a 97 grad, in Physics!
Thanks for the kind words Greg. I am mediocre at best and just trying to get through a build.
I personally am a Gorilla. PSU seemed to be half the costs when I went, and once I had to start paying for it that was all that mattered.
Just a short update. This weekend allowed me to secure all the brake lines (with the exception of the line to the caliper) and do a rough alignment.
A couple of questions
1. I am not used to using Wilwood Calipers for the attachment of the flexible line I am inclined to use some teflon tape. Can someone confirm if this is needed or not needed?
2. When aligning the front steering on the front end I pulled a string around the rear tires ad suggested elsewhere. I noticed that my measurements varied by 2" from passenger side to drivers side. This seems wrong. Can anyone confirm? (I did not install the rear IRS system)
3. I have read on cutting the rear of the UCA ends and adjusting nut to get to 8.5" grease zerk to grease zerk. Can someone provide more context. It seems wrong to cut parts that are supplied in many of these kits.
If you are using power steering (which if memory serves, you are), you can put additional caster in the alignment. However, the rear sleeves on the upper control arms won't allow it. To surmount it, I cut the sleeve at both ends, just enough to remove the rounded bit before the hex portion begins (maybe 1/8'' on both end), and also cut the two bolts that thread into the sleeve by the same amount. Here's how mine looks:
Built an early MkIII years ago, sold years ago.
Got Corvettes out of my system, and now back after 18 years to build a MkIV.
MkIV Complete Kit Ordered 4/18/23, Delivered 7/11/23, 427 Stroker, Holley Sniper 2, Hyperspark, TKX, IRS, Wilwood Big Brakes
Here to learn, contribute, and have fun!
1. Brakes bled.
2. Horn Installed
3. Switch wiring and dash cleanup. (only high beam switch left and hopefully that gets done over the holidays)
4. I had a power steering leak develop and tried to chase it down a couple of times. I though I just forgot to tighten a hose clamp as it appeared loose at the bottom of the reservoir. Cleaned everything up and came back a couple of days later, still leaking... same hose clamp loose. Turns out the hose clamp was junk and once replaced no more leaking.
I am struggling with what to do on the front end. Everyone says to cut the long nuts at the rear of the UCA. I am not able to get to the magic dimensions without so I am most likely going to cut them.
I think there are two issues with the front suspension:
1) The ball joint on the upper control arm should angle outward; yours appear to angle inward,
2) The tie rod arm on the knuckle should angle outward, and yours appear to angle inward.
I think if you reverse your tie rod arms on the knuckles, and (unfortunately) remove ball joints from the upper control arms, you'll be able to remove the UCAs, then flip upside down, reinstall the ball joints, and you should be good to go. Feel free to come check mine out. Happy to help you with all this if you want a hand. Can also help you cut down the rear adjuster sleeves on the UCAs, if you want a hand.
Built an early MkIII years ago, sold years ago.
Got Corvettes out of my system, and now back after 18 years to build a MkIV.
MkIV Complete Kit Ordered 4/18/23, Delivered 7/11/23, 427 Stroker, Holley Sniper 2, Hyperspark, TKX, IRS, Wilwood Big Brakes
Here to learn, contribute, and have fun!
I think there are two issues with the front suspension:
1) The ball joint on the upper control arm should angle outward; yours appear to angle inward,
2) The tie rod arm on the knuckle should angle outward, and yours appear to angle inward.
I think if you reverse your tie rod arms on the knuckles, and (unfortunately) remove ball joints from the upper control arms, you'll be able to remove the UCAs, then flip upside down, reinstall the ball joints, and you should be good to go. Feel free to come check mine out. Happy to help you with all this if you want a hand. Can also help you cut down the rear adjuster sleeves on the UCAs, if you want a hand.


 Thanks:
  Likes:


 Reply With Quote


 When the manager stepped in she informed me they were out.