-
Dave's Wis MK4 build
Thought it was time to get a build thread started seeing as how I got my MK4 2 weeks ago (better late than never). Ordered my MK4 kit on August 21 2023. Kit was completed Nov 11 2023 and delivered on Nov 22 (the day before Thanksgiving). I was counting down the days, and so excited to actually have it in my garage/workshop.
No car building experience so far for me other than oil changes, brake repairs, and a couple of head gasket replacements. I love working with my hands and for most of my life woodworking has been my main hobby along with beer making and bike riding. A few years ago I put a heated workshop on the back of my garage to enable winter activities without frozen fingers. In getting ready for my new challenge I shoved all my woodworking tools to the side so that the chassis fits through the double doors. Unfortunately the body is about 1.5 inches too wide but the chassis fits. I will have to keep measuring to make sure I can get the chassis out again without removing the door frame.
My build plan is daily driver. (Well, during the warmer seasons of the year)
My build:
Complete kit
Powder coated frame
IRS
Power steering
Hydraulic Clutch
Platinum gauges
Powder coated rollbar
Wood steering wheel
Body cutouts
Blank dash
Black vinyl seats
Coyote engine - from Mike Forte
TKX trans. - Mike Forte
Wheels and tires - not decided as yet
Coyote exhaust headers - sent to Jet Hot for ceramic coating
Side exhaust base - sent to Jet Hot for ceramic coating
I am hoping my son and grandsons will be able work with me to complete the build but their 2 hour drive may limit their time availability.
I have been eagerly reviewing many build threads and am very happy to have the forum resource and generous forum members.
Next task is to update my progress and figure out how to attach photos.
Let the fum begin!
Dave
-
Post Thanks / Like - 0 Thanks, 1 Likes
-
Welcome aboard! Looking forward to your build.
-
Senior Member

I have found that there is some jobs that go better with extra set of hand others enjoy being able to lend a hand. With pre-planing it is helpful to line up several task and assemble plan and parts the have the extra set of hands to complete final assembly. Win win for all and you can get a lot knocked out in a day. I think I spend 5x time on planning, sourcing things for mods and purchasing than actually doing the work.
-
Good luck. I pick my kit up in a week, so were starting about the same time. Looking forward to following along. -Joel
-
Senior Member

Welcome to a great adventure. And you'll be glad you're doing a build thread ... with an ongoing thread I think you get more helpful advice and encouragement whenever you hit the inevitable challenges, you help other folks along the way, and of course you end up with a record of your build.
Posting photos may require that you get bumped up from junior status. A PM to David Hodgkins will take care of that for you ... since you're now a kit owner / builder, he'll give you whatever status you need to allow photo posting. Otherwise it usually takes a minimum number of posts.
Good luck and looking forward to your updates. Cheers -- John
MK4 #7838: IRS 3.55 TrueTrac T5z Dart 347
The drawing is from ~7th grade, mid-1970s
Meandering, leisurely build thread is
here
-
-
Post Thanks / Like - 0 Thanks, 2 Likes
-
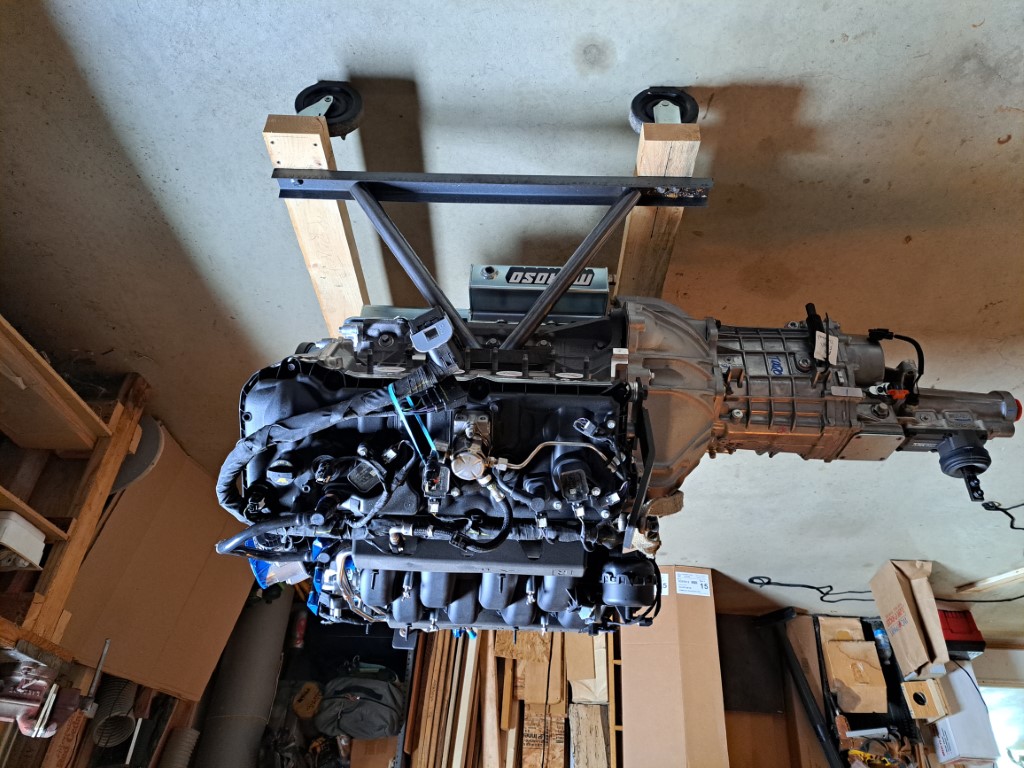
I ordered the engine/trans from Mike Forte and received it a good month before the MK4 kit. Coyote Gen3 with TKX 5 speed. I got the 5th gear ratio of 0.68. Also got the IRS from Mike with the 3.55 ratio gears.
-
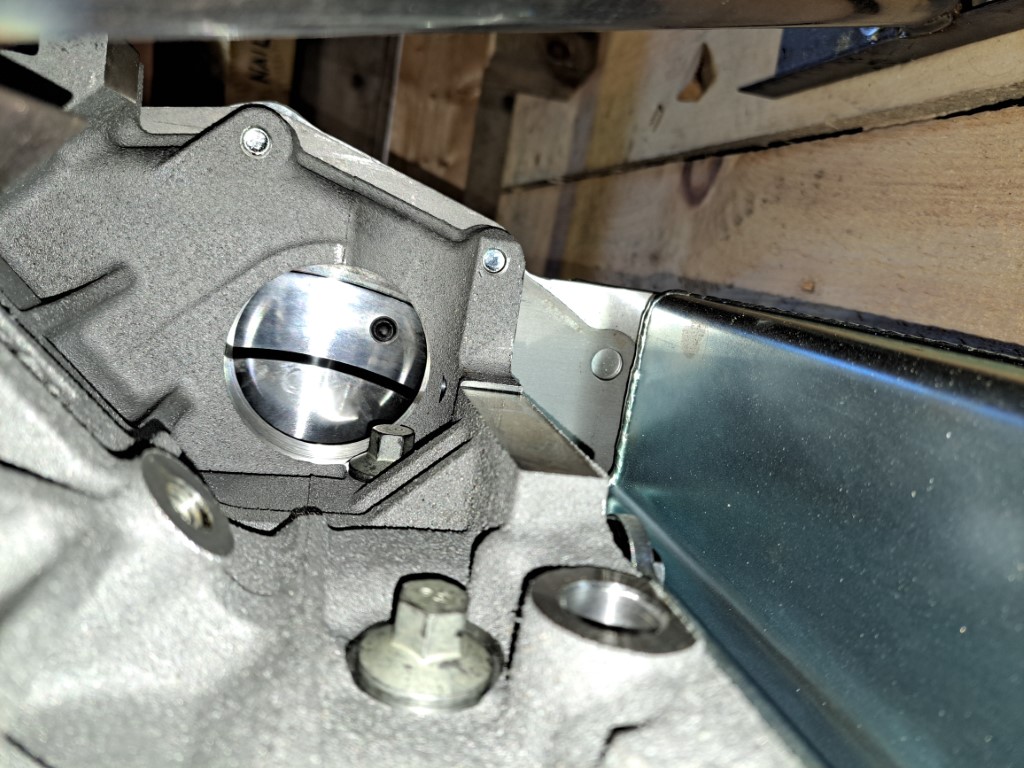
I did not know what the hole in the block was (opposite side of the block where the starter goes and about the same size). The flywheel was clearly visable. Talked to Mike and he sent me a rubber plug that closes off the opening. Also a cover for where the clutch fork goes through the bell housing.
-
Dave, congratulations on your new project. I have a keen interest in your project as I’m down the road in Oshkosh and am spec’ing out my own MK4. Plan to order in June. Also talked with Mike Forte and look forward to working with him.
-
PM me if you are interested in checking out my build.
-
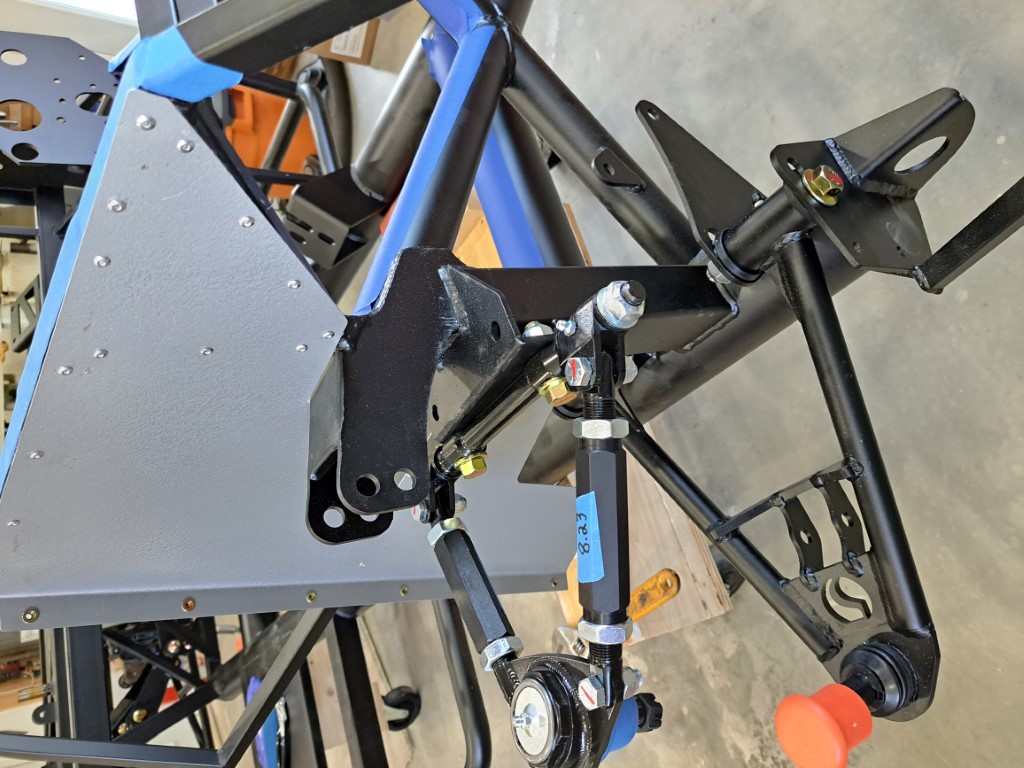
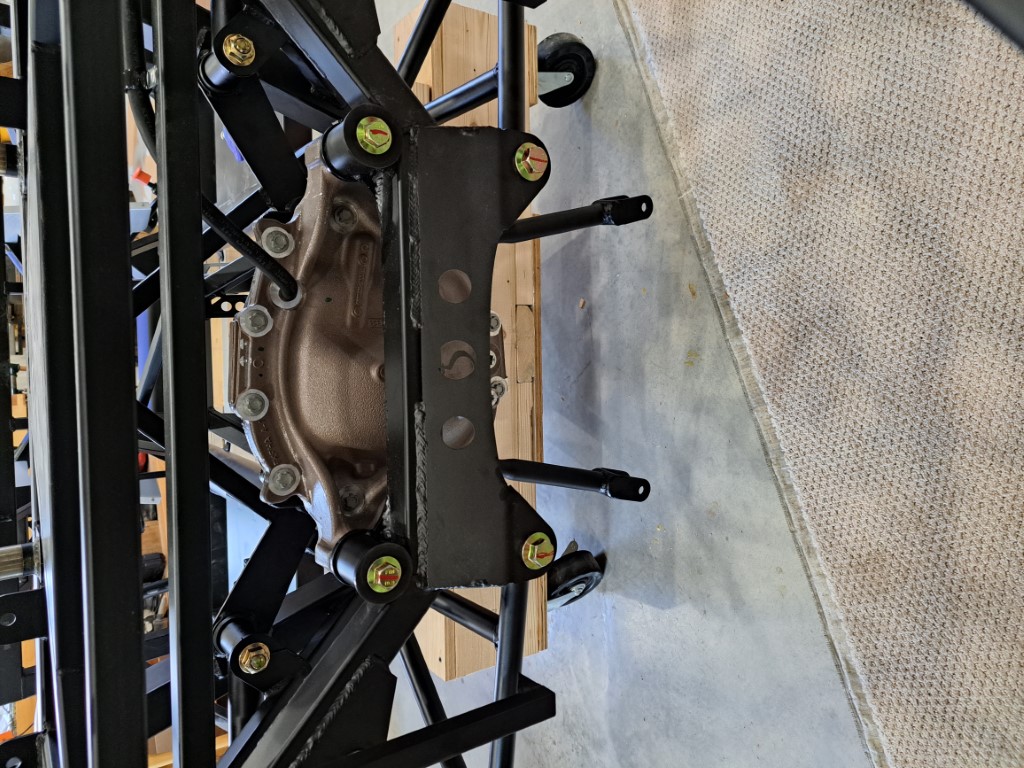
Upper and lower
Front Suspension - If anyone sees a problem let me know
-
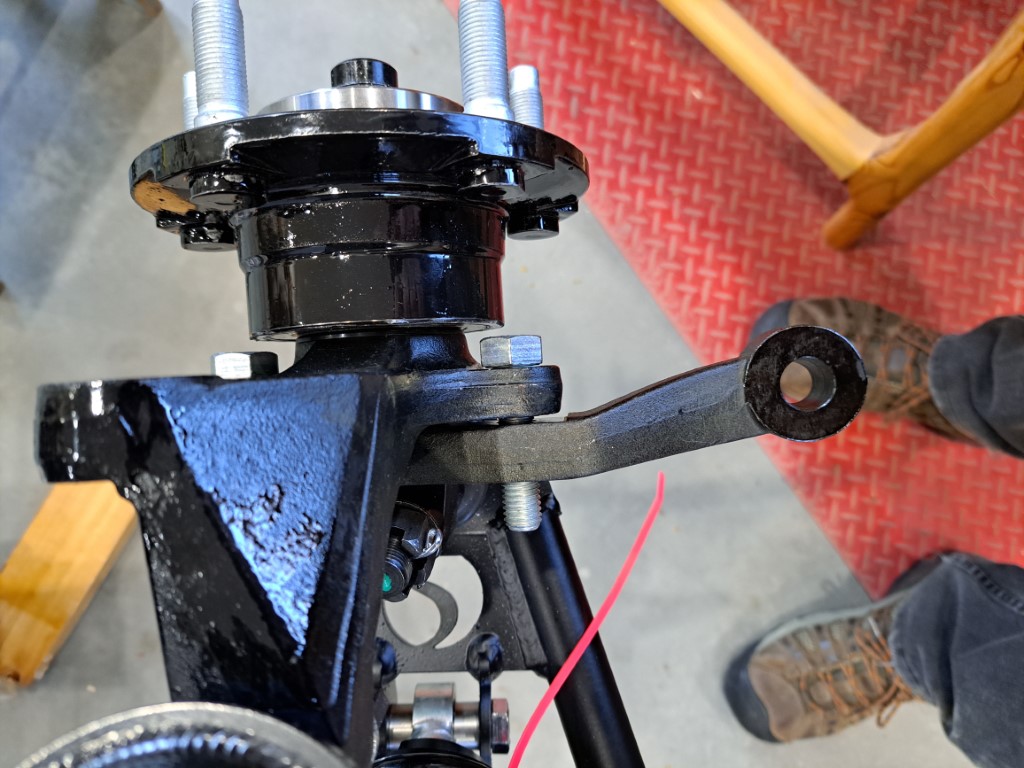
From the manual I can not tell the angle of the steering arm. It looks to me like the arm angles out which is the way I have installed it. The second pic is the way I have installed the steering arm in the horizontal view (arm down)Pics below are of the Steering arm. The first is a pic from above. The arm angles out . The second pic is from the side. arm angles down. Not sure if it should be up or down.

-
Dave108, the steering arm angles out and up. The tie rod end from the steering box mounts from under the steering arm with the threaded, tapered end protruding up through the steering arm. So the bottom part of the hole in the steering arm is larger than the hole at the top-the hole is tapered. Here’s a pic.
IMG_4595.jpeg
Last edited by BUDFIVE; 12-22-2023 at 10:05 AM.
BUDFIVE
Complete kit order 8/28/2023
347 Ford Dyno 10/12/2023
Kit Delivery 11/28/2023
-
Senior Member

Welcome to the asylum!
There's quite a few of us in MN & WI that are building or have built Roadsters. If you "do" Facebook, look us up on MN-WI Cobra Builders group.
John D. - Minneapolis 'Burbs
1965 El Camino - LT-1, 4L60e, 4wh discs, SC&C susp.
2013 F-150 Platinum - Twin Turbo 3.5
2018 Mk4 Roadster w/ Coyote - #9365 - Build Thread Delivery 7/3/18, 1st Start 1/4/19, 1st Road Mile 5/5/19, Legal 6/18/19, In Paint 2/25/21, Done (?) 4/2021
-
Got a bunch of progress, I am not very good at documenting my progress but here goes.
My plan was to get the visible aluminum panels powder coated. After contacting 4 different powder coaters in the area and getting no return calls I decided to paint the panels. Went with the hammered silver color. Sanded and wiped down the panels with alcohol and painted. They look great but I don't think the paint is very durable but the silver paint on aluminum should be easy touch-up when needed.
Got the pumpkin in with the help of my son. Used the milk crate and strap method, we weren't very elegant but got it in,bolted down and torqued.

-
Post Thanks / Like - 0 Thanks, 1 Likes
-
If you need any help let me know. I’m interested in who you tried to contact about powder coating. I’m thinking about having some done too.
Last edited by Oshkosh Rob; 01-04-2024 at 09:51 PM.
-
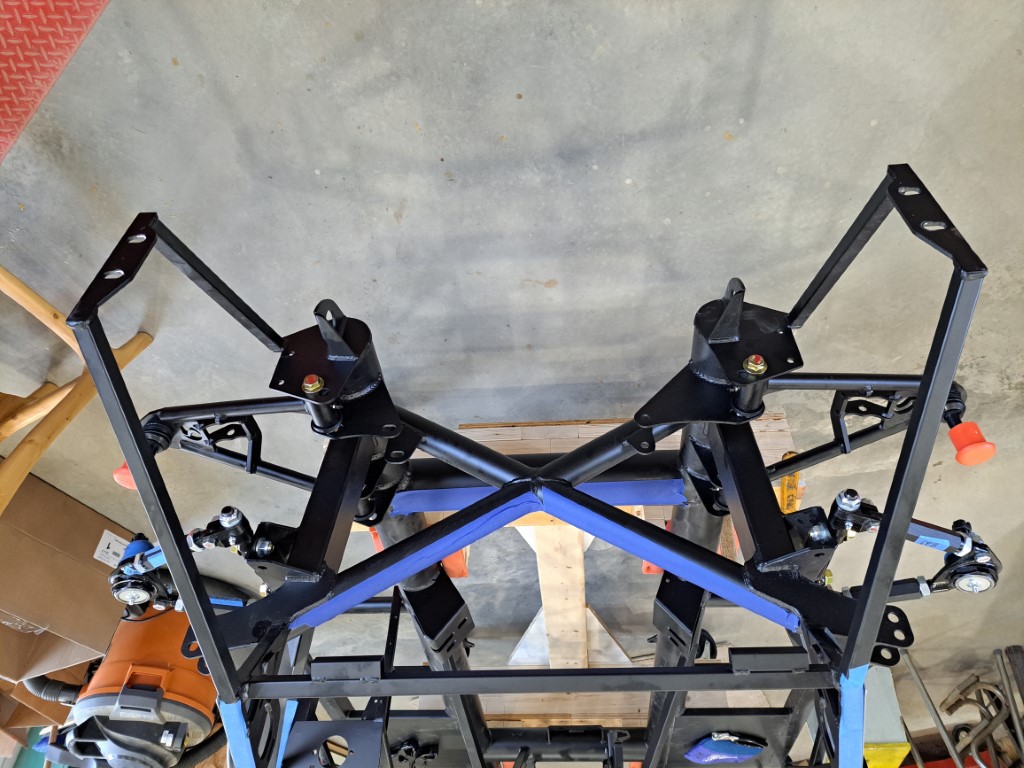
Next worked on the front suspension. Got the upper and lower control arms on after putting the F-panels on.
-
-
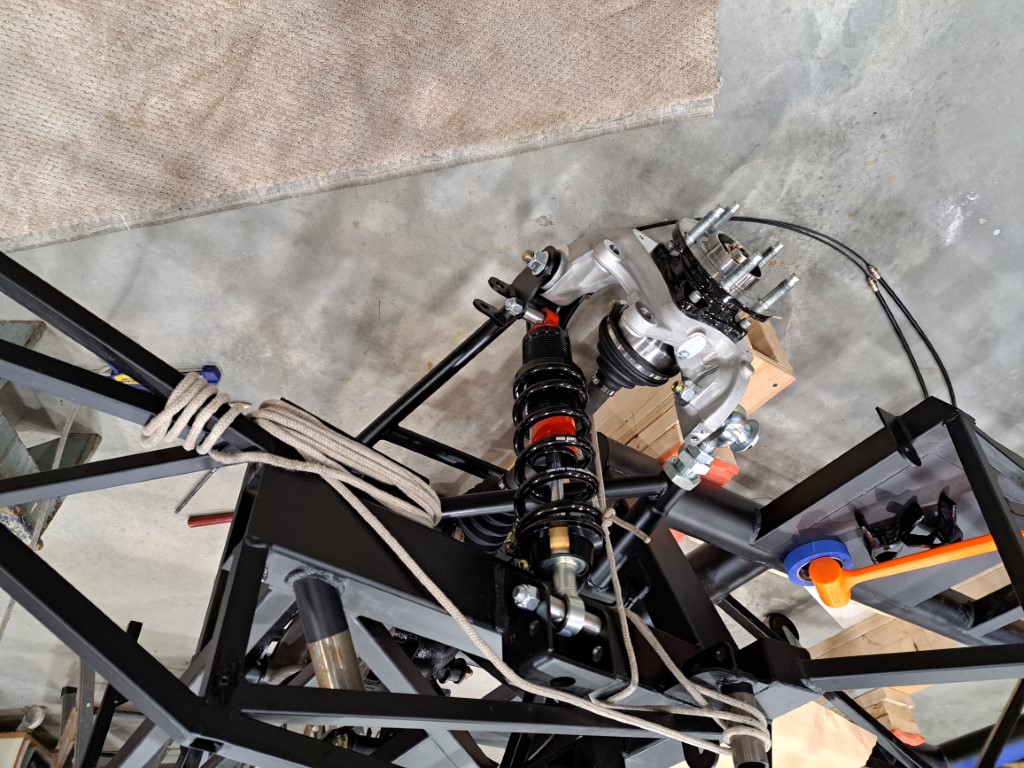
Installed CV shafts, Knuckle/hubs, shocks, and hooked up suspension control arms etc. Pay no attention to the rope temporarily supporting the axle. It didn't seem like I should just leave the CV shafts hanging while waiting to hook up the control rods.
-
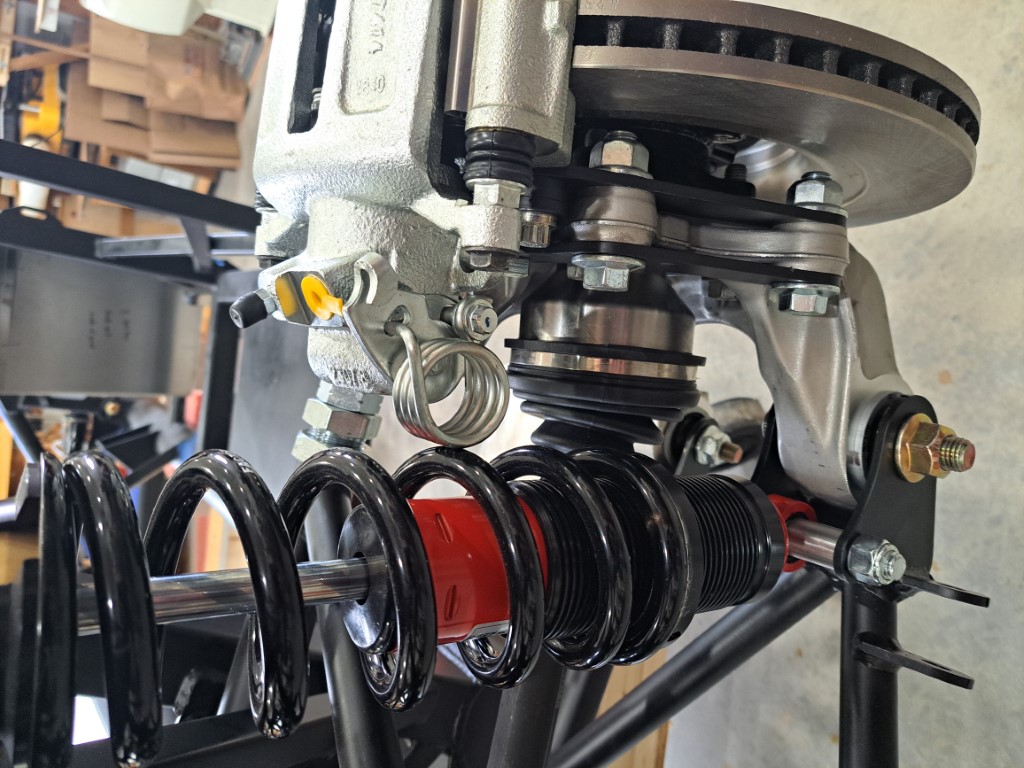
Built up the front and back brakes. I could have used 4 hands to get the pads in the calipers. Ended up using tiny c-clamps and spring clips to hold the spring steel pad holders while sliding in the pads. The rear brakes were especially tough because the pads were slightly long and had to have a small amount removed in order to fit. After grinding off a little of the ears on the pads I got it together.
-
When I put the rotors and calipers on, one side had the emergency brake spring contact the shock coil-over. The brake on the other side was fine. In a separate post it was pointed out that all was fine , just needed to adjust the control arm. Thanks forum members! So far no alignment has been done.
-
Something I forgot to mention earlier, when I found out my steering arms were on wrong (upside down) I had already put on the front hubs and torqued them to the 250lbs setting. Well, in order to correctly mount them I had to remove and swap sides and up/down, and to get them off I had to remove the axle nut (which is a one time use) buy 2 new nuts. Oh well, live and learn.
-
Senior Member

Looking good! While you're at this stage, consider replacing the blue ball joint boots in your upper control arms; they are known to crack quickly. I received my kit in July 2023, and mine are already showing signs of cracks. I replaced them with Energy Suspension 5.13102G...about $10 on Amazon. Note there are 4 boots in the kit; the pair with the thicker 'flange' on the bottom go on the uppers. It's a quick swap at this stage.
Here's more info....Front Upper Ball Joint Boots (thefactoryfiveforum.com)
Greg
Built an early MkIII years ago, sold years ago.
Got Corvettes out of my system, and now back after 18 years to build a MkIV.
MkIV Complete Kit Ordered 4/18/23, Delivered 7/11/23, 427 Stroker, Holley Sniper 2, Hyperspark, TKX, IRS, Wilwood Big Brakes
Here to learn, contribute, and have fun!
-
Senior Member


Originally Posted by
Dave108

Something I forgot to mention earlier, when I found out my steering arms were on wrong (upside down) I had already put on the front hubs and torqued them to the 250lbs setting. Well, in order to correctly mount them I had to remove and swap sides and up/down, and to get them off I had to remove the axle nut (which is a one time use) buy 2 new nuts. Oh well, live and learn.
Oh no!!!!!
The good news is that you figured it out and fixed it, but that doesn't mean it doesn't still hurt.
Getting those axle nuts off is no small feat either!
We all have made similar mistakes, so don't feel too bad. I made my fair share when building ours. I built it with my brother, and we still frequently remind each other the mistakes the other made...
-
Thanks guys, new energy sys. boots, new axle nut. Ready for the next challenge. 
-
-
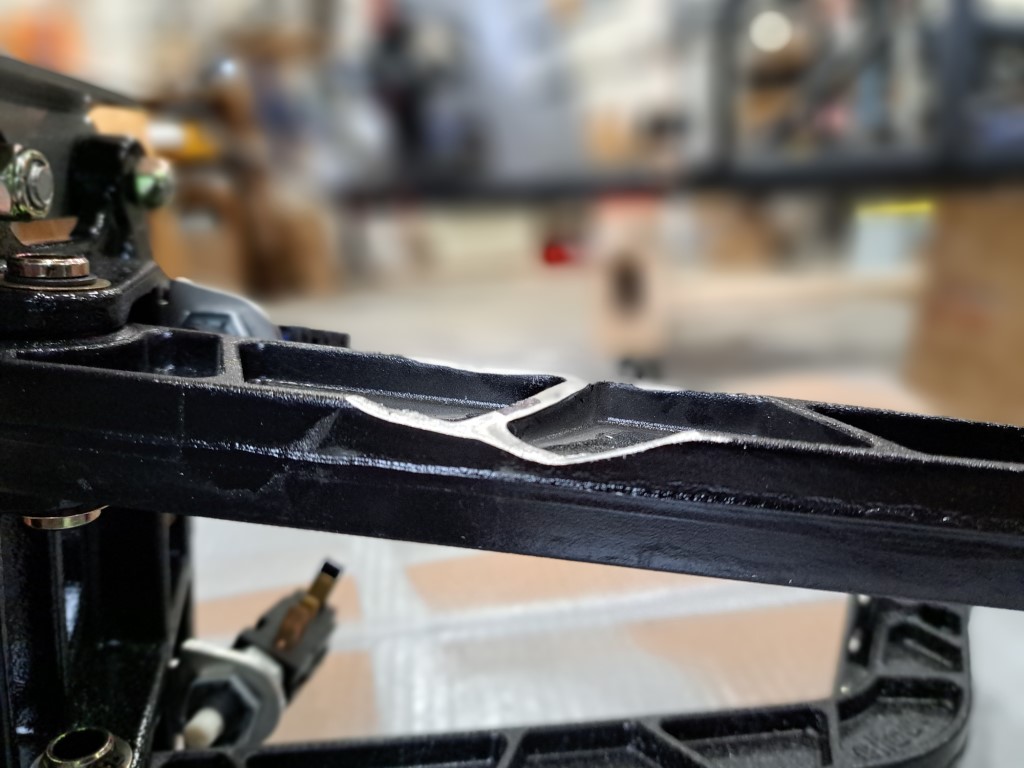
I think many have not had issues (recently) with clutch pedal/frame interference, but my clutch pedal was over an inch away from the end of the foot box when it hit the frame (3/4" tube). Using a flap disk in my angle grinder I modified some of the webbing on the pedal. Now the pedal goes to within 1/4" of the foot box wall. Painted it and should be good to go.

-
For the pedal box setup I wanted the clutch pedal to be the most proud of the 3 pedals. I wanted the brake pedal about 1.5" less proud. Not sure if that is the right terminology. Then I wanted the accelerator pedal to be the furthest back, another 1+". (I had a hot rod where the gas and the brake were at the same level and close side-by-side, and it was super easy to hit the gas while trying to brake (not good)).
I modified the coyote pedal as shown in the manual.
I measured the pedal to pedal separation and distance to the floor on my current cars as a reference
I looked at mounting it like Edwardb had done, but I wasn't getting the setback from the brake pedal I wanted.
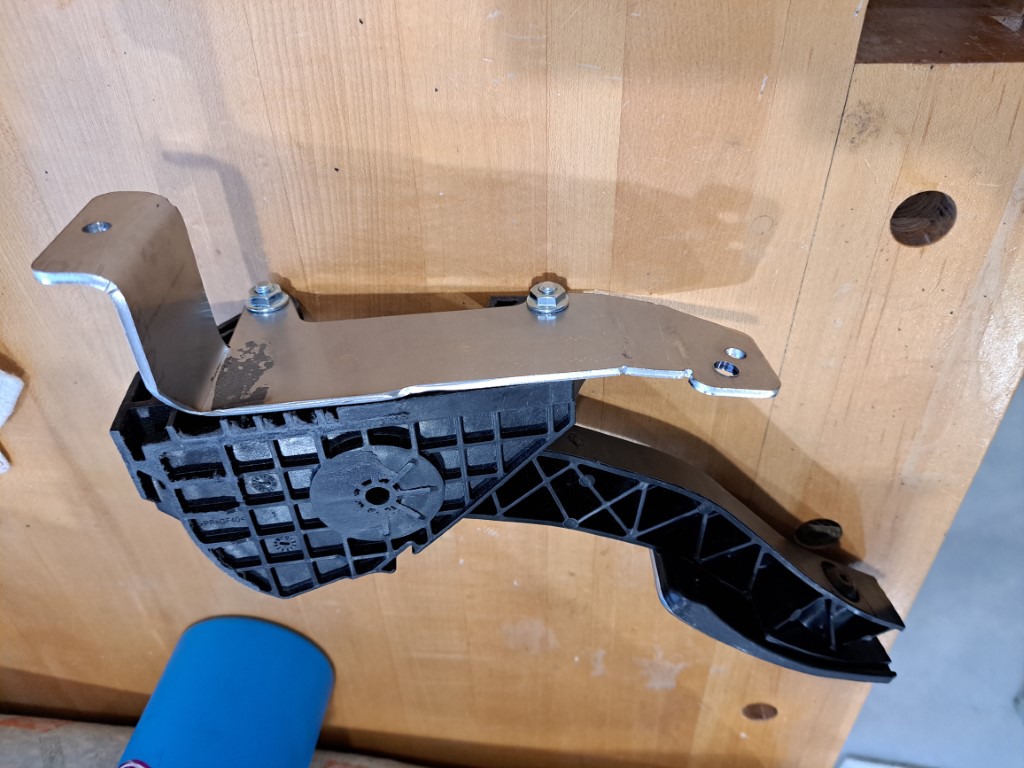
So in trying to use the coyote DBW pedal with the supplied coyote pedal mount I was having issues getting the pedal where I wanted it. It was too low, not enough set back from the brake. The manual recommended spot was too high not leaving enough room for the coyote harness plug, interference with the steering shaft etc. So I ended up modifying the supplied pedal mount and the recommended mount position. Sat in the chassis after install and it seems to be just right (as the little bear said).,
Here is what I ended up with.


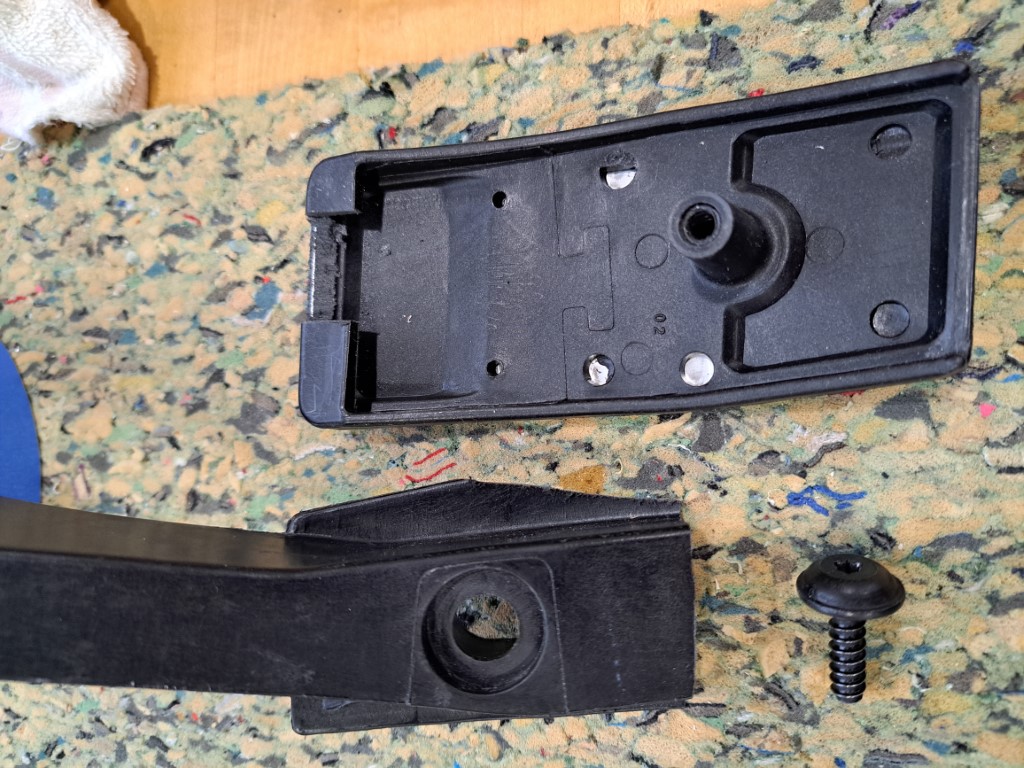
The modified pedal mount. Cut off the upper right side to clear the 3/4" tube, straightened the bend at the bottom, then added a new bend at the bottom of the pedal. Also had to drill a new lower mounting hole at the bottom and a new upper mounting hole next to the steering shaft hole.


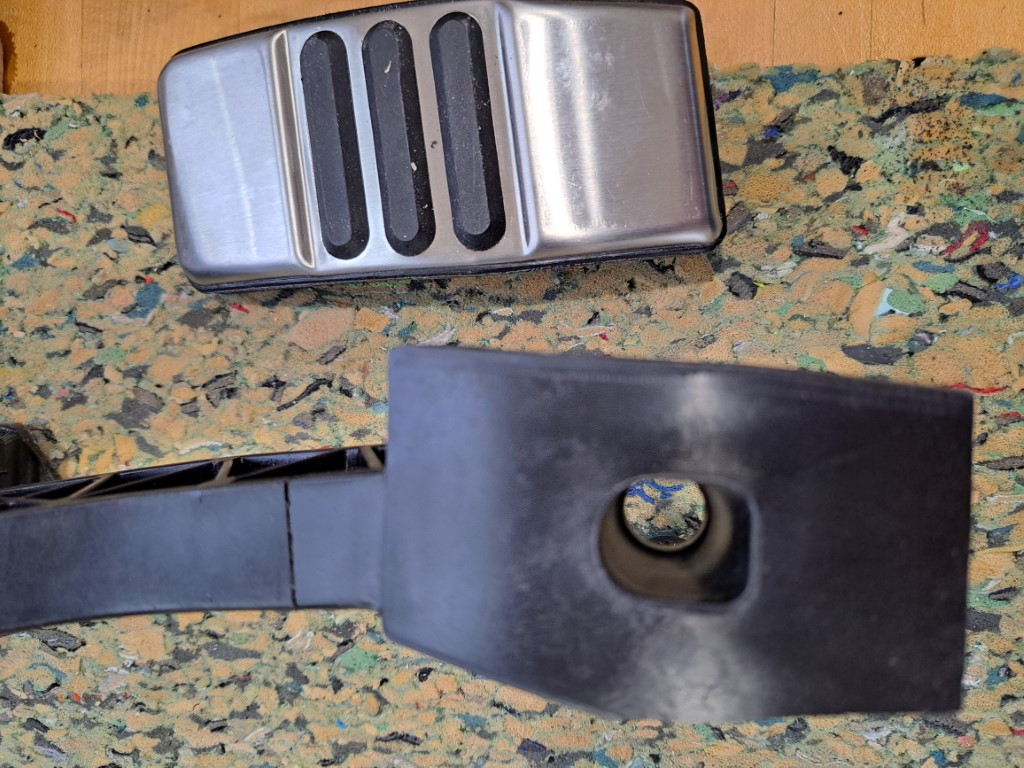
I also shortened the DBW pedal as others have done, looks nice, sorry I can't give credit as I don't know the original designer.
-
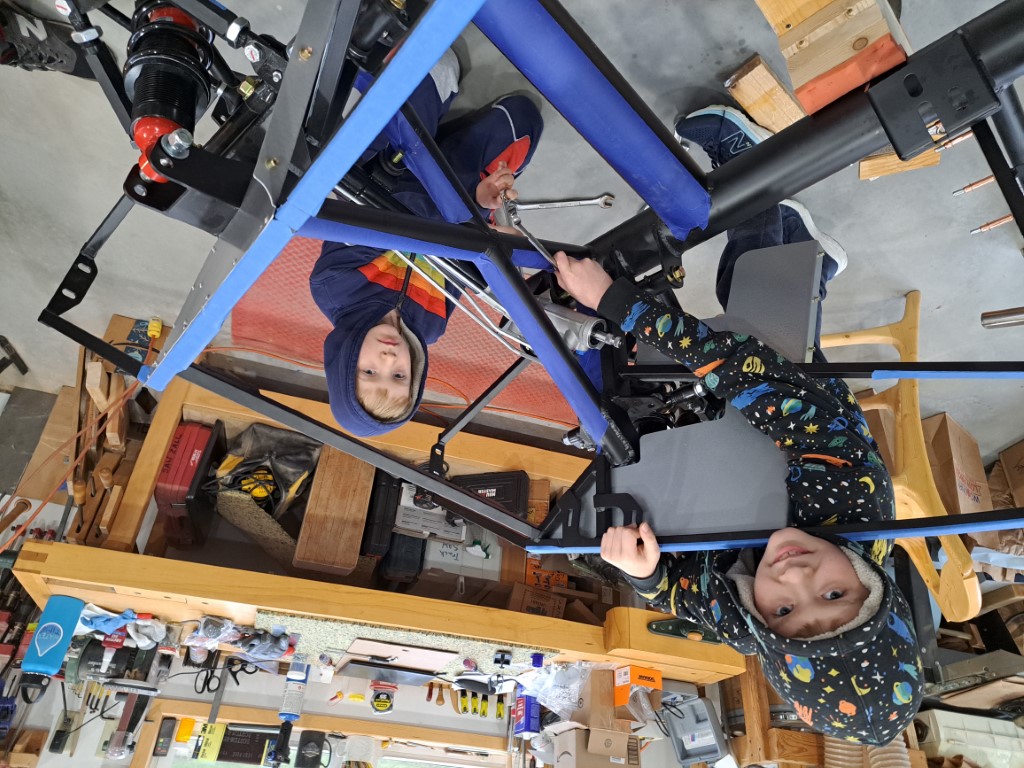
My grandsons, They love to help, and I love it when do
-
Foot boxes, drilling lots o' holes

-
hello Dave my name is Peter Severt, Marshfield Wis. I just ordered my kit a christmas time, I should get it late february. just thought I'd say Hi.
-
Hey Peter, exciting times ahead. I look forward to working on my build every day You will too.
-
Filled my differential late yesterday. WOW that stuff stinks! Both my shop and the garage still smell bad this morning. I will need to do some airing out of my building area.
Also, the manual says 3.3 pints of the 75w 85 oil plus 3 oz of friction modifier. Mine took a full 4 pints plus the friction stuff to fill up until I had a couple drops run out of the fill hole.
-
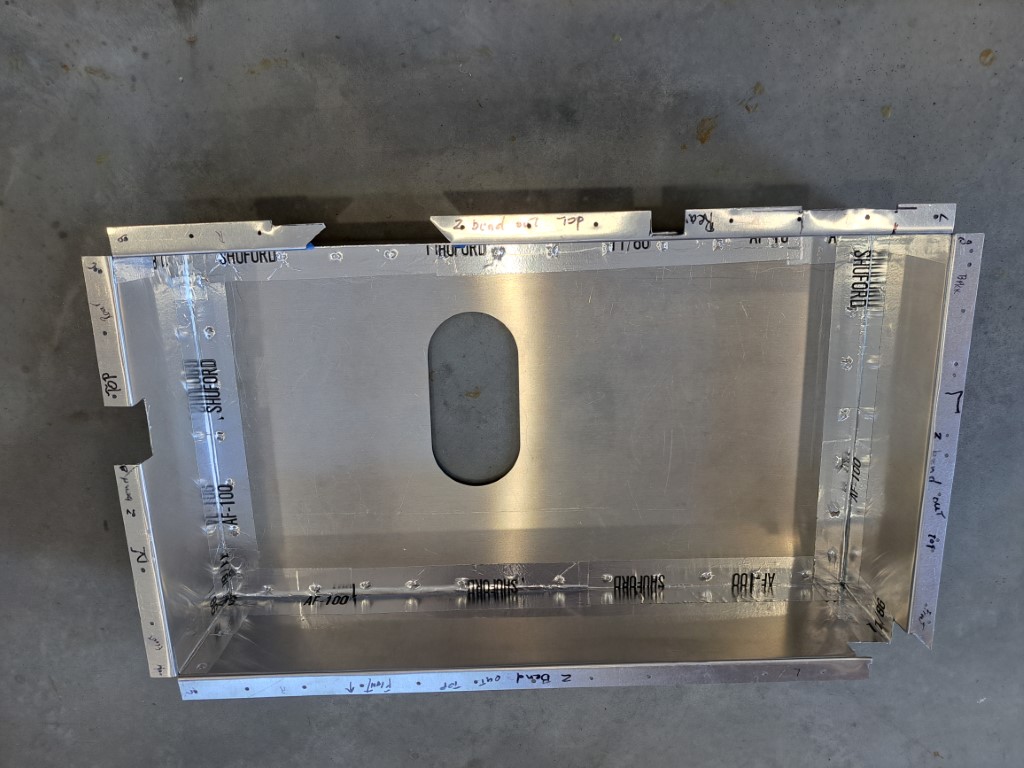
It has been a while since I updated this build log. I have been busy making progress on the car, just not writing about it.
I made a drop trunk. I found a guy who had a nice break. Cut my aluminum strips with my bandsaw to 7 inches wide giving me a 5 inch deep box with 1 inch at the top and bottom for the flanges. Then used my cutout of the original bottom.
-
-


 Thanks:
  Likes:


 Reply With Quote

