-
Senior Member

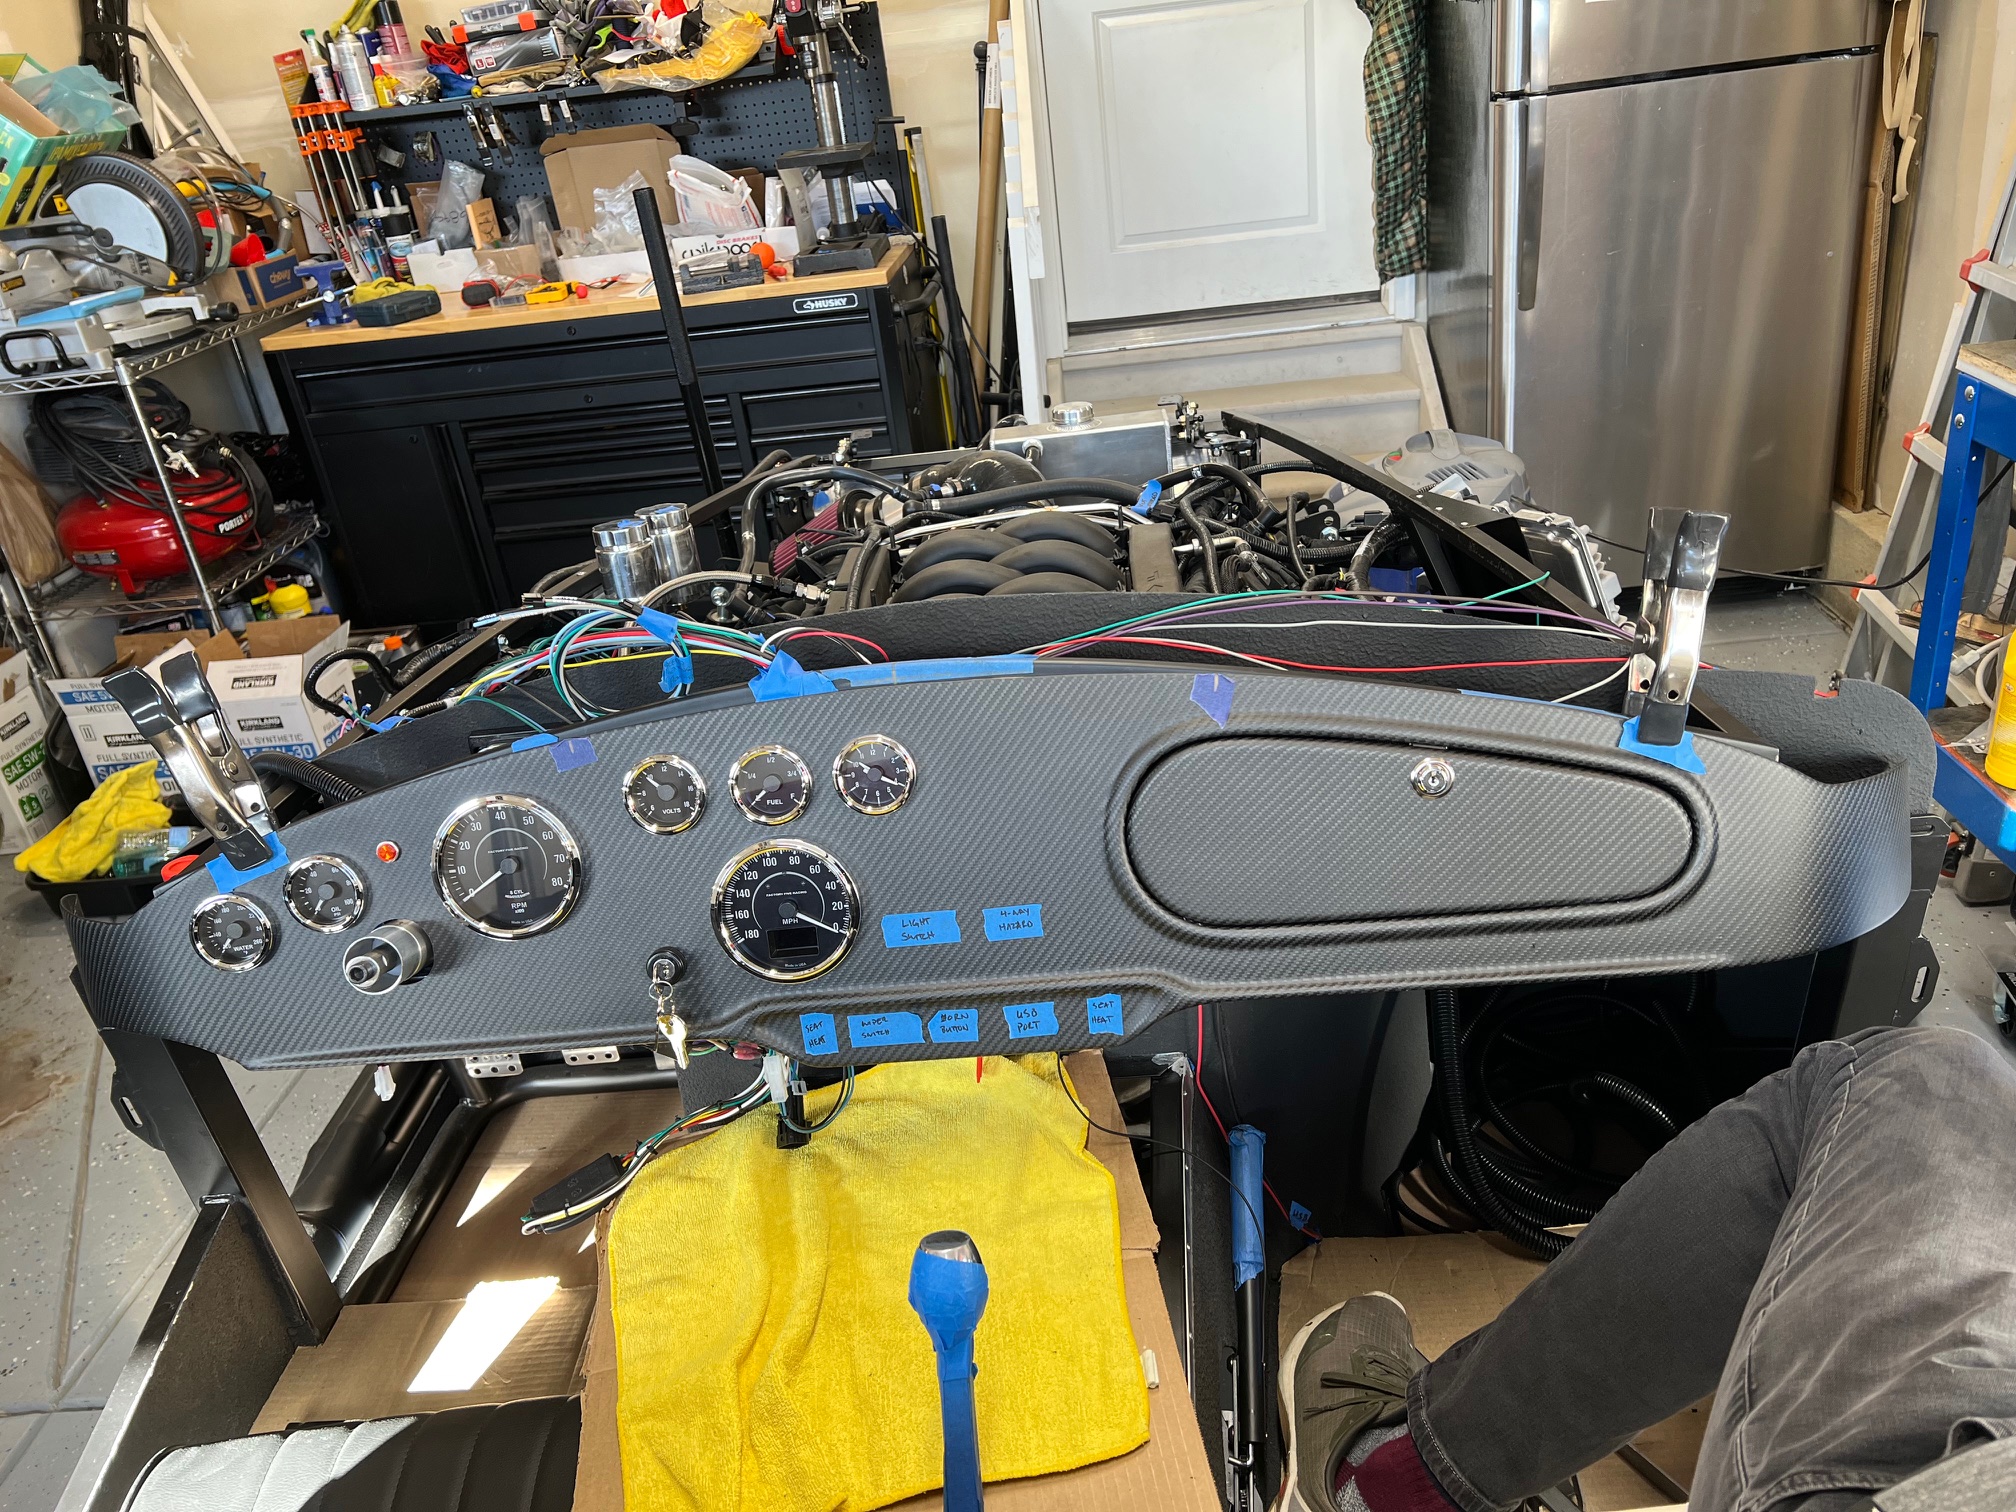
Carbon fiber dash mounting height
All those with a CF dash, how does this height look, especially at the top of the dash? Seeking opinions before I drill and mount everything for final mounting. I plan to use L-shaped aluminum brackets from the bottom of the 1 top bar with rivnut and a single screw through the dash at two or three different locations.
-
Senior Member

I test fitted mine the other day. Looks similar to yours. Not sure why they can't cut these things to mirror the hoop. I know there will be differences from frame to frame but 1/4" in some places seems like a lot. Are you keying in on 3/16" below the ends? I've seen others make it flush to help with the middle, but can't say which is best for certain. I have the under dash panel from Everson, so may use brackets on the hoop with 3M velcro, but haven't decided.
What did you use to cut your holes?
-
Post Thanks / Like - 1 Thanks, 1 Likes
-
Senior Member
So far for the holes in the CF I drill a small hole with a standard bit, then use a step bit to get it to the right size, or on size under. Then I use a small 1/4 circular file/rasp to smooth out any rough edges left by the step bit. I have another set of small files I use to make the notches and/or flat spots needed for the different switches.
Of course I have a vacuum running while I drill and try to keep the CF dust down. I also usually wear a basic mask to cover my nose/mouth.
I hadnt heard the 3/16 below the ends but thats pretty much how mine came out. I completely agree it would be nice for them to get the curve to match.
I had some spare 1/8 inch aluminum L-Shaped bars around that I cut to make mounts for the CF dash. Each I plan to rivet to the bottom of the top bar, and I have a rivnut to hold the bolt that will go through the dash. I got some decorative bolts and washers from Amazon that look pretty good.
-
Senior Member
On my last build I used black chrome button head fasteners to secure my dash like you are saying. Expensive but looked great with the padded version. I tapped the bracket versus a rivnut but I’m sure that would work too.
-
Not a waxer


Originally Posted by
cv2065

...Not sure why they can't cut these things to mirror the hoop...
The dashes are all the same---the curve of the hoop is not and that's why you don't use the center to determine placement.
RE: Velcro at the top; not a good idea if you're thinking it will allow removal. Once the body is on the top of the dash will be captured and you won't be able to pull the dash rearward to disengage the Velcro.
Jeff
-
Member

I don't know of this will work in the end, but I used some black plastic push rivets instead of screws on the upper dash connections. They seem to hold everything secure but have enough give that if there was some flex in the frame, the push rivets would be sacrificed before the carbon fiber. I picked some up from Lowes, but something like these from McMaster Carr https://www.mcmaster.com/products/pu...h-in+fasteners.
David...
MK4 Roadster Delivered 11/28/2022
Ford Racing Aluminator A52XS; T56 Magnum
IRS; Billet IFS; QA1 Double Adjustable Shocks; Wilwood Big Brakes from Gordon Levy
Slowly building my dream
-
Senior Member
Originally Posted by
Jeff Kleiner
The dashes are all the same---the curve of the hoop is not and that's why you don't use the center to determine placement.
RE: Velcro at the top; not a good idea if you're thinking it will allow removal. Once the body is on the top of the dash will be captured and you won't be able to pull the dash rearward to disengage the Velcro.
Jeff
Thanks Jeff. What's the best way to determine placement with the CF dashes? I know that Velcro lock from 3M is heavy duty stuff. I was thinking if I used countersunk screws or nutserts to affix the L shaped brackets to the hoop, I could reach up under there and just unscrew the L bracket mount instead of separating the dash from the velcro. That said, I wasn't sure how well the glue would hold the velcro to the L brackets over time unless I used some other kind of other glue or epoxy to stick it on there.
Do you know if anyone has used epoxy to glue the L brackets on to the back of the CF dash like they do with the metal dashes? I haven't really seen that in any other posts.
-
Senior Member

This is my next project, so looking for some good advice here as well. I was advised to line up the op with the top of the hoop. But have seen different opinions on here. My plan was to mount with black screws and riv nuts.
Mark IV Gen 3 Coyote
Started 7/22.
-
Senior Member
Originally Posted by
DIBaledo
I don't know of this will work in the end, but I used some black plastic push rivets instead of screws on the upper dash connections. They seem to hold everything secure but have enough give that if there was some flex in the frame, the push rivets would be sacrificed before the carbon fiber. I picked some up from Lowes, but something like these from McMaster Carr
https://www.mcmaster.com/products/pu...h-in+fasteners.
David...
Haven't seen that before. Any pics David?
-
Senior Member

For positioning my CF dash, I did what Mike Everson recommended. Basically assemble the glovebox, then push the dash up vertically as high as you can go. Eventually the glove box will hit the underside of the 3/4" frame tube and limit have far up you can go. Then use a level mounted on the lower bump-out to level the dash. I then traced the 3/4" frame tube on the back of the dash using a sharpie for quick re-adjustment. My dash seems to sit slightly higher than yours. The center is about even w/ the 3/4 tube, and the sides are about 1/8" above the corner of the 3/4" tube.
my build thread showing position (w/ images)
For fastening, I plan to use the 3M dual-lock as several others have done so that I don't have any showing fasteners. I do have the Replicaparts under-dash filler panel to support the bottom of the dash.
build thread (hidden fasteners):
Darryl [dbo_texas]
MKIV #9644 (build thread) (Index)
MK4 Complete Kit | Gen2 crate Coyote | Tremec T56, 3.55 IRS | power steering | hydroboost | dual roll bars | FFR carbon fiber dash | 18" Halibrands + Wilwoods | RT drop trunk kit & turn signal | front battery mount | saddle leather Intatrim Stoneleigh seats + interior accents
-
Post Thanks / Like - 0 Thanks, 1 Likes
-
Senior Member

I bonded small right angle brackets (with pre-drilled holes) to the back of the carbon fiber dash with West System epoxy and fiberglass. The brackets attach to the bottom of the hoop with bolts that go into rivnuts. There are four brackets that can be unscrewed with a long screw driver from below. Works great and the dash is completely free of any visible fasteners. The bottom edge of the dash is supported by two L brackets. This, in combination with the rigid carbon fiber, make for a rock solid dash. Unfortunately, I don't have any pictures of the back of the dash, but below is the finished appearance.

James
Mk4 Roadster #9974 - Picked Up 1/2021. Complete kit, Gen 2 Ford Coyote / TKX, IRS. Completed 9/2023
-
Post Thanks / Like - 0 Thanks, 1 Likes
-
Senior Member
Originally Posted by
Lidodrip
I bonded small right angle brackets (with pre-drilled holes) to the back of the carbon fiber dash with West System epoxy and fiberglass. The brackets attach to the bottom of the hoop with bolts that go into rivnuts. There are four brackets that can be unscrewed with a long screw driver from below. Works great and the dash is completely free of any visible fasteners. The bottom edge of the dash is supported by two L brackets. This, in combination with the rigid carbon fiber, make for a rock solid dash. Unfortunately, I don't have any pictures of the back of the dash, but below is the finished appearance.
James
Thanks James! Your build is super clean!! How did you determine final placement of the dash? Also, I'm assuming that you fit the dash to the hoop, held with clamps, and then glued the L brackets to the back while in place? How long did it take for the epoxy to cure?
Also, where'd you get those cup holders? 
-
I placed mine even with the top of the hoop so the hoop wouldn't show. I also used black button heads to secure the dash but had to make some brackets to lower the screws to they cleared the body. I used some velcro at the bottom corners. You can see in the first picture, you would be able to see the blue frame.... so i painted it black. But then, you would see the black once the body is on:
Dash5.JPG Dash9.jpg IMG_5520.jpg
You want that CF dash to be very near the top so you can't see the hoop once the body is on. This is my final positioning of the dash.
Dash_transtunnel.jpg
-
Post Thanks / Like - 0 Thanks, 1 Likes
-
Senior Member
Originally Posted by
cv2065
Thanks James! Your build is super clean!! How did you determine final placement of the dash? Also, I'm assuming that you fit the dash to the hoop, held with clamps, and then glued the L brackets to the back while in place? How long did it take for the epoxy to cure?
Also, where'd you get those cup holders?
Thanks for the kind words. Below is how I tackled the dash:
Determine roughly where you want to locate your brackets (I used four 3/4" right angle brackets from Ace Hardware). Using 60-80 grit sand paper, sand a generous area where each of the brackets will be located.
Clamp the dash in place to the hoop with gauges and glove box installed. You want to make sure that none of the gauges or glove box interferes with the hoop or possible bracket locations. Like Daryl and Mike Everson, I used the glove box to help determine the final dash height.
Position each bracket so that one surface is flush against the back of the dash and the other is flush against the bottom of the hoop. Tape the bracket in place to the back of the dash using 2" painter's tape. Tape the brackets in such a way that half the tape is on the bracket and the other half is just taped to the dash. Once all the brackets are taped in place, remove the dash and gauges.
Using the tape as a hinge, you can peel back each bracket from the back of the dash while still keeping the bracket attached to the tape and half the tape to the dash. Apply epoxy to the back of the hinge and dash and then re-affix the bracket to the dash. Because the painter's tape is relatively stiff, the bracket will go back to the exact original location. Clamp in place and allow to bond overnight. The next day, remove the tape and then use some small strips (1"x2") of fiberglass cloth and epoxy to reinforce the bonding. Allow to cure for 24 hours.
Clamp the dash back in place on the hoop and determine where the rivnuts need to go. I would suggest using undersized bolts to allow for a small amount of play just in case your rivnuts are not perfectly aligned.
Here is a picture of the installed dash without the body:

I got the cup holders from Summit Racing. They are made by Eddie Motorsports and are billet aluminum - high quality and the perfect size. https://www.summitracing.com/parts/EMS-MS281-43P
Good luck,
James
Mk4 Roadster #9974 - Picked Up 1/2021. Complete kit, Gen 2 Ford Coyote / TKX, IRS. Completed 9/2023
-
Post Thanks / Like - 1 Thanks, 1 Likes
-
Member
Originally Posted by
cv2065
Haven't seen that before. Any pics David?
Not the best photo, but this shows the push pin rivets. These can be easily removed and reused. Additionally, as mentioned, if there is any flex in the chassis, the plastic push pins will be sacrificed before carbon fiber dash. Otherwise, they appear very strong and hold the dash in place. Not in the picture, but I have also fabricated a lower bracket as well. I may also use the push pins to connect the carbon fiber below as well. Not as concerned below since they will not be visible.

David....
MK4 Roadster Delivered 11/28/2022
Ford Racing Aluminator A52XS; T56 Magnum
IRS; Billet IFS; QA1 Double Adjustable Shocks; Wilwood Big Brakes from Gordon Levy
Slowly building my dream
-
Post Thanks / Like - 1 Thanks, 2 Likes
-
Senior Member
Originally Posted by
Lidodrip
Thanks for the kind words. Below is how I tackled the dash:
Determine roughly where you want to locate your brackets (I used four 3/4" right angle brackets from Ace Hardware). Using 60-80 grit sand paper, sand a generous area where each of the brackets will be located.
Clamp the dash in place to the hoop with gauges and glove box installed. You want to make sure that none of the gauges or glove box interferes with the hoop or possible bracket locations. Like Daryl and Mike Everson, I used the glove box to help determine the final dash height.
Position each bracket so that one surface is flush against the back of the dash and the other is flush against the bottom of the hoop. Tape the bracket in place to the back of the dash using 2" painter's tape. Tape the brackets in such a way that half the tape is on the bracket and the other half is just taped to the dash. Once all the brackets are taped in place, remove the dash and gauges.
Using the tape as a hinge, you can peel back each bracket from the back of the dash while still keeping the bracket attached to the tape and half the tape to the dash. Apply epoxy to the back of the hinge and dash and then re-affix the bracket to the dash. Because the painter's tape is relatively stiff, the bracket will go back to the exact original location. Clamp in place and allow to bond overnight. The next day, remove the tape and then use some small strips (1"x2") of fiberglass cloth and epoxy to reinforce the bonding. Allow to cure for 24 hours.
Clamp the dash back in place on the hoop and determine where the rivnuts need to go. I would suggest using undersized bolts to allow for a small amount of play just in case your rivnuts are not perfectly aligned.
Here is a picture of the installed dash without the body:
I got the cup holders from Summit Racing. They are made by Eddie Motorsports and are billet aluminum - high quality and the perfect size.
https://www.summitracing.com/parts/EMS-MS281-43P
Good luck,
James
Thanks for going into such detail James. Greatly appreciated!
-
Post Thanks / Like - 1 Thanks, 0 Likes


 Thanks:
  Likes:


 Reply With Quote

