-
A different way to vent the footbox
I thought this group would get a kick out of this.
Here's a different way to ventilate the footbox.
I've read many report that venting them in the traditional sense (3" bilge fan ducted from the front) can be problematic. Some say it works, some say it just sends hot air into the area. I guess it makes sense that the air might get a little toasty pulling through the engine bay, and I would imagine that the intake location being only 10" above the hot pavement doesn't help much either.
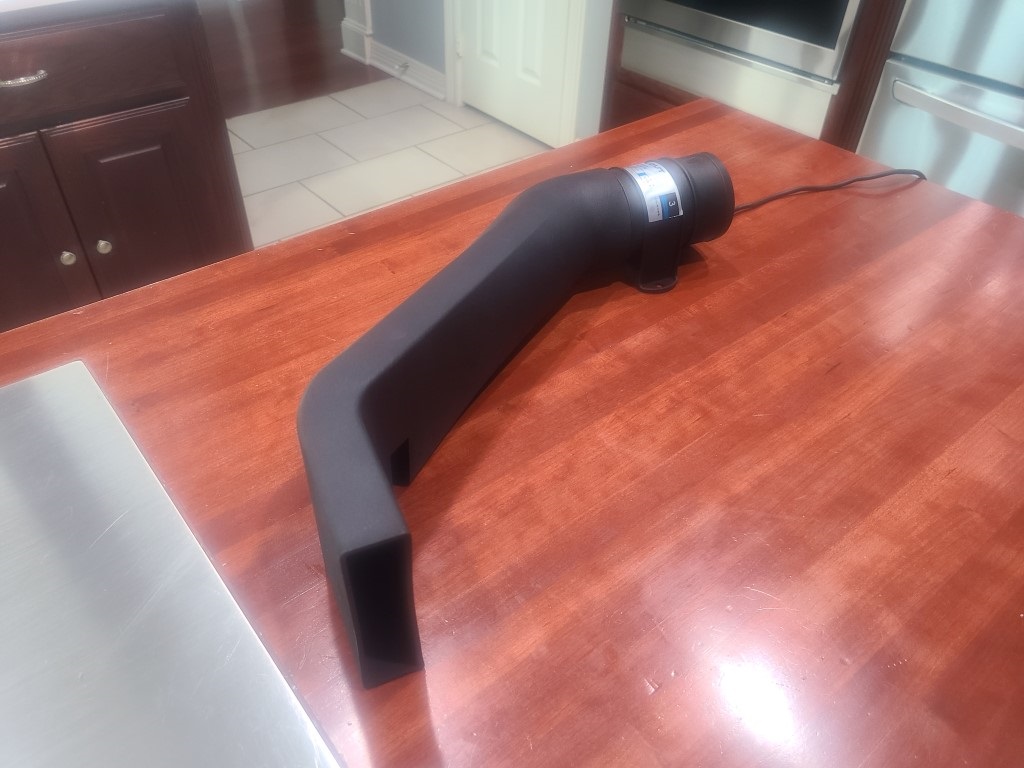
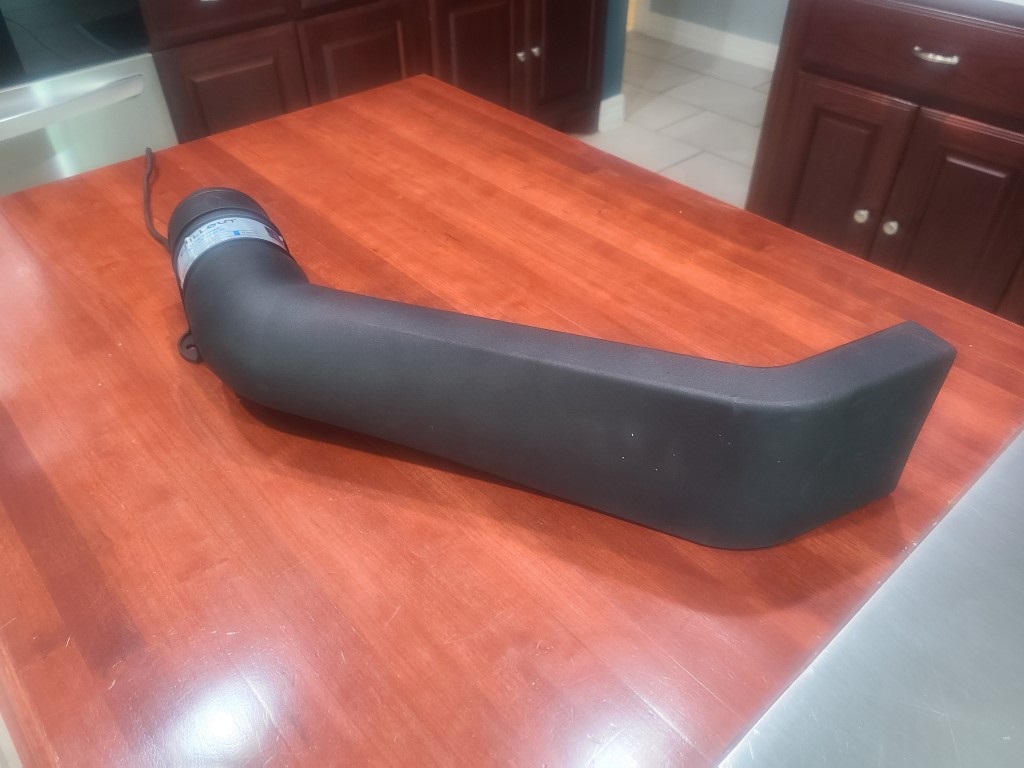
Soooo....I thought I'd try something different. At the end of the summer I mocked up a different location for fan and duct work and gave it a shot. It worked BEAUTIFULLY! Basically, I located the same 3" bilge fan behind the seat, where it pulls in ambient temp air (not hot pavement air) and piped it along the side of the seat into the footwell. And because it's not in the engine bay, the air doesn't heat up as it travels through the tube. Lastely, no need for an inline blast gate-- so installation and function is easier. I'm betting it is actually easier to do it this way than through the engine bay-- no cutting and much easier wiring. It was a super fun little project, and if I'm $80 into it I'd be surprised. If you want to see a bit more on how I did it, you can check out this video (just fast forward past all my annoying talking in the beginning)
https://www.youtube.com/watch?v=rVwMEVxvHZE
fan box with cover.jpgfan box no cover.jpg
Picked up kit 9/6/22. Complete Roadster Kit, IRS, 18" wheels, Forte 302, T5. First build. No auto mechanical experience and beyond excited to learn. Loaded with "Empty Nester" time and energy. Link to my build videos:
https://www.youtube.com/channel/UCgX...uCWGcelzGecm1Q
-
Post Thanks / Like - 2 Thanks, 11 Likes
 Railroad
,
AndrewIdaho,
John4337,
JohnnyB,
Bart Carter,
john42,
phileas_fogg,
Al_C,
Tom Veale,
gburchett,
WIS89 liked this post
-
Senior Member

That is really neat! I debated installing fans and in the end didn't as there wasn't enough consensus that they helped all that much. But this method....
You should make some of those transitions and sell them. I'll take two
Mike
-
Post Thanks / Like - 1 Thanks, 1 Likes
-
Just watched the video loved the idea. Just a quick question do you measurements on the length you need to cut those ducts. Great work love the build videos
-
Post Thanks / Like - 0 Thanks, 1 Likes
-
I just watched your video and I think you just won post of the day.
-
Post Thanks / Like - 1 Thanks, 1 Likes
-
Senior Member

Genius level stuff, well done. On a side note, do you have details on that seatbelt set up?
FFR #7388 - Mk 4 Complete Kit w/ IRS, Ordered 10/21/10, Delivered 12/8/10. 302 with FiTech and Under Car Exhaust, Heat & A/C, Rod Top. Hard top and shop built side curtains added 2023.
-
Post Thanks / Like - 0 Thanks, 1 Likes
-
Senior Member

Very nice! I thought a lot about vent fans, finally decided against them. This might be the thing I was looking for!
----------------------------------------------
Jeff
Roadster delivered 8/27/23
Chevrolet Performance LS3
Build Thread
-
Post Thanks / Like - 0 Thanks, 1 Likes
-

Originally Posted by
AA-ron

I thought this group would get a kick out of this.
Here's a different way to ventilate the footbox.
I've read many report that venting them in the traditional sense (3" bilge fan ducted from the front) can be problematic. Some say it works, some say it just sends hot air into the area. I guess it makes sense that the air might get a little toasty pulling through the engine bay, and I would imagine that the intake location being only 10" above the hot pavement doesn't help much either.
Soooo....I thought I'd try something different. At the end of the summer I mocked up a different location for fan and duct work and gave it a shot. It worked BEAUTIFULLY! Basically, I located the same 3" bilge fan behind the seat, where it pulls in ambient temp air (not hot pavement air) and piped it along the side of the seat into the footwell. And because it's not in the engine bay, the air doesn't heat up as it travels through the tube. Lastely, no need for an inline blast gate-- so installation and function is easier. I'm betting it is actually easier to do it this way than through the engine bay-- no cutting and much easier wiring. It was a super fun little project, and if I'm $80 into it I'd be surprised. If you want to see a bit more on how I did it, you can check out this video (just fast forward past all my annoying talking in the beginning)
https://www.youtube.com/watch?v=rVwMEVxvHZE
fan box with cover.jpgfan box no cover.jpg
I really like that. And as another plus it seems like something you could retrofit after the car is complete so long as you can get a power wire there. Really nice.
BUILD THREAD:
The Brew City Cobra
Current Build: MK4 Complete Kit, Delivered December 2021; First Start November 9, 2022; Go-Cart November 23, 2022; Carbureted 427W, TKX, IRS
-
Post Thanks / Like - 0 Thanks, 1 Likes
-
Great idea AA-ron
Craig C
-
Very impressive. I don't really need that in my car (in Colorado). But it gave me some ideas for other projects I'm planning. Thanx!
I remember a while back somebody did a similar project, but it blew air into the seat for cooling and heating.
-
Senior Member
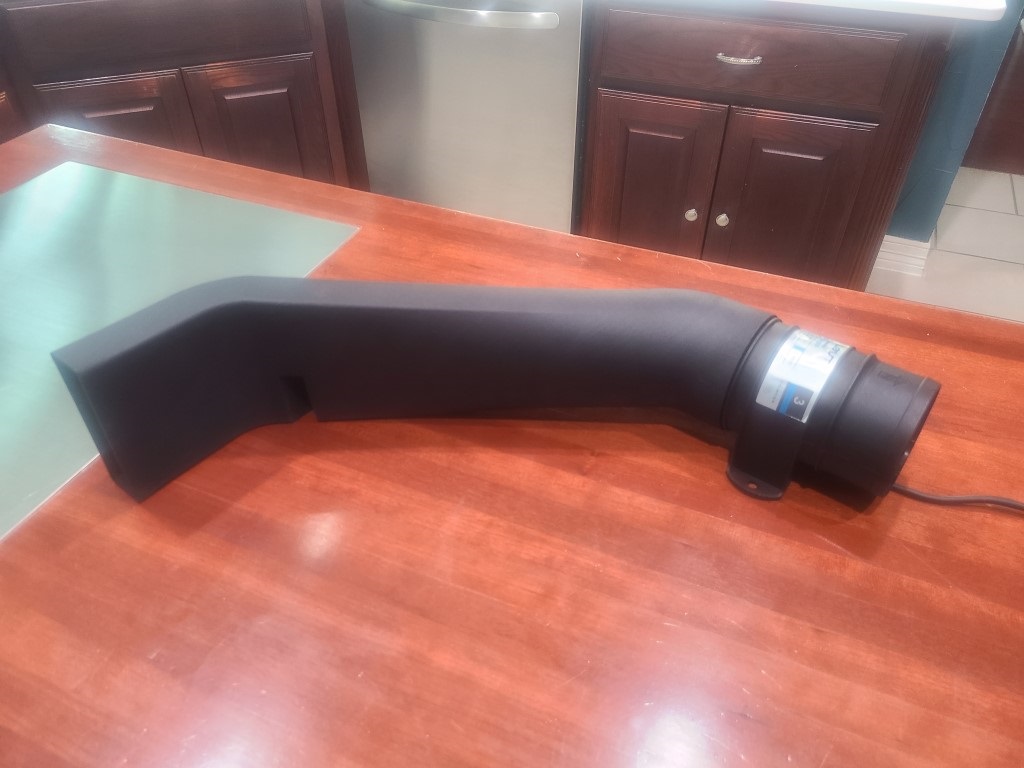
I love this idea but I don't want to do it the way AA-ron did, I hate working with fiberglass too much. I'm looking at fabricating from aluminum, I found some 1" x 4" aluminum RHS at the local Metal Supermarket and thanks to sendcutsend.com I can get the square to round transitions made for $20 each. Then tack weld together and cover with carpet like in the video.
Planning on using this fan.
-
Post Thanks / Like - 1 Thanks, 1 Likes
 WIS89
WIS89 thanked for this post
-
Just wanted to say I love your build! Been looking through the YouTube vids and you gave me some great ideas even though I'm building a Daytona. Well done.
-
Post Thanks / Like - 0 Thanks, 1 Likes
-
My seats aren't in yet and I'm wondering if it could work similarly by ducting in under the seat?
Really nice work.
-
Post Thanks / Like - 0 Thanks, 1 Likes
-
mike,
I hope the blower is not 130db as the spec indicates or it will be deafening behind you. Let us know how loud it really sounds.
-
Senior Member

Originally Posted by
JJK
mike,
I hope the blower is not 130db as the spec indicates or it will be deafening behind you. Let us know how loud it really sounds.
It’s 1 dB per 1 CFM��
-
Originally Posted by
Bellecobra
Just watched the video loved the idea. Just a quick question do you measurements on the length you need to cut those ducts. Great work love the build videos
The length of the long straight piece is 25" and approximately 6" for the shorter piece.
Picked up kit 9/6/22. Complete Roadster Kit, IRS, 18" wheels, Forte 302, T5. First build. No auto mechanical experience and beyond excited to learn. Loaded with "Empty Nester" time and energy. Link to my build videos:
https://www.youtube.com/channel/UCgX...uCWGcelzGecm1Q
-
Post Thanks / Like - 0 Thanks, 1 Likes
-
"I love this idea but I don't want to do it the way AA-ron did, I hate working with fiberglass too much. I'm looking at fabricating from aluminum, I found some 1" x 4" aluminum RHS at the local Metal Supermarket and thanks to sendcutsend.com I can get the square to round transitions made for $20 each. Then tack weld together and cover with carpet like in the video."
Mike, I wish I had the sheet metal fab skills you do. Your rendering and version looks great. I've said it before in my videos, "aint nothing sexy about fiberglass work". But it sure is easy and less cuts and nicks on my poor hands...
Picked up kit 9/6/22. Complete Roadster Kit, IRS, 18" wheels, Forte 302, T5. First build. No auto mechanical experience and beyond excited to learn. Loaded with "Empty Nester" time and energy. Link to my build videos:
https://www.youtube.com/channel/UCgX...uCWGcelzGecm1Q
-
Post Thanks / Like - 0 Thanks, 1 Likes
-
Originally Posted by
johnpinetree
My seats aren't in yet and I'm wondering if it could work similarly by ducting in under the seat?
Really nice work.
My seats sit right on the floor, so no space underneath.
Picked up kit 9/6/22. Complete Roadster Kit, IRS, 18" wheels, Forte 302, T5. First build. No auto mechanical experience and beyond excited to learn. Loaded with "Empty Nester" time and energy. Link to my build videos:
https://www.youtube.com/channel/UCgX...uCWGcelzGecm1Q
-
Post Thanks / Like - 0 Thanks, 1 Likes
-
Thanks for all the nice comments-- means a lot coming from this group.
A quick follow up on the performance of my rear mounted fans:
The amount of air they move is amazing, it's going to be a real treat on those hot days. Second, I'm very surprised how little I hear the fans when the engine is running.
Picked up kit 9/6/22. Complete Roadster Kit, IRS, 18" wheels, Forte 302, T5. First build. No auto mechanical experience and beyond excited to learn. Loaded with "Empty Nester" time and energy. Link to my build videos:
https://www.youtube.com/channel/UCgX...uCWGcelzGecm1Q
-
Post Thanks / Like - 0 Thanks, 1 Likes
-
Originally Posted by
John4337
Genius level stuff, well done. On a side note, do you have details on that seatbelt set up?
I used a universal 3-point retractable seat belt that I found on Amazon. I can't seem to find the details on my order, but I believe most standard 3-point units would work. Mine were about $70. The retractor simply bolts to the stock FFR seatbelt tab on the trunk floor and the other two mounting points also bolted to the stock locations on either side of the seat. When I say it was easy, I mean that the whole install took probably 20 minutes-- seriously, it was a "plug-n-play"!
Picked up kit 9/6/22. Complete Roadster Kit, IRS, 18" wheels, Forte 302, T5. First build. No auto mechanical experience and beyond excited to learn. Loaded with "Empty Nester" time and energy. Link to my build videos:
https://www.youtube.com/channel/UCgX...uCWGcelzGecm1Q
-
Post Thanks / Like - 1 Thanks, 1 Likes
-
Senior Member
Originally Posted by
JJK
mike,
I hope the blower is not 130db as the spec indicates or it will be deafening behind you. Let us know how loud it really sounds.
That's a good point. I'm also looking at this one that might be quieter. https://www.amazon.com/dp/B08FL73F6G...p_imgToDp&th=1
-
Post Thanks / Like - 0 Thanks, 1 Likes
-
Senior Member
Originally Posted by
AA-ron
"I love this idea but I don't want to do it the way AA-ron did, I hate working with fiberglass too much. I'm looking at fabricating from aluminum, I found some 1" x 4" aluminum RHS at the local Metal Supermarket and thanks to sendcutsend.com I can get the square to round transitions made for $20 each. Then tack weld together and cover with carpet like in the video."
Mike, I wish I had the sheet metal fab skills you do. Your rendering and version looks great. I've said it before in my videos, "aint nothing sexy about fiberglass work". But it sure is easy and less cuts and nicks on my poor hands...
I'm going to look today at modeling something up that could be 3D printed. Time for me to start thinking 21st century.
Use this transition with some silicone and pop rivets and I think we're in business.
Last edited by Mike.Bray; 02-21-2024 at 01:50 PM.
-
Post Thanks / Like - 1 Thanks, 3 Likes
WIS89 thanked for this post
-
Picked up kit 9/6/22. Complete Roadster Kit, IRS, 18" wheels, Forte 302, T5. First build. No auto mechanical experience and beyond excited to learn. Loaded with "Empty Nester" time and energy. Link to my build videos:
https://www.youtube.com/channel/UCgX...uCWGcelzGecm1Q
-
Post Thanks / Like - 0 Thanks, 2 Likes
-
Senior Member

It might be hard to get it looking even and smooth but how about a flexible hose? Thinking the kind w/ relatively thin fabric and a wire spiral inside. Pretty easy to go from round to an oval. It would reduce the area of the cross section in the oval but might still work out. One of these?
https://www.mcmaster.com/products/hose/duct-hose~/
FFR MkII, 408W, Tremec TKO 500, 2015 IRS, DA QA1s, Forte front bar, APE hardtop.
-
Senior Member
I'm going to try one with a 3D printed transition and a Chillout Systems 3" inline blower.
Last edited by Mike.Bray; 02-22-2024 at 01:24 PM.
-
Post Thanks / Like - 1 Thanks, 2 Likes
WIS89 thanked for this post
-
Last little tidbit of info on my installation. You do need to notch out the bottom of the tube to clear the bolt on the seat belt mounting tab. It's no biggie, I just cut about 3/4" square in the vent tube and used some industrial flexible tape (used in exterior window flashing) and it worked perfectly. Actually as I'm thinking about it, if you used 1 x 4" tube instead of the 1-1/4" x 4" that I used, it might just clear it.
Just a fyi...
Picked up kit 9/6/22. Complete Roadster Kit, IRS, 18" wheels, Forte 302, T5. First build. No auto mechanical experience and beyond excited to learn. Loaded with "Empty Nester" time and energy. Link to my build videos:
https://www.youtube.com/channel/UCgX...uCWGcelzGecm1Q
-
Post Thanks / Like - 0 Thanks, 1 Likes
-
I am liking it all. I think I would/will look into a variable speed control and use the higher speed blower. I think they make them with the off/on switch with the rheostat feature. Silicone hose in step diameters are available to transition from the rectangular to round connection.
Last edited by Railroad; 02-23-2024 at 08:05 AM.
20th Anniversary Mk IV, A50XS Coyote, TKO 600, Trunk Drop Box, Trunk Battery Box, Cubby Hole, Seat Heaters, Radiator hanger and shroud.
-
Senior Member
Originally Posted by
AA-ron
Last little tidbit of info on my installation. You do need to notch out the bottom of the tube to clear the bolt on the seat belt mounting tab.
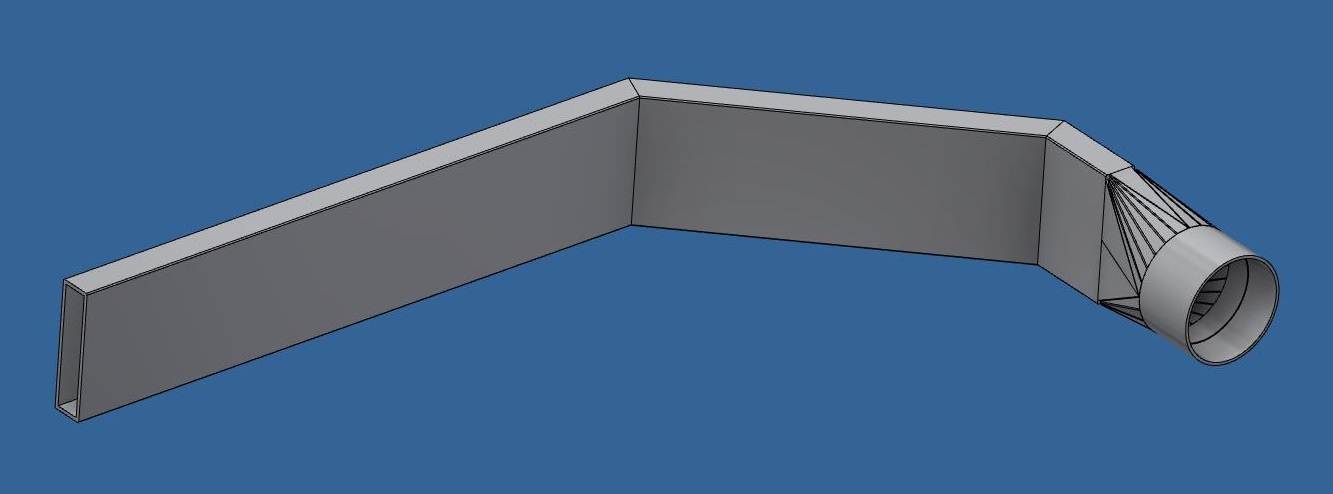
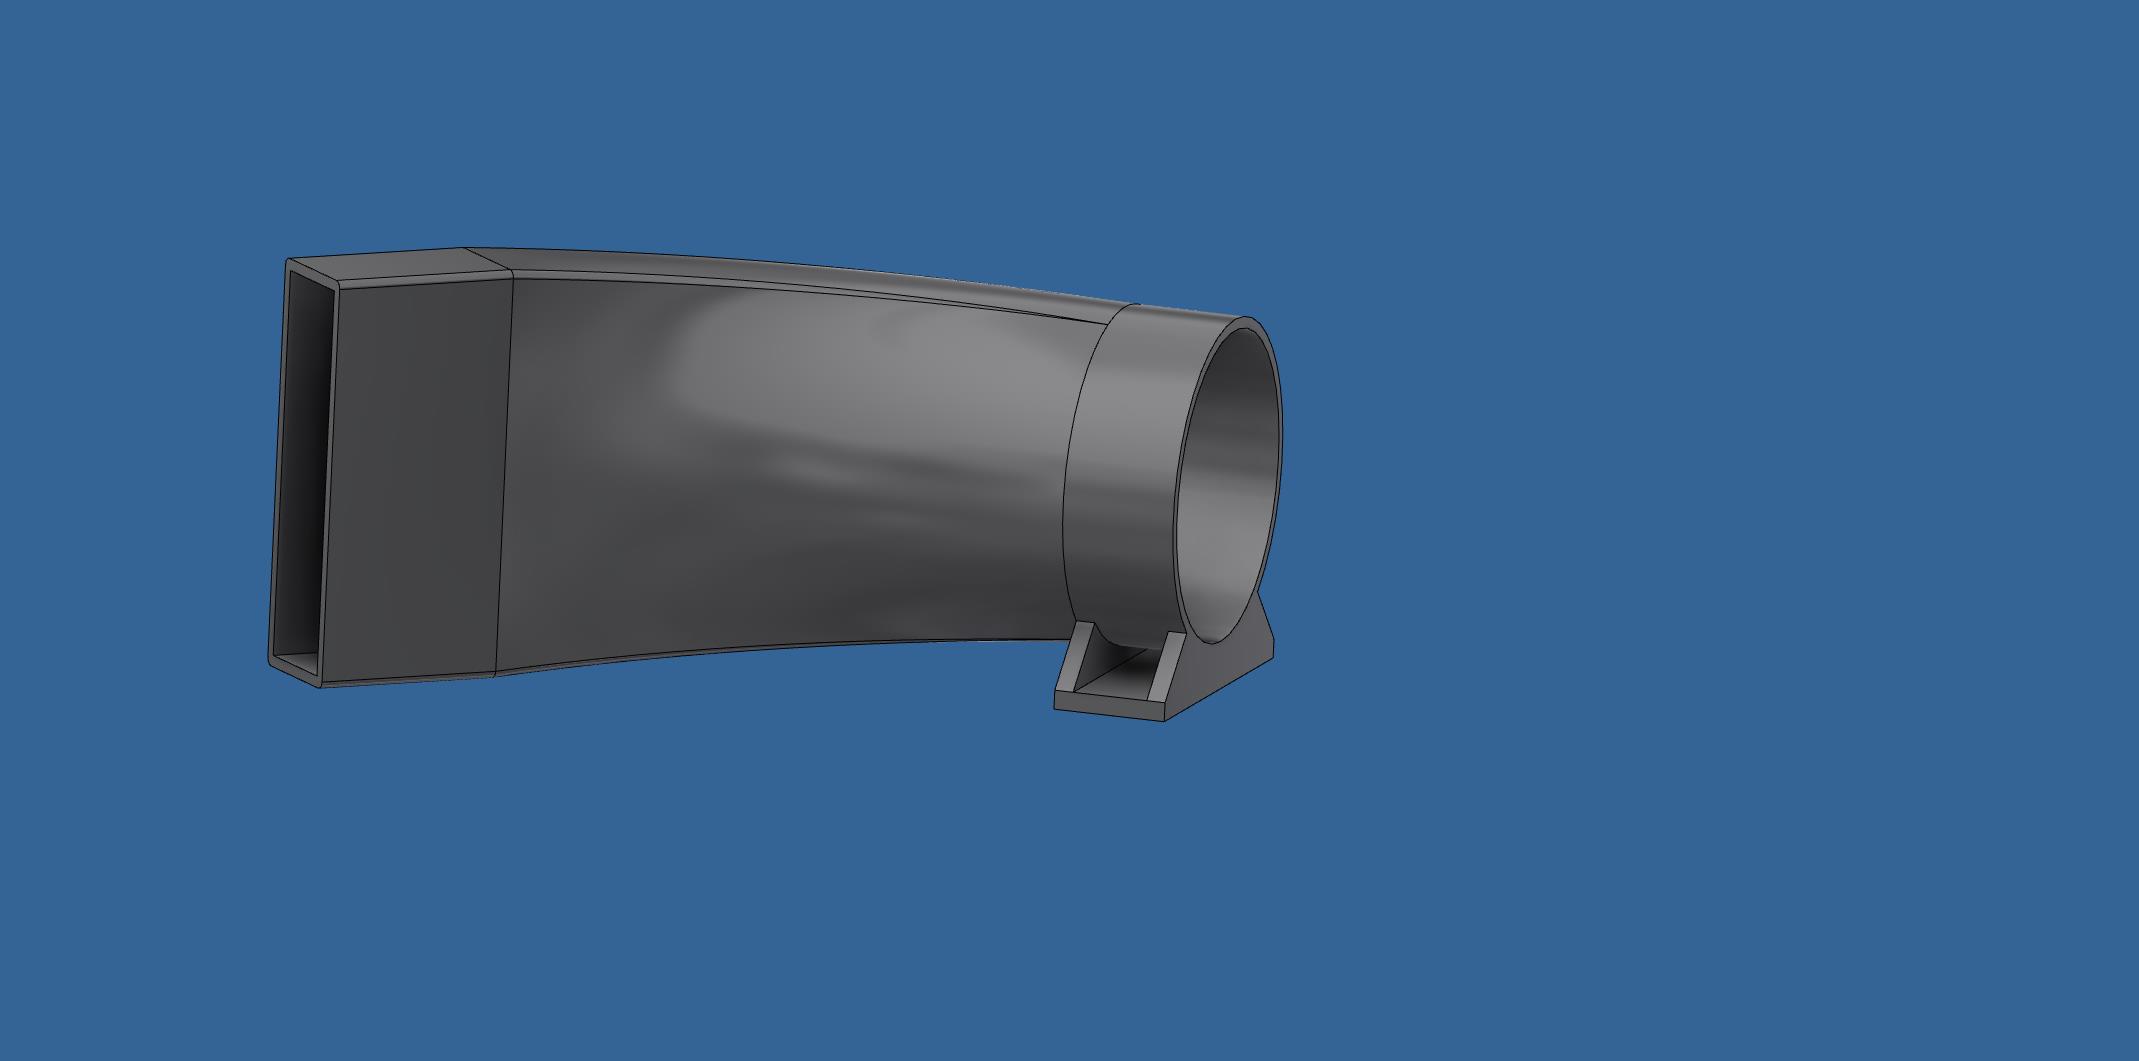
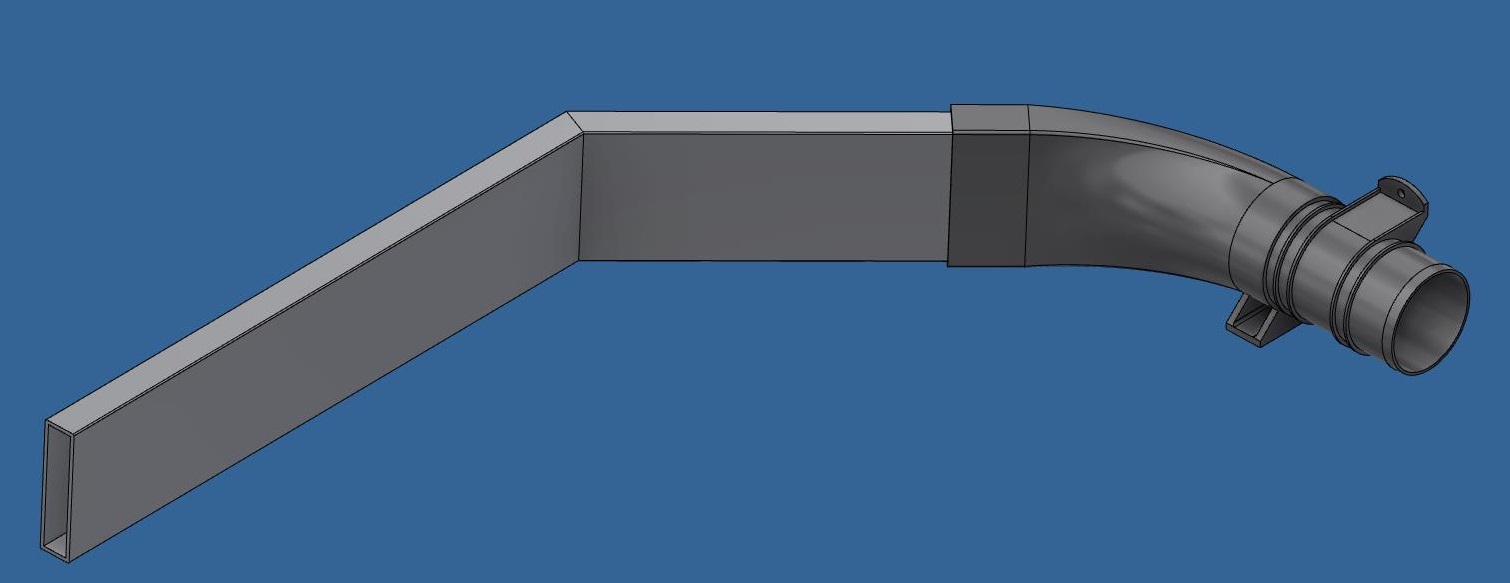
While I'm forever waiting for my car to get back from Glacier Speed Painters I've been looking for stuff I can do to keep busy. I was able to go and get some measurements off OB6's car and play around with my cooling system design. Made a simple mockup of the PS area and placed the fan as far back and towards the center of the car as I could. From there I tweaked my transition piece to make it a little more elegant and also added a shrouded notch to clear the seatbelt bracket as Ron pointed out.
New transition looks like this:
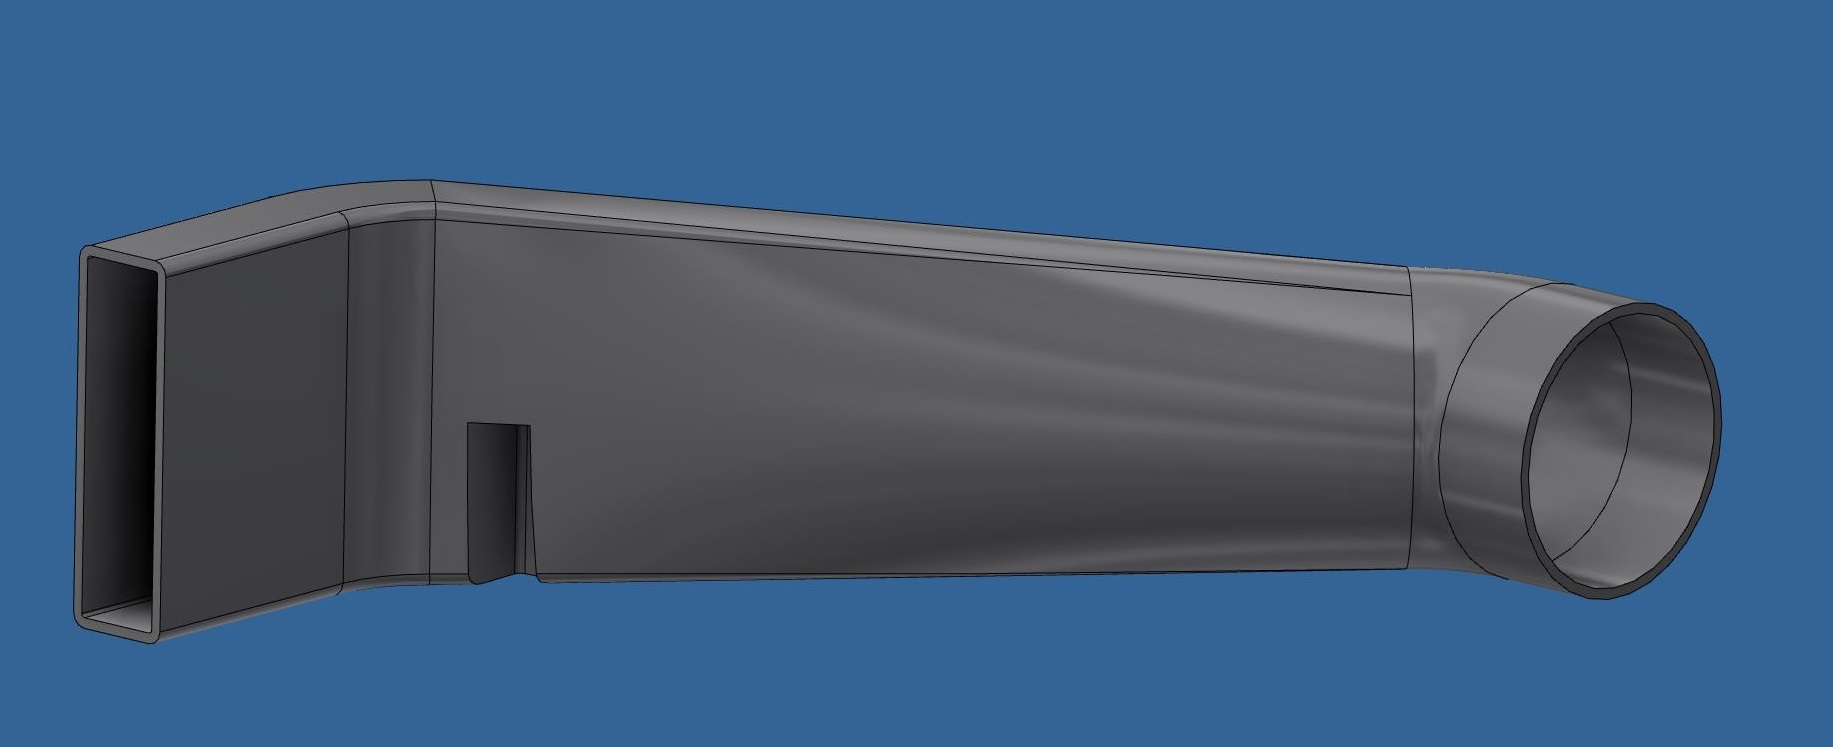
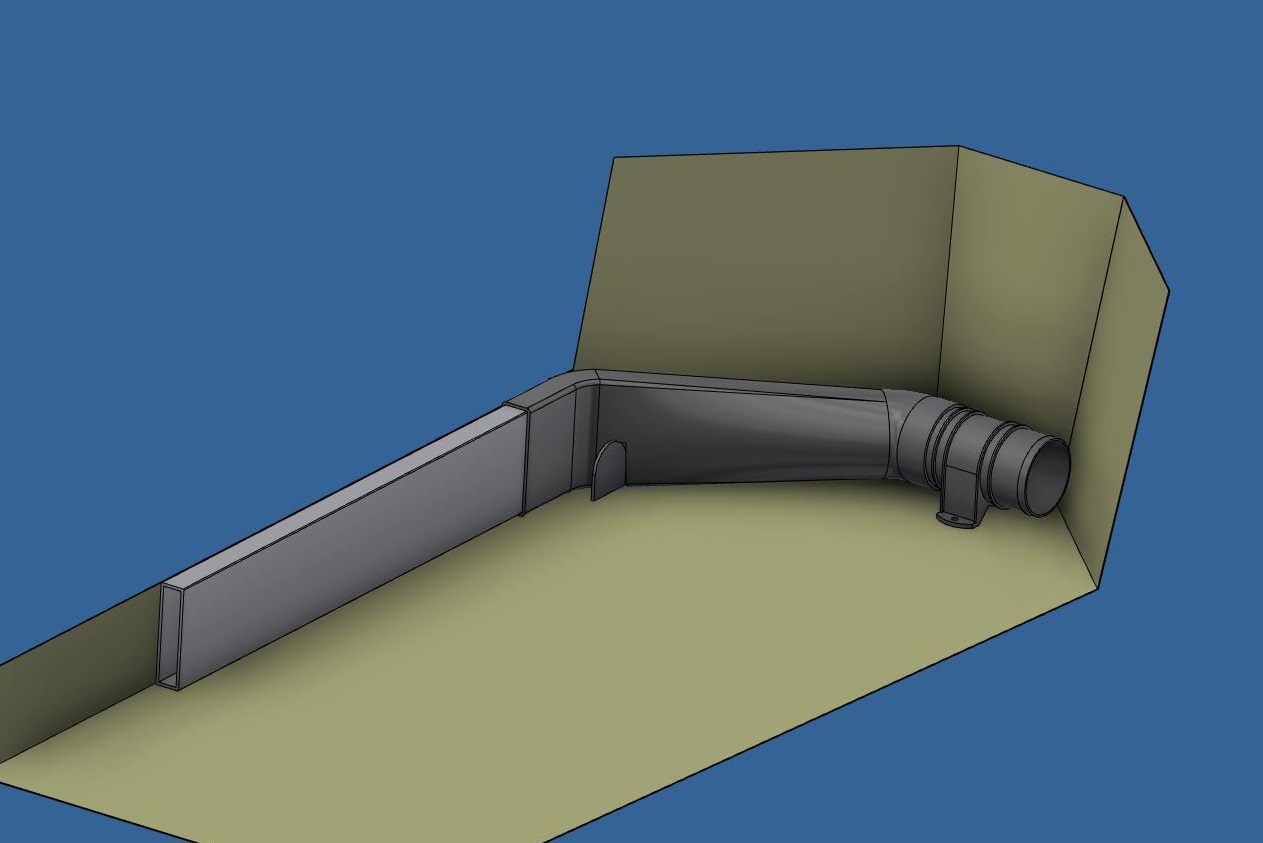
And assembled in the car:
The transition I'll have 3D printed out of nylon.
-
Post Thanks / Like - 0 Thanks, 2 Likes
-
Senior Member

AA-ron
Thanks for all that you have posted. I watched all your You Tube Vids. Twice!! I will be using your new vent system with a bit of a twist. Where you angle the 1x4 duct behind the seat, I plan to run it straight through the aluminum back wall then make an adapter to join a 3" flexible aircraft grade scat tube up through the trunk floor then a 90' turn into the blower then an intake short tube connected to the cubbie side wall. So the intake will be though the cubbie side wall....into the blower....down through the upper trunk floor connecting to the 1x4 behind the seat. There is ample room for the flex duct. My seat position will be all the way back as far as it will go, so moving the blowers and hence the intake up to the cubby will take the blowers out of the cockpit. When I start the rear cockpit aluminum I'll be fabing this plan up. I'll keep you all posted if it works or is a bust.
Allyn...aka Rebostar
-
Post Thanks / Like - 0 Thanks, 1 Likes
-
Originally Posted by
Mike.Bray
While I'm forever waiting for my car to get back from Glacier Speed Painters I've been looking for stuff I can do to keep busy. I was able to go and get some measurements off OB6's car and play around with my cooling system design. Made a simple mockup of the PS area and placed the fan as far back and towards the center of the car as I could. From there I tweaked my transition piece to make it a little more elegant and also added a shrouded notch to clear the seatbelt bracket as Ron pointed out.
New transition looks like this:
And assembled in the car:
The transition I'll have 3D printed out of nylon.
Hello. What a great post.
Is it possible to share the model and discuss where you are getting this fabricated?
-
Post Thanks / Like - 0 Thanks, 1 Likes
-
Senior Member
Originally Posted by
SuperFlyBriBri
Hello. What a great post.
Is it possible to share the model and discuss where you are getting this fabricated?
I'm getting a prototype piece printed to test the fit in the car. When it's proven I'm happy to share the step files and who I'm using for the 3D printing with anyone who's interested.
-
Post Thanks / Like - 1 Thanks, 2 Likes
-
Originally Posted by
Mike.Bray
I'm getting a prototype piece printed to test the fit in the car. When it's proven I'm happy to share the step files and who I'm using for the 3D printing with anyone who's interested.
Thank you so much for this!
New to me FFR MK3 Cobra 4300RD - '94 5.0 Drivetrain - 4-link
-
Mike Great Work on this.
Question: your model shows it fitting for the passenger side. Won't you need the same notch on the top so the channel can fit on the drivers side around the seat belt tab?
Thanks, Andrew
-
Senior Member
Originally Posted by
AndrewIdaho
Question: your model shows it fitting for the passenger side. Won't you need the same notch on the top so the channel can fit on the drivers side around the seat belt tab?
The part is not symmetrical, the round to rectangle transition is offset in two directions to tuck it up tight to the rear cockpit wall and make the bottom flush with the fan feet. I'll do a mirror image model for the DS.
Mike
-
Post Thanks / Like - 1 Thanks, 2 Likes
-
Originally Posted by
Rebostar
AA-ron
Thanks for all that you have posted. I watched all your You Tube Vids. Twice!! I will be using your new vent system with a bit of a twist. Where you angle the 1x4 duct behind the seat, I plan to run it straight through the aluminum back wall then make an adapter to join a 3" flexible aircraft grade scat tube up through the trunk floor then a 90' turn into the blower then an intake short tube connected to the cubbie side wall. So the intake will be though the cubbie side wall....into the blower....down through the upper trunk floor connecting to the 1x4 behind the seat. There is ample room for the flex duct. My seat position will be all the way back as far as it will go, so moving the blowers and hence the intake up to the cubby will take the blowers out of the cockpit. When I start the rear cockpit aluminum I'll be fabing this plan up. I'll keep you all posted if it works or is a bust.
Allyn...aka Rebostar
I actually have my seats all the way back and still had room for the fan and to make the corner with the 1 x 4". However, I really like your idea of moving the blowers out of the cockpit too. I will say, after driving it yesterday (very warm day here in Maine) I had the chance to flip the fans on to see if I could hear them, and I really didn't notice them running with the engine running. I was pleasantly surprised.
Picked up kit 9/6/22. Complete Roadster Kit, IRS, 18" wheels, Forte 302, T5. First build. No auto mechanical experience and beyond excited to learn. Loaded with "Empty Nester" time and energy. Link to my build videos:
https://www.youtube.com/channel/UCgX...uCWGcelzGecm1Q
-
Originally Posted by
Mike.Bray
While I'm forever waiting for my car to get back from Glacier Speed Painters I've been looking for stuff I can do to keep busy. I was able to go and get some measurements off OB6's car and play around with my cooling system design. Made a simple mockup of the PS area and placed the fan as far back and towards the center of the car as I could. From there I tweaked my transition piece to make it a little more elegant and also added a shrouded notch to clear the seatbelt bracket as Ron pointed out.
New transition looks like this:
And assembled in the car:
The transition I'll have 3D printed out of nylon.
Man, I really love how you've improved this idea! So cool.... literally
Picked up kit 9/6/22. Complete Roadster Kit, IRS, 18" wheels, Forte 302, T5. First build. No auto mechanical experience and beyond excited to learn. Loaded with "Empty Nester" time and energy. Link to my build videos:
https://www.youtube.com/channel/UCgX...uCWGcelzGecm1Q
-
I haven't built my factory 5 yet, but I wondered if anybody had ever tried using a water cooled foot box. Perhaps run some copper tubing across the panel and sandwich it between another aluminum outer panel and then run that to a cooler out in front of the radiator. The advantages that it would take up less space than the air ducting.
-
Senior Member
AA-ron & All
In the course of pre fitting and drilling all my aluminum panels I decided to see if venting the footbox from air intakes located in the cubby would work. Seems it will. Rather than make 1x4 rectangle ducts, I only need one side and a way to attach it and make the side and back walls the "outside" of the duct. So I spent the day doing origami! First I had to make sure everything would clear the rear end. So I had to mock up the rear axle and place the wheels to see what room there is. I wont have the drivers side and back wall permenently installed for a while. I will unravel my origami ducts and make .025 2024 T3 ducts and have them ready for when I rivit all the panels on. Below are the results.DSC02879.JPGDSC02874.JPGDSC02877.JPGDSC02875.JPGDSC02878.JPG
-
Post Thanks / Like - 0 Thanks, 2 Likes
-
Senior Member
-
Post Thanks / Like - 1 Thanks, 2 Likes
WIS89 thanked for this post
-
Originally Posted by
Mike.Bray
That looks sweet!
New to me FFR MK3 Cobra 4300RD - '94 5.0 Drivetrain - 4-link
-
Post Thanks / Like - 0 Thanks, 2 Likes
-
Senior Member
Originally Posted by
Rebostar
AA-ron & All
In the course of pre fitting and drilling all my aluminum panels I decided to see if venting the footbox from air intakes located in the cubby would work. Seems it will. Rather than make 1x4 rectangle ducts, I only need one side and a way to attach it and make the side and back walls the "outside" of the duct. So I spent the day doing origami! First I had to make sure everything would clear the rear end. So I had to mock up the rear axle and place the wheels to see what room there is. I wont have the drivers side and back wall permenently installed for a while. I will unravel my origami ducts and make .025 2024 T3 ducts and have them ready for when I rivit all the panels on. Below are the results.
DSC02879.JPGDSC02874.JPGDSC02877.JPGDSC02875.JPGDSC02878.JPG
If I am understanding your design correctly, the blower will be drawing air from inside the trunk. Where will makeup air be coming from?
I thought about putting my heater core and blower in the trunk but couldn't come up with a good way to get air into the trunk without possibly drawing in water and road dirt.
I like your idea!
----------------------------------------------
Jeff
Roadster delivered 8/27/23
Chevrolet Performance LS3
Build Thread


 Thanks:
  Likes:


 Reply With Quote