-
Senior Member

Going Topless! The summer is here!- Hard Top Removal Video
I've had a few people ask me how I change out the hard top to the roadster windshield in under 10 minutes. Well, here's how! (It actually takes me under 7 minutes)
P.S. I'm currently working on a quick release clamp (similar to a bike wheel QR) to get rid of the thumb screws. Not that I'm worried about them coming lose, but instead they are really hard to losen once they grab the lock washers!.
Double P.S. - I am not liable for the song getting stuck your head. If your wife asks what you are whistling or humming, tell her it's from Sesame Street. 
e!
-
Post Thanks / Like - 1 Thanks, 1 Likes
 JMT1
JMT1 thanked for this post
 JMT1
JMT1 liked this post
-
Senior Member

FFR Daytona Type 65 Coupe
67 427 Cobra
57' Belair
72 Pinto Wagon ,306" 1/4 miler
34 5 window coupe Ford
2003 Mustang GT
99' ZX9
85 Goldwing
All toys still in the Scuderia!
Every Saint has a past..................every sinner a future
Don't take yourself so seriously........no one else does.
You never see a motorcycle parked outside a Psychiatrists office.
-
Senior Member

Just Too Cool!!!
Makes me want a Hot Rod.
R/s
Vidal
CURRENT STATUS: Interior Rework and Bodywork.
GenII GTM #331. Delivered (23/9/10)
BUILD LOG AND WEBSITE:
http://gtmbuild.weebly.com/ .
-
Member

-
 Quickie Hardtop Change
Nice work!!!!!!
Racerboy1a
#99 302/347 TKO, 3-link, coupe
-
Senior Member

-
Damn music!!! lol
Nice work. Car looks perfect!
-
Senior Member

Thanks Erik, Nice job on the video and also on the overall concept of how to make the changes. I've been using wing nuts on the roadster windscreen as well as getting a spanner or socket under the dash is a task. The handholes at the firewall are handy, but I'd have to create those. The little clips at the back are very cool.
Great job,
TV
-
Senior Member

Need more info on those clips. Have not drilled yet those are nice
stack
FFR MKI Roadster FFR2202K Built in 2000 sold
FFR Hot Rod #39 under construction
-
cobra Handler

I like both looks for the hot rod! How many times have you changed so far? It looks like you have the procedure down for sure. Now there will probably be a competition to see who can do it the fastest!! But seriously, that's nice and the hot rod is very cool! Thanks, WEK.
FFR MkIII 302 (ATK), EFI 75mm TB with custom box plenum chamber, 24# injectors, 4 tube BBK ceramic, cold air sys, alum flywheel, crane roller rockers, T5, Wilwood pedals, custom five link with Watt's link, 4 rotors, coil overs, power steering with Heidt valve, alum FFR rad, driver's crash bar mod, mini dead pedal mod, quick release steering wheel hub #6046
-
Dreamer

Very cool, but the rollbars are loose in the fittings? Wouldn't they come out when you really need them??
-
Senior Member
Ah, j33ptj, you slay me!  Just kidding. I've got pins that I put in them behind the seat to hold them in. I just didn't do it on the video. Thanks for your concern though!
-
Senior Member

Originally Posted by
stack

Need more info on those clips. Have not drilled yet those are nice
stack
Here you go. The national hardware draw hasp. $5. I was a bit concerned that the top might slide around at the back but I autocrossed it and had no issues.
11sXz3F9xpL._SL500_AA300_.jpg
41rofJzf71L._SL500_AA300_.jpg
http://www.amazon.com/NATIONAL-MANUF.../dp/B000I1ATD4
Also, I picked up some "Super Magnets from Home Depot and put them on the top lever of the hasp so it will stick in a closed position when lifting the body off. Otherwise the catch will hang down and catch the opening as you're trying to pull the top off.
Last edited by ehansen007; 04-13-2012 at 08:26 PM.
-
Dreamer
Originally Posted by
ehansen007
Ah, j33ptj, you slay me!
Just kidding. I've got pins that I put in them behind the seat to hold them in. I just didn't do it on the video. Thanks for your concern though!
 no worries!! They don't fit under the hard top??? I thought a set of those in chrome with head rests would look quite nice!!
-
Senior Member
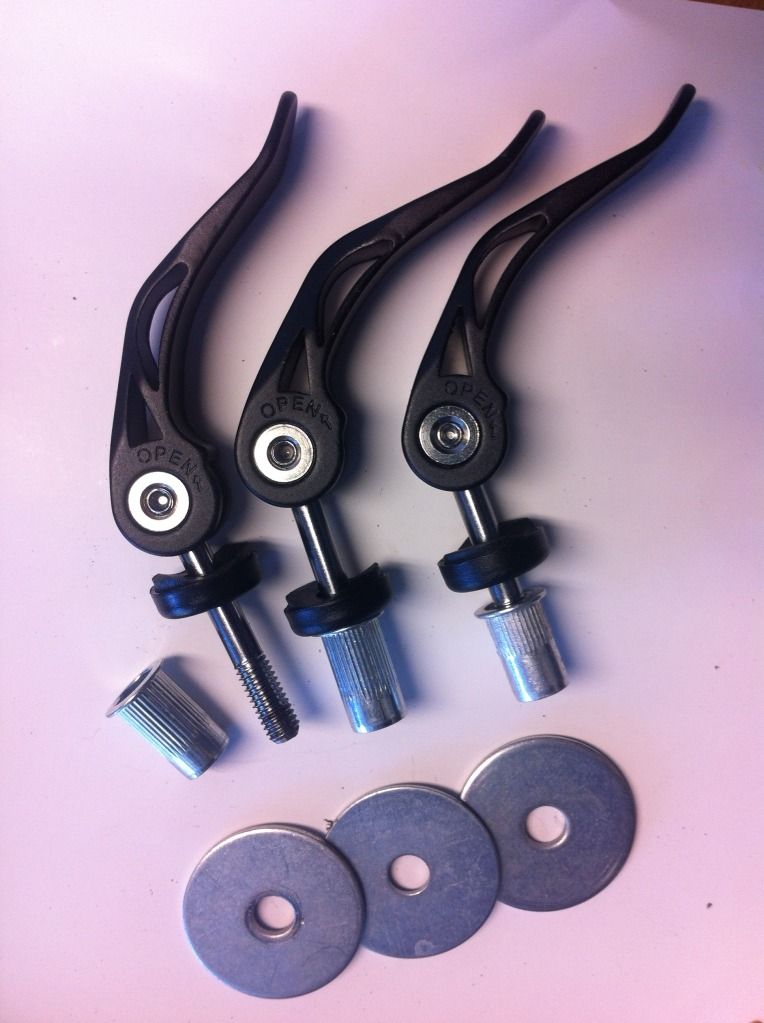
I just put together a set of quick release for the front hardtop. They work really well. It's just a quick release from a bike seatpost but I had to cut them to length and move to 6mm nut insert rivets. I'm considering putting together a full kit/set for sale so let me know if your interested.
-
Member
That looks very good Erik and I'm interested. Do you have a similar solution for attaching the windshield?
-
Looks to me like you got the idea for the hasps from an oldtime Coleman ice chest. Today is the first time for me to see the video and now I've decided to go both ways when I get to that stage in my build. You have some great ideas! Thanks
John
-
Senior Member
Originally Posted by
sheephearder
Looks to me like you got the idea for the hasps from an oldtime Coleman ice chest. Today is the first time for me to see the video and now I've decided to go both ways when I get to that stage in my build. You have some great ideas! Thanks
John
Hmmm. A sheephearder that goes both ways? Different, I'll give you that. ")
Yes that hasp has been around for a long time but I just got it from browsing the isle at the local Hardware shop. The functional term is "draw" as it's made to draw down and create tension on an enclosure that has a seal on it. Such as an ice chest, fridge, trunk etc. It's got a small amount of spring in the catch but it won't stay latched otherwise. It's got elongated holes for sliding so that you can drill in the middle, adjust tension, and then one hole is regular and you drill it last to hold it in place.
Tim, I don't just yet and here's why. The wing nuts work quite well and the weight of the windshield is not as bad so I'm not as concerned. Also the threads on the windshield studs are standard and just about every quick release comes in metric since they are all made in china and japan. So it makes it harder. I'll keep working on it though.
Last edited by ehansen007; 04-17-2012 at 05:54 PM.
-
My, my, my! What a dirty little mind you have. Ewe are bad. Ha Ha I'll have to be more politicaly correct in my wording.
-
Senior Member

Looks great Erik. Has anyone used 1/4 turn fasteners to hold their hard top on? I'm considering using the wing-nut top, spring loaded, dzus buttons.


 Thanks:
  Likes:


 Reply With Quote