FormaCars

Visit our community sponsor

Thanks Thanks:  1
Likes Likes:  4
Page 21 of 23 FirstFirst ... 111920212223 LastLast
Results 801 to 840 of 908

Thread: GTM roll cage modifications and race car build log

  1. #801
    Member kabacj's Avatar
    Join Date
    Mar 2011
    Location
    Long Island
    Posts
    1,103
    Post Thanks / Like
    Quote Originally Posted by longislandwrx View Post
    how did the paint job go? will I see it cruising around East Northport before it cools off?
    I gotta tell you. And you know me . I have no problem sinking tons of time in car. Bodywork takes FOREVER!!

    A few lessons learned.

    Lesson one. Painting a car that has been on the race track for 2 years is MUCH harder than painting your clean and un damaged body shell from factory five.

    WOW I did not realize how much that body had been abused. On the good side the fiberglass is over built and stands up to that type of punishment. On the bad side I had lots of scrapes and other damage from projectiles that really took a while to fix.

    Oh the fact that the car is covered in oil from its duty as a track weapon also makes things harder. Lots of cleaning before you even start working

    [URL=http://s1073.photobucket.com/user/kabacj/media/Factory%20Five%20GTM%20roll%20cage%20modifications/21BEBAC0-D561-412F-A5C2-1342BBA3E2BB_zpsouhmbfpf.jpg.html][/URL

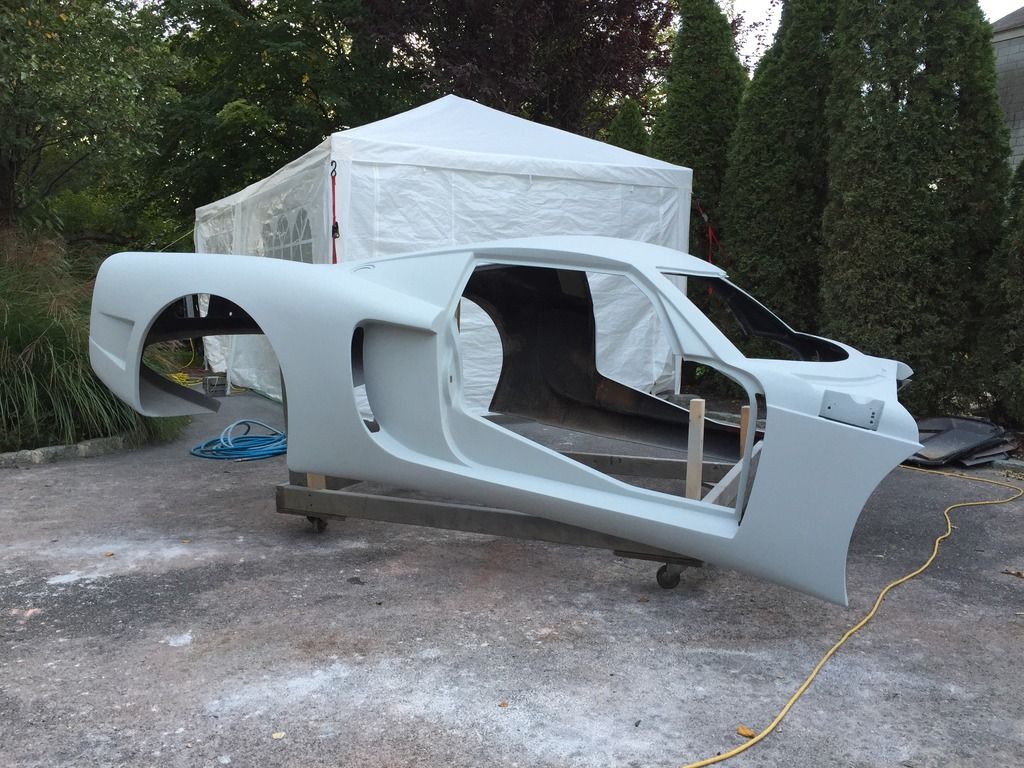
    The body goes on and off lots and lots of times.

    Here is a mid work view of the body back on.


    After the body work phase then its the block and prime, block and prime, block and prime. Boy I did lots of sanding.. A good body buck is essential. I actually made this one a bit higher so I could spray under the rockers more easily.


    Did I mention that bodywork takes a long time!

    But to answer your question, YES! Absolutely I will be driving around town in the next few weeks. That's going to be weird but I cant wait!
    XTF #2
    build start date June 19 2023

    GTM # 344
    Build Start December 2010
    First track day April 2013

  2. #802
    Senior Member
    Join Date
    Feb 2011
    Location
    Clarksville, MD
    Posts
    232
    Post Thanks / Like
    John,

    Nice work. Only those that have done it themselves can appreciate the block and prime cycle. I can't say I miss those days! Looking forward to seeing the final result.

    And nice wedding tent!

    -Michael

  3. #803
    Member kabacj's Avatar
    Join Date
    Mar 2011
    Location
    Long Island
    Posts
    1,103
    Post Thanks / Like
    Quote Originally Posted by RumRunner View Post
    John,

    Nice work. Only those that have done it themselves can appreciate the block and prime cycle. I can't say I miss those days! Looking forward to seeing the final result.

    And nice wedding tent!

    -Michael
    Hey Michael.

    Yeah I got the idea from you regarding the wedding tent spray booth.

    It worked very well.

    For 200 bucks on Amazon you get a 10x 20 tent. Sure it's not made for a lifetime of use, but it will last a week while you paint. Mine was up in high winds 20 mph and survived. They say it's not made for greater than 10 mph. I agree it's lightweight.

    I hung fluorescent lights along the side so I had reasonable light. I even did some painting at night.

    Finally I setup the tent with two 20 inch box fans blowing air in instead of blowing air out.

    The fans were filtered and aimed up toward the roof of the tent. The air blowing in didn't disturb spraying in the tent but also had the benefit of keeping the tent walls flexed out Air escaped from under the tent sides. Sorta down draft!

    This setup didn't work as well when winds were over 10mph. But in light wind it was great. Very little dust fell into the paint.
    XTF #2
    build start date June 19 2023

    GTM # 344
    Build Start December 2010
    First track day April 2013

  4. #804
    Member kabacj's Avatar
    Join Date
    Mar 2011
    Location
    Long Island
    Posts
    1,103
    Post Thanks / Like
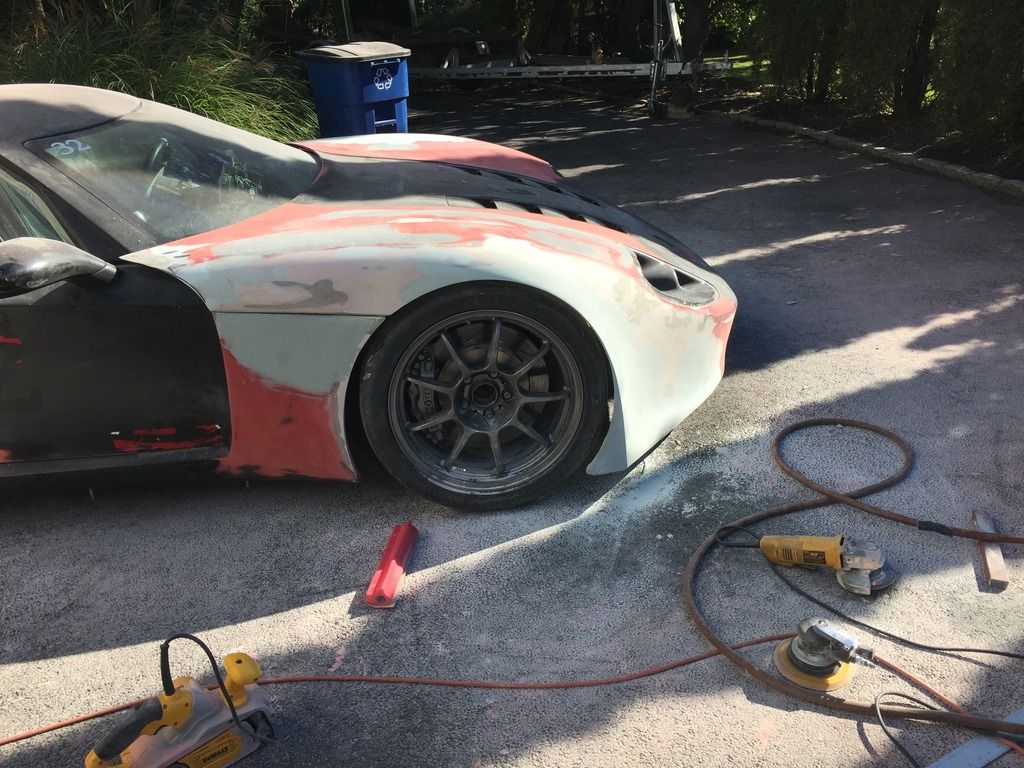
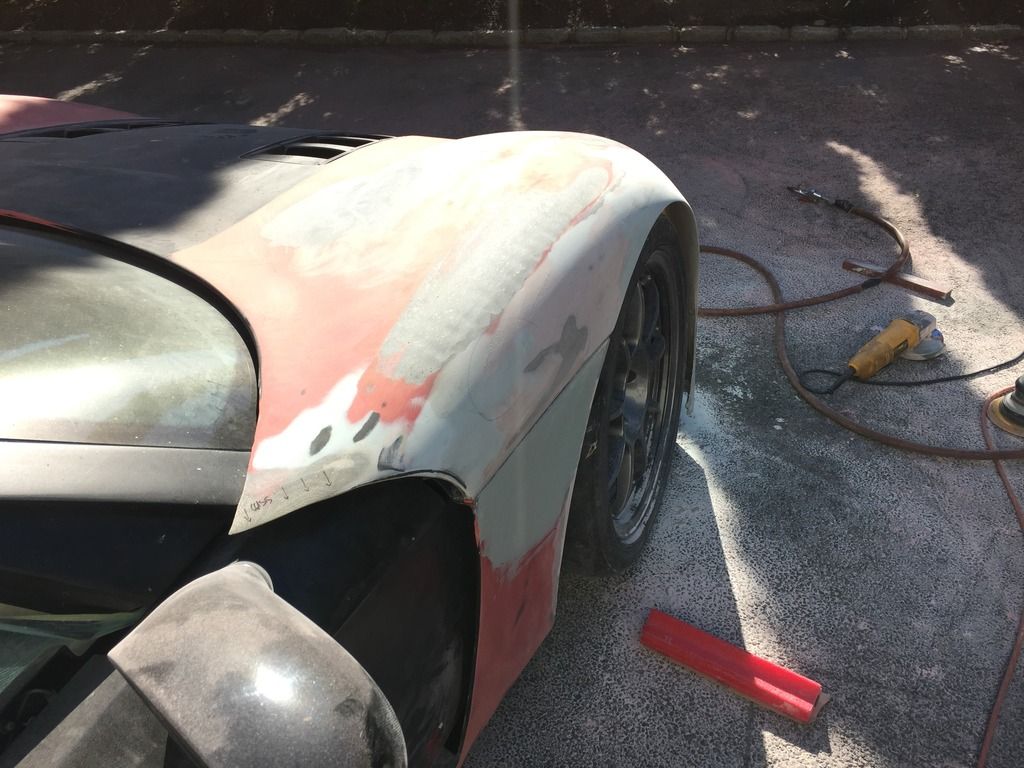
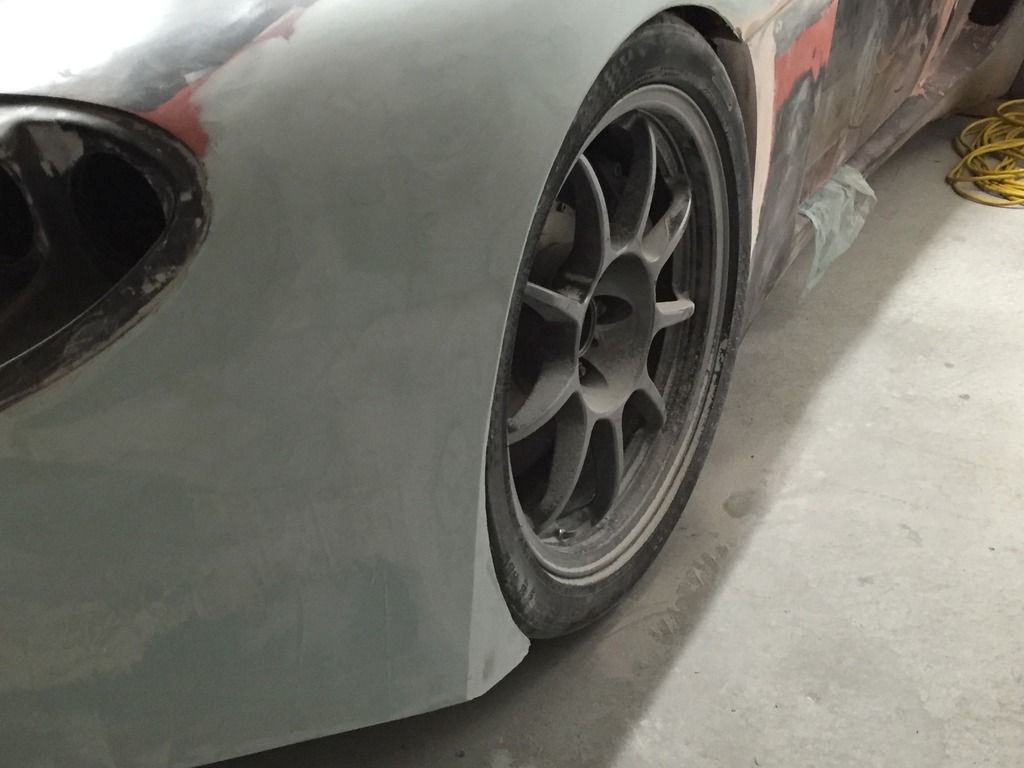
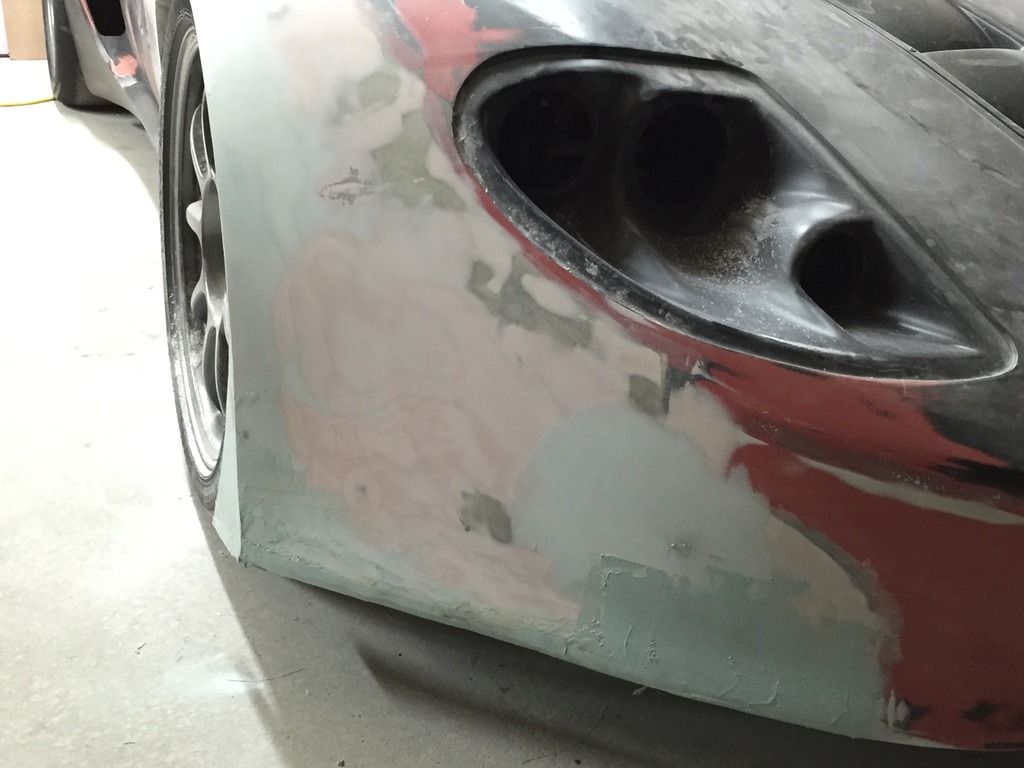
    One of the things I wanted to do before I painted the car was flare the front fenders over the 295 front tires.

    My goal was to improve the aero on the car over my hacked up wheel openings and hopefully make the wheel arches look like they came like that from factory five.

    This job turned out to be way more work than I planned. Matching the lines on the car and making everything symmetrical is not easy. Especially when you are building into thin air (no reference points like you would have if you were repairing a fender.

    On the good side I got lots of practice laying down body filler and sanding it off.

    My other goal as to keep the fenders the stock 1/8 to 1/4 inch finished thickness. Mostly fiberglass cloth with a thin layer of filler over top

    Strength is not an issue below 1/8 inch but rocks are surely going to spiderweb the paint above if you go any thinner.

    With slick tires the wheel wells take tons of punishment. Unless you design a double wall wheel well or don't mind ruined paint you need to keep the fenders at Rock proof thickness.

    Here is a picture of the work in progress. Note where I cut through the gel coat. Beware you are entering pinhole hell as soon as you do this.


    XTF #2
    build start date June 19 2023

    GTM # 344
    Build Start December 2010
    First track day April 2013

  5. #805
    Senior Member
    Join Date
    Feb 2011
    Location
    Clarksville, MD
    Posts
    232
    Post Thanks / Like
    Quote Originally Posted by kabacj View Post
    Strength is not an issue below 1/8 inch but rocks are surely going to spiderweb the paint above if you go any thinner.

    With slick tires the wheel wells take tons of punishment. Unless you design a double wall wheel well or don't mind ruined paint you need to keep the fenders at Rock proof thickness.
    John,

    To prevent the spiderwebs, I lined the inside of each wheel well with 1/4" dynaliner. It's closed cell foam so it doesn't hold moisture, provides enough cushioning to minimize any damage from rocks, inexpensive for what it protects, easy to apply, and so far has held up very well.

    -Michael
    Last edited by RumRunner; 10-29-2015 at 03:03 PM.

  6. #806
    Member kabacj's Avatar
    Join Date
    Mar 2011
    Location
    Long Island
    Posts
    1,103
    Post Thanks / Like
    Quote Originally Posted by RumRunner View Post
    John,

    To prevent the spiderwebs, I lined the inside of each wheel well with 1/4" dynamat. It's closed cell foam so it doesn't hold moisture, provides enough cushioning to minimize any damage from rocks, inexpensive for what it protects, easy to apply, and so far has held up very well.

    -Michael
    Very good idea Michael. After 2 years I did not have any issues with the stock hood, however I would love to make an ultra thin lightweight version for the track. Dynamat is a great way to protect thin fiberglass
    XTF #2
    build start date June 19 2023

    GTM # 344
    Build Start December 2010
    First track day April 2013

  7. #807
    Senior Member
    Join Date
    Feb 2011
    Location
    San Diego
    Posts
    1,961
    Post Thanks / Like
    The pin holes are nothing a good primer will not take care of.

    Looking at your pictures it looks really nice to have such tight wheel openings, but have you jacked up the car and tried to change a tire? Looks like it might become a chore once the suspension drops.
    www.myraceshop.com

    GTM solution kits
    Corvette and Race parts

  8. #808
    Senior Member mikespms's Avatar
    Join Date
    Apr 2011
    Location
    North Miami,FL
    Posts
    145
    Post Thanks / Like
    Hey John,
    Nice work, glass and body work is time consuming and tedious. For the pin holes l recommend duratec primer sealer, it is like gel coat easy to sand and will prevent sand marks and lifting. Fo the wheel wells a good heavy coat of spay on urathane truck bed liner will do the job and is a lot lighter than the dynamat.

  9. #809
    Member kabacj's Avatar
    Join Date
    Mar 2011
    Location
    Long Island
    Posts
    1,103
    Post Thanks / Like
    Quote Originally Posted by crash View Post
    The pin holes are nothing a good primer will not take care of.

    Looking at your pictures it looks really nice to have such tight wheel openings, but have you jacked up the car and tried to change a tire? Looks like it might become a chore once the suspension drops.
    Good point Crash but with the hood tilted up the front tires are far from the wheel arches. I usually jack from the front under the corner of the hood as my light weight jack is not low enough to fit under the car.

    No clearance issues. Maybe if I use the low profile jack behind the front tire with the hood closed it would be a problem. Ill check, but I'm not doing nascar style pit stops so popping the hood works.
    XTF #2
    build start date June 19 2023

    GTM # 344
    Build Start December 2010
    First track day April 2013

  10. #810
    Senior Member
    Join Date
    Feb 2011
    Location
    Clarksville, MD
    Posts
    232
    Post Thanks / Like
    Quote Originally Posted by mikespms View Post
    Hey John,
    Nice work, glass and body work is time consuming and tedious. For the pin holes l recommend duratec primer sealer, it is like gel coat easy to sand and will prevent sand marks and lifting. Fo the wheel wells a good heavy coat of spay on urathane truck bed liner will do the job and is a lot lighter than the dynamat.
    Whoops! I meant DynaLiner - not the sticky asphalty dynamat! The dynaliner is very lightweight.

    Thanks for the catch!

    -Michael

  11. #811
    Member kabacj's Avatar
    Join Date
    Mar 2011
    Location
    Long Island
    Posts
    1,103
    Post Thanks / Like
    Quote Originally Posted by mikespms View Post
    Hey John,
    Nice work, glass and body work is time consuming and tedious. For the pin holes l recommend duratec primer sealer, it is like gel coat easy to sand and will prevent sand marks and lifting. Fo the wheel wells a good heavy coat of spay on urathane truck bed liner will do the job and is a lot lighter than the dynamat.
    Yep Mike, I agree the Duratec is great stuff. It filled many holes, but some needed a follow up pass with glazing putty to fill.

    I'm trying the truck bed liner on my aluminum close off panels. Traditional 3m rubberized under coat was rock blasted right off.
    Last edited by kabacj; 10-29-2015 at 05:07 PM.
    XTF #2
    build start date June 19 2023

    GTM # 344
    Build Start December 2010
    First track day April 2013

  12. #812
    Senior Member
    Join Date
    Feb 2011
    Location
    Houston TX
    Posts
    374
    Post Thanks / Like
    Quote Originally Posted by kabacj View Post
    Yep Mike, I agree the Duratec is great stuff. It filled many holes, but some needed a follow up pass with glazing putty to fill.

    I'm trying the truck bed liner on my aluminum close off panels. Traditional 3m rubberized under coat was rock blasted right off.
    I used truck bed liner as well with good results so far.
    Cheers,
    Dave

    GTM # 294 Build Start Date 10/12/2009,
    2000 C5 Donor, LS-1 Twin Turbo, AC/Heat, G50-20.02 6 speed, Brandwood Cable shifter
    Build site. http://s679.photobucket.com/albums/vv153/dfraser/

  13. #813
    Member kabacj's Avatar
    Join Date
    Mar 2011
    Location
    Long Island
    Posts
    1,103
    Post Thanks / Like
    Quote Originally Posted by Fraser D View Post
    I used truck bed liner as well with good results so far.
    Good news Dave. I think truck be liner is the hot ticket.
    XTF #2
    build start date June 19 2023

    GTM # 344
    Build Start December 2010
    First track day April 2013

  14. #814
    Member kabacj's Avatar
    Join Date
    Mar 2011
    Location
    Long Island
    Posts
    1,103
    Post Thanks / Like
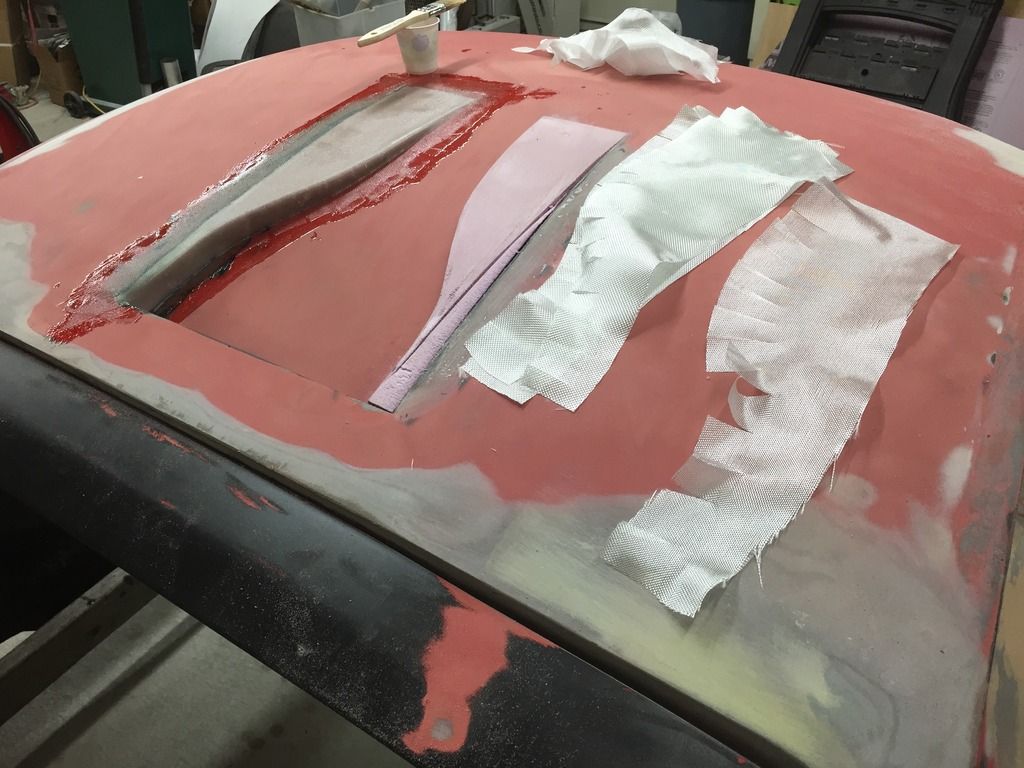
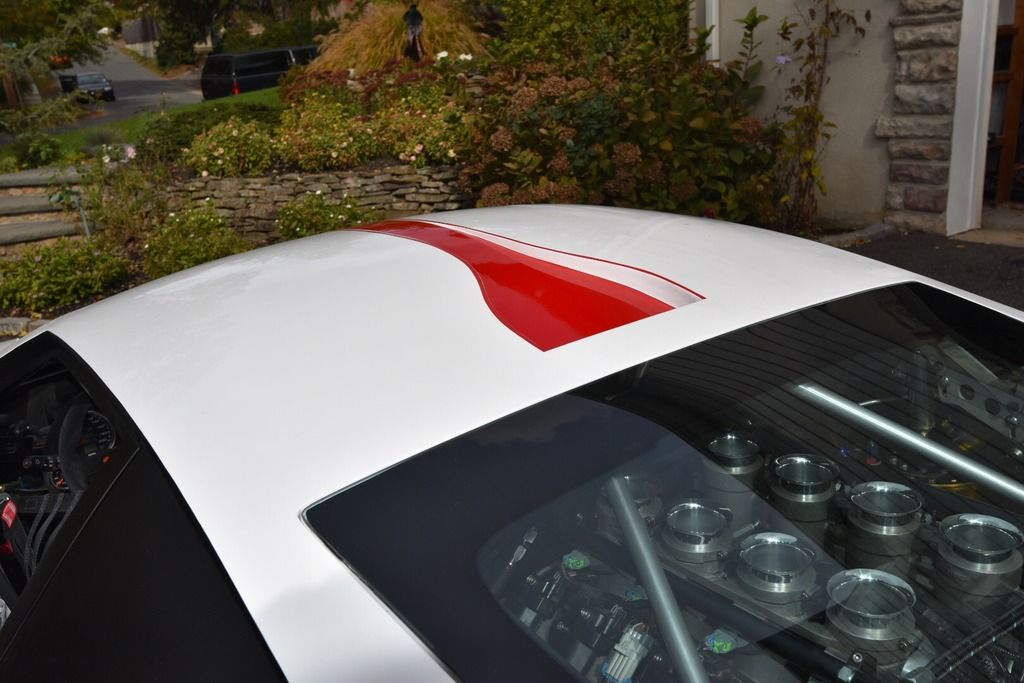
    Once the front was done I began prepping the roof and thinking about installing my modified roof scoop.

    As I'm sanding away the layers of hot rod black on top of a coat of epoxy primer I remember the research i did on NACA ducts.

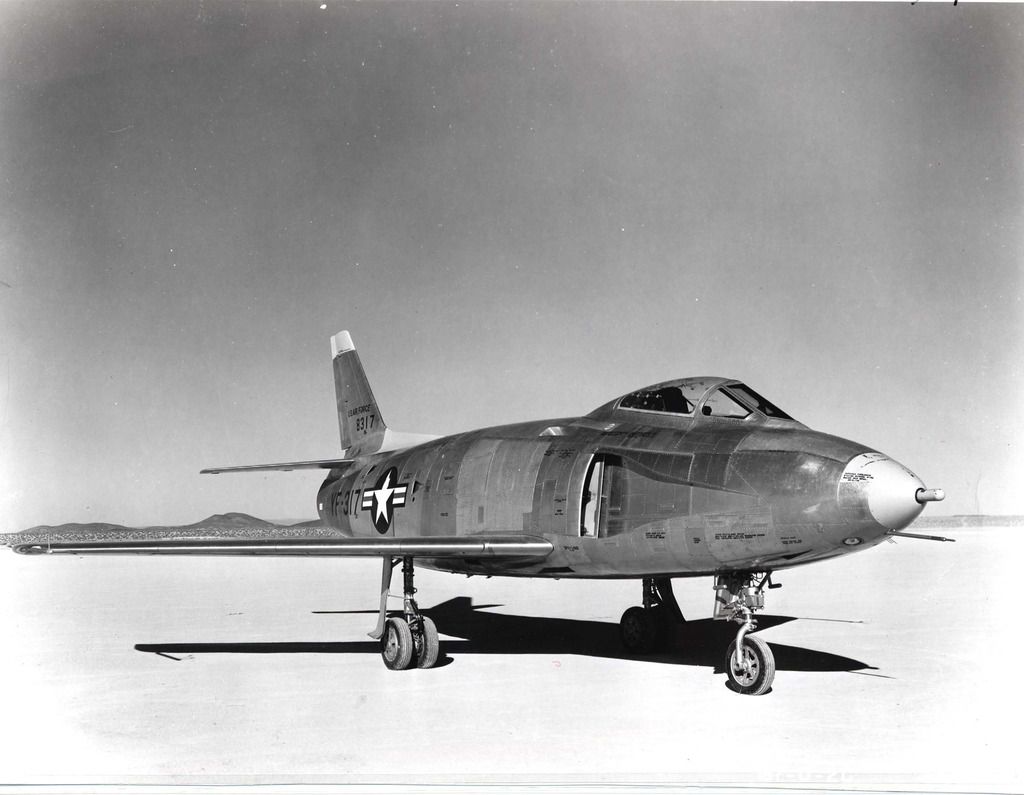
    Back in the late 40s the Air force was developing jets. The engines were not very powerful so the aircraft designs attempted to be as low drag as possible.

    One of the ideas they had was to submerge the intakes with the aircraft exterior instead of sticking a high drag scoop up into the airstream


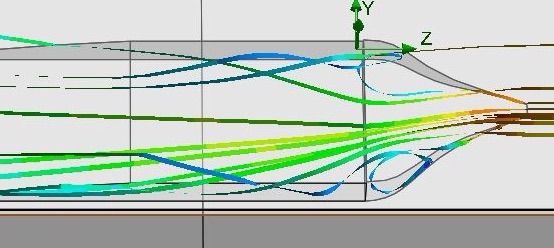
    Lots of information on the Internet on how they work. Seemed perfect for my application. Low drag and since I don't need positive pressure seems perfect.

    The design creates vortices that deflect air into the inlet.


    Since I was creating tons of dust on the roof I was able to see it work as I blasted air over the roof I could see the vortices form and the air dive down into the inlet.

    Cool!

    A little foam and fiberglass and I had a NACA duct on my roof.

    XTF #2
    build start date June 19 2023

    GTM # 344
    Build Start December 2010
    First track day April 2013

  15. #815
    Senior Member
    Join Date
    Oct 2015
    Posts
    147
    Post Thanks / Like
    That's pretty cool. Do you think that it will create more or less wind noise, cut in this fashion, compared to the standard roof scoop sold for the kit?

  16. #816
    Member kabacj's Avatar
    Join Date
    Mar 2011
    Location
    Long Island
    Posts
    1,103
    Post Thanks / Like
    Quote Originally Posted by Aceflo View Post
    That's pretty cool. Do you think that it will create more or less wind noise, cut in this fashion, compared to the standard roof scoop sold for the kit?
    Hi Aceflo

    Which intake will make more noise? Good question.

    I think I depends a lot on how fast you are going and how you mount the intake.

    Noise comes from turbulence. To the extent that you are creating turbulent air you will hear it.

    The NACA duct is all about creating vortices. How loud are they? No idea.

    the roof scoop offer very little turbulence if it is only cosmetic. (No flow through) If you plan to allow air into the engine compartment how you do that will determine how much wind noise is generated.

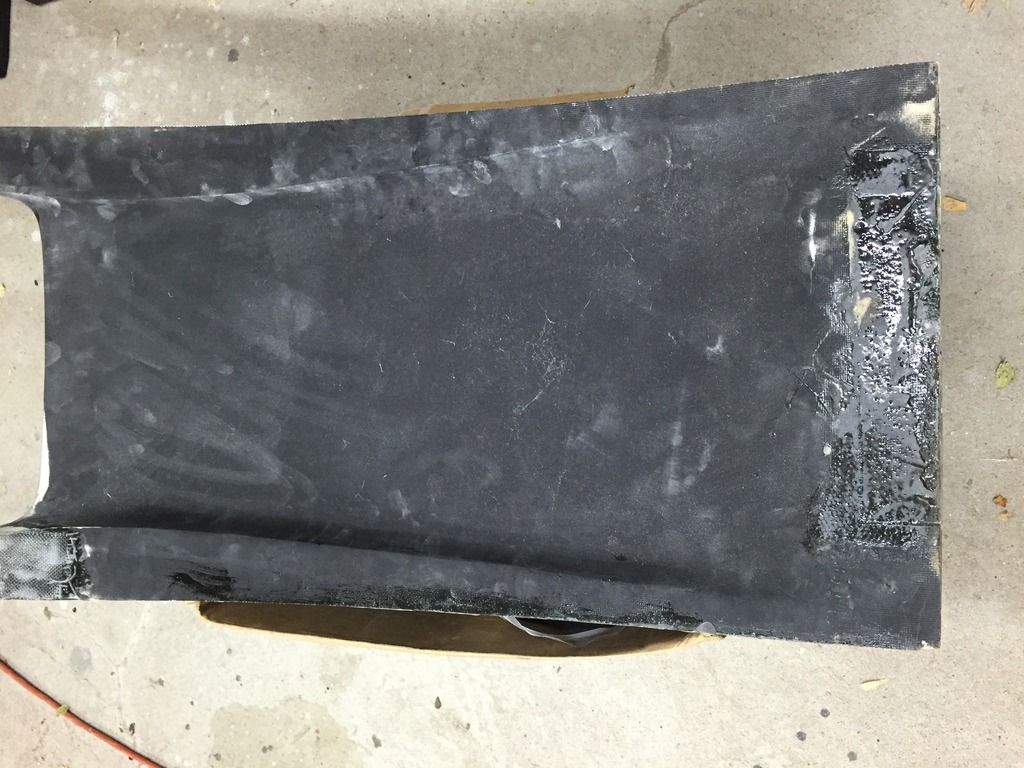
    My original plan was to first create a smooth duct into the engine compartment you can see here.


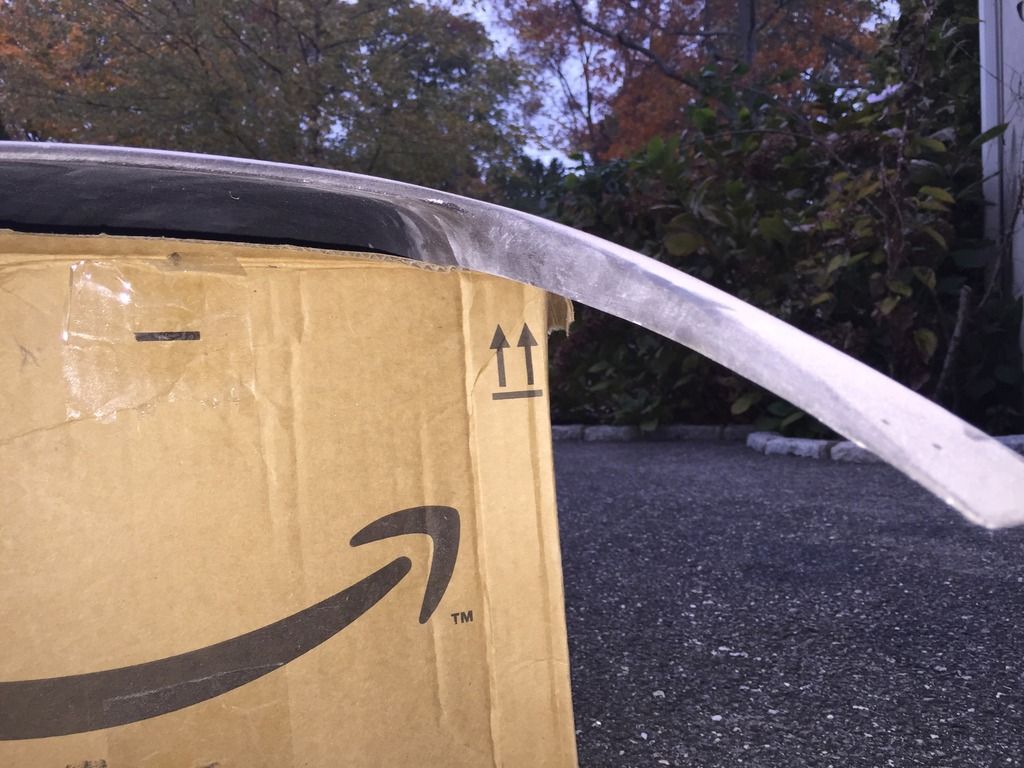
    Then install a modified version of the stock duct. My modification included smoothing out the air path through the stock duct by building up the air path with foam and covering with fiberglass.

    Not sure which would produce more wind noise. I think this is the kind of thing you would need to test.

    All that said there are many many things you can do to your GTM far more easily like sealing the passenger compartment that will quiet your GTM down.

    Production cars are so tight they install vents in the car so you can close the doors else the airlock would bounce the door open as well as make your ears pop when you slam the door.

    Those vents are specially designed to allow air out but not sound in.. yes I did lots of research on this too
    XTF #2
    build start date June 19 2023

    GTM # 344
    Build Start December 2010
    First track day April 2013

  17. #817
    Member kabacj's Avatar
    Join Date
    Mar 2011
    Location
    Long Island
    Posts
    1,103
    Post Thanks / Like
    In so after all the research on drag and airflow I ended up using the NACA duct as both a drag reduction measure and design element.

    I love when the same thing serves multiple purposes.


    John
    XTF #2
    build start date June 19 2023

    GTM # 344
    Build Start December 2010
    First track day April 2013

  18. #818
    Senior Member
    Join Date
    Feb 2011
    Location
    Clarksville, MD
    Posts
    232
    Post Thanks / Like
    John,

    That shot looks absolutely fantastic! If the rest of your car looks half as good as that, it's a stunner! The red stripe along the top of the duct is a great design element. Well done.

    -Michael

  19. #819
    Senior Member
    Join Date
    Oct 2015
    Posts
    147
    Post Thanks / Like
    Thanks John. I'm super interested in what you discover in regards to the noise that it produces.

    I definitely will be using a roof scoop of some variation, and I really like your idea here. It looks great.

  20. #820
    Senior Member
    Join Date
    Feb 2011
    Location
    Houston TX
    Posts
    374
    Post Thanks / Like
    Very nice John!
    So she is white now?
    Cheers,
    Dave

    GTM # 294 Build Start Date 10/12/2009,
    2000 C5 Donor, LS-1 Twin Turbo, AC/Heat, G50-20.02 6 speed, Brandwood Cable shifter
    Build site. http://s679.photobucket.com/albums/vv153/dfraser/

  21. #821
    Member kabacj's Avatar
    Join Date
    Mar 2011
    Location
    Long Island
    Posts
    1,103
    Post Thanks / Like
    Quote Originally Posted by Fraser D View Post
    Very nice John!
    So she is white now?
    Yes sir. My street vehicles have only ever been black. Track vehicles have been many colors, so since the GTM is mostly track I figured I would make an exception to the black rule.


    Quote Originally Posted by Aceflo View Post
    Thanks John. I'm super interested in what you discover in regards to the noise that it produces.

    I definitely will be using a roof scoop of some variation, and I really like your idea here. It looks great.

    Hi Aceflo. Here are some pictures of the mods I did to the stock scoop.

    from the bottom you can see I created a smooth (but not finished yet) air path that matched the cut out on the roof.


    and from the front view I smoothed the transitions to that air path.


    My goal was lower drag, but it turns out that turbulence causes drag but also sound. So we are looking to eliminate the same thing.


    Quote Originally Posted by RumRunner View Post
    John,

    That shot looks absolutely fantastic! If the rest of your car looks half as good as that, it's a stunner! The red stripe along the top of the duct is a great design element. Well done.

    -Michael
    Thanks Michael. I was thinking about the livery while I was sanding for several days and the intake and graphics sorta came together in an idea for a livery.
    XTF #2
    build start date June 19 2023

    GTM # 344
    Build Start December 2010
    First track day April 2013

  22. #822
    Member kabacj's Avatar
    Join Date
    Mar 2011
    Location
    Long Island
    Posts
    1,103
    Post Thanks / Like
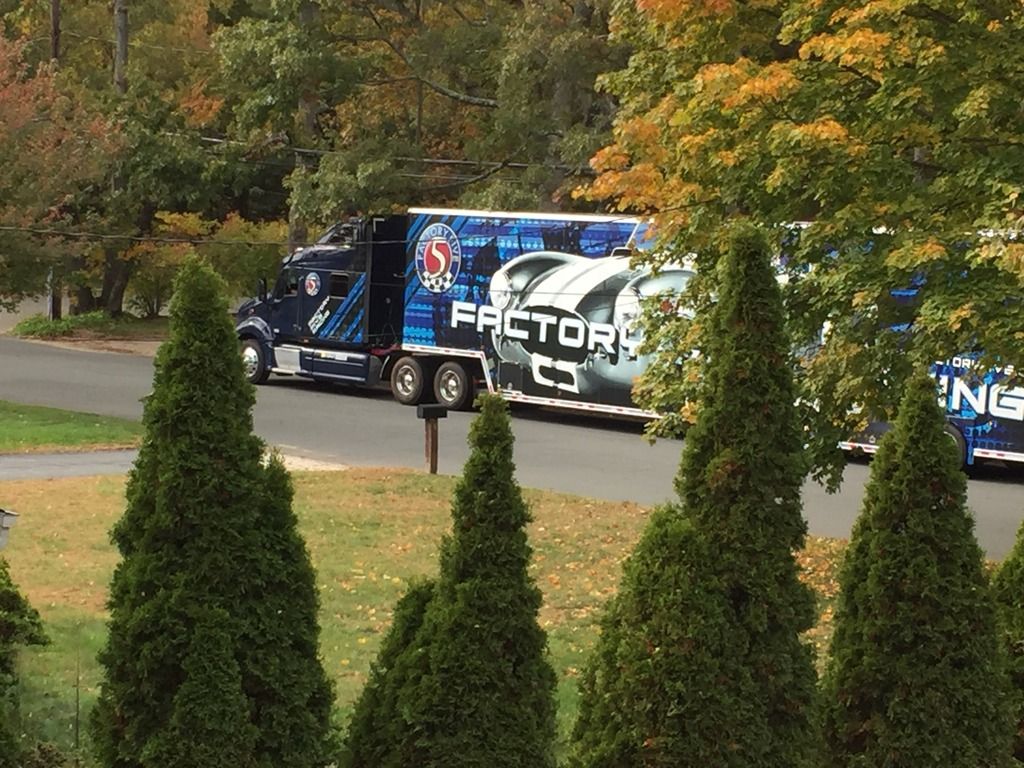
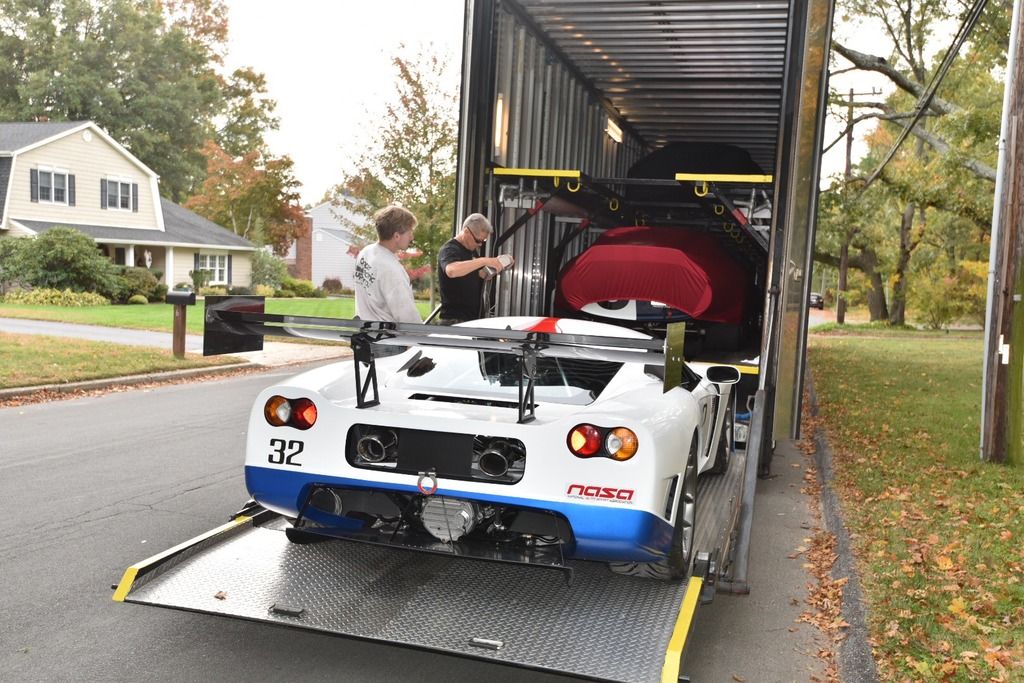
    After burning in the midnight oil for two weeks. Guess what shows up! The mother ship.


    It was great to see Scott again. Scott is the expert driver of the Factory five transporter.

    And away she goes off to SEMA.

    XTF #2
    build start date June 19 2023

    GTM # 344
    Build Start December 2010
    First track day April 2013

  23. #823
    Member kabacj's Avatar
    Join Date
    Mar 2011
    Location
    Long Island
    Posts
    1,103
    Post Thanks / Like
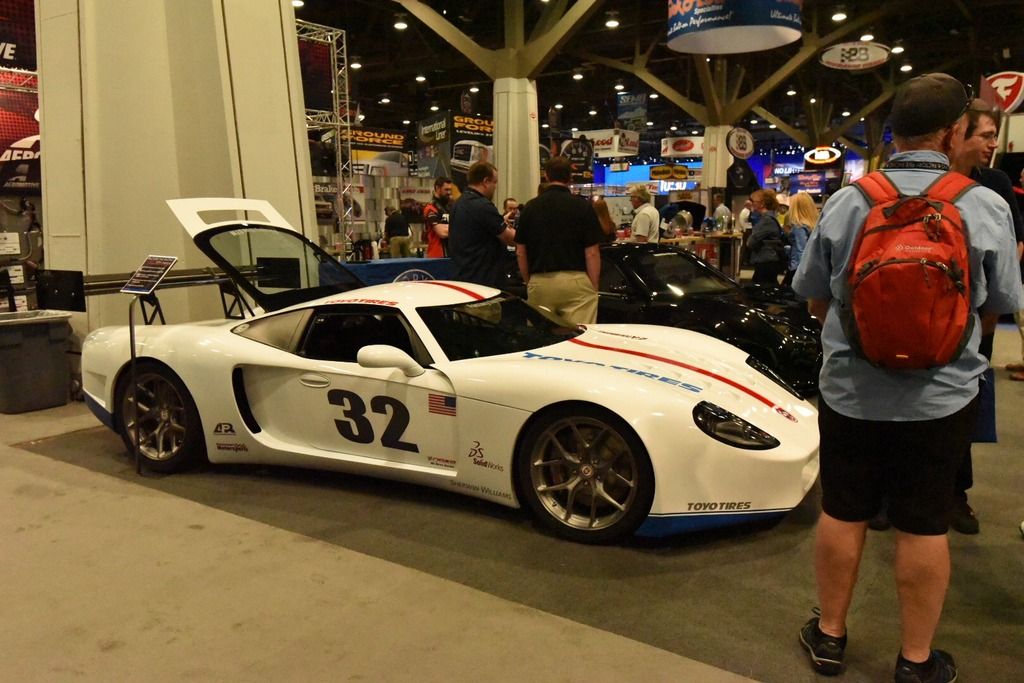
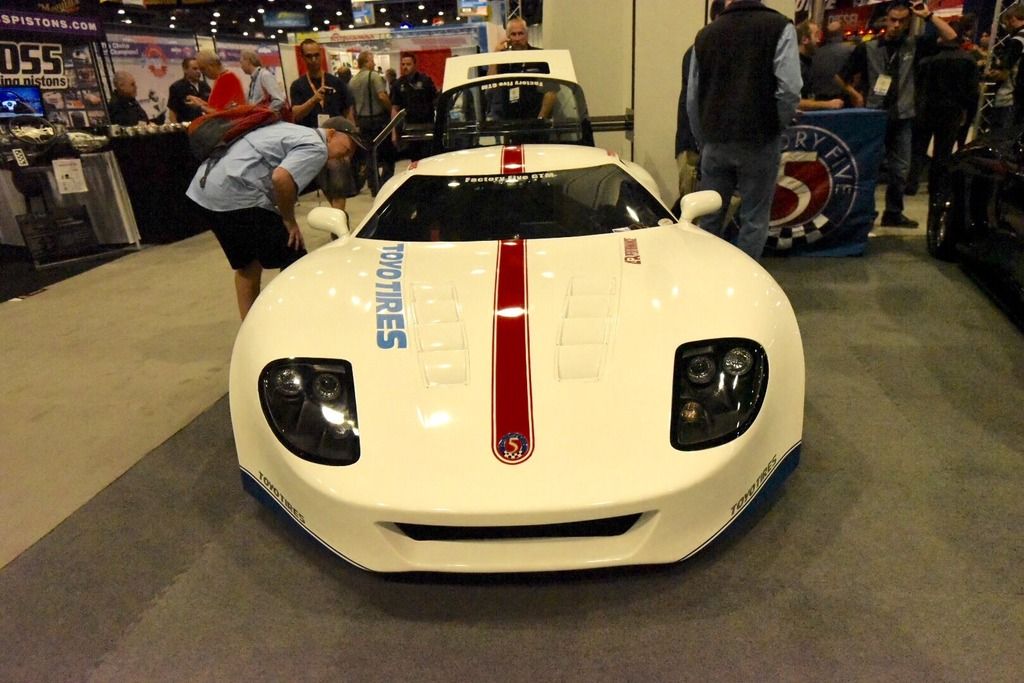
    Here we are at the show.


    John
    XTF #2
    build start date June 19 2023

    GTM # 344
    Build Start December 2010
    First track day April 2013

  24. #824
    Senior Member
    Join Date
    Feb 2011
    Location
    Houston TX
    Posts
    374
    Post Thanks / Like
    Congratulations John!!!
    Cheers,
    Dave

    GTM # 294 Build Start Date 10/12/2009,
    2000 C5 Donor, LS-1 Twin Turbo, AC/Heat, G50-20.02 6 speed, Brandwood Cable shifter
    Build site. http://s679.photobucket.com/albums/vv153/dfraser/

  25. #825
    Member claybags's Avatar
    Join Date
    Feb 2011
    Location
    rio rico,az
    Posts
    93
    Post Thanks / Like
    John, that is totally outstanding!!
    Jeff
    GTM 422, LS6, cam, heads, Mendeola trans

  26. #826
    Senior Member
    Join Date
    Feb 2011
    Location
    San Diego
    Posts
    1,961
    Post Thanks / Like
    Kinda surprised that FFR put your car in its booth after the significant nose change. They always told us that they wanted the body to stay as close to what they offered out of the mold as possible. It looks good, I'm just a little surprised. Maybe FFR will finally embrace the significant changes I have made? Yeah, probably not.

    Enjoy the show. Wish I could have made it out there this year.
    www.myraceshop.com

    GTM solution kits
    Corvette and Race parts

  27. #827
    Member kabacj's Avatar
    Join Date
    Mar 2011
    Location
    Long Island
    Posts
    1,103
    Post Thanks / Like
    Quote Originally Posted by crash View Post
    Kinda surprised that FFR put your car in its booth after the significant nose change. They always told us that they wanted the body to stay as close to what they offered out of the mold as possible. It looks good, I'm just a little surprised. Maybe FFR will finally embrace the significant changes I have made? Yeah, probably not.

    Enjoy the show. Wish I could have made it out there this year.
    Yeah only GTM people notice. It's a GTM race car after all so I guess that allows some leeway for modifications
    XTF #2
    build start date June 19 2023

    GTM # 344
    Build Start December 2010
    First track day April 2013

  28. #828
    Senior Member
    Join Date
    Oct 2015
    Posts
    147
    Post Thanks / Like
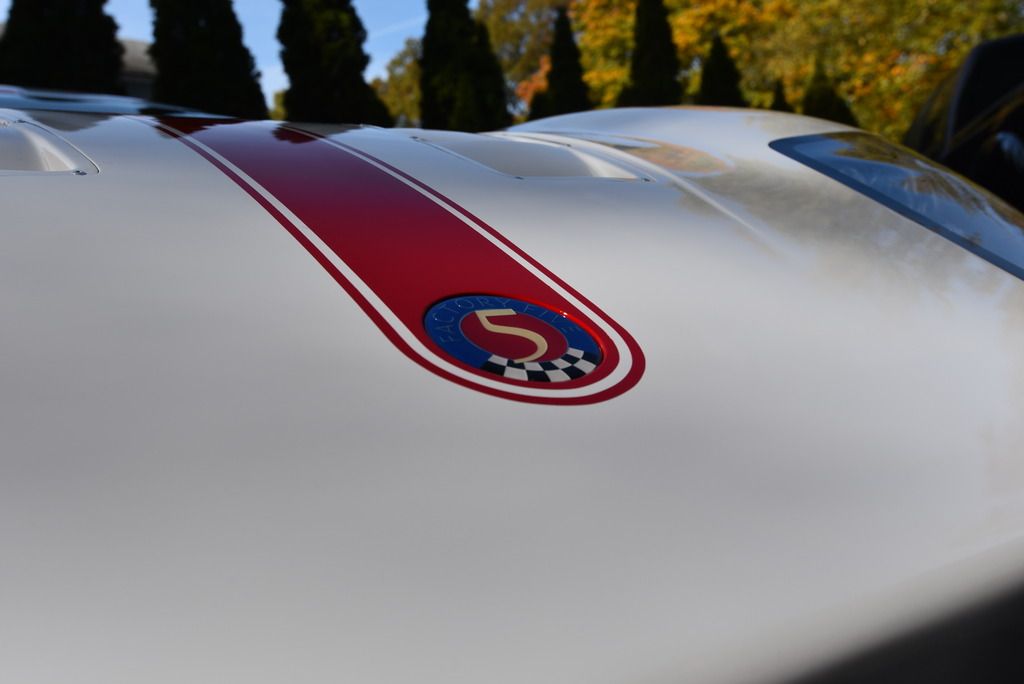
    I like what you did with the Factory Five Badge and the stripe. Pretty cool looking.

  29. #829
    Senior Member
    Join Date
    Feb 2011
    Location
    Clarksville, MD
    Posts
    232
    Post Thanks / Like
    John,

    Simply stunning! Congratulations!

    --Michael

  30. #830
    Member kabacj's Avatar
    Join Date
    Mar 2011
    Location
    Long Island
    Posts
    1,103
    Post Thanks / Like
    Quote Originally Posted by Aceflo View Post
    I like what you did with the Factory Five Badge and the stripe. Pretty cool looking.
    Thanks man.

    Here is a close up.

    XTF #2
    build start date June 19 2023

    GTM # 344
    Build Start December 2010
    First track day April 2013

  31. #831
    Member kabacj's Avatar
    Join Date
    Mar 2011
    Location
    Long Island
    Posts
    1,103
    Post Thanks / Like
    Thanks Michael

    I'm happy with how it turned out
    XTF #2
    build start date June 19 2023

    GTM # 344
    Build Start December 2010
    First track day April 2013

  32. #832
    Senior Member Presto51's Avatar
    Join Date
    Feb 2011
    Location
    Catonsville, Maryland
    Posts
    578
    Post Thanks / Like
    John now that looks fantastic. You are proving that you are a component car renaissance man\GTM Whisper
    "May you be in heaven a full half hour before the Devil knows you're dead"

  33. #833
    Member kabacj's Avatar
    Join Date
    Mar 2011
    Location
    Long Island
    Posts
    1,103
    Post Thanks / Like
    Quote Originally Posted by Presto51 View Post
    John now that looks fantastic. You are proving that you are a component car renaissance man\GTM Whisper
    Haha

    So in with the emblem I wanted it to fit tightly and flush to the surrounding body.

    It's impossible for Favtory Five to mold the impression for the emblem that shape as the edges would not have any draft angle to release from the mold.

    So to get the sharp 90 degree edges I wanted I first filled the outside of the impression with fiber reenforced filler.

    Then I cut a wooden puck slightly larger then the emblem.

    I covered the puck with 80 grit paper and mounted the puck on a hole saw mandrel.

    Then proceeded to cut a nice square edged impression for the emblem.

    Worked very well.
    XTF #2
    build start date June 19 2023

    GTM # 344
    Build Start December 2010
    First track day April 2013

  34. #834
    Senior Member
    Join Date
    Oct 2015
    Posts
    147
    Post Thanks / Like
    So John .... where did you get the idea to do the emblem/stripe?

    Out of all the details about the car, the emblem work really differentiates between good and great work. It's the fine details that count, and some ideas that I have seen from your build really surprise me. I would find myself hard pressed to think .... "hey, that emblem doesn't quite look right. Let's change how it sits on the car, and then accent it with a stripe to top it off".

    So do you wake up in the middle of the night, from a dead sleep, and say "Hey! Let's cut the nose off the car and reshape my own!"?

  35. #835
    Member kabacj's Avatar
    Join Date
    Mar 2011
    Location
    Long Island
    Posts
    1,103
    Post Thanks / Like
    Quote Originally Posted by Aceflo View Post
    So John .... where did you get the idea to do the emblem"hey, that emblem doesn't quite look right. Let's change how it sits on the car, and then accent it with a stripe to top it off".
    Thank you sir.

    The GTM body was made to be mass produced. I Just change it to how I think you would make it if you only needed to make one.

    While I was sanding for hours the design just came to me. I like it, People seem to like it. I'm happy with that


    john
    XTF #2
    build start date June 19 2023

    GTM # 344
    Build Start December 2010
    First track day April 2013

  36. #836
    LCD Gauges's Avatar
    Join Date
    Apr 2011
    Location
    Toronto, Ontario
    Posts
    1,545
    Post Thanks / Like
    Blog Entries
    3
    Insane conversion from the last time I checked in! The paint theme looks great!
    Custom LCD Gauges , Data Loggers, Control Touch Screens
    www.LCDdash.com \\ 647-522-9953 \\ Voice & Text
    Proud new owner of GTM Gen 1., #105 - 08/27/11
    LQ9 Powered, G96.00 6 speed transaxle

  37. #837
    Senior Member mikespms's Avatar
    Join Date
    Apr 2011
    Location
    North Miami,FL
    Posts
    145
    Post Thanks / Like
    Quote Originally Posted by kabacj View Post
    Haha

    So in with the emblem I wanted it to fit tightly and flush to the surrounding body.

    It's impossible for Favtory Five to mold the impression for the emblem that shape as the edges would not have any draft angle to release from the mold.

    So to get the sharp 90 degree edges I wanted I first filled the outside of the impression with fiber reenforced filler.

    Then I cut a wooden puck slightly larger then the emblem.

    I covered the puck with 80 grit paper and mounted the puck on a hole saw mandrel.

    Then proceeded to cut a nice square edged impression for the emblem.

    Worked very well.
    Hey John,
    Congratulations! That's what I call kicking ***,knocking out the bodywork and paint in short order with great results.
    I used the same technique to flush mount my gas caps.
    Now for some action shots and updates on your mechanical upgrades and trans,Again well done!

  38. #838
    Senior Member The Stig's Avatar
    Join Date
    Feb 2011
    Location
    Charlotte, NC
    Posts
    2,004
    Post Thanks / Like
    Quote Originally Posted by kabacj View Post
    In so after all the research on drag and airflow I ended up using the NACA duct as both a drag reduction measure and design element.

    I love when the same thing serves multiple purposes.


    John
    John, That is an awesome picture. I love the ITB intakes. (Hillborn?) I know that you've set this up for race only, but could something like that work well for street? I know that it isn't necessary for street applications, but it just completely "makes" the look of the car from the rear.

    Great job with the body. The whole car looks great. Congrats!

    Mike
    The Stig

    Some say, that I only know two facts about ducks, (both being wrong); and that if I could be bothered, I could solve the "da Vinci Code" in 47 seconds...
    All I know is that I'm called "The Stig".
    GTM #0081

  39. #839
    Junior Member
    Join Date
    May 2015
    Posts
    3
    Post Thanks / Like
    Great work! I love the way the stripe ties into the scoop.

  40. #840
    fasterer and furiouser longislandwrx's Avatar
    Join Date
    Aug 2012
    Location
    Long Island
    Posts
    2,540
    Post Thanks / Like
    Blog Entries
    6
    I cant believe the transporter and probably the 818c was 2 minutes away. I wish I had known! but I'm guessing you had to keep it under wraps.

    Congrats on a beautiful job well done. I imagine few would suspect that that was a driveway paint job!
    A well stocked beverage fridge is the key to any successful project.

Page 21 of 23 FirstFirst ... 111920212223 LastLast

Tags for this Thread

Posting Permissions

  • You may not post new threads
  • You may not post replies
  • You may not post attachments
  • You may not edit your posts
  •  

Breeze

Visit our community sponsor