BluePrint Engines

Visit our community sponsor

Thanks Thanks:  0
Likes Likes:  0
Page 2 of 4 FirstFirst 1234 LastLast
Results 41 to 80 of 134

Thread: Chris' Bodywork Thread - Mk3.1

  1. #41
    Out Drivin' Gumball's Avatar
    Join Date
    Feb 2011
    Location
    Blackberry Township, IL
    Posts
    2,653
    Post Thanks / Like
    I made a reference above to the tubes I used for securing the side curtain ferrules in the doors. The original cars actually had the ferrules set into tubes that were tack welded to the door frame for added support. On an FFR, the old-style soft top used the original style side curtains, which are an aluminum frame with a sliding plexiglass window. I really like the old-school look of those, but one of the issues with the ferrules and the shape of the FFR door is that the ferrules aren't long enough to extend all the way through the outer and inner skins - which would mean they would potentially drain water down into the door (which in my case will be filled with low expansion foam - potentially causing mold and rot issues). So, in keeping with my other attempts to make the car look a bit more original, I came up with a way to add the drain/support tubes to my car. The tubes are 1/2" i.d. - 5/8" o.d. tubing. The outside skin holes are 1/2" and the ones in the inner skins are 5/8", meaning that when the drain/support tubes are inserted in from the bottom (inside the cockpit), they can't come up through the outer holes. The ferrules then slip down inside the drain/support tubes. The plan is to install the drain/support tubes before foaming the inside of the doors so that the foam holds them in place - I'll also use some filler or caulk of some sort to smooth and fill the gap between the tube and the inner door skin. Then, once paint is done, I can insert the chrome ferrules from the outside and secure them in the tubes using epoxy, JB Weld, or (if I want them to remain somewhat removeable) seam sealer. These tubes also give me someplace to mount the leather door pull strap that hangs from the door release lever to the middle tube.

    Here are a few pics of this body mod:


    Later,
    Chris

    "There are no more monsters to fear, and so, we have to build our own."
    Mk3.1 #7074

  2. #42
    Out Drivin' Gumball's Avatar
    Join Date
    Feb 2011
    Location
    Blackberry Township, IL
    Posts
    2,653
    Post Thanks / Like
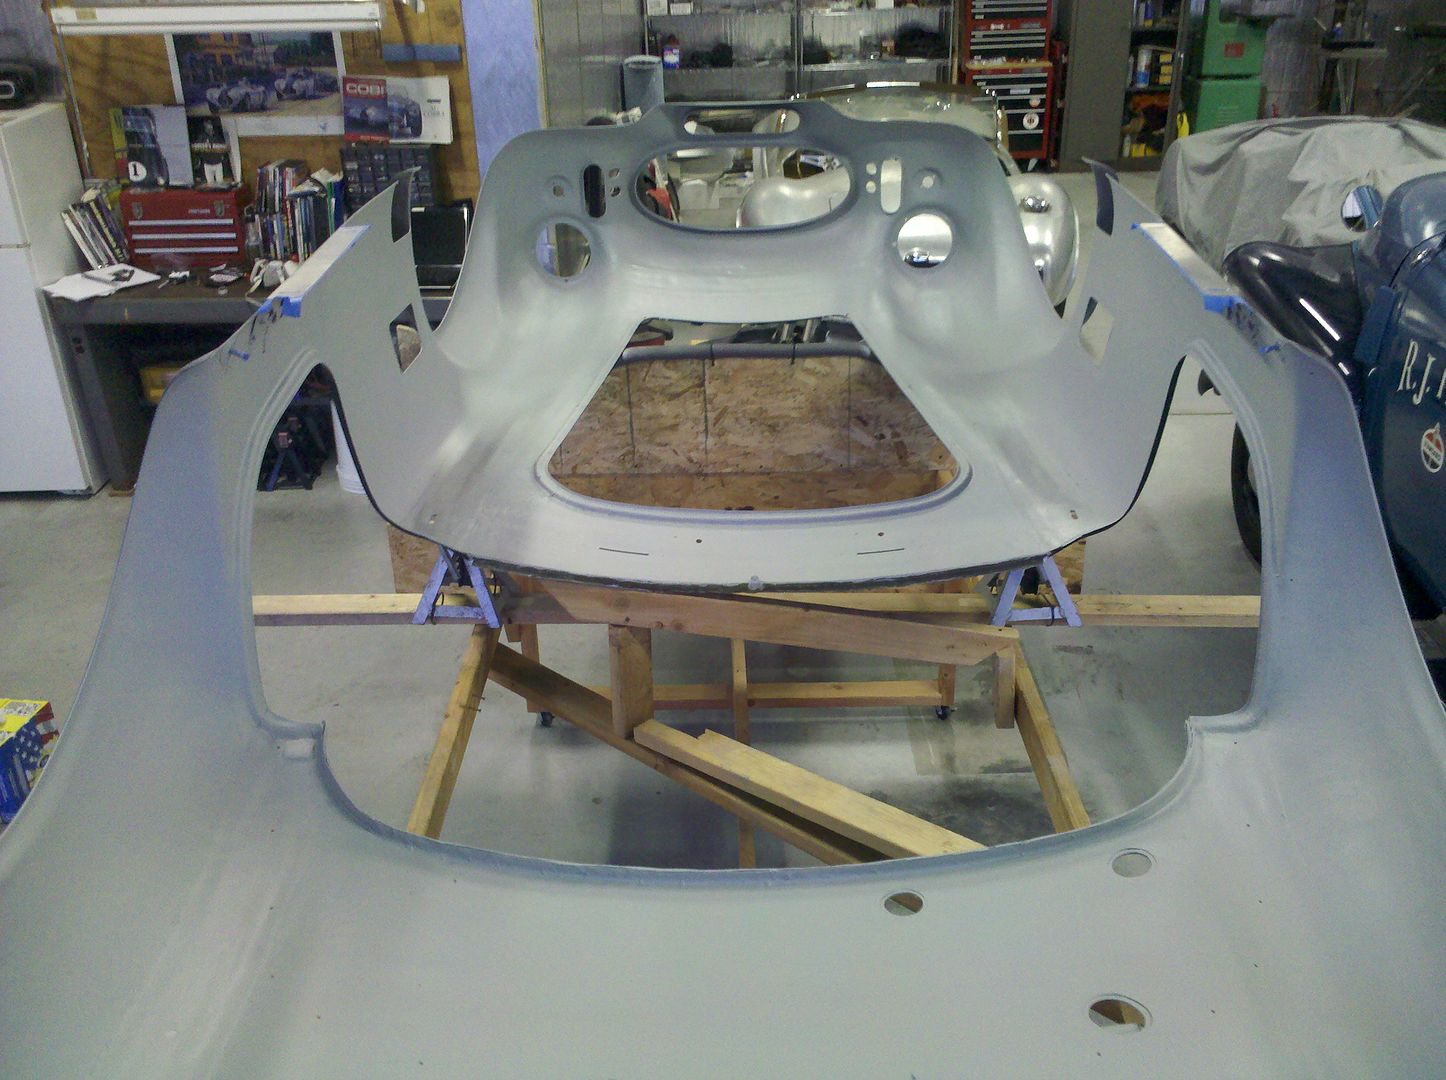
    After final fitment of the body over the last few days, it finally went back on the inverted buck for finishing of the inside. So far, my plan has been to roll the wheel well lips, then smooth the first few inches up from the bottom of the body around the perimeter, the insides of the flares, and the area inside the radiator opening. I was also thinking of doing some light cosmetic work around the spots that are visible when the hood, doors, and trunk lid are opened before giving the entire inside a coating of silver/grey paint. The final step underneath would be some padding bonded above the tires to protect from rock damage to the paint from the inside-out (no paint or filler under the padding - just leaving that in raw fiberglass so the adhesive has something to bite into).

    Now that I'm about at the point where I need to start applying filler, I'm wondering what everyone thinks about just using a few coats of slick sand or feather fill for the inside work? Would either of those be sufficient to just cover some of the "grain" of the fiberglass and give a reasonable smooth-to-the-touch feeling and appearance?
    Later,
    Chris

    "There are no more monsters to fear, and so, we have to build our own."
    Mk3.1 #7074

  3. #43
    Out Drivin' Gumball's Avatar
    Join Date
    Feb 2011
    Location
    Blackberry Township, IL
    Posts
    2,653
    Post Thanks / Like
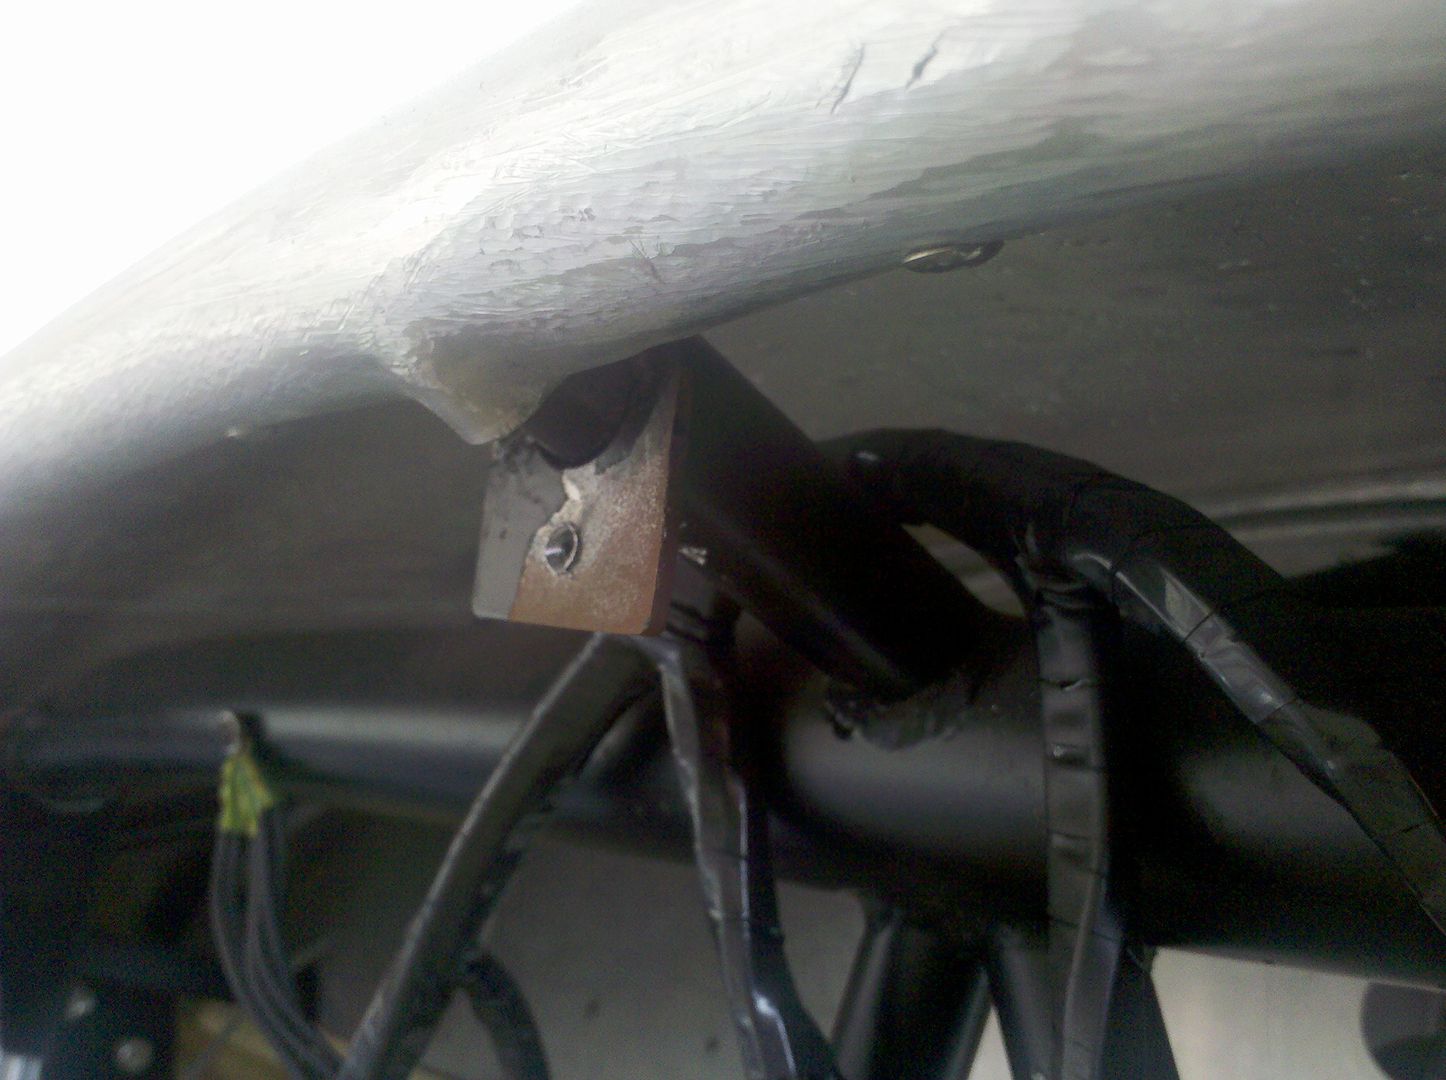
    After looking at some others' finished louvers (Competition Cobra, SCFFR, etc...), as well as pics I have of original cars, I decided a change is in order. I pulled off the brackets that were held in place by HSRF (took some doing and pretty much ruined the aluminum angles) so that I could do a bit more work in that area. I'm going to grind the lip completely off and round-over the thin edge of the body to better replicate the look of the original aluminum skin.

    I'll also make new brackets that are a bit smaller, slotted for adjustment where the louvers bolt on, and use the structural adhesive that my painter recommended (based on Competition Cobra's comments about using the right stuff for the job).

    Pics to come!
    Later,
    Chris

    "There are no more monsters to fear, and so, we have to build our own."
    Mk3.1 #7074

  4. #44
    Out Drivin' Gumball's Avatar
    Join Date
    Feb 2011
    Location
    Blackberry Township, IL
    Posts
    2,653
    Post Thanks / Like
    Yeah - first day of Rage (gold that is)!!!

    Today's project was to roll the wheel well lips. I started with a 90* 3/8" lip with nothing behind it and ended up with this:

    Rage as applied


    Sanding, and sanding, and sanding... (with apologies to Scott for stealing his line)


    Nearly finished - just needs a bit more Rage to fill a few voids and low spots.


    The first gob of Rage that I mixed up was way too hot and kicked in about 2 minutes. I could feel it pulling on the spreader almost right away, so I just scraped it off and tossed that batch. I then experimented with mixing, starting really light with the hardener and adding just a bit more until it was a nice uniform pale green. That gave me 5 minutes or so of working time... more than enough to do each entire wheel well with one batch.

    For sanding, I started by just knocking down the flashing and large boogers (no other way to describe them, really) with my angle grinder (40 grit - 3" disc) and then moved to some 80 grit by hand. I then used a piece of a wooden yard stick that I use as a tight-area sanding block and held it in a way that only the first 1/2" or so could work on the material. This gave me a bit of a groove in the filler while at the same time making the lip very flat and uniform, I finished that up with more hand sanding with fingertips to sort of trowel out the backfill.

    After filling the low spots and voids tomorrow, I'll do a final finish sand with finer paper on a soft round block to ensure that everything is flat (or really concave).
    Later,
    Chris

    "There are no more monsters to fear, and so, we have to build our own."
    Mk3.1 #7074

  5. #45
    Senior Member
    Join Date
    Nov 2011
    Posts
    489
    Post Thanks / Like
    Chris,

    Great body work post!
    I did the same with the wheel wells and hood and trunk openings. I had the painted spray about a 2" strip inside the body at these points so I wouldn't have to bring the bedliner out to the opening edges.
    I had worked the inside of the nose with Rage and did some priming and sanding and asked the painter to spray. He did but it didn't turn out that great so ended up coating it with bedliner. Basically, if you want it to look as good as the outside, you will have to fill, prime and sand the inside of the nose as though it was an outside surface, i.e., perfect preparation. In hindsight, worked out fine with the bedliner. With the radiator side panels installed, you really don't see inside the nose. If you also use the top radiator shroud like I got from Mark Reynolds, you really don't see anything.
    I installed my louvers (**********) pretty much the same as you. I marked the brackets and "glued" them in place with a little bit of Rage. When that had dried, glassed them in with a layer of 1.5 oz mat and covered with a single layer of 10 oz cloth. Gave it a smoother finish. For the inside of the body where the louvers mount, I did completely finished the glass and had it painted body color since this area of the body is visible when you open the hood.

    Great workshop!

    Ron

  6. #46
    Out Drivin' Gumball's Avatar
    Join Date
    Feb 2011
    Location
    Blackberry Township, IL
    Posts
    2,653
    Post Thanks / Like
    Finished off the initial work on the rolled wheel lips with a second (skim) coat of Rage, followed by sanding with adhesive paper on a 1" DuraBlock round pad. I cut 2 3/4" off the long block, which is the width of the adhesive sandpaper, so it worked perfect and was small enough to follow the contour of the wheel opening shape while getting full contact with the paper. This filled in some pinholes and voids in the first coat, while giving a nice uniform roll to each lip. These areas will be coated with slick sand when doing the rest of the body, so they'll be finish sanded later. But, for just a few hours of work, I'm very pleased with the results and it was good experience working with Rage for the first time in a spot that's not visible!


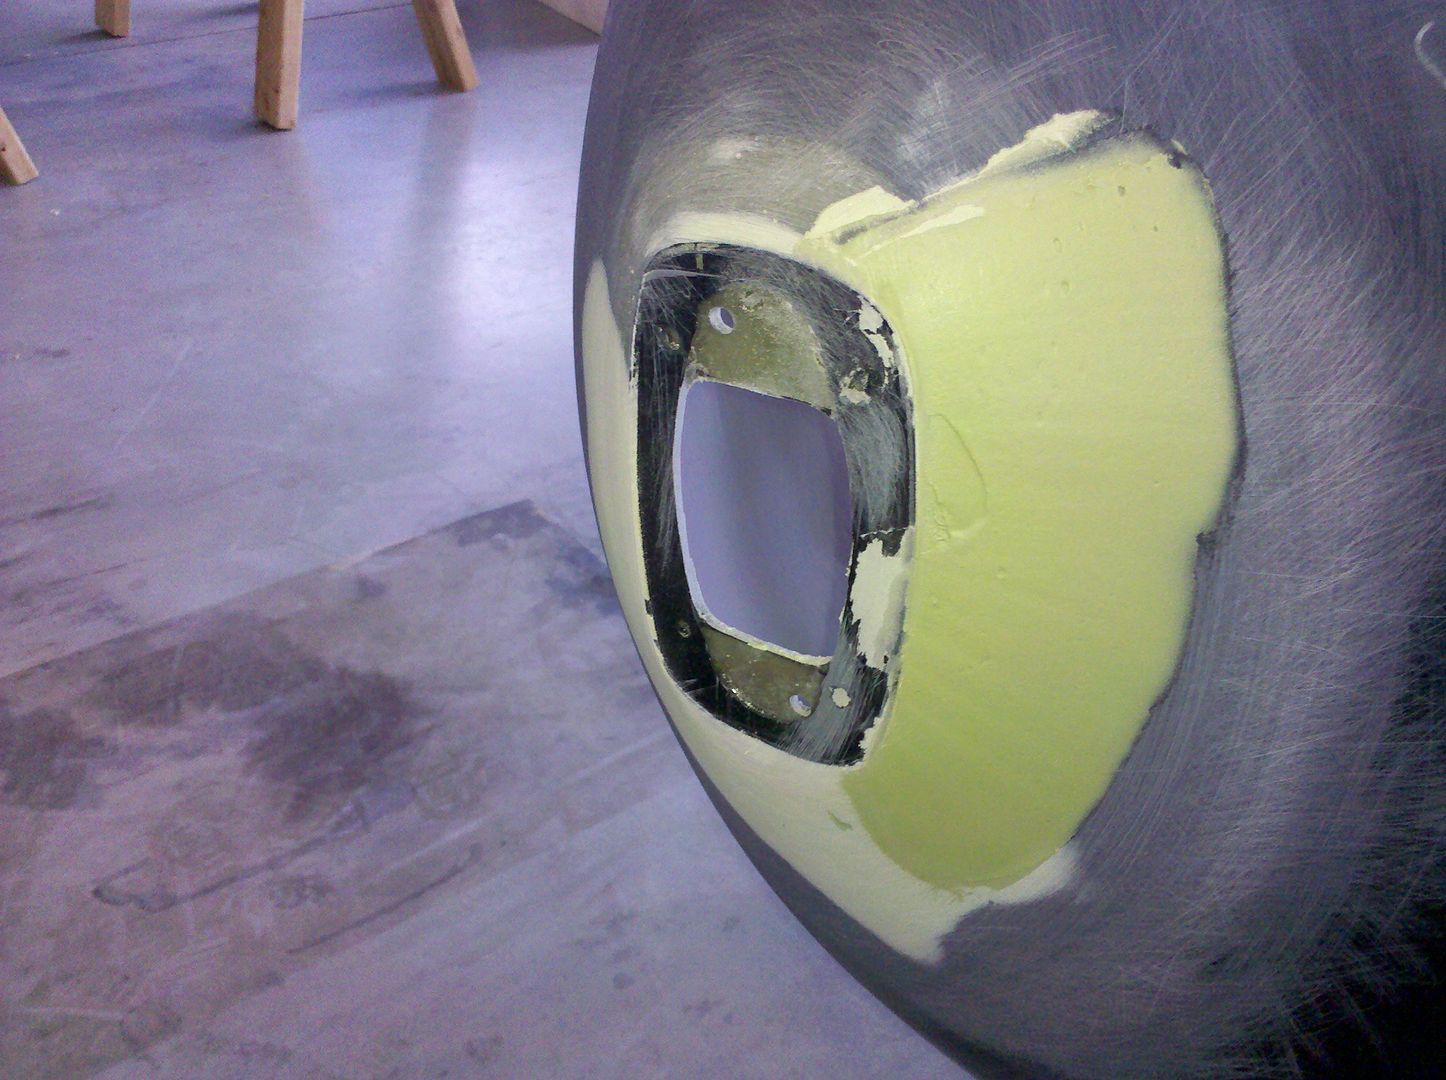
    I also did the initial grinding around the tail lamp pads - I'm changing these from the two round lamps to the rectangular, so I wanted to make the contour match the lamps. I made the templates out of some steel plate and started by cutting down the obvious parts of the FFR lamp pads with an angle grinder (3" - 40 grit). This knocked down the sharp edge and I'll further contour this area using Rage. More to come on this one, for sure.

    Before:


    After:

    Later,
    Chris

    "There are no more monsters to fear, and so, we have to build our own."
    Mk3.1 #7074

  7. #47
    Out Drivin' Gumball's Avatar
    Join Date
    Feb 2011
    Location
    Blackberry Township, IL
    Posts
    2,653
    Post Thanks / Like
    Just a couple of small things last night while still working on the inverted body. I added another 1/4" + of fiberglass mat under the area where the soft top bow ferrules mount through the body. This reinforcement, together with the tubes and brackets mentioned in this post http://www.ffcars.com/forums/17-fact...hout-body.html , should give me a pretty strong foundation for the top and hopefully avoid any cracking of the paint or fiberglass in that area from stress.

    I also worked a little more on the louver openings. This is another "rework" task as I'd already bonded the mounting brackets for the ********** louvers in place last week. But, I was not entirely happy with the thickness of the opening, so I removed the brackets (much harder than the failed side mounts as these brackets were completely covered with HSRF), ground off all the HSRF (quite a chore - that stuff is really hard), and shaved down the lips until they are almost gone. These still need a little more hand sanding with a small block and rounding over to make them appear like the original cars, which just had the outer skin bent back 180* on itself, but they're much better looking already. Once I'm happy with the shaping of the edge and the overall shape of the openings, I'll bond the replacement brackets I made (the first set was destroyed during removal) using SpeedGrip, which is a structural adhesive made for bodywork. The 15 minute set version is designed to work with fiberglass to metal, so should do the trick very nicely.

    Pics from last night:

    The light area in the center of the reinforcement is the 1/2" hole that is drilled through the body. I'll have to open that back up once I turn the body back over. Note that in order to get the ferrules to be perpendicular to the ground, the body is thinned on the trailing edge of the hole, leaving it very thin there. To fix that, I added four or five layers of mat to that side of the hole first, then covered everything with another four or five layers. The result is a reinforced area that no longer has the body contour inside, but instead will give me a nice flat surface that is parallel to the ground - to which I'll match the metal tube that comes off the frame as an underneath back-up to the body/ferrule (see the post link above for details on that).


    Here are a couple shots of the side louver openings - the one that shows the inside is a bit misleading due to the angle it was taken. The remaining lip is only 1/16" or so, but the dark area makes it look much larger. This remaining lip will be knocked down by hand as I do the final fitting of the louvers.


    Later,
    Chris

    "There are no more monsters to fear, and so, we have to build our own."
    Mk3.1 #7074

  8. #48
    Out Drivin' Gumball's Avatar
    Join Date
    Feb 2011
    Location
    Blackberry Township, IL
    Posts
    2,653
    Post Thanks / Like
    Did a little more work on the side louver fitting tonight, including opening up the FFR-cut holes a bit more. After sanding down the lip on the inside of these holes, I also decided to do just a bit more trimming to make sure that the front and rear diagonal sides were parallel to the ********** louvers. I'll post pics of these when I get the louvers re-fitted.

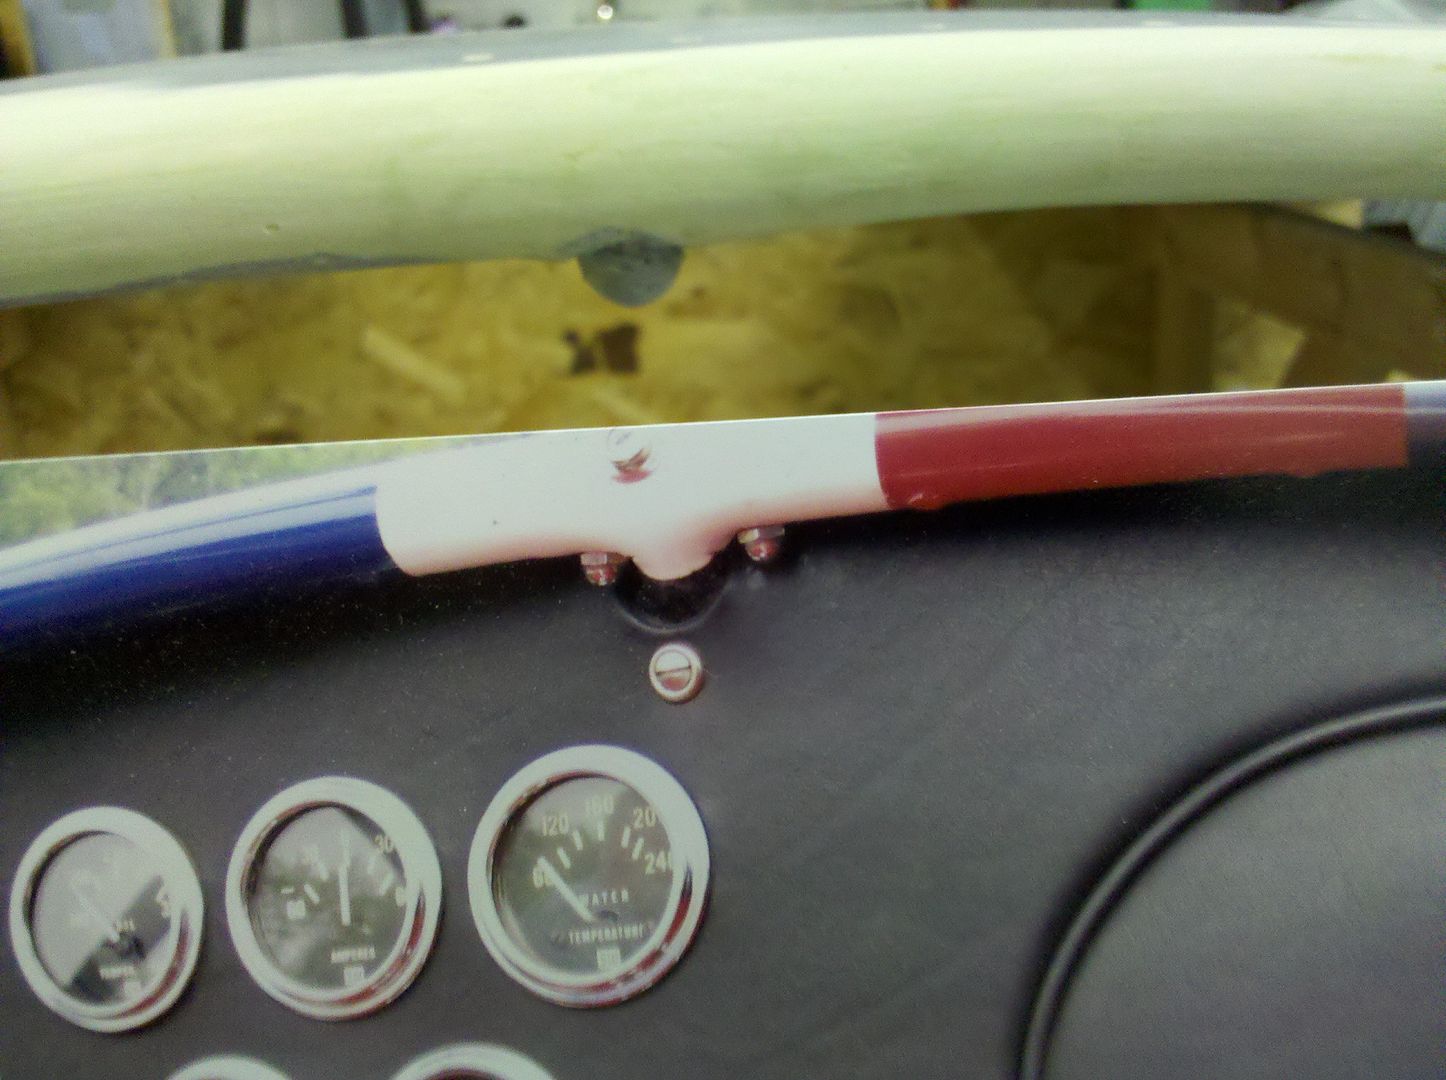
    I also tackled the issue of how to include something that looks like the original cars' dash cowl with the stub of a support tube showing below the rolled edge and disappearing behind the top center of the dash.

    Here's a shot of how Kirkham does this... it's an actual tube that goes from the top dash hoop to the support structure under the dash and ties into the dash support tubes that run down to the main frame rails.


    To mimic that, I cut a 3/4" piece of 1/2" tube at an angle and notched it so that it slips over the fiberglass 90* lip. My plan is to bury this in the fiberglass and filler that I'll use to make the rolled edge on the cowl.

    Later,
    Chris

    "There are no more monsters to fear, and so, we have to build our own."
    Mk3.1 #7074

  9. #49
    Out Drivin' Gumball's Avatar
    Join Date
    Feb 2011
    Location
    Blackberry Township, IL
    Posts
    2,653
    Post Thanks / Like
    Since we were planning on going to a BBQ today, I didn't have much time for bodywork. I did manage to get something done, though... more like started.

    I decided to try something just a little different for rolled cockpit edges (those of you with Mk4 will probably just want to skip past this part... lol). Instead of using all filler to build-up the cockpit edges on the rear cowl and over the dash, I decided to instead build up both of those areas with fiberglass, first. I started by making a drip rail of sorts out of the same heavy duty aluminum tape I used to back up the holes before patching. Then, I started layering on the fiberglass. I used 1" woven strips that I cut into various lengths ranging from 3" to 9"... and many of those were cut in half to make them 1/2" strips. I tried to use a bit less resin on these compared to the other stuff I've slathered on recently, to keep the strips from sliding down and to cut down on drips. It was in the mid 80s today, though, the hottest it's been while I've done fiberglass, so I had to experiment with the amount of MEK as the first batch kicked way too fast and I only was able to get four or five strips set before it wouldn't spread.

    Here's what I started with... notice the "fence" I built previously with a couple layers of 1" woven cloth behind the actual body lip as FFR cut the lips down way too much. By sticking to this lip (no pun intended), I'll be able to have a consistent 3/4" roll.


    And here is the rear lip after five layers of fiberglass. I'm going to have to do quite a few more layers to get to my intended 3/8" thickness. But, when I do, I'll be able to shape it with an angle grinder to form a perfect base for a bit of HSRF or Rage which will finish it off nicely.


    More fiberglassing to come tomorrow as it's a day off from the daily grind and I plan on spending it all at the hangar working.

    I also bought a can of Slick Sand and will be trying to spray the inside of the body over the weekend, so watch this space for updates on that part of the project!
    Later,
    Chris

    "There are no more monsters to fear, and so, we have to build our own."
    Mk3.1 #7074

  10. #50
    Out Drivin' Gumball's Avatar
    Join Date
    Feb 2011
    Location
    Blackberry Township, IL
    Posts
    2,653
    Post Thanks / Like
    Finished adding fiberglass to build up the rolled cowls, including 'glassing in the faux dash tube at the top center of the front.

    It was pretty messy work and I went through a bunch of resin as I had to work in small batches. Each few ounces of resin would do a couple layers of cloth - basically making two passes across the cowl. I did eight or ten layers of 1" woven strips, then topped that off with another four or five layers of 1/2" woven strips. I used varying lengths, too, so that there is an uneven overlap of each layer, ensuring that there wouldn't be any seams that pass all the way through the full build-up.

    As was asked, I also took all the gelcoat off, too (well, almost all... there were some thin traces), so that I wouldn't have any adhesion issues down the road. My plan is to give this a rough rolled shape, drill some holes all the way through this build-up, then add a few skim coats of filler (Rage or HSRF - any suggestions?) to smooth everything off.

    It was pretty hot and a little humid today, so I had to experiment to get the resin to MEK ratio right, so that I'd have sufficient work time, but good kick once it started to harden. I'll make sure to post more pics as I get this further along.


    Later,
    Chris

    "There are no more monsters to fear, and so, we have to build our own."
    Mk3.1 #7074

  11. #51
    Out Drivin' Gumball's Avatar
    Join Date
    Feb 2011
    Location
    Blackberry Township, IL
    Posts
    2,653
    Post Thanks / Like
    Busy day at the hangar... too bad it was wicked humid most of the day - not the best weather for grinding fiberglass!

    Since the body is still inverted, I trimmed and shaped the underside of the rolled cockpit edge. This is still just the raw fiberglass base that will get a final skimcoat (or few) of HSRF or Rage when the body is right-side up in a few days, but it was way easier to do the underside of the edge now than if I'd waited. I did a little preliminary shaping of the 'glass around the stub tube that I bonded into the rolled edge to simulate the cowl support tube found on the original cars, but this will need quite a bit of detail work in the coming weeks.


    I also finished the thinning of the fiberglass patches that I used to make the roll hoop holes smaller. Since this is a Mk3, FFR cut the holes large for the 2" roll hoop. But, I switched to a Mk4 hoop, so I had to make the holes smaller. To do that, I just glassed over all three holes, then re-cut them where I needed and slowly opened them up to just the right size. Since I want to use rubber grommets (McMaster-Carr) to seal the openings when the bar is installed, I had to thin the fiberglass a bit as the grommets are made for metal, not 3/16" fiberglass.

    This pic is from inside the trunk area looking up:


    I also tackled the inner body pads to protect the paint from stars due to rock strikes... more to come later on those.
    Later,
    Chris

    "There are no more monsters to fear, and so, we have to build our own."
    Mk3.1 #7074

  12. #52
    Out Drivin' Gumball's Avatar
    Join Date
    Feb 2011
    Location
    Blackberry Township, IL
    Posts
    2,653
    Post Thanks / Like
    To protect against paint damage on the outside of the body from rocks being thrown against the inside ("stars"), I decided to make some pads for each of the wheel wells. These only cover the areas where the body would take an obvious direct hit, though. For the other spots where a glancing blow can occur (which is less likely to result in damage through the body), I'm going to use truck bed liner. The rest of the inner body areas will be painted silver with a brush to simulate the finish of unprep'd aluminum.

    ERA uses core-mat fiberglass, which is a quilted mat. Others use different forms of foam or rubber materials. I wanted something made of closed-cell foam for this, so that water wouldn't be absorbed and cause problems with the adhesive. In talking with the upholsterer who is doing my seats, he suggested that I look at yoga mats. He also said that he can give me some very serious adhesive that I'll have to apply with a HVLP gun - supposedly, it will stand up to all sorts of heat and weather.

    I stopped at a few stores this week looking for the right material, and came across this at Wal-Mart. It was a super, heavy duty, extra-special version of their yoga mats, but the best part is that it is black... every other mat I looked at was some version of bright color. As a bonus, this material has a great herringbone texture on one side, which will be perfect for giving the adhesive something to bite into. It is something like 26" wide by 71" long and 6mm thick - more than enough to do all four wheels (cost was around fifty bucks, too).

    Before cutting, make sure you trace out the areas on the inner body where the splash guards and other aluminum panels (or other things) are near or in contact with the body to avoid interference.

    Here are a few pics - up close of the mat, one of the front panels in place, and all four:


    Later,
    Chris

    "There are no more monsters to fear, and so, we have to build our own."
    Mk3.1 #7074

  13. #53
    Out Drivin' Gumball's Avatar
    Join Date
    Feb 2011
    Location
    Blackberry Township, IL
    Posts
    2,653
    Post Thanks / Like
    I was hoping to spray the Slick Sand on the inside of the body this weekend, but it was way too humid. Instead, I did a bunch of fiberglass and filler work. Even with the heat and humidity, I was able to vary my mixes to allow just enough working time on both.

    I started with filling in the top of the hood scoop opening patch (closes off about the first 8" of my scoop hole). The patching process is above, but that was just a single layer of previously laid-up 'glass. Today I added five additional layers of mat on top of that in the area that is on the outside of the hood (but under the scoop). I also used HSRF to fill the gap around the opening where the inner and outer panels of the hood don't meet (and where they don't have enough adhesive to seal the gap completely).

    Bad perspective on this pic... the opening is actually symmetrical (just needs finish sanding with a flat paddle to knock down the edges before I do a final skim coat and round them over):


    Inside of the hood showing where I added the HSRF - the opening is now uniform and the inner and outer skins don't have a gap:


    Here's an up-close shot of how thick my hood extension piece is now that it has six layers of 'glass:


    I also spent some time playing with the Gess trunklid I'm using. This thread begins with pics of a Mk4 lid, but since I had the Gess lid, too, I decided to sell the Mk4 version and go with this one. Karl laid it up like FFR - with an inner and outer skin, then bonded those together. On this one (one of his first), the edges weren't filled, so that was something I had to tackle using HSFR. This is just the first coat... I'll add a skim coat of Rage and then make it a uniform thickness all the way around. Once I do the gaps, I'll round the edges over like the other moveable panels.


    I have a few forced days off from bodywork, but will be back at it later in the week!
    Last edited by Gumball; 07-07-2013 at 08:41 PM.
    Later,
    Chris

    "There are no more monsters to fear, and so, we have to build our own."
    Mk3.1 #7074

  14. #54
    Out Drivin' Gumball's Avatar
    Join Date
    Feb 2011
    Location
    Blackberry Township, IL
    Posts
    2,653
    Post Thanks / Like
    Back at it after a crazy week at work - lots of off-site conferences and evening events, so too busy to do anything on the FFR. But, that gave some of my recent work a chance to cure a bit more in the heat and humidity, so all is good.

    My latest task was to re-bond the hidden body side mount brackets to the body. As detailed in earlier posts, my initial attempt using HSRF for this job was illfated. Thanks to Competition Cobra and the advice of my painter, those brackets aren't going anywhere. This time I used a product called SpeedGrip (made by Norton). It's a two-part structural adhesive that bodyshops use to install new panels as new cars have such thin sheetmetal, welding isn't really an option anymore. This stuff comes in 5, 10, and 15 minute set versions - the 15 minute mix is the one that's designated for fiberglass/plastic to metal, so it seemed like the natural for this job. It's not cheap at around $40 per container and it does require application with a proprietary two-plunger gun that is available for around $50 (I bought mine on Amazon).

    I started by repositioning the hidden mount brackets when the body was on the chassis most recently, then taping everything in place and drilling three 1/8" holes per side and using clecos to clamp the hidden mount brackets tightly to the body. I also used the HSRF as a way of getting more contact between the hidden mount brackets and the side of the body - that HSRF stuff is great at sticking to the fiberglass, but no good as a glue to hold things like these brackets in place. After a good cleaning of everything with Prepsol and scuffing the metal and the HSRF surfaces, I applied the SpeedGrip and clamped the parts together using the clecos. I left the excess that oozed out through the holes in the hidden mount brackets so that it could act as additional security in holding the parts in place - not a problem since this area of the body is completely hidden from view when the car is done. I also ran a generous bead of SpeedGrip along the bottom of the body where it meets the aluminum bracket and then smoothed that down into the joint with my finger - making sure to wear rubber gloves as this stuff is really sticky! I left everything cleco'd in place for about 20 minutes (which is the "work time") of the product and began a process that continued for the next couple hours of pulling and reinserting each of the clecos. This allowed the parts to remain clamped for a couple hours, after which I was easily able to remove the clecos - I was afraid that if I didn't do this, I'd never be able to get them out as they were covered with the SpeedGrip.

    I checked on the progress this morning and everything was great - I'm deeming this a success and will use the same stuff (although much less and without the holes in the brackets) to hold my louvers in place.

    Here are some pics - the first are of the brackets and the last three are of the gun:


    Later,
    Chris

    "There are no more monsters to fear, and so, we have to build our own."
    Mk3.1 #7074

  15. #55
    Member
    Join Date
    Apr 2012
    Posts
    70
    Post Thanks / Like
    Are you planning an under-car exhaust like John's car?

  16. #56
    Out Drivin' Gumball's Avatar
    Join Date
    Feb 2011
    Location
    Blackberry Township, IL
    Posts
    2,653
    Post Thanks / Like
    Quote Originally Posted by Davidbr_48 View Post
    Are you planning an under-car exhaust like John's car?
    No... more of what I'm calling a "Gentleman's S/C." It'll have sidepipes, hoodscoop, and roll hoop, but also bumpers and no stripes.
    Later,
    Chris

    "There are no more monsters to fear, and so, we have to build our own."
    Mk3.1 #7074

  17. #57
    Out Drivin' Gumball's Avatar
    Join Date
    Feb 2011
    Location
    Blackberry Township, IL
    Posts
    2,653
    Post Thanks / Like
    Huge progress tonight! After some very hot and humid weather, we had a slight break and the air was much drier, but still in the low 80s. I've been waiting about a week, though, for a window to spray the Slick Sand on the inside of the body and today was my day. After another thorough dusting with compressed air and Prepsol wipe-down yesterday, I tried my hand at spraying the Slick Sand after work today. I've never used a compressed air spray gun, so I figured working with this stuff and doing it on the inside of the body would be good practice.

    I'm using a 2.3 tip HVLP gun that I bought from a local autobody tool supply house. I added a drier/filter to my air line and an add-on canister drier on the gun. My compressor is a 20 gallon Craftsman that I've had for nearly twenty years. I set the gun at 40 psi and was ready to go. I stopped by the local hardware store on my way to the hangar tonight with my gallon of Slick Sand so they could shake it really well for me - others have mentioned that there is quite a bit of settling of the media with this product and the lid said to "agitate before use" - seemed a bit British to me. I also made sure that I had plenty of acetone and thinner for cleaning and lots of rags. Make sure to have the appropriate protective gear, too, as this stuff is nasty! I also bought a pour spout at the hardware store that is used for regular house paint and it made it really easy to dispense the Slick Sand into a mixing cup with volume markings.

    Since the actual volume of Slick Sand is 128 oz and it came with four small bottles of catalyst, I figured that I could mix eight batches of 16 oz each using one half of each of the bottles of catalyst for each - perfect for the cup on my new gun, too. I did a little practice spraying with the gun with a couple ounces of acetone - also worked to clean out any manufacturing residue from the gun - and was ready to go with my first batch.

    I was very surprised at how well this stuff flows, covers, and sprays. One of the hardest parts is that you can't really see the spray coming out when you're working against a background of the first coat, so just watch for the shine and sags. I actually applied it pretty heavy in some spots and didn't really have much in the way of runs or sags. Keeping the gun 6" - 8" away and moving slowly, I applied an even coat in slightly overlapping passes and found that it worked great to fill the texture of the fiberglass (weave and mat), as well as the pinholes - there are tons of those on the inner body!

    After three coats, I called it a night. My plan for tomorrow is to give it a light sanding (especially the wheel well lips and the few areas that are actually visible when the body is mounted) and then another coat or two. Looks like one gallon of Slick Sand will do about five to six coats on the inner body - the first couple of coats really soaked in as the inner fiberglass has lots of texture and was "thirsty" due to the fact that I opened it up by grinding away all of the shine that was on it as-delivered.

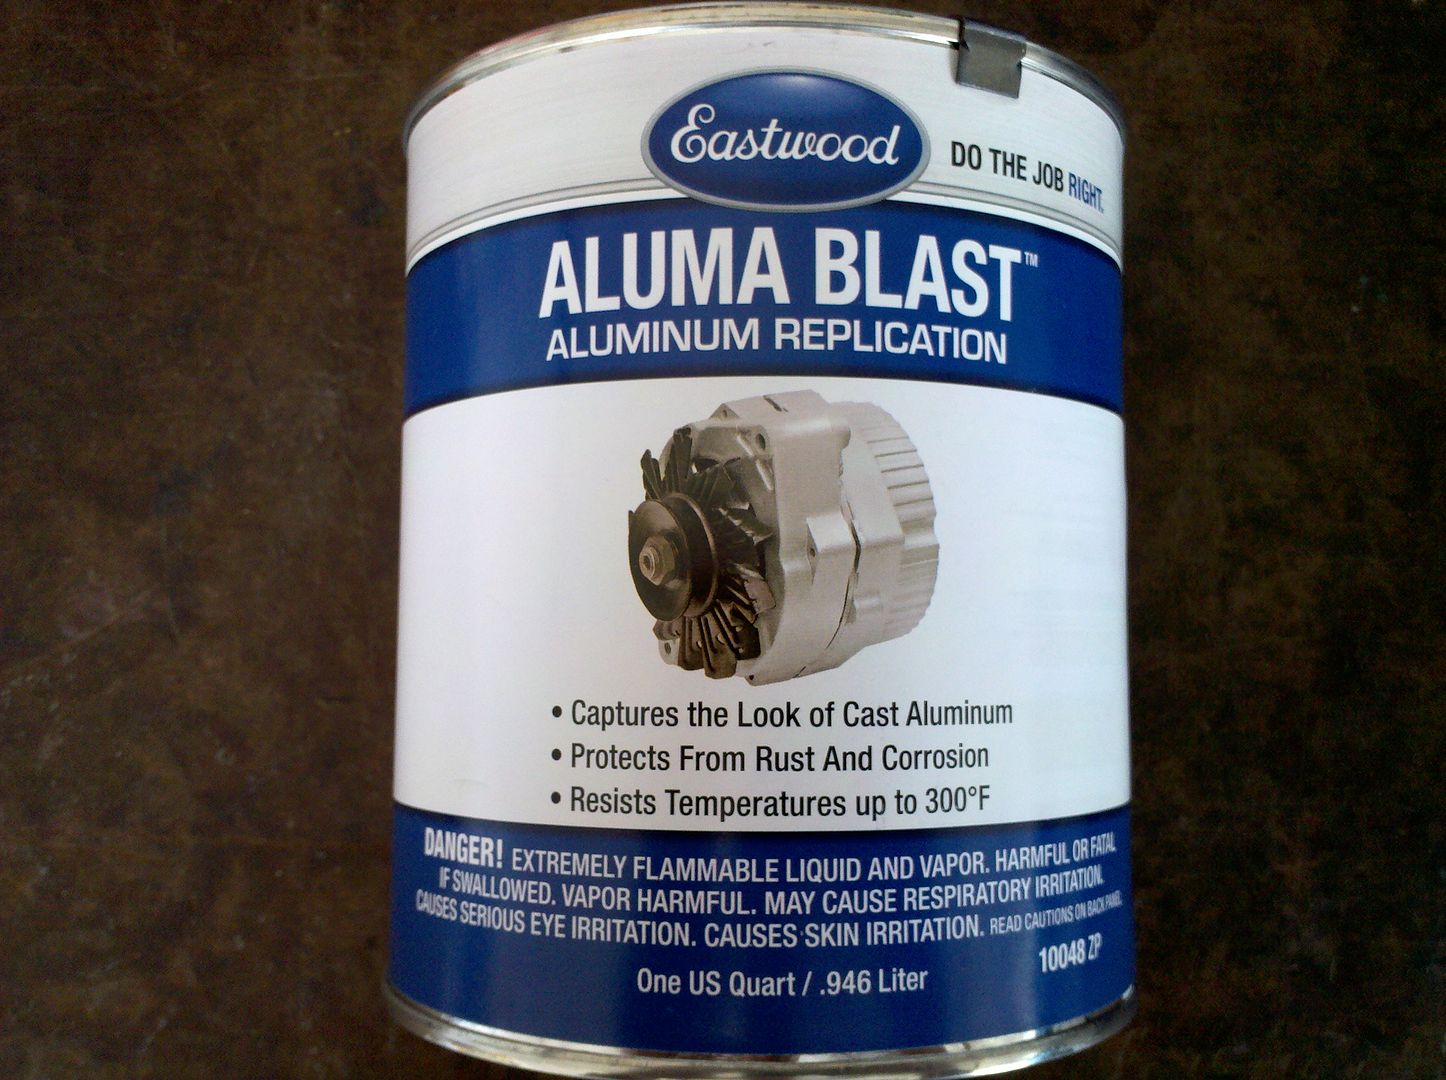
    I also ordered two quarts of Eastwood's "Aluma Blast" paint that I'll apply with a brush to get that mill-fresh finish that I'm hoping for. The final steps will be to add some bed liner to the areas that will see lots of rocks and road debris, as well as gluing in the closed-cell foam pads above each tire (the pads will not go in until final paint is done).

    For those of you who've never sprayed anything before, don't hesitate to give this a try. For a modest outlay for supplies - the gun was $50 - I've been able to do stuff on this body that would have probably cost a few thousand dollars at a body shop in hourly charges alone. On top of that, it was easy and is actually very rewarding and fun - especially when you take big leaps forward in appearance as I did today.

    Pics from my first time ever spraying!

    My big gray hot tub or boat (yea, people ask if that's what it is) - not gonna hold water, though:


    Passenger side inner fender at louver - flipped to show how it will look when peering in through the hood opening:


    Trunk underside and driver's side inner rear quarter:


    Passenger side front inner below headlamp:


    Inside the radiator opening:


    Passenger side rear wheel well lip:

    Later,
    Chris

    "There are no more monsters to fear, and so, we have to build our own."
    Mk3.1 #7074

  18. #58
    Out Drivin' Gumball's Avatar
    Join Date
    Feb 2011
    Location
    Blackberry Township, IL
    Posts
    2,653
    Post Thanks / Like
    Well, the Slick Sand lived up to its name today - it is very easy to sand. I knocked down the entire inside of the body this morning, paying special attention to the areas that are going to be visible when the body is mounted, and sprayed on a couple more coats. The only areas I'm not completely satisfied with are the bottom corners of the wheel wells where the flares meet the body - just a few low spots and grooves that I still need to take care of with a skim coat of Rage Gold when the body is back right-side up so I can see what will be visible on the end product.

    I've also decided that I'm going to leave this coating of Slick Sand untouched for now and flip the body over so that I can work on the exterior. My plan is to get the majority of the exterior things taken care of (except for the fitment of the moveable panels - gapping and leveling) and then, before putting the body on the chassis for the final bodywork, flip it upside-down one more time to do the final sanding and apply the silver paint and the bed liner. I bought one of the Duplicolor bed liner kits and will use that to supplement the closed-cell foam pads that will line the top of each wheel well. I'll also use the bed liner on the splash guards and "F" panels.

    Just a few pics of how the Slick Sand worked to cover the fiberglass texture. I used a full gallon on the inside of the body and I think it was money well spent. Considerably less time than spot-filling the inner body with Rage and much better coverage than I would have had with regular filler.

    Louver area:


    Rear panel - below trunk opening:


    Rear wheel well lip:

    Later,
    Chris

    "There are no more monsters to fear, and so, we have to build our own."
    Mk3.1 #7074

  19. #59
    Out Drivin' Gumball's Avatar
    Join Date
    Feb 2011
    Location
    Blackberry Township, IL
    Posts
    2,653
    Post Thanks / Like
    Woo hoo - vacation time!!! I'm off all week and will be spending every hot, humid moment of it at the hangar doing bodywork. The body is back on the regular buck... right-side up for now, so it's time to make some noticeable progress on the outer skin.

    One of the first things I did today was finish rounding all of the edges. I figured it would be better to wait until it's flipped back over to do these, as they're the edges that are visible and touchable when the car is done. The louver holes will need a bit of skimcoat along the edges to take care of some airbubbles that I opened-up, so pics of those will follow. I also smoothed out the openings for the radiator and oil cooler after making sure the lips were uniform all the way across. I know FFR makes a big deal out of the robot trimming, but it's better to just assume that the holes FFR does are just roughed in and that you'll have to finish them off a bit - nothing major... I was able to do it with just a little patience and a piece of 80 grit paper on a paint stick.

    I also opened-up the holes for the soft top ferrules after 'glassing over them from the underside with about 1/4" - 3/8" of mat. This, combined with the tubes that sit under these openings and are attached to the chassis, will make sure that the soft top ferrules are strong and don't do any flexing, which can lead to paint cracks.


    I was able to get a better look at some of what are the lower parts of the body, but which were harder to see and work on when the body was upside-down. Each of the front/rear flare areas on all four wheel well openings will need just a bit more skimcoat and sanding to smooth out some low spots. I also think I need to do a bit more contouring on the rolled edges - at least on the outside to get just a little more rounded profile.

    Trailing edge of one of the front wheel well flares:


    Trailing edge of one of the rear wheel well flares:


    And, I did a bit of rough grinding and shaping of my rolled cowl edges. See above for details on the fun of layering strip after strip of 1" woven fiberglass tape along the edges to build-up a layer that was 1/4" - 3/8" thick as the basis for the rolled edge (Mk4 guys can just chuckle a bit here). But, after a little time with an angle grinder with 80 grit, followed by the Dremel with a 1/2" barrel sander, these came out looking pretty good. I'm going to use the piece of split-PVC-for-a-trowel method to layer on a little Rage Gold to finish these off, so watch this space for updates on this way of achieving the rolled cowl look on Mk3 and earlier cars!


    This shot shows both the rough rolled edge and the 'glassed-in dash support tube (which is purely cosmetic and meant to replicate the look of the little stub tube running from the cowl to the under-dash structure on the original cars):


    And finally, here are a few additional shots of the effect of a gallon of Slick Sand on the inside of the body:


    This one is the trunk drop-off area - the bumper/body mount holes are evident:

    Later,
    Chris

    "There are no more monsters to fear, and so, we have to build our own."
    Mk3.1 #7074

  20. #60
    Out Drivin' Gumball's Avatar
    Join Date
    Feb 2011
    Location
    Blackberry Township, IL
    Posts
    2,653
    Post Thanks / Like
    Well, another triumph of gaining a new skill through building an FFR. Before I started the bodywork phase, I was very nervous about mixing fiberglass resin, HSRF, and Rage. Now, I'm comfortable enough to mix the Rage even on wickedly hot and humid days like yesterday and today. I had a couple batches kick a little too quick, but I was watching out for the characteristic "pull" on the applicator and kept an eye on the texture as it spread. Once it lost the creamy smoothness, I stopped using a batch and mixed up another. The key for doing this in warmer weather is to work in small batches.

    Earlier, I outlined how I built-up the cowl edges with quite a bit of fiberglass strips. Yesterday and today I was able to apply what amounted to a 1/8" or so skim coat to the front and rear cowl lips and sand it down to a very pleasing rolled edge. To get the Rage Gold to spread out in a consistent shape... and do it along the entire length of the edge... proved a bit of a challenge. But, using tips from others who have done this before me, I was able to make use of the PVC trowel method with great success. I also used a short piece of PVC as a standing form.

    Here is the spreader I made out of 1" PVC pipe. I used this to trowel out a generous layer of Rage Gold along the length of each cowl edge.


    There was quite a bit of waste as a bunch of the Rage dripped to the floor when I first put it on, but I took so much of the excess off and the amount that remained was thin enough not to sag. Here's what it looked like after the first application:


    I did some rough shaping with a "cheese grater" tool and then sanded the rolled edge using my PVC form (also 1", but only 2 3/4" long... perfect for adhesive sand paper):


    This showed the low spots really quickly (note the darker green lines in the photos above), so I did a few more full applications, followed by spot filling and more sanding. In the end, this is what the rolled edges look like. They're 95% of the way there and will be finished when I do the block sanding of the body.


    And in this pic of the front rolled edge, you can also see the stub tube that I 'glassed in to mimic the upper dash support tube (just above and to the right of the brown spot on the particle board):

    Last edited by Gumball; 07-16-2013 at 11:11 PM.
    Later,
    Chris

    "There are no more monsters to fear, and so, we have to build our own."
    Mk3.1 #7074

  21. #61
    Out Drivin' Gumball's Avatar
    Join Date
    Feb 2011
    Location
    Blackberry Township, IL
    Posts
    2,653
    Post Thanks / Like
    Along with the rolled edges and the filling of a bunch of tiny voids (air bubbles) that I opened up along edges when rounding them over - no choice... just sanded through the gel coat, I also worked on the doors. I started by just holding the doors in place against the body to check how in the world I'm going to handle the transitions at the front and rear of the door against the cowls. I'll definitely be using the Kirkham as a template for this... glad that thing is still around. I decided that I needed just a bit more material on the doors to make a decent rolled edge, so I used the same PVC trowel and healthy bead of Rage on top of the seam where FFR glues the inner and outer door skins together. I did some rough shaping (again with the cheese grater while everything was in that semi-soft stage) and will do more sanding tomorrow. I'll probably have to take a good amount of this off the doors, as elbow room is at a premium... at least on the driver's side at the steering wheel.


    The other thing I did on the doors was to fill them with low expansion foam - telltale yellow dots on the inner door skins above. I used the "Great Stuff" version, but the blue can that is designed for windows and doors. This truly is great stuff. I tested it first by spraying a bunch on a scrap of cardboard and watching how it expanded. It expands pretty quickly, then skins over. Once it sets up, it remains very flexible and soft - very different from the traditional red can. Note the yellow spots on the doors in the area where the door panels will lay (hiding the holes). I made quite a few 3/8" holes so that I could put just a small amount of foam in each - hopefully minimizing the chance for bowing the door skins outward. This is a very cool touch for anyone looking for a bit more solid sound when closing the doors and one can (about $6) did both doors with some to spare.

    My plan for the hole near the door latch area is to add a piece of black rubber sheet (like gasket material) to that hole just as a way of finishing it off once everything is painted. I'll add a bit of adhesive to the back of the rubber to hold it in place. The way my door latches are aligned, the striker pin extends slightly into this hole, so covering it completely is not an option - instead, the rubber will give it a finished look, while remaining flexible and not interfering with door operation.
    Last edited by Gumball; 07-16-2013 at 11:27 PM.
    Later,
    Chris

    "There are no more monsters to fear, and so, we have to build our own."
    Mk3.1 #7074

  22. #62
    Out Drivin' Gumball's Avatar
    Join Date
    Feb 2011
    Location
    Blackberry Township, IL
    Posts
    2,653
    Post Thanks / Like
    Ahhh, seams. Well, more like mold parting lines. I've heard that one of the advancements on the Mk4 is that the parting lines are a bit better without the need to carve them out and remove gelcoat, which if left in place could print through the paint, or worse, cause cracking/crazing of the clear coat. So, I expected to find some issues - but I was holding out hope that the rumors of the later Mk3 bodies being pretty good. Happily, the seams on my car were, overall, not too bad. Quite a while ago, I just knocked down some of the "flashing" and thought that they'd be pretty good. I actually thought I could just leave them as is, scuff the gelcoat up a bit, and lay some filler over the top. Well, today I dug into the parting lines... literally. I remember Jeff Kleiner's experience with a recent Mk4 build in which he mentioned finding a glob of uncured gelcoat on a body that was months old. I've got that beat! I found four... count 'em... four deep pockets of gooey gelcoat on a body that was laid-up by FFR back in the summer of 2009 - that's one pocket for each year of the body's life!

    I started my journey of cleaning out the parting lines by taking an awl to a couple of low spots that seemed soft... those turned out to be the four trouble areas. Once I worked those down to clean fiberglass, I moved on to the rest of the lines just to make sure that everything else was okay. Here's a pic of the worst one of the four trouble spots, which as luck would have it is right on the front driver's fender area. The dark black spots and flecks are the uncured gelcoat. Interestingly enough, a couple of the pockets of gelcoat were just that - pockets sandwiched between layers of fiberglass - but exposed at the parting line area. I just had to keep digging with the awl and the angle grinder until I reached clear 'glass:


    And here's a shot of just how much material I had to remove to clean this one out... a bit worrisome as I was working it out, but the nice thing about fiberglass is the ability to work it back to good shape:


    And just to scare some of those who are considering doing their own body work, here's another perspective of the same area - YIKES, now that's a divot:


    That was the worst of the four pockets, and the rest of the parting lines looked like this:


    Overall, I'm not too surprised with what I found - but it did teach me not to shortcut things that I've learned about on the forums. I knew all about the gelcoat issue but, had I not found the soft spots, I may have very well just given them a cursory sanding and moved on... only to likely have issues with the paint at some point down to the road.
    Later,
    Chris

    "There are no more monsters to fear, and so, we have to build our own."
    Mk3.1 #7074

  23. #63
    Out Drivin' Gumball's Avatar
    Join Date
    Feb 2011
    Location
    Blackberry Township, IL
    Posts
    2,653
    Post Thanks / Like
    Another project today was to work on reshaping the tail lamp pads to better match the rectangular Lucas lamps instead of the round FFR supplied ones. Using the metal templates I made to match the footprint of the rectangular lamps, I previously did some rough work using an angle grinder. To prepare for a little filler tomorrow in this area, I did a bit more subtle shaping using 80 grit on a DuraBlock pad. Here are a few shots of the results. I think with just a little bit of skim coat work with Rage Gold, these will look pretty good.


    Later,
    Chris

    "There are no more monsters to fear, and so, we have to build our own."
    Mk3.1 #7074

  24. #64
    Out Drivin' Gumball's Avatar
    Join Date
    Feb 2011
    Location
    Blackberry Township, IL
    Posts
    2,653
    Post Thanks / Like
    Received a package from Eastwood today - the paint that I'm going to use on the inside of the body. The plan is to brush this on using a sort of "dry brush" style like faux finishes done on furniture to give the look of mill-finished aluminum... sort of a series of lines from the brush bristles.

    Later,
    Chris

    "There are no more monsters to fear, and so, we have to build our own."
    Mk3.1 #7074

  25. #65
    Out Drivin' Gumball's Avatar
    Join Date
    Feb 2011
    Location
    Blackberry Township, IL
    Posts
    2,653
    Post Thanks / Like
    Dang... it's hot and humid around here - whew!!! Six days straight at the hangar with just a short break yesterday to cool off while running some errands. What I have to show for all this work (lots of sweat... not too much in the way of blood - good thing - or tears) is a list of planned body mods that is getting checked off, but not as fast as I'd hoped. I guess that with bodywork, that's not a bad thing, as it seems wise to let everything have time to cure, set, shrink, etc...

    So, today I worked on the tail lamp pads and the rolled edges on the doors. As I've mentioned and posted already, I wanted to contour the pads so that they more closely resemble the original cars. I'm using the Kirkham I have laying around as a template and, after a bit of grinding, I filled the low areas with some Rage Gold and have this -


    Just a little more sanding and the pads and the surrounding area will be very - sorry - but the only word I can use is voluptuous!

    The rolled edges on the doors are coming along nicely... just taking it easy and building up the area and sanding it down - trying to get a nice uniform edge. These need lots more work, but I've decided that I can't rush it.


    Next up is the seams. I have some more HSRF on order and the plan is to use some flocking and vinyl ester resin to build up the voids, then cover those areas with HSRF. The final coat will be a skim of Rage Gold to get the contour back on the tops of the fenders.

    I also talked with the painter today and we decided that instead of me putting on the first couple coats of Slick Sand (or Feather Fill) on the outside, I'm going to deliver the body and moveable panels to him with all of my patches and mods and let him do the final flattening. I will do the fitting of the moveable panels to the body with everything on the chassis (fitting, leveling, etc...), but then I'll pull it all off and put it on the buck for his final work. This way, he can ensure that my amateur bodywork is feathered properly and as flat as can be before doing the final sealing of everything.

    Taking a day off to do some other fun stuff, then back at it when (hopefully) the weather breaks with a cold front. I don't want to do the fiberglass patching on the parting lines (seams) when it's this hot!
    Later,
    Chris

    "There are no more monsters to fear, and so, we have to build our own."
    Mk3.1 #7074

  26. #66
    Out Drivin' Gumball's Avatar
    Join Date
    Feb 2011
    Location
    Blackberry Township, IL
    Posts
    2,653
    Post Thanks / Like
    Took a break from bodywork and spent the day at the vintage races at Road America (the race formerly known as the BRIC). Awesome time with some very cool cars - one sighting of what may have been an original 2000-series CSX in the paddock (or a really nicely done Kirkham slabside - it was aluminum, but nothing was open and I couldn't see any identifying marks on the exposed parts like the door hinges, etc... Surprisingly, the two Cobras running today were not original CSX cars... one was a Superformance and the other was one of the mid-'80s Autokraft AC replicas. All in all a great day at the races, filled with noise, dust, the smell of race fuel exhaust and hot brakes, as well as great Road America food like "eggers" for breakfast and bratwurst for lunch. But, I just went up for the day, then headed home a little early to stop at my local Grainger and pick-up some more HSRF so I can get more work done on the FFR this weekend as it's supposed to cool off tonight, so it should be good weather for working on seams.

    One thing I did do tonight when I stopped by the hangar to drop off the HSRF was to hold a picture of the dash of an original car up to my rolled front cowl with the mock dash support tube for comparison - what do you think?


    I'll notch my dash with a semi-circle and wrap the leather into it, then the faux tube will just rest in the opening... looking like it's disappearing behind the dash.
    Later,
    Chris

    "There are no more monsters to fear, and so, we have to build our own."
    Mk3.1 #7074

  27. #67
    Out Drivin' Gumball's Avatar
    Join Date
    Feb 2011
    Location
    Blackberry Township, IL
    Posts
    2,653
    Post Thanks / Like
    Today was visitors day at the hangar, so not much work was done. Sort of my own fault, as I've been inviting friends and neighbors by to check out my progress, but today I had six separate groups of visitors show up one after the other. I did get some work done early, and then I stuck around late and sanded for a while.

    Here's today's progress pics of my work on the seams. Following input from a bunch of people, including "Da Bat," I'm using just Rage Gold and putting it on in thin layers. I spread the first layer this morning, and then finally got around to sanding that one down late in the day. I'm going to let it sit overnight and then add the second layer, this time feathering it out a little more, tomorrow evening. The first thin coating actually filled most of the "v" channel I made when grinding out the gelcoat flashing, but there are a few low spots still, including the four trouble areas mentioned above.


    I also put a little time in on the rolled door edges, but these need just a little more work. As others have mentioned, the transition areas at the front and rear of the door are going to be a bit of a challenge, but for now I'm leaving them unsanded and will do some shaping when everything is mounted on the chassis. Here's a sneak-preview of the rolled edges, though:

    Later,
    Chris

    "There are no more monsters to fear, and so, we have to build our own."
    Mk3.1 #7074

  28. #68
    Out Drivin' Gumball's Avatar
    Join Date
    Feb 2011
    Location
    Blackberry Township, IL
    Posts
    2,653
    Post Thanks / Like
    This doesn't include the price for some of the tools I've had to buy - spreaders, sanding blocks, HVLP gun, respirator, epoxy mixing gun, etc., but for those who've asked, so far my expendable materials usage is:

    One box (40 yrd roll) of 80 grit adhesive sandpaper ($31)
    One gallon of Rage Gold ($57)
    One quart HSRF ($72 - ouch!)
    One gallon of Slick Sand ($86)
    One gallon of vinylester resin ($82)
    One roll of 1" fiberglass woven "tape" ($15)
    A small amount of a 40 yrd roll of 120 grit adhesive sandpaper (also $31, like the 80 grit)
    One tube of SpeedGrip adhesive ($40)
    Lots of mixing containers from Home Depot and/or Lowes ($1 each)
    Lots of paint stir sticks from Home Depot and/or Lowes - the HD ones are better quality wood (Free if you ask the people at the paint counter nicely)
    One pair of old-man bifocal safety glasses from McMaster-Carr ($13 - be careful how close you hold the HVLP gun to the rag when spraying during cleaning... it'll spray back in your face)
    One box of rubber gloves - powder free / examination grade?!?! ($11)
    Soap, washer, and dryer charges at local laundromat - the wife won't wash anything with fiberglass dust on it at home... something about getting itchy undies ($20 or so - but you meet the nicest people... who probably have itchy undies from using the machines after you wash your shop clothes)

    I'm guessing that so far I'm into the whole process for around $600, which includes an estimated $150 or so in tools and such. I have to buy another gallon of Rage Gold soon, and I'll need at least another gallon or two of Slick Sand for the exterior. When all is said and done, I'm expecting that I'll have around $800 or so in material costs to get the body 80% of the way to paint - including all of the mods that I'm doing.
    Last edited by Gumball; 07-22-2013 at 01:45 PM.
    Later,
    Chris

    "There are no more monsters to fear, and so, we have to build our own."
    Mk3.1 #7074

  29. #69
    Out Drivin' Gumball's Avatar
    Join Date
    Feb 2011
    Location
    Blackberry Township, IL
    Posts
    2,653
    Post Thanks / Like
    Sigh... back to the day job today - no more getting up and heading to the hangar each morning. So, I'm relegated once again to my goal of at least doing one thing each day, while leaving the big jobs for the weekends. Tonight's project was the second layer of Rage Gold on the seams. This layer went on a little thicker and wider than the first and will form the base for what I'm hoping with be the final layer. Tomorrow is going to be a sanding night - yay!


    Here's the front driver's side fender... the one that had the pretty good size pocket of gelcoat and the resulting divot on the top:


    This application was done using just a 4" wide spreader - the next layer will be done with the hacksaw blade to get a good even spread that I hope will help me feather the patches out wide enough to get a nice radius back on the top of each panel while avoiding chances for printing.
    Later,
    Chris

    "There are no more monsters to fear, and so, we have to build our own."
    Mk3.1 #7074

  30. #70
    Out Drivin' Gumball's Avatar
    Join Date
    Feb 2011
    Location
    Blackberry Township, IL
    Posts
    2,653
    Post Thanks / Like
    Finally - a bit of really nice weather - cool, clear, and not humid... just perfect for sanding! Didn't have too much time, though, so I only made it through the rear fender seams - I'll work on the fronts in the next day or so. This is the second coat of filler and I went a little heavier and spread it out a little further. This gives me a pretty good base for a smooth, feathered transition from the body to the filler. These are a little lumpy still, but the next layer will be spread out using the hacksaw blade method and will hopefully give me a good final shape.

    No real ground-breaking comments tonight; just lots of sanding with the DuraBlocks (I bought a 7 block kit from Eastwood), a pool noodle, and the K-block (KB16) which is very flexible and great for restoring the final radius. I'm using Mirka sandpaper - never used this sort of paper. It's adhesive and of a standard width (2 3/4"). The adhesive is really tacky and sticks to even dusty sanding blocks very well. I'm staying with 80 grit for now as it cuts really nice and, surprisingly, the Rage Gold doesn't load it up at all.


    Later,
    Chris

    "There are no more monsters to fear, and so, we have to build our own."
    Mk3.1 #7074

  31. #71
    Out Drivin' Gumball's Avatar
    Join Date
    Feb 2011
    Location
    Blackberry Township, IL
    Posts
    2,653
    Post Thanks / Like
    Back at it today, finally, working on the seams and the rolled door edges. I'm in the process of sanding a third application of Rage Gold on the seams. The painter stopped by on Thursday to drop off some things (some old parts off my wife's '67 Camaro) and check out the progress on the FFR. He had a few tips and suggestions about applying the filler (like always going lengthwise on the car, rather than across and trying to avoid starting and stopping when spreading... instead doing a single smooth swipe with the spreader). The good news is that he didn't throw up his hands (or just throw up) and say there's no way he'd ever paint over my hack-job bodywork. He actually said it's looking good!

    Here's a before and after of the driver's front fender where the largest pocket of gelcoat had to be ground out:


    And here's the after shot with three thin layers of Rage Gold - just one very little low spot left to fill, which will be done as part of the final shaping layer that is going on tomorrow:


    I also experimented with the pool noodle method of sanding in the complex curve areas of the body, like between the headlamps and the radiator opening, as well as next to the trunk opening. I picked-up a noodle at Wal-Mart for a couple bucks, then cut it into various lengths. This worked way better than the 1" DuraBlock for these areas and the adhesive sandpaper stuck to it perfectly.


    Finally, here are some random shots of the body in its current state:


    Tomorrow - more Rage Gold and sanding!
    Last edited by Gumball; 07-27-2013 at 11:17 PM.
    Later,
    Chris

    "There are no more monsters to fear, and so, we have to build our own."
    Mk3.1 #7074

  32. #72
    cobra Handler skullandbones's Avatar
    Join Date
    Jul 2011
    Location
    Superstition Mtn foothills 5 miles west of Gold Canyon AZ
    Posts
    2,686
    Post Thanks / Like
    Blog Entries
    19
    The top of the fender looks great! I still only have one coat of filler and primed. I wanted to drive so badly, I couldn't wait. Looks like I will be breaking out the extra pool noodle I got for the curve shaper. Thanks and good luck on the rest of the body work, WEK.
    FFR MkIII 302 (ATK), EFI 75mm TB with custom box plenum chamber, 24# injectors, 4 tube BBK ceramic, cold air sys, alum flywheel, crane roller rockers, T5, Wilwood pedals, custom five link with Watt's link, 4 rotors, coil overs, power steering with Heidt valve, alum FFR rad, driver's crash bar mod, mini dead pedal mod, quick release steering wheel hub #6046

  33. #73
    Out Drivin' Gumball's Avatar
    Join Date
    Feb 2011
    Location
    Blackberry Township, IL
    Posts
    2,653
    Post Thanks / Like
    Another day of working on seams. I did a little more sanding of the last layer, touched-up a few low spots separately, then slathered on what I'm hoping is the final shaping layer (fourth application). I didn't use the hacksaw blade method, though, but rather cupped the spreader in my hand as the painter showed me. Although I haven't sanded this application yet, it looks like it may do the job.


    I also gave the hood and scoop a little attention, if for no reason than I missed the itchy feeling after a day of grinding fiberglass. I had to level a high area on the hood opening patch, make the seam area between the patch and the hood's outer skin a bit concave to hopefully hide the transition, and then skimcoat the entire area with Rage Gold. Not sanded yet, either, as it was very cool today (filler kicking much slower, making both of these spreads nice) and I did this late in the afternoon. I'll let this sit overnight and do some sanding tomorrow. This is just the first of two or three applications on this area to get the shape right (even though it's under the scoop) and ensure that the feathered edge is far enough out past the seam in an effort to avoid any printing through.


    Finally, I sanded the modified scoop to get rid of the 'glass patch weave and to take the shine off the patches and the inside of the scoop. I did a little shaping of the opening, too, but that will be finished when I do the inside skimcoat with Rage. For now, I just added a little HSFR to hide the holes from the metal tabs I used to hold the upper and lower parts together while doing the fiberglass patch. To make sure these don't print through the filler and paint, I made the area around the holes concave out to about the size of a nickel - this for a 1/8" hole - on both the inside and outside. I added a bit of HSRF along the length of the patch, too, where the two parts came together as there was a bit of a groove. I'll finish all this off with some Rage Gold once I get the HSRF ground down.

    Later,
    Chris

    "There are no more monsters to fear, and so, we have to build our own."
    Mk3.1 #7074

  34. #74
    Out Drivin' Gumball's Avatar
    Join Date
    Feb 2011
    Location
    Blackberry Township, IL
    Posts
    2,653
    Post Thanks / Like
    Just a short time to work tonight, so I sanded down the HSRF repairs on the modified hoodscoop and shaped the opening. I didn't have time to work on the seams, but hopefully I'll get to those in the next day or so. I also have some finishing work to do on the hood and trunk lid, but once all these things are done, it's back on the chassis for the body.


    Later,
    Chris

    "There are no more monsters to fear, and so, we have to build our own."
    Mk3.1 #7074

  35. #75
    Out Drivin' Gumball's Avatar
    Join Date
    Feb 2011
    Location
    Blackberry Township, IL
    Posts
    2,653
    Post Thanks / Like
    I took some more time off from seams to do something about the Breeze hidden trunk hinge stud-plates that are bonded to my Gess trunklid. As mentioned way early in this thread, I decided to use the trunk lid that Karl Gess made a few years ago instead of a Mk4 version. This lid has a completely smooth inner skin, with no raised stiffening rib to cut away for the stud-plates. I previously bonded the plates on using HSRF (before I was clued in on the SpeedGrip stuff) and I need to do something to integrate the installation and make them both durable and good looking. So, I decided to encase the plates in more HSFR.

    I used some adhesive foam weatherstrip to make a box around each plate, then filled them with HSRF. Just as it started to kick, I trimmed the excess and simply pulled the foam away - no mess and no stick. I'll work on grinding this stuff down a bit before adding beveled edges with Rage that will give the appearance of raised mounting pads that are molded into the inner skin.

    Pics so far:


    Later,
    Chris

    "There are no more monsters to fear, and so, we have to build our own."
    Mk3.1 #7074

  36. #76
    Out Drivin' Gumball's Avatar
    Join Date
    Feb 2011
    Location
    Blackberry Township, IL
    Posts
    2,653
    Post Thanks / Like
    A little more sanding today... I think I'm about done with the seams on the front... just have to sand the rear seams tomorrow and maybe tweak the "peak" on he passenger side front a little by taking off just a small amount of filler to get the right contour.

    One thing I can say for sure is that when doing seams, make sure you have plenty of various sanding pads on hand. So far, I've found the KB long block, the thin rectangular DuraBlock, and the pool noodle to be the most used, but I've employed quite a few others during the process so far. The more alternatives you have, the more likely it is that you'll get a nice finish with less re-work.


    Driver's front fender - calling this one done... and it's the one that had the large pocket of gelcoat:


    Passenger front fender - possibly just the way I took the picture, as it sure felt pretty good, but this one seems to have a bit more of a "peak" to it and may need just a little more work with the long KB block:


    Once I'm happy with the seams, I'm going to finish the hood scoop, scoop opening, and the trunk lid inner area, then wrap the chassis in plastic sheeting and get the body back on so I can gap and level the moveable panels with regard to the main body. After that, it'll be time for some Slick Sand and... yay... block sanding.
    Later,
    Chris

    "There are no more monsters to fear, and so, we have to build our own."
    Mk3.1 #7074

  37. #77
    Senior Member JL1958's Avatar
    Join Date
    Jul 2013
    Location
    Atlanta
    Posts
    159
    Post Thanks / Like
    I have enjoyed reading this and learning the amount of detail you have done to get the car just right.
    Very impressive.

  38. #78
    Out Drivin' Gumball's Avatar
    Join Date
    Feb 2011
    Location
    Blackberry Township, IL
    Posts
    2,653
    Post Thanks / Like
    Yet another update in the ongoing saga of my bodywork experience. What an incredible adventure it's been so far and yesterday I reached a milestone - the seams are done!

    Grinding, filling, and sanding the seams was the most time consuming part so far for me. Like a lot of this build, I probably went a little overboard on this part, but I wanted to make sure I did a good job. Even if I have issues with printing or cracking down the road, at least I'll be able to say that I didn't cut corners and that I did the best I could with my limited (really non-existent) experience. I have to admit, though, that it felt really good to stand back and admire the curves on the car when I finished sanding last night... I couldn't find an angle of the body that I didn't like. I also noticed that my feel for bodywork - and I mean this literally - has really come far since I started this. I've heard from many experienced professionals that you do bodywork more with the feel of your hands than with your eyes and I finally understand. I'm now spending as much or more time when sanding just closing my eyes and running my entire hand along the area I'm sanding. It's amazing what you can "see" when you're not really looking! I'm sure it's not perfect, but I'm just hoping to get it close to that so that the painter - the real pro - can put the final touches on it just before shooting the color and clear.

    Here are a few pics of the rear seams - which I worked on yesterday. You can see in the first two that I followed the painter's advice and did one continuous pull on the applicator down the length of the panels (at least where the fuel filler hole didn't get in the way).


    This photo shows the top of the driver's side quarter looking back from the door opening - visually it looks good, but more important it feels good to the hand and the contour gauge doesn't show any flat spots, either.


    I'm getting really close to putting the body back on the chassis for gapping and leveling the moveable panels, but I want to get the door openings at the rolled cowl edges roughed-in first. I'm also working on finishing the hood scoop opening, the trunk lid mounting pads and edges, as well as the rolled edges on the doors. Once all of those things are done, everything will go back on the chassis.

    Speaking of the chassis, when I got to the hangar yesterday, it was still a little early and the ramp area outside my hangar where I like to work on sanding was in the blazing sun. So, after doing a few things inside, I decided to roll the go-kart out for a little fun. I ended up driving it around for nearly a half hour, doing 1 - 3 gear runs up and down the taxiway, and learning a few things about driving one of these cars. First, it's loud. I noticed that I'm blowing out some of the packing in the sidepipes and that has translated into a noticeable increase in sound level. I'm guessing that putting the body on will re-direct some of the sound, though. But, given my experience yesterday, I agree with others that ear protection will be recommended for long rides and for passengers - I'll make sure I keep a supply of yellow foam earplugs in the glove box, just so I can offer them anytime I give someone a ride. Second is that the carburetor is very well tuned and responsive - maybe a tad too responsive with the mechanical throttle linkage... I think I'm going to re-adjust that so that I have a little more travel on the pedal since my linkage gives me the flexibility to adjust the ratio between pedal movement and throttle butterfly opening. What I found was that when I hit an undulation in the pavement at low speed, my foot would push an imperceptable amount on the throttle, causing just a slight hop of acceleration, which would be followed by a few more of those... each worse than the last and in a span of just a second or two, but enough to realize that this thing needs to be treated with serious respect! Anyway, what a blast to drive it around... and what a motivator to keep working on the body so that I can get on the road!

    Here are a couple of shots of the roughed-in rolled cowl to door opening transition... more to come on this, for sure.


    Later,
    Chris

    "There are no more monsters to fear, and so, we have to build our own."
    Mk3.1 #7074

  39. #79
    Out Drivin' Gumball's Avatar
    Join Date
    Feb 2011
    Location
    Blackberry Township, IL
    Posts
    2,653
    Post Thanks / Like
    I'm finally back after some time off from bodywork due to a very hectic late-summer family and work schedule. Not too much visible progress lately, but I've been working on little things on the main body and now I'm calling that part done and ready to go back on the chassis. The doors are ready to be mounted, too, for gapping and leveling with the adjacent parts of the body. I just have a few things to finish on the hood, trunk lid, and scoop, as well as a few things on the chassis (including wrapping it in plastic to cut down on the mess I'm about to make) before putting it all together for the last stages of the bodywork that I'm doing.

    Here are some pics of things I've been working on, though.

    Hood scoop cut-out modified to match the turkey pan. Check out earlier posts for the process of cutting off the scoop and patching the front 8" of the hole:


    Here's how I decided to handle the trunk lid stud plates. Since this is a Mk3, I had the trunk with the "beak" or "stinger" as it was often called - that pointy license plate mounting area. I'm using a custom lid that was made by Karl Gess here in Illinois back before FFR was making the Mk4. This lid looks quite a bit like the Mk4 trunk, but has a bit more room between the license plate mounting location and the latch handle. Unfortunately, what it doesn't have is a clear mounting point or reinforcement area for the Breeze hidden trunk hinges. I used HSRF (before I learned about SpeedGrip structural adhesive) to bond the stud plates to the lid, then as covered above, made forms to allow me to completely encase the plates in the HSRF. Now, I've shaped the HSFR and added some Rage Gold to form what look like raised mounting pads. The final step on the trunk lid is to fill the perimeter where the inner and outer skins come together as the inner skin was a bit smaller than the outer, making the outside 1/2" or so only one layer thick.

    The pads before shaping:


    Layering on the Rage:


    Not quite finished - needs some final sanding, Slick Sand, etc..., but looking good:

    Later,
    Chris

    "There are no more monsters to fear, and so, we have to build our own."
    Mk3.1 #7074

  40. #80
    Senior Member MPTech's Avatar
    Join Date
    Feb 2011
    Location
    St. Louis, MO
    Posts
    1,186
    Post Thanks / Like
    Blog Entries
    8
    Chris,
    Really enjoying this thread, thanks for sharing your experiences and knowledge.
    I have similar rectangular lights and was wondering, when you knock the edges off to contour to the rectangular shape, do you need to re-inforce the backside? Didn't know if it thinned out the the body too much taking off the original pad corners from the round lights.
    Looks GREAT, keep up the good work and post frequently!


    Quote Originally Posted by Gumball View Post
    Another project today was to work on reshaping the tail lamp pads to better match the rectangular Lucas lamps instead of the round FFR supplied ones. Using the metal templates I made to match the footprint of the rectangular lamps, I previously did some rough work using an angle grinder. To prepare for a little filler tomorrow in this area, I did a bit more subtle shaping using 80 grit on a DuraBlock pad. Here are a few shots of the results. I think with just a little bit of skim coat work with Rage Gold, these will look pretty good.


    F5R #7446: MK4, 302, T5 midshift, 3.55 Posi IRS, 17" Halibrands
    Delivered 4/4/11, First start 9/29/12, Licensed 4/24/13, off to PAINT 2/15/14!! Wahoo!

Page 2 of 4 FirstFirst 1234 LastLast

Tags for this Thread

Posting Permissions

  • You may not post new threads
  • You may not post replies
  • You may not post attachments
  • You may not edit your posts
  •  

Stewart Transport

Visit our community sponsor