FormaCars

Visit our community sponsor

Thanks Thanks:  0
Likes Likes:  2
Page 5 of 34 FirstFirst ... 3456715 ... LastLast
Results 161 to 200 of 1342

Thread: Casey Family Build Thread (coupe)

  1. #161
    Senior Member jkrueger's Avatar
    Join Date
    Feb 2011
    Location
    DFW, TX
    Posts
    432
    Post Thanks / Like
    Julie

    I feel your frustration with not being to get going on the build. We spent a week doing frame mods before we could paint and start putting the car together.


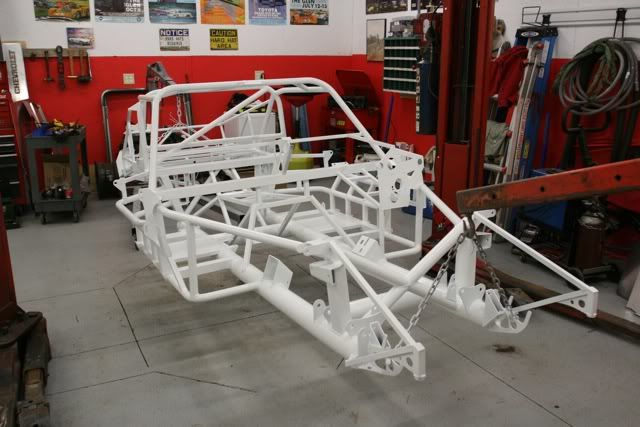
    PS: the white looks good in this picture, but I'd advise against it
    Factory Five Type-65 Coupe:"Race Spec" coupe, Ordered 1/12, picked-up 5/12, roller 5/12, first start 10/12, finished 4/13
    Factory Five Roadster: Sold 12/2011.
    http://www.25tires.com

  2. #162
    Senior Member xlr8or's Avatar
    Join Date
    Feb 2011
    Location
    San Diego CA
    Posts
    316
    Post Thanks / Like
    Julie you forgot option D) it flies off and is nowhere to be found until right after you purchase and install the new one.
    It's never too early to start beefing up your obituary.

  3. #163
    Coupy's Mom MRSQSL's Avatar
    Join Date
    Nov 2011
    Location
    Corona, CA
    Posts
    505
    Post Thanks / Like
    Quote Originally Posted by jkrueger View Post
    Julie

    PS: the white looks good in this picture, but I'd advise against it
    I actually had no plans to paint the frame white, but we DID discuss it at one point. Out of curiosity, why would you advise against it? I'm guessing it shows every greasy fingerprint, smudge, streak, etc.

  4. #164
    Coupy's Mom MRSQSL's Avatar
    Join Date
    Nov 2011
    Location
    Corona, CA
    Posts
    505
    Post Thanks / Like
    Quote Originally Posted by xlr8or View Post
    Julie you forgot option D) it flies off and is nowhere to be found until right after you purchase and install the new one.
    I don't like option D. I've experienced option D too many times.

  5. #165
    Senior Member Rodster's Avatar
    Join Date
    Nov 2011
    Location
    Orange County, CA
    Posts
    280
    Post Thanks / Like
    Use a magnet when you are removing critical small parts that may be un-obtainum. Really helps when installing shims in the IRS. You have to deal with a handful of those little washers, and then thread a bolt thru a stack of stuff. . . then something moves, and that stack of washers falls out, and they roll all over the floor in different directions. And at least one of them will roll into a crack in the garage floor, probably on its way to China or something, never to be found, so now you have to stop the build, because you ran out of those little shims.

    Go like this, holding a magnet in one hand and a punch to thread all the parts thru, and chase the parts and punch with the bolt:

    kh6wz-3-10-13-006.jpg

    Even more fun when you have a camera in one hand, as in the above picture...A video of this might be more helpful.
    Ordered Type 65 Complete Kit Aug 29, 2012 - The 50-50 $ale!
    Standard Width IRS; Halibrands - 17x9, 17x10.5
    Kit Arrived: Oct 9, 2012; Build Started: Oct 28, 2012
    WordPress: http://wayne-yoshida-kh6wz.com/
    LinkedIn: www.linkedin.com/in/waynetyoshida
    YouTube: http://www.youtube.com/user/kh6wz?feature=results_main

  6. #166
    Coupy's Mom MRSQSL's Avatar
    Join Date
    Nov 2011
    Location
    Corona, CA
    Posts
    505
    Post Thanks / Like
    Mike still needs to post pictures, but I'm going to try to get two off of my camera and onto here. One is that adorable dog and wagon I mentioned. It was the best shot I could get since I was basically chasing it through the crowd. The other is the $250K Superformance. _DSC0010.JPG_DSC0014.JPG

  7. #167
    Senior Member jkrueger's Avatar
    Join Date
    Feb 2011
    Location
    DFW, TX
    Posts
    432
    Post Thanks / Like
    Quote Originally Posted by MRSQSL View Post
    I actually had no plans to paint the frame white, but we DID discuss it at one point. Out of curiosity, why would you advise against it? I'm guessing it shows every greasy fingerprint, smudge, streak, etc.
    You are correct.
    Factory Five Type-65 Coupe:"Race Spec" coupe, Ordered 1/12, picked-up 5/12, roller 5/12, first start 10/12, finished 4/13
    Factory Five Roadster: Sold 12/2011.
    http://www.25tires.com

  8. #168
    Senior Member QSL's Avatar
    Join Date
    Nov 2011
    Location
    CORONA, CA
    Posts
    700
    Post Thanks / Like
    Julie, post pics of what?!? YOU DID NOTHING OVER THE WEEKEND. No pictures to show. However, i may be posting pictures of MY progress on MY roadster thread.

    P.S. Make sure dinner is done when i get home... LOL.
    MK4 delivery 12/17/11
    Build thread: HERE
    Epic First start video HERE

    Type 65 Coupe Ordered 01/17/13
    Build thread: HERE

  9. #169
    Senior Member
    Join Date
    Nov 2011
    Location
    Portland, OR
    Posts
    103
    Post Thanks / Like
    Quote Originally Posted by QSL View Post

    P.S. Make sure dinner is done when i get home... LOL.
    Haha you're in trouble now

  10. #170
    Coupy's Mom MRSQSL's Avatar
    Join Date
    Nov 2011
    Location
    Corona, CA
    Posts
    505
    Post Thanks / Like
    Din din is on the lawn along with all your clothes. Sleep well!!

  11. #171
    Senior Member QSL's Avatar
    Join Date
    Nov 2011
    Location
    CORONA, CA
    Posts
    700
    Post Thanks / Like
    That was good din, din! Thx for getting my clothes out for work tomorrow too! Best wife ever!
    MK4 delivery 12/17/11
    Build thread: HERE
    Epic First start video HERE

    Type 65 Coupe Ordered 01/17/13
    Build thread: HERE

  12. #172
    Senior Member QSL's Avatar
    Join Date
    Nov 2011
    Location
    CORONA, CA
    Posts
    700
    Post Thanks / Like
    Just ordered up some goodies!
    -TCI Streetfighter Aod trans
    -Wilwood pedal box
    -Wilwood master cyl
    -Motor/Trans mounts

    Hopefully we should see them this week. This will help with mock up of the engine/trans as well as the footbox so we can make the necessary frame mods to make it all work.
    MK4 delivery 12/17/11
    Build thread: HERE
    Epic First start video HERE

    Type 65 Coupe Ordered 01/17/13
    Build thread: HERE

  13. #173
    Tool Baron frankeeski's Avatar
    Join Date
    Feb 2011
    Location
    "The I.E." SoCal
    Posts
    1,356
    Post Thanks / Like
    Quote Originally Posted by QSL View Post
    That was good din, din! Thx for getting my clothes out for work tomorrow too! Best wife ever!
    Sprinklers go on at 6, so there is your wake up call.
    Frank
    __________________________
    Factory Five Racing MKIII Super Snake Replica. Cannonball Cobra Drop Trunk Box, Horn Button and other machined Do Dads.
    i.e.427 Chromed Full Width Roll Bar with integrated LED Third Brake Light.
    I will never forget My Buddy Paul.

  14. #174
    Senior Member Presto51's Avatar
    Join Date
    Feb 2011
    Location
    Catonsville, Maryland
    Posts
    578
    Post Thanks / Like
    Quote Originally Posted by QSL View Post
    That was good din, din! Thx for getting my clothes out for work tomorrow too! Best wife ever!
    Quote Originally Posted by frankeeski View Post
    Sprinklers go on at 6, so there is your wake up call.
    And Here's Your Sign
    "May you be in heaven a full half hour before the Devil knows you're dead"

  15. #175
    Junior Member
    Join Date
    Jan 2013
    Posts
    18
    Post Thanks / Like
    Quote Originally Posted by QSL View Post
    what?!?! nobody thinks i am funny?! That hurts, That hurts really bad thanks guys...
    Quote Originally Posted by QSL View Post
    Julie, post pics of what?!? YOU DID NOTHING OVER THE WEEKEND. No pictures to show. However, i may be posting pictures of MY progress on MY roadster thread.

    P.S. Make sure dinner is done when i get home... LOL.
    Mike, you are officially funny. I literally LOLed.

  16. #176
    Tool Baron frankeeski's Avatar
    Join Date
    Feb 2011
    Location
    "The I.E." SoCal
    Posts
    1,356
    Post Thanks / Like
    Quote Originally Posted by QSL View Post
    Julie, YOU DID NOTHING OVER THE WEEKEND. No pictures to show.
    I think Mrs.QSL is going to have plenty of pictures for you to post this week Mike. She Kicked Butt on the build today (Saturday) and still had time to run to get lunch for her two helpers. Her welding skills are getting better as well. Enjoy the rest of your fabrication this weekend you two.
    Frank
    __________________________
    Factory Five Racing MKIII Super Snake Replica. Cannonball Cobra Drop Trunk Box, Horn Button and other machined Do Dads.
    i.e.427 Chromed Full Width Roll Bar with integrated LED Third Brake Light.
    I will never forget My Buddy Paul.

  17. #177
    Senior Member QSL's Avatar
    Join Date
    Nov 2011
    Location
    CORONA, CA
    Posts
    700
    Post Thanks / Like
    Julie with the LEGEND Karen! Last week. I guess I lied there was a pic.

    coupe0001.jpg
    MK4 delivery 12/17/11
    Build thread: HERE
    Epic First start video HERE

    Type 65 Coupe Ordered 01/17/13
    Build thread: HERE

  18. #178
    Senior Member QSL's Avatar
    Join Date
    Nov 2011
    Location
    CORONA, CA
    Posts
    700
    Post Thanks / Like
    Nice progress this weekend. It felt really good to get some work done! Thanks Frank!! Julie will post the comments, but one technical thing I would like to add. If you plan on doing the front bars like we did. Mock up your footbox pedals first. We are using the wilwood setup and IF we were using a clutch the 1-1/2 tube would interfere with the clutch pedal. We are going automatic, so its not an issue.
    Attached Images Attached Images
    Last edited by QSL; 03-17-2013 at 09:05 PM.
    MK4 delivery 12/17/11
    Build thread: HERE
    Epic First start video HERE

    Type 65 Coupe Ordered 01/17/13
    Build thread: HERE

  19. #179
    Senior Member QSL's Avatar
    Join Date
    Nov 2011
    Location
    CORONA, CA
    Posts
    700
    Post Thanks / Like
    more pics
    Attached Images Attached Images
    MK4 delivery 12/17/11
    Build thread: HERE
    Epic First start video HERE

    Type 65 Coupe Ordered 01/17/13
    Build thread: HERE

  20. #180
    Senior Member QSL's Avatar
    Join Date
    Nov 2011
    Location
    CORONA, CA
    Posts
    700
    Post Thanks / Like
    MK4 delivery 12/17/11
    Build thread: HERE
    Epic First start video HERE

    Type 65 Coupe Ordered 01/17/13
    Build thread: HERE

  21. #181
    Senior Member QSL's Avatar
    Join Date
    Nov 2011
    Location
    CORONA, CA
    Posts
    700
    Post Thanks / Like
    I like this pic.

    coupe10001.jpg
    MK4 delivery 12/17/11
    Build thread: HERE
    Epic First start video HERE

    Type 65 Coupe Ordered 01/17/13
    Build thread: HERE

  22. #182
    Tool Baron frankeeski's Avatar
    Join Date
    Feb 2011
    Location
    "The I.E." SoCal
    Posts
    1,356
    Post Thanks / Like
    How about a picture of the COOL bending machine.
    Frank
    __________________________
    Factory Five Racing MKIII Super Snake Replica. Cannonball Cobra Drop Trunk Box, Horn Button and other machined Do Dads.
    i.e.427 Chromed Full Width Roll Bar with integrated LED Third Brake Light.
    I will never forget My Buddy Paul.

  23. #183
    Coupy's Mom MRSQSL's Avatar
    Join Date
    Nov 2011
    Location
    Corona, CA
    Posts
    505
    Post Thanks / Like
    Week 3:

    So, do I lie and tell you how amazing I am as a welder and fabricator or do I tell the truth and admit that Frank finally got a chance to see how useless I am and what Mike has to endure? I think I'll go with the truth on this one.

    Friday was package palooza! I actually went to work with Mike (we work for the same company, but different locations) and we only worked part of the day because Steve had to be picked up from school. It was nice coming home around 3:00 and not having to work, work. I'd like to suggest we do that every Friday. Anyway, we pulled up and found two packages by the door. One turned out to be my side pipes and the footbox cover which was missing from inventory. The other package was the headlight covers, MSO and little VIN plate. About an hour later, a giant semi truck pulled up in front of the house. I was jealous that someone was getting a new nifty something until I realized the recipient was ME!!!!! My transmission arrived. Wooooohooooo! The excitement was short lived as they had put fluid in it, only partially installed the plug and shipped it. So much for the rug and the box and the garage floor and the cement driveway. Mike got it all cleaned up while I hugged the transmission. It's adorable! Alyssa came home and a short while later, UPS showed up. Yay! Mike got the header bolts he was waiting for and I got my motor and trans mounts. Not sure if anything else arrived in that package, but I also got some stuff I had ordered for the house (in a separate package, not from Summit). I'm positive the UPS guy hates us. He has been to the house almost every single day for the last week or two. I think of it as job security for him, but I suspect he doesn't feel the same.

    Okay, so with all the packages rifled through, it was time to get down to work. Frank would be arriving Saturday morning and I needed to have the footbox aluminum off, the steering temporarily mocked up and the garage cleaned up (had to move the boxes and there was stuff everywhere). I thought I was high tech with my screwdriver kinda handle thing with a socket attachment so that I could remove all the footbox screws. It was tedious, but I got most of them out. Unfortunately, one or two were hidden behind the body and were unobtainable. I moved on to the steering. I found the upper shaft and the pillow thing and other assorted doodads in one box, but the long bendy shaft was nowhere to be found. I remembered seeing it during inventory and recalled it was in a tube, but the only tubes I could find were definitely not it. I couldn't see the inventory list well because Mike was working on his car and my car was shoved up against the lists. I ended up wiggling through the frame and wedged myself in enough to spy the missing shaft on the list. Why would they put it in a completely separate box????? I found it and proceeded to the installation portion. Other than being out of shape, it went smoothly. I'm going to have to build up arm strength. By the time I ratcheted all the bolts in, my arms were tired. I also unwrapped the steering wheel and temporarily installed the hub thing so I could jam the wheel onto the shaft. The goal was to drop (gently lower) the coupe onto pieces of wood so that I could test out the height to see if the steering needed to be moved (thanks to Karen for pointing this out).

    Frank arrived Saturday morning and we got to work. Nothing went as smoothly as I had envisioned, but we survived. This is where Frank really got a taste of why wives shouldn't be in the garage. At one point he even said "if I wanted to listen to fighting, I'd have stayed home". Hmmmmm...I hope his wife isn't reading this. Sorry Frank!

    The final discovery was that Mike is larger than I am. I know, rocket science, right? If I use a booster in my seat, we should both fit (snuggly for him). The steering was high for both of us and I found it to be too far to the right. Frank was able to mark my comfort area so that Mike can cut out whatever needs to be sliced off and the steering components altered. Can you tell I'm not 100% positive how that's going to be accomplished?

    It was time to get the frame back up, body off and frame torn apart. Sadly, the cart the frame sits on didn't like the engine hoist (what we were using to raise the car) and it was a heavy experience for Frank. Fortunately he's strong and he didn't break any body parts (or at least he hasn't admited it yet). I ran off to get lunch while they began the cutting process. I returned to find they just needed to grind down the new tube a hair. That hair must've belonged to the largest, hairest monster on the planet. 15 minutes later, they were still grinding. Lunch was consumed and the bar was welded in. During this process, I sat and watched and occasionally got up to take a picture or hand someone something or just view from a different angle. I'd like to say I did an amazing job, but alas I was pretty much statue-like.

    The process on the other bar was basically the same except now the steel plate in the front of the driver's side footbox where the steering shaft goes through was in the way. No biggie. Mike and Frank did some measuring and some slicing and grinding. I'm really impressed by how great the new bars look. Frank was a huge help and had some very good ideas. Thanks Frank!!!!! Oh and once the body was off, I could remove the rest of the footbox aluminum. Frank looked at me like a crazy person when he saw me undoing all the screws by hand. Mike ended up handing me a drill with the socket attachment. What?! Why didn't he give me this sooner?????!!!!

    They didn't get around to bending any metal yet except for one test piece just to make sure Frank's magnificent bending machine worked. Yup. It works. Thanks for lending it to us. Karen was going to be retrieving the jigs for the door mods and I'm hoping the next update will include some progress on those and lots of pictures of the "COOL bending machine".

    After Frank left Saturday, Tool Monkey Me cleaned up the garage except for the heavy things I couldn't move. Mike will tell you everything was heavy and he did all the work, but don't believe it. While Frank and Mike had been working on the bars, I undid all the steering stuff and repacked it (except for the hub thing that will eventually go to Russ Thompson).

    Sunday morning we went back out into the garage, but we both looked at the cars, talked about how much we like them and decided to relax the rest of the day. My biggest problem is that I'm supposed to be attaching the door frames and hinges so that they can be certain the door and the door bars they are fabricating will work together. I got all the important door pieces out of one box and discovered the hardware was in another. This wouldn't have been an issue except it was box 3 which is on the very bottom of the box stack and I had already moved and unmoved the boxes once during the weekend. Aly says she'll help me when the time comes (for a small fee). Nothing else was accomplished. I hope the weather is as nice next weekend and I really hope Frank will be able to come back to help. I think Mike was spoiled with having a real assistant with muscles and logical ideas. Alas, Mike will be stuck with me for many more years...poor guy.

  24. #184
    First Time Builder DARKPT's Avatar
    Join Date
    Feb 2011
    Location
    West Alabama
    Posts
    256
    Post Thanks / Like
    Excellent progress! You mentioned the steering wheel being a little far to the right. Some other builders reported the same issue with their Coupe recently. You can confirm the position by putting the dash in place to see where the steering column aligns.

    Just a heads up, the dash piece might need a little trimming in order to mock this up...
    Coupe #497 delivered 7/29/10. Engine in on 10/1/10. Pushcart on 10/4/10. First start on 12/01/10. First go-cart on 12/31/10. Finished and on the road as of February 2012.
    Coupe Body Buck Plans - My Spray Booth - Painting Lessons Learned
    Build site: www.bamacoupe.blogspot.com
    Lots of build photos and some observations: http://www.flickr.com/photos/53614858@N05/

  25. #185
    Super Moderator vnmsss's Avatar
    Join Date
    Feb 2011
    Location
    California
    Posts
    649
    Post Thanks / Like
    Blog Entries
    13
    Thanks for another great update, Julie...I enjoy reading your reports.

    I'll bring the jigs over this afternoon, and am looking forward to checking in on the progress. Very cool that Frank has been able to come over and help as well. He's a gem! (and when you're lucky, you get blessed with Julie's company as well...Which is always 2x FUN!)

    Karen
    #28 FFR Challenge Series
    #28 FFR Type-65 Coupe
    2011 Western Endurance Racing Championship
    2010 West Coast Champion
    Drive it.....Like you stole it!

  26. #186
    Super Moderator vnmsss's Avatar
    Join Date
    Feb 2011
    Location
    California
    Posts
    649
    Post Thanks / Like
    Blog Entries
    13
    ....Forgot to add.....LOL at your comment about the packing "wisdom" in having to search through multiple boxes for the parts needed for any particular job....Maybe one of the tips for future builders is to sort the parts after they do the inventory....Of course, that assumes one knows what all those "thing-a-ma-bobs" are!

    See you this afternoon!

    K
    PS.....Tip #2346: There's a cool template provided in the manual that doesn't match the screw holes for the LeMans cap....Ask me how I know.
    Last edited by vnmsss; 03-19-2013 at 10:38 AM.
    #28 FFR Challenge Series
    #28 FFR Type-65 Coupe
    2011 Western Endurance Racing Championship
    2010 West Coast Champion
    Drive it.....Like you stole it!

  27. #187
    Coupy's Mom MRSQSL's Avatar
    Join Date
    Nov 2011
    Location
    Corona, CA
    Posts
    505
    Post Thanks / Like
    Yeah, I was whining like an infant about the way the boxes were packed. Not only are parts for one job in multiple boxes, but now everything is wrapped in that brown paper and even when you open a box, you can't see what's in it. You start pulling out paper and discover some of it is empty and some of it is full, but you never know until you mush it all around. It's like digging for parts in a sandblaster if you put too much sand in there. Well, maybe not. Even though I'm complaining, I'm not really complaining. I would way rather FF took extra care to package the parts so they don't get damaged than to toss them all willy nilly in a box to scratch and scuff each other up. I was telling Mike I wanted to get big see through containers and take everything out of those boxes. Either I didn't say it out loud or he didn't care as I can't remember him actually responding to that comment. Definitely some repacking somehow is in order. Karen, you are 100% right about having to know what the thing a ma bobs are first though. Anyway, looking forward to seeing you this afternoon. Thanks again for driving all the way over here to bring me more goodies. Oh and thanks for tip #2346. Can I get a written copy of tips 1-2345? I may need those.

  28. #188
    Senior Member QSL's Avatar
    Join Date
    Nov 2011
    Location
    CORONA, CA
    Posts
    700
    Post Thanks / Like
    Man, i am really excited about the jigs. I want to get this all done asap so we can get the frame powder coated and start putting it together.

    We also need to fabricate before coating...

    -Weld in pedal brackets
    -Weld in mount for auto trans shifter
    -Weld in fast freddies power steering brackets
    -Fabricate and weld in rear trunk X brace
    -Fabricate and weld in rear impact protection.
    -Move steering wheel mount.
    -Side impact bars.
    -Move Dash brackets if needed.
    MK4 delivery 12/17/11
    Build thread: HERE
    Epic First start video HERE

    Type 65 Coupe Ordered 01/17/13
    Build thread: HERE

  29. #189

    Join Date
    May 2011
    Location
    Pittsburgh, PA
    Posts
    729
    Post Thanks / Like
    Quote Originally Posted by QSL View Post
    -Move steering wheel mount.
    I aligned it "left to right" with the dash, but didn't lower it before powder coating. What I am thinking of doing, for simplicity, is flipping the support bearing upside-down on the existing mount, boring a 1.5" hole through the 2" tube, and welding a spare piece of 1.5" roll cage tubing into the hole (essentially creating a tunnel through the 2x2 square tube). My sense is that this would be both the easiest way to do it, and the strongest.

  30. #190
    Senior Member QSL's Avatar
    Join Date
    Nov 2011
    Location
    CORONA, CA
    Posts
    700
    Post Thanks / Like
    interesting idea. Will look at that some more. One issue we will have with that is the russ thompson turn signal needs that lower mount, but there may be another option.
    MK4 delivery 12/17/11
    Build thread: HERE
    Epic First start video HERE

    Type 65 Coupe Ordered 01/17/13
    Build thread: HERE

  31. #191
    Senior Member
    Join Date
    Feb 2011
    Location
    Cumming, GA
    Posts
    232
    Post Thanks / Like
    Unless you are using a removable steering wheel I have to wonder how much dropping the column through the 2" tube is going to impact getting in and out.

  32. #192
    Senior Member QSL's Avatar
    Join Date
    Nov 2011
    Location
    CORONA, CA
    Posts
    700
    Post Thanks / Like
    It feels like very little. The right dropfor us is about 1.5". We are going to mod for the max and if need be, its much easier to raise then lower.
    MK4 delivery 12/17/11
    Build thread: HERE
    Epic First start video HERE

    Type 65 Coupe Ordered 01/17/13
    Build thread: HERE

  33. #193
    Senior Member STLMARSHALL's Avatar
    Join Date
    Feb 2011
    Location
    St Louis, MO
    Posts
    138
    Post Thanks / Like
    I did the same thing with the wheel. With the stock wheel the leg room is a little tight. But with the small MOMO wheel it is fine. I just flipped the bearing upside down on the stock mount and drilled a small hole in the 2x2 frame.


    Mike......FFR Coupe #340, 2003 LS1 350 RWHP, TKO 500, QT BH, Champ 10 QT pan, 5 Lug and AC, Cobra Disc, SAI mod, Nitto NT-01 275/315 ..Licensed for 28k..Just over 30k w/race tires and many mods
    http://s464.photobucket.com/albums/rr2/mmarshall01/
    http://www.youtube.com/user/stlmarshall
    2011, 2012, and 2013 St Louis region XP Champion

  34. #194
    Senior Member QSL's Avatar
    Join Date
    Nov 2011
    Location
    CORONA, CA
    Posts
    700
    Post Thanks / Like
    great pics, thanks for sharing!!!

    Karen, thanks for the shipment today! You rock!!!!!
    MK4 delivery 12/17/11
    Build thread: HERE
    Epic First start video HERE

    Type 65 Coupe Ordered 01/17/13
    Build thread: HERE

  35. #195
    Senior Member Rodster's Avatar
    Join Date
    Nov 2011
    Location
    Orange County, CA
    Posts
    280
    Post Thanks / Like
    STLmarshall - good tip, I need to check my fit with the stock steering wheel - my steer shaft is way too much to the right - but this may be due to some change in the pedalbox area - if the steering shaft were to be "centered" in the correct location, it would interfere with clutch travel. So, I think The Factory may have fixed one problem, but created another problem.

    Julie - On locating parts, it will be good to re-pack or stage them in groups - I re-packed all of my stuff and marked the box with a group name, like "front brake parts," "IFS parts," "radiator / cooling" and so on. BUT - if you do this, make sure you also note what box it originally came from - based on the parts list. Then, when you need a certain jobby-doo, you can look it up on the original F5R parts list and find it easily.

    This is probably why it took me 2 days to take inventory, but so far it is worth it - even though I have Coupe parts in every room in the house, I can find exactly what I need..... I need to get building so I can get rid of the "inside boxes"

    Looking forward to ***pictures*** of your progress!

    -wayne
    Ordered Type 65 Complete Kit Aug 29, 2012 - The 50-50 $ale!
    Standard Width IRS; Halibrands - 17x9, 17x10.5
    Kit Arrived: Oct 9, 2012; Build Started: Oct 28, 2012
    WordPress: http://wayne-yoshida-kh6wz.com/
    LinkedIn: www.linkedin.com/in/waynetyoshida
    YouTube: http://www.youtube.com/user/kh6wz?feature=results_main

  36. #196
    Senior Member Rodster's Avatar
    Join Date
    Nov 2011
    Location
    Orange County, CA
    Posts
    280
    Post Thanks / Like
    Quote Originally Posted by QSL View Post
    Man, i am really excited about the jigs. I want to get this all done asap so we can get the frame powder coated and start putting it together.

    We also need to fabricate before coating...

    -Weld in pedal brackets
    -Weld in mount for auto trans shifter
    -Weld in fast freddies power steering brackets
    -Fabricate and weld in rear trunk X brace
    -Fabricate and weld in rear impact protection.
    -Move steering wheel mount.
    -Side impact bars.
    -Move Dash brackets if needed.
    Julie's chassis is going to be one battle-ready vehicle soon - can't wait to see the chassis mods completed!
    -wayne
    Ordered Type 65 Complete Kit Aug 29, 2012 - The 50-50 $ale!
    Standard Width IRS; Halibrands - 17x9, 17x10.5
    Kit Arrived: Oct 9, 2012; Build Started: Oct 28, 2012
    WordPress: http://wayne-yoshida-kh6wz.com/
    LinkedIn: www.linkedin.com/in/waynetyoshida
    YouTube: http://www.youtube.com/user/kh6wz?feature=results_main

  37. #197
    Senior Member cobrajj's Avatar
    Join Date
    Feb 2011
    Location
    Murrieta, Ca
    Posts
    239
    Post Thanks / Like
    I know it's a lot of work, but when I inventoried the parts I listed the parts by number, description on the outside of each box. As each item was removed, it was crossed out.
    Mk3.1 Complete kit #6846 Delv. 12/20/08-- Finished 2/11/11, 89 302 EFI,T-5, 3-Link, 17" Halibrands, Nitto 555 245-315 tires, widened drivers footbox w/ dead pedal, extended passengers footbox,Sapphire Blue Met & Wimbledon White stripes,radiator stone guard shield, Build blog http://jimsffrcobrabuild.blogspot.com/

  38. #198
    Coupy's Mom MRSQSL's Avatar
    Join Date
    Nov 2011
    Location
    Corona, CA
    Posts
    505
    Post Thanks / Like
    Something needs to be done. Dealing with the boxes the way they are is going to drive me insane. I don't remember this issue so much with the roadster, but maybe I just blocked it out. I like the idea of writing on the outside and crossing it off as used, but I also like the idea of grouping into assembly sections. Needing to know the original box number messes that up a little. I'm trying to think of an easy way to accomplish all of that. I'm a big fan of spreadsheets so maybe I'll do something like that. Still...I need to be able to identify the jobby-doos (that makes the third word this week that makes me smile) which is enough of a challenge when they are in the correct boxes. I'll have to think about this. The next update should be interesting.

  39. #199
    Senior Member Rodster's Avatar
    Join Date
    Nov 2011
    Location
    Orange County, CA
    Posts
    280
    Post Thanks / Like

    Jobby-Doo

    Where's that search tool when ya need it - Julie said, "I love inventory. . . . "

    Spreadsheets - that might do it, but sounds like too much work. Although - I think you can get the parts lists in PDF from the Factory. Then you can copy - paste. Oh. Wait. Jason said that the list is not always the latest - your packing slips are the latest source for part numbers and qtys.

    It really is not that terrible of a chore, now that I am done with that.

    You have some kids that can have fun organizing the parts, right?

    Let's see. You'd have a box of Jobby-Doos, then Do-hickeys, then thing-a-ma-bobs. Then another section for aluminum sheet shapes. Then rubber-licorice-looking soft thingies. Then you have to deal with all the screws, bolts, nuts, nylocks, washers, rivets (in 2 sizes), and some other weird fasteners I have seen for the first time.

    Pictures of all the parts would help.

    Anyone remember Heathkit electronic project kits? Amazing and great instructions, with actual size drawings of all the parts!

    Still - this really is a fun project, right?


    -wayne
    Ordered Type 65 Complete Kit Aug 29, 2012 - The 50-50 $ale!
    Standard Width IRS; Halibrands - 17x9, 17x10.5
    Kit Arrived: Oct 9, 2012; Build Started: Oct 28, 2012
    WordPress: http://wayne-yoshida-kh6wz.com/
    LinkedIn: www.linkedin.com/in/waynetyoshida
    YouTube: http://www.youtube.com/user/kh6wz?feature=results_main

  40. #200
    Coupy's Mom MRSQSL's Avatar
    Join Date
    Nov 2011
    Location
    Corona, CA
    Posts
    505
    Post Thanks / Like
    I love doing inventory. Not so fond of trying to find things AFTER inventory. Imagine how huge the inventory packet would be if there were pictures or drawings of each part!! It would be amazing!! I suspect most men have waaaaay fewer issues than I do so probably not feasible for FF. Mike thinks I should just leave well enough alone, but when he and Frank turn their backs this weekend, I'm gonna repackage the parts. Shhhhh...

Page 5 of 34 FirstFirst ... 3456715 ... LastLast

Posting Permissions

  • You may not post new threads
  • You may not post replies
  • You may not post attachments
  • You may not edit your posts
  •  

Martin's Dent and Collision Shop

Visit our community sponsor