Visit our community sponsor

Thanks:
0

Likes:
0
-
Member

-
Member
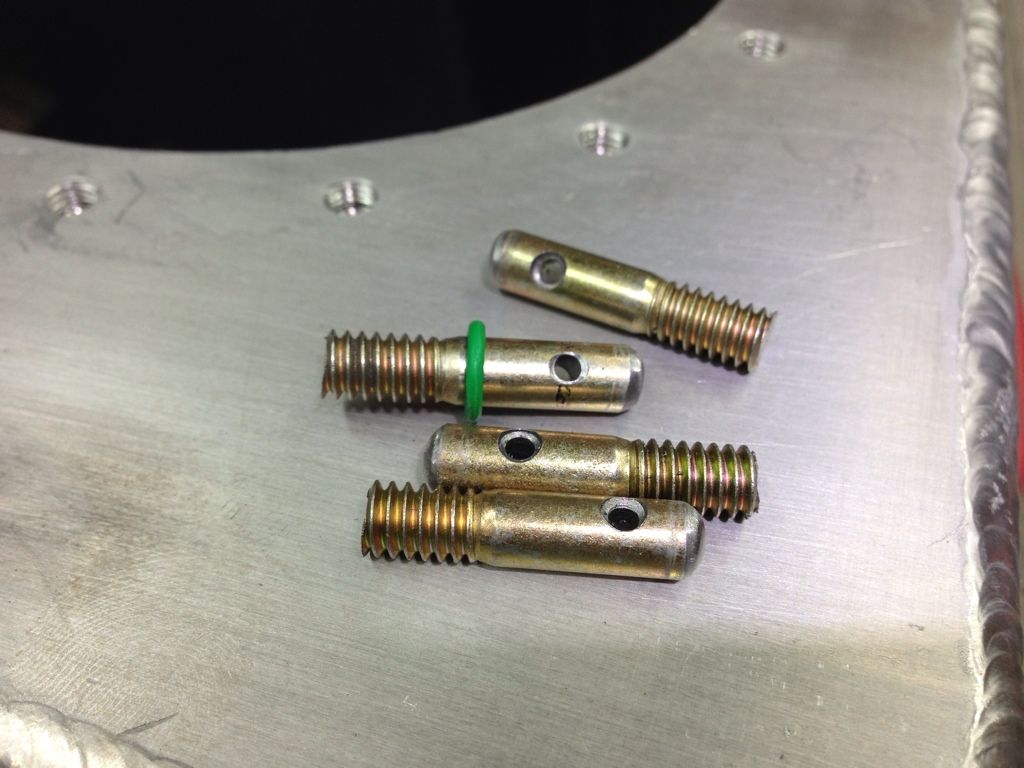
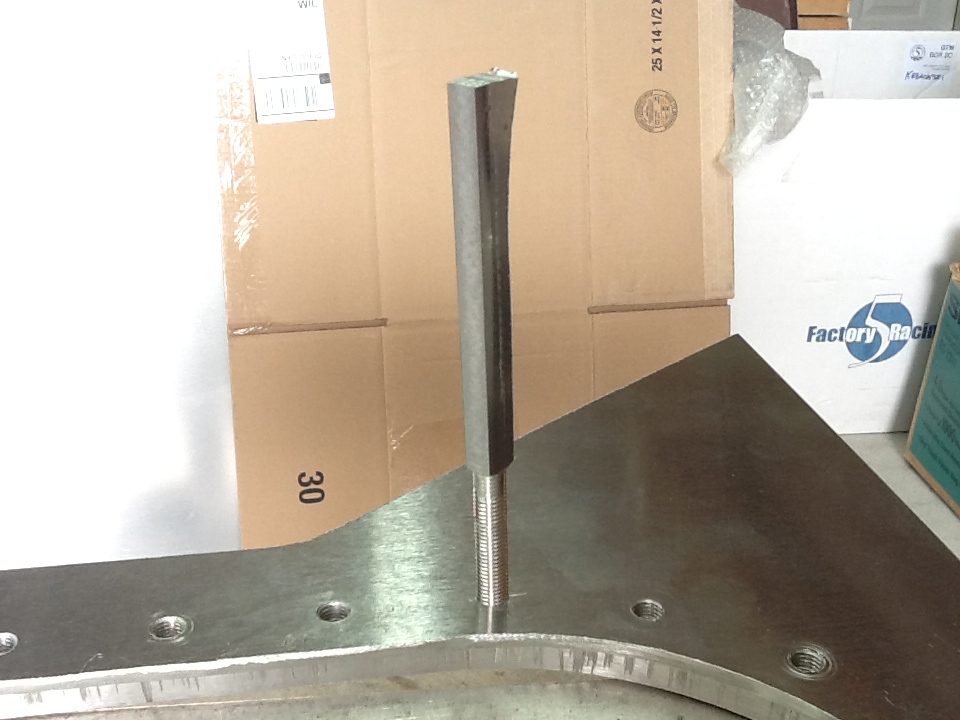
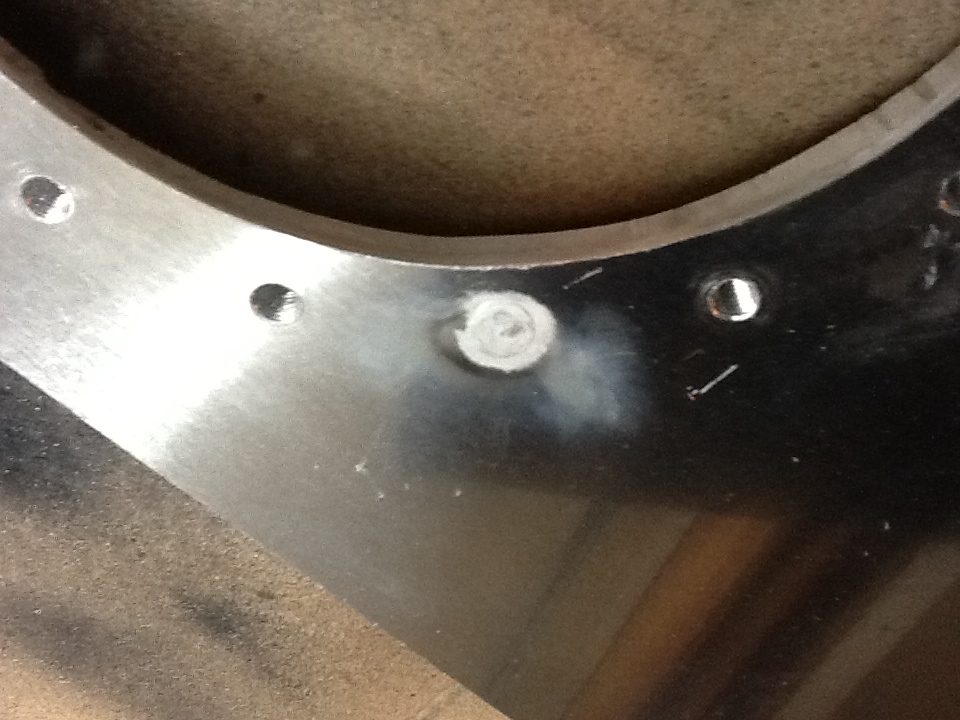
One thing with the fill plate ring. Well I was very accurate with most of the holes but unfortunately one was about 1/32 off. I am sure the drill bit wondered while my 5 year old was asking me questions about what ever project she was making on the shop floor behind me. Yes I could have rounded out that hole in the fill plate and it would have been fine. But I just did not want to do that.
I needed to weld up the hole but that is difficult to do with aluminum. I also did not want to warp the hell out of the plate trying to get enough heat into it in order to melt it half way through in order to fill the misaligned hole.
I came up with this fix. I just made a 1/4 28 screw out of scrap aluminum. I had the 1/4 inch plate. I threw it in to the lathe and presto. one weld in plug.
Last edited by kabacj; 04-02-2012 at 09:55 PM.
XTF #2
build start date June 19 2023
GTM # 344
Build Start December 2010
First track day April 2013
-
Senior Member

Amazing work John. You sure are a top notch fabricator. Keep the updates coming.
GenII GTM #354
Delivered (02/09/11)
-
John, that's really cool. What kind of tig welder are you using? I'd like to buy one at some point and am interested in what you think is a good machine for welding thinner aluminum and similar work.
-
Yep, what you did is pretty much the "standard" fix for a hole in the wrong place. Unfortunately I just had to use this method myself last month.
Tank project looks pretty good. Many people want to use too thin a material for this kind of job and it not only makes the fabrication difficult, but can lead to problems "down the road".
This tank looks nicely done.
-
Member
Hi Jacob,
I am far from an expert, however I went with a Lincoln 225 ready pack. Miller or lincoln both have very good products in this range. You probably could go cheaper and have simmiar success with other brands, but I dont konw.
I got my tig welder a month before my GTM arrived. I learned how to weld from watching videos on the internet and reading. Once you learn the basics of torch angle, rod feeding and the like it boils down to practice. Welding aluminum is like juggling. You need to balance the heat input, torch speed, and rod feed, all while watching where you are going.
I would just weld on scrap for hours just learning how to stack beads first in steel then out of position on steel and on very thin steel, then on thick aluminum then thinner aluminum then out of position.
I could never understand why good welders could not explain welding beyond the basics. I knew the basics and my welds still looked like crap. The reason its tough to explain is the difference between good aluminum weld and a bad one is a very subtle difference in the temperature of the base metal, amperage of the torch, torch speed and the ability of the thing you are welding to conduct heat away from the weld pool. When its good, the torch sounds nice and the pool is deep enough and not too wide. The pool is hot enough to weld the rod as it hits but not so hot that the pattern of beads is lost.
You just need to learn to see and hear the signs of too hot, too cool, too fast, too slow etc. The only thing that can teach that is practice and making lots of mistakes.
I made a 4x4 box of aluminum scrap and welded tons of scrap to it. Ran beads completly covering it. its now about 1/2 inch thick. I am sure I have 10 hours on that box. If you run a bead on the thick block it acts one way. Try to run that bead out on to a 1/8 inch think plate I attached and its a whole other ball game.
I really enjoy welding. Not to get too deep and corny but its Zen like. You focus your entire being on this little point of light and for a long while it does not work out but then you get the hang of it and its easy. I wish I was welding right now 
I encourage you to try it.
John
XTF #2
build start date June 19 2023
GTM # 344
Build Start December 2010
First track day April 2013
-
Member

Originally Posted by
crash

Yep, what you did is pretty much the "standard" fix for a hole in the wrong place. Unfortunately I just had to use this method myself last month.
Tank project looks pretty good. Many people want to use too thin a material for this kind of job and it not only makes the fabrication difficult, but can lead to problems "down the road".
This tank looks nicely done.
Thanks Crash,
Of course i am re inventing the wheel with my standard fix Its funny how that happens. Lots of people independently get to the same place by their own path.
Thanks for the comments. The only downside of thicker aluminum was bending it. Its soft 3003 so I had that going for me. I just have a standard 48 inch box break. I was pulling on that thing with all I had. I even got my wife involved on one of the bends. (she loves when i call her, she knows she is in for an interesting helper task
XTF #2
build start date June 19 2023
GTM # 344
Build Start December 2010
First track day April 2013
-
John,
Thanks for your good advice. I've done a lot of mig welding but never tig. I think I will give the tig a try shortly. I am fortunate in that I can borrow a newer Miller Syncrowave for as long as I need it (and it sounds like I'll need a good bit of practice). I have a few ideas for taking some weight off of my Coupe and aluminum welding is required (aluminum driveshaft loops, some aluminum brackets, etc.). Thanks again for the detailed response.
-
Let me just caution you that if indeed you need to use a drive shaft hoop, you want that out of nothing less than 4130 steel. I have witnessed an aluminum drive shaft come apart and, even with the required hoops, break a carbon kevlar seat and bruise a guys leg. I simply would not suggest any aluminum in either the driveline or anything that is supposed to contain it. Aluminum just doesn't cut it, and this is why the drag race sanctioning bodies require either steel or blanket scatter shields for transmission bell housings. These spinning parts store a lot of energy. Just an FYI.
-
I hear what you are saying, crash. I have Forte's loops on each u-joint. I was going to go re-fabricate the loops with 1/4" x 2" aluminum, but will follow your advice and scrap the idea. I recently watched a rear u-joint fail on a big lifted pickup that passed me and it was quite a sight to see! I thought that 1/4" would be an OK balance between strength and weight, but I'll trust your judgment on that.
I don't want to be disrespectful and hijack John's thread, but since we're addressing welding, let me ask this: any thoughts on welding 4130 steel. My understanding is that tig is the best process, but mig will work OK if you preheat it to avoid the initial "shock" that you'd otherwise impart to the steel from the mig process. My understanding is that the grain structure of 4130 doesn't like the rapid blast of heat from a mig, but the tig process, if done properly, avoids the problem. Can't claim any firsthand knowledge of any of this, so if you guys have any thoughts, I'd welcome them.
-
Senior Member

John,
More oustanding work.
We hit 90 last weekend........
R/s
Vidal
CURRENT STATUS: Interior Rework and Bodywork.
GenII GTM #331. Delivered (23/9/10)
BUILD LOG AND WEBSITE:
http://gtmbuild.weebly.com/ .
-
Member
Originally Posted by
Jacob McCrea
thoughts on welding 4130 steel. My understanding is that tig is the best process, but mig will work OK if you preheat it to avoid the initial "shock" that you'd otherwise impart to the steel from the mig process. My understanding is that the grain structure of 4130 doesn't like the rapid blast of heat from a mig, but the tig process, if done properly, avoids the problem. Can't claim any firsthand knowledge of any of this, so if you guys have any thoughts, I'd welcome them.
Yep its true that TIG is the best welding process for 4130, however for our purposes 4130 adds lots of complexity for little gain. Its not like we are building our cars with lightness in mind so we can save weight in other ways but not need to go with a 4130 frame.
In my early stages comparison shopping GTM like kits I was attracted to more exotic construction and materials.
After I got over that, I realized that cutting, adding to and reparing a frame as needed was much more valuable then a few lbs saved.
You ever see that video where a top fuel dragster's 4130 frame snaps in half mid track. Yeah that's never good. I am 100% sure DOM mild steel frame I built myself would never fail like that. The welders building that frame knew what they were doing and it still failed!
I am not trying to be dramatic, but here is the footage
http://www.youtube.com/watch?v=I5hc4ZJS0zs
When I had exhausted all the easy weight savings then I would move into 4130 construction.
Last edited by kabacj; 04-03-2012 at 06:40 PM.
XTF #2
build start date June 19 2023
GTM # 344
Build Start December 2010
First track day April 2013
-
Sometimes it's not about weight savings. I am building to the same spec of DOM with 4130. It's simply about strength. ANYTHING 4130 or otherwise will benefit from a normalizing process after it has been completely welded out. Problem is that it is expensive and difficult to find someone that can bake an entire frame. That said, I have used both MIG and TIG with 4130 and had excellent results. If you aren't careful with TIG, you get too much heat into the area. Because you are having to move along with the MIG, you don't see this issue as much. Also with TIG the gaps need to be REALLY tight, whereas with MIG you can squirt the filler material in there pretty easily and come out with a good strong weld. I learned from a pro a long time ago that the filler metal should be substantially more flexible than the parent metal to avoid cracking and preserve strength. I generally over build EVERYTHING as I feel my life isn't worth a few pounds of lightness.
So to answer your question, in my experience, MIG is fine. I personally use a soft rod/filler and straight CO2 for extra penetration.
My frame is a mixture of 4130 DOM and 1020 DOM.
Last edited by crash; 04-04-2012 at 11:14 AM.
-
Guys, thanks for taking the time to write out your additional thoughts. Also, that video is pretty surreal!
-
Member

Hi Jacob
I set up the ASME weld procedures for my company back in the 80s. We had a saying back then and I quote "There are Welders and there are Dobbers and there are sparkling Fu----g idiots." I would say you are at the Dobber stage. That is a complement, as it takes many years and many hours of practice to become a certified welder. To the untrained eye it looks easy but as you stated, it is Zen like to be good.
Good Luck
Jack D
-
Thanks Jack, I will take the compliment, but I think you may have me mixed up with John as he was the one who rightly mentioned the Zen-like nature of being good at this. 
-
Member
-
Senior Member

Wow! That sure is some beautiful work. Thank you for sharing. It's good to see I'm not the only one who can take a project and spend way too many hours just because we have the opportunity to do it our way. Besides this forum, no one except you will know all that went into your fuel tank. But you'll know and after it's done you'll know you enjoyed the journey. After all isn't that the point?
-
Member
Originally Posted by
sk7500
It's good to see I'm not the only one who can take a project and spend way too many hours just because we have the opportunity to do it our way. Besides this forum, no one except you will know all that went into your fuel tank. But you'll know and after it's done you'll know you enjoyed the journey. After all isn't that the point?
Yes it makes me happy to look at the tank. Its a little sad its buried in the car, however its was lots of fun to figure out. Totally agree with you about the build journey. This build has been more fun then I imagined. I have learned so many new things I would never have even tried if were not for this project... like tig welding! These side projects take a crazy amount of time as you know, but I am either working on it or thinking about working on it. This is my first build, it surely will not be my last.
John
XTF #2
build start date June 19 2023
GTM # 344
Build Start December 2010
First track day April 2013
-
Mad Scientist

Super Nice to see you do this project!!
Like you, I spend many hours extra doing stuff that I want to just to do it.
your work is great quality and in the end it works!!
when you share your work with me in inspires me to keep working on my stuff too.
Thanks for sharing!!
David 253
GTM #253 In Process

-
Senior Member
Great work John, excellent craftsmanship as usual. The pictures of your roll bar are also amazing.
GenII GTM #354
Delivered (02/09/11)
-
Member
-
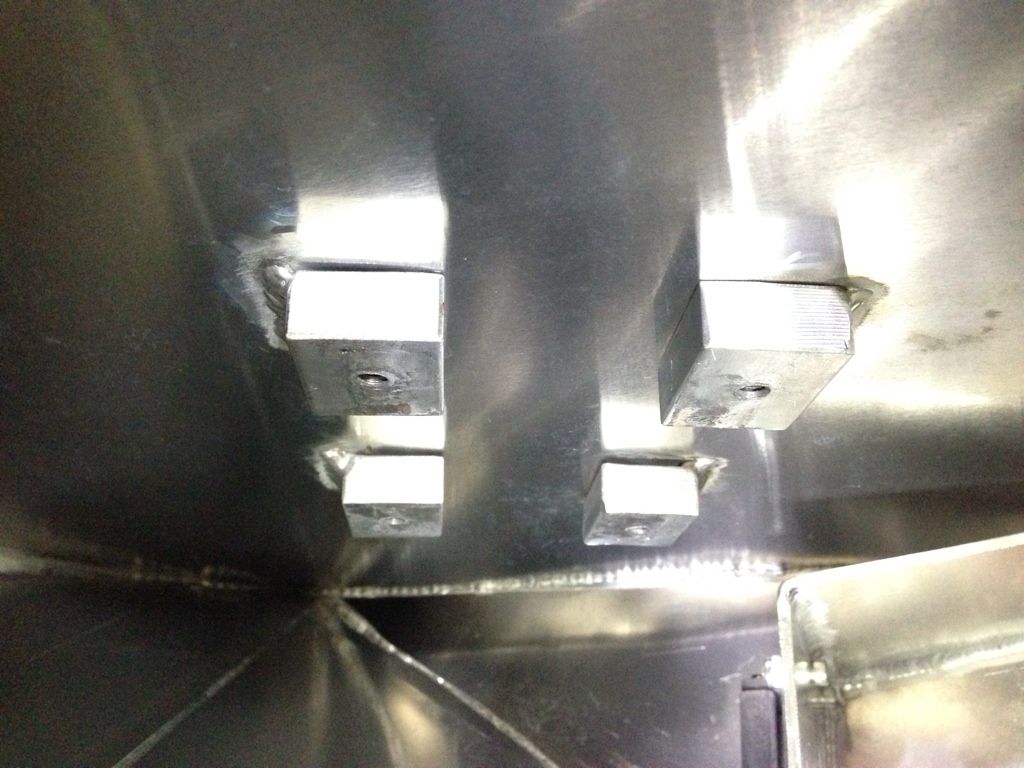
I don't want to say that you will have problems with that, but I have worked with fuel tanks previously that DID have issues with baffles that were welded into the inside of the tank tearing the sides of the tank apart and resulting in a pretty significant fuel leak. The sloshing fluid carries a ton of energy, and over hundreds of cycles will damage the outer wall of the tank. At the very least I would do whatever I could to maximize the amount of weld area that you can get by welding AROUND every one of those mounts. Simply put, after having issues, I am not a fan of attaching anything to the walls of fuel tanks.
-
Member
Originally Posted by
crash
I don't want to say that you will have problems with that, but I have worked with fuel tanks previously that DID have issues with baffles that were welded into the inside of the tank tearing the sides of the tank apart and resulting in a pretty significant fuel leak. The sloshing fluid carries a ton of energy, and over hundreds of cycles will damage the outer wall of the tank. At the very least I would do whatever I could to maximize the amount of weld area that you can get by welding AROUND every one of those mounts. Simply put, after having issues, I am not a fan of attaching anything to the walls of fuel tanks.
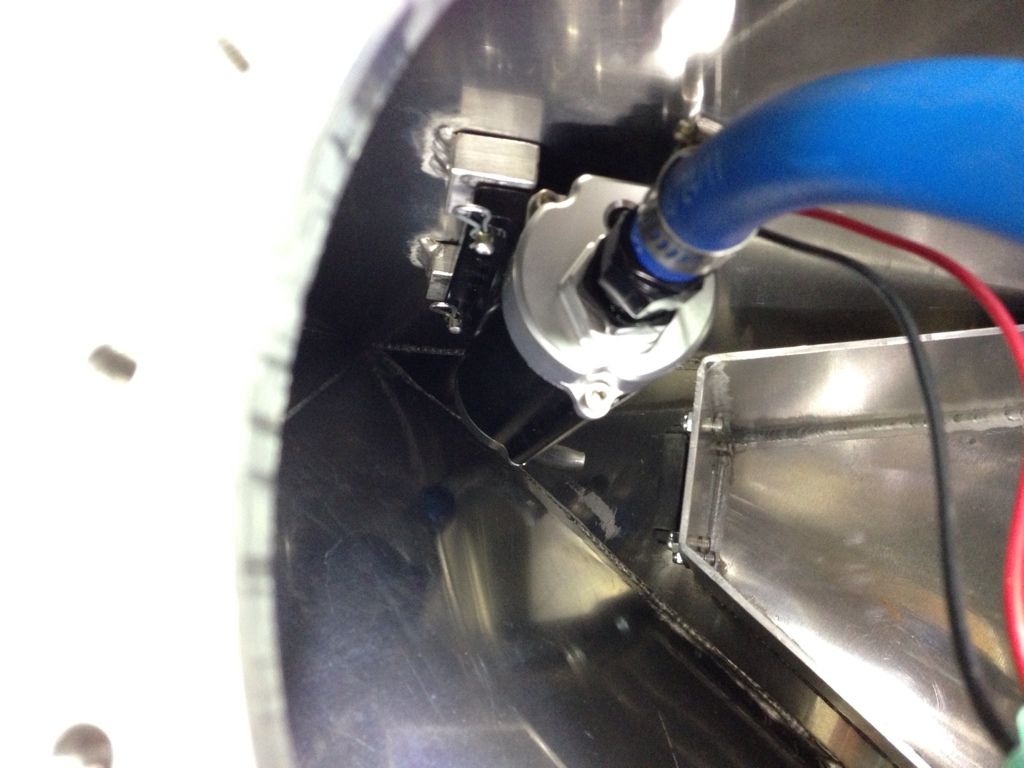
Yep that's good advice. This tank is a working prototype and my first gas tank ever. The ultimate tank will have a bladder and this pump arrangement would not work. I wanted to test the packaging, weight distribution etc before committing to the cost of a custom bladder.
I was not sure where I wanted to put the fuel pump inside the tank, so I planned to mount it after the tank was complete. I barely had enough room to weld the mounting blocks on the inside of the tank. Somehow I figured i would have plenty of room to get both arms through a 6/9 fill plate hole and tig in the blocks. Getting my arms in was no problem. Seeing what I was doing was another story. I got it done but it was not pleasant.
On the good side the tank walls are 1/8 inch 3003 aluminum. That's massive overkill but my logic was that thick mailable aluminum would be a good bet in the event that the tank is crushed in any way. Not as good as a bladder , but good enough for track testing car development. Hopefully the extra thickness will give me a bit longer before I have any fatigue issues with the pump mounts. If I do have problems, then ill cut out the blocks and the tank wall and ill and weld them back in from the outside.
Thanks for the heads up.
John
XTF #2
build start date June 19 2023
GTM # 344
Build Start December 2010
First track day April 2013
-
Originally Posted by
crash
I don't want to say that you will have problems with that, but I have worked with fuel tanks previously that DID have issues with baffles that were welded into the inside of the tank tearing the sides of the tank apart and resulting in a pretty significant fuel leak. The sloshing fluid carries a ton of energy, and over hundreds of cycles will damage the outer wall of the tank. At the very least I would do whatever I could to maximize the amount of weld area that you can get by welding AROUND every one of those mounts. Simply put, after having issues, I am not a fan of attaching anything to the walls of fuel tanks.
Crash.... is this still an issue with a foam filled tank??? Seems it would keep the sloshing to a minimun.
Last edited by Fred Brewer; 03-08-2013 at 03:52 PM.
Fred
----------------------------------------------------------------------------------------------------------------------------------------
GTM #22 - Worlds slowest build
-
Nope. Free standing foam works well. Just anything that is physically attached to the aluminum walls is a potential issue.
-
Originally Posted by
crash
Nope. Free standing foam works well. Just anything that is physically attached to the aluminum walls is a potential issue.
Including external mounts.
 Posting Permissions
- You may not post new threads
- You may not post replies
- You may not post attachments
- You may not edit your posts
-
Forum Rules

Visit our community sponsor


 Reply With Quote