BluePrint Engines

Visit our community sponsor

Thanks Thanks:  1
Likes Likes:  4
Page 5 of 23 FirstFirst ... 3456715 ... LastLast
Results 161 to 200 of 908

Thread: GTM roll cage modifications and race car build log

  1. #161
    Senior Member sk7500's Avatar
    Join Date
    Feb 2011
    Posts
    377
    Post Thanks / Like
    To say you have a passion for cool chassis stuff would be the understatement of the year. You need to have a clear body made. I'm not sure but it might be a sin to cover up your work.
    PM me your e mail address. I have something I want to send you.
    Steve

  2. #162
    Senior Member The Stig's Avatar
    Join Date
    Feb 2011
    Location
    Charlotte, NC
    Posts
    2,004
    Post Thanks / Like
    I have to agree with Steve.

    It seems a shame to cover such nice work with the body! Even if it's a body that looks as nice as the GTM.

    Congrats and great work!

    Mike
    The Stig

    Some say, that I only know two facts about ducks, (both being wrong); and that if I could be bothered, I could solve the "da Vinci Code" in 47 seconds...
    All I know is that I'm called "The Stig".
    GTM #0081

  3. #163
    Member kabacj's Avatar
    Join Date
    Mar 2011
    Location
    Long Island
    Posts
    1,103
    Post Thanks / Like
    Thanks Mike and Steve. I am having lots of fun with the frame mods. I did consider for a second how I could drive the car without a body, but the rocks that rain down all the time as they are thrown off the tires take the fun out of the no body configuration.

    I have lots of body mods planned and then interior mods. So I should be busy for a few more months.


    John
    XTF #2
    build start date June 19 2023

    GTM # 344
    Build Start December 2010
    First track day April 2013

  4. #164
    Member
    Join Date
    Apr 2013
    Location
    near the lil podunk town of Milano (about a hour northeast of Austin) {middle of NOWHERE}
    Posts
    84
    Post Thanks / Like
    Great jod on the mods!!!
    When the mods to the frame/cage are finished, are you going to re-powder coat or paint???

    For us guys that are NOT "vertically challenged" (6' or over) any ideas on fitting an "approved" cage without lifting the roof? I don't think laying the seat back is going to be an option for me (I have a 38"inseam & will probably be cramming the seat all the way back to begin with)...

  5. #165
    Member kabacj's Avatar
    Join Date
    Mar 2011
    Location
    Long Island
    Posts
    1,103
    Post Thanks / Like
    Hi Cowboy

    I repainted the sections where I removed the powder coat with POR 15. It's almost as durable as powder coat. It looks the same and it's much easier.

    If you want to use the approved design. You can install the cross braces and additional hoop behind the driver and just move the pedal box forward.

    Moving the pedal box wil require reconfiguring the bracing to make room for your feet.

    Prior to this project I didn't have any experience building/ modifying frames. I tried to limit the changes I needed to make.

    In hind sight, anything is possible. It just depends how badly you want to do it. You will find that every change requires a cascade of other changes and lots of time.

    Before you commit to any drastic changes. I would sit in the car, get yourself a Kirkey intermediate road race seat that you can modify. There is tons of room to be gained just by sitting on the floor pan and adjusting the seat angle.

    Solving all the little problems you create is part of the fun. It also makes you appreciate how nice it is that factory five give you all the parts and step by step instructions.

    John
    XTF #2
    build start date June 19 2023

    GTM # 344
    Build Start December 2010
    First track day April 2013

  6. #166
    LCD Gauges's Avatar
    Join Date
    Apr 2011
    Location
    Toronto, Ontario
    Posts
    1,545
    Post Thanks / Like
    Blog Entries
    3
    I see that all the welding lessons I gave you, paid off. I'll be sure to send your certificate of achievement this week.

    This is now the JohnTM, not GTM.
    Custom LCD Gauges , Data Loggers, Control Touch Screens
    www.LCDdash.com \\ 647-522-9953 \\ Voice & Text
    Proud new owner of GTM Gen 1., #105 - 08/27/11
    LQ9 Powered, G96.00 6 speed transaxle

  7. #167
    Member kabacj's Avatar
    Join Date
    Mar 2011
    Location
    Long Island
    Posts
    1,103
    Post Thanks / Like
    Quote Originally Posted by 00SS_M6LS1 View Post
    I see that all the welding lessons I gave you, paid off. I'll be sure to send your certificate of achievement this week.

    This is now the JohnTM, not GTM.
    Ha! Your lessons and 10 bottles of argon worth of practice and here I am!


    Working like a madman to get my car and trailer ready for this weekends track event.

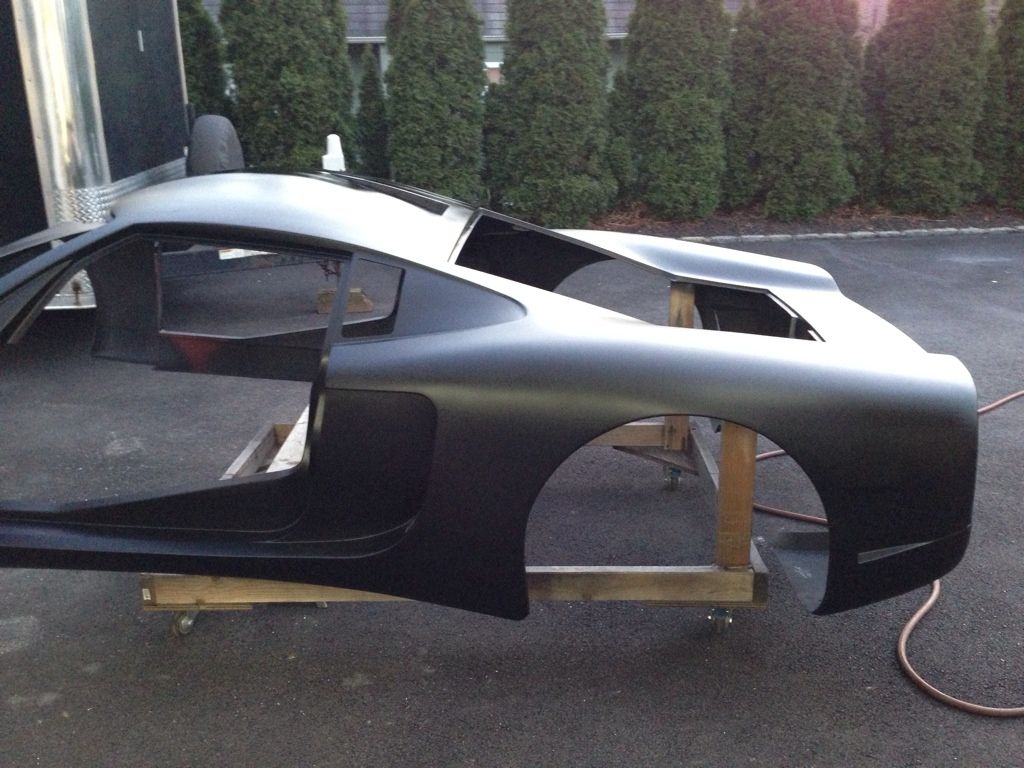
    I repainted the car satin hot rod black because the epoxy primer did not look nice at all and I had a little more body work to cover up.


    The satin black is actually a pretty cool look. I'm a shiny car guy but it will be fun to play with this paint style while I finish the car.


    As I modify the body ill just keep it looking reasonably good with a quick coat of satin black. Then i will strip it all off for final paint. I have only had black cars/trucks I can't break that streak now.

    I was working on the alignment and I noticed something that might
    Be useful for folks.

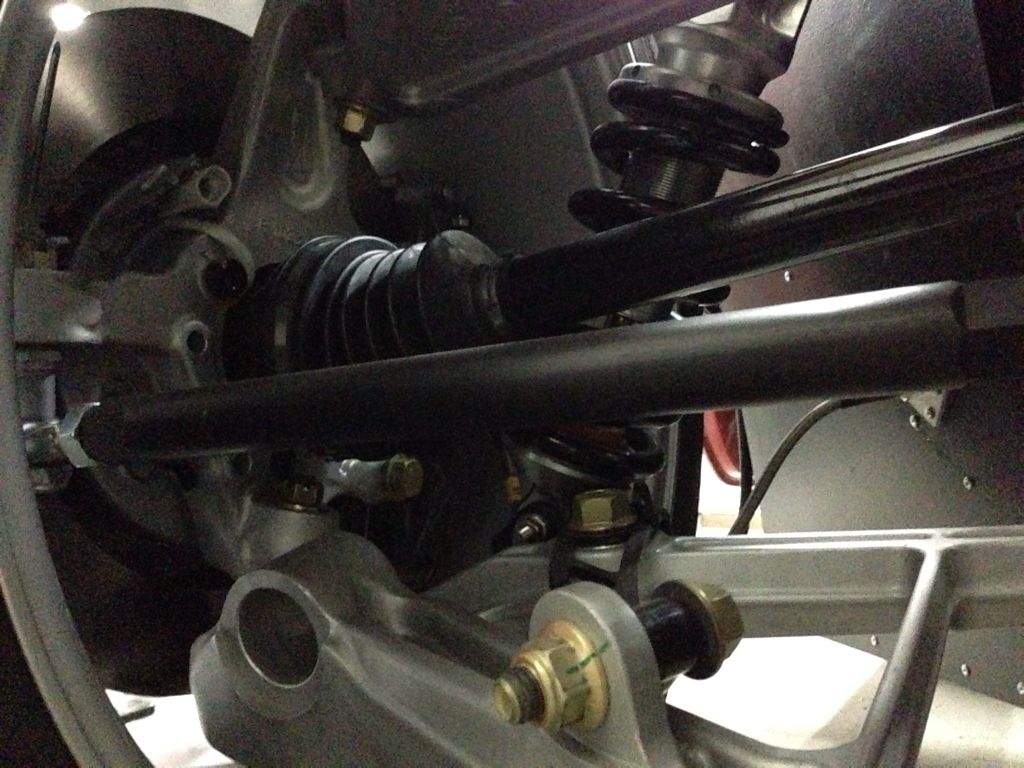
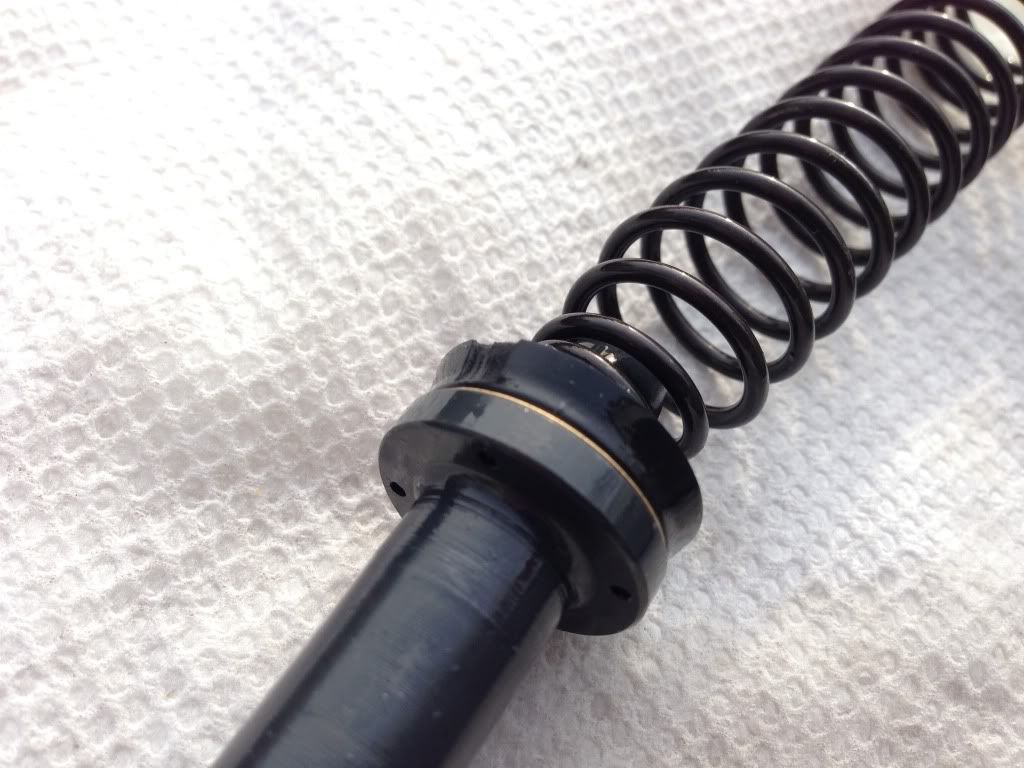
    I lowered my car a little with my custom ohlins shock Setup. That requires adjusting the bump steer. I have the ffr bump steer kit as well as upgraded tie rods in the rear that also includes a bump steer kit.


    In order to eliminate any bump steer I used the shorter factory five stud and shims on the rear and the corvette lowering kit stud on the front. This way I got more adjustment in the front.

    In order to eliminate bump steer I needed to drop the rear tie rods roughly half inch or 6 factory five shims and almost 3/4 inch in the front.

    If you follow the directions on the car build for ride height i suspect you gain a little with front bump steer adjustment. Front and rear adjustments are required if you lower the car.

    The car is not very street friendly this low but I don't mind. I might change my mind after I get some time on the road however.

    Speed bumps are not my friend.

    John
    Last edited by kabacj; 04-19-2013 at 06:19 AM.
    XTF #2
    build start date June 19 2023

    GTM # 344
    Build Start December 2010
    First track day April 2013

  8. #168
    Member kabacj's Avatar
    Join Date
    Mar 2011
    Location
    Long Island
    Posts
    1,103
    Post Thanks / Like
    There is this saying that work expands to fill the time allotted. For some reason in my case it seems like work expands to twice the time available.

    Of course I do it to myself.

    Friday night 6:00pm: I had planned on taking the day off Friday before the race weekend to pack and clean up loose ends. Well that did not happen. So I got home at 6.00 and I had I needed to hang the doors, mount the gauges, remount the seats and belts, figure out the air filters, mount the rear view camera screen install the passenger tunnel side panel, close out the panels in the front wheel wells so I don’t get blasted with rocks and sand, attach the hood and hinges, attach the rear hatch, pack my stuff, mount the fuel filler to the body, mount the wing, finish the alignment and transfer tools and parts into the trailer and load the truck then drive 3 hours to Millville NJ. I can say I was almost at the point of giving up.

    Its not like I waited to the last min to get all this stuff done. I took off wed, painted the car, rebalanced the GTM tires, put new tires on the trailer, and lubed up the bearings and gave the trailer a once over. Unloaded all the stuff I store in the trailer including my next project. Double checked every nut and bolt on the car and remounted the rear cell of the isis kit and plugged everything back in. 4.5 hours of sleep on thurs night.

    Back to Friday night.

    I had hoped that the doors would just bolt up and fit because I had adjusted them so they were absolutely perfect closing and latching smoothly. I forgot I took the doors all apart after I assembled them in order to close up the area where the striker exits the fiberglass. That was a terrible idea.

    Now my doors did not latch properly again. The guys who have fit the doors know how sensitive they are to adjustment. Make a very slight adjustment in the wrong direction and they don’t fit well anymore. I think part of the reason that the doors are difficult to fit is that the factory leave a lot of extra fiberglass on the edges of the door so you can fit the door to the opening Unless you are doing the body work at the same time as fitting the doors and internals a difficult job gets harder.

    So just getting the doors to fit properly again took 2 hours. The hood went right on and fit pretty well. I had drilled 1/8th inch locating locating holes for all the parts. That was a good idea.

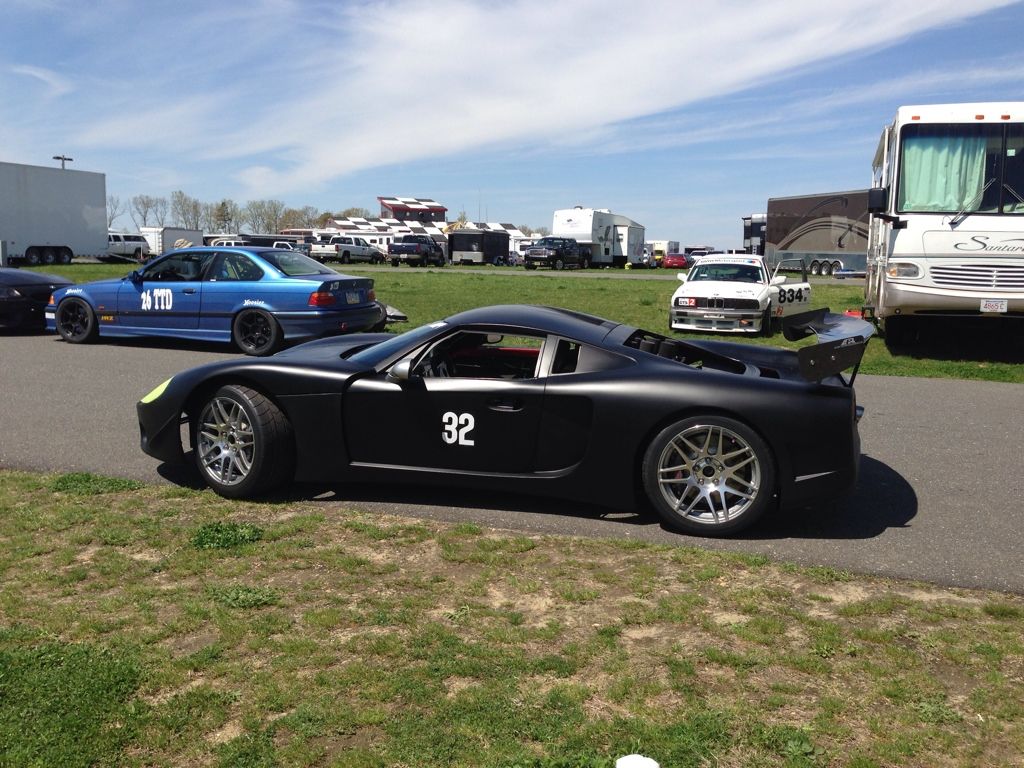
    I put the rear hatch on bc I thought it looked nicer and just a little better aero. Finally mounted the rear wing. It was midnight and thunderstorms were heading in it was already starting to rain. I decided that pulling the fully loaded 25’ trailer in a downpour for 3.5 hours would not be the best approach. Even though it was late and raining, my wonderful wife helped me load up and my buddy and I agreed to head out at 3am. It was 1.30am. Time for bed.


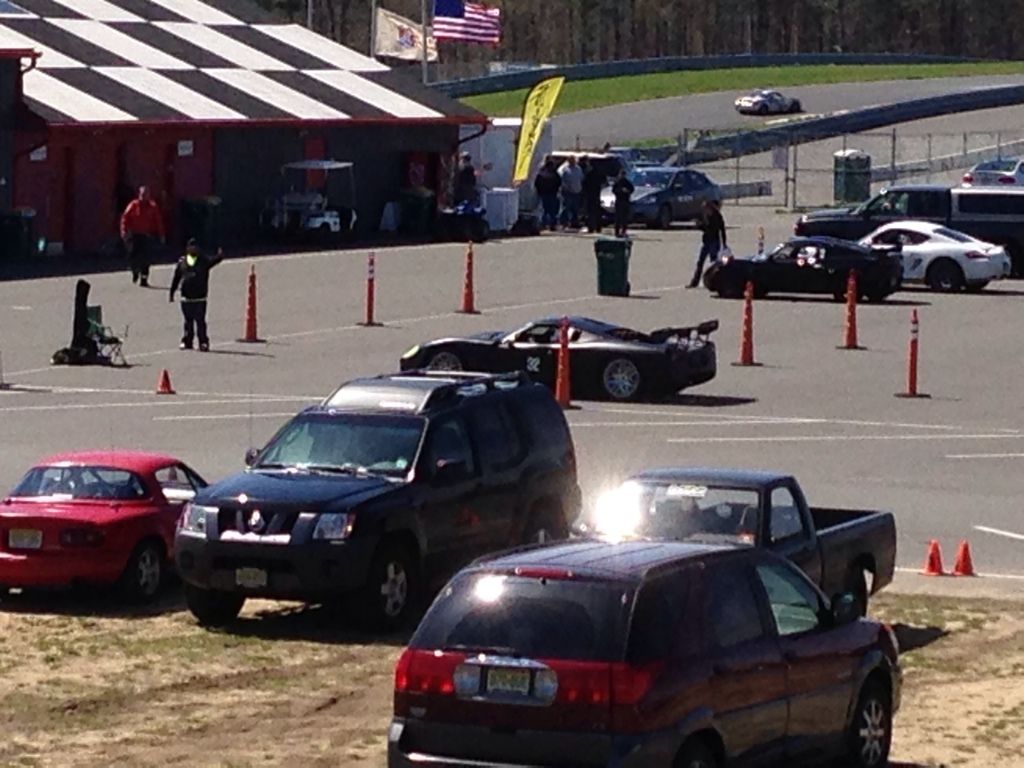
    3am. Still raining , working on an hour and a half of sleep. 645am we arrived. The Rain had stopped but the track was very wet . Little rivers running across sections of the track.

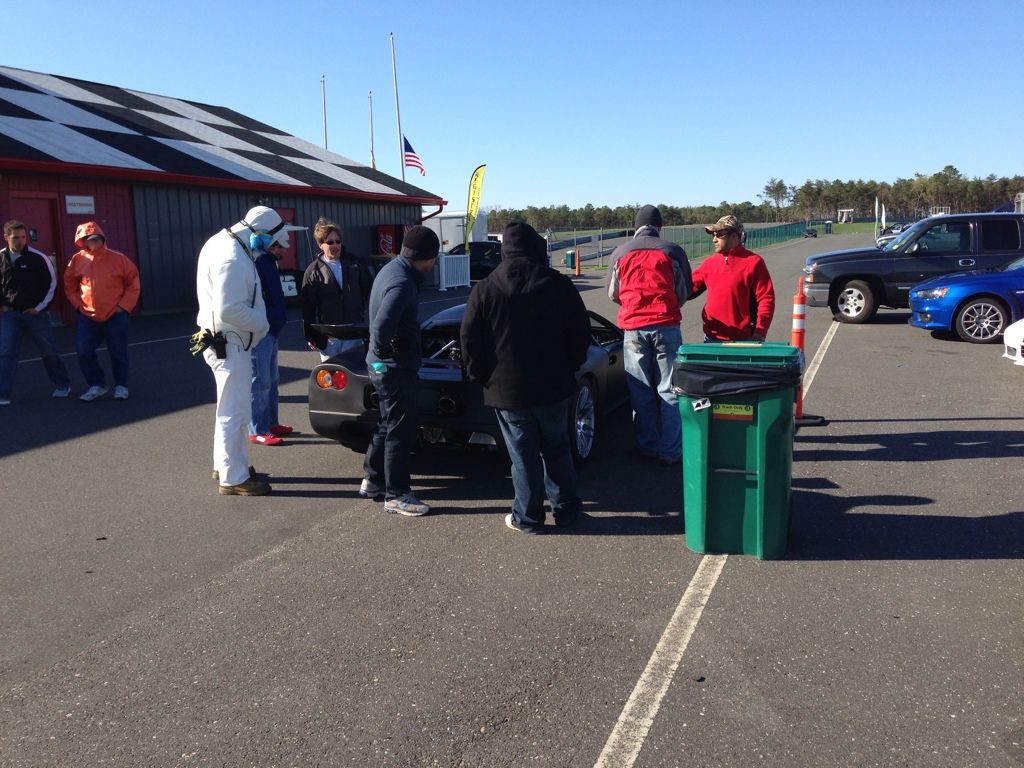
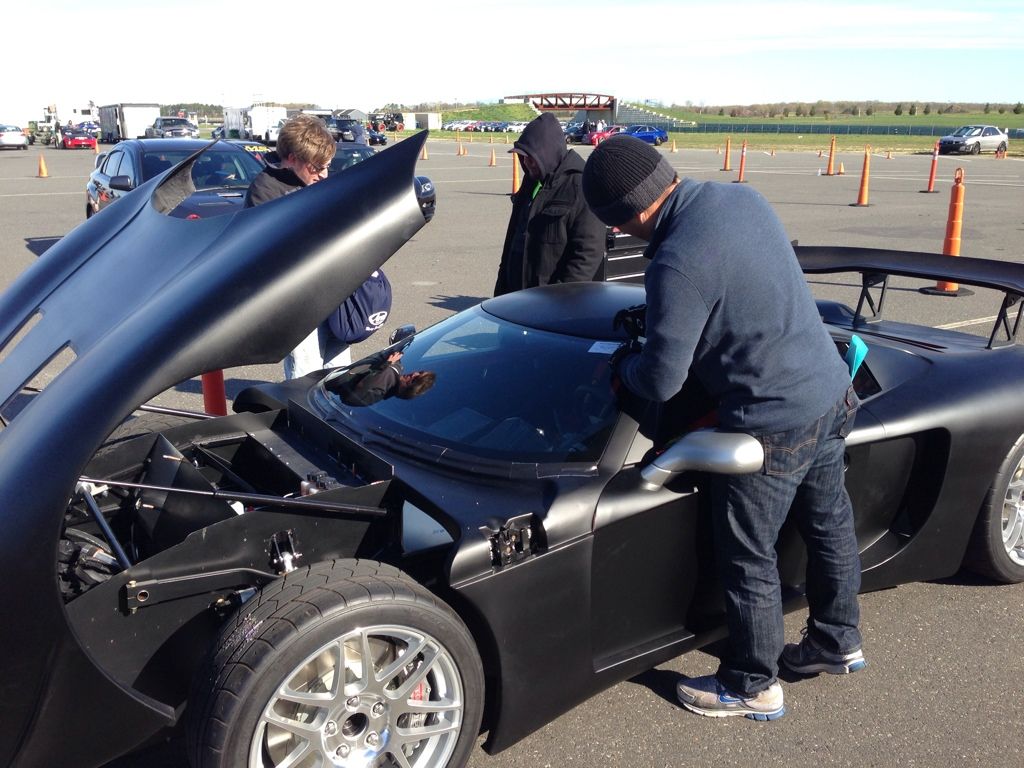
    Since I still had the list above to fix I was clearly not ready for tech at 7am. So I started wrenching. Maybe I can get all this stuff done by the second session. Now this was the hard part. I cant tell you how many people came over to talk about the car. People just love this car. Old guys, young kids, racers ever body just loves it. The car is an absolute celebrity . So as the ambassador for our mark and our hobby, I did my best to keep working while talking with the all the folks that stopped by.

    By 4:00 I was ready for tech.


    I drive the car out and make my way to the tech station. You would think I was driving around with a naked Victoria secret model on the roof. Everybody stares. It helps that the car sounds unique as well, bc if people are not looking they do hear something that sounds interesting and check it out.

    So I roll into tech (which they re opened for me as it was closed for the day) and the car draws a crowd.


    Passed all the points of tech with only a slight suggestions on how I wrapped the shoulder belts around the harness bar… then the guy says can u just check the brake lights. Sure I say..nothing happens. What! No brake lights! CRAP. OK that’s seems impossible bc I did a really good job with the wiring. Everything soldered and shrink wrapped. Weather pack connectors in front of every load so I can just swap things out. Its actually setup so I can just take off the body by unplugging the power feed to the ISIS. The power cell is attached to the body. I tested it all out before I painted the car. I could even turn on the lights with my iphone. How is this not working!

    Back to our trailer. I figured the sleep deprivation I did not plug something in properly. After going over the whole setup I could not find the problem. All the plugs are directional and fool proof! I could barely think clearly at this point and I was having a hard time troubleshooting the isis. I was having trouble just visualizing the circuit! I left all my paperwork at home. Time for extreme measures.

    Lets go to autozone get some parts and just rig up a brake circuit. Of course I go to auto zone and they don’t have a universal plunger switch. I go to the counter guy. He is useless. Can you give me a make and model? Um… Now what….!!. My buddy says, Well my 1976 F100 had the perfect brake switch for you. See if they have that. Guy puts it in the system. 1 in stock!

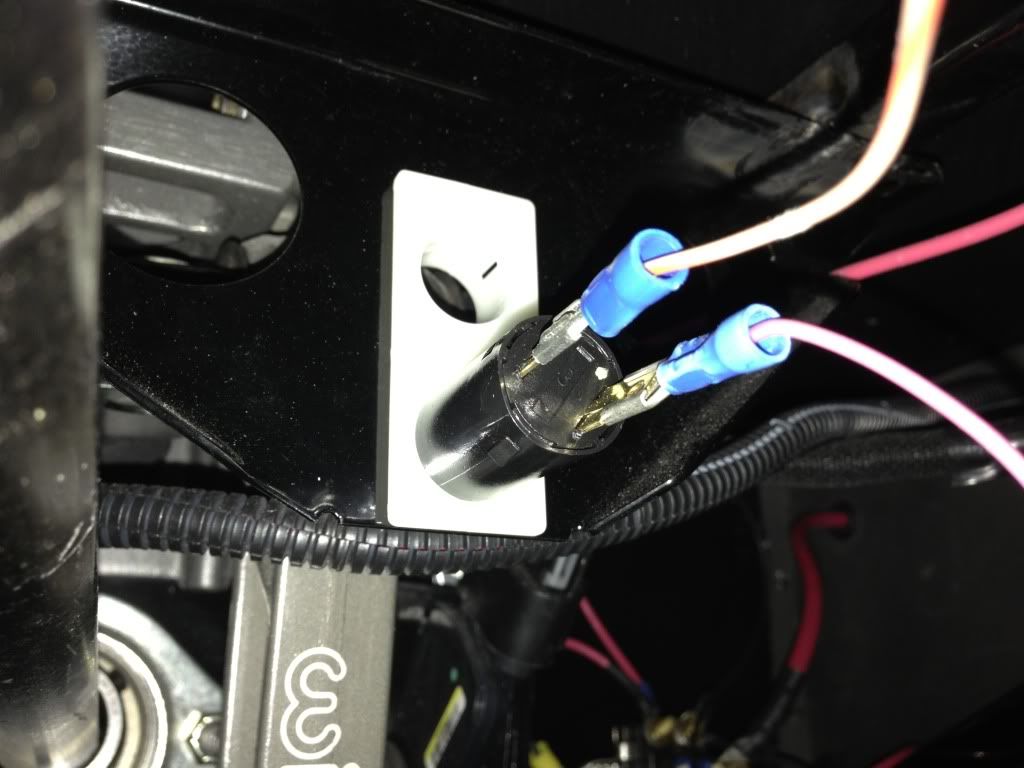
    Its designed for the GTM! I screwed out the corvette switch that I had reconfigured to be a closed when the plunger is out and the ford part just screwed in the other hole in the plastic mount from the corvette! This is impossible! I cant believe it fit! So I ran the wires, installed the switch, Stuffed the bare ends of the wire into the weather pack connectors on the brake lights taped them up and I had brake lights!

    Im ready! I had missed the last session for the day, however I was not going to run anyway. Something about taking a car that I had a thousand hours in over 2 years that I had finished up 5 min ago out on a track where top speeds are 150 mph on 1.5 hours of sleep did not sound like a good idea.

    After a good nights sleep and a final once over of the car in tech I got my stickers.


    Some final tweaks to the alignment and I was out for my first laps.


    WOW!!!! This car is awesome! Glued down in the corners. Stable under braking and accelerates like a bat out of hell. Like nothing I have ever driven. Much sharper then stock corvettes or 911s. The only comparison I know is the difference between a street bike and a GP race bike. The GP bike makes a modern sport bike feel like a dump truck. That’s how different this car is then a stock sports car.


    Unfortunately I was having some difficulty shifting into 4th gear so I was limited to 127 mph. But it was rock solid stable at 127. I definitely need to adjust the shift cables. The other problem I was having is the clutch was slipping over 4500 rpm. As soon as the car got into the power the clutch would slip. That’s another thing I need to adjust . The ACT dual disk can hold 800 ft lbs so I am sure its up to the task. (hard to test going around the block however)

    I could not put a string of corners together because as soon as things got going the clutch would slip.

    Since nothing was fastened or sealed between the body and engine compartment I could smell the clutch. Not good. So I backed off and just ran around at half throttle. Ha! I was still pulling people in.

    GREAT GREAT weekend. The car is so good out of the box ! Even with the teething issues I know when this thing is sorted its going to be a blast! I need to find some track time where I can just go in and out all day doing a few laps at a stint testing things out.

    Getting the car street legal will help a little, while I can’t do the bonsai runs I can at least get things adjusted closer to what I need on the track.

    After all that work I am so glad I built this car. Its was worth it.

    John
    Last edited by kabacj; 04-23-2013 at 09:22 PM.
    XTF #2
    build start date June 19 2023

    GTM # 344
    Build Start December 2010
    First track day April 2013

  9. #169
    Senior Member
    Join Date
    Feb 2011
    Location
    Clarksville, MD
    Posts
    232
    Post Thanks / Like
    John,

    Simply Outstanding! Congratulations! I hope you realize that it wasn't just you waiting to get your car on the track - I'm certain there are plenty of others like me that have followed your build with amazement and anticipation for this very day. Reading your excellent post made me feel like all GTM builders out there had accomplished something through you. Can't wipe the stupid grin off my face!

    And the satin black looks damn menacing!

    Again, congrats.

    -Michael

  10. #170
    Senior Member sk7500's Avatar
    Join Date
    Feb 2011
    Posts
    377
    Post Thanks / Like
    Remember John,
    Even the worst day at the track is better than the best day at work. I'll bet all your future track days will just keep getting better and better.

  11. #171
    Senior Member Kempo's Avatar
    Join Date
    Feb 2011
    Location
    Cabo Rojo,PR. USA
    Posts
    723
    Post Thanks / Like
    Great write up John as I read it I could feel the sense of urgency to get things done to make the event. Thanks for sharing. The car looks mean in that hot rod black.

    Check your clutch adjustment. Make sure you left the 1/8-1/4" gap between the pressure plate "fingers" and the trow out bearing. If you didn't you might be slightly depresing the pressure plate and making the clutch slip. I have the ACT twin disc as well and it handles my power level although, your engine it's a monster but it should be able to handle it. Check the adjustment. Congrats on that first track day on the GTM after all that hard work.
    Last edited by Kempo; 04-23-2013 at 10:05 PM.
    GenII GTM #354
    Delivered (02/09/11)

  12. #172
    Senior Member Taz Rules's Avatar
    Join Date
    Dec 2012
    Location
    BC, Canada
    Posts
    738
    Post Thanks / Like
    Awesome work, John!

    Especially considering the sleep deprivation, and stress from last minute rushing around...just getting the thing through tech was an accomplishment, and then doing over 120 mph on partial throttle and without a 4th or 5th gear...incredible!

    Don't beat yourself up over the little things. They're teething issues, like you said. Right now, just sit back, grin your grin, and savour your accomplishment. You've earned the moment!

  13. #173
    Senior Member VD2021's Avatar
    Join Date
    Feb 2011
    Location
    Central, FL
    Posts
    958
    Post Thanks / Like
    Blog Entries
    2
    John,

    Congratulations! Simply Outstanding.
    R/s
    Vidal
    CURRENT STATUS: Interior Rework and Bodywork.
    GenII GTM #331. Delivered (23/9/10)
    BUILD LOG AND WEBSITE:
    http://gtmbuild.weebly.com/ .

  14. #174
    Member JCHRacer's Avatar
    Join Date
    Feb 2011
    Posts
    54
    Post Thanks / Like
    Awesome John,

    Congrats and thanks for the great writeup. I look forward to hearing more as you get things sorted out.
    Ciao,

    Joel

    Working ever so slowly on GTM #269, Twin Turbo SBC, Ricardo, Kit arrived April 5, 2009

    http://photobucket.com/JCHRacer_GTM_Build

  15. #175
    Senior Member mikespms's Avatar
    Join Date
    Apr 2011
    Location
    North Miami,FL
    Posts
    145
    Post Thanks / Like
    Hi John,

    It's great to see a plan come together, the car is looking good.Great pictures and video, what a marathon !
    Bet you can wait to get it sorted out and do it again

    Mike

  16. #176
    Senior Member Roger Reid's Avatar
    Join Date
    Feb 2011
    Location
    Caldwell (near Boise) Idaho
    Posts
    238
    Post Thanks / Like
    Nice write-up. All your hard work is paying off. Congrats.
    Just an old man with a great hobby

  17. #177
    Member claybags's Avatar
    Join Date
    Feb 2011
    Location
    rio rico,az
    Posts
    93
    Post Thanks / Like
    John, simply OUTSTANDING!!!! Great write up also. Thanks.
    Jeff
    GTM 422, LS6, cam, heads, Mendeola trans

  18. #178
    Senior Member Presto51's Avatar
    Join Date
    Feb 2011
    Location
    Catonsville, Maryland
    Posts
    578
    Post Thanks / Like

    Very Nice Indeed

    How many times did you say?

    "May you be in heaven a full half hour before the Devil knows you're dead"

  19. #179
    Senior Member
    Join Date
    Feb 2011
    Location
    San Diego
    Posts
    1,965
    Post Thanks / Like
    Yep, these cars are more fun than a red head and a jug of whiskey on a Friday night!

    Glad you got some laps in. If the clutch is adjusted properly, this may be part of the break in process. All performance clutches I have run require a little bit of time where you have some slippage to transfer material from the disc to the pressure plate and flywheel surfaces. Are you, hopefully, using a sintered copper puck disc, or is it "organic"? The fact that you can smell the clutch leads me to think it is organic, and IMHO you should not be running that with that much HP/TQ. Either sintered copper or a carbon/carbon setup should be used.
    www.myraceshop.com

    GTM solution kits
    Corvette and Race parts

  20. #180
    Banned
    Join Date
    Aug 2011
    Posts
    669
    Post Thanks / Like
    congrats! great story, and great comparison between street bike and gp bike too. out of all the stories i've heard, this one makes me want to finish the build the most!

  21. #181
    Member kabacj's Avatar
    Join Date
    Mar 2011
    Location
    Long Island
    Posts
    1,103
    Post Thanks / Like
    Guys thanks so much for the congratulations. It was definitely a marathon few days, but the pay off was great.

    I think the problems I had with the clutch and shifting were due to a faulty Master Cylinder. At least that's the working theory. I was not getting enough throw from the master cylinder so I had to adjust it so I was not fully engaging the clutch when my foot was off the pedal and still not fully disengaging the clutch when I put pressure on it.

    I compared notes with Hugo (kempo) who has the same transaxle, clutch and MC, and I seems pretty clear I have a problem with my MC.

    I have the stock 3/4 bore so I will just swap that in and see if that solves the issues.

    Crash, the ACT dual disk is an organic clutch but its designed for street / track. Its SFI rated With 800 foot lbs of holding power im sure its up to my 530 ft lbs of torque.

    It slips very nicely without any vibration but its up to the abuse of the track according to the ACT marketing. I figure if I can make it work as both a street and track solution its a good choice. If I need to its easy to swap out the twin organic disks for sintered pucks. We will see if that's necessary.

    If I can sort out all the little things I want to fix ill be back on the track in a few weeks. As soon as I unload the car and can take some more pictures ill post another update.
    XTF #2
    build start date June 19 2023

    GTM # 344
    Build Start December 2010
    First track day April 2013

  22. #182
    Senior Member Kempo's Avatar
    Join Date
    Feb 2011
    Location
    Cabo Rojo,PR. USA
    Posts
    723
    Post Thanks / Like
    I have that same ACT clutch kit with the organic discs. It holds the 485 ft/lbs that my engine puts out at the wheels. That is about 575 flywheel ft/lbs going with the average 15% drivetrain loss.

    Are your 530 ft/lbs at the wheels or engine?
    GenII GTM #354
    Delivered (02/09/11)

  23. #183
    Member kabacj's Avatar
    Join Date
    Mar 2011
    Location
    Long Island
    Posts
    1,103
    Post Thanks / Like
    Quote Originally Posted by Kempo View Post
    I have that same ACT clutch kit with the organic discs. It holds the 485 ft/lbs that my engine puts out at the wheels. That is about 575 flywheel ft/lbs going with the average 15% drivetrain loss.

    Are your 530 ft/lbs at the wheels or engine?
    I am at 533 at the crank. I have not yet had a chance to put the car on the dyno for its final tune and to see what I actually get to the ground.

    From your experience sounds like I should be OK.

    John
    XTF #2
    build start date June 19 2023

    GTM # 344
    Build Start December 2010
    First track day April 2013

  24. #184
    Senior Member Presto51's Avatar
    Join Date
    Feb 2011
    Location
    Catonsville, Maryland
    Posts
    578
    Post Thanks / Like
    Quote Originally Posted by crash View Post
    Yep, these cars are more fun than a red head and a jug of whiskey on a Friday night!
    Man Crash did it again.

    Manage to slip in a woman reference into a thread.

    Have to admit, this boy does have a certain talent
    "May you be in heaven a full half hour before the Devil knows you're dead"

  25. #185
    Member kabacj's Avatar
    Join Date
    Mar 2011
    Location
    Long Island
    Posts
    1,103
    Post Thanks / Like
    Guys Crash does not over state how much fun this car is on the track. In order to get back out there asap I have a laundry list of things to fix.

    Saturday AM I un loaded the trailer and took inventory of the issues I had with the GTM

    First was the brake circuit.

    The Isis indicated that I had a broken circuit. I knew the brake lights were ok from the light bulb to the weather pack connector since they worked fine when I ran power directly to them. I checked the fuse in the Isis. It was fine. Clearly there was a problem between the power cell and the connector in front of the light. Next I checked the continuity of ground wire in the wiring harness. No ground! I pulled the ground wire out of the harness. It was clipped!

    I soldered the wire back together. Ahh all the lights work again. Well that took all of 5 min. Amazing how easy it is to troubleshoot problems on a full nights sleep. This was an impossible problem to fix on Saturday night with an hour and a half of sleep in the prior 24 hours.

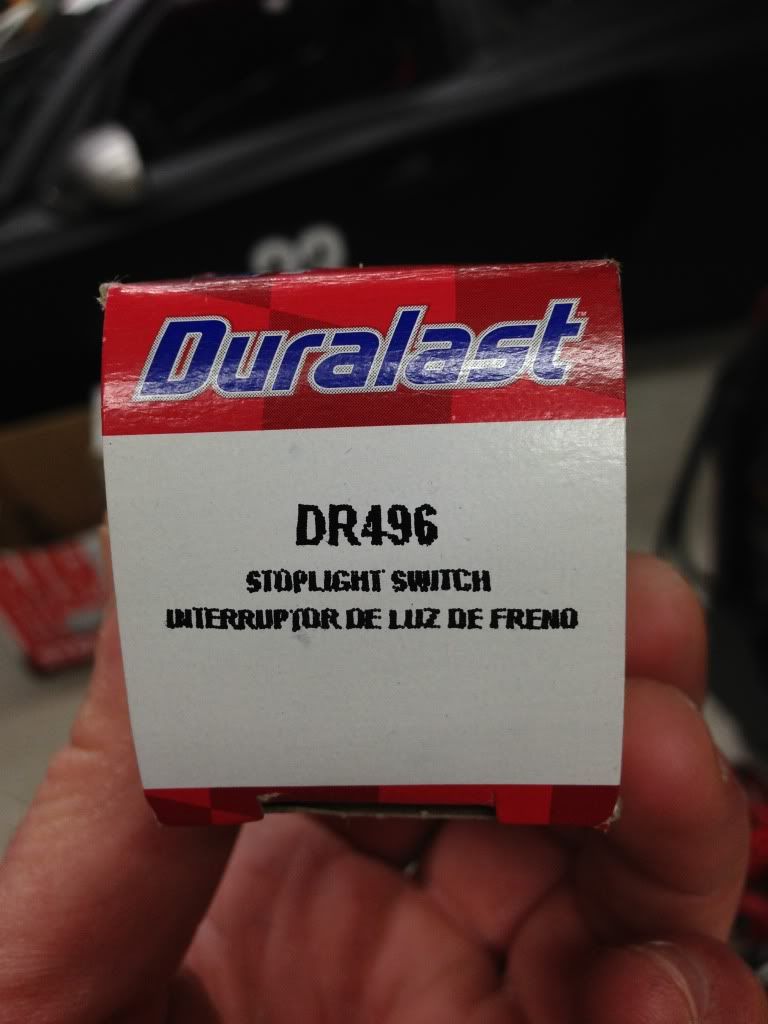
    The positive of this ordeal. I got this great switch to control the brake lights. I also learned to trust the Isis. When it says their is a circuit fault. There is a circuit fault.


    Here is the part number for the brake light switch.


    The shifting problem:

    I compared notes with Kempo to confirm how the Mendiola setup should work. Hugo had a few suggestions regarding the possible issues. I dove into my problem.

    I took out the master cylinder.

    First problem. The push rod was bent. As I adjusted the pedals lower and lower the excess rod contacted the pedal arm. The rod was only one thread too long, however as the rod hit the pedal arm it jammed and slightly bent.

    Next removed the circlip and opened the master cylinder. Immediately I knew I found my problem. One of the seals has a gouge in it.


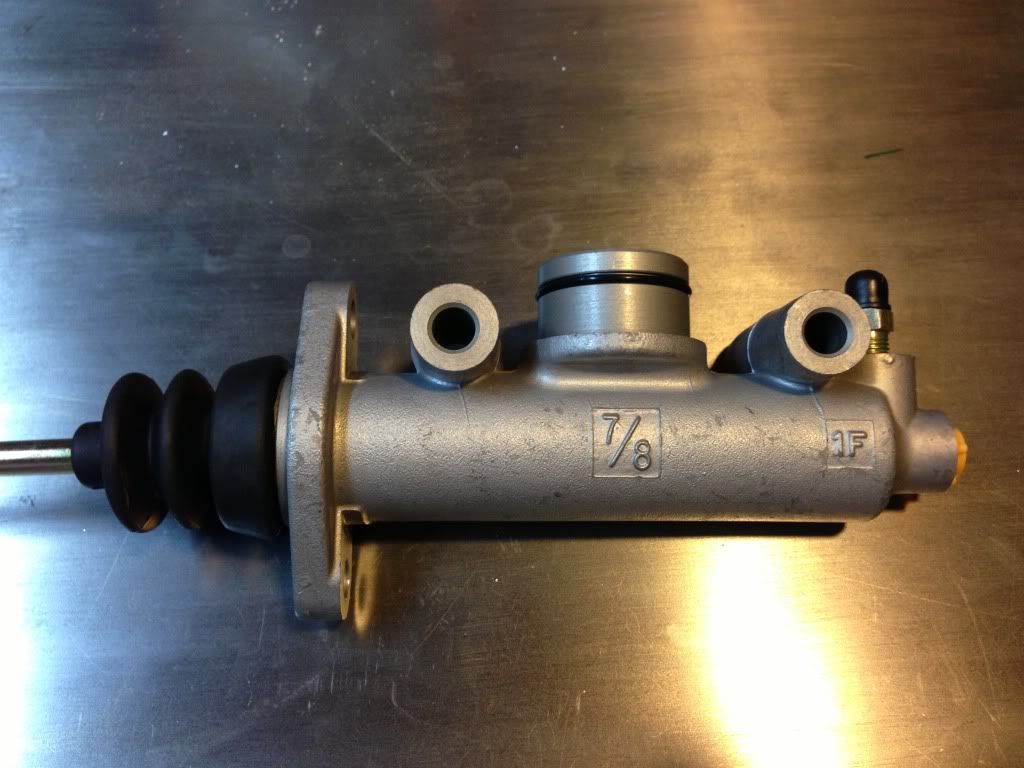
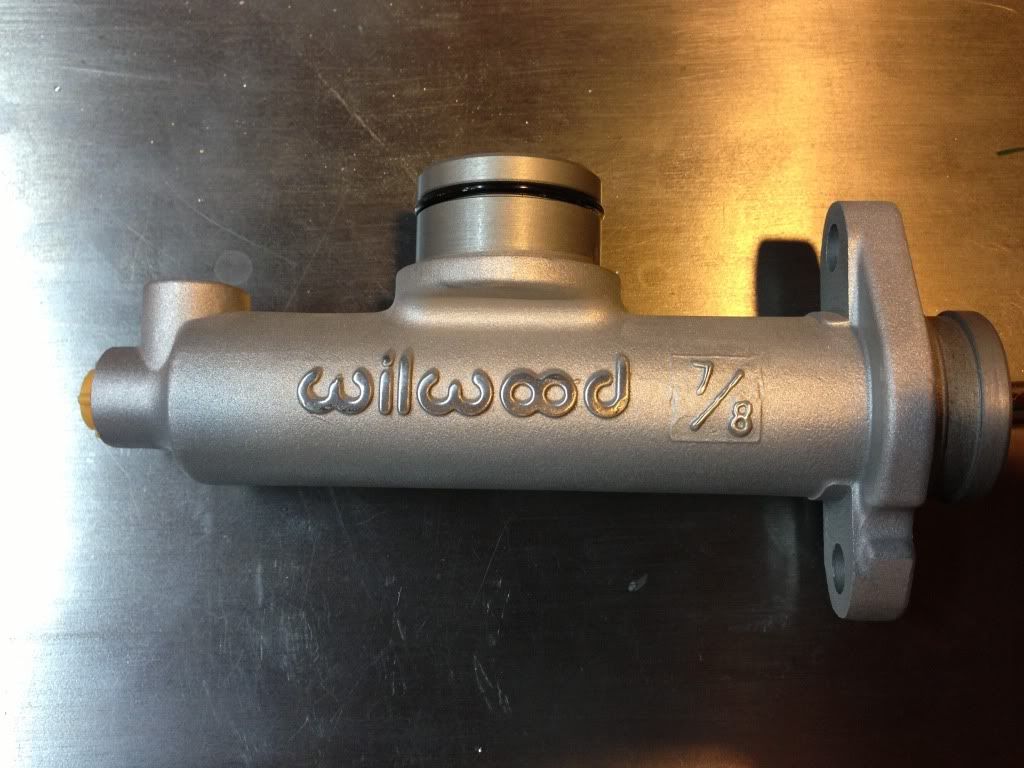
    That was why I could not fully disengage the clutch and shift easily. Pressure was bleeding off. The bore of the master cylinder is smooth and undamaged. A 13/16 bore rebuild kit and I'm back in business. Just to be sure I swapped in a spare 3/4 inch bore master cylinder. Imagine that I can shift now! I ordered a 7/8 bore as I want a very short throw to go from the fully engaged position to the fully disengaged. Of course Kempo reminded me that I should be careful not to overdrive the clutch springs. I will start with a large air gap between the fork and throw out bearing and sneak up on the correct throw. I'll add a stop to limit throw if needed.

    I did not notice the problem with the clutch testing at home. I had adjusted the clutch so the little pressure I could generate with the damaged MC would disengage the clutch. Unfortunately that meant the clutch would not fully engage. I could not even test half power driving in the neighborhood to get the clutch slipping.

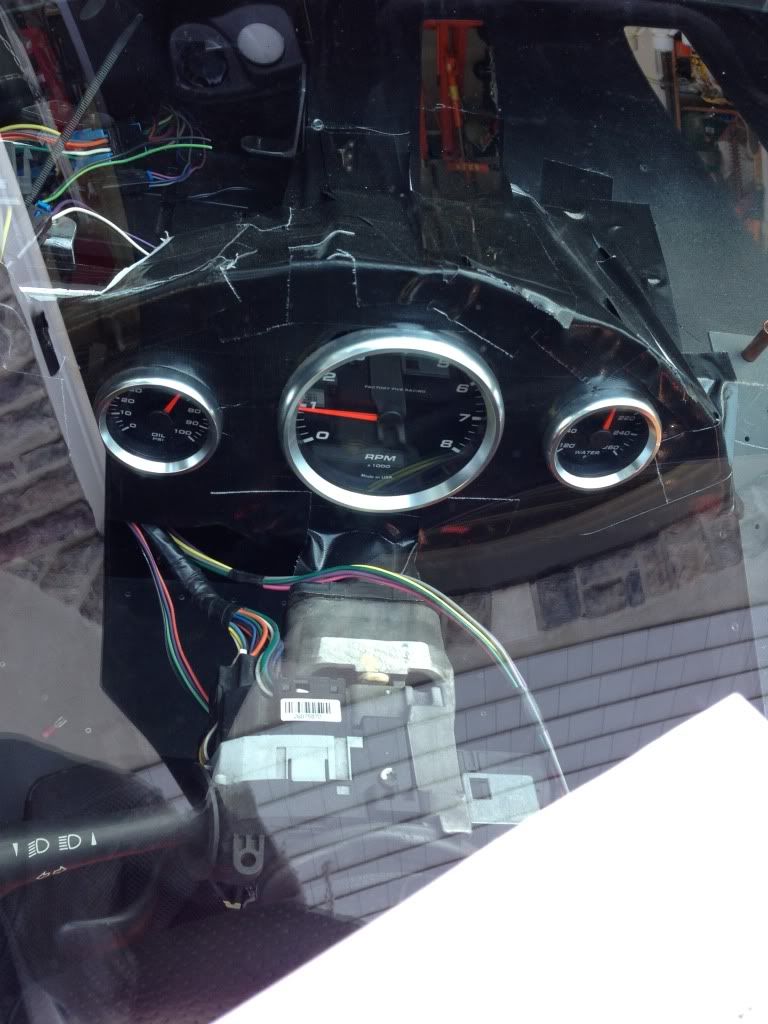
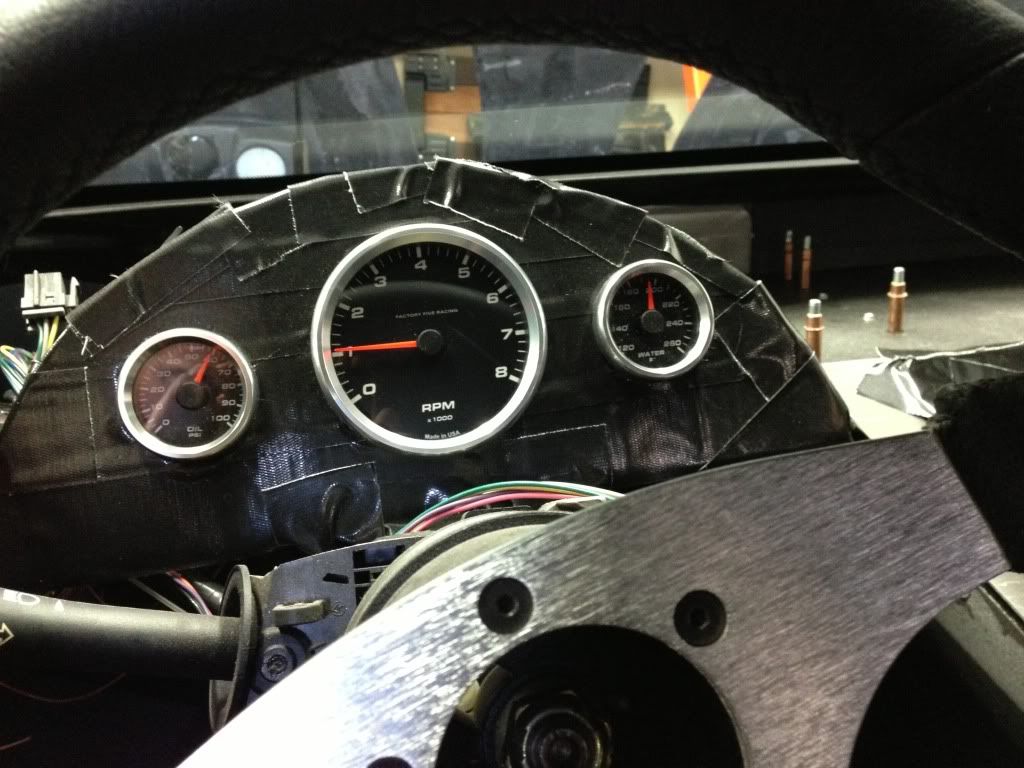
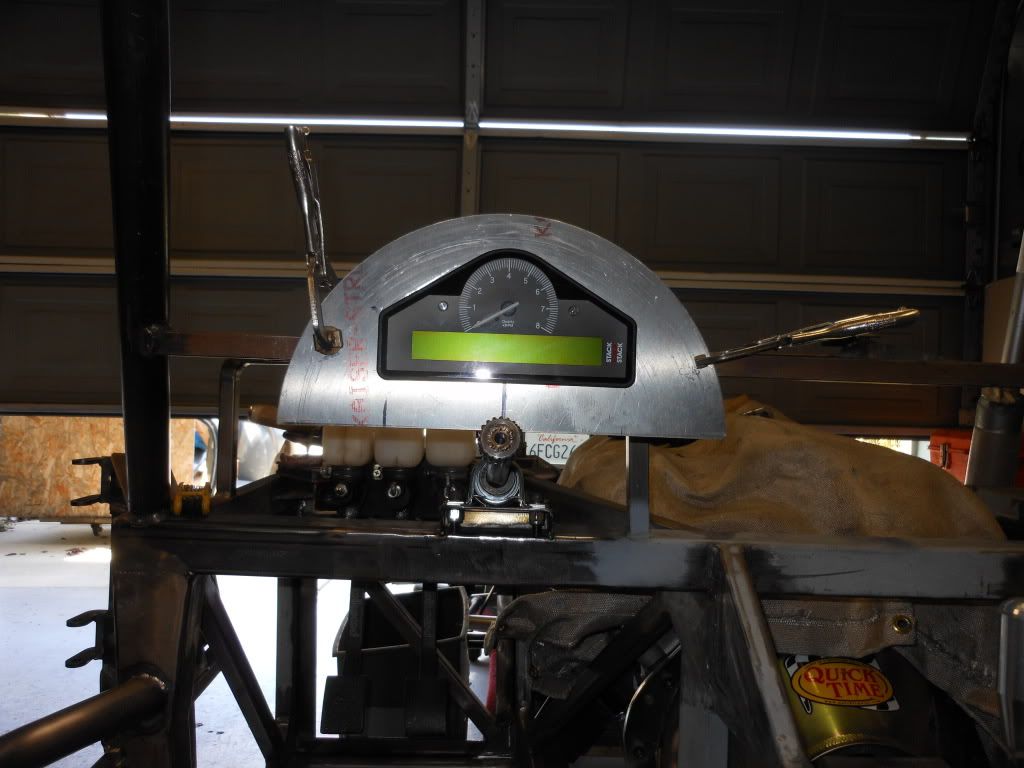
    I mentioned in my weekend recap that I went to the track with my gauges still in the original box taped to the dash. This setup got more then a few joking comments. In order to pass tech I needed something that looked a little stronger. I had sheets of aluminum to make a dash but that was going to take too long.

    I had cardboard to make templates. Well the templates are going to be the final solution. I don't have time for anything else.

    I did'nt need a speedo or gas gauge. So I mocked up a cluster with the tach, oil, and temp. Duct tape and cardboard actually make a pretty sturdy dash.


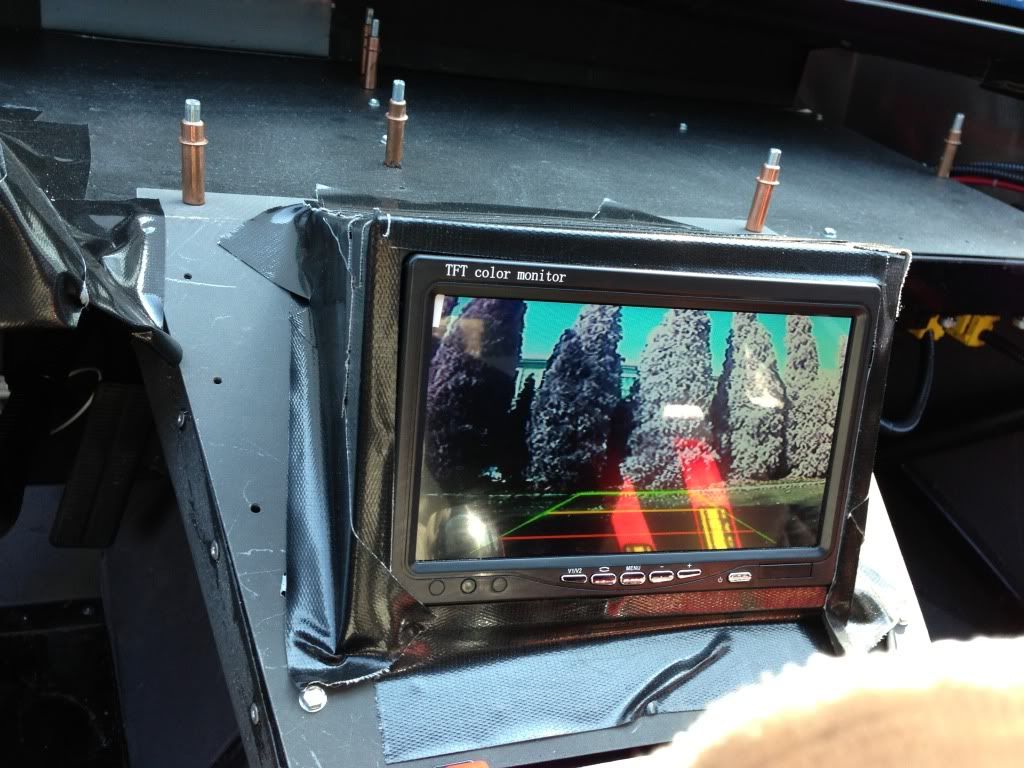
    I also added a screen with backup camera. I had this on full time as my rear view mirror. Also not mounted when I got to the track of course. I saw more people walking up to check out the motor while waiting to go out on the track then cars following me , but the camera is very useful.


    Next track test session is may 18th. A few more things on my list to fix before I am ready for another test.

    John
    XTF #2
    build start date June 19 2023

    GTM # 344
    Build Start December 2010
    First track day April 2013

  26. #186
    Senior Member
    Join Date
    Feb 2011
    Location
    San Diego
    Posts
    1,965
    Post Thanks / Like
    Well, there are good things and bad things about having a race date deadline. It certainly gets things done, but sometimes not to the point that we might like. Now it's time to go back and redo/update things that need it. Sounds like this is what you are doing, and I am sure the next event you will have everything much better sorted and have a much better time. Not that it sounds like you had a bad time, but it is always more enjoyable when things are finished and the event goes smoothly.
    www.myraceshop.com

    GTM solution kits
    Corvette and Race parts

  27. #187
    Member
    Join Date
    Jul 2011
    Posts
    35
    Post Thanks / Like
    John. Great to read about your update. I left you a VM. I look forward to meeting you and seeing your build. Some buddies who also run LS engine ITB's are beginning to plan a get together this summer. It would be great to have you there.

  28. #188
    Member kabacj's Avatar
    Join Date
    Mar 2011
    Location
    Long Island
    Posts
    1,103
    Post Thanks / Like
    HI Stage!

    Sorry I missed your VM. It was a bad connection so it cut in and out. I did not know it was you. I thought it was a wrong number. Yep it would be great to get together. I ll give you a call.


    I will be at NJMP again the weekend of May 18th and 19th. NASA have a great event that you can do laps with your car for 50 bucks. Its called hyperdrive. See the NASANE.com website for details. It would be great to see a bunch of guys out on the track.

    John
    Last edited by kabacj; 05-01-2013 at 01:23 PM.
    XTF #2
    build start date June 19 2023

    GTM # 344
    Build Start December 2010
    First track day April 2013

  29. #189
    Member
    Join Date
    Jan 2013
    Posts
    30
    Post Thanks / Like
    congratulations on turning the corner! Although I have never driven the GTM at race speeds, I have seen and witnessed first hand of the smiles, sh*t eating grins, excitement,relief, and "I want to go again" expressions of what the GTM does! Great story! What you describe in your story is a prelude of entering the 25 hour race, where you finish the car just minutes before the race. The only difference is at the 25, you role the dice and go for it!

  30. #190
    Member kabacj's Avatar
    Join Date
    Mar 2011
    Location
    Long Island
    Posts
    1,103
    Post Thanks / Like
    Quote Originally Posted by GTM RACER View Post
    I have seen and witnessed first hand of the smiles, sh*t eating grins, excitement,relief, and "I want to go again" expressions of what the GTM does!
    HI GTM Racer,

    Thanks so much. Yeah it was both a relief and super exciting to get the car out on the track. While it would have been nicer to be more ready, none of the things i finished on Saturday at the track had any issue. Surprisingly the biggest issue was a bad seal on my new master cylinder.

    I had adjusted my way around the problem at home and was unable to do any full throttle tests driving around the block. The only way to ID the problem was on the track. I tried a few times to adjust around the issue, not suspecting bad parts as everything was new. When I got home with the luxury of more time it was an easy thing to identify, test and fix. In the end I ended up with what I think will be a quicker shifting setup using a 7/8 MC.


    I cant wait to get out there again next weekend.


    John
    XTF #2
    build start date June 19 2023

    GTM # 344
    Build Start December 2010
    First track day April 2013

  31. #191
    Member kabacj's Avatar
    Join Date
    Mar 2011
    Location
    Long Island
    Posts
    1,103
    Post Thanks / Like
    A few updates. I have the new 7/8 willwood master installed to operate the slave on the Mendiola master cylinder. It works very well with a shorter stroke but a heavier pedal of course. I was able to adjust the pedal height lower so that I did not need a limiter.

    The extra bosses on the master cylinder bother me so I have taken them off. Since this is my fifth time I actually can cut/ file / bead blast and then polish up the willwood letters on the MC in a half hour.


    This weekend I have some modifications for the crankcase pressure evacuation setup to capture the oil mist in the crankcase gasses as well as making a few catch cans.

    Anyone familiar with STACK data loggers? Its an UK company who go way back in Formula 1 as they designed a stepper motor tac. The needle never bounces. The reason I was interested is Stack support the J1939 CAN protocol the MAST ECU uses and it looks like they have some slick software.

    Just looking for some feedback.

    Thanks
    John
    XTF #2
    build start date June 19 2023

    GTM # 344
    Build Start December 2010
    First track day April 2013

  32. #192
    Senior Member
    Join Date
    Feb 2011
    Location
    San Diego
    Posts
    1,965
    Post Thanks / Like
    Never used the Stack stuff. They always seemed to be a bit over priced for what you got.
    www.myraceshop.com

    GTM solution kits
    Corvette and Race parts

  33. #193
    Trick Tool Maker, Super Moderator Hankl's Avatar
    Join Date
    Feb 2011
    Location
    Northern CA
    Posts
    671
    Post Thanks / Like
    Blog Entries
    1
    What I like to use.


    Hank
    “If you didn’t have enough time to do it right the first time. How come you always have time to go back and do it again?” FFR1000186CP

    Understeer is when you hit the wall with the front of the car and oversteer is when you hit the wall with the rear of the car.
    Horsepower is how fast you hit the wall and torque is how far you take the wall with you.

  34. #194
    Member kabacj's Avatar
    Join Date
    Mar 2011
    Location
    Long Island
    Posts
    1,103
    Post Thanks / Like
    Thanks Hank and Crash. Hank your endorsement means a lot. The thing I like about the Stack setup is the software. It seems open and configurable. I also like the video support. It's less focused on the hey check me out on the track and more focused on video as another data stream for analysis. It's very easy to compare two video laps with all the other captured data. Lots of reasearch still needed however.

    Thanks
    John
    XTF #2
    build start date June 19 2023

    GTM # 344
    Build Start December 2010
    First track day April 2013

  35. #195
    Member kabacj's Avatar
    Join Date
    Mar 2011
    Location
    Long Island
    Posts
    1,103
    Post Thanks / Like
    Update

    T-48 hours

    I have addressed many of the little issues I discovered last visit to the track.

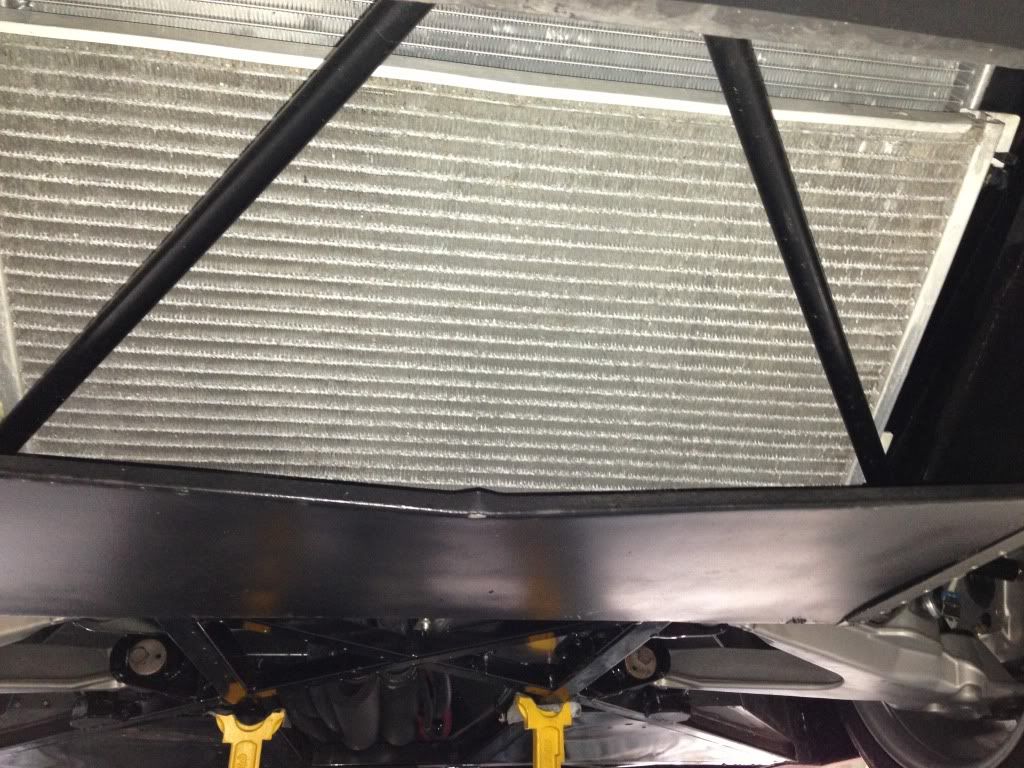
    One thing that surprised me was the lower aluminum under the radiator. It bent somewhere between 100 and 130 mph.

    Reinforcement of this piece was on my list, however I figured this piece was bending on the gen 1 GTMs because the air intake is so large. Turns out the gen2 also requires reinforcement if you plan on hitting the track or you live in Germany where you can exceed 75 mph on the road

    I used a piece of 3/4 square .063 aluminum. I plan on building something to fill the gap between the splitter and rad enclosure/ wheels. The square aluminum will act as a mount for this piece.


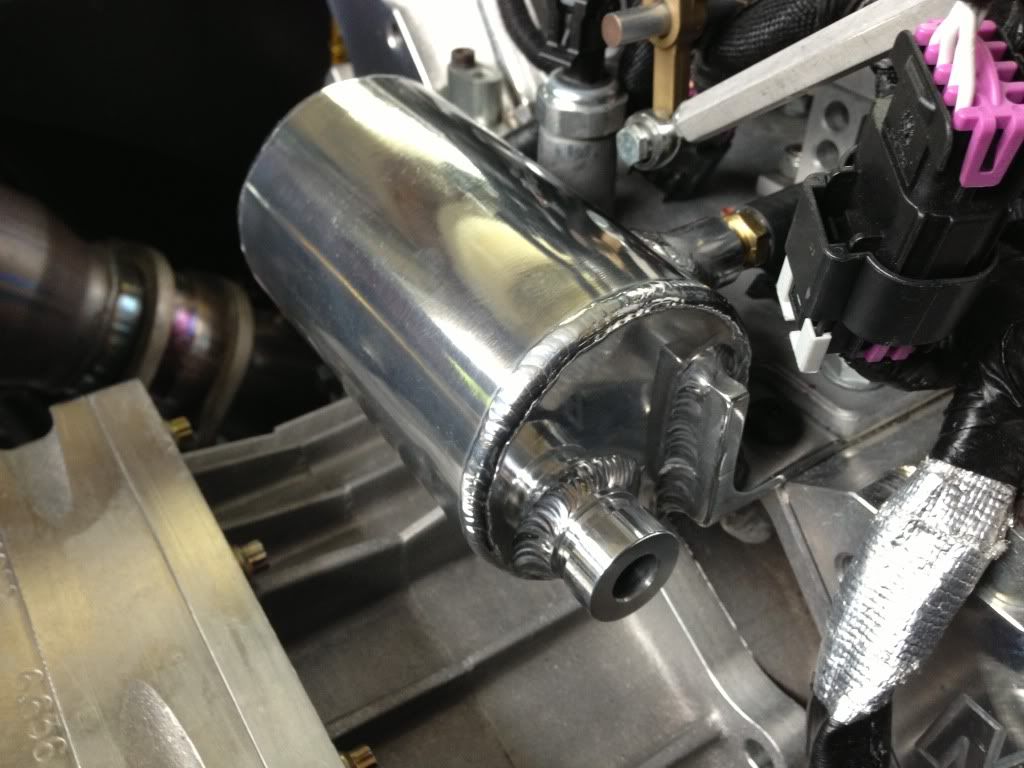
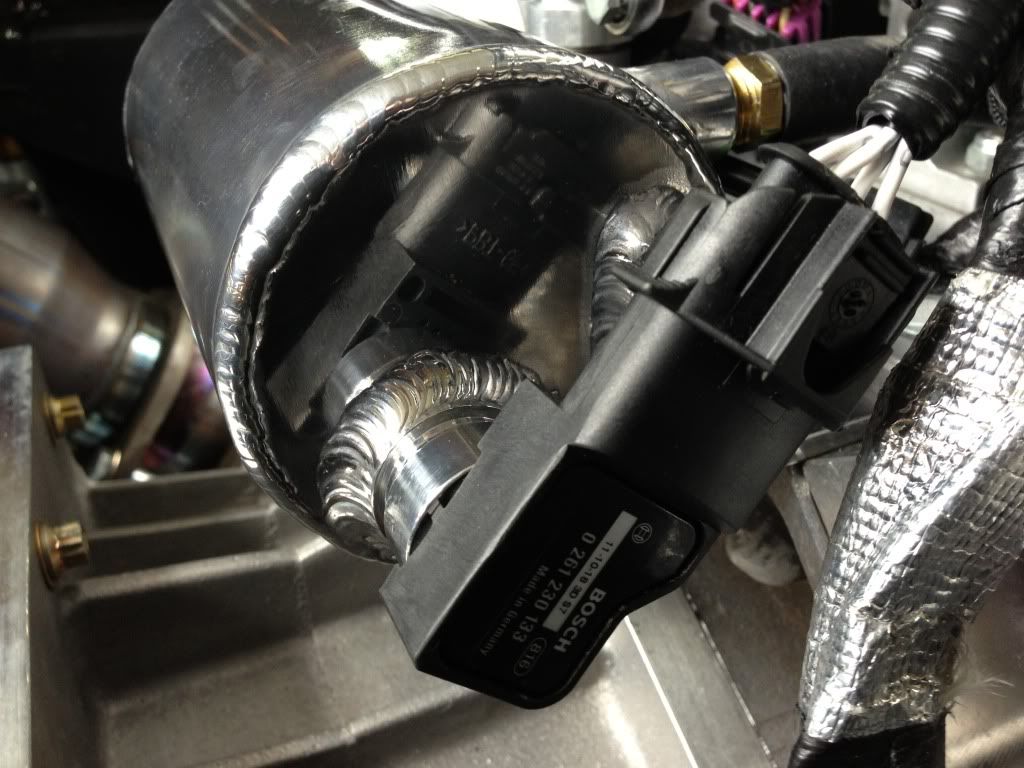
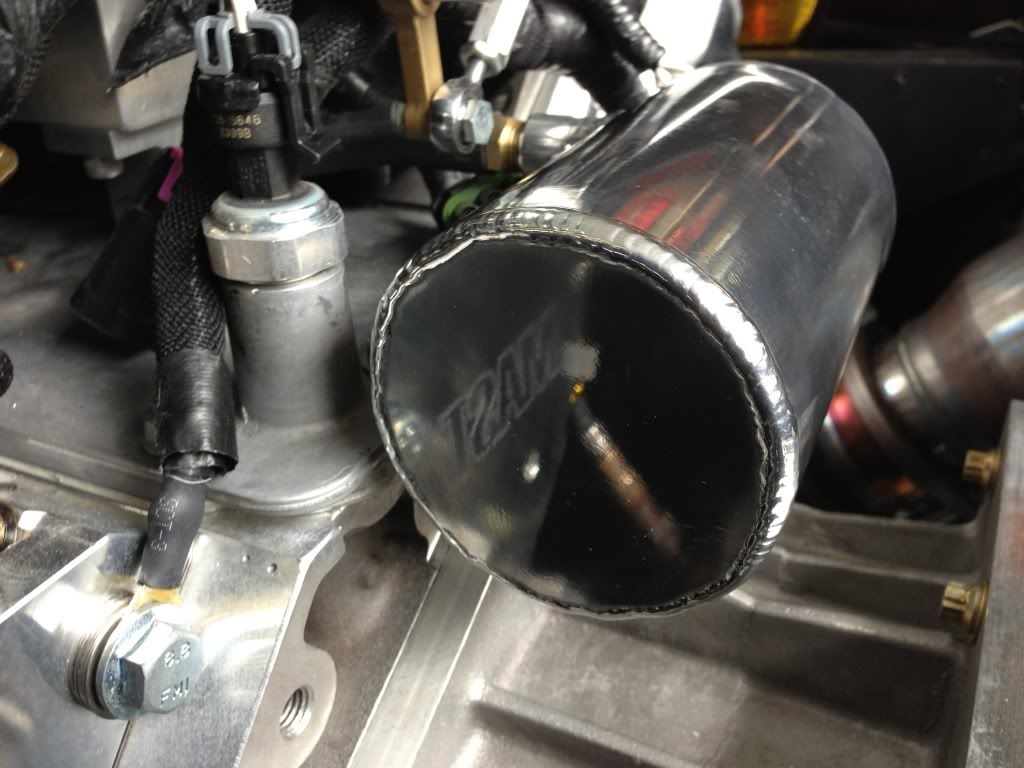
    Second project was a vacuum canister to house my intake pressure sensor. With 8 throttle bodies I don't have a common plenum to measure intake pressure. I do have vacuum pickups at the base of each intake. These are combined and routed to this canister. With this setup I have a stable place to measure vacuum.


    There was an open threaded hole in the top of the block so I built this canister to mount using that attachment.


    I think I am going to redo this canister after I make the intake and coil covers but this is good enough for now.


    Only a few more things to finish before the next test.

    John
    XTF #2
    build start date June 19 2023

    GTM # 344
    Build Start December 2010
    First track day April 2013

  36. #196
    fasterer and furiouser longislandwrx's Avatar
    Join Date
    Aug 2012
    Location
    Long Island
    Posts
    2,540
    Post Thanks / Like
    Blog Entries
    6
    Great Job on everything. Car looks awesome. When's the next track day?
    A well stocked beverage fridge is the key to any successful project.

  37. #197
    Member kabacj's Avatar
    Join Date
    Mar 2011
    Location
    Long Island
    Posts
    1,103
    Post Thanks / Like
    Quote Originally Posted by longislandwrx View Post
    Great Job on everything. Car looks awesome. When's the next track day?

    Next track day is June 14 at Pocono Raceway. I hear the infield is repaved, and we get to use some of the high banks. Plenty of high speed running, which will be fun.

    I am fltering through the hours of footage I have from this past weekend and I should have some fun clips to post in the next few days.

    John
    XTF #2
    build start date June 19 2023

    GTM # 344
    Build Start December 2010
    First track day April 2013

  38. #198
    Member JCHRacer's Avatar
    Join Date
    Feb 2011
    Posts
    54
    Post Thanks / Like
    Great work John....it's impressive to see someone get something done in a reasonable amount of time. I assume you are running with NASA. Are you running the HPDE or time trial groups? Did they approve the car for competition events?

    Good luck and we all look forward to hearing (and seeing) more.
    Ciao,

    Joel

    Working ever so slowly on GTM #269, Twin Turbo SBC, Ricardo, Kit arrived April 5, 2009

    http://photobucket.com/JCHRacer_GTM_Build

  39. #199
    Member kabacj's Avatar
    Join Date
    Mar 2011
    Location
    Long Island
    Posts
    1,103
    Post Thanks / Like
    Quote Originally Posted by JCHRacer View Post
    I assume you are running with NASA. Are you running the HPDE or time trial groups? Did they approve the car for competition events?

    Good luck and we all look forward to hearing (and seeing) more.
    Hi Joel,

    Yep I am running with NASA. I need to get a competition license and even time trials require a log book and a license from NASA. The only way to get those is to do HPDE and or the Comp school. Unfortunately I missed the comp school the first weekend of the year. As I get more comfortable with the car and work out the bugs in HPDE I will be ready to compete.

    I hope to do time trials for the latter half of the season and start lobbying that the car can be accepted for racing by the end of the year. Part of winning the local guys over is showing up often. In the mean time I will keep working on the hundreds of little things that need completion.

    Ill have a track day report out in the next few days. One thing I can say is the GTM is unbelievable in the rain. It would probably help if I had slightly waterproofed the car, but beyond that I was railing around corners faster then the 4wd cars.

    more to come.

    John
    XTF #2
    build start date June 19 2023

    GTM # 344
    Build Start December 2010
    First track day April 2013

  40. #200
    LCD Gauges's Avatar
    Join Date
    Apr 2011
    Location
    Toronto, Ontario
    Posts
    1,545
    Post Thanks / Like
    Blog Entries
    3
    Nice John, you've been working hard I see! Love the engine details; that canister looks great too.
    Custom LCD Gauges , Data Loggers, Control Touch Screens
    www.LCDdash.com \\ 647-522-9953 \\ Voice & Text
    Proud new owner of GTM Gen 1., #105 - 08/27/11
    LQ9 Powered, G96.00 6 speed transaxle

Page 5 of 23 FirstFirst ... 3456715 ... LastLast

Tags for this Thread

Posting Permissions

  • You may not post new threads
  • You may not post replies
  • You may not post attachments
  • You may not edit your posts
  •  

FFMetal

Visit our community sponsor