Forte's

Visit our community sponsor

Thanks Thanks:  0
Likes Likes:  0
Results 1 to 8 of 8

Thread: GPS Vintage Gauge Install

  1. #1

    Join Date
    Nov 2016
    Location
    Petaluma, CA
    Posts
    345
    Post Thanks / Like

    GPS Vintage Gauge Install

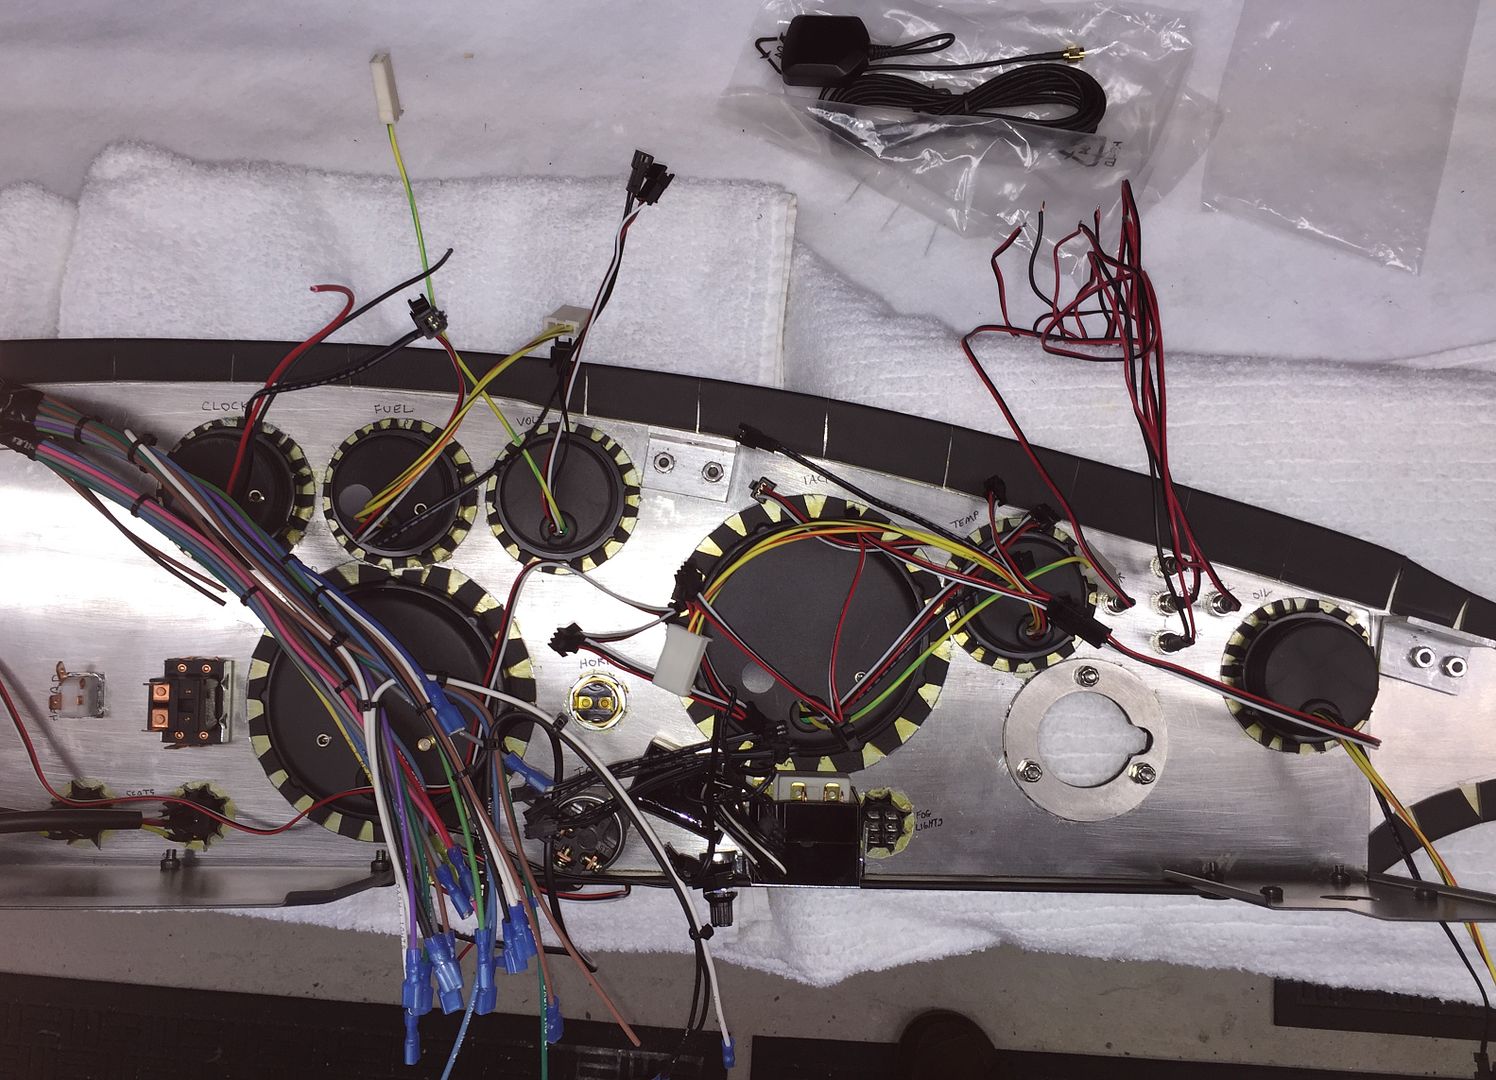
    I am working on the wiring behind the dash for the gauge set, etc. My kit came with the "GPS Vintage Gauge Set" and the manual is Revision 5, February 2017. Is there anyone who has installed this particular gauge set and wiring who can share pictures of the process completed? There are so many wires and many it seems (on a non-EFI car) that are not used. I'm just curious what a good, clean installation looks like. I can't imagine just stuffing all of those wires behind the dash. Wiring is not my strong suit so would love to see what others have done with this particular gauge set. It appears that this is a fairly new gauge set and maybe only for the 289 FIA? Not sure about that.

    20180310_082759.jpg
    20180310_083942.jpg

  2. #2
    Senior Member edwardb's Avatar
    Join Date
    Feb 2011
    Location
    Lake Orion, Michigan
    Posts
    10,833
    Post Thanks / Like
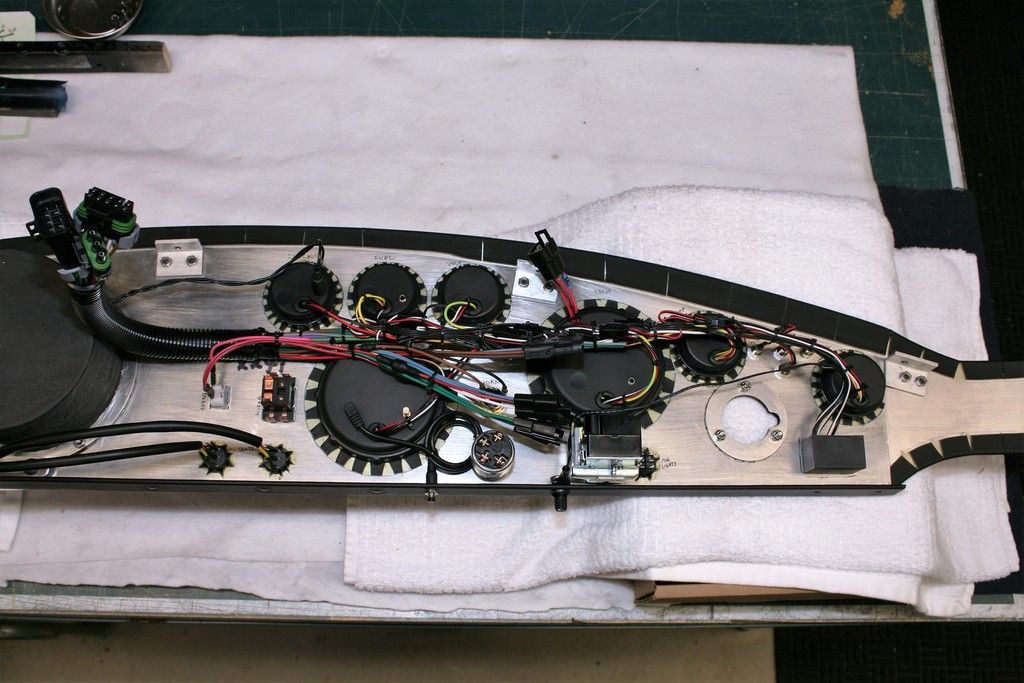
    Well, you know the old cliché about eating an elephant one bite at a time. That’s how you have to approach this. The gauges you have appear to be exactly the same as the gauges I installed in #8674 with the addition of the oil temp gauge, which is an easy add. I haven’t completed the Revision S, Feb 2017 RF wiring harness. But it came with my Gen 3 Coupe so I’ve studied and have started working on it. The biggest difference I can see is they have made the connections to the Speedhut gauges now more standard. Plus they’re referenced in the instructions. Neither was the case before. Here’s a high level approach that I would recommend.

    1. Get all the gauges and switches installed in your instrument panel and clearly marked. Looks like you’ve got that done.

    2. Get far enough along with the main harness in the chassis that you know where the three dash harness connectors are located and oriented. Now set your dash harness on the instrument panel so it aligns with the mating connectors on the main harness. I like to tie wrap the dash harness in this position, at least temporarily, so that it stays put while hooking everything up. This is a step many don't take. IMO, makes things neater behind the dash plus easier to take on and off.

    3. Now start working through the individual circuits. The Speedhut gauges have daisy chains for the lighting and power circuits. Hook those up and then terminate to the appropriate locations on the RF harness. A number of other threads have gone into details here. I won't repeat.

    4. One of the changes I see for the new revision harness is that it has mating connectors already installed for the sending units on the gauges. This is something builders have always questioned because the gauges come with cables for the sending units. Some just used those directly to the gauges vs. using the RF harness. That made it a little hard to unplug the whole dash assembly using only the RF connectors. Now it would seem easiest to go ahead and use the RF connections at the gauges, and then graft the Speedhut cables onto the end of the RF sending unit branch. Note this is actually what I've done with all my builds, but without the benefit of the connectors already installed at the gauges.

    5. I add connectors for the turn signal and hazard wires since they're not in the RF dash harness. They can be seen in the pictures below. The wires for the wipers, ignition switch, and headlight are connected when the dash is installed. They also don't go through the RF dash harness.

    Hopefully that gives you a little bit of a place to start. FWIW, this is my “before” on #8674 with the dash harness located. Then the “after” with everything wired up and tied. Not as pretty as some. But not a rats nest either.


    Last edited by edwardb; 03-10-2018 at 11:50 PM.
    Build 1: Mk3 Roadster #5125. Sold 11/08/2014. Build 2: Mk4 Roadster #7750. Sold 04/10/2017. Build Thread
    Build 3: Mk4 Roadster 20th Anniversary #8674. Sold 09/07/2020. Build Thread and Video. Build 4: Gen 3 Type 65 Coupe #59. Gen 3 Coyote. Legal 03/04/2020. Build Thread and Video
    Build 5: 35 Hot Rod Truck #138. LS3 and 4L65E auto. Rcvd 01/05/2021. Legal 04/20/2023. Build Thread. Sold 11/9/2023.

  3. #3

    Join Date
    Nov 2016
    Location
    Petaluma, CA
    Posts
    345
    Post Thanks / Like
    Thank you! As always, great help! Joel

  4. #4
    East Coast Speed Machines Erik W. Treves's Avatar
    Join Date
    Feb 2011
    Location
    Huntsville, Al
    Posts
    2,135
    Post Thanks / Like
    Wow that's I nice install... If I could.... and not taking anything away from the time it took to make the wiring look that good and it's hard to tell from the picture....

    Think about after it is installed in the car.... then... hope this doesn't happen... but if you need to pull a switch to T-shoot or replace a gauge..... make sure you leave enough length in the wire so you can pull the gauge or switch out without having to pull the dash...if you are ok with pulling the dash and that's part of the plan then disregard please.

    you are coming right along!
    FFR 1879, Blown DSS 306,REDLINE management, VeryCoolParts Tuned 460RWHP

    FFR 818S, The Flash, Chassis #5, 2.0L, LSD, Electromotive TEC-S, VCP Tuned, 278RWHP 265 RWTQ

    FFR 6651, Green Lantern, 408W Crate, Hellion 66mm Turbo, JGS Waste gate / Blowoff valve, Tec-GT management, VCP Tuned, 575 RWHP, 690 RWTQ

    FFR 8335, Black Mamba, 289 FIA CSX 2001 tribute car, 347, 48 IDA webers, VCP Tuned, 311 RWHP 386 RWTQ, 3-link, Trigo's

    FFR 0004, Gen 3 , Hawk Coupe, Coyote twin turbo, 683 RWHP 559 RWTQ, IRS, VCP Tuned. "not too shabby"

    US ARMY Maintenance Test Pilot (CW4 Retired)

  5. #5
    Senior Member edwardb's Avatar
    Join Date
    Feb 2011
    Location
    Lake Orion, Michigan
    Posts
    10,833
    Post Thanks / Like
    Quote Originally Posted by Erik W. Treves View Post
    Wow that's I nice install... If I could.... and not taking anything away from the time it took to make the wiring look that good and it's hard to tell from the picture....

    Think about after it is installed in the car.... then... hope this doesn't happen... but if you need to pull a switch to T-shoot or replace a gauge..... make sure you leave enough length in the wire so you can pull the gauge or switch out without having to pull the dash...if you are ok with pulling the dash and that's part of the plan then disregard please.

    you are coming right along!
    Thanks Erik. You make very good points. Maintainability is important. It might not be obvious from the pictures, but I did install wires and wrap the bundles thinking what would happen if I needed to replace something. The Speedhut daisy chains are basically on top of everything else, and can be loose to all gauges after snipping a few tie wraps. The sending unit wires in my case are hard wired, so would need to be cut. But for the new harness they're all on plugs. It would be possible, I think, for me to change a gauge without taking the dash out. But hoping not to find out. I did have to replace the hazard switch. The famous Lucas toggle switch literally just fell apart after being on the road for several months. It was a pain, but was able to replace by reaching behind the dash.
    Last edited by edwardb; 03-11-2018 at 12:08 PM.
    Build 1: Mk3 Roadster #5125. Sold 11/08/2014. Build 2: Mk4 Roadster #7750. Sold 04/10/2017. Build Thread
    Build 3: Mk4 Roadster 20th Anniversary #8674. Sold 09/07/2020. Build Thread and Video. Build 4: Gen 3 Type 65 Coupe #59. Gen 3 Coyote. Legal 03/04/2020. Build Thread and Video
    Build 5: 35 Hot Rod Truck #138. LS3 and 4L65E auto. Rcvd 01/05/2021. Legal 04/20/2023. Build Thread. Sold 11/9/2023.

  6. #6
    East Coast Speed Machines Erik W. Treves's Avatar
    Join Date
    Feb 2011
    Location
    Huntsville, Al
    Posts
    2,135
    Post Thanks / Like
    That's great to point out... I was impressed by how neat the dash installs have become..when I did my green car I made everything super nice..... and..... couldn't pull my autometer gauge out when it failed...rrrr had to pull the dash....i should have fired the guy that did the install....wait... that was me...hee hee
    FFR 1879, Blown DSS 306,REDLINE management, VeryCoolParts Tuned 460RWHP

    FFR 818S, The Flash, Chassis #5, 2.0L, LSD, Electromotive TEC-S, VCP Tuned, 278RWHP 265 RWTQ

    FFR 6651, Green Lantern, 408W Crate, Hellion 66mm Turbo, JGS Waste gate / Blowoff valve, Tec-GT management, VCP Tuned, 575 RWHP, 690 RWTQ

    FFR 8335, Black Mamba, 289 FIA CSX 2001 tribute car, 347, 48 IDA webers, VCP Tuned, 311 RWHP 386 RWTQ, 3-link, Trigo's

    FFR 0004, Gen 3 , Hawk Coupe, Coyote twin turbo, 683 RWHP 559 RWTQ, IRS, VCP Tuned. "not too shabby"

    US ARMY Maintenance Test Pilot (CW4 Retired)

  7. #7
    CobraboyDR's Avatar
    Join Date
    Jun 2017
    Posts
    232
    Post Thanks / Like
    Quote Originally Posted by edwardb View Post
    Thanks Erik. You make very good points. Maintainability is important. It might not be obvious from the pictures, but I did install wires and wrap the bundles thinking what would happen if I needed to replace something. The Speedhut daisy chains are basically on top of everything else, and can be loose to all gauges after snipping a few tie wraps. The sending unit wires in my case are hard wired, so would need to be cut. But for the new harness they're all on plugs. It would be possible, I think, for me to change a gauge without taking the dash out. But hoping not to find out. I did have to replace the hazard switch. The famous Lucas toggle switch literally just fell apart after being on the road for several months. It was a pain, but was able to replace by reaching behind the dash.
    Edward-

    How did you install the dash to be easily removable? Is there a link?

    Being able to remove the dash without a lot of hassle to me is important. AND no extra dash bolts that look funky.

  8. #8
    Senior Member edwardb's Avatar
    Join Date
    Feb 2011
    Location
    Lake Orion, Michigan
    Posts
    10,833
    Post Thanks / Like
    Quote Originally Posted by CobraboyDR View Post
    Edward-

    How did you install the dash to be easily removable? Is there a link?

    Being able to remove the dash without a lot of hassle to me is important. AND no extra dash bolts that look funky.
    Not one specific link. I've used the same method on all three of my Roadster builds. The last two have build threads where it's shown pretty clearly. Links are in my sig line. The short answer is in the two pictures I posted in this thread. I mount right angle brackets on the back of the dash and then attach those to the underside of the dash hoop. I have them placed where they're accessible from underneath. Haven't had to take one back out yet after final assembly. Hoping it stays that way.
    Build 1: Mk3 Roadster #5125. Sold 11/08/2014. Build 2: Mk4 Roadster #7750. Sold 04/10/2017. Build Thread
    Build 3: Mk4 Roadster 20th Anniversary #8674. Sold 09/07/2020. Build Thread and Video. Build 4: Gen 3 Type 65 Coupe #59. Gen 3 Coyote. Legal 03/04/2020. Build Thread and Video
    Build 5: 35 Hot Rod Truck #138. LS3 and 4L65E auto. Rcvd 01/05/2021. Legal 04/20/2023. Build Thread. Sold 11/9/2023.

Posting Permissions

  • You may not post new threads
  • You may not post replies
  • You may not post attachments
  • You may not edit your posts
  •  

FFMetal

Visit our community sponsor