-

Originally Posted by
Shawn818c

did you use paint, rubberized undercoating or truck bed liner on the firewall?? Also, if you finish before me then you're welcome to come help me with my kit

I used Duplicolor truck bed coating. It leaves a very nice slightly pebbled finish with a couple of buts. First you need to rough up the aluminum with like a 80 grit. I used a DA sander.
Second, I was concerned when a panel I did earlier in the day pealed when I removed some blue tape from it. Turns out it was surface dry but not really fully dry. I took a test panel I had done a week before and try scraping it pretty hard and it held up well. It is not an epoxy but seems to be a good choice for panels that may seem some weather plus it offers some sound deadening
properties.
Be happy to but I am pretty slow especially when it comes to body stuff.
-
FYI, you can buy black rivets from McMaster.
https://www.mcmaster.com/#rivets/=16vlww3
You'll probably need way more rivets then what's provided in the kit so if you need more that's a good way to get them.
-
PLATNUM Supporting Member


Looking good Frank. It is good to see another old guy getting after it! LOL. TW
-
-
Was able to hammer off one of the 2 donor front cv joints but second just would not come off. Tried Art's inertia method but could not get enough velocity in short height I had.

So I used small cutoff wheel to cut cage apart and remove the balls after which it just fell apart and I had my stub to use. took less time than all the hammering I did.

-
Administrator


Originally Posted by
frankc5r
Was able to hammer off one of the 2 donor front cv joints but second just would not come off. Tried Art's inertia method but could not get enough velocity in short height I had.
So I used small cutoff wheel to cut cage apart and remove the balls after which it just fell apart and I had my stub to use. took less time than all the hammering I did.
Frank, I didn't know you were working on the fron CV's when we talked. I just cut through the CV's about 3/8" off the ABS wheel. Makes lighter axle stubs.
Frank,
-
Thanks Wayne. I will do that.
-
Great stuff and quick progress.
After reading your thread I have garage envy. ;-)
Russ
-
Took yesterday off to visit my old crewmates at Corvette Racing preparing for next weekends race at Long Beach.
Today spent time drilling all the rivits for the cockpit side panels and doing misc other tasks.
protected the floor with some old under carpet foam so tools and drillings don't mess up powder coat.

At another members suggestion, I bought some Vvivd xpo carbon fiber vinyl wrap to cover cockpit sidepanels. It is about 7 mils thick. Did a test install using black rivet from McMaster.

-
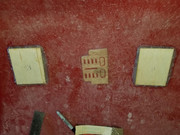
The R version manual ( newest) shows older cockpit aluminum around the coolant tubes. I had missing those coolant tube coverls like I have seen on recent builds on forum. So I installed the others
pieces and covered with Vvivd carbon vinyl wrap. Picture attached.

I saw some nice seats at Tom Wallace's shop. They were reclining and had sliders and were black cloth. Cost $157 ea. Got them today and slider adds very little height so I am hopefull
they will work well. I am about 5-10. More as I install.

-
-
-
PLATNUM Supporting Member
Coming along very nice Frank.
-
Test of PostImage hosting site.

Should see a picture
-
Senior Member

Be careful with using rivnuts into the bottom of the floor - all it takes is one bump to knock them off or shear your bolts. For attaching the tank, seats, bottoms of the side sails, etc. I used low profile hex button flange head screws, where the head is towards the ground.
-
-
Senior Member

Originally Posted by
frankc5r
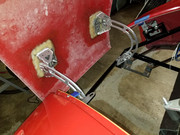
Some Progress- did the interior in carbon fibre vinyl, built insulated rear firewall, and installed engine transaxle. Few pictures attached.
Frank, well done. I see I need to insulate the sides of the passenger compartment; forgot about hot water running by that area.
What oil pan are you using? Does it hang below the cross tube just in front of the engine? Thanks!
~ Mark
818C S/N 429ES: Start Date 1 September 2016

2001 NB Miata LS3 V8 440 rwhp
2004 Miata MazdaSpeed Factory Turbo
-
Originally Posted by
fastzrex
Frank, well done. I see I need to insulate the sides of the passenger compartment; forgot about hot water running by that area.
What oil pan are you using? Does it hang below the cross tube just in front of the engine? Thanks!
The dynamat is stop panel vibration and noise and insulation will go into side area later. (good idea @ water tubes). Oil pan is stock WRX. Thanks.
-
-
Senior Member

Really clean stuff, there!
Frank
818 chassis #181 powered by a '93 VW VR6 Turbo GT3582R
Go-karted Aug 5, 2016 - Then May 19+21, 2017
Tracked May 27/July 26, 2017
Build time before being driveable on Sep 27, 2019: over 6000h
Build Completed Winter 2021
-
Thanks Frank. Hours counting up but nothing like your project. Glad it coming to a proper end.
-
-
Senior Member
I have that dual IC gauge. It's very interesting to see the temp differences, however my gauge sometimes has erratic incomplete numbers as display. Maybe a lemon and I should buy a new one but for the time being I'll see how it runs for the summer. Keep an eye on yours and let me know if you get the same flaw.
I did post those inside clearance pix a long time ago and yes me neither I didn't see many of them elsewhere. Which was the reason why I posted back then! loll
Frank
818 chassis #181 powered by a '93 VW VR6 Turbo GT3582R
Go-karted Aug 5, 2016 - Then May 19+21, 2017
Tracked May 27/July 26, 2017
Build time before being driveable on Sep 27, 2019: over 6000h
Build Completed Winter 2021
-
Been awhile since I posted to build thread, but after
solving a priming and crank sensor
issues, I did a first start today. Using a Microsquirt V3
for controller and it started right up using some
suggested start parameters. Backfired a bit cause
wind band showed pretty lean. Looking a datalogs
and will refine but nice to have 1st
start done w/o any problems.
-
Post Thanks / Like - 0 Thanks, 1 Likes
-
Administrator
-

Yes, I love Technology

Back on your post re the seats - ("I saw some nice seats at Tom Wallace's shop").
Pep Boys have these under their "APC - ITR" brand, cloth with blue, red or black back panels, and a leather-ette version. From your pix I'm sure it is the same product as I have some. I picked up the blue paneled ones on sale for like $119 a while back. Some of the stores have a "race shop" in the store, for example East side Indianapolis, and they had the seats on display there or you can get them on line - eBay, etc. from Pep Boys.
The store said the seat examples were fastened to the wall, but I went in and it was hanging on a hook, took it down, sat in it and said - works for my 6'1" 220# chassis.
Low end seats, sure, but they recline, slide and really - not to bad if your wanting the style on a low budget. They are pretty decent looking too, but they won't have the haute couture branding if you must have. Cheap enough to just buy another if one gets messed up, some of the fancier stuff would hurt the pocketbook to replace for looks.
-
Post Thanks / Like - 1 Thanks, 0 Likes
-
-
Congrants, the first start is always a great feeling of accomplishment.
-
Here is video of almost 1st start using Microsquirt V3. Was rich on very 1st start so leaned out.
Utube link.
https://youtu.be/xq-1N57IEME
Hope it works
Thanks to all that helped especially Wayne Presley.
-
-
Senior Member

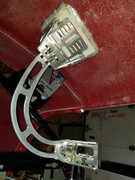
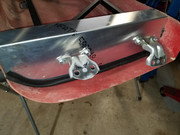
Nice job on mounting the ZBD hood hinge. Yes, it's a beautiful design and after a few years my hinges still work well.
818S/C : Chassis #25 with 06 WRX 2.5 turbo, ABS, cruise, PS, A/C, Apple CarPlay, rear camera, power windows & locks, leather & other complexities. Sold 10/19 with 5,800 miles.
Mk3 Roadster #6228 4.6L, T45, IRS, PS, PB, ABS, Cruise, Koni's, 17" Halibrands, red w/ silver - 9K miles then sold @ Barrett-Jackson Jan 2011 (got back cash spent).
-
-
Senior Member
How close from the from bumper's insert is your hood opening with the hinges? Is it slightly rubbing or clearing no problem? If your bumper insert is at its final location, of course.
Frank
818 chassis #181 powered by a '93 VW VR6 Turbo GT3582R
Go-karted Aug 5, 2016 - Then May 19+21, 2017
Tracked May 27/July 26, 2017
Build time before being driveable on Sep 27, 2019: over 6000h
Build Completed Winter 2021


 Thanks:
  Likes:


 Reply With Quote