-
04-28-2019, 07:38 AM
#281
Senior Member


Originally Posted by
SSNK4US

That really looks good!! I also love what you did.
Keep in mind that in the immortal words of edwardb that lizard skin does not like the elements and you might want to top (or bottom in your case lol) coat it with something to protect it.
ALWAYS pay attention to Paul

Also yay and congrats! Its been a tad over a year since you bought them

Kurt
I was wondering if I need to use the Lizard Skin top coat product, or could I just use some of the bedliner product I intend to use on the underside of the body? Absolutely, to me Paul's build threads are the real manual. That printed thing FFR gives you is just a guideline
-
05-04-2019, 04:32 PM
#282
Senior Member
Forte hydraulic clutch release installed
Well Forte was kind enough to swap out my bracket and cylinder for basically enough to cover shipping. I had to tweak it a bit to get it to fit properly. I bought some longer bolts and added 4 additional washers to give me a little bit more room between the cylinder and the bracket that fits on the clutch fork. I then cut about 1/4" off the rod end and the threaded end of the pushrod, and cut about 1/2" off the back side of the push rod. It took quite a bit of marking and testing to figure out just how much to remove, but I got it installed and it has just a bit of flex towards the rear. I figure with the rod end and the washers I have plenty of options to adjust it for wear.

I also reinstalled my clutch stop, but I barely think I need it with this setup. Forte recommended a 13/16" master, but I already had a 7/8" installed. I put the trans in gear and had my son push in the clutch pedal until I could turn the rear wheels, and then adjusted the clutch stop to that point plus just a bit more. I put a rubber vacuum cap on it so it wouldn't be metal on metal contact. I tested it to full extension and back multiple times and it looks good and no leaks. I think I'm back in business!

Last edited by shark92651; 05-04-2019 at 04:40 PM.
-
05-04-2019, 04:37 PM
#283
Senior Member
Go Carting, again!
I took the Go Cart around the neighborhood for a few miles to test out the new clutch release and it is working great - shifts smoothly into all gears, including reverse. Feels great to be back and this point again. On to the body work!
-
Post Thanks / Like - 0 Thanks, 2 Likes
-
05-04-2019, 05:02 PM
#284
Senior Member

Looks and sounds great! Congrats on getting it back together and working well. I see you didn't get any responses on your question about Lizard Skin top coat. I've used their product. I have the transmission tunnel cover coated with Lizard Skin on the bottom since it's got foam and leather on the top. I used their top coat after applying to the two Lizard Skin products. It's OK, but nothing really special IMO. If anything, kind of thin. Doesn't make a heavy coating like other undercoat products. It's solvent based, and once the Lizard Skin is cured obviously holds up to it just fine. You could use just about anything, e.g. your undercoat product of choice, and I think it would be fine.
Build 1: Mk3 Roadster #5125. Sold 11/08/2014.
Build 2: Mk4 Roadster #7750. Sold 04/10/2017.
Build Thread
Build 3: Mk4 Roadster 20th Anniversary #8674. Sold 09/07/2020.
Build Thread and
Video.
Build 4: Gen 3 Type 65 Coupe #59. Gen 3 Coyote. Legal 03/04/2020.
Build Thread and
Video
Build 5: 35 Hot Rod Truck #138. LS3 and 4L65E auto. Rcvd 01/05/2021. Legal 04/20/2023.
Build Thread. Sold 11/9/2023.
-
05-04-2019, 05:42 PM
#285
Senior Member
Originally Posted by
edwardb
Looks and sounds great! Congrats on getting it back together and working well. I see you didn't get any responses on your question about Lizard Skin top coat. I've used their product. I have the transmission tunnel cover coated with Lizard Skin on the bottom since it's got foam and leather on the top. I used their top coat after applying to the two Lizard Skin products. It's OK, but nothing really special IMO. If anything, kind of thin. Doesn't make a heavy coating like other undercoat products. It's solvent based, and once the Lizard Skin is cured obviously holds up to it just fine. You could use just about anything, e.g. your undercoat product of choice, and I think it would be fine.
Thanks. Sure feels good to get back to this point. I will probably just brush on some of the Herculiner I received today.
-
05-04-2019, 07:05 PM
#286
The recessed bezels look great.
build thread:
http://thefactoryfiveforum.com/showt...-USRRC-vspeeds
Build School: July 14-16, 2017
Kit purchased: July 25, 2017
Kit delivered: September 13, 2017
First Start: December 22, 2018
Body painted and kit completed and drivable: July 2019 (but still not done)
CA SB100 Registration: January 2020
Mk4 - 289 USRRC Roadster kit, Roush 427SR with Schneider Racing custom camshaft, Fitech EFI, TKO600 (.64-5th gear), 15" wheels, stock brake calipers, under car exhaust with Spintech 7000 muffler, no roll bar, Russ Thompson turn signal, removable steering wheel, and many other small upgrades and modifications
-
05-04-2019, 07:09 PM
#287
Did you ever figure out what the problem was with your Tilton HRB?
build thread:
http://thefactoryfiveforum.com/showt...-USRRC-vspeeds
Build School: July 14-16, 2017
Kit purchased: July 25, 2017
Kit delivered: September 13, 2017
First Start: December 22, 2018
Body painted and kit completed and drivable: July 2019 (but still not done)
CA SB100 Registration: January 2020
Mk4 - 289 USRRC Roadster kit, Roush 427SR with Schneider Racing custom camshaft, Fitech EFI, TKO600 (.64-5th gear), 15" wheels, stock brake calipers, under car exhaust with Spintech 7000 muffler, no roll bar, Russ Thompson turn signal, removable steering wheel, and many other small upgrades and modifications
-
05-05-2019, 03:52 PM
#288
Senior Member
Originally Posted by
Vspeeds
Did you ever figure out what the problem was with your Tilton HRB?
No I did not. I started working with Tilton customer service on it and they even mentioned that the powder coat on the bell housing must be the same thickness all around to prevent the possibility that the transmission, and HRB, is not perfectly aligned with the clutch. That seemed a bit of a stretch to me, but I guess with extremely poor powder coating that could be a possibility - something I doubt Quicktime has a problem with though. I think either my unit was defective or I did not set my clutch stop properly and overextended it to the point where the diaphragm spring could not push it back in. Even if it were defective, the pain of having to pull the transmission had me thinking to switch to an external unit should I have more problems in the future. Then a local builder friend offered me a free Forte unit so I jumped on that and didn't even spend any time with Tilton customer service again. I plan to send it back to them anyway in case they can find an issue with it and maybe send me a replacement.
Last edited by shark92651; 05-05-2019 at 03:55 PM.
-
05-06-2019, 01:37 PM
#289
Originally Posted by
shark92651
I took the Go Cart around the neighborhood for a few miles to test out the new clutch release and it is working great - shifts smoothly into all gears, including reverse. Feels great to be back and this point again. On to the body work!
I am digging your progress. I cant wait till i'm where you are.
-
05-12-2019, 03:59 PM
#290
Senior Member
-
05-12-2019, 04:05 PM
#291
Senior Member
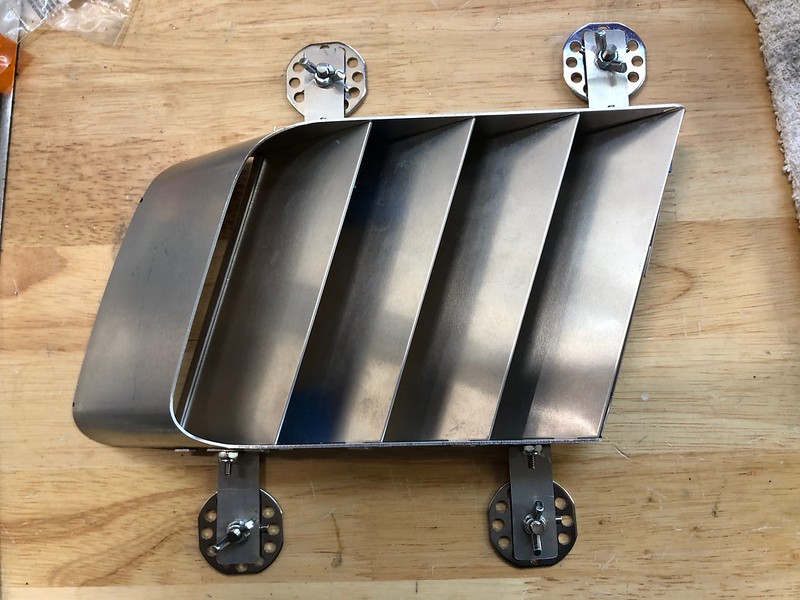
Drummer Mike's Heat Shields
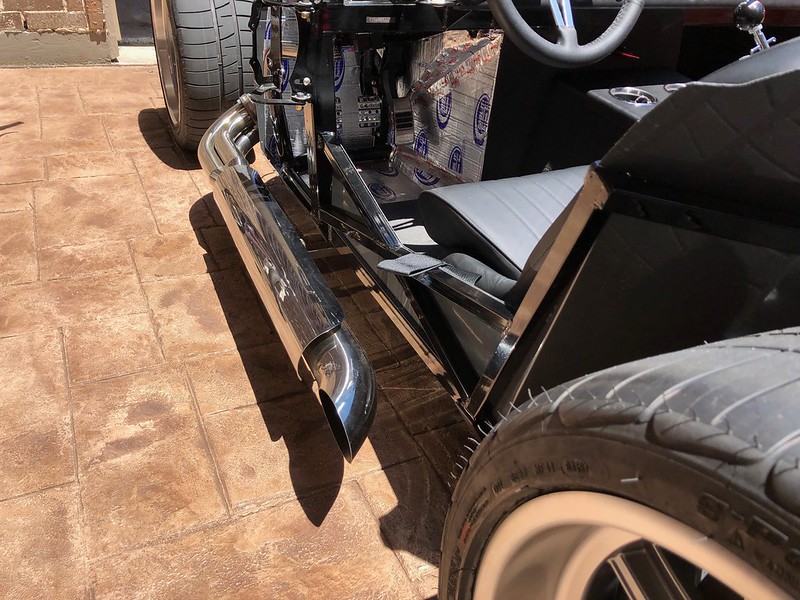
My brother came over to help me test fit the body for the first time, but before that I took him for a go-cart ride. I guess it was a good time to go ahead and install the heat shields I picked up from Drummer Mike on the forums. I opted for the polished stainless shields and I think they look great, and they work great too! After a quick go-cart ride of a couple miles around the neighborhood, I was able to rest my hand on the shield and they were just warm.
-
05-12-2019, 04:28 PM
#292
Senior Member
First body test fit
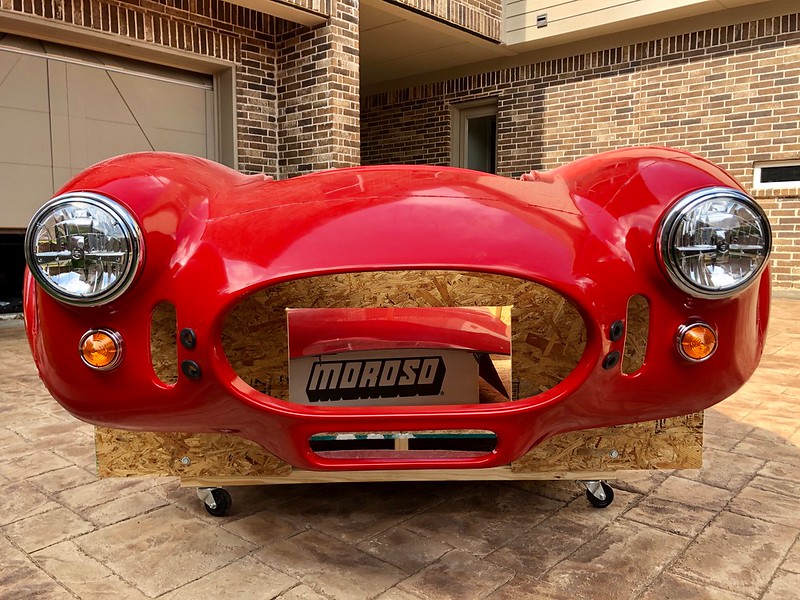
Ok, now it's about to get real. I rolled the body outside for the first time since last May when I received my kit. Following the advice of others on the forum, I decided to mount the body first without any bulb seal to see if I there is any aluminum I need to trim (seems to be plenty of clearance all around and I don't really see any that I need to trim at first glance).

Jeff Kleiner told me I should trim about 1/4" off the underside of the lip on the dash side so I marked it with a sharpie, then some painters tape, donned the trusty respirator and face shield and got to cutting with the angle grinder. It cut real easy with the angle grinder, although it does make a mess.
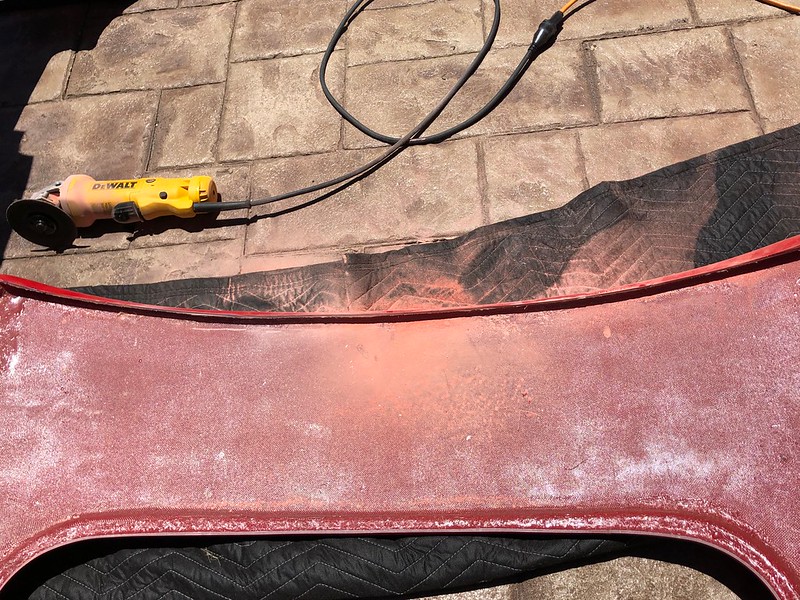
The lip on the rear of the cowl was pretty uneven, like really bad, so I measured and marked the rear as well and cut it to even it up on both sides.

With my brother on the front, me on the rear, and my wife and neighbor manning the sides, we managed to get the body on. One thing I learned is that it probably isn't a very good idea to do this for the first time with the side pipes on. The body is making slight contact with the pipe on the rear of the cutout on the drivers side (plenty of room on the passenger side). After a bit of shifting and maneuvering of the body it is sitting fairly well, although the body seems to be putting pressure on the ends of the dash on both sides, more so on the passenger side. I'm hoping the bulb seal is going to be enough to lift it off the dash. There is no contact from the rolled lip and either the dash or the rear wall so that is good.

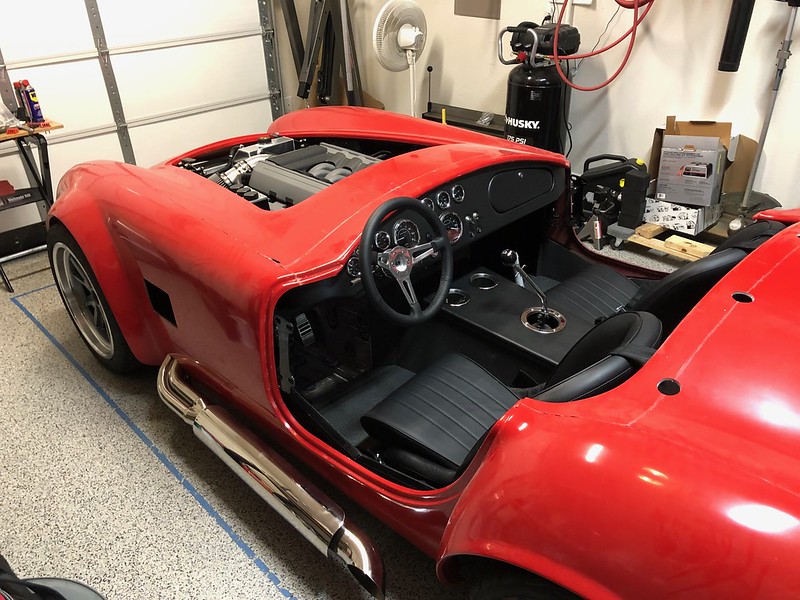
Well my brother couldn't stick around much longer so didn't have time to pull the body back off and just parked it back in the garage. Here are a few shots of it in the garage. I guess this is sort of a milestone, feels good to finally be on the body work.

Last edited by shark92651; 05-12-2019 at 04:31 PM.
-
Post Thanks / Like - 0 Thanks, 1 Likes
-
05-13-2019, 04:51 PM
#293
Senior Member

Looks Great!!
I was in the very same situation just a few weeks ago... did the pre-trim on the cockpit openings and the body dropped down without a fuss.
As far as the ends of the dash hitting the body, is it the dash panel itself, or the ends of the curved frame "hoop" the dash attaches to?
Reason I ask is I recall a blip in the assembly manual about clearance in this area, and FFR suggest you physically bend the ends of the hoop down a bit for clearance if needed...
John D. - Minneapolis 'Burbs
1965 El Camino - LT-1, 4L60e, 4wh discs, SC&C susp.
2013 F-150 Platinum - Twin Turbo 3.5
2018 Mk4 Roadster w/ Coyote - #9365 - Build Thread Delivery 7/3/18, 1st Start 1/4/19, 1st Road Mile 5/5/19, Legal 6/18/19, In Paint 2/25/21, Done (?) 4/2021
-
05-13-2019, 08:13 PM
#294
Senior Member
Originally Posted by
Fixit
Looks Great!!
I was in the very same situation just a few weeks ago... did the pre-trim on the cockpit openings and the body dropped down without a fuss.
As far as the ends of the dash hitting the body, is it the dash panel itself, or the ends of the curved frame "hoop" the dash attaches to?
Reason I ask is I recall a blip in the assembly manual about clearance in this area, and FFR suggest you physically bend the ends of the hoop down a bit for clearance if needed...
I'm not really sure but I'll get in there with a flashlight when I have a chance and take a good look at it. Did you have to trim the aluminum side trunk panels? I have a gap all the way around, but the gap near the rear just before they turn downwards is a bit narrower than the gap further in towards the roll bars. There is probably 3/8" at the smallest gap. Is this worth trimming a bit more or will the bulb seal take care of it?
-
05-13-2019, 10:43 PM
#295
Senior Member
Originally Posted by
shark92651
I'm not really sure but I'll get in there with a flashlight when I have a chance and take a good look at it. Did you have to trim the aluminum side trunk panels? I have a gap all the way around, but the gap near the rear just before they turn downwards is a bit narrower than the gap further in towards the roll bars. There is probably 3/8" at the smallest gap. Is this worth trimming a bit more or will the bulb seal take care of it?
I'd leave it alone. Bulb seal should easily deal with it. I'm personally not a fan of wholesale trimming of the aluminum. Only if it's really obvious. Hard to put it back on after trimming it off. ") I haven't found much was needed at all on 3 builds.
I haven't found much was needed at all on 3 builds.
Build 1: Mk3 Roadster #5125. Sold 11/08/2014.
Build 2: Mk4 Roadster #7750. Sold 04/10/2017.
Build Thread
Build 3: Mk4 Roadster 20th Anniversary #8674. Sold 09/07/2020.
Build Thread and
Video.
Build 4: Gen 3 Type 65 Coupe #59. Gen 3 Coyote. Legal 03/04/2020.
Build Thread and
Video
Build 5: 35 Hot Rod Truck #138. LS3 and 4L65E auto. Rcvd 01/05/2021. Legal 04/20/2023.
Build Thread. Sold 11/9/2023.
-
05-14-2019, 03:50 PM
#296
Senior Member
I'd leave it alone. Bulb seal should easily deal with it. I'm personally not a fan of wholesale trimming of the aluminum. Only if it's really obvious. Hard to put it back on after trimming it off.
x2...
A good tip/trick is to lay a Sharpie flat against the body, and run it down against the panels that get bulb seal. 90% of the time it won't touch the aluminum (poke through the gap). Where it does, that's where it needs trimming to about 3/8" clearance (which would be to the inside of the line plus a little bit). (I only had 2 or 3 spots that were tight).
John D. - Minneapolis 'Burbs
1965 El Camino - LT-1, 4L60e, 4wh discs, SC&C susp.
2013 F-150 Platinum - Twin Turbo 3.5
2018 Mk4 Roadster w/ Coyote - #9365 - Build Thread Delivery 7/3/18, 1st Start 1/4/19, 1st Road Mile 5/5/19, Legal 6/18/19, In Paint 2/25/21, Done (?) 4/2021
-
05-18-2019, 10:51 AM
#297
Senior Member
Radiator screen
Last night my brother came back over and we pulled the body off so I could get back to work on prepping everything for body assembly. Next up is a radiator screen. I purchased a large sheet of 1/4" hex perforated mesh, powder-coated black, from customcargrills.com. I had to get the largest sheet in order to get a piece that was wide enough to cover the entire radiator. I will have enough of this mesh to cover the radiator, the oil cooler, and the brake ducts for 2 roadsters. I figure I will try to sell what I have left to someone on the forum when I am done and hopefully recoup some of the cost. I also purchased the neoprene trim to wrap around the outside to protect from the sharp edges. This stuff is easy enough to cut with some tin snips so that is what I used. I had to cut corners out on the top so it would slip under the top of the 3/4" tubes that angle inward at the top of the radiator. I also purchased a piece of 1/2" x 1/4" aluminum bar to add as a spacer. Between the aluminum spacer and the neoprene trim, it holds the mesh relatively flat against the raised edges on either side of the radiator. I am using the Mike Everson radiator aluminum in the cowl which will press against the screen once installed, so I didn't see any reason to secure it other than at the top using the radiator mounting bolts.

I like it. The hex pattern is a nod to the current Ford Mustang grilles - works will with my car's theme of blending modern Ford powertrain and suspension with the classic Shelby Cobra look.


Someone had warned me about the black oxide socket head bolts FFR supplies for the Wilwood pedal box, the radiator mounting bolts, and the hood hinge hardware rusting prematurely. Sure enough, within a couple months I started seeing rust on these bolts so I swapped them out for some stainless hardware this morning. Stainless hardware this size at lowes costs more than it should, but I can't stand the rust. So far the bolts on the hood hinges are showing no sign of rust. Perhaps they are from another supplier that knows how to properly apply a black oxide finish. I'll keep an eye on them and swap them out later if they start to rust as well.


-
05-18-2019, 05:38 PM
#298
Senior Member
-
05-19-2019, 08:36 AM
#299
Senior Member
-
05-19-2019, 06:38 PM
#300
Senior Member
-
05-20-2019, 05:32 AM
#301
Not a waxer

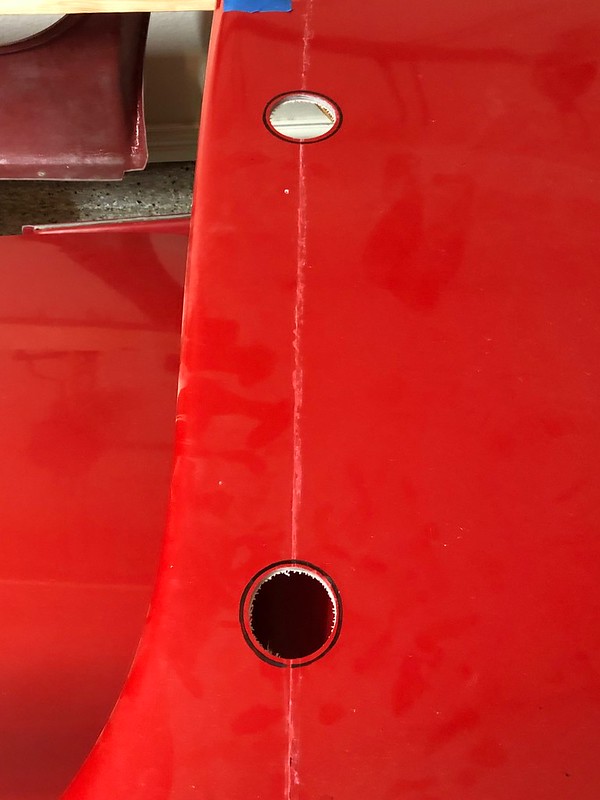
You'll need to cut a section out of the bulb on the PS firewall extension for the windshield post to pass through BTW, it appears that you have the wire for your GPS receiver in the the slot in the extension where the post will be.
I apply the nice "D" seal around the perimeter of the hood and to the doors after paint:

Available from a few sources but I like to support our fellow builder/vendors and get it from Mike Everson. FFR supplies a crude self stick foam for the hood and door openings but PLEASE do your painter a favor and don't put it on The adhesive is a bear to get off...
Jeff
-
05-20-2019, 08:32 AM
#302
Senior Member
Originally Posted by
Jeff Kleiner
You'll need to cut a section out of the bulb on the PS firewall extension for the windshield post to pass through BTW, it appears that you have the wire for your GPS receiver in the the slot in the extension where the post will be.
I apply the nice "D" seal around the perimeter of the hood and to the doors after paint:
Available from a few sources but I like to support our fellow builder/vendors and get it from Mike Everson. FFR supplies a crude self stick foam for the hood and door openings but PLEASE do your painter a favor and don't put it on
The adhesive is a bear to get off...
Jeff
I will reroute the GPS wire around the top side of the firewall extension. As far as the bulb seal in the slot, should I notch out the entire slot, or does the windshield post tend to end up towards the DS, PS, or middle of the slot?
I don't plan to put on any other weatherstripping at this point. I'm going to do the bare minimum fitting on the hood, doors, and trunk just so that I can fit the latches and hinges before sending out for paint.
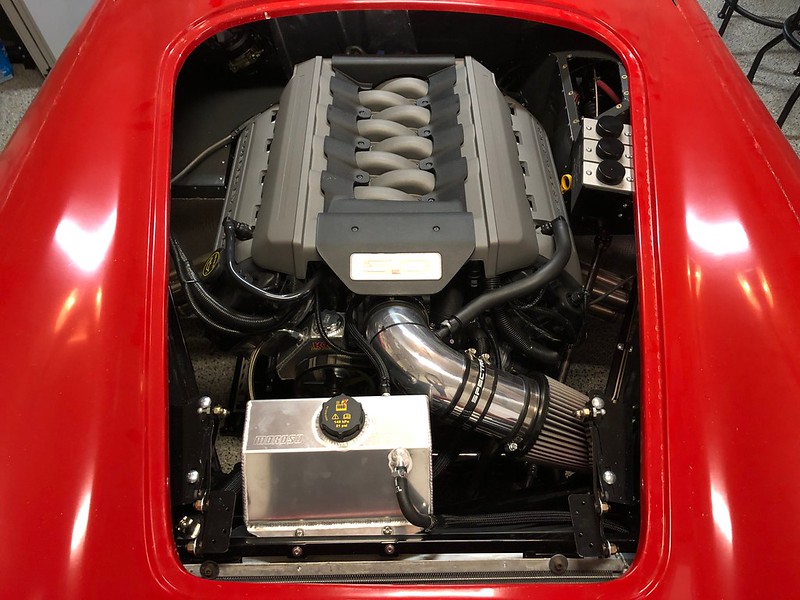
BTW I am amazed at the engine compartment in that roadster. Stunning craftsmanship.
Thanks,
David
-
05-25-2019, 05:48 PM
#303
Senior Member
-
05-25-2019, 08:43 PM
#304
Originally Posted by
shark92651
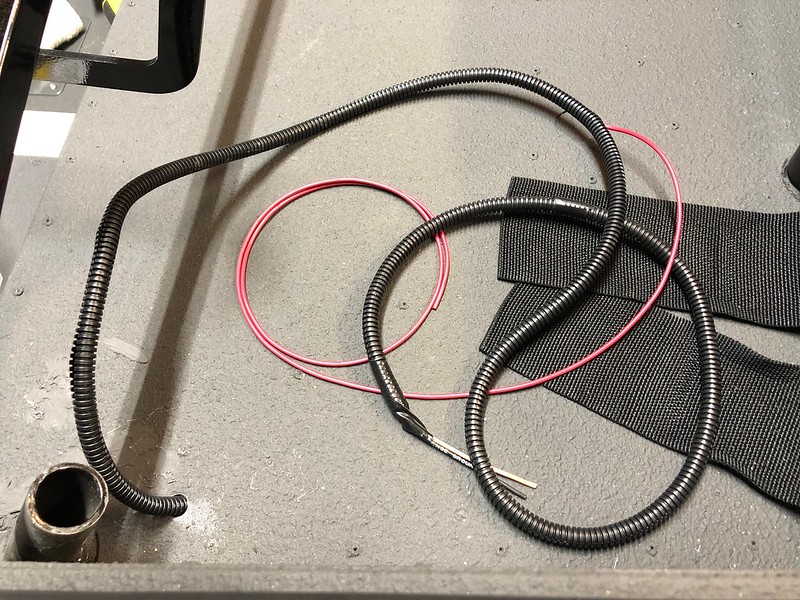
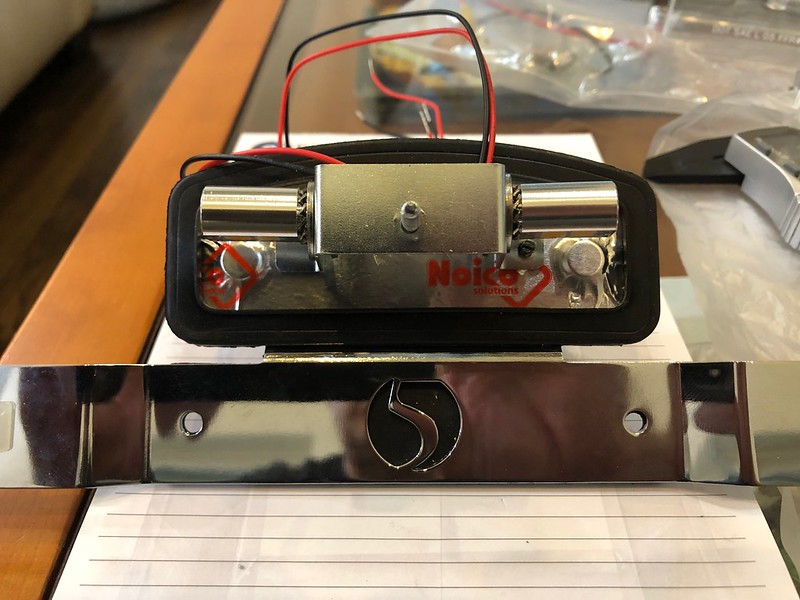
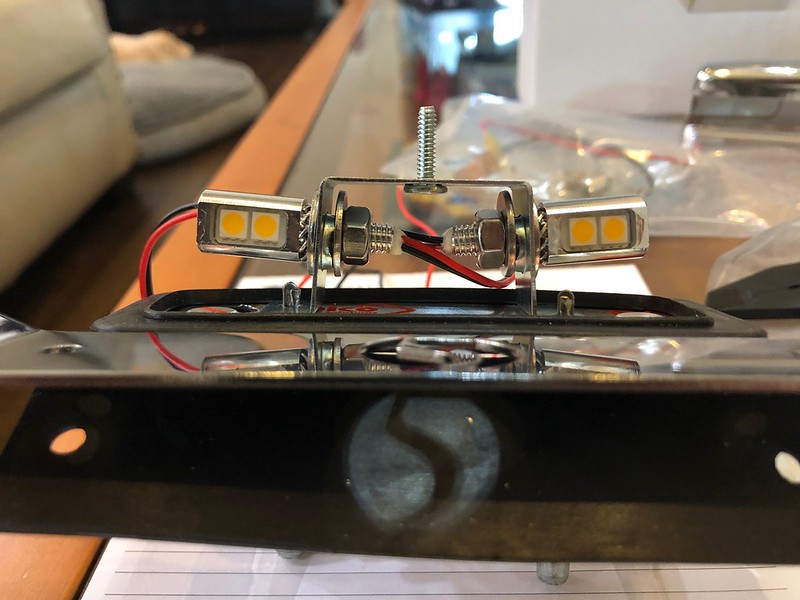
Well I really wanted to do some lighting in the oil cooler opening behind the mesh I plan to install in the opening, and I wanted them to be LED. After a bit of research I found these small 3" motorcycle lights and figured I could use them. They have halo or "angel eyes" as well as the fog lights. I decided to wire up the halos as daytime running lights and the main fog lights will be switched from the dash. I plan to mount these to the bottom of the radiator support but can't finish up the bracket until I have the body back on. I'm sure the supports will need to be cut down and bent into position, and then I will powder coat them black. Total cost about $50.00

I used 2 relays, one for the halo "daytime running" lights and another for the fogs. I used weatherpacks for all the connections.

I removed the electrical tape from around the ignition switch and ran a wire to the post that is powered when the key is turned to accessory. This will be used to switch the relay on the halos for the daytime running lights. I ran this wire inside the same loom with the SPST switch I installed earlier to manually switch on the fogs, down to the front of the car below the radiator.

It was hard to get a photo that shows just the halos with my phone so this pic is actually with them off, but they do power on as designed with the key is switched on.

Here is a shot of the bright fogs when switched on manually.

I like that alot. Very nice touch.
-
05-26-2019, 07:53 AM
#305
Senior Member
-
05-26-2019, 08:04 AM
#306
Originally Posted by
shark92651
Well I really wanted to do some lighting in the oil cooler opening behind the mesh I plan to install in the opening, and I wanted them to be LED. After a bit of research I found these small 3" motorcycle lights and figured I could use them. They have halo or "angel eyes" as well as the fog lights. I decided to wire up the halos as daytime running lights and the main fog lights will be switched from the dash. I plan to mount these to the bottom of the radiator support but can't finish up the bracket until I have the body back on. I'm sure the supports will need to be cut down and bent into position, and then I will powder coat them black. Total cost about $50.00
I have been planning a similar mod and have purchased similar lights. They almost look a little too big for the oil cooler opening but we'll see... I will be interested to see how your final installation looks!
Mark
-
05-26-2019, 08:24 AM
#307
Not a waxer
Just a bit of advise: trying to adjust cutouts for the bars and pipes without the body installed on the chassis and in it's final position may lead to shooting yourself (or even worse your body guy!) in the foot.
Jeff
-
05-26-2019, 02:41 PM
#308
Senior Member
Originally Posted by
Jeff Kleiner
Just a bit of advise: trying to adjust cutouts for the bars and pipes without the body installed on the chassis and in it's final position may lead to shooting yourself (or even worse your body guy!) in the foot.
Jeff
That makes sense, however I have already put the body on once and the drivers side pipe was making contact with the back of the existing cutout, so much that I couldn't even open the driver's side door hinge without it hitting the body. Maybe I should just cut out 1/4" at the areas that were making contact and let you do the rest.
Also since I have the breeze roll bars they won't even fit through the holes at this point. I thought I would open it up at least enough so that the main hoops fit through the holes. Bad idea as well?
-
05-26-2019, 02:44 PM
#309
Senior Member
Originally Posted by
Mark Eaton
I have been planning a similar mod and have purchased similar lights. They almost look a little too big for the oil cooler opening but we'll see... I will be interested to see how your final installation looks!
Mark
The oil cooler opening is about 3" tall. The halo's on these lights are less than that. I agree if I were trying to get them inside the cutout the entire housing won't fit. My plan is to use mesh in the opening, and mount these lights behind the mesh. You should be able to see them, but they shouldn't be very prominent. Once you start the car, the lit round halo's should be completely visible through the mesh.
-
05-27-2019, 09:32 AM
#310
Senior Member
Some random items
I'm kind of all over the place with projects on the car right now, I guess all of them are important and have to be done at some point anyway. First up is I finished putting the first two pieces of carpet into the car this morning. I'm probably not going to do any more in the cockpit until after paint to avoid making my painter's life difficult, or getting my carpet too messy. The two pieces in the back of the footbox are probably the most difficult pieces to install because it's hard to get back there and you have to run them behind some frame tubes - especially the drivers side. I decided not to cut the pieces in two, just some slight trimming, and managed to get them in place. I used outdoor carpet glue and put them in one section at a time. I started with the back section, applied the glue with a small spatula and then a small plastic 1/8" trowel to get the adhesive the right height. I press those into place and let it setup over night, then applied some more glue on the outside sections of the driver's footbox, behind the round tube, then pulled the carpet through. It's a very tight fit and I ended up using some pliers to grip the carpet and pull it. I then applied the glue on the sides, in front of the tube, and in the dead pedal cutout, and pressed it all into place. I did manage to get a little glue on the tubes and a small bit on the face of the carpet, but like Paul mentions in his thread, a little paint thinner/mineral spirits cleaned it right up. You definitely need to have the paint thinner or mineral spirits on hand before you start this job if you use this type of adhesive. You need it to clean the tools as well.


I also installed the rear brackets for the trunk support kit I picked up from Mike at replicaparts.com. I figure like the carpet I installed earlier, this will be a LOT easier before the body is in place.

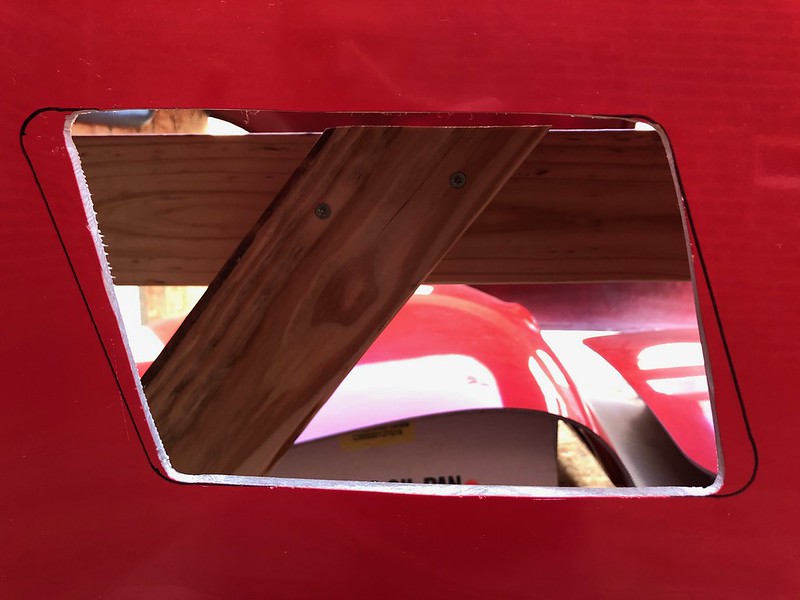
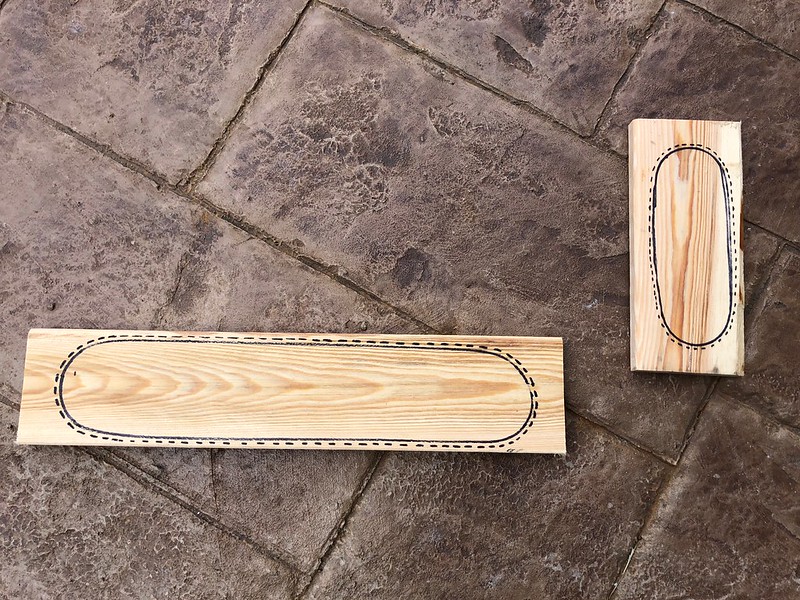
Next up I bought a cheap 1x4 at Home Depot and cut it to size and traced around the oil cooler and brake duct openings. I drew a dashed line around my trace to account for the thickness of the fiberglass, then cut them out with my jig saw. I thought this would be good to make a form for the hex brake mesh I have left over from the radiator. After a bit of trimming, bending, and forming around the block I then took it over to the body and did my best to bend and form it to fit the opening. It didn't turn out too bad for a first attempt but I think I will start over and leave a bit more material around the edges to give the silicon more material to grip when I install them after paint. When you look at the shape of the block I traced it becomes very apparent just how asymmetrical these cutouts on the body are (or maybe I just suck at tracing a hole with a sharpie).


Last edited by shark92651; 05-27-2019 at 09:37 AM.
-
Post Thanks / Like - 0 Thanks, 1 Likes
-
05-27-2019, 10:32 AM
#311
Not a waxer
Originally Posted by
shark92651
That makes sense, however I have already put the body on once and the drivers side pipe was making contact with the back of the existing cutout, so much that I couldn't even open the driver's side door hinge without it hitting the body. Maybe I should just cut out 1/4" at the areas that were making contact and let you do the rest.
Also since I have the breeze roll bars they won't even fit through the holes at this point. I thought I would open it up at least enough so that the main hoops fit through the holes. Bad idea as well?
Just keep things to the absolute minimum for now and as I said earlier don't cut until the body is on otherwise you're kinda' working out in unknown space without any real references because the factory cutouts are just a starting point. RE: the Breeze bars---it's much easier to get them set up and welded now before putting the body on again.
Jeff
-
05-27-2019, 08:59 PM
#312
Senior Member
Originally Posted by
Jeff Kleiner
Just keep things to the absolute minimum for now and as I said earlier don't cut until the body is on otherwise you're kinda' working out in unknown space without any real references because the factory cutouts are just a starting point. RE: the Breeze bars---it's much easier to get them set up and welded now before putting the body on again.
Jeff
My stainless roll bars have been ready to go for awhile, just need to get them polished. I used three different sized bits and cutting fluid so wasn't too bad to drill them. I had to make a single "relief" cut in the coupling tube on the passenger side to get that one to line up properly as it moved just a bit during welding.
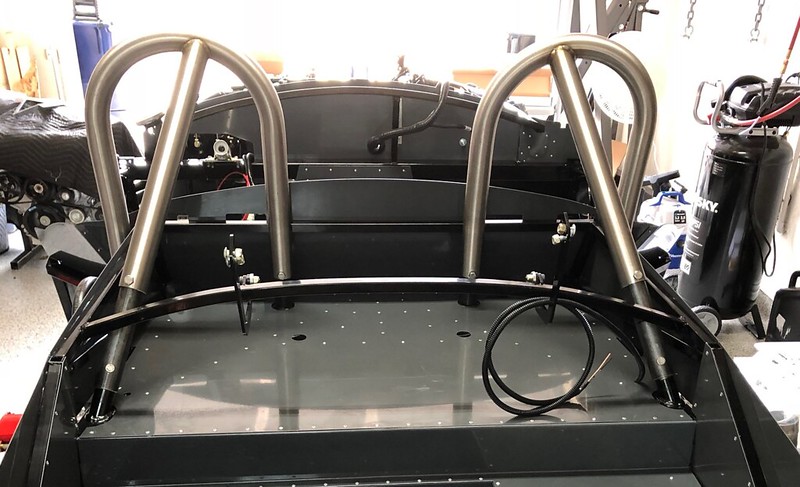
Last edited by shark92651; 05-28-2019 at 07:40 PM.
-
05-27-2019, 10:21 PM
#313
Originally Posted by
shark92651
Hopefully my kit will be picked up this week, but no word on that yet. I didn't get a whole lot of work done this weekend because I couldn't get the engine on the stand. I couldn't source the grade 10.9 M10 x 1.5 x 100mm bolts locally so going to have to wait on a delivery from McMaster this week. I did manage to get a few things done, however.
As others have mentioned, I removed some material in the oil pan in the area that may cause interference with the dipstick. I used a rotary burr file on the angle grinder to get the bulk of the material off and finished it up with small sanding drums on the Dremel. Cleaning out all the bits of aluminum was a pain. I removed that top plate and then used hot water and Simple Green. I wiped it out with paper towels and then blew it out with my compressor. It took awhile but I finally got it all out.

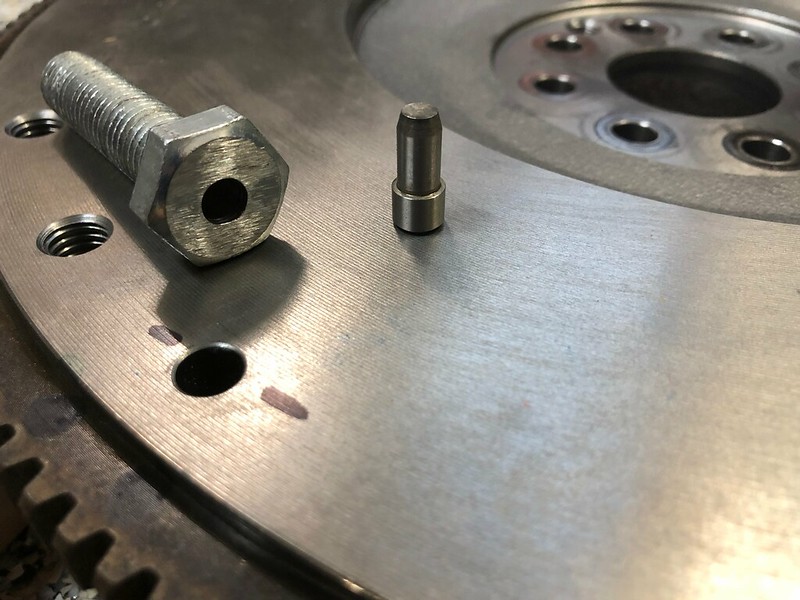
I got my clutch in this week and of course the dowels had to be swapped so I took the flywheel back off. I flipped it upside down and laid it across a couple 2x4's and drove out the old dowels with a 1/4" punch.

To drive the new dowels in I used a cool tip I saw on Youtube. I took a large bolt and I drilled a 1/4" hole into the head just deep enough to set the dowels slightly recessed into the flywheel. I also ground off the raised identification letters on the head of the bolt so that it wouldn't stamp them into the flywheel. I have no idea if that would actually happen, but didn't want to take a chance. I also left the dowels in the freezer overnight, just a touch of oil, used my homemade starter punch, and they drove in very easily. Flywheel is now installed with new flywheel bolts, properly torqued to 177 in/lbs + 60 degrees.


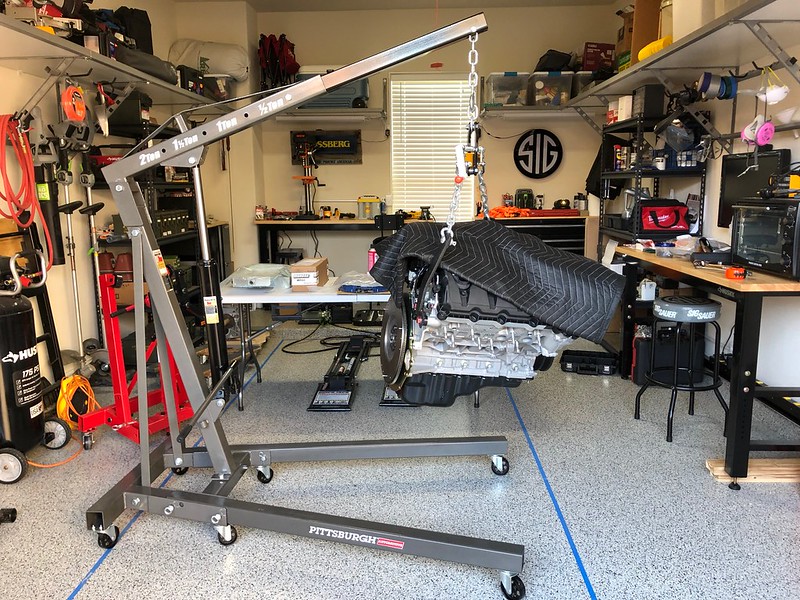
I borrowed lift brackets from a friend so I was finally able to get the engine off the pallet. I may have to shorten those chains when I am putting it in the car to get enough height out of it. I put the motor on the fixed engine cradle I bought from
https://www.stumpysfabworks.com/ so that I could drain the oil. Of course I then realized I bought the wrong cradle. It works great for the stock oil pan but it isn't going to clear the Moroso pan. I emailed Kurt asking if I could exchange it, hopefully that won't be an issue. For those looking for an engine cradle, the price and quality is right at Stumpy's. The model you want for the Coyote and the Moroso pan is the MOD-PAW - "W" for Wide.

Curious about how you drilled out the head of the bolt to fit over the dowel pins. Did you put the bolt in a vice and use a drill press?
-
05-28-2019, 02:04 PM
#314
Senior Member
Originally Posted by
ZachT
Curious about how you drilled out the head of the bolt to fit over the dowel pins. Did you put the bolt in a vice and use a drill press?
That is exactly what I did. I have a drill press at work with a cross vise in it. You could probably do it easy enough with a bench vise and a hand drill if you use a center punch, then a small bit and work your way up to final size. I am not a big fan of drilling large holes in steel with a single bit. So much easier to work your way up from small bits to larger bits.
Last edited by shark92651; 05-28-2019 at 04:29 PM.
-
05-28-2019, 03:23 PM
#315
Fog Lights
Originally Posted by
Desert Snake
I like that alot. Very nice touch.
I am also running fog/driving lights in the same location. I will probably use a similar mounting bracket so thanks for the idea! Since my headlights have my DRLS I went with just the PIAA driving lights, spent way more than I should have but at this point I would hate to break tradition!
-
05-29-2019, 11:12 AM
#316
Senior Member
Originally Posted by
rodneyarcher1
I am also running fog/driving lights in the same location. I will probably use a similar mounting bracket so thanks for the idea! Since my headlights have my DRLS I went with just the PIAA driving lights, spent way more than I should have but at this point I would hate to break tradition!
I'll post more pics when I finish mounting them, but my plan is to do something similar to the mount for the radiator overflow tank. I will bend the aluminum supports under, and up behind the lower radiator support and through bolt it.
-
05-30-2019, 08:37 PM
#317
Senior Member
-
Post Thanks / Like - 0 Thanks, 1 Likes
-
06-01-2019, 12:20 PM
#318
Senior Member
-
06-01-2019, 12:41 PM
#319
Senior Member
-
Post Thanks / Like - 1 Thanks, 1 Likes
-
06-10-2019, 11:26 PM
#320
Senior Member
Trunk liner
This weekend I worked on my trunk liner. I liked the way Papa's trunk turned out so I ordered some of the same material, the Stinger STLBLK Car Audio Trunk Liner Black Carpet 54" x 5 Yards from hifisoundconnection.com. I picked up a couple cans of 3M Super 90 from Lowes to use as adhesive.
The first thing I did was make a pattern out of some craft paper from the office. I cut a piece that was just over half the width of the trunk and took measurements of the location of the tabs for the racing harness and the roll bar stubs and transferred that to the paper. After a test fit and satisfied with the template, I traced it onto another piece of craft paper, mirrored it, and then put both pieces into the trunk and taped them together with some painters tape. I repeated this until I had a single pattern for the entire floor of the trunk, all the way down to the horizontal piece under the top quick-jack location. I placed the pattern onto the trunk material and traced it out with some more painters tape, and carefully cut it out with my shop shears. I just made slits in the material for the harness tabs and cut out the roll bar holes with an X-ACTO knife.

I adhered the material to the floor in sections, starting at the top around the harness tabs and the roll bar stubs. I worked my way down from there. I was hoping to do the entire floor in a single piece, but because the material stretches a bit as it is installed and smoothed out, I made a cut at the bottom of where the trunk drops down to the lower section. I then started at the bottom of the trunk and worked my way up to where it meets the top piece where I had cut it. It's kind of tricky to get this glued down without the seams showing too much, but I think it turned out pretty nice.

Here is a shot of the finished product, less the trunk sides which I still have to work on. I had to cut a separate piece of material to go down the left and right sides, and the floor of my dropped trunk, but I was able to get the seams to meet up pretty well.
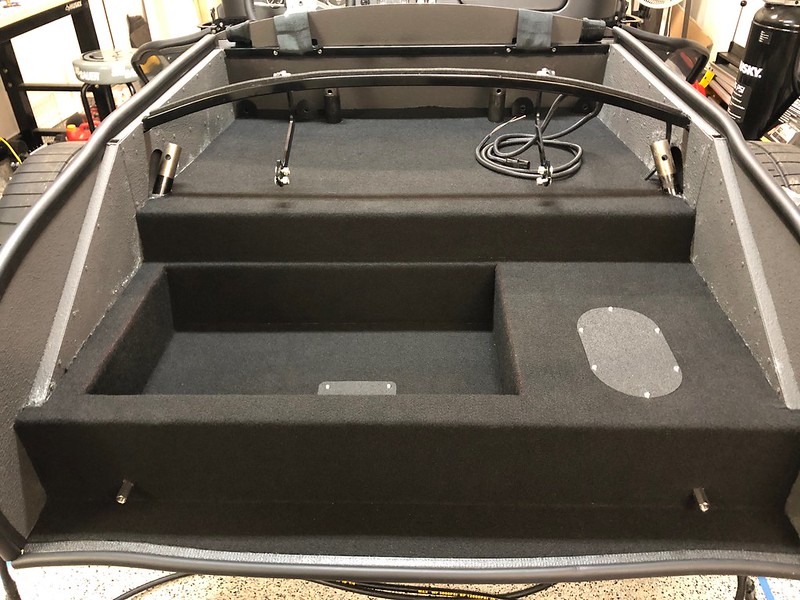
I was planning to cover my removable panels with some more of the same material, but I had some more of that textured, rubber anti-skid mat I had bought to cover my dead pedal and decided that it would look cool on top of my access panels instead. Not only does it look cool, but it has a bit more of a low profile using that material as well.

-
Post Thanks / Like - 0 Thanks, 2 Likes


 Thanks:
  Likes:


 Reply With Quote