-
06-22-2019, 10:31 PM
#121
Senior Member

Question for the forum
I’m taking my time finishing the brake and fuel line routing and using SS for the hard lines. At the time I finished up the front section I used aluminum sleeves and tube nuts for connections to the -3 aluminum adapters shown. I really didn’t even realize that this might be an issue because it seemed to be sold as brake line compatible equipment.
I am planning on replacing with steel. After reading some other forum thoughts on this I figured I would ask.
I should replace these aluminum fittings/adaptors with steel, correct?
Is this a theoretical issue or actually known to cause failure?


Last edited by MSumners; 06-23-2019 at 10:00 AM.
-
Post Thanks / Like - 1 Thanks, 0 Likes
-
06-22-2019, 10:51 PM
#122
Senior Member
Being totally new to bending and fitting brake lines, I’ve found this useful for assessing bending angles when completing the ends going to the fittings. I’ve been taking short pieces of scrap tubing and using as angle guides to mark the incoming length and measure the angle to bend. I think I would’ve saved about 10 feet of SS tubing if I would have done this from the start.


-
Post Thanks / Like - 1 Thanks, 1 Likes
-
06-23-2019, 10:28 AM
#123
Senior Member
Does it matter which side of the flange the wheel-well fill panels attach later in the build?
Debating which orientation to put some brake line clamps on.

-
06-23-2019, 02:24 PM
#124
Senior Member

The "elephant ears" attach to the wheel-side of the "F" panel, or from the front, not behind.
Nice work on the lines!... tight radii and everything tucked in.
John D. - Minneapolis 'Burbs
1965 El Camino - LT-1, 4L60e, 4wh discs, SC&C susp.
2013 F-150 Platinum - Twin Turbo 3.5
2018 Mk4 Roadster w/ Coyote - #9365 - Build Thread Delivery 7/3/18, 1st Start 1/4/19, 1st Road Mile 5/5/19, Legal 6/18/19, In Paint 2/25/21, Done (?) 4/2021
-
Post Thanks / Like - 1 Thanks, 0 Likes
-
06-23-2019, 09:54 PM
#125
Senior Member

Originally Posted by
Fixit

The "elephant ears" attach to the wheel-side of the "F" panel, or from the front, not behind.
Nice work on the lines!... tight radii and everything tucked in.
Thanks!
I think round 4 for the brake lines was finally the keeper. Now I just have to figure out if I need to re-do the front run to switch out the aluminum fittings.
-
06-24-2019, 06:58 AM
#126
Very professional looking line routing and bending. Nice work!
-
06-24-2019, 06:53 PM
#127
Senior Member
Originally Posted by
cv2065
Very professional looking line routing and bending. Nice work!
Thanks!
Definitely took some practice and a few extra lengths of line. I’ll probably be getting a Christmas card from in-line tube this year.
-
06-25-2019, 08:13 PM
#128
Senior Member
Finishing up fuel hard lines with the 3/8 SS. I think I checked angles about 3 times for every bend and those tubes must have been in and out about 15 times. I did not want to have to re-order these lengths. Now just have to tie in the fuel filter and the tank can go up.
Still have to go back and equalize the thread length on the IRS section shown. Didn’t think of that until I was re-reading EdwardB’s thread.


-
06-25-2019, 08:28 PM
#129
Very nicely done! I'm about to tackle all the brake and fuel lines myself. I can only hope mine turn out anywhere near that nice.
MkIV Roadster build: Gen 2 Coyote, IRS, TKO600. Ordered 10/24/18. Delivered 1/29/19. Engine installed 8/8/21. First start 9/12/21. First go-kart 9/17/21. Off to paint 4/11/22. Back from paint 12/30/22.
Build thread here.
-
06-26-2019, 09:06 PM
#130
Senior Member
Pulled the tank out to prep.
Is this edge supposed to be bent?

-
06-26-2019, 09:12 PM
#131
Senior Member
Originally Posted by
JohnK
Very nicely done! I'm about to tackle all the brake and fuel lines myself. I can only hope mine turn out anywhere near that nice.
Thanks for the compliment, I honestly spent a good deal of time on the lines. I had never done this before and wanted to get it right. First I made templates in 1/4 copper tubing I picked up at HD. Then made a second round in the included steel line, then copied into the SS. Even messed up the first round of SS on 3 of the lengths and re made them. Luckily the 3/8 fuel lines turned out good the first round.
-
06-27-2019, 08:53 PM
#132
Senior Member
I contacted Fragola Performance Systems and asked about my use of their aluminum fittings on the front brake runs with the SS 3/16 hard lines. They said there is no issue and many people run them this way. They said they are tested to over 3000psi in this setting, so for now the front system stays put.
-
Post Thanks / Like - 0 Thanks, 1 Likes
-
06-28-2019, 11:05 PM
#133
Senior Member
Side by side of kit (left) vs Breeze big bore fuel tank vent valve.

-
06-30-2019, 08:10 PM
#134
Senior Member
-
07-05-2019, 07:25 AM
#135
Senior Member
-
07-05-2019, 03:23 PM
#136
Senior Member
When using the rear sway bar, is anyone replacing the 110mm M16 bolt that goes through the UCA and mounting plate with a 120mm for some extra thread length. If so , where did you find one? I can’t even find one on McMaster. It’s been on my list of things to check back on now for a few weeks.
Last edited by MSumners; 07-05-2019 at 03:25 PM.
-
07-05-2019, 08:25 PM
#137
Senior Member
Brake lines finished. Just a short checklist and I’ll be filling the system/bleeding them.

-
07-06-2019, 06:09 AM
#138
Senior Member

Originally Posted by
MSumners
Pulled the tank out to prep.
Is this edge supposed to be bent?
Mine was receive the same way. Havent installed it yet....
-
Post Thanks / Like - 0 Thanks, 1 Likes
-
07-06-2019, 08:37 AM
#139
Senior Member
Originally Posted by
MSumners
When using the rear sway bar, is anyone replacing the 110mm M16 bolt that goes through the UCA and mounting plate with a 120mm for some extra thread length. If so , where did you find one? I can’t even find one on McMaster. It’s been on my list of things to check back on now for a few weeks.
Found

-
Post Thanks / Like - 1 Thanks, 1 Likes
-
07-06-2019, 11:52 AM
#140
Senior Member
Finished up the front hard fuel lines by making a mount out of .625” aluminum block. This way it won’t be hanging in space. I put a couple layers of anti-slip foam between the block and the footbox so it has some degree of room for vibration. The aluminum I ordered from Online metals, who will cut to almost any dimension you need. All I really did was drill out for mounting and tap the holes for the 3/8 tubing clamps. Of course, literally every piece of SS I use gets anti-seize now, in accordance with prior recommendations.


Last edited by MSumners; 07-06-2019 at 11:55 AM.
-
07-06-2019, 05:08 PM
#141
Senior Member
Has anyone run three reservoir tubing lengths (I'm using the CNC triple) through this hole and found a grommet that works well. Obviously a simple grommet would work but just wondering about achieving a good seal given the possibility of running three lines through it. Or maybe not even a big concern and just K.I.S.S.
Thanks for any advice! As always, this build would only be possible with all of your help.

Last edited by MSumners; 07-06-2019 at 06:22 PM.
-
07-07-2019, 03:09 AM
#142
I made a single round plate with 3 grommeted holes in it. The holes were pretty close, just enough space for the grommets, but it works, seals off the footbox and looks good. I spent some time looking for some kind of rubber diaphragm that would go in the hole like a single grommet, then I could cut access thru it for the hoses, but never found anything that I liked.
-
07-08-2019, 08:20 PM
#143
Senior Member
Originally Posted by
Boydster
I made a single round plate with 3 grommeted holes in it. The holes were pretty close, just enough space for the grommets, but it works, seals off the footbox and looks good. I spent some time looking for some kind of rubber diaphragm that would go in the hole like a single grommet, then I could cut access thru it for the hoses, but never found anything that I liked.
Thanks for the info! Again fairly simple but good to know what others have come up with. I did find a correct size ( I believe) solid grommet and will see if I can fit it and cut the appropriate holes. If not I will probably follow suit and make a panel as well.
-
07-08-2019, 08:28 PM
#144
Senior Member
Worked a bit on fitting the fuel tank. Didn’t have any difficulty getting it into place but I am seeing interference from the mounting posts on the passenger side. After searching the forum it looks like others have at least intermittently had similar experience. I think the easiest fix will be to very slightly bend the passenger side forward mount bar away from the tank.
Anyone else have this recently? The last thread that came up on searching was a few years ago.

-
07-08-2019, 08:37 PM
#145
Senior Member

I also made a plate to route the three reservoir lines through that hole in the footbox. I played around with grommets, but wasn't able to get them lined up and fitted the way I liked. I ended up shrinking two short pieces of double wall shrink sleeve over each line where they went through the plate. Once installed, filled from both sides with Permatex Ultra Black RTV. Picture below is before the sleeving and RTV, and also the Coupe build. But wouldn't be any different for the Roadster.
For the fuel tank, I've had that happen too. That thin wall tubing is easy to bend. Couple of taps with a dead blow hammer with the tank out of the way and you'll be fine.

Last edited by edwardb; 07-08-2019 at 08:40 PM.
Build 1: Mk3 Roadster #5125. Sold 11/08/2014.
Build 2: Mk4 Roadster #7750. Sold 04/10/2017.
Build Thread
Build 3: Mk4 Roadster 20th Anniversary #8674. Sold 09/07/2020.
Build Thread and
Video.
Build 4: Gen 3 Type 65 Coupe #59. Gen 3 Coyote. Legal 03/04/2020.
Build Thread and
Video
Build 5: 35 Hot Rod Truck #138. LS3 and 4L65E auto. Rcvd 01/05/2021. Legal 04/20/2023.
Build Thread. Sold 11/9/2023.
-
Post Thanks / Like - 1 Thanks, 1 Likes
-
07-09-2019, 09:34 AM
#146
Like others I went with 3 seperate grommets.

-
Post Thanks / Like - 1 Thanks, 0 Likes
-
07-09-2019, 03:15 PM
#147
Senior Member
Originally Posted by
edwardb
I also made a plate to route the three reservoir lines through that hole in the footbox. I played around with grommets, but wasn't able to get them lined up and fitted the way I liked. I ended up shrinking two short pieces of double wall shrink sleeve over each line where they went through the plate. Once installed, filled from both sides with Permatex Ultra Black RTV. Picture below is before the sleeving and RTV, and also the Coupe build. But wouldn't be any different for the Roadster.
For the fuel tank, I've had that happen too. That thin wall tubing is easy to bend. Couple of taps with a dead blow hammer with the tank out of the way and you'll be fine.
Thanks again, I’m confident I’ll be heading that way with the separate cover panel.
Before raising the fuel tank back up I planned to ensure the IRS differential was adequately filled. After searching and reading some threads it sounds as if the take-home message is the diff is usually filled from the factory, but there seems to be differing experiences with this and checking the level for peace of mind would be the way to go.
Is there a way to just remove the top plug and check the level without draining the whole thing?
-
07-09-2019, 08:25 PM
#148
Senior Member
Originally Posted by
MSumners
Before raising the fuel tank back up I planned to ensure the IRS differential was adequately filled. After searching and reading some threads it sounds as if the take-home message is the diff is usually filled from the factory, but there seems to be differing experiences with this and checking the level for peace of mind would be the way to go. Is there a way to just remove the top plug and check the level without draining the whole thing?
When you fill the empty diff with specified amount, in my experience, it goes right to the level of the top plug and even starts coming out a bit. So you could do the same with a partial fill. Check to make sure the fluid is at the top plug. If not, put in enough to where it starts coming out.
Build 1: Mk3 Roadster #5125. Sold 11/08/2014.
Build 2: Mk4 Roadster #7750. Sold 04/10/2017.
Build Thread
Build 3: Mk4 Roadster 20th Anniversary #8674. Sold 09/07/2020.
Build Thread and
Video.
Build 4: Gen 3 Type 65 Coupe #59. Gen 3 Coyote. Legal 03/04/2020.
Build Thread and
Video
Build 5: 35 Hot Rod Truck #138. LS3 and 4L65E auto. Rcvd 01/05/2021. Legal 04/20/2023.
Build Thread. Sold 11/9/2023.
-
07-09-2019, 10:03 PM
#149
Originally Posted by
MSumners
Thanks again, I’m confident I’ll be heading that way with the separate cover panel.
Before raising the fuel tank back up I planned to ensure the IRS differential was adequately filled. After searching and reading some threads it sounds as if the take-home message is the diff is usually filled from the factory, but there seems to be differing experiences with this and checking the level for peace of mind would be the way to go.
Is there a way to just remove the top plug and check the level without draining the whole thing?
Use a pipet , just like back in highschool chemistry, to check the differential fluid level.
Mark
-
07-10-2019, 08:11 PM
#150
Senior Member
Originally Posted by
Mark Eaton
Use a pipet , just like back in highschool chemistry, to check the differential fluid level.
Mark
Thanks if I can get the plug out I think I’ll try this and check the level.
Is there a specific tool to get this plug out? Searched and found some have had success using a simple 3/8 drive but when I try to fit this it’s clearly too loose. If I’m not mistaken that’s red threadlocker as well? I think I’m going to call FF and check their confidence of whether this comes ready to roll.

Last edited by MSumners; 07-10-2019 at 08:14 PM.
-
07-10-2019, 09:45 PM
#151
Senior Member
Originally Posted by
MSumners
Thanks if I can get the plug out I think I’ll try this and check the level.
Is there a specific tool to get this plug out? Searched and found some have had success using a simple 3/8 drive but when I try to fit this it’s clearly too loose. If I’m not mistaken that’s red threadlocker as well? I think I’m going to call FF and check their confidence of whether this comes ready to roll.
That's sealant, not red Loctite. The plug isn't hard to get out. I've successfully used a 3/8-inch drive on mine for both IRS builds. Similar plugs are used by Tremec and a 3/8-inch drive works OK there too. Maybe you're using a ratchet with a push button release? You may need to push the button when inserting into the plug so the locking ball retracts and it goes in far enough. It's not a super precision fit, but works fine.
Build 1: Mk3 Roadster #5125. Sold 11/08/2014.
Build 2: Mk4 Roadster #7750. Sold 04/10/2017.
Build Thread
Build 3: Mk4 Roadster 20th Anniversary #8674. Sold 09/07/2020.
Build Thread and
Video.
Build 4: Gen 3 Type 65 Coupe #59. Gen 3 Coyote. Legal 03/04/2020.
Build Thread and
Video
Build 5: 35 Hot Rod Truck #138. LS3 and 4L65E auto. Rcvd 01/05/2021. Legal 04/20/2023.
Build Thread. Sold 11/9/2023.
-
07-10-2019, 09:50 PM
#152
Senior Member
Originally Posted by
edwardb
That's sealant, not red Loctite. The plug isn't hard to get out. I've successfully used a 3/8-inch drive on mine for both IRS builds. Similar plugs are used by Tremec and a 3/8-inch drive works OK there too. Maybe you're using a ratchet with a push button release? You may need to push the button when inserting into the plug so the locking ball retracts and it goes in far enough. It's not a super precision fit, but works fine.
Perfect, thanks for the re-direction. That makes sense. I’ll see if I can get a drive in and loosen it out. Just didn’t want to start torquing on something I wasn’t sure of.
-
07-13-2019, 08:10 AM
#153
Senior Member
Again probably not needed but couldn’t stop seeing the thread length on IRS LCA and decided to switch the bolts out for m16 120mm.


Last edited by MSumners; 07-13-2019 at 10:41 AM.
-
07-13-2019, 12:18 PM
#154
Senior Member
Engine package arrived from Forte!

-
07-13-2019, 07:51 PM
#155
Originally Posted by
MSumners
I think I’m going to call FF and check their confidence of whether this comes ready to roll.
Not sure if you have completed this task yet, but wanted to chime in. There is no way anyone at FF will know if there is fluid in your diff. And even more, whether it has the appropriate amount of friction modifier in it as well. Mine came with only the friction modifier in it so I drained it and started fresh all the way around just to be sure I knew what was going on in there. I would say that if you pull the plug (use a 3/8 ratchet) and it is full to the bottom of the hole then good to go. If not I'd pull the bottom plug and drain whatever is in there out and put your own fluid in it for peace of mind that it is done and done correctly. Just my $.02 worth.
-
07-13-2019, 08:14 PM
#156
Senior Member
Originally Posted by
BadAsp427
Not sure if you have completed this task yet, but wanted to chime in. There is no way anyone at FF will know if there is fluid in your diff. And even more, whether it has the appropriate amount of friction modifier in it as well. Mine came with only the friction modifier in it so I drained it and started fresh all the way around just to be sure I knew what was going on in there. I would say that if you pull the plug (use a 3/8 ratchet) and it is full to the bottom of the hole then good to go. If not I'd pull the bottom plug and drain whatever is in there out and put your own fluid in it for peace of mind that it is done and done correctly. Just my $.02 worth.
Thanks for the recommendation!
This is actually exactly what I plan to do. It sounds like it’s supposed to be full but anecdotally people have had differing experiences. When I talked to Dave Smith at the build course one of his top 3 recommendations was to make sure the differential is checked and full. He said even they incorrectly made the assumption once that one was filled and turned out obviously poorly.
Thanks again, I’ll let you know what I find.
-
07-15-2019, 11:22 AM
#157
Senior Member
Called the Ford Performance tech line to check on the differential fluid level recommendation. I removed the fill plug last night and checked it. Ford tech said the fill point level is 9mm below the plug. This is actually exactly what I measured so I am putting the plug back and leaving it alone.
-
Post Thanks / Like - 0 Thanks, 2 Likes
-
07-18-2019, 12:22 AM
#158
Senior Member
Remember the game ‘Operation’ with the bones and the tweezers and the buzzer etc?
I currently have the nightly hot rod equivalent of this happening involving a gas tank, dislodged fuel pump sock, wrench and drift punch.
With the tank in the car, does the long axis of the sock end up oriented forward-rear or left-right?

Last edited by MSumners; 07-18-2019 at 12:25 AM.
-
07-18-2019, 06:08 AM
#159
Senior Member
Originally Posted by
MSumners
Remember the game ‘Operation’ with the bones and the tweezers and the buzzer etc?
I currently have the nightly hot rod equivalent of this happening involving a gas tank, dislodged fuel pump sock, wrench and drift punch.
With the tank in the car, does the long axis of the sock end up oriented forward-rear or left-right?
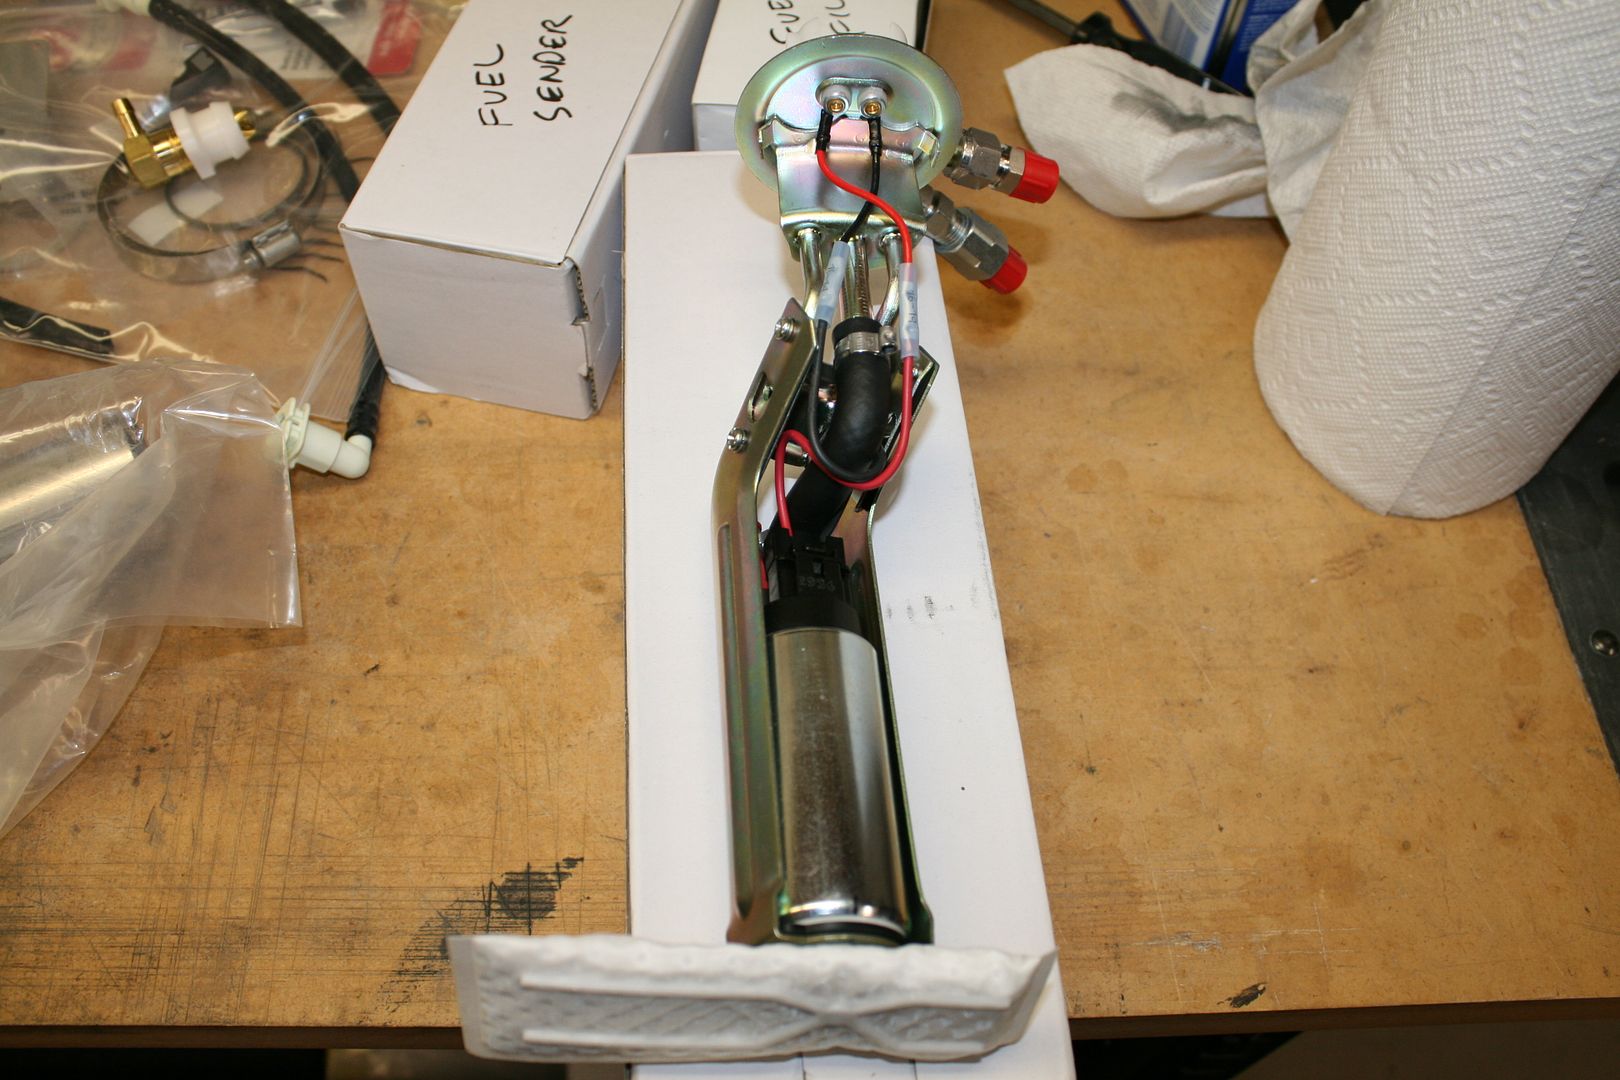
Side-to-side. That's how I've put them in. Takes a little finesse to bend the sock through the hole, and then rotate the assembly to where it drops into the sump. This picture from my #8674 build just before installing into the tank. Later switched to a Pro-M full 3/8-inch pump hangar, but that's a separate discussion.
Build 1: Mk3 Roadster #5125. Sold 11/08/2014.
Build 2: Mk4 Roadster #7750. Sold 04/10/2017.
Build Thread
Build 3: Mk4 Roadster 20th Anniversary #8674. Sold 09/07/2020.
Build Thread and
Video.
Build 4: Gen 3 Type 65 Coupe #59. Gen 3 Coyote. Legal 03/04/2020.
Build Thread and
Video
Build 5: 35 Hot Rod Truck #138. LS3 and 4L65E auto. Rcvd 01/05/2021. Legal 04/20/2023.
Build Thread. Sold 11/9/2023.
-
07-18-2019, 08:24 AM
#160
Senior Member
Originally Posted by
edwardb
Side-to-side. That's how I've put them in. Takes a little finesse to bend the sock through the hole, and then rotate the assembly to where it drops into the sump. This picture from my #8674 build just before installing into the tank. Later switched to a Pro-M full 3/8-inch pump hangar, but that's a separate discussion.
Thanks! That’s clear.
I did look at the ProM as I have 3/8 feed and return lines run. Any reason to just do the ProM now in the build that I’m unaware of? Obviously would rather do it now rather than later. I however am using a FiTech EFI so may be different.
Thanks again for the guidance.


 Thanks:
  Likes:


 Reply With Quote


