-
06-11-2019, 09:59 AM
#321
Senior Member

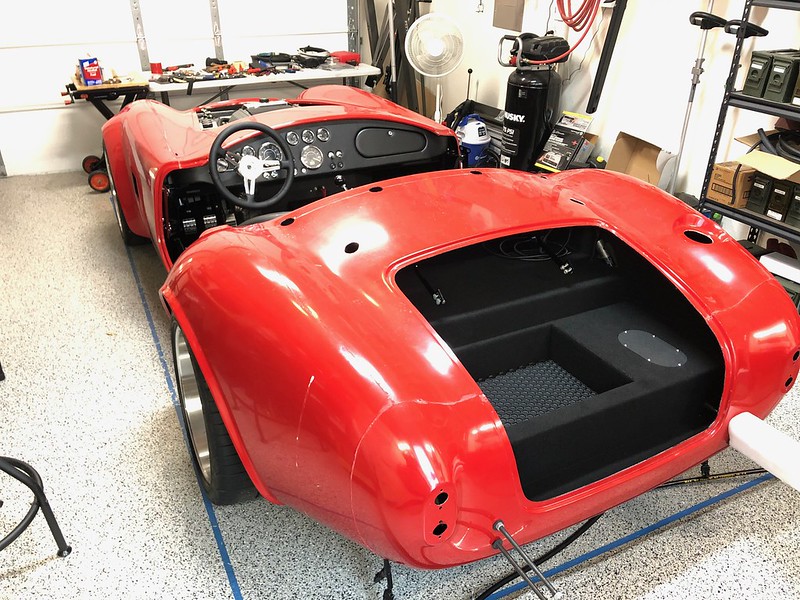
One more touch on the trunk. I found an "open box" Hexomat trunk mat for a Smart Car fortwo at a great price on eBay, so I picked it up and cut it to fit the dropped trunk. The Hexomat is sort of like a Weathertech in that the hex cells can hold spilled liquids.

-
Post Thanks / Like - 1 Thanks, 2 Likes
-
06-12-2019, 07:33 PM
#322
Senior Member
-
06-12-2019, 07:38 PM
#323
Senior Member
After a bit of research I decided to pick up a JLT catch can. According to what I read the passenger side gets the most benefit for this on the Gen2 Coyote so that is what I bought. This was probably the simplest project on the entire car so far. Took all of 30 seconds to install.

Last edited by shark92651; 06-12-2019 at 07:42 PM.
-
06-13-2019, 11:13 PM
#324
Senior Member
Trunk is complete
I finished up the sides and back of the trunk tonight so here is a pic of the entire completed trunk. I spent more time on this than I thought I would, especially for the rear where it probably won't be seen but I figured if I was going to cover it I better finish it now before the body is on.

-
06-14-2019, 01:17 PM
#325
Senior Member
Roll bars polished
I got my roll bars and LeMans gas cap back from the metal polisher this afternoon - they turned out real nice. My friend did a great job on the welds.


-
06-15-2019, 12:00 PM
#326
Senior Member
-
Post Thanks / Like - 0 Thanks, 1 Likes
-
06-15-2019, 01:16 PM
#327
Not a waxer

You want the flange of the door jamb to be ahead of the striker tab. It looks like you may need to take the body forward but can't tell from the photos you have---Give us pictures of the body to striker tab more from the sides, not straight on.
Jeff
-
06-15-2019, 02:45 PM
#328
Senior Member

Originally Posted by
Jeff Kleiner

You want the flange of the door jamb to be ahead of the striker tab. It looks like you may need to take the body forward but can't tell from the photos you have---Give us pictures of the body to striker tab more from the sides, not straight on.
Jeff
Ok I see what you are saying. I pulled on it a bit and this is a shot from the top of the striker tabs looking down. This also allowed the drivers side hinge to clear the body by about 1/8"
Driver Side

Passenger Side

Does this look better? Once I get it in the ideal position should I put a couple self-tappers underneath to keep it from moving before I start putting anything else on? Does the manual do a decent job of describing the order in which I should proceed from here?
Last edited by shark92651; 06-15-2019 at 03:57 PM.
-
06-15-2019, 04:18 PM
#329
Senior Member
I tugged on it some more and I have about 5/16" from the edge of the body to the striker tab, at the bottom. At the top of the tab it's more like 3/16". The passenger side is about 3/8" at the bottom. Do you think this is good? Should I run a self-tapper under each side to keep it from moving before I do anything else?

-
06-15-2019, 08:17 PM
#330
Not a waxer
OK, I see what's happening...you have another thread going with the same photos and text. I thought the reply I made earlier was in that one and had somehow disappeared but I now see that it was here. Anyway, your latest photos show that you now have the body in a good place to start from---carry on!
Jeff
-
06-15-2019, 11:49 PM
#331
Senior Member
Originally Posted by
Jeff Kleiner
OK, I see what's happening...you have another thread going with the same photos and text. I thought the reply I made earlier was in that one and had somehow disappeared but I now see that it was here. Anyway, your latest photos show that you now have the body in a good place to start from---carry on!
Jeff
Awesome, thanks!
-
06-17-2019, 08:52 AM
#332
Senior Member
I'm going to be away from the garage for about 2 weeks for vacation (I would rather spend it IN the garage, but my wife has other plans) so this will be my last update for a bit. I didn't got a lot more done this weekend, but at least I got the body in a good position and did get a few items taken care of.
Since I had to remove the wheels to check the body position, I decided to go ahead and bolt on a few items in the front. I installed the lights and routed the cables in such a way that the area behind the brake ducts is fairly clear. One of the weatherpacks on the passenger side was being difficult and a pin got mangled, so I had to pull it out and put on another one. I have another in the rear that seems to have the same issue. Not that difficult to fix, if you have the terminal extractor tool, but still a pain.

I went ahead and installed the front overriders. These were easy, the ones in the rear are going to have to be drilled out and installed with a nut behind the plate since I used the coupling nut and threaded rod modification back there.

I installed the louvers to check the fitment. I did have to adjust a couple of the brackets so that the louver fits flush against the body. This side doesn't look too bad, but the cutout doesn't look very straight to me, the passenger side is a bit worse. FFR didn't do a very good job cutting these out and I was constrained to fit around the holes they cut. There is still enough room to straighten these up and still have the top and bottom edge of the louvers slightly recessed behind the opening. I will ask the painter to clean these up for me.

I installed the top cover on the DS footbox. Because of the body being in place I could not get a tool to one of the nutserts - you can barely see it to the left of the top screws. It's not that visible but I am thinking of installing a screw by hand and leave a small gap, and then notch that hole on the cover so that I can slip it under the head and then screw down all the others. We will see how OCD I am feeling next time I look at it 

Last edited by shark92651; 06-17-2019 at 08:57 AM.
-
06-17-2019, 05:15 PM
#333
Senior Member
-
Post Thanks / Like - 0 Thanks, 3 Likes
-
06-30-2019, 05:08 PM
#334
Senior Member
Back from vacation
I got back from vacation on Saturday and managed to still find time to work on the car a bit this weekend. I did some test fitting of the front splash guards and found out pretty quickly they would need some trimming. I went ahead and ordered 10' of the 1" bulb seal from McMaster before I went on vacation so it was waiting for me when I returned. After quite a bit of test fit, trim, fit again cycles I think I have them pretty well dialed in. I still need to trim a little bit off the bottom of the driver's side panel and is what the tape marker is for. I installed rivnuts in my F-Panels at the start of my build so once I had them pretty much in place, I used a center punch to mark the top and bottom holes and drilled those out, put in some bolts to hold it in place, and then marked the other holes. Even so some are still not starting easily so I will have to open up the holes a bit more. I am always afraid to use too much force with a rivnut for fear of spinning it loose. Before I button these up I am going to pull them out, along with the rear splash guards, and coat with some of my leftover Herculiner bed liner. I also need to make a couple brackets to secure the bottom since I cut off quite a bit from the bottom, including the existing tabs.
Drivers Side

Passenger Side

I also worked on my threaded rod for my bumper overriders. Before vacation I ordered some stainless low-profile jamb nuts, stainless washers, and neoprene washers from McMaster. I used a "sandwich" of SS nut, SS washer, then neoprene washer both inside and out. I used two nuts jambed together to get the rod threaded into the coupler nuts, then tightened the nuts on either side of the body against each other. Once that was done, I placed the short pieces of the aluminum tube provided by FFR for the quick jack bolts on the rod, screwed a nut on to chase the threads, then marked and cut so 1" of threaded rod will extend beyond the tube and into the bumper overriders. I still have to drill out the threaded holes on the overriders to 1/2" diameter to slip over the rod and then secure with more SS nuts.


Last edited by shark92651; 06-30-2019 at 05:13 PM.
-
07-01-2019, 05:28 AM
#335
Not a waxer
The low profile nut between the tube and washer is unnecessary. On the exterior it will be body---rubber washer---steel washer---tube---bumper---spacer---nut and then the overrider. I have a thread with photos of the process posted here somewhere; I'll see if I can find and link it.
EDIT: Found it;
https://www.ffcars.com/forums/17-fac...upler-mod.html
Jeff
-
07-01-2019, 06:56 AM
#336
Senior Member
Originally Posted by
Jeff Kleiner
The low profile nut between the tube and washer is unnecessary. On the exterior it will be body---rubber washer---steel washer---tube---bumper---spacer---nut and then the overrider. I have a thread with photos of the process posted here somewhere; I'll see if I can find and link it.
EDIT: Found it;
https://www.ffcars.com/forums/17-fac...upler-mod.html
Jeff
That makes a lot of sense, simple enough to remove, thanks
-
07-04-2019, 04:53 PM
#337
Senior Member
-
07-05-2019, 11:58 AM
#338
Senior Member
Question about fitting hood
I placed the hood on the car yesterday as I think I will start to work on fitting that next. One thing I noticed right away is that it seems to be slipping down and overlapping with the body on the front and dropping down into the opening at the top. I assume this is just gravity at work but was wondering what is the best way to proceed. I want to take a minimum amount of material off the hood and leave final gapping to the painter. What is the best way to proceed? I was thinking about taping down some of the small bumpers on the side and top to raise the hood and maybe that would keep it from slipping down as much on the front. Do I need to have a small gap all around before I mount it to the hood hinges, or should I go ahead and mount the hood to the hinges and then take a little material off at a time until it closes properly all around? Any advice would be appreciated.
Front of Hood

Rear of Hood

Last edited by shark92651; 07-05-2019 at 02:54 PM.
-
07-05-2019, 12:47 PM
#339
Not a waxer
The hood is too big for the hole and the hinges are misadjusted or the front of the body is too low---or both. You have my number.
Jeff
-
07-05-2019, 02:07 PM
#340
Senior Member
Originally Posted by
Jeff Kleiner
The hood is too big for the hole and the hinges are misadjusted or the front of the body is too low---or both. You have my number.
Jeff
I just set it in the opening and not attached to the hinges at this point. I'll give you a call, thanks.
-
07-07-2019, 07:05 PM
#341
Senior Member
Fitting roll bars
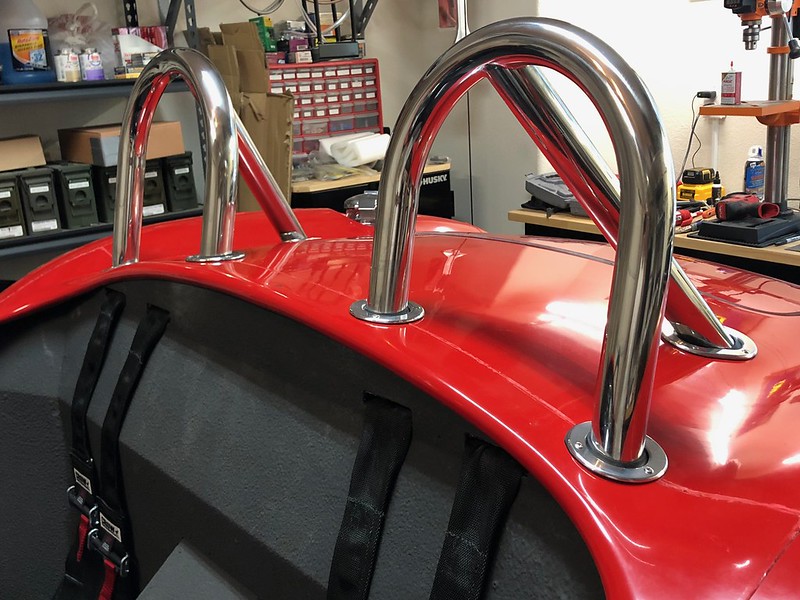
While waiting for input on mounting the hood I decided to work on fitting the breeze roll bars. It took quite a bit of test fitting, opening up the holes with the drum sander, test fitting again, and on and on but I finally got the holes right to allow the bars to drop into place. I still need to finish up the passenger roll bar, but at least I have the process down now and should go quickly. Temps are approaching the mid 90's every day now in Texas and it is really limiting the amount of time I can spend in the garage on weekends now.
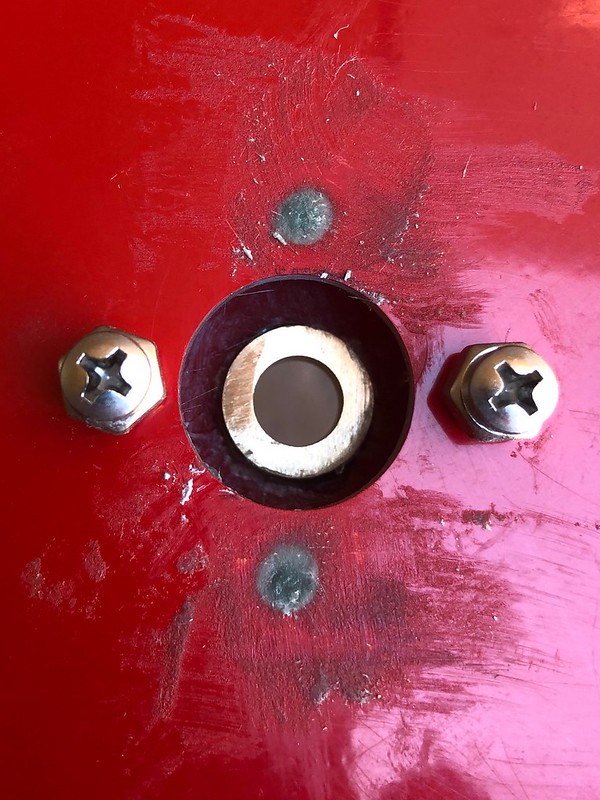
Previously I had done all the work to weld and test fit the bars before the body was on. I also had drilled all the bars and coupling tubes prior to body install as well. Turns out that wasn't the best idea because, as you can see, the hole I drilled for the rear leg is partially exposed above the body and trim rings after I got them in place. In hind sight I should have probably dropped the bars down another 1" onto the stub tubes, or drilled this hole left to right instead of front to rear, and then it would have cleared completely, but seeing as I have already drilled all the holes in the bars and tubes I am just going to make the best of it. My plan now is to use a torx button head bolt on the rear leg instead of the hex head I used on the front hoop. It will be partially exposed but shouldn't look too bad. I had wanted it to be completely clean without any bolts visible at all, but I guess I will just have to live with it. The other options I thought about to fix this are just going to be too much work.
The front hoop is not exactly the right width to slip onto the stub tubes easily so I used a ratcheting tie-down strap to slightly compress the hoop to get it to drop into place. It still needs a few taps with a rubber mallet but doesn't fight me too much.

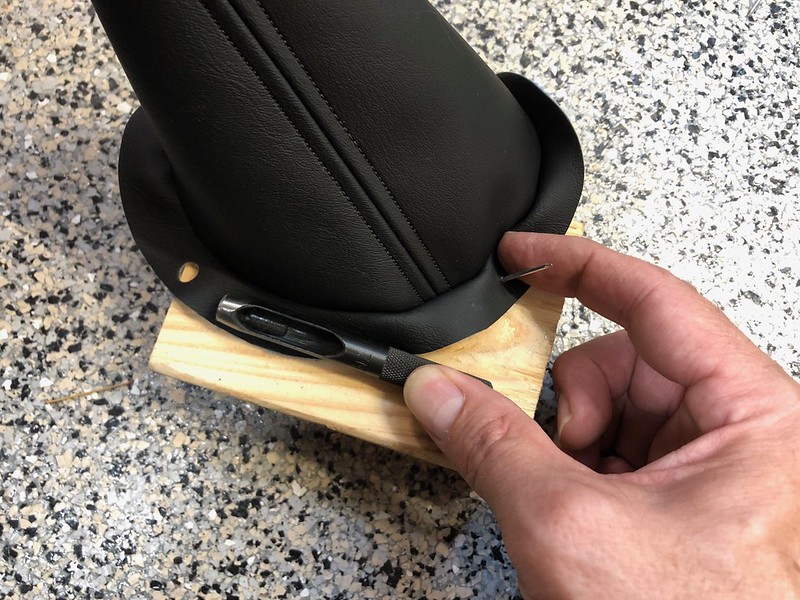
Another issue is that the rubber grommets for the trim rings are just not tight enough around the bars and leave gaps. I plan to buy a sheet of slightly thicker, weather-resistant rubber from McMaster Carr and cut my own grommets that fit tight around the bars to completely fill the gaps. Once I have the gaskets and new bolts ready, I will install the bars with the rear coupling tube and bolt them all down.


-
07-07-2019, 08:39 PM
#342
Senior Member
Gas cap finished
I received the #8-32 x 3/4" SS oval head bolts, nylon locknuts, and washers on Saturday. These are perfect all the trim rings and the gas cap, if not a little short for the gas cap but they work. I swapped these for the self-tappers and also mounted the ground strap. I don't know why FFR supplies a ground strap with such ridiculously large rings and a huge washer. I cut those off and crimped on some smaller ring terminals I had on hand and mounted it with a 1/8" self tapper screw.

-
07-08-2019, 05:38 AM
#343
Not a waxer
Originally Posted by
shark92651
The front hoop is not exactly the right width to slip onto the stub tubes easily so I used a ratcheting tie-down strap to slightly compress the hoop to get it to drop into place. It still needs a few taps with a rubber mallet but doesn't fight me too much...
How about getting it back off? A while back I had to break out my engine hoist to remove a Breeze bar that had sprung when the owner welded it 
Jeff
-
07-08-2019, 06:51 AM
#344
Senior Member
Originally Posted by
Jeff Kleiner
How about getting it back off? A while back I had to break out my engine hoist to remove a Breeze bar that had sprung when the owner welded it
Jeff
I used my jack to bend the front hoop when it was a bit undersized, now it is just a tad oversize. I have gotten it on and off a couple times by myself now. The ratchet strap idea worked pretty well to compress it just enough to get it on. They will probably require some encouragement with a rubber mallet but should come out without too much trouble.
-
07-11-2019, 01:45 PM
#345
Senior Member
Replacement turn signal lens
A quick shout out to Factory Five customer service for quickly sending me a replacement turn signal unit. I noticed that the lens on one of mine was pressed into the bezel at an angle and I could not get it to move when I tried to straighten it out myself. I sent a pic and email to Factory Five and Tony send me out a replacement right away.

-
07-11-2019, 02:09 PM
#346
Not a waxer
The O rings are missing 
Jeff (Captain O Ring)
-
Post Thanks / Like - 0 Thanks, 1 Likes
-
07-11-2019, 03:23 PM
#347
Senior Member
Originally Posted by
Jeff Kleiner
The O rings are missing
Jeff (Captain O Ring)
They are supposed to have O Rings? None of mine do. There is a flat rubber gasket on the back and another on the inside, but no O Rings.
-
07-11-2019, 08:05 PM
#348
Not a waxer
Originally Posted by
shark92651
They are supposed to have O Rings? None of mine do. There is a flat rubber gasket on the back and another on the inside, but no O Rings.
Ha! You haven't been around long enough to understand Grasshopper---ask Miller, he'll tell ya 
Captain O
-
07-12-2019, 07:19 AM
#349
Senior Member
Ahhh, forum inside joke
-
07-14-2019, 05:51 PM
#350
Senior Member
Fitting the hood
This weekend I worked on fitting the hood. As per the painter's instructions, my goal was to remove just enough material to get the hood to fit in the hole with operational hinges and latches, and then to let the painter do all the final gapping work. I was a little in the dark on how to get started, but after taking advise from others and reading some forum threads, this is how I proceeded.
First thing I did was to tape down the small bumpers all around the opening. At first I used some double-stick mounting tape but that didn't hold very well, so I later added another piece of painters tape on top. A also noticed some interference with my hood hinges so I loosened them and slid them back as far as they could go. I wanted to give some support to the hood and lift it all around so that I could tell when it was sitting into the hole properly. I felt that without the bumpers that gravity was causing the hood to slide down to the front of the car.

Next I laid the hood in the opening and centered it the best I could. It was obvious there was more clearance in the corners so I didn't want to take any material off of there at first. I marked the areas where the hood was too large for the opening with a sharpie and then ran a thin mark along the areas to sand so that I had a guide. I sanded each of these areas on all four sides of the hood until the sharpie mark was gone, and slightly blended the ends into the corners. I would then drop the hood in place, check clearance and mark more areas, and repeated this process several times.

I hand sanded with a block and hook n loop sanding pads. I tried the sanding pad on my Milwaukee multi-tool, but it did not do a very good job. I briefly thought about picking up an orbital sander, but I just stuck with my hand block and 80-120 grit sand paper. After a few hours of sanding and testing I was satisfied with the way it fit in the hole.

Next I riveted in the hood hinge brackets and the ball pivots for the hood struts. I found and marked the center of the hood, and again as per the advice of the painter, marked the location for the hood latches to be 13" from the center. I drilled the hole to 5/8" as per the FFR instructions and mounted the hood latches with the supplied self-tapping screws. As edwardb and others have pointed out, it isn't very sturdy and doesn't fill me with confidence that it will hold up for very long like this. I went ahead and ordered some nut plates and bronze bushings to improve this installation and will post more details when they come in and I have completed the latch installation.

Last edited by shark92651; 07-14-2019 at 06:00 PM.
-
07-18-2019, 07:17 PM
#351
Senior Member
Hood latches
I received the parts I ordered from McMaster to perform the hood latch mods others have done. I sent a PM to EdwardB and he informed me that he used a bushing with a 3/8" opening and filed down the edges of the square shaft on the latch for a tight fit, so that is what I did as well. I also ordered Nut Plates and bonded them underneath so that I could use 8-32 oval head machine screws rather than the self tapping screws provided. Like most everything, this was more work than I expected but I am glad that I did it and pleased with the results.
Parts I ordered from McMaster Carr:
98001A115 Low-Profile Narrow-Base Weld Nut, 8-32 Thread Size, Packs of 25
7815K23 Multipurpose Flanged Sleeve Bearing for 3/8" Shaft Diameter and 5/8" Housing ID, 3/4" Long
Here are all the parts prepped for installation. I ran a file along the corners of the latch post until it slid tightly into the bearings, I cut the bearings down to 1/4" length so there is no interference with the latch itself, and I drilled a couple extra holes into the nut plates to aid in bonding to the fiberglass.

Here is a view from the top after all the work was done and waiting for the Bondo Glass to cure. You can see that I had originally mounted the latches with the screws in a front to rear orientation - that was a mistake, this is what happens when you get ahead of yourself and follow the manual on a task rather than checking the forums first. There is not enough room for the nut plates unless the screw holes go side to side on the hood. Oh well, I just sanded them down a bit and filled them in. Another thing you will notice is that the hole on the top is opened up to 7/8" whereas the one on the bottom is 5/8" as in the manual. I originally drilled both sides 5/8" but then opened up the top to 7/8" go give myself a bit more room to fit the nut plates in. Do yourself a favor and make those holes into slots as shown in EdwardB's thread - makes it a lot easier to install as you can just thread a bolt into the plate and then slide it right into place. I was trying to feed them in from underneath and had a heck of a time getting them in the right position to screw them down. Once again, if I had to do it over again I would slot them.
Here is a shot from underneath that shows the nut plate being held in place with a bolt while the glass filler cures. I drilled a couple extra holes in each nut plate to allow the filler something else to grab onto.

Here is the underside that shows the sleeve bearing after latch installation. After the Bondo Glass cured, I put a small fillet of JB weld around it and on the inside to help secure it. A couple notes on the bearing - first you need to cut it down to around 1/4" length to allow the latch to seat properly. Also, as the painter pointed on on Facebook, don't buy the oil impregnated ones if you intend to paint over it. Oil and paint don't mix so well

And finally here is a shot of the latches screwed down and the hood in place. Next up is the catches on the underside of the body, and yes I guess I will make my own with a curved recess so that the paddles "snap" into place. Can't leave well enough alone.

-
Post Thanks / Like - 1 Thanks, 0 Likes
-
07-23-2019, 09:54 AM
#352
Senior Member
-
07-23-2019, 10:20 AM
#353
Not a waxer
Originally Posted by
shark92651
...then figure out what sort of seal I am going to use around the trunk opening and make sure I have that in place before I mount the catch.... Anyone have any advice for me on this?
Best trunk seal both for fit and function is what Factory Five provided.
Jeff
-
07-23-2019, 11:33 AM
#354
Senior Member
Originally Posted by
Jeff Kleiner
Best trunk seal both for fit and function is what Factory Five provided.
Jeff
Well that certainly makes it easy. I haven't even looked for that bulb seal yet but will check it out tonight. Thanks.
-
07-23-2019, 12:46 PM
#355
Not a waxer
The fiberglass often gets kind of fat around the trunk opening so is frequently necessary to grind/sand down the underside of the body flange and/or spread the "U" channel of the seal so that it will slip on easily.
Jeff
-
07-23-2019, 03:47 PM
#356
David aka Ducky2009

Originally Posted by
shark92651
I got a few more items done since my last update. I went ahead and mounted the paddles and the catches for the hood latches. For now I decided to just use the supplied pieces and rounded the ends. I attached them pretty much the way the manual shows with the bolts through the bumpers. They seems to work just fine for now and I can always modify it later if I feel the need. The hood certainly isn't gapped very well and the front corner on one side is too high but I think I will leave all that for the painter to fix.

If you give the hood latch brackets a concave shape instead of flat (or convex/rounded shape like the manual shows), the hood latches will stay in a closed position without being locked. I started off rounding per the manual, and the latches would rotate to the open position. Needed to use the key/lock to keep the hood tightly closed.
MK4 Build #9035 Delivered 2/17/17, First Start & Go-Kart 6/2/17, Licensed 9/1/17
Paint - Lightning Blue Metallic, No Hood Scoop, No Stripes
Gen 2 Coyote Engine & TKO-600. Solid Axle, 8.8-3.55, Power Steering, Power Brakes, Dual Roll Bars
Heater and Glove Box, Drop Trunk, Wipers, Radio, FFR Vintage Gauges, Custom Dash
Build Thread:
http://thefactoryfiveforum.com/showt...MK4-Build-9035
-
07-25-2019, 07:14 AM
#357
Senior Member
Originally Posted by
Ducky2009
If you give the hood latch brackets a concave shape instead of flat (or convex/rounded shape like the manual shows), the hood latches will stay in a closed position without being locked. I started off rounding per the manual, and the latches would rotate to the open position. Needed to use the key/lock to keep the hood tightly closed.
I have seen others do something like that. I was thinking to just use the latches several times until I can see a mark on the paddle and then transfer the profile of the paddle at that point to the catches.
-
07-27-2019, 02:20 PM
#358
Senior Member
-
Post Thanks / Like - 0 Thanks, 1 Likes
-
07-27-2019, 05:31 PM
#359
Powder or polish? You could powder those strips as an accent color in the cockpit, maybe work it into your exterior scheme? Tie the inside and outside together a little? If you'd like it to match the other chrome / polish / stainless in the cockpit, then just polish em up.
Nice job installing them.
-
Post Thanks / Like - 1 Thanks, 0 Likes
-
07-28-2019, 05:47 PM
#360
Senior Member


 Thanks:
  Likes:


 Reply With Quote