-
03-31-2020, 07:41 PM
#481
I think this is going to fix all of your issues. I almost wish I could do my install again. The wiring would be much neater. But, I'm not too dissatisfied to do it over. Did they let you keep the old Sniper? Parts source!
MK IV Build #9659, 3 link, 17's, Forte 347, Sniper EFI, power steering, built for a freak sized person with 17" Kirkey Vintage seats, RT drop trunk, RT turn signal, lots of stuff from Breeze Automotive, Wilwood brakes, paint by Jeff Miller
-
04-01-2020, 11:11 AM
#482
Senior Member


Originally Posted by
TMartinLVNV

I think this is going to fix all of your issues. I almost wish I could do my install again. The wiring would be much neater. But, I'm not too dissatisfied to do it over. Did they let you keep the old Sniper? Parts source!
I’m supposed to send the old one back. I’m not gonna have a chance to work on the car for about a week or so. I hate when work gets in the way of wrenching. But once I get a few days off, I’m gonna take the old Sniper off and send it back to Holley.
-
04-01-2020, 12:42 PM
#483
Senior Member
Throttle Cable Length
What length of throttle cable are ya'll using?
-
04-01-2020, 12:56 PM
#484
Senior Member

Stay safe in the ED Pat. We haven't had any serious surge yet and our epidemiologists are now saying 'sometime between now and July' so its a lot of waiting for the unknown and trying not to let too many cases pile up for later. Hope all is well.
Mike S.
-
Post Thanks / Like - 1 Thanks, 0 Likes
-
04-01-2020, 01:10 PM
#485
Originally Posted by
Pat427
Throttle Cable Length
What length of throttle cable are ya'll using?
I used the 36" Lokar cable with a plate from FAST.
https://www.amazon.com/gp/product/B0...?ie=UTF8&psc=1
https://www.amazon.com/gp/product/B0...?ie=UTF8&psc=1
I also did some stand-off clamps via longer valve cover bolts. All those parts were acquired from McMaster-Carr and I can help you with that if you want to do the same.
Dave
-
04-01-2020, 04:53 PM
#486
Originally Posted by
Papa
I used the same ones that Dave did. In fact, I took the part numbers from his build page 
The F.A.S.T. bracket makes it super easy to install and adjust the throttle cable.
MK IV Build #9659, 3 link, 17's, Forte 347, Sniper EFI, power steering, built for a freak sized person with 17" Kirkey Vintage seats, RT drop trunk, RT turn signal, lots of stuff from Breeze Automotive, Wilwood brakes, paint by Jeff Miller
-
04-02-2020, 11:44 AM
#487
Senior Member
Throttle Length
Basically, I don't think my throttle cable is long enough.
I had purchased a 36 inch Lokar cable earlier in my build, but after TMartinLVNV and Skidd to a look at my build, it became evident to me the cable is too short. Currently, the cable (Yellow Arrows) has some pretty tight curves, which I don't think it is good. Plus, there isn't enough length to be able to use Papa's modification of securing the cable to the valve covers (which I think is pretty slick and would like to be able to do).
So, I think I'm going to have to get a 40 or 44 inch Lokar cable in order to make the curves less severe and to ensure I have enough length to do the Papa mod. (The red line is what I think it should look like)
I'm guessing my monstrosity of an engine is the reason a 36in cable isn't long enough...

-
04-02-2020, 06:32 PM
#488
Senior Member
New Sniper 2.0
I was able to install my new Holley Sniper today.

Not a very exiting photo as it looks the exact same as the old one. Pretty straight forward install. I haven't hooked up all the wiring yet, but it looks like it'll be a straighforward process. I'm just hoping I can get the thing up and running without any problems. Fingers crossed.
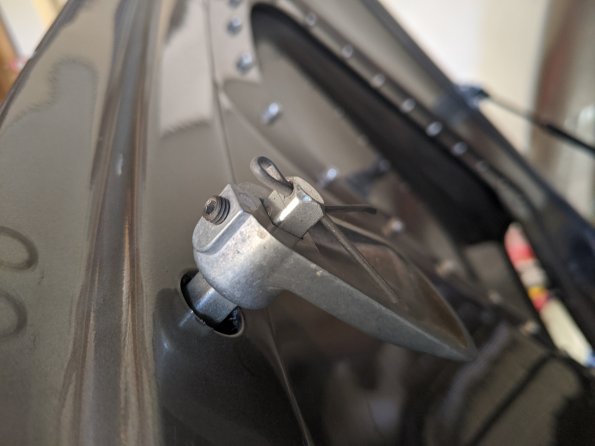
The only thing I bunged up is the threaded rod that the air filter sits on.

Not sure if this has a specific name, but I'm likely going to need a new one as I dinged up the threads when removing it. Any thoughts on where to get one of these?
Last edited by Pat427; 04-02-2020 at 07:51 PM.
MK4-IRS, 427w, TKO-600
-
04-02-2020, 06:44 PM
#489
https://www.summitracing.com/search/...-cleaner-studs
I went into the garage and measured mine. 1/4-20 thread
MK IV Build #9659, 3 link, 17's, Forte 347, Sniper EFI, power steering, built for a freak sized person with 17" Kirkey Vintage seats, RT drop trunk, RT turn signal, lots of stuff from Breeze Automotive, Wilwood brakes, paint by Jeff Miller
-
Post Thanks / Like - 1 Thanks, 0 Likes
-
04-06-2020, 06:39 PM
#490
Senior Member
New Sniper
I got my new Sniper all wired up and I started the engine. It fired up without any issue. I checked the A/F ratio on the handheld computer and, BAM!, the A/F ratio was 12.9, which is what it's supposed to be, I think.
Anyway, I'm encouraged by this.
Unfortunately I have to go back to work tomorrow and can't work on the car.
Ya'll take care and be safe.
Pat
-
Post Thanks / Like - 0 Thanks, 1 Likes
-
04-06-2020, 07:28 PM
#491
Congratulations, Pat. Much easier once you've done the initial work. Where did you settle on the idle setting?
Dave
-
04-06-2020, 08:10 PM
#492
Senior Member
Originally Posted by
Papa
Congratulations, Pat. Much easier once you've done the initial work. Where did you settle on the idle setting?
Dave
Dave,
850.
The engine sounds like a deep rumble. Again, I don’t have a point of reference given my lack of experience, but I gotta say, I think the engine sounds good.
-
Post Thanks / Like - 0 Thanks, 1 Likes
 Papa
Papa liked this post
-
04-06-2020, 09:39 PM
#493
That is fantastic Pat. Glad to hear you made a big step in the right direction.
MK IV Build #9659, 3 link, 17's, Forte 347, Sniper EFI, power steering, built for a freak sized person with 17" Kirkey Vintage seats, RT drop trunk, RT turn signal, lots of stuff from Breeze Automotive, Wilwood brakes, paint by Jeff Miller
-
04-06-2020, 11:56 PM
#494
Senior Member

Love it! Can't wait to hear that beast of a 427 rummblin!!
2016 MK4 | '99 Explorer 5.0 | E303&600cfm carb | T5z + 3.55 | 3-link | SN95 | PB/PS | FR500 17" 315&275 |
-
04-07-2020, 05:24 AM
#495
Congrats Pat! Doesnt that 427 sound great? Wait till ya drive it! Happy for ya, man.
-
Post Thanks / Like - 1 Thanks, 0 Likes
-
04-07-2020, 05:54 PM
#496
Senior Member
Missing Part
I'm missing this bolt from the gas cap. I don't know what it's called. I was going to call Factory Five to see if I could get a replacement, but I'm not even sure how to describe what it is.

Any thoughts on where to find one of these?
Thanks,
Pat
-
04-09-2020, 03:16 PM
#497
Senior Member
Progress
On the recommendation of TMartinLVNV and Skidd, I added a nut to the steering rack that butts up against the tie rod.
I'm still not entirely sure of the purpose of these nuts, but I went ahead and added them. The process was pretty simple, but definitely wish I had known about this while I was assembling the front end the first time around. I used a Ball Joint Separator tool that made this job a breeze. Thank you TMartinLVNV for that recommendation.

I think I'm almost ready to put the body back on....
Last edited by Pat427; 04-09-2020 at 03:22 PM.
MK4-IRS, 427w, TKO-600
-
04-09-2020, 03:54 PM
#498
Senior Member
Originally Posted by
Pat427
Missing Part
Any thoughts on where to find one of these?
Pat
It's just a brass pin. It's a tiny bit smaller, but pretty much the same as the brass pin just below it in your photo. I'm sure F5 would send you one for nothing. if you're feeling creative, you could get a piece of brass rod from Home Depot, and try to fashion your own pin. Just have to find a way to turn down the rod to the right size, and then press it in. Or.. just contact a local metal fab shop, and see if they can make one for you. It'd be a snap for any of them.
2016 MK4 | '99 Explorer 5.0 | E303&600cfm carb | T5z + 3.55 | 3-link | SN95 | PB/PS | FR500 17" 315&275 |
-
04-09-2020, 08:57 PM
#499


Originally Posted by
Pat427
Progress
On the recommendation of TMartinLVNV and Skidd, I added a nut to the steering rack that butts up against the tie rod.
I'm still not entirely sure of the purpose of these nuts, but I went ahead and added them. The process was pretty simple, but definitely wish I had known about this while I was assembling the front end the first time around. I used a Ball Joint Separator tool that made this job a breeze. Thank you TMartinLVNV for that recommendation.
I think I'm almost ready to put the body back on....
Pat, it is a jam/lock nut. with out it, the toe adjustments would be free to "adjust" themselves. The inner rod is free to turn so that you can adjust the toe in and out. When you get to a point to have the car aligned, your alignment person will loosen the nut, and use the flats just at the end of the threads to put a wrench on it and turn it as needed. I had pointed out those missing during one of my visits to your garage. Glad you got them on there... your tires will also thank you...
Carl
-
Post Thanks / Like - 1 Thanks, 0 Likes
-
04-09-2020, 09:18 PM
#500
Senior Member
Originally Posted by
BadAsp427
Pat, it is a jam/lock nut. with out it, the toe adjustments would be free to "adjust" themselves. The inner rod is free to turn so that you can adjust the toe in and out. When you get to a point to have the car aligned, your alignment person will loosen the nut, and use the flats just at the end of the threads to put a wrench on it and turn it as needed. I had pointed out those missing during one of my visits to your garage. Glad you got them on there... your tires will also thank you...
Carl
Ahh... now I get it! I sat there for a good 1/2 hour staring at the steering rack trying to make sense of those jam nuts and came up with nada, but now I get it. Thank you for the explanation Carl.
-
04-10-2020, 06:16 PM
#501
Senior Member
Headlight Wiring
I started to work on wiring the headlights today. Before I get too far into this project, I wanted to make sure I'm going in the right direction.
After reading other build threads, I decided to install Delphi Weatherpacks on the wires to make life easier when having to replace bulbs. For the headlights, I ordered 12 Gauge connectors.
Below is a mock-up of what I think things should look like:

From Left-to-Right:
The three wires (from the Ron Francis Harness) are: Low Beam (red), Ground (black), High Beam (brown). These three wires will go into the Delphi Weatherpack. On the right side of the picture are three wires of the headlight harness, which are: Red, Black and White. These wires don't have any labels on them.
My plan was to hook these wires up in the orientation that I have them in the picture. So, Red-to Red, Black-to-Black and then Brown-to-White
Will this work?
The reason I'm concerned is because the Chassis Wiring Book says this, (which doesn't make sense to me):

And finally, the Black ground wire seems to be a good bit larger than the Red Low Beam and Brown High Beam wires and I'm concerned the larger Black Ground wire won't fit into the Delphi Weather Pack?
Any help would be much appreciated.
Thanks,
Patrick
-
04-11-2020, 10:23 AM
#502
Senior Member

Hey Patrick, yeah the instructions aren’t terribly helpful, though it will help if you draw out your own schematic plan when wiring things. That way, when it doesn’t work you can keep track of what you’ve tried before. Two suggestions: buy a multi-pack of assorted fuses and buy the terminal removal tools for the weather packs. The terminal removal tools work really well and make it easy to change the orientation of wires in the connectors. Also, those connectors are labeled so you’ll be sure that a wire in one half is going to match up on the other half without having to compare them.
“My plan was to hook these wires up in the orientation that I have them in the picture. So, Red-to Red, Black-to-Black and then Brown-to-White”
this how mine are connected.
Last edited by GTBradley; 04-11-2020 at 10:30 AM.
Bradley
Build thread - Mk4, Coyote, IRS, Wilwood brakes, old-style soft top and accessories.
The distance between "finished" and finished is literally infinite.
-
04-11-2020, 11:48 AM
#503
Pat, I concur with GTBradley. That is how the wires get hooked up. Kleiner has a detailed write up for all of the lights. Do you have the correct tool to crimp the Delphi Weatherpack wire ends?
https://www.amazon.com/Delphi-Packar..._=sb_s_sparkle
MK IV Build #9659, 3 link, 17's, Forte 347, Sniper EFI, power steering, built for a freak sized person with 17" Kirkey Vintage seats, RT drop trunk, RT turn signal, lots of stuff from Breeze Automotive, Wilwood brakes, paint by Jeff Miller
-
04-11-2020, 12:21 PM
#504
Senior Member
Going through this today too. I am using these old thread posts.


-
04-11-2020, 02:22 PM
#505
Senior Member
Originally Posted by
TMartinLVNV
Terry,
So, I hit a wall today because I do not have the necessary crimping tool. None of the local auto/hardware stores have one in stock. I ordered one today. Unfortunately, it's going to be several days until it arrives, so now I'm stuck trying to knock out little things in the meantime.
Also, any thoughts on the Ground wire being much bigger than the other wires? I'm worried the Ground won't fit into the metal terminal of the Weatherpack.
Last edited by Pat427; 04-11-2020 at 02:26 PM.
MK4-IRS, 427w, TKO-600
-
04-11-2020, 02:31 PM
#506
Senior Member
If needed you can use different gauge pins on the same housing.
-
Post Thanks / Like - 1 Thanks, 0 Likes
-
04-11-2020, 03:40 PM
#507


Originally Posted by
Pat427
Terry,
So, I hit a wall today because I do not have the necessary crimping tool. None of the local auto/hardware stores have one in stock. I ordered one today. Unfortunately, it's going to be several days until it arrives, so now I'm stuck trying to knock out little things in the meantime.
Also, any thoughts on the Ground wire being much bigger than the other wires? I'm worried the Ground won't fit into the metal terminal of the Weatherpack.
If your little rubber seals are green, they will fit. You can squeeze it over the slightly larger wire. There are actually different color seals and terminals for different gauge wire. But for our purposes, the green ones will be fine.
Here is a pretty good tutorial for how to crimp and install everything. If you have some extra terminals to practice with, it will help when you do the real ones. It took me a couple of tries before I got the hang of it. Another thing that helped me was to try to assign ground (black) to a specific spot on all four corners. In my case, I choose to use "A" for each one. Red always went to "B" and so on.
https://www.wikihow.com/Assemble-Wea...ack-Connectors
Just like forgetting to install the threaded coupler on a brake line until after you have flared it, I bet you will crimp on a terminal before remembers to put the seal on.
MK IV Build #9659, 3 link, 17's, Forte 347, Sniper EFI, power steering, built for a freak sized person with 17" Kirkey Vintage seats, RT drop trunk, RT turn signal, lots of stuff from Breeze Automotive, Wilwood brakes, paint by Jeff Miller
-
Post Thanks / Like - 1 Thanks, 0 Likes
-
04-12-2020, 02:35 PM
#508
Senior Member
-
04-12-2020, 03:44 PM
#509
Senior Member
Rubber Gasket.. yep.. that's correct. It just shows that edge around the chrome piece. You're good there.
As for those hood latch bits... I'd suggest a cotter pin through the small hole at the end of the square rod. Just in case one of the set-screws backs out, at least you won't lose the whole piece. Just a set screw. I can't for the life of me remember if they came with that hole, or if I drilled them??
2016 MK4 | '99 Explorer 5.0 | E303&600cfm carb | T5z + 3.55 | 3-link | SN95 | PB/PS | FR500 17" 315&275 |
-
Post Thanks / Like - 1 Thanks, 0 Likes
-
04-12-2020, 06:38 PM
#510
Senior Member
Skidd,
Thank you for the recommendation about the cotter pin. I'll definitely be do that modification. Those holes are not present on the square rod, so I'll drill them and add the pin.
Thanks,
Patrick
-
04-12-2020, 06:46 PM
#511
Edwardb idea, I used. I put a bronze shouldered bushing in the bottom hole for the square shaft support.
I found them at Ace Hdwe. You have to dress the corners of the square shaft down slightly. I epoxied the bushings into the bottom of the hood. This make the handles feel much more stable and takes some of the laterial load off the top screws.
Just remembered the bushing are a little long, had to shorten, used a cut off wheel.
Last edited by Railroad; 04-12-2020 at 06:48 PM.
20th Anniversary Mk IV, A50XS Coyote, TKO 600, Trunk Drop Box, Trunk Battery Box, Cubby Hole, Seat Heaters, Radiator hanger and shroud.
-
04-12-2020, 08:16 PM
#512
Senior Member

Originally Posted by
Pat427
Holding Pattern
I'm still in a holding pattern waiting on my crimping tool to arrive so I can work on the lighting. In the meantime, I'm trying to get a couple things done.
First, I mocked up the headlights just for practice. As per usual, the instructions aren't very good in the build manual. I assembled the headlights and installed them as best I could. I wanted to see if this looks correct? Is the rubber gasket supposed to be visible like this (where the blue arrow is pointing)? I'm guessing its not supposed to look like this....

Next, I installed the brackets for the hood latches. Pretty straightforward. I used 10-32 screws to mount those brackets instead of screws that come with the kit.


My headlight looks the same. To me it looks fine.
-
04-12-2020, 08:46 PM
#513
Patrick, before you go too far down that road to hood latches by the FFR manual I would consider the Edwardb mod, its pretty sweet and makes the hood open and close really well. Here's a link to my build which has Edwardb's link in it
https://thefactoryfiveforum.com/show...l=1#post398214
-
04-13-2020, 04:20 PM
#514
Senior Member
Updates
I can't leave well enough alone. I ordered the parts for the hood latch modification from McMaster. Once they get here, I'll work on those latches.
In the meantime, I fired up the engine today and let it get up to temperature to the point I got the fan to turn on for the first time. I'm happy that it's working appropriately because I was nervous I had done something wrong. (Thanks to Papa for walking me through the wiring)
I no longer saw the leak from the power steering pump, which was a relief. However, I still see a small oil leak from where the oil pressure gauge screws into the engine. I think I have to either just tighten it a bit or unscrew the thing and put some thread sealant on there.
Still waiting for my crimper...
-
04-13-2020, 04:24 PM
#515
Originally Posted by
Pat427
Updates
I can't leave well enough alone. I ordered the parts for the hood latch modification from McMaster. Once they get here, I'll work on those latches.
In the meantime, I fired up the engine today and let it get up to temperature to the point I got the fan to turn on for the first time. I'm happy that it's working appropriately because I was nervous I had done something wrong. (Thanks to Papa for walking me through the wiring)
I no longer saw the leak from the power steering pump, which was a relief. However, I still see a small oil leak from where the oil pressure gauge screws into the engine. I think I have to either just tighten it a bit or unscrew the thing and put some thread sealant on there.
Still waiting for my crimper...
Pat,
Don't over tighten the oil pressure sender. Use a PTFE sealant on the threads and reinstall.
https://www.amazon.com/gp/product/B0...?ie=UTF8&psc=1
Dave
-
Post Thanks / Like - 1 Thanks, 0 Likes
-
04-13-2020, 06:30 PM
#516
Senior Member
Oil Leak
Here is a picture of where I think the oil leak is coming from. Red Arrow.

The Blue arrow is pointing to the PTFE sealant I already put on the adapter that connects the engine to the pressure receiver.
Question: If I remove the brass adapter (Red arrow) in order to put on the PTFE sealant, will I have oil squirting all over the place?
-
04-13-2020, 06:37 PM
#517
Originally Posted by
Pat427
Oil Leak
Here is a picture of where I think the oil leak is coming from. Red Arrow.
The Blue arrow is pointing to the PTFE sealant I already put on the adapter that connects the engine to the pressure receiver.
Question: If I remove the brass adapter (Red arrow) in order to put on the PTFE sealant, will I have oil squirting all over the place?
Pat,
You should have sealer on those brass threads. I think you'll be fine removing it and reinstalling it with sealer with no major oil spill. There might be a few drips, but it's not like removing the drain plug. The oil level is in the pan when the engine is off and has been sitting for a while. Do you have sealer on the other end of the extension that goes into the block? If not, you know what I'm going to tell you.
Dave
-
04-13-2020, 06:47 PM
#518
Senior Member
Dave,
The brass adapter was already installed on the block when I received the engine, so I'm not sure if there is sealant on it, but I doubt there is because I think that is where the leak is coming from (Red arrow).
I did put sealant on the threads that link the brass adapter to the oil pressure receiver. (blue arrow) You can kinda see the PTFE sealant where the blue arrow is pointing.
I'll be removing the brass adapter and applying sealant (where the red arrow is pointing).
-
04-13-2020, 07:23 PM
#519
Pat - I literally just removed this part about an hour ago and there were just a few drops that leaked out. So don't worry about that.
David
-
Post Thanks / Like - 1 Thanks, 0 Likes
-
04-14-2020, 04:16 PM
#520
Senior Member
Todays Updates
Still waiting for my weatherpack crimpers and McMaster parts.
I was able to find some Permatex PTFE thread sealer at an auto store. I took off the oil pressure sensor and was able to put on the sealant and got it tightened back in place. Fairly straightforward process. You can see some of the sealant where the arrow is pointing.

I also drilled a hole in the hood latch square bar and put a cotter pin through the hole. I think this is a good idea and was a simple job.

I hate that I've wasted the past few days just waiting for parts. Not very good planning on my part.
Last edited by Pat427; 04-14-2020 at 05:22 PM.
MK4-IRS, 427w, TKO-600
-
Post Thanks / Like - 0 Thanks, 1 Likes


 Thanks:
  Likes:


 Reply With Quote


