-
08-20-2020, 03:54 PM
#641
Senior Member

Colin,
It's going well. I'm in the home stretch. I'm in the process of wrapping up some of the smaller projects and working on getting the car registered and titled. It's been a lot of fun (and some frustration), but this forum has been a lifesaver.
Almost have the same setup, just received my car last month, how is your build going?
Colin[/QUOTE]
-
08-20-2020, 04:08 PM
#642
Senior Member
Colin,
I used the thermo-tec stuff as well as a spray on stuff on top. It wasn't lizard skin, instead a product called Boom-Mat.

Originally Posted by
Chilly

Pat,
Did you do the lizardskin as well as the thermo-tec product? Curious.
Colin
-
08-21-2020, 08:58 AM
#643
Originally Posted by
Pat427
Colin,
I used the thermo-tec stuff as well as a spray on stuff on top. It wasn't lizard skin, instead a product called Boom-Mat.
Pat,
How many cans of Boom-Mat did it take to get the job done? looks a little easier process that the lizard skin. Also did you go with the hydraulic clutch on your set-up?
Let me know how it goes with your titling, If there are any tricks to the process.
FFR MKIV Complete Kit - Blueprint 427 TKO 600 - IRS 3.55 Center section and Spindles.
-
08-21-2020, 06:19 PM
#644
Senior Member
Colin,
I honestly forget how many cans of Boom-Mat I used, but I think it was between 6-8. I chose it because it seemed easier than Lizard skin. I didn't feel like getting a compressor and buying all the equipment needed for Lizard Skin. At that part of the build I had blown my budget so badly, I was trying to avoid spending too much money on the soundproofing, so I went with Boom-mat.
I did not use a hydraulic cluth. However, I did buy the OEM Mustang clutch cable that is recommended in multiple build threads (I think Mike Forte sells them and I would defintitely recommend it). I also bought a clutch cable adjuster that attaches to the drivers footbox wall (it's the same one Papa used in his build). My clutch feels fine and doesn't feel too floppy or too hard. It feels just right.
I'll let you know about titling. Sounds like it's a vriable experience depending on who you deal with at the DMV.
Originally Posted by
Chilly
Pat,
How many cans of Boom-Mat did it take to get the job done? looks a little easier process that the lizard skin. Also did you go with the hydraulic clutch on your set-up?
Let me know how it goes with your titling, If there are any tricks to the process.
-
08-23-2020, 05:50 PM
#645
Pat,
Thanks for the info. Yes budget seems hard to stick with. I am going the hydraulic clutch route, will let you know how it goes.
Last edited by Chilly; 08-23-2020 at 05:52 PM.
FFR MKIV Complete Kit - Blueprint 427 TKO 600 - IRS 3.55 Center section and Spindles.
-
08-26-2020, 04:25 PM
#646
Originally Posted by
Pat427
Brake Line
I started on my brake lines today. A little tougher than I anticipated.
I was only able to get the front lines that connect the front PS and DS brakes before I had to go to work.
My question for the forum: Is it okay to have the brake lines protruding out like they are OR do I need to re-do them to reflect the red lines so they are more "tucked" into the sides of the engine compartment?
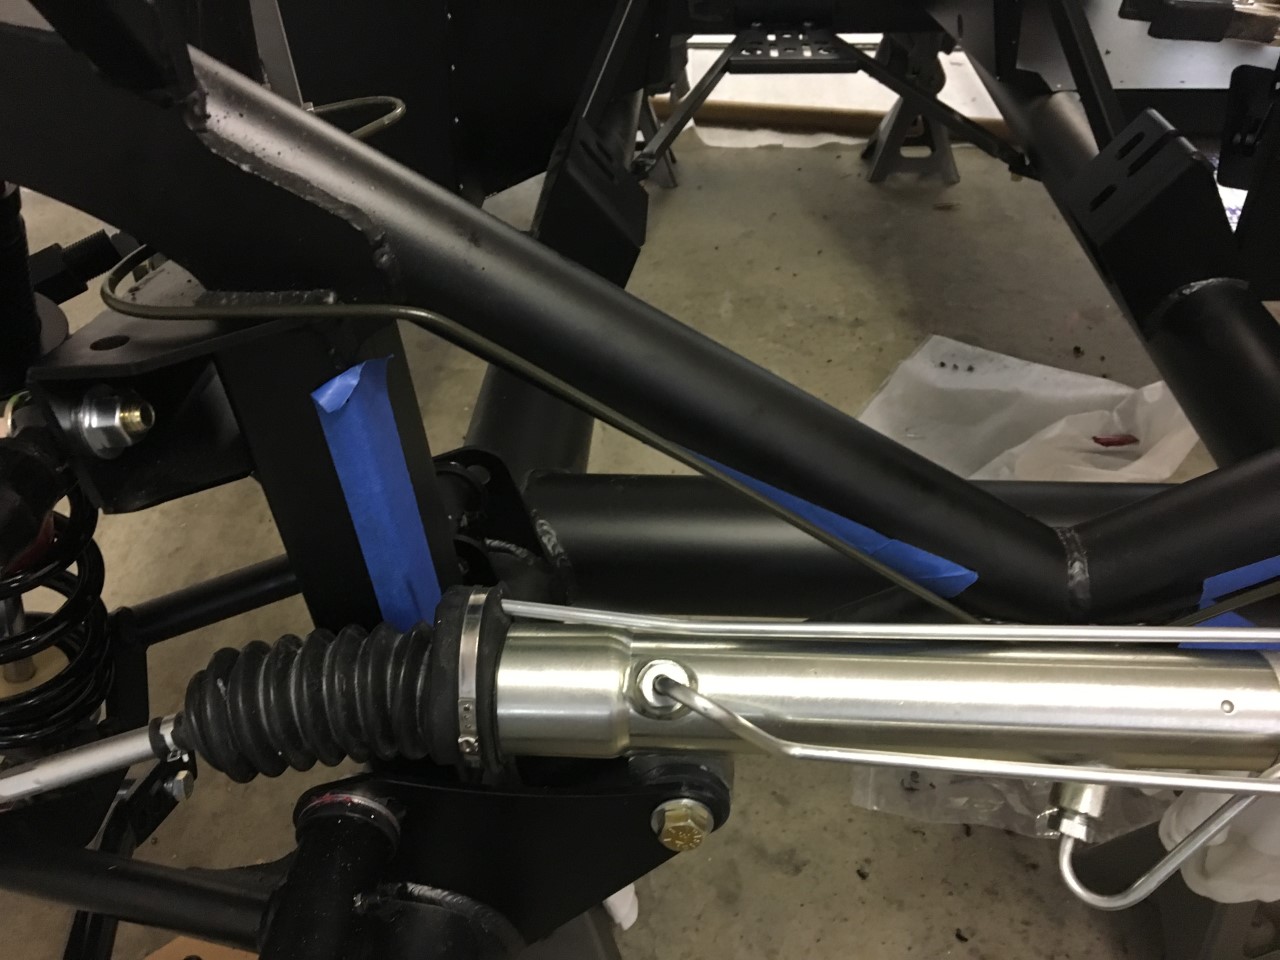

None of them are bolted down. I'm waiting for my stainless attachment pieces.


Also, I got a my CNC resevoirs delivered today.

Now it's off to work...
Thanks,
Patrick
Where did you buy your CNC dual brake canisters kit? Did you order the FF brake line or use something different?
Regards,
Chilly
FFR MKIV Complete Kit - Blueprint 427 TKO 600 - IRS 3.55 Center section and Spindles.
-
09-01-2020, 11:13 AM
#647
Senior Member
Chilly,
I purchased it from some random supplier I found online. As I understand CNC has gone out of business, so I just searched the internet until I found an auto store that had one in stock. I can't remember the name.
Last edited by Pat427; 09-02-2020 at 06:28 AM.
MK4-IRS, 427w, TKO-600
-
09-01-2020, 11:21 AM
#648
Senior Member
Battery Issue..Again.
Just to recap. Earlier in my build, my battery died. Orginally, the battery was an Optima, which people told me was a bad battery to use. So, I ended up putting in a new battery that I got from O'reilly Auto Parts. Since putting in that new battery, everything was fine, but I started to notice the car would struggle to start after a few weeks.
Thankfully, Terry and Shane came to my build and discovered that my alternator was not working properly because a bolt had come loose on the inside, which was causing the alternator to malfunction. Those guys fixed the alternator and all was good.
Now, my car is struggling to start again. It'll do that that, 'clicky clicky' sound of a dying battery. I managed to get it to turn over today (barely) and I noticed the Volt gauge on the dash was reading 14. However, the volts on my Holly Sniper are only reading 11.8-11.9. I drove around for about 20 minutes today, and the car ran great.
Does anyone have an idea of what the heck is going on with my battery? Is the alternator not working again or what?
Any help is always appreciated.
-
09-01-2020, 11:31 AM
#649
Pat,
There are at least two items on the car that will draw current all the time; the clock and the GPS speedo (memory) feature. If the car isn't being driven, the alternator can't keep the battery charged and you'll get a slow drain over time until the battery is too low to turn the starter over and too low to feed voltage-critical functions like the EFI computer. I keep battery maintainers on all my vehicles that aren't driven regularly.
My preferred maintainer for lead acid batteries is: https://www.amazon.com/Battery-Tende...NsaWNrPXRydWU=
Dave
-
09-01-2020, 11:37 AM
#650


Originally Posted by
Pat427
Battery Issue..Again.
Just to recap. Earlier in my build, my battery died. Orginally, the battery was an Optima, which people told me was a bad battery to use. So, I ended up putting in a new battery that I got from O'reilly Auto Parts. Since putting in that new battery, everything was fine, but I started to notice the car would struggle to start after a few weeks.
Thankfully, Terry and Shane came to my build and discovered that my alternator was not working properly because a bolt had come loose on the inside, which was causing the alternator to malfunction. Those guys fixed the alternator and all was good.
Now, my car is struggling to start again. It'll do that that, 'clicky clicky' sound of a dying battery. I managed to get it to turn over today (barely) and I noticed the Volt gauge on the dash was reading 14. However, the volts on my Holly Sniper are only reading 11.8-11.9. I drove around for about 20 minutes today, and the car ran great.
Does anyone have an idea of what the heck is going on with my battery? Is the alternator not working again or what?
Any help is always appreciated.
It is weird that the gauge and the Holley Sniper readout are not the same. They should be. I don't know why they would be different. Were you looking at them at the same time or maybe one with the engine off and one with the engine on? With the engine off and key on, it should be in the 12s. With the engine on, it should be in the 14s.
If my car is going to sit for more than two weeks, I hook up my Battery Tender. It keeps it nice and topped off. Driving around the neighborhood may not be enough for your alternator to charge up the battery. At idle, there may not be enough RPMs for the alternator to charge at all.
Use your multimeter to check the output of your alternator at idle. Attach the red wire to the post that Shane tightened up and ground the black wire.
MK IV Build #9659, 3 link, 17's, Forte 347, Sniper EFI, power steering, built for a freak sized person with 17" Kirkey Vintage seats, RT drop trunk, RT turn signal, lots of stuff from Breeze Automotive, Wilwood brakes, paint by Jeff Miller
-
09-01-2020, 11:50 AM
#651
Use a multimeter to determine if the holley or the dash is right. If your gauge is somehow connected to the alternator but the alternator isnt well connected to the battery then I guess both could potentially be right...
-
09-01-2020, 02:19 PM
#652
Senior Member
Dave,
Thank you for your response.
I purchased that exact Tender. I've got it hooked up to the battery as I type this. I'll be hooking the battery up from now on.
Originally Posted by
Papa
Pat,
There are at least two items on the car that will draw current all the time; the clock and the GPS speedo (memory) feature. If the car isn't being driven, the alternator can't keep the battery charged and you'll get a slow drain over time until the battery is too low to turn the starter over and too low to feed voltage-critical functions like the EFI computer. I keep battery maintainers on all my vehicles that aren't driven regularly.
My preferred maintainer for lead acid batteries is:
https://www.amazon.com/Battery-Tende...NsaWNrPXRydWU=
Dave
-
09-03-2020, 02:31 PM
#653
Strange, I've had my car sit for weeks without running and never have any problem with the battery and Pat has the same one. I'm wondering if he somehow has something hooked to be hot all of the time that should not be. Pat, have you tried turning off your master kill switch and seeing if your battery drains with that off? Just a thought.
Carl
-
09-03-2020, 02:51 PM
#654
Senior Member
Battery Update
Alright, so I've had my battery hooked up to a charger/tender for the past 30 hours. The charger is finally showing a green light, which indicates a full charge.
The car started much better. I noticed the dash gauge showed a little over 14V. The Holley Sniper computer showed 12.3-12.4 (it was previously 11.3-11.8)
I've been scratching my head trying to figure out why the battery keeps getting drained and I think I found an issue I wanted to run past the forum.
The battery cable and grounding strap that attach to the battery posts are loose. I've attached a picture for context:
Basically the battery cable and grounding strap have a ring-like female end that goes over the battery posts. The female endings have a bolt that can be tightened. However, even with those bolts tightened down as far as they'll go, that female end is still loose on the battery post. They definitely touch the battery posts, but are loose enough to pull up and off without any significant force. You can see those bolts where the red arrows are pointing.
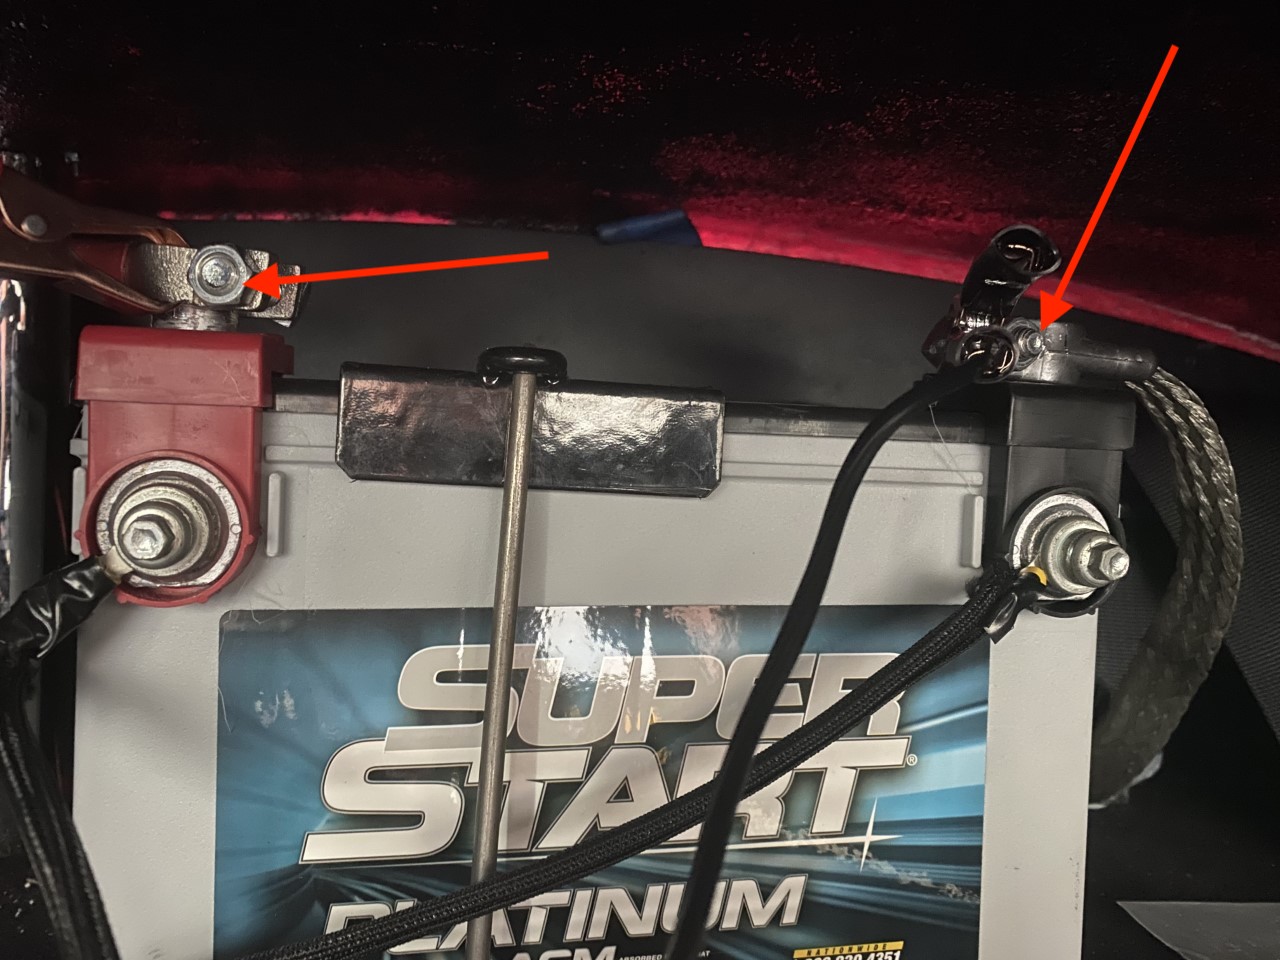
Can this cause my battery to be drained?
Carl, I do not have a master cut-off switch? Is this something I need to add?
Thanks guys!
Last edited by Pat427; 09-03-2020 at 03:54 PM.
MK4-IRS, 427w, TKO-600
-
09-04-2020, 04:05 PM
#655
Pat, I'm at a loss, what is all of that? You have a side post battery, but using top post mounts or something. Please explain all of that so I can help, if I can. I do not understand why you have wires on the top and on the side. As far as the top post battery posts, you should have those down on to the posts much further and then tighten up the nuts you are pointing at. It will clamp tight to the battery posts.
Here is a photo of my battery. I have the ground strap and the hot (+) wire hooked up. That's it. Are the extra wires you have for your Viper system? That is about the only thing you have on your car that is different from my build.
IMG_2300.jpg
-
09-04-2020, 04:14 PM
#656
What gauge are those battery cables?
-
09-04-2020, 10:04 PM
#657
Senior Member
Carl,
With respect to the top of the battery: I have the battery cable attached to the positive post. Then, I have the ground strap attached to the negative post.
With respect to the side posts: This is where the Holley Sniper power and ground wires are attached. I spoke to a Tech from Holley Sniper who recommended attaching the Holley Sniper power and ground wires to a side port on the battery.
Also, in the picture above, the battery charging clamps are also attached to the top negative and positive posts.
Originally Posted by
BadAsp427
Pat, I'm at a loss, what is all of that? You have a side post battery, but using top post mounts or something. Please explain all of that so I can help, if I can. I do not understand why you have wires on the top and on the side. As far as the top post battery posts, you should have those down on to the posts much further and then tighten up the nuts you are pointing at. It will clamp tight to the battery posts.
Here is a photo of my battery. I have the ground strap and the hot (+) wire hooked up. That's it. Are the extra wires you have for your Viper system? That is about the only thing you have on your car that is different from my build.
IMG_2300.jpg
Last edited by Pat427; 09-04-2020 at 10:08 PM.
MK4-IRS, 427w, TKO-600
-
09-05-2020, 07:27 AM
#658


Originally Posted by
Pat427
Carl,
With respect to the top of the battery: I have the battery cable attached to the positive post. Then, I have the ground strap attached to the negative post.
With respect to the side posts: This is where the Holley Sniper power and ground wires are attached. I spoke to a Tech from Holley Sniper who recommended attaching the Holley Sniper power and ground wires to a side port on the battery.
Also, in the picture above, the battery charging clamps are also attached to the top negative and positive posts.
Ok, so that makes a little better since of what I'm seeing.
1st. So the top post battery cables should tighten down and be very solid. If you haven't, start by loosening the nuts on each of them all the way until they are just about to come off the bolt. Remove both of them so that they are not touching the battery. Using perhaps a large flat screwdriver, open them up a little bit. This will allow them to slide down onto the post further. Notice that the post and the clamps are tapered slightly, be sure they tappers match. In the photo with the arrows, the positive terminal actually looks like it may be upside down. Check the tapper and confirm. I can not really tell about the ground post. Then put them back on the post. They should almost go all the way down to the top of the battery's plastic top. A slight gap is fine or if you have the felt pads, then down to them. Then tighten the nuts down. This should create a good tight connection.
2nd, I just pulled up the Holley Sniper wiring diagram and you appear to have that done correctly. At first I was thinking this could be causing your drain on the battery, but it appears that is what they want done with those power wires.
Hopefully, the loose wires will fix your problem. If the alternator was not able to charge the battery, due to the poor connections, then every time you started it up, the battery would loose a little more charge. And also, the loose connections would not allow the appropriate current to flow to the starter.
Carl
-
09-21-2020, 01:35 PM
#659
Senior Member
Battery Update and License Lighting
I took the advice of Carl, BadAsp427, and noticed the battery cable ends indeed have a taper to them. I had them upside down. I remedied this issue and was able to tighten the connectors much tighter. In addition, I noticed the wires in the busbar I used had come loose, so I tightened those as well. The car starts much beer now. I'm hoping it was those loose connections that were the culprit. Fingers crossed.
Then I tackled the license plate wiring. Pictures below. Before ya'll start beating me up, let me explain: No, this is not the final way the wiring will be. I just want to get the license plate light working for inspection purposes.
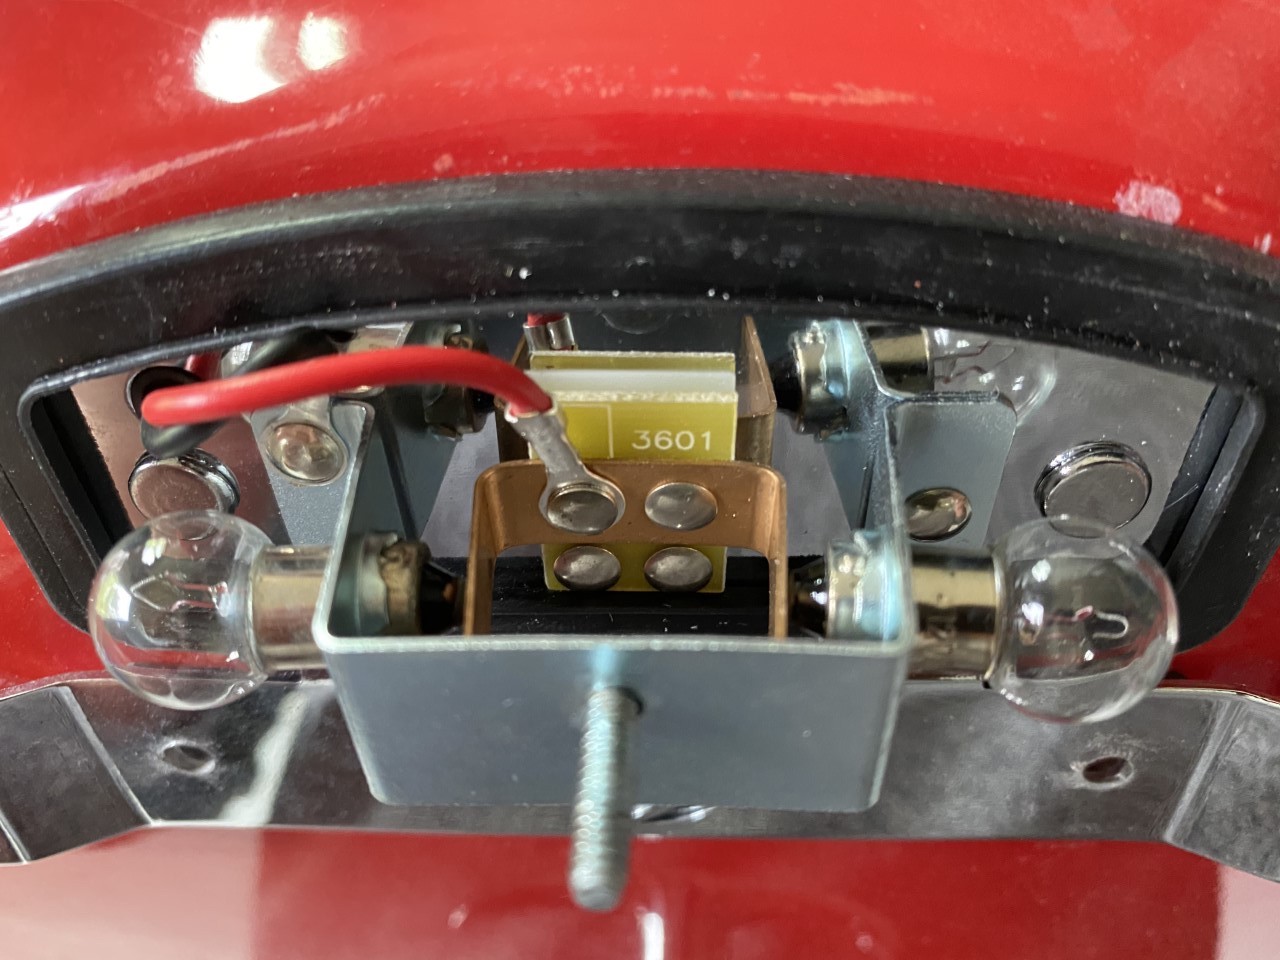

After getting things wired up, the light didn't work...
Is there anything I'm missing here? Is there a switch or something? Or is the light just supposed to come on automatically?
Thanks guys,
Pat
-
09-21-2020, 01:53 PM
#660
Pat,
The light should come on with your headlights.
-
09-21-2020, 02:01 PM
#661
Senior Member

As long as you're into the license plate mount you may want to do the mod so the plate fits. I ended up doing a blend of what EdwardB and Shark did with LED conversion. Was a pain and the whole mod took longer than I planned for but in the end it came out nice.
Build 1: MKIV #7275 Gen 2 Coyote TK600, IRS 3.55 2020 Covid
Build 2: Gen3 65 Coupe: Arrived June 2024. Gen 2 Coyote, T56, IRS 3.55 [/B]
-
09-21-2020, 03:04 PM
#662
Senior Member
Dave,
Thanks for the clarification. The license light worked when I turned on the headlights!
Next stop is getting the car inspected.
-
Post Thanks / Like - 0 Thanks, 1 Likes
 Papa
Papa liked this post
-
09-21-2020, 03:26 PM
#663
Originally Posted by
Pat427
Dave,
Thanks for the clarification. The license light worked when I turned on the headlights!
Next stop is getting the car inspected.
Congrats! Think you'll be taking to the event in San Marcos?
Good luck with the registration process. Be interested to hear any tips about it.
Mark IV Complete kit delivered 7/7/20
Blueprint 427 ordered 11/23/20
-
09-21-2020, 05:13 PM
#664
Senior Member
Originally Posted by
bldr.rob
Congrats! Think you'll be taking to the event in San Marcos?
Good luck with the registration process. Be interested to hear any tips about it.
Yes, I’m gonna do my best to get to the event in San Marcos.
-
Post Thanks / Like - 0 Thanks, 1 Likes
-
09-21-2020, 08:33 PM
#665
Senior Member

Originally Posted by
Pat427
Yes, Im gonna do my best to get to the event in San Marcos.
Guys I may see yall there. I am planning to go also. Hope weather stys nice.
-
Post Thanks / Like - 0 Thanks, 1 Likes
-
09-24-2020, 12:35 PM
#666
Senior Member
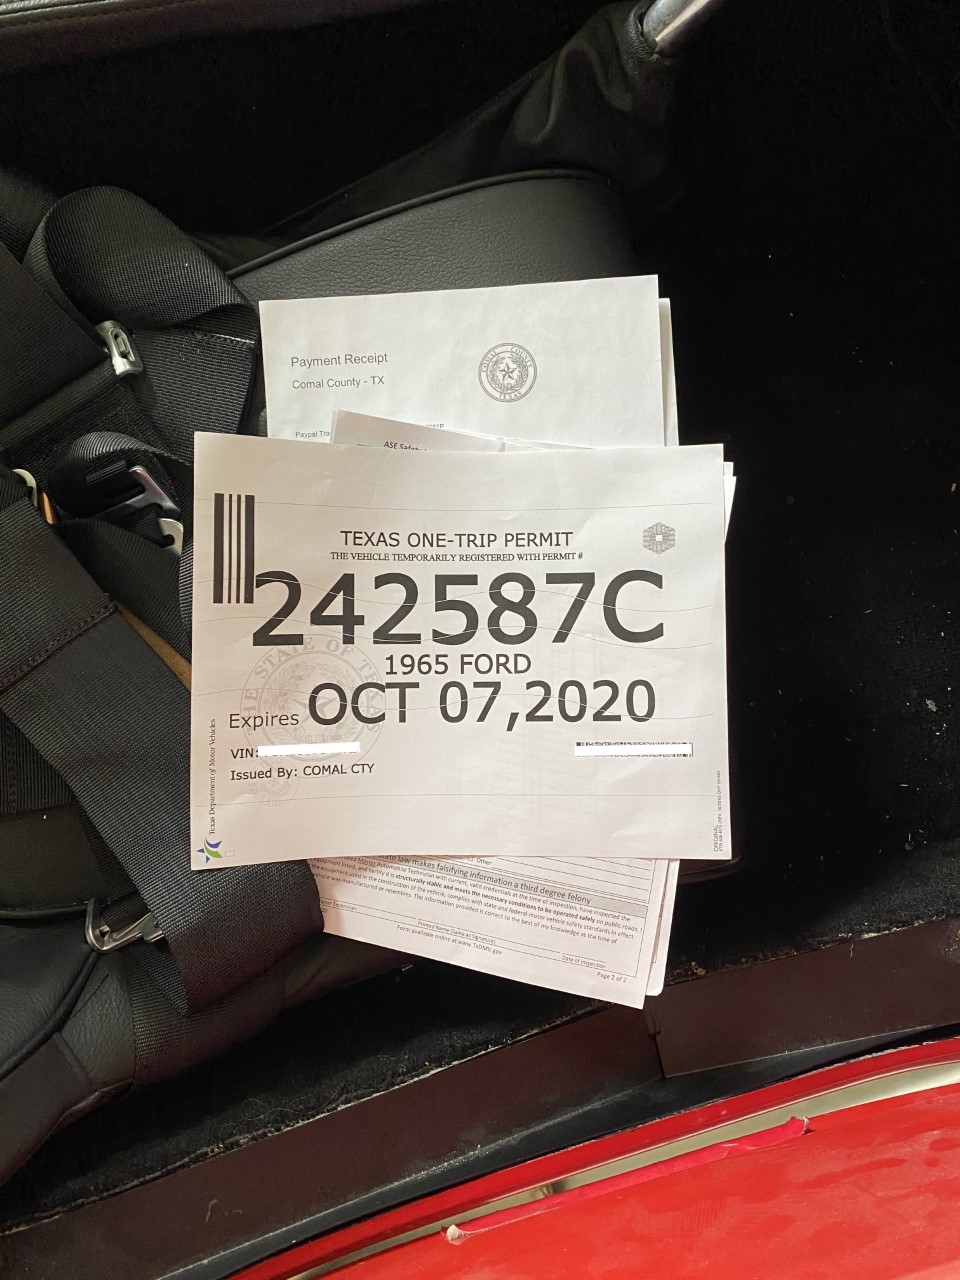
Inspection
In order to legally drive my car to the mechanic for inspection, I had to get a Single Trip Permit from the Texas DMV, which I was able to do this week.
Texas requires the inspection be performed by an ASE Master Mechanic AND that mechanic has to print out a copy of his/her ASE certificate that shows it is currently valid.
Sounds easy, but it has been tougher than I imagined, but I eventually found someone that I think will work. I'm planning on driving the car there today. I'm nervous because I haven't taken her out on public roads yet. I've only driven around my neighborhood to this point, so I'm keeping my fingers crossed everything goes smoothly. The mechanic is about 10 miles from my house. I'll let y'all know how it goes.
-
Post Thanks / Like - 0 Thanks, 1 Likes
-
09-24-2020, 12:58 PM
#667
Good luck, Pat! First real drive is a great experience.
-
Post Thanks / Like - 1 Thanks, 0 Likes
-
09-28-2020, 12:42 PM
#668
Senior Member
Inspection Update
I took the car into the mechanic today for inspection. I was supposed to do this a few days ago, but life got in the way.
I was more nervous than I expected while exiting my neighborhood onto the public roads. The car drove fine and I made it to the mechanic without any issues. Of course..I don't really have a point of reference, so I'm not sure if the car performed like it was supposed to or not. I digress. The point is, the car made it.

I dropped the car off and the guy told me it would be an, "all day" process, so I took an Uber back home. Welp...about 45 minutes after getting home, I got a call saying the car was ready. So, I took another Uber back to the shop and picked up the car.
Everything checked out. The mechanic said that he thinks the engine is running rich because the exhaust has a very strong gas smell to it. Any advice on this would be appreciated.
Other than that, she passed the ASE Master Mechanic inspection.
Next stop is to get her registered. Hopefully, I can get this done quickly as I would like to drive her to the Texas Cobra meet in October.
It felt pretty good to have the car on the open road. It sounds pretty good and that acceleration....
-
Post Thanks / Like - 0 Thanks, 4 Likes
-
09-28-2020, 12:57 PM
#669
-
09-28-2020, 04:13 PM
#670
"Everything checked out. The mechanic said that he thinks the engine is running rich because the exhaust has a very strong gas smell to it. Any advice on this would be appreciated."
Plug in your Sniper display and it will tell you exactly what your air/fuel ratio is. I think the standard tune will be about 13.5 to 14.0 to one while at a steady cruise. Heavy throttle will drop that down to 12ish to one. The mechanic may not remember what an exhaust without catalytic converters smells like
Congrats on your first legal road trip.
MK IV Build #9659, 3 link, 17's, Forte 347, Sniper EFI, power steering, built for a freak sized person with 17" Kirkey Vintage seats, RT drop trunk, RT turn signal, lots of stuff from Breeze Automotive, Wilwood brakes, paint by Jeff Miller
-
Post Thanks / Like - 1 Thanks, 0 Likes
-
09-29-2020, 09:08 AM
#671
congratulations pat! I just found this thread over the weekend, once I started reading I couldn't stop. great job building as well as posting your progress. what impresses me the most is how fast you completed the build! new wife congrats, new baby boy again congrats, new job one more time congrats, not one but two moves! truly impressive!!!
-
09-29-2020, 09:17 AM
#672
Senior Member

Congrats! You have done it and now you have her to drive. The first few outings are nerve wracking due to always thinking what could go wrong as you did just build a car!
Kyle
Complete Kit pickup 09/05/2015, 351w, QF680, 3.55, 3-Link, 15" Halibrands with MT's, Painted Viking blue with Wimbledon white stripes on 03/15/2017. Sold in 08/2018 and totally regret it.
-
09-29-2020, 10:08 AM
#673
Originally Posted by
KDubU
Congrats! You have done it and now you have her to drive. The first few outings are nerve wracking due to always thinking what could go wrong as you did just build a car!
It took me at least 1000 miles to start feeling comfortable and relaxed while driving mine.
MK IV Build #9659, 3 link, 17's, Forte 347, Sniper EFI, power steering, built for a freak sized person with 17" Kirkey Vintage seats, RT drop trunk, RT turn signal, lots of stuff from Breeze Automotive, Wilwood brakes, paint by Jeff Miller
-
09-29-2020, 01:49 PM
#674
Congratulations Pat. You did well.
-
09-29-2020, 02:01 PM
#675
Not a waxer

Originally Posted by
TMartinLVNV
It took me at least 1000 miles to start feeling comfortable and relaxed while driving mine.
I know what you mean...I waited until mine had 36 miles before I put it on the track the first time 
Jeff
-
Post Thanks / Like - 0 Thanks, 1 Likes
-
09-29-2020, 02:08 PM
#676
He likely says he thinks it's rich because it doesn't have catalytic converters. Does it? a modern mechanic isn't used to that smell since basically everything they see does have converters.
-
09-29-2020, 04:42 PM
#677
Senior Member
Originally Posted by
BadAsp427
Congratulations Pat. You did well.
Carl, you know that I would have never ever gotten this done without your help. You deserve a huge shout out for everything you did to help.
-
09-29-2020, 04:44 PM
#678
Senior Member
Originally Posted by
Papa
Congratulations, Pat!
Dave, you deserve a huge thank you too. I wouldn't have gotten this far without your help. I greatly appreciated all your explanations and suggestions. You spent my money well.
-
Post Thanks / Like - 1 Thanks, 0 Likes
 Papa
Papa thanked for this post
-
09-29-2020, 04:57 PM
#679
Senior Member
Originally Posted by
Raddksn
congratulations pat! I just found this thread over the weekend, once I started reading I couldn't stop. great job building as well as posting your progress. what impresses me the most is how fast you completed the build! new wife congrats, new baby boy again congrats, new job one more time congrats, not one but two moves! truly impressive!!!
Thanks Raddksn,
It's been a whirlwind the past year or so. I did go fast only because I knew we would be moving during the build, but if I could do it again, I'd go much slower and try to enjoy the process a little more.
-
09-30-2020, 04:44 PM
#680
Congrats Pat! Great build and thank you for all the incredible hints, tips and tricks you've shared on your journey. Hope to see you in San Marcos next week!
Mark IV Complete kit delivered 7/7/20
Blueprint 427 ordered 11/23/20


 Thanks:
  Likes:


 Reply With Quote
