-
08-06-2020, 01:47 PM
#121
Senior Member


Originally Posted by
BadAsp427

I know that you said that there is no rev limiter. But the distributor that you received on the engine has a built-in rev limiter that may need to be reset. What you are describing sounds like what a Revlimiter would be doing.
You da man!
Winner winner Chicken dinner!
I called Holley/MSD and asked about how to reset/set the rev limiter. I rev'd the engine to just below where it was breaking up and just touched the Grey wire coming from the distributor to ground. Then it was breaking up around 3800 rpm! I then rev'd it up to 3800 and touched it to ground again so my rev limt should be somewhere close to 7500.
The grey wire bundle has exposed conductor at the end of the wire and somehow it grounded itself out while the engine was at idle, thus the 2000 limit.
Thanks for your help!
Moving on!
Mk IV Roadster #9749, Kit received Jan 2, 2020, Blueprint SBF 347 TKO600 Holley Sniper EFI, Dual roll bars, IRS, 17" Halibrand, Nitto 555 G2 245, 315 Road legal Oct 20, 2020
-
Post Thanks / Like - 0 Thanks, 2 Likes
-
08-06-2020, 02:42 PM
#122
Holy smoke. That is great news. I would have NEVER guessed that. Way to go Carl.
Last edited by TMartinLVNV; 08-06-2020 at 02:45 PM.
MK IV Build #9659, 3 link, 17's, Forte 347, Sniper EFI, power steering, built for a freak sized person with 17" Kirkey Vintage seats, RT drop trunk, RT turn signal, lots of stuff from Breeze Automotive, Wilwood brakes, paint by Jeff Miller
-
Post Thanks / Like - 0 Thanks, 1 Likes
-
08-07-2020, 06:18 AM
#123
Junior Member

Originally Posted by
TMartinLVNV
<I'm running a 347 and Holley Sniper EFI from Blueprint engines. My issue now is that whenever I increase the RPM past 2K, the engines sputters, pops, coughs and runs rough. At idle its fine The Sniper widget screen says I'm still in learn mode. Is this normal? How long does learn mode last?>
This is interesting. Usually, it is at idle that problems arise and they clear up with higher RPMs. When it happens, is the engine under load or in neutral? Have you tried it without the air cleaner on (just for a short time to diagnose)?
With your scan tool, you can also check the IAC setting and air/fuel ratio.
I'm learning all of the Sniper stuff right now too. I had a problem with IAC setting that caused the motor to stall when pressing the clutch in coming to a stop sign but got everything sorted out.
I have a FITech system on a 302 in my mustang that does the same thing occasionaly. what is IAC? You're going to tell me and I am going to feel like an idiot. Anyways how did you fix it on the Sniper system?
1967 Mustang Coupe, FiTech powered 302, T5, Rod and Customs Mustang II, A/C, Satellite Radio, Blue Tooth All Around Great Cruiser
-
08-07-2020, 07:31 AM
#124
Senior Member
Originally Posted by
LOBO 302
I have a FITech system on a 302 in my mustang that does the same thing occasionaly. what is IAC? You're going to tell me and I am going to feel like an idiot. Anyways how did you fix it on the Sniper system?
My AFR was about 13.5 and the IAC (Idle Air Controller) starts out at 9 and drops to near 0 when at idle. I haven't checked it at speed yet. My issue was that the rev limiter was kicking in at 2000 RPM which is controlled by the MSD distributor, not the Sniper system. I went back and re-read the MSD documentation that came with the engine and sure enough, there it was. Lesson learned. If all else fails, just read the directions. :-)
Mk IV Roadster #9749, Kit received Jan 2, 2020, Blueprint SBF 347 TKO600 Holley Sniper EFI, Dual roll bars, IRS, 17" Halibrand, Nitto 555 G2 245, 315 Road legal Oct 20, 2020
-
Post Thanks / Like - 0 Thanks, 1 Likes
-
08-07-2020, 08:38 PM
#125


Originally Posted by
LOBO 302
I have a FITech system on a 302 in my mustang that does the same thing occasionaly. what is IAC? You're going to tell me and I am going to feel like an idiot. Anyways how did you fix it on the Sniper system?
I don't know anything about the FITech setup. The IAC on the Holley is an air bypass when the throttle blades are closed, or nearly so. I adjusted according to the Holley instructions, and it has been fine ever since. Here is a really good video.
https://www.youtube.com/watch?v=j5Wz_RoXVSI
What I think happened to mine (after discussing it with Forte's EFI guy) is that mine was initially set up at the builder's shop on the dyno without an air cleaner and at sea level. When I was running it at 2300 ft altitude and with an air cleaner, it was getting choked compared to the original set up. It was really frustrating to diagnose, but very easy to fix.
MK IV Build #9659, 3 link, 17's, Forte 347, Sniper EFI, power steering, built for a freak sized person with 17" Kirkey Vintage seats, RT drop trunk, RT turn signal, lots of stuff from Breeze Automotive, Wilwood brakes, paint by Jeff Miller
-
08-31-2020, 08:29 AM
#126
Senior Member
I've been working on finishing up the interior and getting it completed so I can move on to fitting the body. I badly estimated how much time it takes to install the interior. The carpet comes slightly oversized so it's a lot of fit, trim, fit again, trim again, lather, rinse, repeat. I used outdoor carpet adhesive to attach the carpeting to the floors etc. Geez is that stuff messy to work with! It's worse that anti-seize in that it gets everywhere if you're not paying attention and being careful. Fortunately it cleans up with soap and water.
First I located where the transmission cross braces are with respect to the tunnel cover. Unfortunately I forgot to trace these on the back side of the tunnel cover before installing the transmission so I had to make a paper template and then transfer it to the back side of the cover. This gave me the locations where I can make cutouts for the cup holders and also where to install the industrial strength Velcro strips that will hold the tunnel cover in place. I then attached 1/8" closed cell padding and vinyl covering with 3M90. It seems to work really well but you really only get once chance to get it right. If you accidentally get a crease in it you'll need to tear it off and start over. :-(
The shifter boot is from Mike Everson. I think it looks better than the rubber one that comes with the kit. The trim ring is held in place with rivnuts

The 3" cup holders are held in place with large O-Rings on the backside. Seems to work well.

After I was able to get the carpeting installed and set for a day or two, I installed the floor mats. I went on the FFR web site and saw that they were out of stock but called and left a VM. FFR called back the next day and said they just got some in. So I ordered the FFR floor mats and attached them with 1/4-20 SS screws and fender washers into rivnuts mounted on the footbox cross tube. They're mounted on the front of the frame tube so you can't see them when installed. I saw that idea from someone on here and thought it was great.

Here's a picture of the nearly completed interior. I just need to mount the Speedometer mode select push button somewhere handy. The PS grab bar is from West marine and secured in place with 2 brackets I fabricated and secured to the 2x2 firewall frame (another tip from Boyd427). Nice and stout. The 2" floor vent is a great idea from EdwardB and purchased from Jegs.

Go carting is going well. No leaks or issues so far. My only surprise is how quick this car is. Geez it's crazy fast!
Enjoy the build!
Last edited by Caddy Dad; 08-31-2020 at 08:33 AM.
Mk IV Roadster #9749, Kit received Jan 2, 2020, Blueprint SBF 347 TKO600 Holley Sniper EFI, Dual roll bars, IRS, 17" Halibrand, Nitto 555 G2 245, 315 Road legal Oct 20, 2020
-
Post Thanks / Like - 0 Thanks, 4 Likes
-
08-31-2020, 09:21 AM
#127
Steve >> aka: GoDadGo

Looking Good My Friend!
Yes, These Cars Are Crazy Fast!
..This Step Is A Big Milestone!
-
08-31-2020, 12:47 PM
#128
Senior Member

Looking great. You'll be glad you anchored those floor mats down. They tend to move around a bit and can become a safety hazard. Agreed that outdoor adhesive can be messy. Have to keep your hands and tools as clean as possible. Sounds like you were using the latex version. I found the solvent version works better. But it's also messy (although cleans up easily with mineral spirits) and has a strong smell. Also not as easily available. I haven't found one perfect solution for putting down the carpet. Every method has pluses and minuses. Do what works best for you. That transmission cover is nice. Hopefully the Velcro will do the job. There's a surprising amount of positive air pressure in the transmission tunnel. Just keep an eye on it.
Build 1: Mk3 Roadster #5125. Sold 11/08/2014.
Build 2: Mk4 Roadster #7750. Sold 04/10/2017.
Build Thread
Build 3: Mk4 Roadster 20th Anniversary #8674. Sold 09/07/2020.
Build Thread and
Video.
Build 4: Gen 3 Type 65 Coupe #59. Gen 3 Coyote. Legal 03/04/2020.
Build Thread and
Video
Build 5: 35 Hot Rod Truck #138. LS3 and 4L65E auto. Rcvd 01/05/2021. Legal 04/20/2023.
Build Thread. Sold 11/9/2023.
-
Post Thanks / Like - 1 Thanks, 1 Likes
-
08-31-2020, 12:59 PM
#129
That looks really good. You did a clean install. I also like the idea of bolting the mats down. Mine currently move around a lot.
MK IV Build #9659, 3 link, 17's, Forte 347, Sniper EFI, power steering, built for a freak sized person with 17" Kirkey Vintage seats, RT drop trunk, RT turn signal, lots of stuff from Breeze Automotive, Wilwood brakes, paint by Jeff Miller
-
09-04-2020, 04:36 PM
#130
The trans cover looks great... I will guess that you will find the "O" rings will not hold the cup holders down after you get up over 50 or 60 MPH. The amount of air coming through there is crazy. I had my cup holders held in (what I thought was very tight) by the leather fabric down in the hole. The cup holders flew out. I found a simple fix by putting a hose clamp around them under the cover. Very easy and they have never moved again.
IMG_5272.JPG
-
Post Thanks / Like - 1 Thanks, 0 Likes
 GWL
GWL thanked for this post
-
09-05-2020, 12:33 PM
#131
Senior Member
Originally Posted by
BadAsp427
The trans cover looks great... I will guess that you will find the "O" rings will not hold the cup holders down after you get up over 50 or 60 MPH. The amount of air coming through there is crazy. I had my cup holders held in (what I thought was very tight) by the leather fabric down in the hole. The cup holders flew out. I found a simple fix by putting a hose clamp around them under the cover. Very easy and they have never moved again.
IMG_5272.JPG
Hey Carl,
I like that idea! I may have to go to your solution but so far I've only gotten it up to 25 mph. Just taking baby steps for now and getting the feel of how quickly this car responds to my inputs. I'm really looking forward to getting it titled and out on the road!
Thanks!
Mk IV Roadster #9749, Kit received Jan 2, 2020, Blueprint SBF 347 TKO600 Holley Sniper EFI, Dual roll bars, IRS, 17" Halibrand, Nitto 555 G2 245, 315 Road legal Oct 20, 2020
-
Post Thanks / Like - 0 Thanks, 2 Likes
-
09-06-2020, 10:01 AM
#132
Senior Member

That vinyl covering will be durable stuff and you won’t have to worry about water damage. The industrial velcro, if it’s the Dual Lock 3M stuff a lot of us used, will hold fine. I put it on every brace under the cover and it works great. It even holds my dash on.
Bradley
Build thread - Mk4, Coyote, IRS, Wilwood brakes, old-style soft top and accessories.
The distance between "finished" and finished is literally infinite.
-
09-15-2020, 10:27 PM
#133
Senior Member
With the help of a friend I installed the body and got it sitting about right on the chassis. I then started fitting the Gas-N side pipes. Even though I have the ball flange headers, it still looks like I'm going to need an 1/4" spacer to get the pipes to set right. I confirmed this by using a stack of washers to approximate the thickness of a spacer. So I quick call to Breeze and the parts are on their way.
In the mean time, I proceeded to mount the quick jacks, tail lights, Le Mans cap and the filler tube. The Kleiner mod made installing the rear quick jacks a non-issue.

Here is a picture of the tail lights looking aft from inside the body.

With the sun shining on the body, I can now see all the places where I missed applying the Raptor truck bed liner. :-(
I don't like the way the back of the tail light PC board is exposed to the elements. What have others used to protect the tail light circuitry? Maybe some kind of rubber gasket? Or can I just use some of that flexible strip caulk from Eastwood? Thoughts?
Thanks!
Last edited by Caddy Dad; 09-15-2020 at 10:37 PM.
Mk IV Roadster #9749, Kit received Jan 2, 2020, Blueprint SBF 347 TKO600 Holley Sniper EFI, Dual roll bars, IRS, 17" Halibrand, Nitto 555 G2 245, 315 Road legal Oct 20, 2020
-
Post Thanks / Like - 0 Thanks, 1 Likes
-
09-16-2020, 02:23 PM
#134
Senior Member
Electrical devices are sometimes potted in epoxy to keep out the elements. See this wiki article for some ideas.
Last edited by GTBradley; 09-16-2020 at 02:27 PM.
Bradley
Build thread - Mk4, Coyote, IRS, Wilwood brakes, old-style soft top and accessories.
The distance between "finished" and finished is literally infinite.
-
09-16-2020, 07:55 PM
#135
Senior Member
Originally Posted by
GTBradley
Electrical devices are sometimes potted in epoxy to keep out the elements. See this
wiki article for some ideas.
I also heard back from FFR stating that they are designed by the manufacturer to be installed that way right out of the box. Go figure. I'm not 100% convinced but hopefully it'll be ok.
Mk IV Roadster #9749, Kit received Jan 2, 2020, Blueprint SBF 347 TKO600 Holley Sniper EFI, Dual roll bars, IRS, 17" Halibrand, Nitto 555 G2 245, 315 Road legal Oct 20, 2020
-
Post Thanks / Like - 0 Thanks, 1 Likes
-
09-17-2020, 04:21 PM
#136
Senior Member

On my third driving season with these lights, no issues yet. Of course I may have just jinxed myself...
I seem to recall a thin layer of clear potting compound or conformal coat on mine.
Last edited by cnutting; 09-17-2020 at 04:27 PM.
FFR #8833 289 FIA 3-link
1965 289, TKO600 from Forte's Parts Connection
Body and Paint by Mike's Auto Restoration
Picked up 3/5/2016, First start 4/22/2017, MA legal 7/11/2018
Build Thread
http://thefactoryfiveforum.com/showt...FIA-build-8833
"Insanity is contagious" - Joseph Heller
-
Post Thanks / Like - 0 Thanks, 1 Likes
-
09-27-2020, 10:16 AM
#137
Senior Member

Originally Posted by
Caddy Dad
Today was another major milestone. I got impatient waiting on my new Boig coolpipes, so I decided to try to connect up the corrugated hose and fittings that come with the kit. I managed to get everything connected and cranked down hard on the hose clamps (I think you know where this is going). My first attempt resulted in a no start. After trouble shooting it a bit and confirming with a phone call to Johnny at BPE I realized I need to run a switched 12 VDC to the plus side of the coil. Sure enough, it's right there in his latest email in black and white.
And this happened:
http://www.youtube.com/watch?v=jKuW9...ature=youtu.be
Engine started right up and sounds really strong. A few issues to work on. Tach reads twice as high as it should. I'm guessing I need to configure it correctly and the oil temperature never came off the peg. Everything else looked good.
Just as it was reaching operating temperature (~85 C) the top radiator hose blew off!
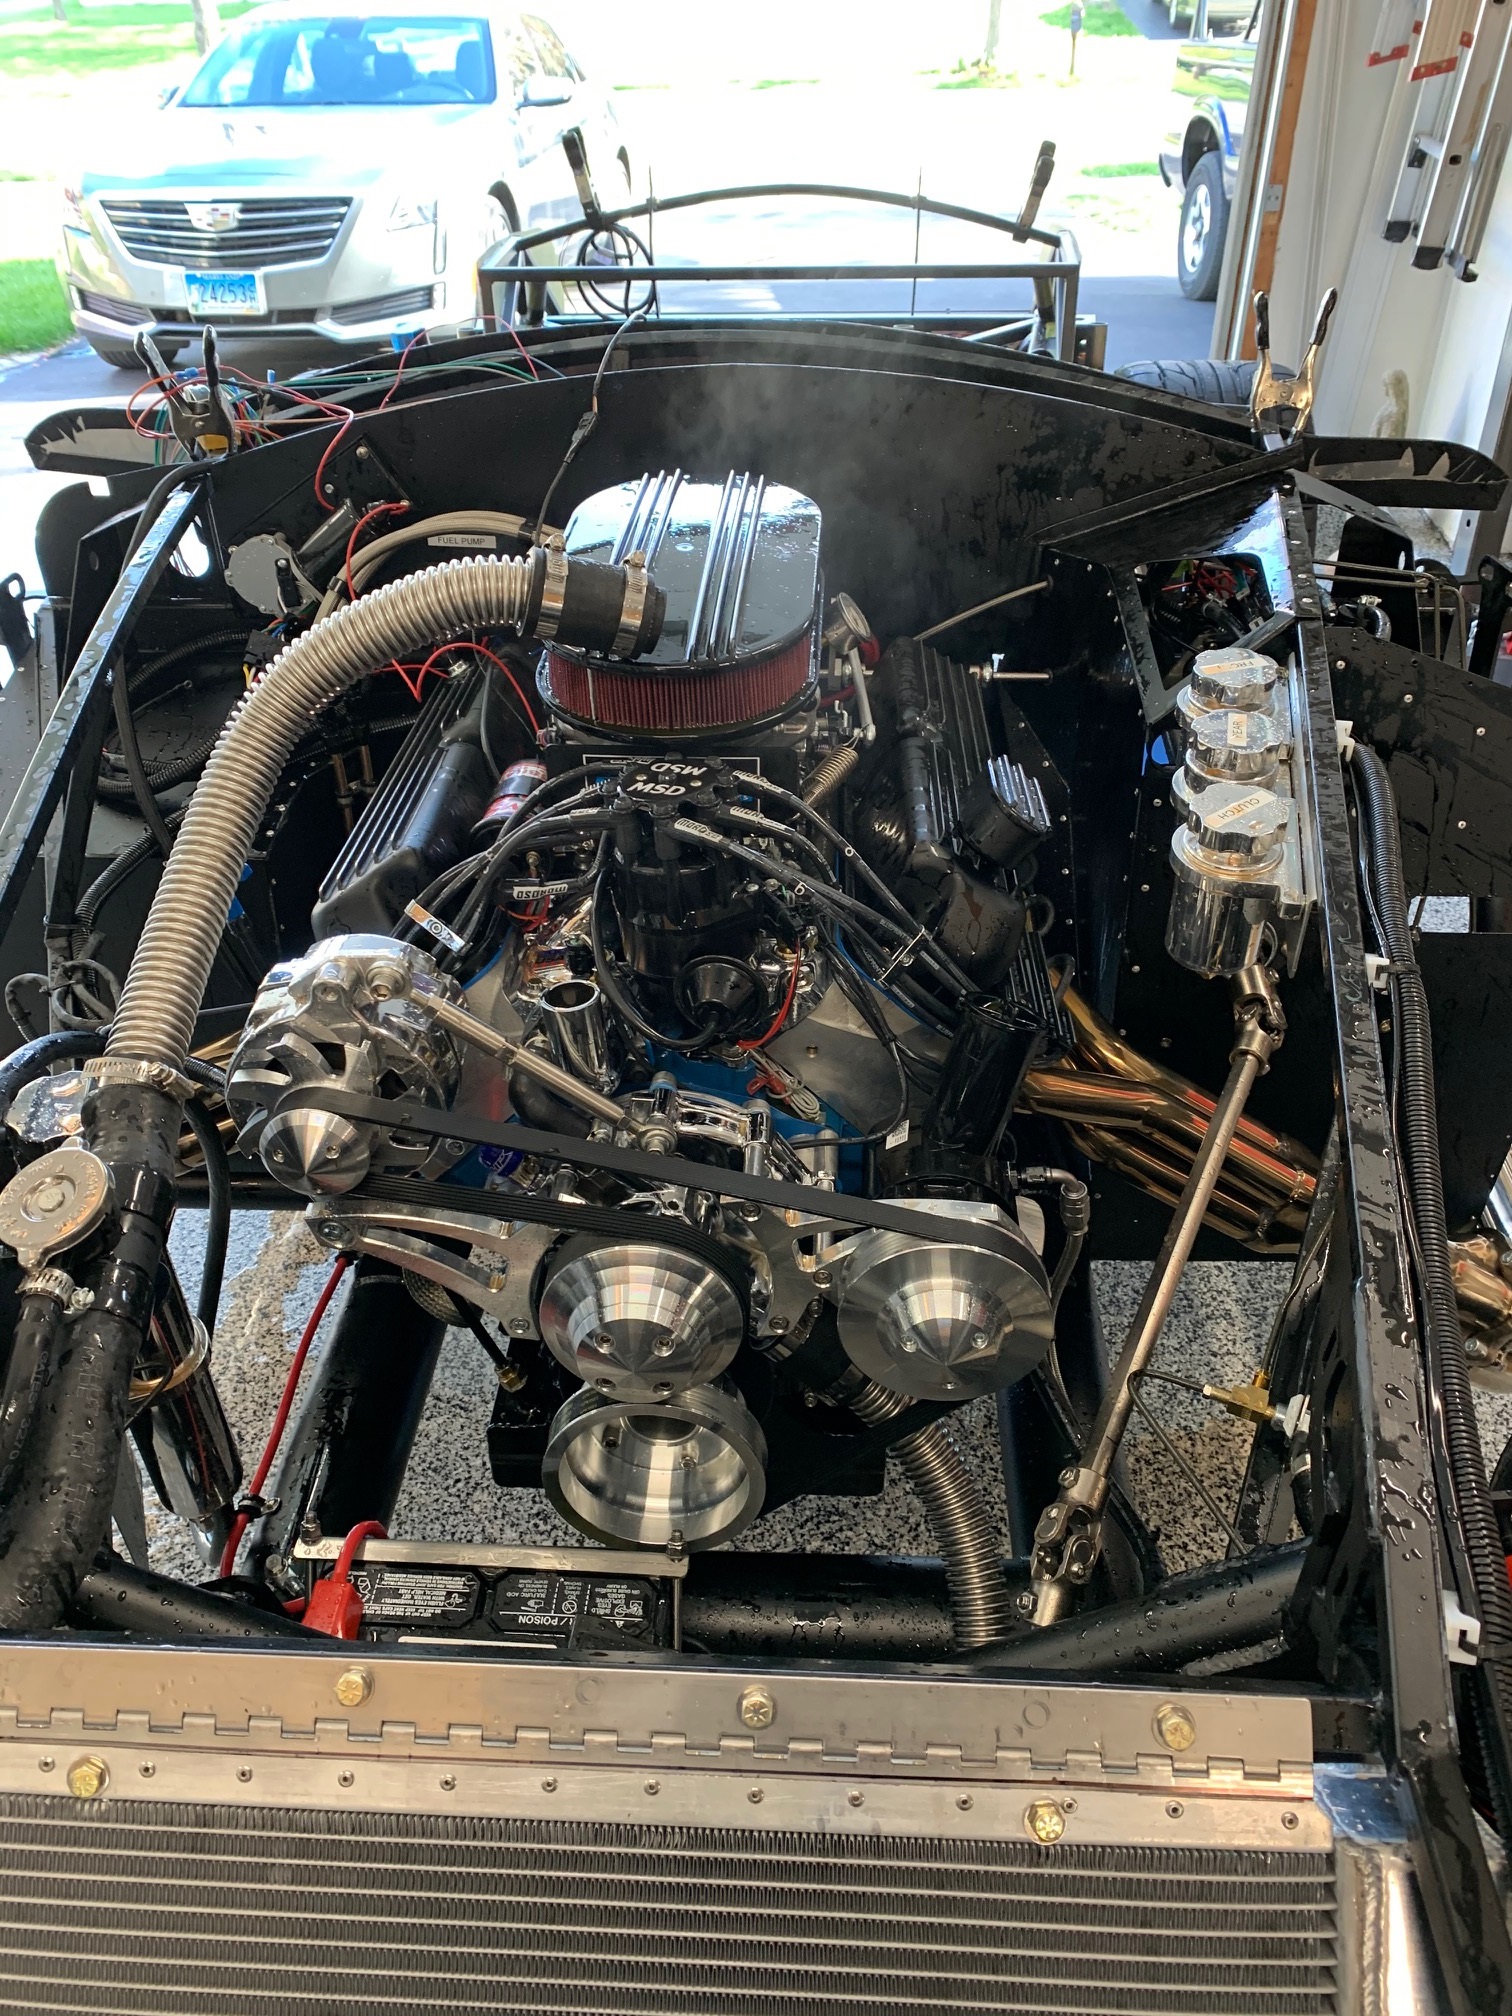
Nothing like a face of hot dexcool to ruin your day!
Fortunately no harm done and no one injured. I've got a huge mess to clean up and a great lesson learned.
This is really getting to be fun now! Enjoy the build!
Hi Caddy Dad, I'm just reviewing your build thread and I see that I have the same Blueprint T-Stat chrome neck like you do. I read further and saw a reply from BadAsp427 about scuffing the chrome and putting a few self tapping screws into the water neck. So, yesterday, I did just that. Hoping that the screws will help the clamp keep the hose on the neck. Can you tell me if this looks like it will work or do I need to replace my water neck? Thanks a million.
20200926_154026.jpg 20200926_154030.jpg
-
09-29-2020, 07:38 PM
#138
Senior Member
Hi NA5KAR,
I'm not an expert by any means, but that looks really good to me. I didn't add the screws. I just scuffed up the neck like you did and then put the hose back on with double clamps. I then did a pull test on it and I couldn't get it to budge. I also replaced my top and bottom hoses with Boig cool pipes. No issues, so far.
Best of luck!
Mk IV Roadster #9749, Kit received Jan 2, 2020, Blueprint SBF 347 TKO600 Holley Sniper EFI, Dual roll bars, IRS, 17" Halibrand, Nitto 555 G2 245, 315 Road legal Oct 20, 2020
-
Post Thanks / Like - 1 Thanks, 1 Likes
-
09-29-2020, 08:04 PM
#139
Senior Member
I'm inching my way towards completing all the necessary components needed to pass state inspection and getting this baby on the road before the cold weather sets in. This week I've been working on fitting the hood, trunk and doors. A major part of this was installing the windshield. I was not looking forward to doing this because I've read how easy it is to break the windshield and/or strip out the brass threaded inserts on the sides of the windshield.
Just like many others on here, my windshield side brackets didn't fit correctly out of the box. They were twisted in a wonky way that made them look impossible to fit. But I followed the lead of others and clamped them in a soft jaw vice and went at it with soft taps of a plastic mallet. Eventually I got them close enough where I could screw them on. I applied yellow tape to the inside of each bracket and then drew a center line down each one as a reference mark. I then had to widen the body cut outs to get the mounting brackets to fit without taking too much material away.
I then installed the windshield and held it at the proper angle/distance (27") with the help of some soft sided ratchet straps attached to the front quick jacks.
Here's the drivers side

Passenger side

Here's a shot from the rear

Next I reached inside and with a marker outlined on the tape where to drill the holes. Here's a shot of the PS mount.

The DS bracket fit flush to the mount but the PS was way off. The lower hole had a gap of 0.71 and the upper had a gap of 0.48 measured with my depth gauge on my calipers. That was a lot more of a gap than I was expecting, but it is what it is. I was about to order some spacers from McMaster Carr when a buddy stopped by. He has a 3D printer and offered to print out several different thickness spacers. They are made of nylon and are really robust. I just picked the one that fit and went with it. Easy peasy!
Here's a shot of some left over spacers.

Just as others have done I drilled and tapped the holes to 1/2" and then when installed added the nylock nuts on the outside of the brackets.
Windshield installed.

Yeah, it was a lot of work but I just took my time and took little steps along the way. Next up is wiper installation and door latches.
Cheers!
Last edited by Caddy Dad; 09-29-2020 at 08:07 PM.
Mk IV Roadster #9749, Kit received Jan 2, 2020, Blueprint SBF 347 TKO600 Holley Sniper EFI, Dual roll bars, IRS, 17" Halibrand, Nitto 555 G2 245, 315 Road legal Oct 20, 2020
-
Post Thanks / Like - 0 Thanks, 1 Likes
-
09-29-2020, 08:10 PM
#140
Steve >> aka: GoDadGo
Bravo, Bravo!
Installing the windshield was one of the most stressful tasks for me!
-
10-08-2020, 07:48 PM
#141
Senior Member
I've been inching my way toward getting my VIN and safety inspection in the state of Maryland. The last item I wanted to install was my wipers. I passed on the FFR offering and ordered the Specialty Power Windows wiper kit WWK2 and the right hand bend wiper arms with 11" blades. I was impressed with the kit and it looks like a quality product. I have the FF Metals 2" firewall forward kit installed so I was a bit worried early on how it would affect mounting the wipers but was reassured several times by others that it wouldn't be an issue. I mounted the wiper motor directly to the firewall on the passenger side with 1/4-20 rivnuts and had no issues at all. I then attempted to install the wiper transmissions and arms today. I must have measured this 15 times and researched it over and over but here is what happened to me during the install.
First I used the FFR jig to get the general location and angle for installing the transmissions.

I then drilled a pilot hole at the proper angle as close as I could to the windshield and yet still accommodate the wiper transmission at the proper angle. I ended up having to walk the hole forward about 3/4" to get the transmission to fit. Ended up with a keyhole looking hole in my cowling Arg! It's just another hole for the body/paint guy to fix. Sorry about that Jeff K.

Transmission before install

What it might look like after installation. I was planning on bonding it to underneath the cowling with HSRF.

I also have a friend who is handy with a 3D printer and offered to print up a bracket from Nylon. Here it is what it looks like before installation.

I then mounted the wiper arm on the transmission as a mock up to see how everything lines up. In the current location, when the arm is parked it rests on the windshield rubber. At full sweep, the bottom of the wiper rubs the frame of the windshield. Arg x2! I know I can cut down the transmission sleeve as needed and most probably will.


Then I realized that if I bonded the transmission mount sleeve to the underside of the cowling, there is no way I'll be able to remove the transmission if I ever have to. It's tight up against the firewall (FF Metal 2" forward kit) Arg x3!
I'm now thinking I've got a couple of options. I could go with some ugly clip on wipers (manual or electric) and remove them after I pass inspection (not preferred). I can secure the sleeves to the cowling with a couple of button head screws so that they can be removed if needed. Or I can just delete them altogether and hope for the best at safety inspection. I've read the inspection guidelines and it's not clear if you need them or not in Maryland. If you do have them, they have to be functional. I also think I need to move the DS wiper about an inch outboard from the hole I drilled. Arg x4!
I'm going to put the tools down for a bit and think this one over some more. Any insight from others that have gone through this would be appreciated.
Thanks!
Last edited by Caddy Dad; 10-08-2020 at 08:04 PM.
Mk IV Roadster #9749, Kit received Jan 2, 2020, Blueprint SBF 347 TKO600 Holley Sniper EFI, Dual roll bars, IRS, 17" Halibrand, Nitto 555 G2 245, 315 Road legal Oct 20, 2020
-
10-08-2020, 08:52 PM
#142
Senior Member
Feel some responsibility here since I was one (maybe the only one?) recommending the Specialty Power Windows wiper kit. The firewall forward and the slightly larger wheelboxes are clearly working against you. Normally they come out of the cowl a little further back as your initial holes found out. Never say never, but once installed not sure why you would need to get them out. I sure wouldn't give up yet. You've got several steps that should get the wiper off the bottom of the windshield. Clearly cutting the sleeve down so the base of the arm is as low as possible will help a lot. I checked and on my Roadsters only used 10" wiper blades. Finally, do you have the wiper arms fully extended? Looked for a picture and this is the best one I could find. Are yours out this far? I used ANCO Adjustable Wiper Arms 44-01 on my Coupe and they adjust from 10.8 to 15.5 in. long. Maybe that's another option? Hope it works out.

Build 1: Mk3 Roadster #5125. Sold 11/08/2014.
Build 2: Mk4 Roadster #7750. Sold 04/10/2017.
Build Thread
Build 3: Mk4 Roadster 20th Anniversary #8674. Sold 09/07/2020.
Build Thread and
Video.
Build 4: Gen 3 Type 65 Coupe #59. Gen 3 Coyote. Legal 03/04/2020.
Build Thread and
Video
Build 5: 35 Hot Rod Truck #138. LS3 and 4L65E auto. Rcvd 01/05/2021. Legal 04/20/2023.
Build Thread. Sold 11/9/2023.
-
10-08-2020, 09:44 PM
#143
Senior Member
I didn't even know the arms extended! No instructions were included with the wiper arms and I didn't look that close at the arms either. Sure enough, on the underside there is a small set screw which is used to adjust the length of the arm. I extended it to max length and it now fits much better. I then had a 10 inch wiper blade laying around from another vendor (who sent me the wrong parts earlier) and I tried that one on. It also helps the swing arc much better too. It's not perfect but much better than before. I also ordered a pair of trim bezels from Specialty Power Windows for the wipers and maybe those will help with my issue of securing the transmissions to the cowling. I too think that the failure of a wiper transmission is low and wipers are not likely to be used much on a roadster, but it sure would be difficult to remove if it did fail. More to follow.
Thanks!
Mk IV Roadster #9749, Kit received Jan 2, 2020, Blueprint SBF 347 TKO600 Holley Sniper EFI, Dual roll bars, IRS, 17" Halibrand, Nitto 555 G2 245, 315 Road legal Oct 20, 2020
-
10-20-2020, 03:38 PM
#144
Senior Member
Another major milestone today. Made it through the Maryland MVA gauntlet and got my tags and title! I was a bit intimidated by the process but the State police inspector really knew what he was doing and made it almost a non event. The only snag was that BPE stamped their serial number over the top on the original Ford serial number. However the inspector was still able to decipher it. Turns out my engine was from a 1989 Lincoln Town car Signature edition! A 4 door 5.0 liter 2 barrel car. Last titled in Alabama from 1996 to 2004. I was amazed that they had a database that thorough and could bring up records that easily. He was just making sure there were no stolen parts. I really appreciate that.
Here's the pick up in the AM at my house.

Leaving the MVA in Glen Burnie MD

Put the plates on as soon as I got home. Front license plate bracket courtesy of Mike Everson.

I'm still working on the wiper installation but I'm almost complete. I came up with the idea of using a 1" spacer from McMaster Carr cut on a 45 degree angle. Seems to work just fine. The lighting makes the spacers look like they are bronze, but they are just aluminum.

Here's a picture installed. Note that the nut in the picture will be replaced by the trim nut or a stainless jam nut.

I still have a few trim pieces to install but most likely those will wait until after the body and paint is complete.
Cheers!
Last edited by Caddy Dad; 10-20-2020 at 03:40 PM.
Mk IV Roadster #9749, Kit received Jan 2, 2020, Blueprint SBF 347 TKO600 Holley Sniper EFI, Dual roll bars, IRS, 17" Halibrand, Nitto 555 G2 245, 315 Road legal Oct 20, 2020
-
Post Thanks / Like - 0 Thanks, 2 Likes
-
10-20-2020, 03:51 PM
#145
Senior Member
Congratulations! Looks good. Hopefully you'll get to drive it some. Our season is running out here.
Build 1: Mk3 Roadster #5125. Sold 11/08/2014.
Build 2: Mk4 Roadster #7750. Sold 04/10/2017.
Build Thread
Build 3: Mk4 Roadster 20th Anniversary #8674. Sold 09/07/2020.
Build Thread and
Video.
Build 4: Gen 3 Type 65 Coupe #59. Gen 3 Coyote. Legal 03/04/2020.
Build Thread and
Video
Build 5: 35 Hot Rod Truck #138. LS3 and 4L65E auto. Rcvd 01/05/2021. Legal 04/20/2023.
Build Thread. Sold 11/9/2023.
-
10-20-2020, 03:56 PM
#146
Senior Member
Thanks! I hope so too. It's supposed to be in the 70's all week here. Working through last minute details on insurance. They wanted pictures and an exclusion that my 19 y/o daughter won't drive the car. No problem with that! LOL.
Mk IV Roadster #9749, Kit received Jan 2, 2020, Blueprint SBF 347 TKO600 Holley Sniper EFI, Dual roll bars, IRS, 17" Halibrand, Nitto 555 G2 245, 315 Road legal Oct 20, 2020
-
10-20-2020, 03:59 PM
#147
MKIV complete kit w/powder coating and cut outs, serial #9189 delivered 10/10/17, first start - 10/5/18, legal - 10/08/20. Blueprint 306 w/Holley Sniper EFI, TKO 600, power steering, Breeze fan shroud, trunk cubby, & engine compartment battery kit, CNC brake reservoirs, RT turn signal & gas pedal, mechanical throttle linkage, METCO safety loop, GASN side pipes, drop trunk, dual chrome roll bars, vintage gauges, glove box, custom center console, cup holders, and speakers.
-
Post Thanks / Like - 1 Thanks, 0 Likes
-
10-20-2020, 07:18 PM
#148
Senior Member

Congrats Caddy Dad! You have done an amazing job! One question for you since I have the same engine. I just searched my 347 and there is a serial number plate from BPE in the valley behind the manifold but that is the only serial number I am seeing besides the casting engineering numbers by the starter. Did you have a similar setup and did the officer peel the plate back to to look under it or was it actually stamped over the other number (wherever that is). Just trying to anticipate any hiccups down the road ( I am in Alabama so maybe my hiccups at the DMV will be a little smaller than yours in Maryland.) Thank you.
-
10-20-2020, 07:42 PM
#149
Originally Posted by
nucjd19
Congrats Caddy Dad! You have done an amazing job! One question for you since I have the same engine. I just searched my 347 and there is a serial number plate from BPE in the valley behind the manifold but that is the only serial number I am seeing besides the casting engineering numbers by the starter. Did you have a similar setup and did the officer peel the plate back to to look under it or was it actually stamped over the other number (wherever that is). Just trying to anticipate any hiccups down the road ( I am in Alabama so maybe my hiccups at the DMV will be a little smaller than yours in Maryland.) Thank you.
My 347 from BPE had the serial number stamped on the rear deck, no plates. When I did my Colorado State Patrol VIN inspection, the officer actually used his cell phone to get a picture of the number to compare with the documentation from BPE.
-
Post Thanks / Like - 1 Thanks, 1 Likes
-
10-20-2020, 08:36 PM
#150
Senior Member
Originally Posted by
Papa
My 347 from BPE had the serial number stamped on the rear deck, no plates. When I did my Colorado State Patrol VIN inspection, the officer actually used his cell phone to get a picture of the number to compare with the documentation from BPE.
Thank you Papa for the response!
-
Post Thanks / Like - 0 Thanks, 1 Likes
-
10-21-2020, 07:22 AM
#151
Senior Member

Congrats, Caddy Dad! And historic plates, too! Very nice.
MKIV Complete Kit #9822 l BluePrint 347 EFI l TKO600 l Power Steering l Heater/Defrost l
Build Thread
-
Post Thanks / Like - 1 Thanks, 0 Likes
-
10-21-2020, 07:29 AM
#152
Senior Member
Originally Posted by
Papa
My 347 from BPE had the serial number stamped on the rear deck, no plates. When I did my Colorado State Patrol VIN inspection, the officer actually used his cell phone to get a picture of the number to compare with the documentation from BPE.
Mine was just like what Papa stated. No plate. Just a stamping. The inspector used his cell phone to take pictures. After the paper work was completed he attached a VIN sticker to the DS footbox 2" tube. Stuck a bar code sticker to the firewall and to the DS front chassis tube. He also stated that I need to attach the FFR data plate somewhere near the firewall. They don't inspect for it, but he just had to tell me to install it.
Mk IV Roadster #9749, Kit received Jan 2, 2020, Blueprint SBF 347 TKO600 Holley Sniper EFI, Dual roll bars, IRS, 17" Halibrand, Nitto 555 G2 245, 315 Road legal Oct 20, 2020
-
Post Thanks / Like - 1 Thanks, 1 Likes
-
10-22-2020, 11:15 AM
#153
Senior Member
I took my car on the longest drive ever to a shop for alignment (50 mile round trip). I had done a rough alignment previously myself, but these guys dialed it in perfectly to the factory specs. It felt a bit twitchy before when I got her over 40 MPH, but now tracks nice and straight. It took them about an hour or so.

I'm working through fixing a few bugs as I put more miles on her. I know that I don't have the body to frame sealed up too well but I am getting a ton of hot air coming through and blowing right on my legs and lap. Even with this cool fall weather it's WAY too hot. I'm trying to figure out where the gaps are that I need to seal up. Has anybody else had this issue? How did you solve it?
Thanks!
Mk IV Roadster #9749, Kit received Jan 2, 2020, Blueprint SBF 347 TKO600 Holley Sniper EFI, Dual roll bars, IRS, 17" Halibrand, Nitto 555 G2 245, 315 Road legal Oct 20, 2020
-
10-22-2020, 11:20 AM
#154
Yes! There are two major areas you need to look at. The first is between the driver side foot box and the body. This will help close that up:
https://www.amazon.com/Duck-Conditio...PT0VTJGPKHRDMD
Next, look across the top side of the footbox for a narrower gap to fill. I used this:
https://www.amazon.com/gp/product/B0...?ie=UTF8&psc=1
-
Post Thanks / Like - 0 Thanks, 1 Likes
-
10-22-2020, 11:24 AM
#155
Senior Member
Originally Posted by
Caddy Dad
I know that I don't have the body to frame sealed up too well but I am getting a ton of hot air coming through and blowing right on my legs and lap. Even with this cool fall weather it's WAY too hot. I'm trying to figure out where the gaps are that I need to seal up. Has anybody else had this issue? How did you solve it? Thanks!
Very common problem and discussed frequently. Most likely is between the straight section of your footboxes alongside the curved sections of the body. Right in front of the door hinges. The kit provides (and mentions in the instructions) using expanding foam tape on the footboxes before putting the body on for the final time. That can work, but sometimes doesn't and seem many miss/forget it anyway. Multiple ways to block that area off. I use A/C foam cut to shape. Can be installed before putting the body on. Or pushed into place if already together. Compliments of Mr. Kleiner: https://thefactoryfiveforum.com/show...l=1#post103194.
Build 1: Mk3 Roadster #5125. Sold 11/08/2014.
Build 2: Mk4 Roadster #7750. Sold 04/10/2017.
Build Thread
Build 3: Mk4 Roadster 20th Anniversary #8674. Sold 09/07/2020.
Build Thread and
Video.
Build 4: Gen 3 Type 65 Coupe #59. Gen 3 Coyote. Legal 03/04/2020.
Build Thread and
Video
Build 5: 35 Hot Rod Truck #138. LS3 and 4L65E auto. Rcvd 01/05/2021. Legal 04/20/2023.
Build Thread. Sold 11/9/2023.
-
Post Thanks / Like - 0 Thanks, 1 Likes
-
10-22-2020, 12:14 PM
#156
Not a waxer

Originally Posted by
edwardb
Very common problem and discussed frequently. Most likely is between the straight section of your footboxes alongside the curved sections of the body. Right in front of the door hinges. The kit provides (and mentions in the instructions) using expanding foam tape on the footboxes before putting the body on for the final time. That can work, but sometimes doesn't and seem many miss/forget it anyway. Multiple ways to block that area off. I use A/C foam cut to shape. Can be installed before putting the body on. Or pushed into place if already together. Compliments of Mr. Kleiner:
https://thefactoryfiveforum.com/show...l=1#post103194.
Thanks Paul, you saved me from having to look that post up! 
Jeff
-
10-29-2020, 09:28 AM
#157
Senior Member
I've been spending the past week enjoying the nice weather and putting some miles on the Mk IV. So far I've got 150 miles on her and getting lots of attention wherever I go. Yeah, shes quick! Top speed so far has been 80 and shes gets there very nicely between 2nd and 3rd. :-) It's been a while since I've driven an open top car and the sensations are totally different than what I'm accustomed to. I'll be driving along and smell radiator fluid, transmission fluid or burning brakes, etc and immediately thinks its me! But I don't see any smoke or fluid on the road behind me, car still feels fine, sounds fine, so I calm down and realize it's got to be all the other traffic on the road. Funny how you don't notice those when you're sealed up in a modern car.
One of my challenges is that I've never driven one of these before so I really don't know what to expect or know what feels right and what doesn't. My steering always seemed tight to me but it turned lock to lock with no issues, tracked straight, etc but I didn't like that it felt like it took way too much effort to just turn the wheel slightly left or right. This made it interesting driving down the highway trying to make small adjustments as I went along. I have the RT turn signal mod (which I highly recommend) so I gave a call to Russ to see if he had any insight. He suggested that it sounded like I didn't have the steering bearing and the nylon bushing perfectly aligned. I disconnected the steering shaft and removed it for inspection.
Here's a picture of the RT mount tube and the steering shaft. Note the wear marks from the nylon bushing.

Looking into the RT tube

So I took it all apart and the bearing and nylon bushing rode perfectly on the shaft by themselves. That confirmed that I have them misaligned. I polished the shaft with scotchbrite, cleaned everything up, lubed with Boeshield and reassembled carefully checking each time I tightened up a mounting bolt. Here's a video after I remounted everything. Much better!
https://www.youtube.com/watch?v=fOQG1kpObtE
I also finished up installing the Specialty Power Windows WWK2 wipers. No doubt these were a lot more work than I had planned on. I didn't have them installed when I drove to get the car aligned the other week. It was a foggy AM and I had water all over the windshield making it almost impossible to see! Fortunately I have long arms and was able to reach over the top and wipe the windshield with a paper towel. Never again!
Here's the PS wiper. Note the 3D printed gasket between the bezel and the body.

Front on view

I've also been tweaking the brake balance bar to get the bias set correctly. I'm not sure if I'm doing this correctly or not but my method has been to set it favoring the rear brakes, then adjusting it toward the front after each test drive. I would get up to 35-40 MPH, mash on the brakes until something locked up. Once I got to the point where the front brakes locked up before the rear, I figured that's about right?
I also have been playing around with the brake and clutch pedal pads. Adjusting them to get me more foot room (size 11). I still feel that I can use some more room between the gas pedal and the brake pedal It's a bit too tight for my liking. Another 1/4 -1/2 inch would be perfect.
I'm also having an issue when I coast up to a stop and push the clutch in. I have the BPE347 with Holley Sniper EFI. The RPMs drop to near zero, but recover eventually. Papa on this forum gave me some things to look at/adjust so that's next on my list.
Another concern I have is that when I get back from a drive I do a post drive inspection. I noticed that the brake and clutch reservoirs get extremely warm to the touch. I don't know the exact temperature but they are hotter than I was expecting. I don't have my hood scoop installed yet so maybe when that gets installed it'll help with airflow under the hood? Has anybody else experience this?
Thanks for any insight.
Enjoying the ride!
Last edited by Caddy Dad; 10-29-2020 at 09:58 AM.
Mk IV Roadster #9749, Kit received Jan 2, 2020, Blueprint SBF 347 TKO600 Holley Sniper EFI, Dual roll bars, IRS, 17" Halibrand, Nitto 555 G2 245, 315 Road legal Oct 20, 2020
-
Post Thanks / Like - 0 Thanks, 1 Likes
-
10-29-2020, 09:57 AM
#158
Senior Member
Originally Posted by
Caddy Dad
I also finished up installing the Specialty Power Windows WWK2 wipers. No doubt these were a lot more work than I had planned on. I didn't have them installed when I drove to get the car aligned the other week. It was a foggy AM and I had water all over the windshield making it almost impossible to see! Fortunately I have long arms and was able to reach over the top and wipe the windshield with a paper towel. Never again!
Good to hear you're driving. Taking it slow and easy at first and that's good. They are a blast. Good find on that drag in the steering column. That alignment is pretty tight. I had a similar issue with the Coupe that I just was able to resolve. But my interference (very slight) was where the modified end of the Factory Five steering wheel adapter went into the turn signal assembly.
Glad to hear you were able to get those wipers to work. The bezels and gaskets look great. One comment (a little to my defense...) you say a lot more work than you expected. Compared to what? You haven't lived until you've tried to install and get the Lucas style wipers to work properly. I'll bet you might have a slightly different impression if you had that experience. Just saying.  Also, FWIW, a lot of us bend the arms down a bit so they park parallel to the bottom of the windshield. Looks a little better. But you may be finished messing with them, which I understand.

Build 1: Mk3 Roadster #5125. Sold 11/08/2014.
Build 2: Mk4 Roadster #7750. Sold 04/10/2017.
Build Thread
Build 3: Mk4 Roadster 20th Anniversary #8674. Sold 09/07/2020.
Build Thread and
Video.
Build 4: Gen 3 Type 65 Coupe #59. Gen 3 Coyote. Legal 03/04/2020.
Build Thread and
Video
Build 5: 35 Hot Rod Truck #138. LS3 and 4L65E auto. Rcvd 01/05/2021. Legal 04/20/2023.
Build Thread. Sold 11/9/2023.
-
10-29-2020, 10:07 AM
#159
Senior Member
Originally Posted by
edwardb
Good to hear you're driving. Taking it slow and easy at first and that's good. They are a blast. Good find on that drag in the steering column. That alignment is pretty tight. I had a similar issue with the Coupe that I just was able to resolve. But my interference (very slight) was where the modified end of the Factory Five steering wheel adapter went into the turn signal assembly.
Glad to hear you were able to get those wipers to work. The bezels and gaskets look great. One comment (a little to my defense...) you say a lot more work than you expected. Compared to what? You haven't lived until you've tried to install and get the Lucas style wipers to work properly. I'll bet you might have a slightly different impression if you had that experience. Just saying.
Also, FWIW, a lot of us bend the arms down a bit so they park parallel to the bottom of the windshield. Looks a little better. But you may be finished messing with them, which I understand.
LOL! Yep, you're right. This was the first time I've ever installed wipers so I have nothing to compare it to. Sounds like I'm fortunate to skip the Lucas experience. I was wondering how you got the wipers to park parallel to the windshield. If I get bored over this winter I may take a look at bending them slightly but for now, like you said, I'm tired of messing with them.
Mk IV Roadster #9749, Kit received Jan 2, 2020, Blueprint SBF 347 TKO600 Holley Sniper EFI, Dual roll bars, IRS, 17" Halibrand, Nitto 555 G2 245, 315 Road legal Oct 20, 2020
-
Post Thanks / Like - 0 Thanks, 1 Likes
-
11-08-2020, 10:26 AM
#160
Senior Member
I've been putting more break in miles on my roadster and just rolled over 400 miles. So far I've only had one piece fall off. The DS O2 sensor bung hole plug went missing somewhere on I-95. I started hearing a loud pop on deceleration. My post drive inspection revealed it missing as well as the ball flange bolts needed tightening up. I installed the plug with Permatex Ultra copper but I guess it worked itself loose. Napa bung hole plug P/N 35299 $10.
I've never driven one of these before so I really didn't know how the steering, brakes or suspension felt. I have the power steering rack from FFR with the Breeze offset bushings. At highway speeds the steering is very sensitive but manageable. I don't need a dead pedal (and didn't install one) because I find that I can stretch out my left foot and rest it on the 2 inch round tube on the left side of the footbox. The pedals were too narrow, so I replaced them with AC brake and clutch pedals and when I'm wearing Sparco driving shoes everything fits fine. I've been playing around with the brake bias and it seems to feel about right to me, but may need another turn or so toward the front brakes. I think I've got the Sniper EFI dialed in but it may need another tweak or two on the IAC. Papa has a nice thread on Learning to tune the Sniper. Very helpful!
At highway speeds, I'm turning about 3000 RPM, H20 coolant temp 78C, oil temp 95C and I'm not sure what my mileage is yet. The cooling fan doesn't come on while at road speed but cycles nicely when in traffic or at a light. Ear plugs are mandatory and when approaching 75 MPH the wind really gets loud. I don't have visors or wind wings installed yet. I'm sure those will help but I'm really not interested in going over 80 any time soon!
I went to my first cars and coffee this AM, gave away some free leftover stuff from my build and got lots of questions. The car is still in gel coat so lots of questions on the seams etc. Is it real? Yes, it's a real FFR roadster. LOL! How much does it cost? Is it fun to drive? etc. Several people said I did a good job, but I also didn't point out all the flaws.
Enjoyed the build, now enjoying the ride!
Cheers!
Last edited by Caddy Dad; 11-08-2020 at 10:29 AM.
Mk IV Roadster #9749, Kit received Jan 2, 2020, Blueprint SBF 347 TKO600 Holley Sniper EFI, Dual roll bars, IRS, 17" Halibrand, Nitto 555 G2 245, 315 Road legal Oct 20, 2020
-
Post Thanks / Like - 0 Thanks, 6 Likes


 Thanks:
  Likes:


 Reply With Quote


