-
Senior Member

looking good. good catch on the back of the cockpit aluminum. I didn't recognize that the backs of the rear wall would be the front of the wheel well until the panels were on. I had to tape them off and sprayed them w/ bed liner to match the rear splash panels.
-
Post Thanks / Like - 1 Thanks, 0 Likes
-
Very nice and clean! My box 15 with tank should arrive this week, I'm excited to do some more wrenching and not sheet metal work. I did build my e-brake, that was fun. Your panels are looking really clean, and I love the fuel lines on the passenger footbox, very jealous!
-
Senior Member


Originally Posted by
BeePea

Very nice and clean! My box 15 with tank should arrive this week, I'm excited to do some more wrenching and not sheet metal work. I did build my e-brake, that was fun. Your panels are looking really clean, and I love the fuel lines on the passenger footbox, very jealous!
Thanks man!
-
Senior Member
-
Post Thanks / Like - 0 Thanks, 2 Likes
-
Senior Member
-
Post Thanks / Like - 0 Thanks, 1 Likes
 Fman
Fman liked this post
-
Senior Member

Jesse nice to see you and your dad working on the car together. I had some build days with my dad too, will always remember those times with him.
Keep up the good work!
-
Post Thanks / Like - 1 Thanks, 2 Likes
-
Senior Member

Originally Posted by
Blitzboy54
I couldn't find a route for the rear that I liked. A lot of guys go through the footbox and that was my first choice but it requires manipulating the line in a way that is difficult without a lift. I also didn't want the line in front of the footbox. This is my solution was to run down the lower 3/4 tube to the "F" panel and then drop straight down to the 4" main tube and run all the way back.
That's what I did, too. Works just fine.
MKIV Complete Kit #9822 l BluePrint 347 EFI l TKO600 l Power Steering l Heater/Defrost l
Build Thread
-
Post Thanks / Like - 1 Thanks, 0 Likes
-
Senior Member
Originally Posted by
Fman
Jesse nice to see you and your dad working on the car together. I had some build days with my dad too, will always remember those times with him.
Keep up the good work!
Thank you, it was a good week.
-
Senior Member
-
Senior Member
-
Post Thanks / Like - 0 Thanks, 1 Likes
-
You're making nice progress, great work. Everything is looking really clean.
-
Senior Member

Your build is looking great!
Are you going to do the Kleiner mod on the rear body mount bolts? Somebody reminded me to do it before I did the trunk aluminum and I really appreciated the reminder.
-
Senior Member
Originally Posted by
hineas
Your build is looking great!
Are you going to do the Kleiner mod on the rear body mount bolts? Somebody reminded me to do it before I did the trunk aluminum and I really appreciated the reminder.
Yes sir. I just ordered the couplers and rods from McMaster Carr. I could not find it locally oddly enough. Thanks for the reminder
Last edited by Blitzboy54; 04-09-2021 at 04:11 PM.
-
Jesse, just sent you a PM
-
Senior Member
I'm glad you ordered them. I didn't understand how useful the modification was until I played with the quick jack bolts after installing the gas tank. Now I completely understand why the mod is so popular!
-
Senior Member
Originally Posted by
hineas
I'm glad you ordered them. I didn't understand how useful the modification was until I played with the quick jack bolts after installing the gas tank. Now I completely understand why the mod is so popular!
If you plan to do a "drop trunk" mod, the Kleiner mod is pretty much mandatory. You lose a lot of access to the space between the trunk and the gas-tank/body with the drop-trunk mod. The Kleiner mod really comes in handy.
MKIV Complete Kit #9822 l BluePrint 347 EFI l TKO600 l Power Steering l Heater/Defrost l
Build Thread
-
Post Thanks / Like - 1 Thanks, 0 Likes
-
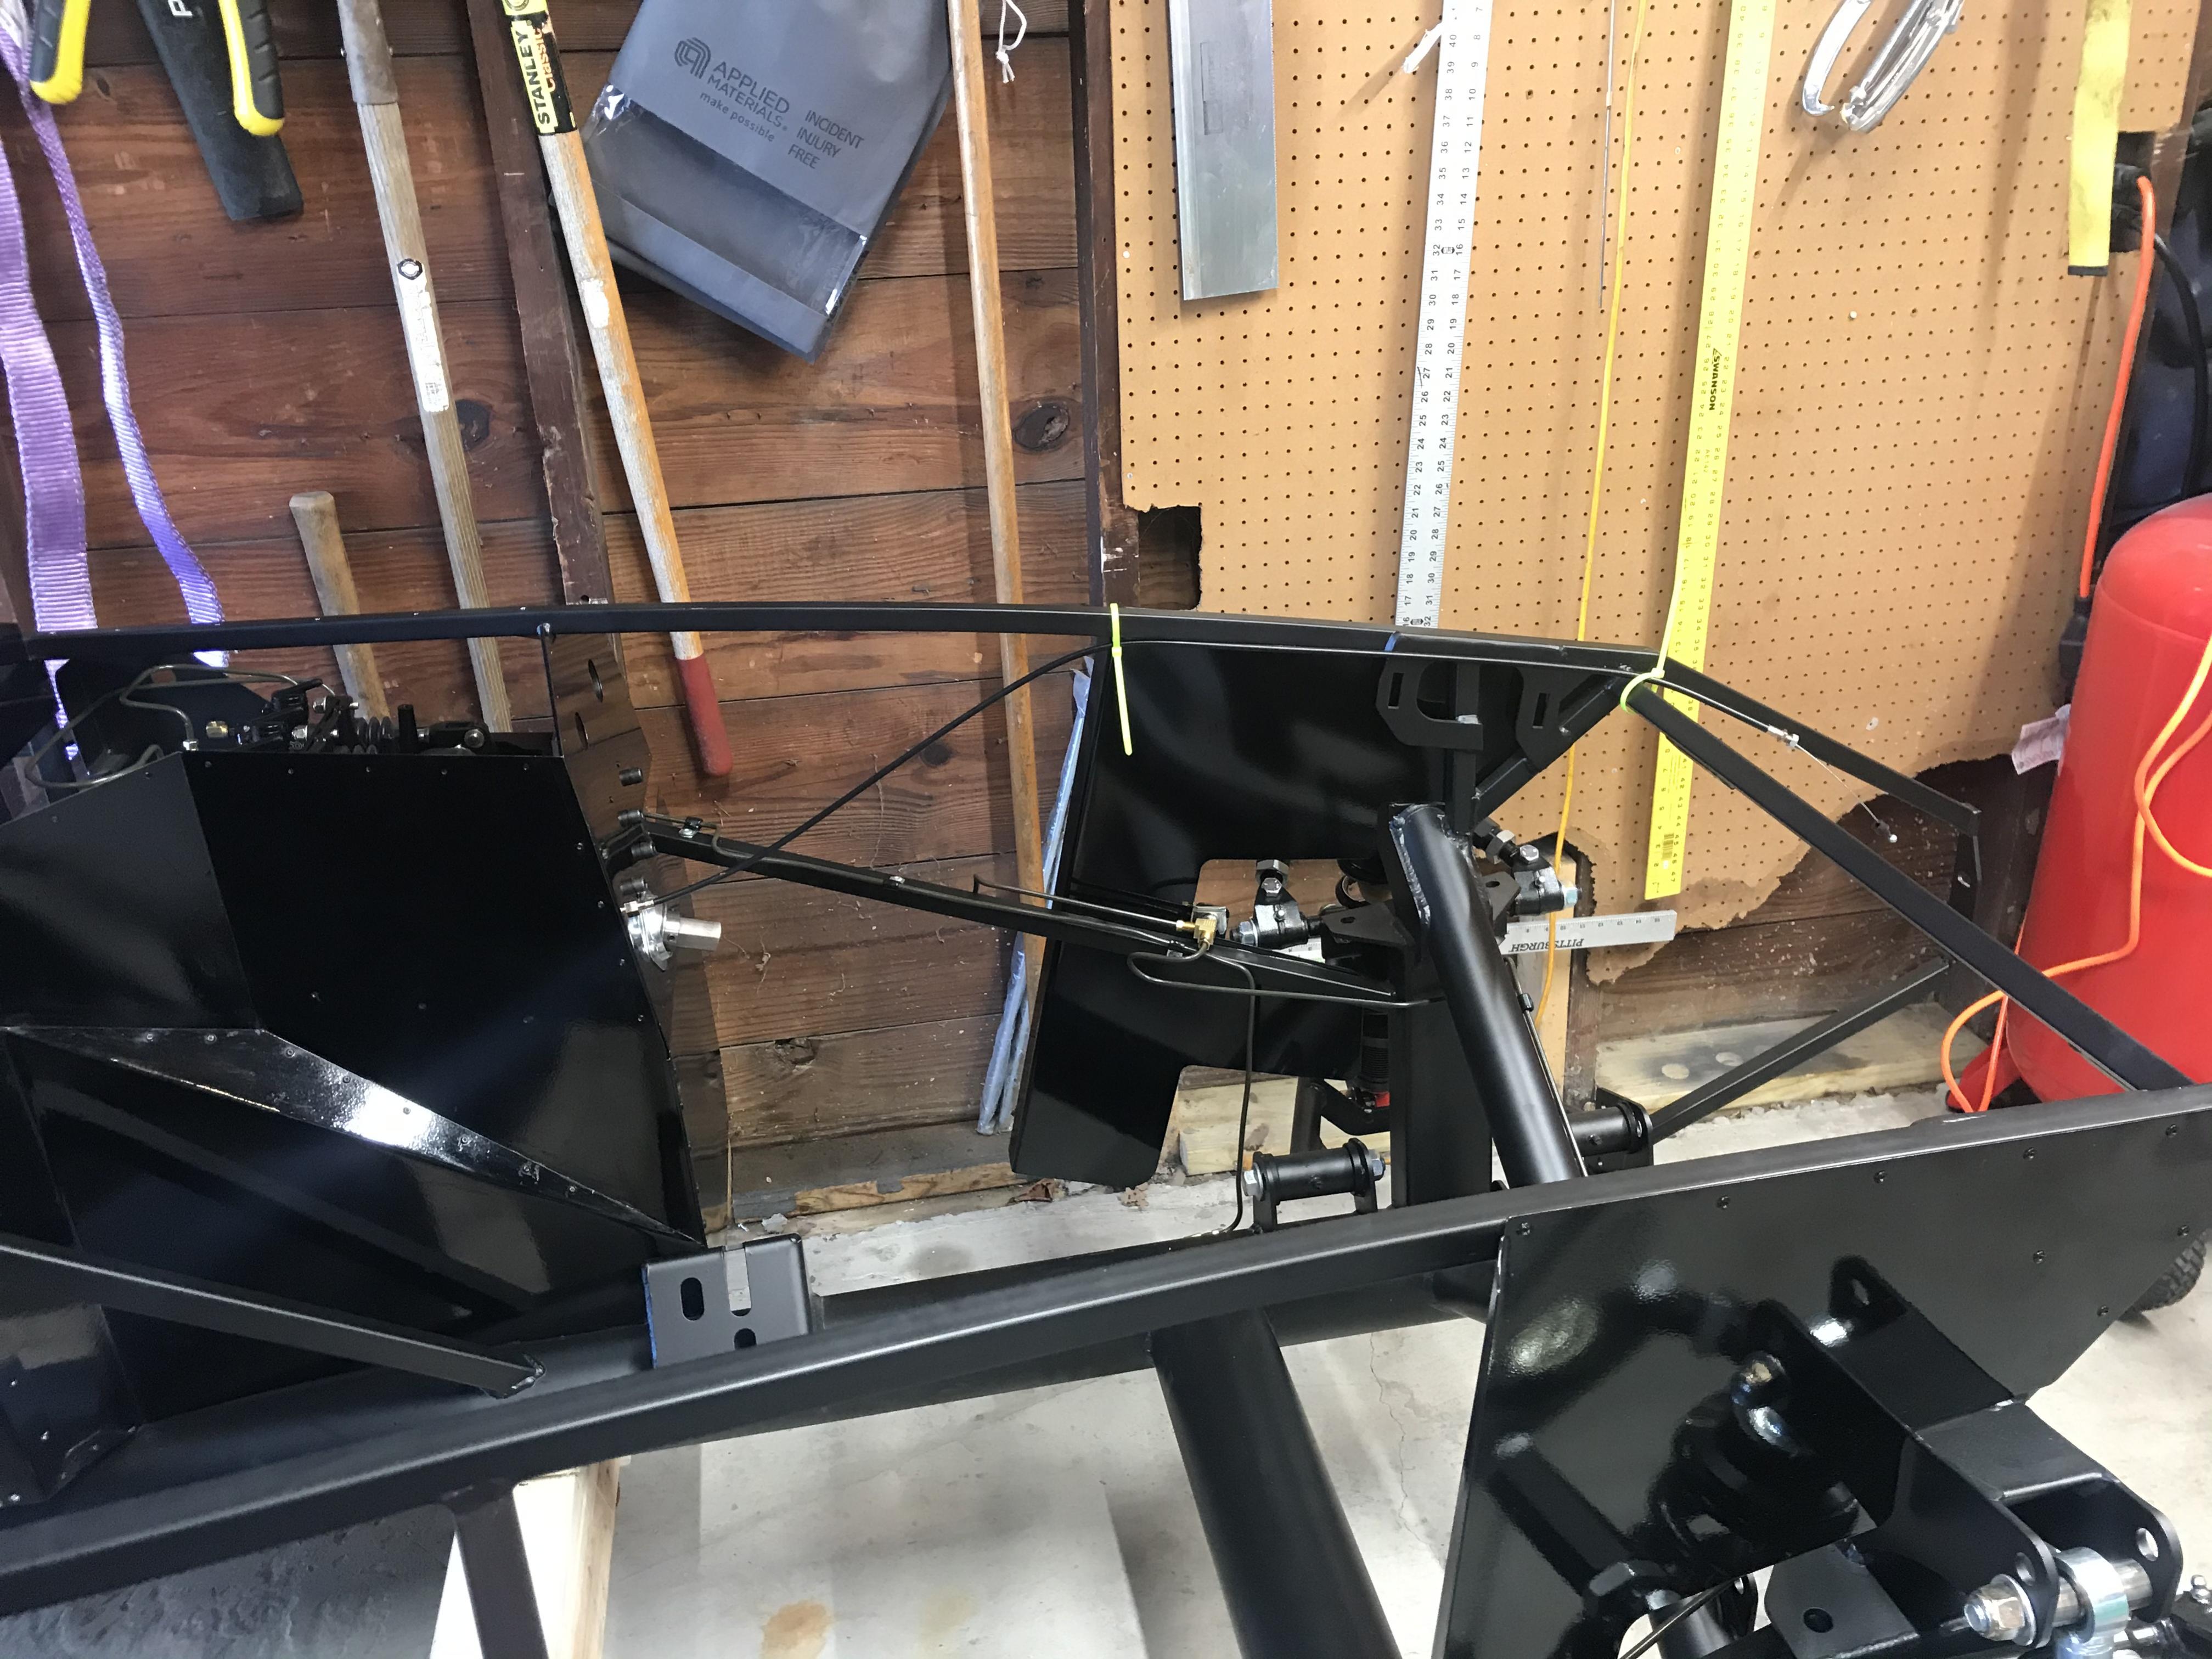
The build is coming along really nicely. Cool to see that your dad is also able to help out. I noticed in one of the photos that you mounted the steering rod bearing on the outside of your foot box. You may want to consider putting that on the inside of the foot box. This extra 1/4" or so is very helpful when working with the steering rod installation. Just an observation that could save you a bit of hassle.
-
Senior Member
Originally Posted by
BadAsp427
The build is coming along really nicely. Cool to see that your dad is also able to help out. I noticed in one of the photos that you mounted the steering rod bearing on the outside of your foot box. You may want to consider putting that on the inside of the foot box. This extra 1/4" or so is very helpful when working with the steering rod installation. Just an observation that could save you a bit of hassle.
Really appreciate the advice and will do! I’ll switch it when I get my steering rack.
Thanks
Last edited by Blitzboy54; 04-22-2021 at 10:41 PM.
-
Senior Member
-
Post Thanks / Like - 0 Thanks, 2 Likes
-
04-16-2021, 10:24 AM
#100
Nice work Jessie, I have similar thoughts around my drop trunk install, but like you said, it will be covered (and in the trunk...). Nice progress!
-
04-18-2021, 05:07 PM
#101
Senior Member
-
Post Thanks / Like - 0 Thanks, 2 Likes
-
04-19-2021, 07:24 AM
#102
Senior Member
FWIW others have pointed out that the speedo is more visible when positioned on the R of the steering column.
-
04-19-2021, 09:57 AM
#103
Senior Member

Great progress. I thought doing the dash layout was a lot of fun. I had more flexibility (and therefore more opportunity for bad layout decisions) with a blank dash as a starting point. I think your knobs and switches are thoughtfully laid out from the front view. Make sure things are adequately separated in the back - check to make sure you can plug in the headlight plug right below the electrical gauge.
You can get a carbon copy of the light / wiper knobs and use it on the heater. At first I thought there was something special about the heater knob, and had visions of having to use epoxy / mold-making ... or some other elaborate scheme to get a better looking knob on the heater. But on close inspection its just basically a set screw engaged in a slot in the shaft that does the work.
I don't have your layout, but personal preference for me in terms of visibility / proximity would be oil pressure, water temp, volts, fuel, and oil temp. I don't think you're going to be monitoring oil temp unless you're in an endurance race with a lot of time at sustained high RPM.
One final tip: if you place the dash face down after leather application, make sure the weight / pressure is ALWAYS very evenly distributed across the dash face. Not only the days / weeks you have the dash down on towels when you're doing the dash wiring, but also the minutes / hours when you're hooking the dash up to the main harness and installing. Ask me how I know. ")
MK4 #7838: IRS 3.55 TrueTrac T5z Dart 347
The drawing is from ~7th grade, mid-1970s
Meandering, leisurely build thread is
here
-
04-19-2021, 10:41 AM
#104
Senior Member
Originally Posted by
egchewy79
FWIW others have pointed out that the speedo is more visible when positioned on the R of the steering column.
Yes, I think you are right. Great point, thank you
Originally Posted by
John Ibele
Great progress. I thought doing the dash layout was a lot of fun. I had more flexibility (and therefore more opportunity for bad layout decisions) with a blank dash as a starting point. I think your knobs and switches are thoughtfully laid out from the front view. Make sure things are adequately separated in the back - check to make sure you can plug in the headlight plug right below the electrical gauge.
You can get a carbon copy of the light / wiper knobs and use it on the heater. At first I thought there was something special about the heater knob, and had visions of having to use epoxy / mold-making ... or some other elaborate scheme to get a better looking knob on the heater. But on close inspection its just basically a set screw engaged in a slot in the shaft that does the work.
I don't have your layout, but personal preference for me in terms of visibility / proximity would be oil pressure, water temp, volts, fuel, and oil temp. I don't think you're going to be monitoring oil temp unless you're in an endurance race with a lot of time at sustained high RPM.
One final tip: if you place the dash face down after leather application, make sure the weight / pressure is ALWAYS very evenly distributed across the dash face. Not only the days / weeks you have the dash down on towels when you're doing the dash wiring, but also the minutes / hours when you're hooking the dash up to the main harness and installing. Ask me how I know.
I have the stand for the dash and generally plan to use that. But what am I avoiding, does the foam shift? I've not heard laying it down is an issue. I appreciate the heads up, your leather work is excellent. On the spacing I spent quite a bit of time making sure it would all fit. My only "compromise" is I rotated the headlight switch 90 deg to best fit all the wiring. I'm a tiny bit concerned that my defroster is going to be an issue but that's down the line and I don't have louvers yet so I can't mock it up.
I had not considered changing the heater knob, now I'm intrigued.
Last edited by Blitzboy54; 04-19-2021 at 10:51 AM.
-
04-19-2021, 05:21 PM
#105
Senior Member
Hmm ... maybe we're stuck on two uses of the term 'laying it down'. It applied just fine and stays in place. And when it's all done it does exactly what you want ... when you push on it, it gives. You push on it hard with a sharp edge for long enough, you're going to leave a permanent dent that won't bounce back. That's all. And it took a lot less than I thought, in weight and time, to do that.
90 deg ... really good idea, and worst case, I'm going to have to do some time-consuming work from the back side with the Dremel to do that. I think flag terminals will fit though.
Heater knob, I remember now ... there's an allen screw hidden deep in all that tacky plastic. Loosen that up and you can take the knob off and see that it's a lot less than what you thought. And, you can see that the shaft not only has the 'D' shape in cross section, they also put another flat on it so that the pull / push function isn't going to result in the handle coming off in your hand.
MK4 #7838: IRS 3.55 TrueTrac T5z Dart 347
The drawing is from ~7th grade, mid-1970s
Meandering, leisurely build thread is
here
-
Post Thanks / Like - 1 Thanks, 0 Likes
-
04-19-2021, 07:45 PM
#106
Looks really nice! The buttons you picked are going to look great with the leather dash.
MK4 Complete Kit, EFI 427W/TKO 600, 2015 IRS
Ordered: 11/6/20, Kit Completion: 2/13/21, Picked Up: 2/16/21, Build Started: 2/19/21, First Start: 6/13/21, Go Kart: 8/15/21, Sent for Paint: 12/23/21, Back From Paint: 6/16/22, Street Legal: 7/11/22
-
04-21-2021, 02:02 AM
#107
Senior Member
Things are looking great! We will be starting our dash and doing the drop trunk fairly soon (if I ever get time to get back to the car--work gets in the way). It's nice to see your solutions before I do it!
-
04-22-2021, 09:35 PM
#108
Senior Member
-
04-22-2021, 11:42 PM
#109
Nice work on the dash, things are looking great!
I'm seeing dust/more on my panels as well, it's a bummer for sure.
-
04-23-2021, 12:41 PM
#110
Senior Member
Originally Posted by
Blitzboy54
Last I was sorting out some aluminum and I saw this. It's listed as a fuse panel bracket. Is it safe to assume this is for a donor harness perhaps? I'm not clear what it's for and I don't see it anywhere in the manual.
You're looking in the manual for the wiring harness, correct? I don't know if there's more than one version of this panel in your kit, but you need this to hold the fuse panel which is connected to the main harness up on the top of your DS footbox.
Here's a link to a photo of Fman's in his build thread.
MK4 #7838: IRS 3.55 TrueTrac T5z Dart 347
The drawing is from ~7th grade, mid-1970s
Meandering, leisurely build thread is
here
-
04-23-2021, 01:29 PM
#111
Senior Member
Originally Posted by
John Ibele
You're looking in the manual for the wiring harness, correct? I don't know if there's more than one version of this panel in your kit, but you need this to hold the fuse panel which is connected to the main harness up on the top of your DS footbox.
Here's a
link to a photo of Fman's in his build thread.
Thanks John, The RF harness had an aluminum mount packed with it for the fuse box. I used it. The pic is a close up, but it's in there. I think I must have either received 2 or its for the donor harness.
Fuse Panel.jpg
As an aside, I'm taking on the upholstery this weekend, definitely a little nervous. If it comes out half as good as yours I'll be happy.
Last edited by Blitzboy54; 04-23-2021 at 01:32 PM.
-
04-23-2021, 06:37 PM
#112
Senior Member
Looks like you’re set - good luck with the weekend project!
MK4 #7838: IRS 3.55 TrueTrac T5z Dart 347
The drawing is from ~7th grade, mid-1970s
Meandering, leisurely build thread is
here
-
Post Thanks / Like - 1 Thanks, 0 Likes
-
04-27-2021, 07:10 PM
#113
Senior Member
-
Post Thanks / Like - 0 Thanks, 2 Likes
-
04-28-2021, 07:33 AM
#114
Senior Member

Excellent build thread BLitz! I just got caught up on it. Keep on cruising. You will be go karting in no time. Like you my biggest issue for slowing me down is the POL. Also my other issue slowing me down is analysis paralysis..... Too many options to do one thing that has ramifications down the road so I sit on it and ponder too long.
FFR MK4 Roadster (9945) complete kit, delivered 12/4/2020, First start and go kart 5/7/2021. Legal 8/14/2021, Paint finished 7/18/2022 (Viking Blue). 347BPE CI, TKO600, Moser 8.8 3link 3.55, Halibrand 17x9 17x10.5, power steering. Carbon Fiber Dash. Carbon Fiber trans tunnel, adjustable Kirkey Lowback Vintage seats, Vintage gauges, RT drop trunk mod, FFmetal drop battery mod and trans tunnel, Forte front sway bar. Forte mechanical throttle linkage, RT gas pedal.
www.covespringsfarm.com
-
Post Thanks / Like - 1 Thanks, 0 Likes
-
04-28-2021, 08:19 AM
#115
Senior Member
Well, that was a successful weekend! Congrats on a big milestone - it's definitely a 'built not bought' item, and the first finished part of the interior that you get to see. The next goofy milestone is sitting in your car, in the dark, in the garage, enjoying the gauge lighting
MK4 #7838: IRS 3.55 TrueTrac T5z Dart 347
The drawing is from ~7th grade, mid-1970s
Meandering, leisurely build thread is
here
-
04-28-2021, 08:29 AM
#116
Senior Member
That dash turned out excellent, very nice job!
I really like how each builder does there own recipe on the dash layout.
-
Post Thanks / Like - 1 Thanks, 0 Likes
-
04-28-2021, 10:02 AM
#117
Senior Member
Originally Posted by
John Ibele
Well, that was a successful weekend! Congrats on a big milestone - it's definitely a 'built not bought' item, and the first finished part of the interior that you get to see. The next goofy milestone is sitting in your car, in the dark, in the garage, enjoying the gauge lighting
I'm really looking forward to that part for sure
-
04-28-2021, 01:00 PM
#118
Senior Member
Just noticed a couple things. First, really nice work, it looks great. I picked the vintage gauges but the Auto Meters really pop and have a more race-ready look. Nice. I also like the simplicity of the layout.
Second thing, particularly since I don't see a warning light, for your small gauges I would have water temp and oil pressure closest to me. That way you have 'something's not right' and 'pull over now' gauges closest. After that probably volts and fuel, then oil temp last unless you're planning on long stints at high RPM. FWIW.
MK4 #7838: IRS 3.55 TrueTrac T5z Dart 347
The drawing is from ~7th grade, mid-1970s
Meandering, leisurely build thread is
here
-
04-28-2021, 01:27 PM
#119
Senior Member
Originally Posted by
John Ibele
Just noticed a couple things. First, really nice work, it looks great. I picked the vintage gauges but the Auto Meters really pop and have a more race-ready look. Nice. I also like the simplicity of the layout.
Second thing, particularly since I don't see a warning light, for your small gauges I would have water temp and oil pressure closest to me. That way you have 'something's not right' and 'pull over now' gauges closest. After that probably volts and fuel, then oil temp last unless you're planning on long stints at high RPM. FWIW.
Thanks John
All good points. I thought about warning lights but the gauges are right there, although I could easily add a red indicator. I used the same line of thinking. While sitting in the cockpit my eyes were naturally up to that first row. The first 2 gauges on the top row are the ones I see best. I agree those are the two most critical and for me most in my line of site.
-
Post Thanks / Like - 0 Thanks, 1 Likes
-
04-28-2021, 08:34 PM
#120
Congrats Jesse! You did a great job. It looks amazing.
MK4 Complete Kit, EFI 427W/TKO 600, 2015 IRS
Ordered: 11/6/20, Kit Completion: 2/13/21, Picked Up: 2/16/21, Build Started: 2/19/21, First Start: 6/13/21, Go Kart: 8/15/21, Sent for Paint: 12/23/21, Back From Paint: 6/16/22, Street Legal: 7/11/22
-
Post Thanks / Like - 1 Thanks, 0 Likes


 Thanks:
  Likes:


 Reply With Quote

