-
Senior Member

Thanks for the awesome ideas and pics Chris and John. I looked at your build threads and Looks like that Lokar block is the key to this setup. I had also read edwwardb's thread on this several times. Where did you guys source the pulleys? And where does one get small pieces of 1/8" steel? I'm sure I'll find it all at mcmaster carr, but if you remembered off hand it might save me the looking!
-
Senior Member

Originally Posted by
Springsyeti

Getting ready to start our build in a few weeks of one close to what you bought. I will need to hand the body also and saw your straps going through the wheel wells. Do you have anything supporting in the middle? Are you worried about the body bending upward at the ends?
Congrats on starting soon! I did support the cockpit opening with a support I made out of a couple of pieces of 2x4. Others have done this as well. Seems fine!

-
Senior Member

Originally Posted by
sohcrates
Thanks for the awesome ideas and pics Chris and John. I looked at your build threads and Looks like that Lokar block is the key to this setup. I had also read edwwardb's thread on this several times. Where did you guys source the pulleys? And where does one get small pieces of 1/8" steel? I'm sure I'll find it all at mcmaster carr, but if you remembered off hand it might save me the looking!
Hi Ethan,
Here's a link to the pulleys I bought on Amazon: NATIONAL HARDWARE N245-894 Pulley Assembly, 2 in Bore. Looks like they are about $8 each.
Chris
Coupe complete kit delivered: 4/22/24.
Build Thread. Coyote. T-56. IRS w/3.55. Wilwoods. PS. HVAC. Side windows.
MK4 Complete kit.
Build Thread Index. Delivered: 10/15/2020. Legal: 7/25/23. Coyote Gen3. TKO600 (0.64 OD). IRS w/3.55. PS. Wilwoods. Sway bars. This build is dedicated to my son, Benjamin.
Build Thread.
-
Senior Member
Thanks Chris! I'm working an idea here. I'll post when I try it
-
Senior Member

McMaster:
Pulley: 3434T24
Steel (4" x 4" x 1/8"): 1388K384
Threaded Rod: 99086A313
Ball Joint Rod End: 60645K33
Hope that helps! Cheers, John
MK4 #7838: IRS 3.55 TrueTrac T5z Dart 347
The drawing is from ~7th grade, mid-1970s
Meandering, leisurely build thread is
here
-
Senior Member
It does, thanks John for looking all of that up!!
I might try to work this somehow for a simpler way to both move the cables over the frame and get the clevis to clear the bottom of the bracket.

-
Senior Member
Back at it: Parking Brake
Well, that was an unfortunate long layoff from building. Family, health, life all get in the way sometimes. But I'm back at it and I think I even recruited a new builder and forum member, and maybe even build help lifeline, so its all good. I am picking up where I left off after hitting a wall with the parking brake and studying the solutions from some others, noteably John and Chris, who posted above. I came up with a stainless pulley from Amazon, and decided to fabricate a bracket from 3/16" steel to offset the pulley towards the center of the car, where the now rerouted parking brake cables come forward.

I bolted the pulley to the bracket and the bracket to the frame. It's a nice wide pulley that accomodates both cables fine.
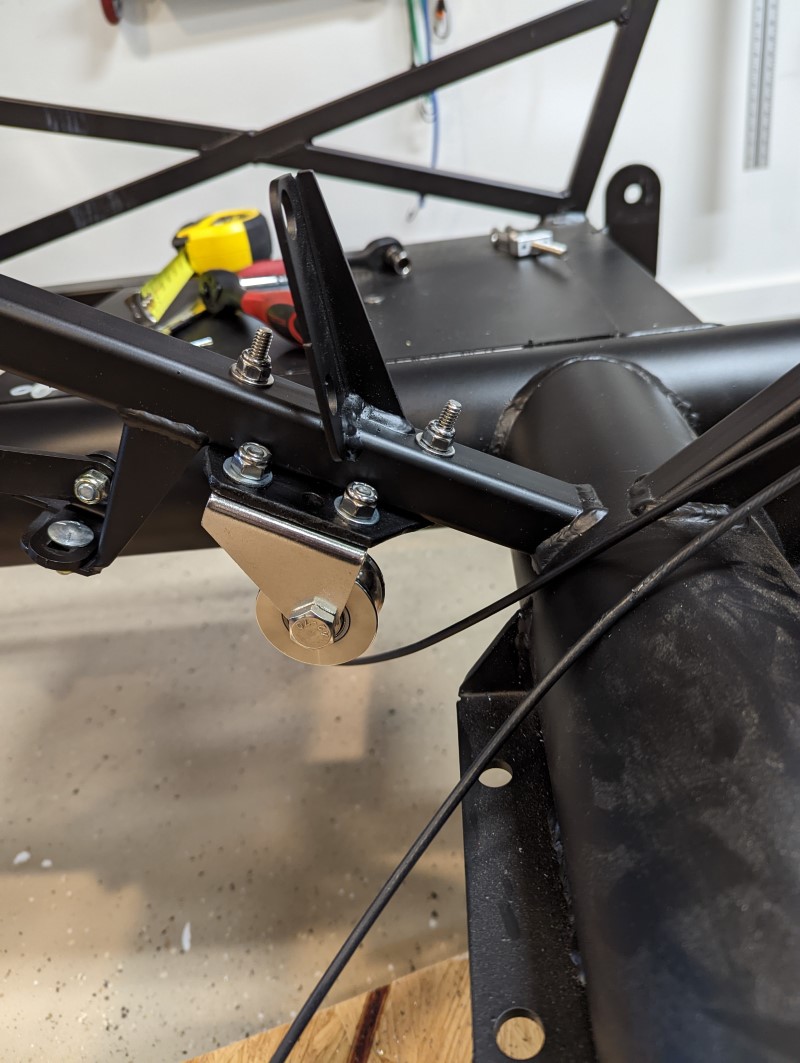
It succeeded in gertting the cables over and away from the big frame tube. The cable run isn't quite straight, given the placement of the cables and the handle, but it seems to work. I also sourced the lokar cable block from summit and a clevis rod end from McMaster.

I cut the ends off the cable with this. Worked pretty well.

I was having a really hard time pulling on the cables to get enough tension into them. I ended up pushing the spring lever on the caliper itself to set the brake and then I secured it that way with zipties. I then tightened down the set screws on the cable block and cut the zipties. This seemed to preload the cable enough to put tension in it. The problem I am having is at the handle. The carriage bolt on the back side of the handle bracket is catching on the cable linkage and getting stuck. I couldn't get the cable low enough with the pulley.

After a whole day's effort to find all the hardware I needed and fabricate and paint that bracket, and get the cables tensioned, I was pretty frustrated, so I had to walk away for a while.
I think I am going to try to move the back of the handle bracket under the frame, which will both lower the linkage and turn the carriage bolt over, so maybe it won't catch on the linkage anymore. I see Chris has his carriage bolt with the head down and a similar linkage, and this seems to work for him. Fingers crossed. Like Chris, I also see the need to put a cushion clamp in to locate the cable better near the rear suspension. My mustang brakes have a completely different orientation of the parking brake though, so it'll be in a different place. Pictures to follow once that's all set.
-
Senior Member
In other news, I took my friend who is ordering his kit soon out to meet Mike Forte the other day. While we were there, I asked about his progress on my engine and when I might expect it. Much to my surprise given the supply situation, this is what we found:

And it even had my name on it! He said its a couple weeks out. Very exciting!
-
Senior Member
-
Post Thanks / Like - 0 Thanks, 1 Likes
-
Senior Member
-
Post Thanks / Like - 0 Thanks, 2 Likes
-
Senior Member
Feels good when it’s done, doesn’t it? And it looks fine. I remember putting in a carriage bolt or two backwards after literally turning a round into a square hole to accommodate the change. Whatever works to get it in the right position to keep things from binding.
Don’t forget the teeth on the brake aren’t hardened. So push the button down when setting the brake so the pawl doesn’t wear the teeth down. I actually found a place that would heat treat mine, but I decided yet another $40, a drive across town and another 4 day wait just weren’t worth it.
MK4 #7838: IRS 3.55 TrueTrac T5z Dart 347
The drawing is from ~7th grade, mid-1970s
Meandering, leisurely build thread is
here
-
Senior Member
Thanks John,
Youre not the first to point that out, unfortunately. Thanks also for your help on this. I don't know why this particular project was such a struggle for me.
-
Senior Member
Looking good, Sohcrates. I like that doublewide pulley. Nice find. It came together nicely.
P.S. I had the chance to visit Forte at his business when I flew in for the F5 open house in June. I bought my Coyote and TKO from him. Lots of interesting history in that building.
Chris
Coupe complete kit delivered: 4/22/24.
Build Thread. Coyote. T-56. IRS w/3.55. Wilwoods. PS. HVAC. Side windows.
MK4 Complete kit.
Build Thread Index. Delivered: 10/15/2020. Legal: 7/25/23. Coyote Gen3. TKO600 (0.64 OD). IRS w/3.55. PS. Wilwoods. Sway bars. This build is dedicated to my son, Benjamin.
Build Thread.
-
Senior Member
Thanks Chris. Nothing like a double wide to make it happen . Forte and his shop are certainly quite the institution. Irreplacable knowledge and know how, for sure. My friend who is about to buy a kit is thinking Coyote. Are you happy you went that route? I've always been curious, can you use the mustang 6-speed transmission, or does that packaging necessitate a TKO/TKX?
-
Senior Member
The drivetrain is such a huge decision, with so many factors to consider. In my limited experience with my Gen3 Coyote, I'm happy. Granted, I'm only a little past go-kart stage, but so far it hasn't given me any reason to be disappointed. I like the idea of having the army of Ford engineers behind my crate Coyote in terms of design, reliability, and performance. It does require a professional tune, which I'll do next year (hopefully!), and that adds some bucks to the build. From what I've read its friendly when you just want to putt around town, and ready to rip when your right foot gets heavy. I think it redlines at 7,000 or 7,500 RPM--not that I'll be hanging out on that end of the tach much!
It's my understanding it can be mated to the T56 Magnum (6 speed by Tremec) and fits in the MK4. Here's a current build thread with a Coyote Gen3 and T56: Danny Boy's Mk4 Build. He's toward the end of his build, so would be a good source of info. I'm sure there are other builders on the forum who've done the same in the MK4, but this one comes to mind quickly.
Chris
Coupe complete kit delivered: 4/22/24.
Build Thread. Coyote. T-56. IRS w/3.55. Wilwoods. PS. HVAC. Side windows.
MK4 Complete kit.
Build Thread Index. Delivered: 10/15/2020. Legal: 7/25/23. Coyote Gen3. TKO600 (0.64 OD). IRS w/3.55. PS. Wilwoods. Sway bars. This build is dedicated to my son, Benjamin.
Build Thread.
-
Senior Member
Thanks Chris, that's awesome info. I do like to rev it out once in a while, and that redline has me jealous!!
-
Originally Posted by
sohcrates
Thanks Chris. Nothing like a double wide to make it happen
. Forte and his shop are certainly quite the institution. Irreplacable knowledge and know how, for sure. My friend who is about to buy a kit is thinking Coyote. Are you happy you went that route? I've always been curious, can you use the mustang 6-speed transmission, or does that packaging necessitate a TKO/TKX?
I went the 6-speed (MT82) Mustang route with my MKIV. It works but there are a few things to be aware of. The first is that you will need to convert the long shift linkage OEM set up. Forma Cars (on the forum) makes a great kit. This is what I used. It comes with all the hardware to put the shifter right where it needs to be in regards to the transmission and the placement in the vehicle. They include a new aluminum top sheet for the tunnel with the hole in the right place and nutserts, a nice aluminum dress up ring and a black leather boot, but it is $850. The next is the drive shaft. This requires a custom drive shaft that includes an aluminum yoke ($300ish) to replace the stock flexible joint (called a Guibo). Mine cost me $950, and I haven't heard of one much less than that. So that is an $1,800 hit right at the beginning. The mounting is the same using the FFR provided hardware.
I chose to do this because I got a Coyote Gen2 and MT82 package at a price that made it worth it and I wanted to do something a little different. Hope this helps.
MKIV #8414 - Complete Kit - Gen 2 Coyote - MT82 6 Speed - Wilwoods - Moser 3.55 Rear
-
Senior Member
Originally Posted by
juddster
I went the 6-speed (MT82) Mustang route with my MKIV. It works but there are a few things to be aware of. The first is that you will need to convert the long shift linkage OEM set up. Forma Cars (on the forum) makes a great kit. This is what I used. It comes with all the hardware to put the shifter right where it needs to be in regards to the transmission and the placement in the vehicle. They include a new aluminum top sheet for the tunnel with the hole in the right place and nutserts, a nice aluminum dress up ring and a black leather boot, but it is $850. The next is the drive shaft. This requires a custom drive shaft that includes an aluminum yoke ($300ish) to replace the stock flexible joint (called a Guibo). Mine cost me $950, and I haven't heard of one much less than that. So that is an $1,800 hit right at the beginning. The mounting is the same using the FFR provided hardware.
I chose to do this because I got a Coyote Gen2 and MT82 package at a price that made it worth it and I wanted to do something a little different. Hope this helps.
Thanks Juddster, that's great info. I'll pass it along to my friend. I think he wants to do that transmission if he ends up with the coyote.
-
Post Thanks / Like - 0 Thanks, 1 Likes
-
Nice build. I should get my motor from Mike at the end of December. Question, are your rear shocks upside down for a reason?
-
11-21-2022, 04:43 PM
#100
Senior Member
Originally Posted by
Springsyeti
Nice build. I should get my motor from Mike at the end of December. Question, are your rear shocks upside down for a reason?
Hey Yeti,
I did agonize quite a bit over that. The manual says the double adjustable shocks should be upside down for the IRS, but is a little ambiguous about the regular red shocks. The pictures in the manual show the silver shocks. Looking around at most recent builds with IRS and the stock shocks, most guys are putting them in upside down, so I followed suit. Eventually (after putting them in upside down), I did find this video from FFR:
https://www.youtube.com/watch?v=zk8Afyu7UQw
At about the 0:48 Mark, he states that the red shocks can be mounted either way and that the silvers need to be upside down.
-
02-12-2023, 09:29 AM
#101
Senior Member
-
Post Thanks / Like - 0 Thanks, 3 Likes
-
02-12-2023, 10:33 AM
#102
Sohcrates,
Did you go to Mike's shop to pick it up since you are (relatively) local? I think he ships otherwise (to far-away hinterlands). I'm anxiously awaiting mine for a delivery sometime in March.
Looks like I'll need to rent a forklift to get it off the shipping truck unless they typically get shipped with a drop/lift gate?
Craig C
-
02-13-2023, 10:19 AM
#103
I bought my engine from Mike. I did end up picking it up but during conversations with him he said if needed he would ship on a truck with a lift gate.
-
Post Thanks / Like - 1 Thanks, 0 Likes
-
02-13-2023, 03:24 PM
#104
Senior Member
Originally Posted by
cc2Arider
Sohcrates,
Did you go to Mike's shop to pick it up since you are (relatively) local? I think he ships otherwise (to far-away hinterlands). I'm anxiously awaiting mine for a delivery sometime in March.
Looks like I'll need to rent a forklift to get it off the shipping truck unless they typically get shipped with a drop/lift gate?
Craig C
Hi Craig. I also ordered my drivetrain from Forte (Coyote/TKO) and had it shipped to me here in Spokane. Mike had it crated such that everything was well protected. To save a few bucks, I opted to pick it up at the shipping dock here in Spokane, but lift gate service was available. They loaded it with a forklift onto my trailer. At home I used my four post lift to pick it up just enough to slide the trailer out from underneath.
Chris
Coupe complete kit delivered: 4/22/24.
Build Thread. Coyote. T-56. IRS w/3.55. Wilwoods. PS. HVAC. Side windows.
MK4 Complete kit.
Build Thread Index. Delivered: 10/15/2020. Legal: 7/25/23. Coyote Gen3. TKO600 (0.64 OD). IRS w/3.55. PS. Wilwoods. Sway bars. This build is dedicated to my son, Benjamin.
Build Thread.
-
Post Thanks / Like - 1 Thanks, 0 Likes
-
02-13-2023, 03:27 PM
#105
Senior Member
Great looking motor, Ethan. Congrats on getting it home. A motivating site, no doubt.
I think I’m on a 3-4 year build pace. Whatever pace works for you and brings the most enjoyment is my $0.02.
Chris
Coupe complete kit delivered: 4/22/24.
Build Thread. Coyote. T-56. IRS w/3.55. Wilwoods. PS. HVAC. Side windows.
MK4 Complete kit.
Build Thread Index. Delivered: 10/15/2020. Legal: 7/25/23. Coyote Gen3. TKO600 (0.64 OD). IRS w/3.55. PS. Wilwoods. Sway bars. This build is dedicated to my son, Benjamin.
Build Thread.
-
02-16-2023, 10:22 AM
#106
Senior Member
Sorry guys, I was out of town for a few days at work, but it looks like questions were answered about delivery and packaging from Forte. As you can see, they put it in my truck with a forklift, but I was able to get it out of my truck using a 1 ton shop crane I bought from harbor freight for $229. Just had to take the tailgate off in order to allow the crane to reach the motor. In conversations with Mike, I understood that he has several ways to get your motor to you, so I'm sure he can solve whatever logistical issues you have. Certainly not his first rodeo.
Definitely nice to have the motor here, and it definitely is motivating. Hoping to get some work in this afternoon if I can evade my wife's honey do list! Glad to hear I'm not the only one on a longer term build plan...
-
02-16-2023, 05:23 PM
#107
Senior Member
-
02-16-2023, 09:18 PM
#108
Good progress! Wanted to drop one note about that front aluminum piece. I see you glued. And riveted the top part. I did that too, and then had to undo it for the rest of the aluminum panels to align. I documented it in this post https://thefactoryfiveforum.com/show...l=1#post503066 Not sure if it will be an issue for you, but in case you run into it, that's what it is.
-
02-17-2023, 12:54 PM
#109
Senior Member
Thank you! I peeked at your build thread and see you are working much faster than me!!! That's why I just clecoed this part in for so long, but you can't really deal with the steering shaft until this is done, so I bit the bullet, knowing it may have to come off. It aligns just right with all of the holes in the frame as it is, and I can see it may need some trimming in places, but I'll just cross that bridge when I get to it and am mentally prepared to have to do that over...
-
Post Thanks / Like - 0 Thanks, 1 Likes
-
03-19-2023, 03:10 PM
#110
Senior Member
Managed a little time this weekend. Finished up the mounting of the pedal box and master cylinders. I discovered that I had put the brackets for the brake and clutch switches on the wrong side of the pedal box frame and they wouldn't reach the pedals. I tried to move them with everything still in place, but failed, so ended up taking the whole pedal box off anyway. Resulted in some bad language and frame scratches, but I eventually got everything together. I am interested to see how the adjusting of the balance bar and pedal height goes. The brake pedal sure is close to the frame....


Last edited by sohcrates; 10-09-2023 at 04:04 PM.
-
10-09-2023, 04:26 PM
#111
Senior Member
Steering shaft and clutch pedal
Another really long layoff caused by home reparis, family health issues and trying to raise a teenager. At this rate, I should have a go cart in 10 or 12 years....
But, I'm going to do better than that. Should be easier to get time in during the colder months with less going on outside. The build is always on my mind so my gears are always churning about how to attack certain issues. I managed a little bit of time today, and after taking a while to find all of the parts I had put aside so many months ago, I finished up the steering linkage. As recommended by many on this forum, I moved the bottom bearing flange to the inside of the footbox, and then put the bearing in with its collar in the engine bay. This allowed everything to fit without interference. The lower shaft is still a little long, and is protruding about 1/8" into both U joints. Seems not to be interfering with anything, so I'll call it good.


Despite living in my heated garage, the upper shaft had started to rust in places, so I sanded it a bit to get rid of most of it.

I used these spring washers to insert the upper shaft into the lower. It took a fair amount of banging to get the upper shaft into the lower all the way to the second spring washer. I hope I don't ever have to take this apart. I have no idea how I would get that shaft out...
The clearance from the frame on the upper shaft seemed OK. At least 1/8" in all positions.

After having read some posts about clutch pedal master cylinder shaft trimming, I fiddled with the clutch MC a bit. I trimmed the rod like I did the brake MC rods, but it still protrudes a little. It doesn't seem to interfere with the pedal at any point, so maybe I'll leave it untrimmed.

The pedal can move all the way through its travel, limited only by the master cylinder. It is 1 5/8" from the front wall of the footbox fully depressed, and even with the brake pedal at 7 3/4" when fully out. Seems good. I have read that I may want to go to a 1" master cylinder for lighter effort, but maybe I'll see how it is before making the change.
I'm hoping for more progress soon. I plan to finish up the passenger footbox aluminum and then move to the fuel system.
-
10-09-2023, 07:02 PM
#112
Glad you are back at it! Progress not perfection!
Regarding the steering shaft, speaking from the same experience, you shouldn't have to 'bang' it together. I did the same thing to the point where I couldn't get it apart again. Funny thing is that I knew that it couldn't be right, but kept banging away like the apes on 2001 A Space Odyssey. I called up FFR and they replaced it with one that slid easily in and out of the shaft. I believe that it is designed to collapse in the event of an accident so it needs to move. I learned one thing on that build, many times as an expensive and time-consuming lesson. If you feel that you have to force something to go together or work, then stop for a moment and see where the issue might be. Keep at it!
Last edited by cv2065; 10-09-2023 at 07:04 PM.
-
10-10-2023, 03:55 AM
#113
Senior Member
Thanks for that! Glad I mentioned it. How did you get it out?
-
10-10-2023, 04:20 AM
#114
Senior Member

Consider a slide hammer. Then polish the inner shaft with sand paper or emery cloth until it slides in easily
-
10-10-2023, 09:34 AM
#115
Originally Posted by
sohcrates
Thanks for that! Glad I mentioned it. How did you get it out?
I never did. I sent the entire assembly as was back to FFR.
-
10-10-2023, 05:00 PM
#116
Senior Member
Thanks guys. I'll have to figure out what to do there. Glad I brought it up. I'm inclined to go to FFR about it. I wasn't very happy about the rust on that shaft to begin with. May be a good time to buy a slide hammer as well...
-
10-10-2023, 06:17 PM
#117
Not a waxer

The male steering shaft almost always needs to be cleaned up to move freely. A few minutes with some fine emery cloth will shine it right up and have it sliding in and out without having to resort to hammers
Jeff
-
10-10-2023, 06:34 PM
#118
Senior Member
Thanks Jeff,
Now if I can just get it out.....
-
10-17-2023, 05:59 PM
#119
Senior Member
Well,
I got it out. Wasn't easy. I had to take the whole shaft out of the car, and then I stuck a pry bar down the female shaft and banged the whole thing on the ground until the male shaft came out. It took a fair amount of sanding, but the shaft eventually fit better, and was able to go in just by pushing hard on it. On to the next thing. I hear Russ Thompson has passed on. I had intended to get his steering column turn signal mod and drop trunk. Anyone found good sources for these now? I have inquired with IE427 and Mountain Metalworks but havent heard back.
-
10-17-2023, 08:39 PM
#120
Originally Posted by
sohcrates
Well,
I got it out. Wasn't easy. I had to take the whole shaft out of the car, and then I stuck a pry bar down the female shaft and banged the whole thing on the ground until the male shaft came out. It took a fair amount of sanding, but the shaft eventually fit better, and was able to go in just by pushing hard on it. On to the next thing. I hear Russ Thompson has passed on. I had intended to get his steering column turn signal mod and drop trunk. Anyone found good sources for these now? I have inquired with IE427 and Mountain Metalworks but havent heard back.
I just bought my drop trunk kit from TJ at Mountain Metalworks. Plan on getting their pedal and turn signal as well.


 Thanks:
  Likes:


 Reply With Quote


