-
08-01-2022, 06:22 AM
#401
Senior Member


Originally Posted by
Namrups

WHEN ADDING A SWAY BAR TO IRS, MOUNT THE SWAY BAR BRACKET WITH THE NEW LONGER BOLTS WHEN INSTALLING THE TOE LINK! Don't do what I did....not fun.
Scott, thanks so much for this! Guaranteed though that when I get to that sway bar part I will STILL use the wrong bolts, despite reading this haha! I should just go find those boxes now and put the longer bolts where they belong to troubleshoot my future self.
Its coming together great, I really am enjoying your progress and have to agree with others am digging the red suspension bits!
-
Post Thanks / Like - 1 Thanks, 1 Likes
-
08-01-2022, 07:32 AM
#402

Originally Posted by
edwardb

Even with your SBF 427 (as opposed to the Coyote in mine, where neither option would work) anything on the outside of that frame rail will probably need to be moved out of the way to get the engine in and out. Plus (maybe) kind of in the way for maintenance, e.g. headers, spark plugs, etc. You wouldn't regret having them all inside the two frame rails and out of the engine compartment. But probably not possible with those individual mounts. Hopefully other non-Coyote builders can provide some feedback.
I have thought about that also. There are two immediate issues with option 1. First, all three will not fit there. Second, I I do not think I can get a drill in place to drill the mounting holes. As for option 2, I might be able to slide them more toward the front of the car to keep them out of the way. I would really prefer to use the factory supplied ones but I may have to go the route of others and use the plastic Tilton reservoir. Still undecided.
-
08-01-2022, 09:19 AM
#403
Reservoir solution
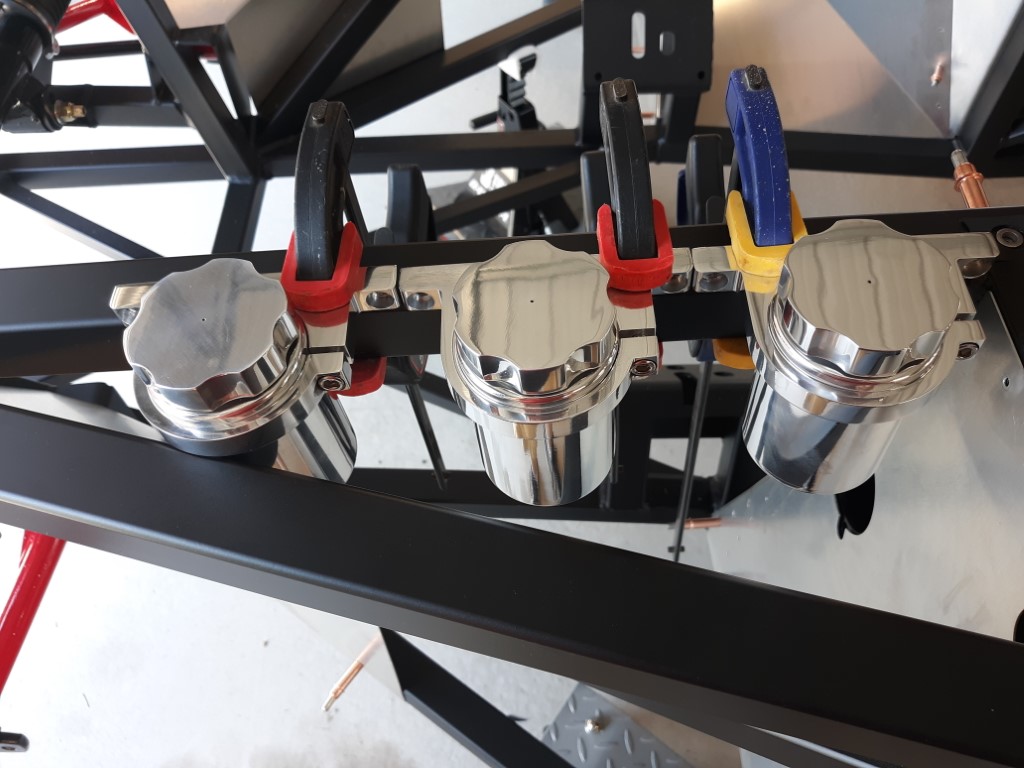
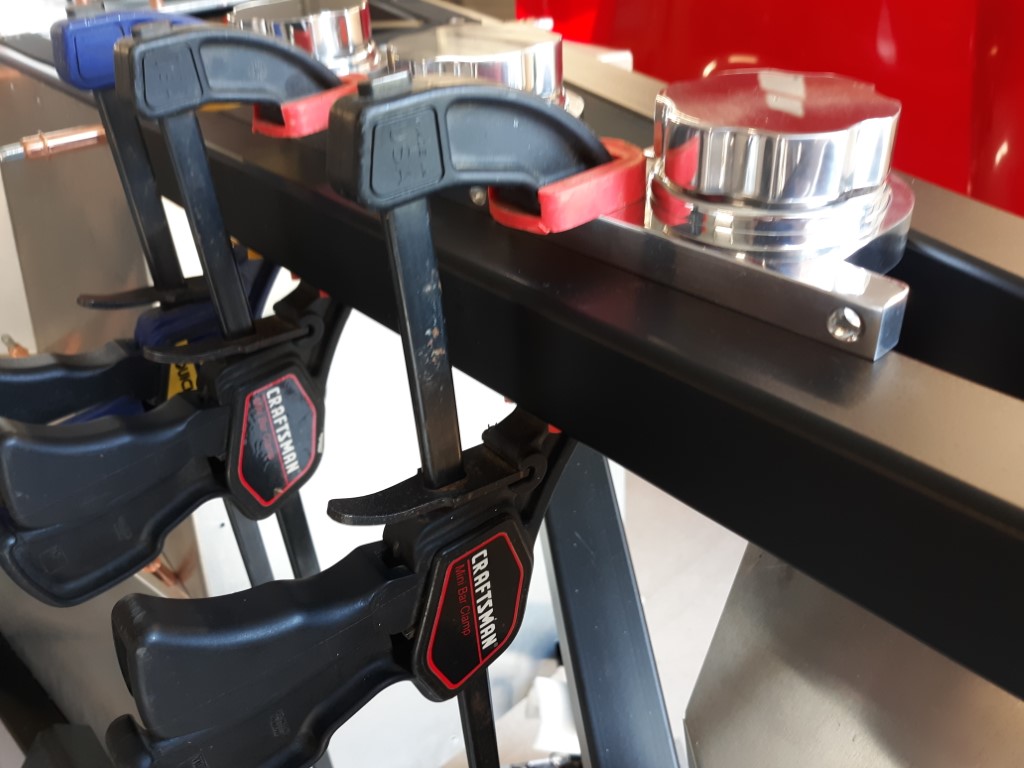
I think this idea will work. Based on Paul's post #207 in his coupe build, he is mounting his reservoir approximately 3 inches above the chassis tube. I can do the same and using an angle bracket locate all three reservoir's inside the opening. Anyone see any issues I'm missing?
-
08-01-2022, 02:18 PM
#404
Senior Member

Just how you're going to attach them Scott...if drilling down from the top they will crash into the sidewall of the frame. But I am thinking simplistically and I'm sure you already have an idea what you are going to do.
-
08-01-2022, 06:23 PM
#405
Piece of aluminum angle attached to the top of the square tube. Not pretty but doable. I should have it mocked up sometime tomorrow. Pics to follow.
-
08-01-2022, 09:19 PM
#406
Member

Scott, did you receive three reservoirs with your kit?
I have the hydraulic clutch option also and only got two reservoirs, one with the brake components and one with the clutch kit.
Type 65 Daytona Coupe Complete Kit ordered 11/2021, delivered 7/25/2022....the fun has begun!
Build Thread
-
08-02-2022, 07:26 AM
#407

Originally Posted by
slarson

Scott, did you receive three reservoirs with your kit?
I have the hydraulic clutch option also and only got two reservoirs, one with the brake components and one with the clutch kit.
The kit only comes with two reservoirs. One for the clutch and one for the brakes. There is a "Y" fitting to split the brake feed from the reservoir to the two MC's. I wanted to have separate front and rear brake systems so I ordered a third reservoir as an extra option.
-
Post Thanks / Like - 2 Thanks, 0 Likes
-
08-02-2022, 02:53 PM
#408
-
08-02-2022, 03:26 PM
#409
Pedal box question
I am working on installing the pedal box. The manual states that the shafts on the MC's should be cut by 5/8". It doesn't say anything about the shaft on the clutch MC. After staring at if for way too long and discussing it with Jesse when he stopped by today, I believe it should not be cut. Anyone??
-
08-02-2022, 03:58 PM
#410

Originally Posted by
Namrups

Reservoir mock-up
As promised here are the pics of my reservoir mock-up. It turned out better than I had envisioned. I think I am going to go with this idea. The aluminum angle piece will be painted black to match the chassis. Just need to decide if I am going to use rivnuts or thru bolts to mount the angle. Leaning toward rivnuts. Thoughts??
rivnuts
-
Post Thanks / Like - 1 Thanks, 1 Likes
-
08-02-2022, 06:54 PM
#411
Senior Member


Originally Posted by
Namrups

Pedal box question
I am working on installing the pedal box. The manual states that the shafts on the MC's should be cut by 5/8". It doesn't say anything about the shaft on the clutch MC. After staring at if for way too long and discussing it with Jesse when he stopped by today, I believe it should not be cut. Anyone??
Don't cut anything until mocking them up. It's not hard to do. Then only cut what's needed. As I recall, they all need to be trimmed a bit. Especially if you put the clutch pedal even with the brake pedal. Which is my personal preference.
That bracket on your reservoirs is a nice solution. I agree rivnuts might look a little cleaner than the lock nuts. Especially if you put them on before painting. But it's all pretty busy underhood. So whatever you do won't stand out.
Build 1: Mk3 Roadster #5125. Sold 11/08/2014.
Build 2: Mk4 Roadster #7750. Sold 04/10/2017.
Build Thread
Build 3: Mk4 Roadster 20th Anniversary #8674. Sold 09/07/2020.
Build Thread and
Video.
Build 4: Gen 3 Type 65 Coupe #59. Gen 3 Coyote. Legal 03/04/2020.
Build Thread and
Video
Build 5: 35 Hot Rod Truck #138. LS3 and 4L65E auto. Rcvd 01/05/2021. Legal 04/20/2023.
Build Thread. Sold 11/9/2023.
-
Post Thanks / Like - 1 Thanks, 1 Likes
-
08-02-2022, 07:37 PM
#412
Senior Member


Originally Posted by
Namrups

Pedal box question
I am working on installing the pedal box. The manual states that the shafts on the MC's should be cut by 5/8". It doesn't say anything about the shaft on the clutch MC. After staring at if for way too long and discussing it with Jesse when he stopped by today, I believe it should not be cut. Anyone??
Installed mine today Scott. Was thinking the same thing but when mocked up the clutch shaft is way too long. I cut 5/8 off of it and leveling the clutch with the brake pedal there was still excess thread, whereas the brake MC threads are flush with their connections. Of course I haven’t balanced the F/R bias yet, but seems it can be trimmed down safely.
I really like your bracket, very well done keeping the reservoirs level.
-
Post Thanks / Like - 1 Thanks, 1 Likes
-
08-03-2022, 08:44 PM
#413
-
08-03-2022, 09:42 PM
#414
Very professional! You hit the nail on the head.
FFR MKIV 8309, FMS 306 Crate w/Edelbrock EFI, T5, 3.55 Three Link, Wilwood Brakes
-
Post Thanks / Like - 1 Thanks, 1 Likes
-
08-04-2022, 09:53 AM
#415
Senior Member

Agreed. Looks great Scott. Question - what's the stuff around the riv-nuts for the removable panel over the drivers foot box? Thin foam tape?
-
08-04-2022, 10:12 AM
#416

Originally Posted by
rhk118

Agreed. Looks great Scott. Question - what's the stuff around the riv-nuts for the removable panel over the drivers foot box? Thin foam tape?
That is 1" x 1/16" foam tape (sticky one side). It was included in the inventory but no one seems to know what it's for so I put it to good use. It fills the gap left by the rivnuts perfectly. Is it really needed, don't know but it does seal that area now.
-
Post Thanks / Like - 2 Thanks, 0 Likes
-
08-04-2022, 02:32 PM
#417
Senior Member

Reservoir setup turned out great. Very sharp
-
08-04-2022, 05:29 PM
#418

Originally Posted by
Blitzboy54

Reservoir setup turned out great. Very sharp
Thanks Jesse. I am very pleased with it.
-
08-04-2022, 08:29 PM
#419


Health update!
Had an appointment with my cancer doctor today. Good news! Good to go for another three months. Better news! Because I have done so well on the medication, my doctor has decided to try a lower dosage of the cancer meds! He believes a lower dosage will still keep the cancer at bay and reduce some of the side effects such as muscle and joint pain, hypertension and what I feel is most important the out of pocket cost! He wanted to see me after only three months just to make sure all is well. Praying this works.
Due to the fact it was over 100 degrees today I decided to put off working on the car and instead went in search of a supplier of sheet aluminum. I have ideas of parts and pieces I want to fab and didn't want to wait for online sales. I found a local business called Metal Supermarket that specializes in small orders. They had a cutoff rack that I found three pieces 20" x 22" and I ordered two specific cut pieces 23" x 7 1/2" all for $56.00. When I priced this online it was over $100.00! Great find.
-
Post Thanks / Like - 0 Thanks, 3 Likes
-
08-04-2022, 09:15 PM
#420
Senior Member

Scott, fantastic news on your blood work. You are progressing along at a great rate. Reminded me as well I need to find a local supply of metal as well. But I’m still in the drilling of holes phase haha! Cockpit started today.
-
Post Thanks / Like - 1 Thanks, 1 Likes
-
08-04-2022, 09:20 PM
#421

Originally Posted by
rhk118

Scott, fantastic news on your blood work. You are progressing along at a great rate. Reminded me as well I need to find a local supply of metal as well. But I’m still in the drilling of holes phase haha! Cockpit started today.
I wanted to install the gas tank but I also want to fab a drop trunk which has to go in before the tank so I had to find a place. Just glad this one was not that far away.
-
08-05-2022, 01:31 PM
#422
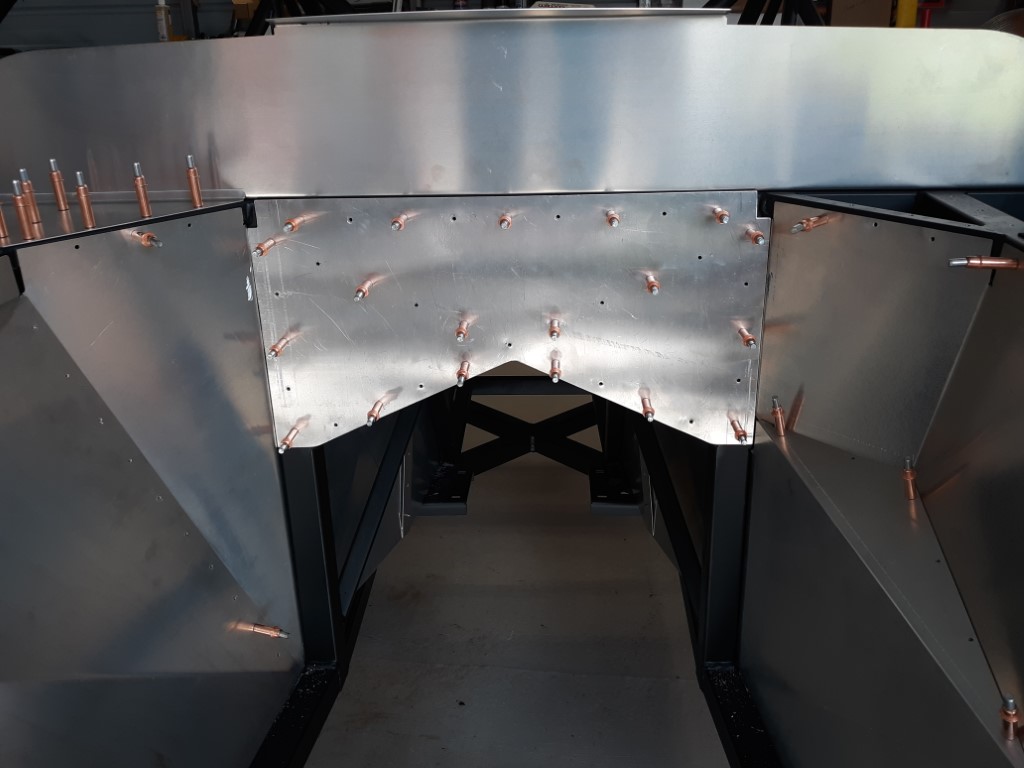
Managed to get the firewall filler piece cut, drilled and mocked in place before the heat got too bad. Did have to grind down and repaint a few welds on the chassis to get the piece to sit flat. On to the next item .... The drop trunk??
-
08-07-2022, 01:48 PM
#423
-
08-07-2022, 01:53 PM
#424
Trimmed the box for the chassis cross members, mocked it in place and started drilling.
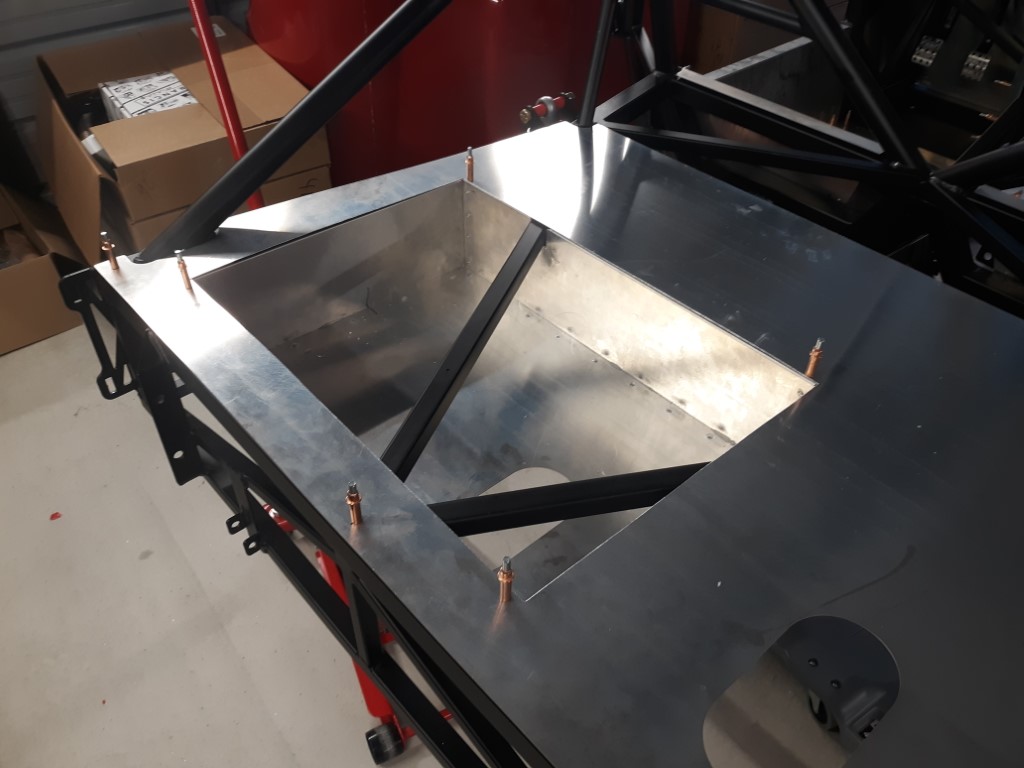
Decided to finish fitting and drilling the rest of the rear panels.
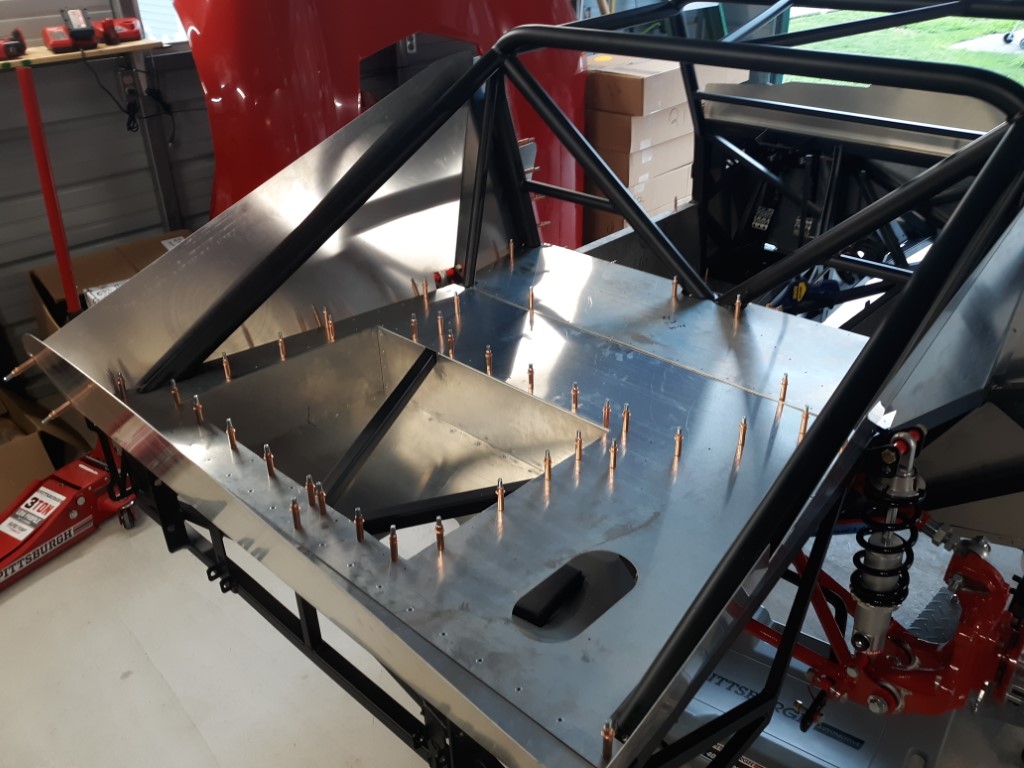
Now that that is done I can go back to running my gas lines and installing the tank.
-
08-07-2022, 02:01 PM
#425
-
08-07-2022, 05:08 PM
#426
Senior Member

Scott — looking great. Got all my cockpit and rear panels drilled over the past 2 days. Turns out 75 clecos don’t go very far on this car! I didn’t drill around the area where you put your storage box as was wondering what I’d do there myself. Seeing your post make me just want to bite the bullet and do it.
I assume you got the 30” harbor freight brake? What gauge/thickness aluminum sheeting did you use (turns out large box stores carry sheets of the stuff as well).
Finally what did you make your cuts with? Bandsaw? Jigsaw?
On the fuel lines - what spacers are those for the fuel line/return line? Those are pretty slick.
Looking great!
-
08-07-2022, 07:28 PM
#427


Originally Posted by
rhk118

Scott — looking great. Got all my cockpit and rear panels drilled over the past 2 days. Turns out 75 clecos don’t go very far on this car! I didn’t drill around the area where you put your storage box as was wondering what I’d do there myself. Seeing your post make me just want to bite the bullet and do it.
I assume you got the 30” harbor freight brake? What gauge/thickness aluminum sheeting did you use (turns out large box stores carry sheets of the stuff as well).
Finally what did you make your cuts with? Bandsaw? Jigsaw?
On the fuel lines - what spacers are those for the fuel line/return line? Those are pretty slick.
Looking great!
Hell, I have 200 Cleco's and could use more. Thanks for the encouraging words.
Yes, that is the 30" Harbor Freight brake. The key to using it is being able to clamp the top bar tight. As seen in my pic, I use 4 "c" clamps. Thicker material might require more clamps.
The aluminum is .040 thick. I do not know what grade it is. I picked it out of the cut-off rack at the local Metal Supermarket here in Albany. It formed easily so I'm guessing it was 5052. 6000 series is a little stiffer. I had checked out the big box stores and the thickest material they had was .020 which in my opinion is to thin. It may work just fine in this application as there is no real load placed on it. (The cut offs were cheaper sq ft wise)
I have used both a jig saw and a Dremel cut-off blade. I used a wood blade in the jig saw as the metal one clogs with aluminum to easy. Also try to cut slowly so that you don't build a lot of heat. Getting it to hot will actually melt the aluminum making the clogging worse. I used the Dremel cut-off blade for very thin cuts. The rear deck cutout is an example. I burned out my Dremel tool a couple of days ago so I just mount the cut-off shaft/blade in my drill. Works fine. Slow and easy. Don't force it.
On the fuel lines I used 3/8" ID Aluminum Line Separators pt# 555-830023 from Jeggs. A little pricey at $6.39 each. Budget, what budget?
-
Post Thanks / Like - 1 Thanks, 1 Likes
-
08-07-2022, 10:14 PM
#428
Looking great! I love the red paint everywhere. Looks sharp!
-
08-08-2022, 06:28 AM
#429
Senior Member


Originally Posted by
Namrups

Hell, I have 200 Cleco's and could use more. Budget, what budget?
Thanks Scott. Forget the budget on the cool or blingy things, I wonder what % of the build budget goes to drill bits and clecos  ...I broke or dulled about 6 drill bits this weekend, so will be ordering more with more Clecos from Aircraft Spruce today......waaay more than I budgeted for haha! Just noticed you also painted the shock spacers red. Love it man, the red really looks good. I'm just waiting on my axles so I can paint everything at one time then can start assembling the "car stuff". Engine is months away, brakes...no clue on timing on those, Wildwood apparently has quite the backlog, so panels and dash for now it is. The dash for me will take some time. Going to be doing things I've never done before, hopefully goes smoothly.
Last edited by rhk118; 08-08-2022 at 06:31 AM.
-
08-08-2022, 06:54 AM
#430

Originally Posted by
Ron F

Looking great! I love the red paint everywhere. Looks sharp!
Thank you Sir!!
-
08-08-2022, 07:02 AM
#431


Originally Posted by
rhk118

Thanks Scott. Forget the budget on the cool or blingy things, I wonder what % of the build budget goes to drill bits and clecos

...I broke or dulled about 6 drill bits this weekend, so will be ordering more with more Clecos from Aircraft Spruce today......waaay more than I budgeted for haha! Just noticed you also painted the shock spacers red. Love it man, the red really looks good. I'm just waiting on my axles so I can paint everything at one time then can start assembling the "car stuff". Engine is months away, brakes...no clue on timing on those, Wildwood apparently has quite the backlog, so panels and dash for now it is. The dash for me will take some time. Going to be doing things I've never done before, hopefully goes smoothly.
I may be going way overboard with the "little" details like the shock spacers but that's what makes your car stand out from others. It also shows attention to detail that I think is important when it comes time for resale. That kind of attention to an item like that shows that the "important" items got the same attention to detail.
-
08-08-2022, 05:53 PM
#432
Senior Member

Terrific medical news!
Drop drunk looks great! Any word on the power plant?
-
08-08-2022, 09:16 PM
#433

Originally Posted by
Blitzboy54

Terrific medical news!
Drop drunk looks great! Any word on the power plant?
I read in another post that Mike's dyno is out of service at the moment and he is backed up waiting for repair parts. I will give it a couple of days and give him a call. Thanks for your encouraging words! I really want to find out the details of the recent legislation capping prescription costs on Medicare to $2000.00. That would be hugh for me.
-
08-10-2022, 08:27 AM
#434
Senior Member


Originally Posted by
Namrups

Day 45 update
I decided on doing the drop trunk mod even though I have no metal working knowledge. I followed Paul's build and decided to make mine the same 16" x 23" x 5 1/2".
Cut the rear deck to fit the drop box. This piece will be the base of the box.
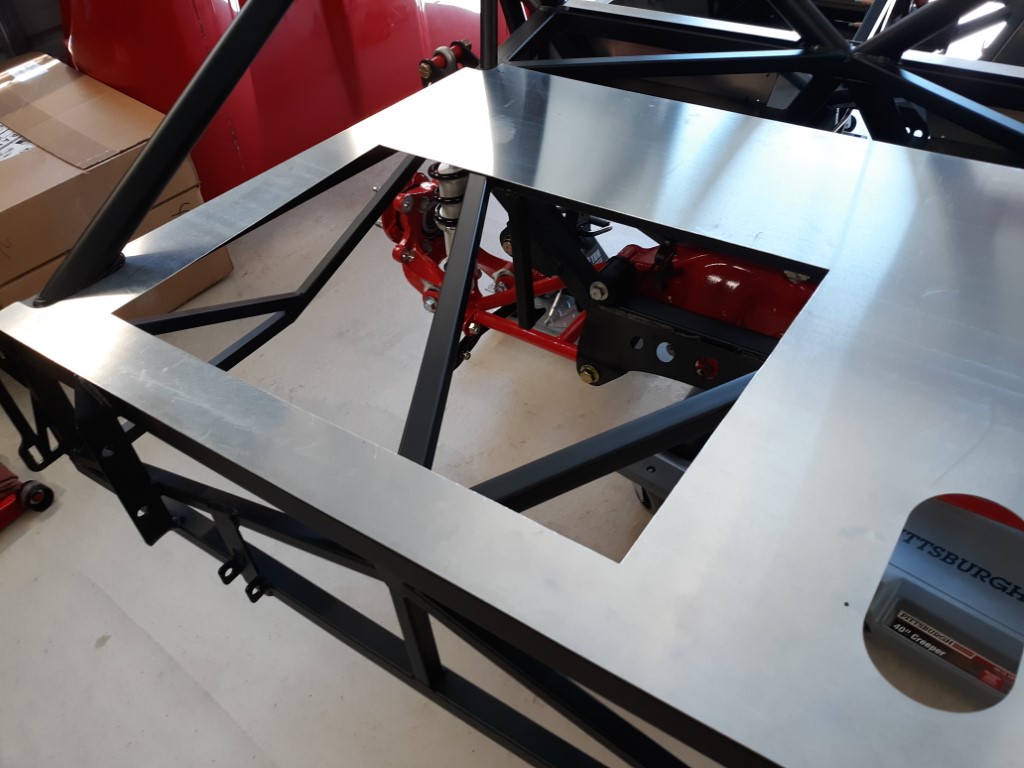
Scott, sorry to spam your build thread but figure this information may be useful to others who may want to perform this mod. I will be doing this myself today (hopefully). Could you please share the rough measurements for where you cut the hole in that large rear panel? Assuming the opening is 23x16"...how many inches from the back of that panel and roughly how many inches from the drivers side edge of that panel (given its tapered). Looks like you made your cut up to the frame cross beam so that the bent over edge of the box rivets to that crossmember? Paul's appears that he was maybe 0.75 to 1 inch away from that cross member and riveted the box only to the panel and not the frame. Also did you use a cutting wheel on your dremel to make those cuts? They look really clean.
Thanks,
Hank
-
08-10-2022, 09:39 AM
#435
Senior Member


Originally Posted by
rhk118

Scott, sorry to spam your build thread but figure this information may be useful to others who may want to perform this mod. I will be doing this myself today (hopefully). Could you please share the rough measurements for where you cut the hole in that large rear panel? Assuming the opening is 23x16"...how many inches from the back of that panel and roughly how many inches from the drivers side edge of that panel (given its tapered). Looks like you made your cut up to the frame cross beam so that the bent over edge of the box rivets to that crossmember? Paul's appears that he was maybe 0.75 to 1 inch away from that cross member and riveted the box only to the panel and not the frame. Also did you use a cutting wheel on your dremel to make those cuts? They look really clean.
Thanks,
Hank
To be honest, I don't remember if the box I fabricated and placed in my Coupe is riveted into the cross member cited. It is riveted to the diagonal cross members. Can see that in my pictures. Whatever I did, in actual use for three seasons strength has never been an issue. It's fine. Haven't put any sand or bricks in there though. 
One comment about placement. I did a split cover on mine (also detailed in my build thread) and placed the box where the door could be opened without running into anything, e.g. the rear hatch opening, etc. Something to consider IMO if you're planning a cover.
Build 1: Mk3 Roadster #5125. Sold 11/08/2014.
Build 2: Mk4 Roadster #7750. Sold 04/10/2017.
Build Thread
Build 3: Mk4 Roadster 20th Anniversary #8674. Sold 09/07/2020.
Build Thread and
Video.
Build 4: Gen 3 Type 65 Coupe #59. Gen 3 Coyote. Legal 03/04/2020.
Build Thread and
Video
Build 5: 35 Hot Rod Truck #138. LS3 and 4L65E auto. Rcvd 01/05/2021. Legal 04/20/2023.
Build Thread. Sold 11/9/2023.
-
Post Thanks / Like - 1 Thanks, 1 Likes
-
08-10-2022, 04:18 PM
#436


Originally Posted by
rhk118

Scott, sorry to spam your build thread but figure this information may be useful to others who may want to perform this mod. I will be doing this myself today (hopefully). Could you please share the rough measurements for where you cut the hole in that large rear panel? Assuming the opening is 23x16"...how many inches from the back of that panel and roughly how many inches from the drivers side edge of that panel (given its tapered). Looks like you made your cut up to the frame cross beam so that the bent over edge of the box rivets to that crossmember? Paul's appears that he was maybe 0.75 to 1 inch away from that cross member and riveted the box only to the panel and not the frame. Also did you use a cutting wheel on your dremel to make those cuts? They look really clean.
Thanks,
Hank
Sorry it took so long to respond to this question Hank. Was in the garage all day. Yes on both counts. I did attach to the crossmember and I did use the dremel cutting wheel to make the cuts.
For measurements: it's 6" from the cutout for the fuel hanger.
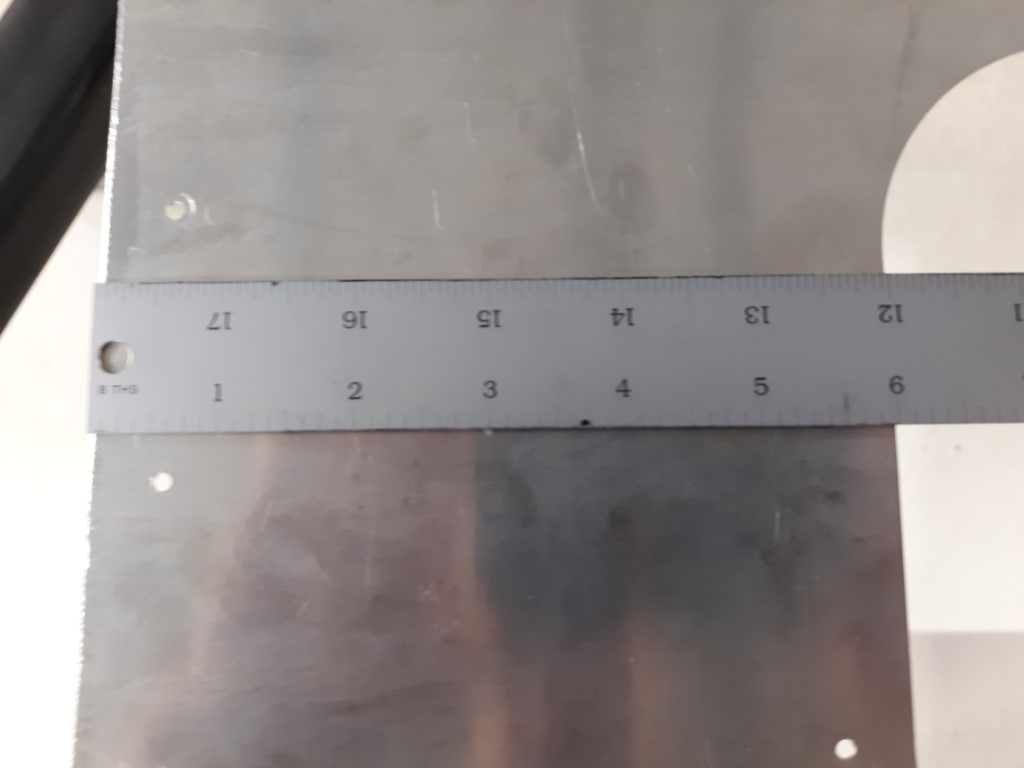
and 2 7/8" from the very back edge.

For anyone who has used a dremel cutoff wheel you know how brittle they are. I did not use a dremel tool. I used my drill. I found it was easier to control. Work slowly and cut from left to right. It will grab less. I did go thru 4 wheels for this cut.
-
Post Thanks / Like - 1 Thanks, 1 Likes
-
08-10-2022, 04:22 PM
#437

Originally Posted by
edwardb

To be honest, I don't remember if the box I fabricated and placed in my Coupe is riveted into the cross member cited. It is riveted to the diagonal cross members. Can see that in my pictures. Whatever I did, in actual use for three seasons strength has never been an issue. It's fine. Haven't put any sand or bricks in there though.

One comment about placement. I did a split cover on mine (also detailed in my build thread) and placed the box where the door could be opened without running into anything, e.g. the rear hatch opening, etc. Something to consider IMO if you're planning a cover.
My box is the same 23 x 16 that I believe yours is. I am not planning a cover (at this time  ) so leaving room for that was not an issue for me.
-
08-10-2022, 04:29 PM
#438
Steering rack bolts heads-up
This may have been noted in other builds. I don't recall seeing it. I was watching another coupe build on utube yesterday and it was noted that the manual shows the 4 1/2" steering rack bolts being put in from the front with the nuts on the back side. I put mine in this way without a second thought. The issue is when the aluminum piece is mounted to the front of the car there is not 4 1/2" of space left if you have to remove the rack. You would have to also remove the radiator and the rest of the front aluminum to get them out. First thing I did this morning was to reverse those bolts.
-
Post Thanks / Like - 0 Thanks, 2 Likes
-
08-10-2022, 04:32 PM
#439
Christmas in August!
Received 5 boxes from FF this morning! Still a couple of major items like the CV axles, headers and the rear glass still outstanding but the rest is small items like nuts and bolts. The list is getting smaller.
-
Post Thanks / Like - 0 Thanks, 1 Likes
-
08-10-2022, 08:47 PM
#440
Senior Member


Originally Posted by
edwardb

To be honest, I don't remember if the box I fabricated and placed in my Coupe is riveted into the cross member cited. It is riveted to the diagonal cross members. Can see that in my pictures. Whatever I did, in actual use for three seasons strength has never been an issue. It's fine. Haven't put any sand or bricks in there though.

One comment about placement. I did a split cover on mine (also detailed in my build thread) and placed the box where the door could be opened without running into anything, e.g. the rear hatch opening, etc. Something to consider IMO if you're planning a cover.
No worries on timing of reply Scott...My mother, who has never ordered anything online (not even Amazon) because of fear of identity theft willfully gave all her personal information to a text from a bank that isn't her bank today, so spent most of the afternoon helping her prevent her upcoming/about to happen identity theft with her bank, credit unions, and social security...fun...
In any event thanks for the measurements guys. Paul I was totally making an assumption based on your pictures about the horizontal cross member but see the diagonal attachments (and you know what happens when I think...just ask the boss  )...My aluminum wasn't ready for pickup today so hopefully will get to this tomorrow, I did get a piece of .063 for the lid, and hinges on order. I appreciate everyone's help in this, and as they say in surgery "if you ain't wreckin' you ain't racin'"...well, I'd rather not be wreckin'...and glad you're all here!
Last edited by rhk118; 08-10-2022 at 09:11 PM.


 Thanks:
  Likes:


 Reply With Quote


 ...I broke or dulled about 6 drill bits this weekend, so will be ordering more with more Clecos from Aircraft Spruce today......waaay more than I budgeted for haha! Just noticed you also painted the shock spacers red. Love it man, the red really looks good. I'm just waiting on my axles so I can paint everything at one time then can start assembling the "car stuff". Engine is months away, brakes...no clue on timing on those, Wildwood apparently has quite the backlog, so panels and dash for now it is. The dash for me will take some time. Going to be doing things I've never done before, hopefully goes smoothly.
