-
12-31-2022, 06:11 PM
#681
-
Post Thanks / Like - 0 Thanks, 1 Likes
-
01-01-2023, 12:37 PM
#682
-
Post Thanks / Like - 0 Thanks, 1 Likes
-
01-01-2023, 12:47 PM
#683
-
Post Thanks / Like - 0 Thanks, 1 Likes
-
01-05-2023, 06:20 PM
#684
-
01-05-2023, 06:28 PM
#685
-
01-06-2023, 09:20 AM
#686
Too late for your build but.... I used a mid mount bracket set that locates the AC compressor under the alternator. This reduces the hose length and I think is a neater system.
Yours is an awsome build and really well documented.
David W
Mkll 4874 built in 2004
Gen 3 coupe #16 registered 2018 painted 2019
-
01-06-2023, 09:49 AM
#687

Originally Posted by
David Williamson

Too late for your build but.... I used a mid mount bracket set that locates the AC compressor under the alternator. This reduces the hose length and I think is a neater system.
Yours is an awsome build and really well documented.
David W
David, Thanks for your reply and support. Being a first time builder I am finding that there are a number of things I would do differently if I were to do it again. Even though your suggestion may not help me, continue to comment if you see something as it will help future builders!
-
01-12-2023, 03:32 PM
#688
It's been just shy of 7 months since I took delivery. I decided to do a short 7 minute walk around explaining where things sit at the moment. Other posts have been talking about the shape there body is in so I added views of my body at the end of the video. Enjoy.
-
Post Thanks / Like - 0 Thanks, 3 Likes
-
01-12-2023, 03:52 PM
#689
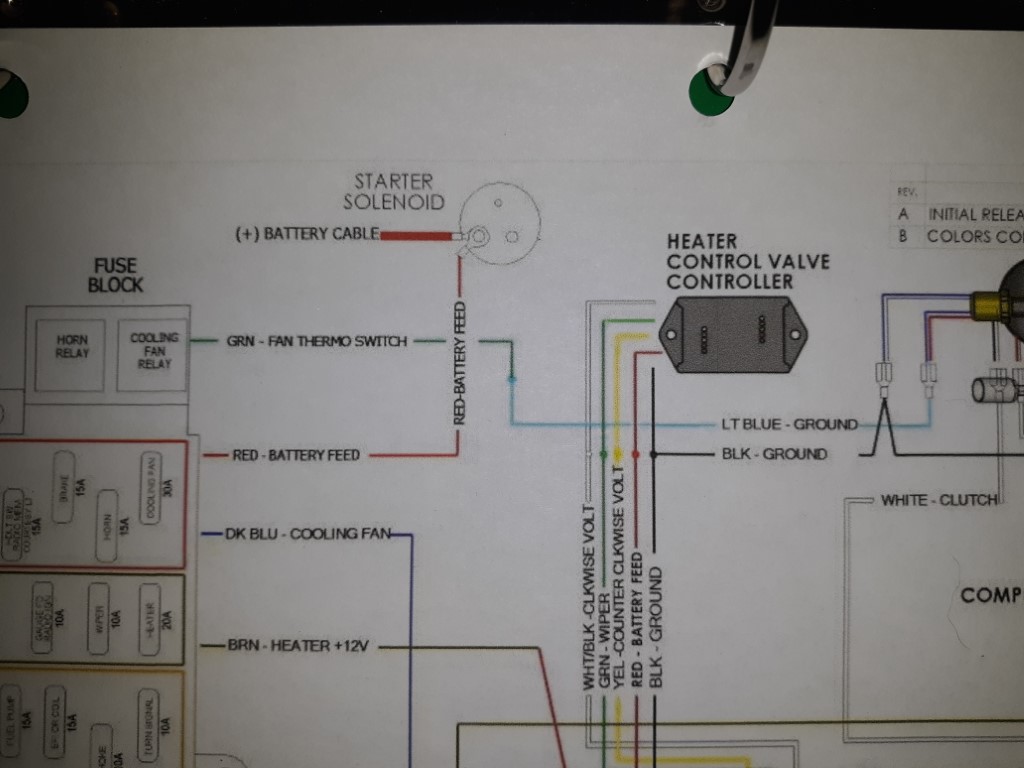
As mentioned in my previous video, I am installing the wiring for the Vintage Air heater/A-C unit. I have figured out everything except one blue wire coming off the trinary switch. Any help would be appreciated!
Background: I have the FF supplied Vintage Air A/C unit. I am running the Sniper EFI. The Sniper controls the fan.
The FF installation wiring diagram (shown below) shows the blue wire coming off the trinary switch attaching to the green fan thermo relay in the RT harness.
The Sniper documentation (shown below) shows two optional leads. One marked "Connect to a ground triggered A/C relay" and the other marked "Connect to ground side trigger of A/C shutdown relay"
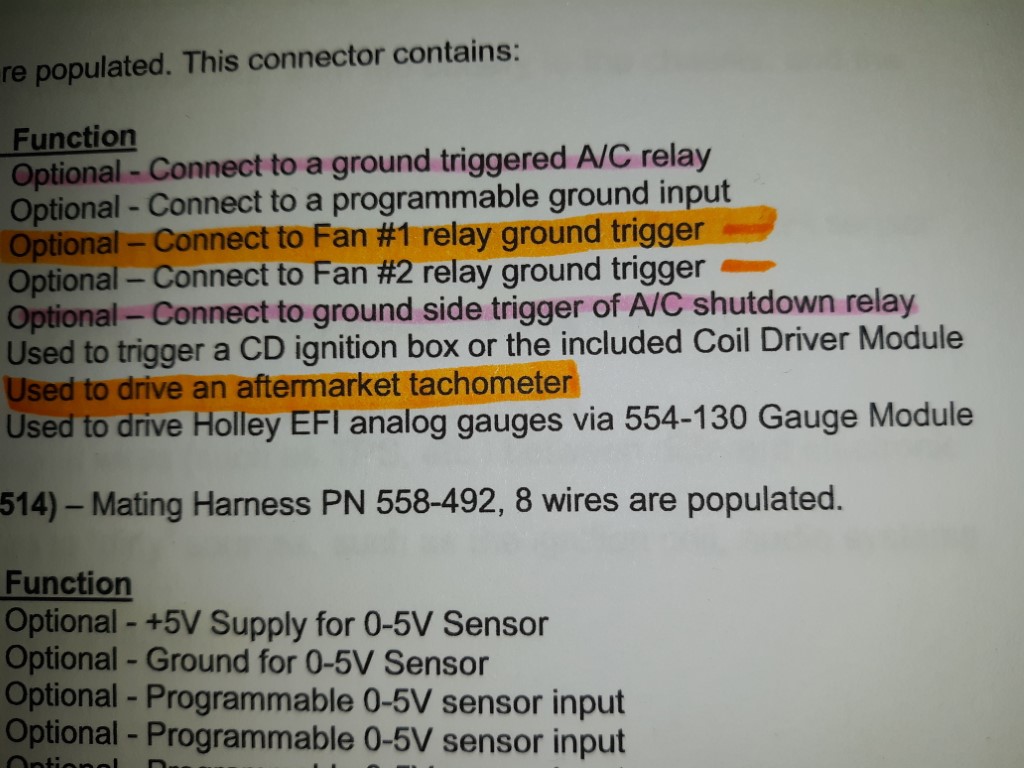
So should I connect the blue wire from the trinary switch to the fan relay as shown in the FF documentation or to one of the wires from the Sniper? If the Sniper then which one?
Thanks in advance for any and all replies!
Scott
-
01-12-2023, 05:50 PM
#690
Senior Member

Nice video and great progress. Your body does look excellent. You'll likely uncover some voids or whatever when that flashing is ground down on the parting lines. But in general you're right. Looks decent. As for the voids around that are behind the windows, yours looks great. Mine was kind of a mess in that area. So have some others that have been posted. I don't have an explanation for the variability. One other random comment. I see you have your GPS antenna mounted up on the roll bar. It's maybe fine there if that's what you want. But does seem like it's at an angle rather than flat pointed at the sky. Mine works just fine under the dash. My build thread shows where I mounted it. It's flat to the sky, acquires quickly, and has been rock solid. Plus it's out of sight.
For your A/C wiring I can only give a semi-educated answer based on my experience wiring A/C with a Coyote and LS. Which were exactly the same. In my case, the two installations had control packs with +12V fan wires for the cooling fan. So the PCM in both cases powered the fan based on engine temp. Same as how a non-A/C build would be wired with those engines. Then there was a second circuit using the RF fan circuit with the ground wire attached to the trinary switch per the diagram you posted. When the trinary switch closed to ground, the attached RF fan thermo wire would activate the RF fan circuit and power the fan. Just to confirm, the trinary switch shuts off the A/C compressor if pressures are too low or too high. Hence the connections to the compressor. It also turns on the cooling fan when the A/C is running. So it needs to connect to the cooling fan circuit.
In your case, if I understand what I'm looking at, the Sniper EFI system doesn't have a +12V power lead for the fan. It's expecting to use your RF fan circuit, and use one of the RF fan thermo wires to trigger engine cooling, which you would do whether you have A/C or not. Then the other RF fan thermo wire (there are two in the harness) would go to your A/C trinary switch. So when the trinary switch closes to ground, that also will cause the fan to run via the RF fan circuit. I'm not sure you'd use either of the Sniper EFI wires you have highlighted in orange. I'd get that confirmed either from someone who's actually installed A/C with the Sniper EFI system in one of these cars. Or check with Holley. But at least maybe my explanation helps describe how it should work.
Last edited by edwardb; 01-12-2023 at 05:55 PM.
Build 1: Mk3 Roadster #5125. Sold 11/08/2014.
Build 2: Mk4 Roadster #7750. Sold 04/10/2017.
Build Thread
Build 3: Mk4 Roadster 20th Anniversary #8674. Sold 09/07/2020.
Build Thread and
Video.
Build 4: Gen 3 Type 65 Coupe #59. Gen 3 Coyote. Legal 03/04/2020.
Build Thread and
Video
Build 5: 35 Hot Rod Truck #138. LS3 and 4L65E auto. Rcvd 01/05/2021. Legal 04/20/2023.
Build Thread. Sold 11/9/2023.
-
Post Thanks / Like - 1 Thanks, 1 Likes
-
01-12-2023, 09:25 PM
#691
WOW! Your body is so much better than mine. Luck of the draw, I suppose. Glad you got a good one! Nothing about my build has been easy or simple.
Next crisis is trying to figure out how to mount the rear lower control arms as the frame and mounting points of the lower control arms are an 1/8" apart. I am not even sure how I am going to make any adjustments to be able to fit those arms.
My two options, at the moment, is either to cut the arms and narrow them 1/8" or cut the mounting ears on the frame and relocate them 1/8".
Neither of those options are very attractive, but I am not seeing any alternatives, at the moment.
This is the way it has been with my build. Nothing has attached to the frame without some type of surgery/alterations. I just assume that is the way it is.
Last edited by Skuzzy; 01-12-2023 at 09:48 PM.
My Type 65 Coupe: Ordered May 27, 2021. Arrived November 19, 2021.
I would like to treat my gas pedal as a binary operator. It would be nice to get the cooperation of everyone in front of me. 
-
01-12-2023, 11:37 PM
#692


Originally Posted by
Skuzzy

WOW! Your body is so much better than mine. Luck of the draw, I suppose. Glad you got a good one! Nothing about my build has been easy or simple.
Next crisis is trying to figure out how to mount the rear lower control arms as the frame and mounting points of the lower control arms are an 1/8" apart. I am not even sure how I am going to make any adjustments to be able to fit those arms.
My two options, at the moment, is either to cut the arms and narrow them 1/8" or cut the mounting ears on the frame and relocate them 1/8".
Neither of those options are very attractive, but I am not seeing any alternatives, at the moment.
This is the way it has been with my build. Nothing has attached to the frame without some type of surgery/alterations. I just assume that is the way it is.
Before getting that drastic I would slide the bolt thru one ear. Add a washer, two nuts and a second washer in that order then thru the other ear and by using the nuts to try to open up the ears enough to get the arms in. I had to do that to one of mine and was able to get in. Worth a try.
-
01-13-2023, 08:04 AM
#693

Originally Posted by
Namrups

Before getting that drastic I would slide the bolt thru one ear. Add a washer, two nuts and a second washer in that order then thru the other ear and by using the nuts to try to open up the ears enough to get the arms in. I had to do that to one of mine and was able to get in. Worth a try.
The ears are not the problem. The width between the ears is fine. It is the distance between the front mount and rear mount that is at issue. They are just over 1/8" too far apart for the control arms to fit in. I'll have a pic later this morning.
After sleeping on it, I am of the mind that I am going to have to build another set of control arms to make this work, but I am going to look at it again with fresh eyes and see if another solution is possible.
My Type 65 Coupe: Ordered May 27, 2021. Arrived November 19, 2021.
I would like to treat my gas pedal as a binary operator. It would be nice to get the cooperation of everyone in front of me. 
-
01-13-2023, 09:24 AM
#694
Senior Member


Originally Posted by
Skuzzy

The ears are not the problem. The width between the ears is fine. It is the distance between the front mount and rear mount that is at issue. They are just over 1/8" too far apart for the control arms to fit in. I'll have a pic later this morning.
After sleeping on it, I am of the mind that I am going to have to build another set of control arms to make this work, but I am going to look at it again with fresh eyes and see if another solution is possible.
Scott's suggestion to adjust the ears is a valid one. It can make a difference just for situations like yours. Using a piece of threaded rod, washers, and nuts to spread them is the least invasive way to do it and is quite effective. Not just for the side-by-side tabs but also the distance between the tabs. By creating additional space often the arms will go in. If you read other build threads, many others note the need to adjust the ears and use a similar method. I've had to do it on multiple places on nearly every build. Better than beating them in like some do.
If/when that's not enough, you can adjust the control arms. I'm assuming since you're talking about rear control arms, that has to be IRS and I've had to adjust the arms a couple of times on the IRS builds I've done. They have relatively long tubes and even though welded in fixtures, the welding can cause built-in stresses that move the metal slightly when removed. I'm sure you know that. I've used a floor jack to spread them. I've used a couple of sharp hits with a dead blow hammer and the other side on a solid surface to narrow them. With the poly bushings removed of course. It doesn't take much, again because of the length of the tubes. One other hint, I always pump the joint full of grease through the zerk fitting before assembly. It's easier to fill the first time before assembly, make sure they're filled, plus the grease makes assembly go a bit easier. You seem pretty determined to take more extreme measures and that's certainly your choice. But for others reading this thread including those of us that don't have the skills or tools, what you have isn't particularly unusual and can be adjusted to fit.
Now back to Scott's build thread. 
Last edited by edwardb; 01-13-2023 at 12:33 PM.
Build 1: Mk3 Roadster #5125. Sold 11/08/2014.
Build 2: Mk4 Roadster #7750. Sold 04/10/2017.
Build Thread
Build 3: Mk4 Roadster 20th Anniversary #8674. Sold 09/07/2020.
Build Thread and
Video.
Build 4: Gen 3 Type 65 Coupe #59. Gen 3 Coyote. Legal 03/04/2020.
Build Thread and
Video
Build 5: 35 Hot Rod Truck #138. LS3 and 4L65E auto. Rcvd 01/05/2021. Legal 04/20/2023.
Build Thread. Sold 11/9/2023.
-
01-13-2023, 10:09 AM
#695

Originally Posted by
edwardb

Scott's suggestion to adjust the ears is a valid one. It can make a difference just for situations like yours. Using a piece of threaded rod, washers, and nuts to spread them is the least invasive way to do it and is quite effective. Not just for the side-by-side tabs but also the distance between the tabs. By creating additional space often the arms will go in. If you read other build threads, many others note the need to adjust the ears and use a similar method. I've had to do it on multiple places on nearly every build. Better than beating them in like some do.
If/when that's not enough, you can adjust the control arms. I'm assuming since you're talking about rear control arms, that has to be IRS and I've had to adjust the arms a couple of times on the IRS builds I've done. They have relatively long tubes and even though welded in fixtures, the welding can cause built-in stresses that move the metal slightly when removed. I'm sure you know that. I've used a floor jack to spread them. I've used a couple of sharp hits with a dead blow hammer and the other side on a solid surface to narrow them. With the poly bushings removed of course. It doesn't take much, again because of the length of the tubes. One other hint, I always pump the joint full of grease through the zerk fitting before assembly. It's easier to fill the first time to before assembly, make sure they're filled, plus the grease makes assembly go a bit easier. You seem pretty determined to take more extreme measures and that's certainly your choice. But for others reading this thread including those of us that don't have the skills or tools, what you have isn't particularly unusual and can be adjusted to fit.
Now back to Scott's build thread.

After a cup of coffee, I see what you guys are talking about. None of those solutions are ideal (the engineer cringes a bit). I apologize for this intrusion into your build thread Namrups. I'll figure it out and take this someplace else to discuss.
My Type 65 Coupe: Ordered May 27, 2021. Arrived November 19, 2021.
I would like to treat my gas pedal as a binary operator. It would be nice to get the cooperation of everyone in front of me. 
-
01-13-2023, 10:36 AM
#696

Originally Posted by
Skuzzy

After a cup of coffee, I see what you guys are talking about. None of those solutions are ideal (the engineer cringes a bit). I apologize for this intrusion into your build thread Namrups. I'll figure it out and take this someplace else to discuss.
Not an issue Skuzzy. Other first timers will be reading the thread and information like this will be helpful no matter if they read it here or somewhere else. A separate thread with a proper title and tags would only make it easier to search.
-
01-17-2023, 05:23 PM
#697
-
01-28-2023, 04:41 PM
#698
Went in a little different direction. I was going to apply the Lizardskin and then mount the body. Decided to hold off on the Lizardskin until the weather gets better. Not sure how it would react with freezing weather overnight.
I contacted a number of friends and we installed the body and set the hood in place today.
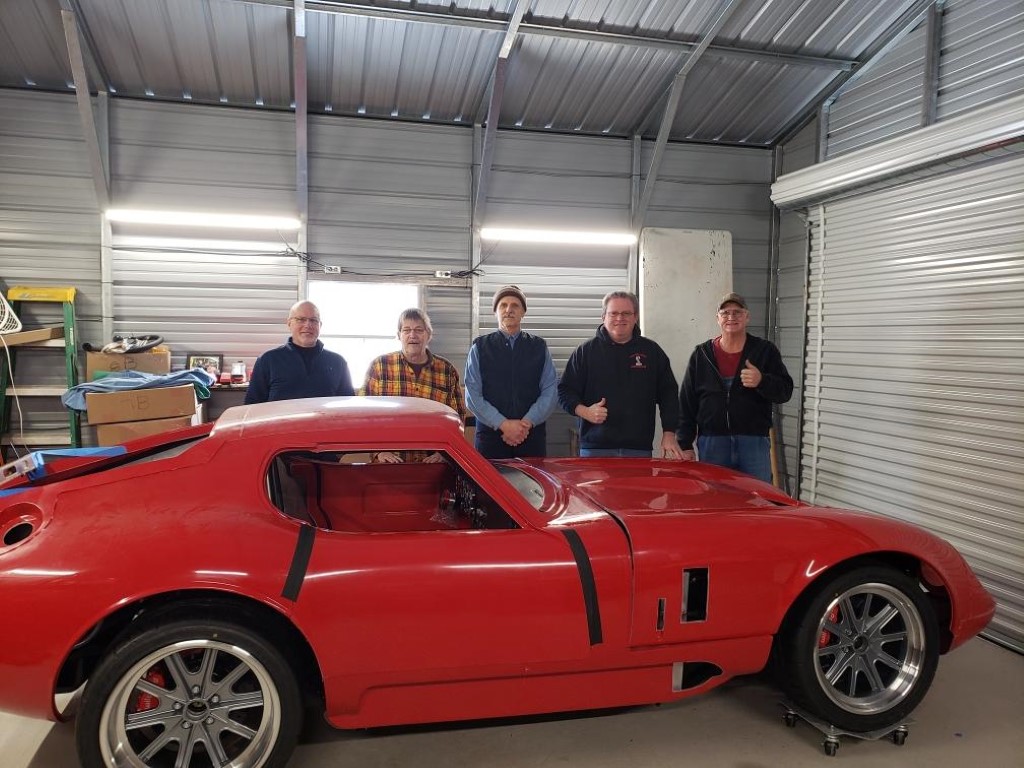
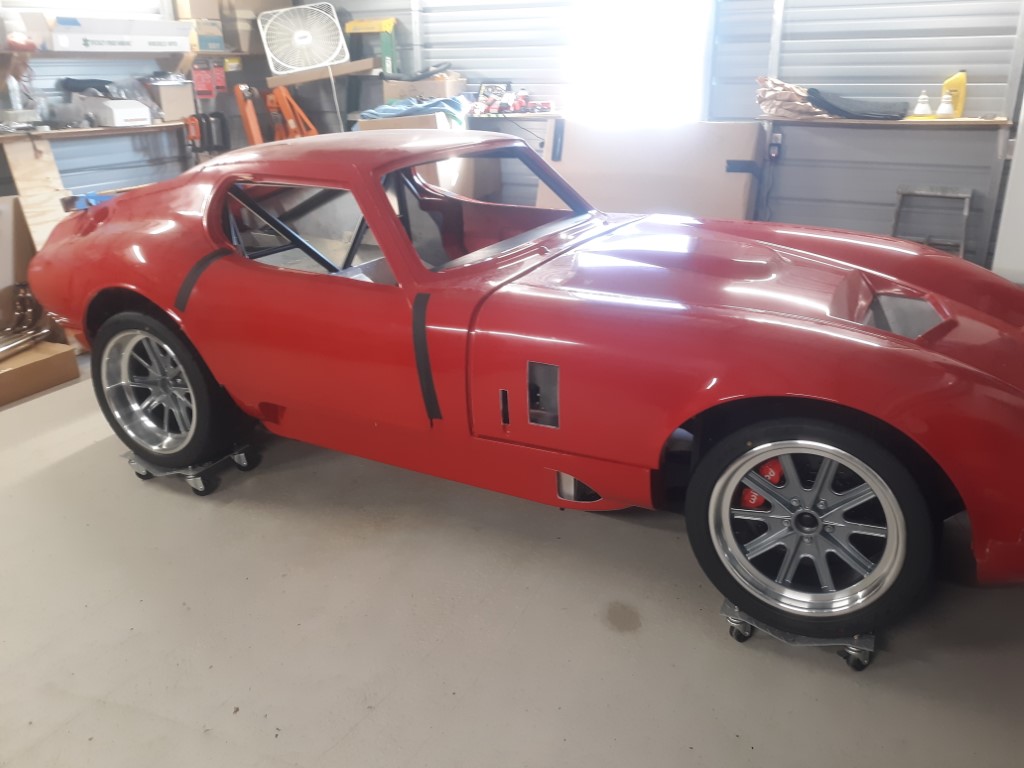
Very exciting day but now the work continues with getting everything to line up.
-
01-28-2023, 04:52 PM
#699
Congratulations on another milestone!
My Type 65 Coupe: Ordered May 27, 2021. Arrived November 19, 2021.
I would like to treat my gas pedal as a binary operator. It would be nice to get the cooperation of everyone in front of me. 
-
Post Thanks / Like - 1 Thanks, 0 Likes
-
01-28-2023, 10:25 PM
#700
Did your air filter clear the hood? How do the side pipes fit in the cutout?
-
01-29-2023, 07:27 AM
#701

Originally Posted by
GT_Rich

Did your air filter clear the hood? How do the side pipes fit in the cutout?
Air filter does not clear! Not even close. The side pipes fit great.
-
01-29-2023, 11:12 AM
#702

Originally Posted by
Namrups

Air filter does not clear! Not even close. The side pipes fit great.
Keep is posted on you solution, I fear I am in the same boat.
-
01-29-2023, 01:00 PM
#703
Senior Member

Congrats on the progress Scott! Thanks for the detailed build photos, once I am able to my AC box will be going into the PS footbox and then I can get the holes drilled, then maybe can get panels out for powdercoating. You are now the 3rd builder I'm aware of who has had alignment issues with those short hoses. I am just assuming I'll be in the same boat as well so appreciate you detailing how you dug out of that hole so to speak.
Question - is your radiator tunnel aluminum bare inside? I forget if you posted this earlier and if so sorry, they look powdercoated to me but photo is unfocused.
-
01-29-2023, 01:15 PM
#704

Originally Posted by
rhk118

Congrats on the progress Scott! Thanks for the detailed build photos, once I am able to my AC box will be going into the PS footbox and then I can get the holes drilled, then maybe can get panels out for powdercoating. You are now the 3rd builder I'm aware of who has had alignment issues with those short hoses. I am just assuming I'll be in the same boat as well so appreciate you detailing how you dug out of that hole so to speak.
Question - is your radiator tunnel aluminum bare inside? I forget if you posted this earlier and if so sorry, they look powdercoated to me but photo is unfocused.
The aluminum is a combination of Raptor bed liner on the wheel side and sharkhide on the radiator side.
-
Post Thanks / Like - 1 Thanks, 0 Likes
-
01-29-2023, 01:48 PM
#705

Originally Posted by
Namrups

Air filter does not clear! Not even close. The side pipes fit great.
I'm not sure if mine will clear either. Should know in another month. I will say it's quite a bit lower than yours based on the pics I've seen from you. If you want to compare any measurements let me know via PM. I basically assembled mine with what I believe to be the lowest profile solution for a 351w based engine.
-
01-29-2023, 02:57 PM
#706

Originally Posted by
GT_Rich

I'm not sure if mine will clear either. Should know in another month. I will say it's quite a bit lower than yours based on the pics I've seen from you. If you want to compare any measurements let me know via PM. I basically assembled mine with what I believe to be the lowest profile solution for a 351w based engine.
If I can't figure this out I will take you up on your offer.
-
01-30-2023, 04:48 PM
#707
-
01-30-2023, 04:49 PM
#708
Here is a short video of the taillights in operation.
-
Post Thanks / Like - 0 Thanks, 3 Likes
-
01-30-2023, 07:53 PM
#709
Looking good, nice progress!
-
Post Thanks / Like - 1 Thanks, 0 Likes
-
01-31-2023, 01:38 AM
#710
Hey Scott,
Great build! I am really enjoying learning from your build thread. I got my Forte mechanical throttle linkage in the mail last week and have been slowly installing it. Your write up on the install has really helped. I can't figure out were I am suppose to mount this return spring bracket.
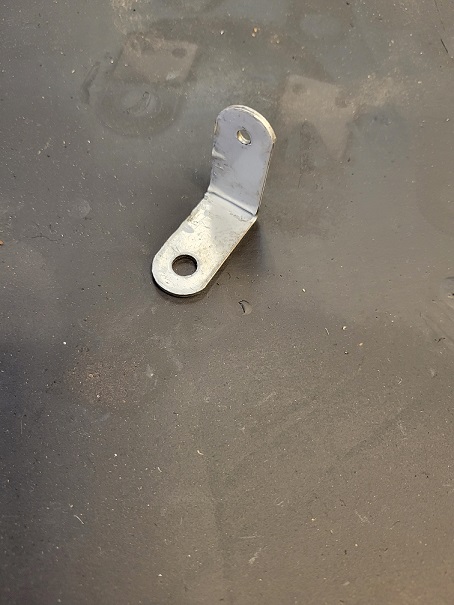
Did you use this in your install? Where did you mount it?
Thanks,
Shakey
-
01-31-2023, 08:31 AM
#711
I have not used it yet. I have the spring hooked around the coil bracket. May use the bracket in that location. The return spring is a must use though. Throttle would not return all the way without it.
-
Post Thanks / Like - 1 Thanks, 0 Likes
-
02-07-2023, 05:06 PM
#712
Finished mounting the back up light, the license plate bracket and license plate light. I changed the license plate light to LED following the lead of EdwardB.
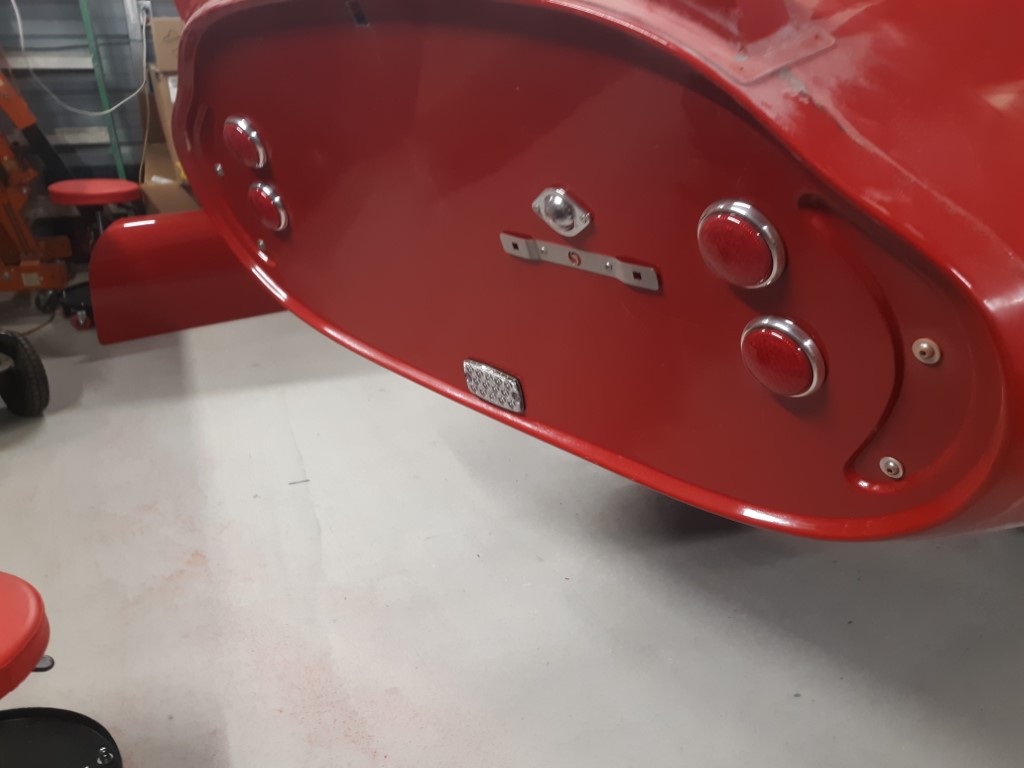
I also decided on the location for the backup camera and cut out the hole. Need to work out how to mount it now.

-
Post Thanks / Like - 0 Thanks, 1 Likes
-
02-21-2023, 12:32 PM
#713
-
02-21-2023, 12:55 PM
#714
-
02-21-2023, 01:05 PM
#715
-
02-21-2023, 01:06 PM
#716
From your first photo, it looks like the main issue with fitting the larger oval air cleaner is the distributor. One option might be to use an angle-drive distributor. It seems like this might allow you to fit the large oval air cleaner without even needing the 5* wedge base or trimming the cowl. I've never used one of these personally, but I've seen others use them and it might be a solution (albeit an expensive one) to your issue.
MkIV Roadster build: Gen 2 Coyote, IRS, TKO600. Ordered 10/24/18. Delivered 1/29/19. Engine installed 8/8/21. First start 9/12/21. First go-kart 9/17/21. Off to paint 4/11/22. Back from paint 12/30/22.
Build thread here.
-
02-21-2023, 01:07 PM
#717
Not a waxer

K&N 14" drop base with an X-Stream top.

Your engine will thank you; those short ovals are tremendously restrictive and like breathing through a straw!
Jeff
EDIT Looks like I was typing and retrieving a photo while you made your last post! Never mind 
Last edited by Jeff Kleiner; 02-21-2023 at 01:11 PM.
-
Post Thanks / Like - 1 Thanks, 1 Likes
-
02-21-2023, 01:13 PM
#718

Originally Posted by
JohnK

From your first photo, it looks like the main issue with fitting the larger oval air cleaner is the distributor. One option might be to use an
angle-drive distributor. It seems like this might allow you to fit the large oval air cleaner without even needing the 5* wedge base or trimming the cowl. I've never used one of these personally, but I've seen others use them and it might be a solution (albeit an expensive one) to your issue.
Thanks for that info. After mounting the body it was clear that the Cobra air cleaner was sitting higher that the cowl. Wasn't workable in IMO.
-
02-21-2023, 01:14 PM
#719

Originally Posted by
Jeff Kleiner

K&N 14" drop base with an X-Stream top.

Your engine will thank you; those short ovals are tremendously restrictive and like breathing through a straw!
Jeff
EDIT Looks like I was typing and retrieving a photo while you made your last post! Never mind 
See Jeff ... like minds think the same!!
-
02-21-2023, 07:44 PM
#720
Were you able to install the hatch without trimming the body for hinge clearance?


 Thanks:
  Likes:

 Reply With Quote


