BluePrint Engines

Visit our community sponsor

Thanks Thanks:  91
Likes Likes:  353
Page 19 of 28 FirstFirst ... 91718192021 ... LastLast
Results 721 to 760 of 1104

Thread: The race is on - Namrups 65 Daytona Coupe build

  1. #721
    Namrups's Avatar
    Join Date
    Sep 2021
    Location
    Mechanicville, NY
    Posts
    1,169
    Post Thanks / Like
    Quote Originally Posted by GT_Rich View Post
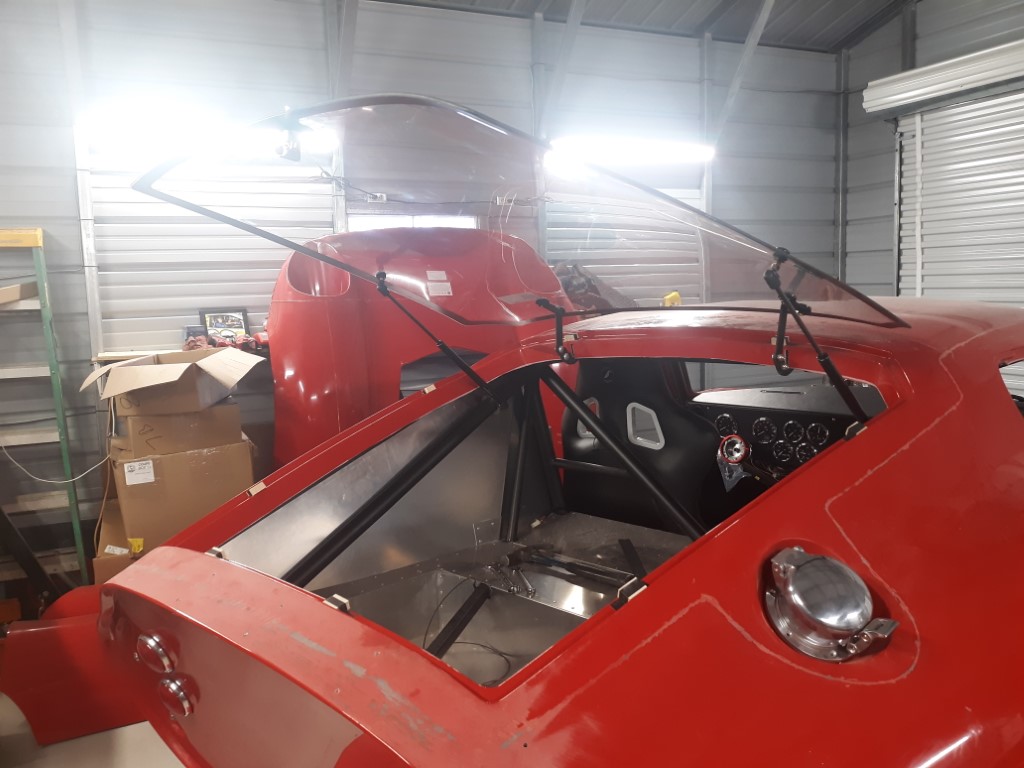
    Were you able to install the hatch without trimming the body for hinge clearance?
    No. I had to cut slots for the hinges. If you look close you can see them.
    Scott Pregont
    Present build: 65 Daytona Coupe #393 - Forte 427 EFI crate w/TKX 2.87/ .81 - Ordered 11/16/21 - Delivered 6/23/2022
    Location: Mechanicville, NY
    Build Thread: https://thefactoryfiveforum.com/show...na-Coupe-build
    My Albums
    Build album: https://thefactoryfiveforum.com/album.php?albumid=2151
    Build album 2: https://thefactoryfiveforum.com/album.php?albumid=2437
    Special Tools, Custom Parts, misc supplies: https://thefactoryfiveforum.com/album.php?albumid=2045
    Garage Pics: https://thefactoryfiveforum.com/album.php?albumid=2041
    POR15 First Try: https://thefactoryfiveforum.com/album.php?albumid=2068
    Silicone application tips: https://thefactoryfiveforum.com/album.php?albumid=2063

  2. #722
    Namrups's Avatar
    Join Date
    Sep 2021
    Location
    Mechanicville, NY
    Posts
    1,169
    Post Thanks / Like
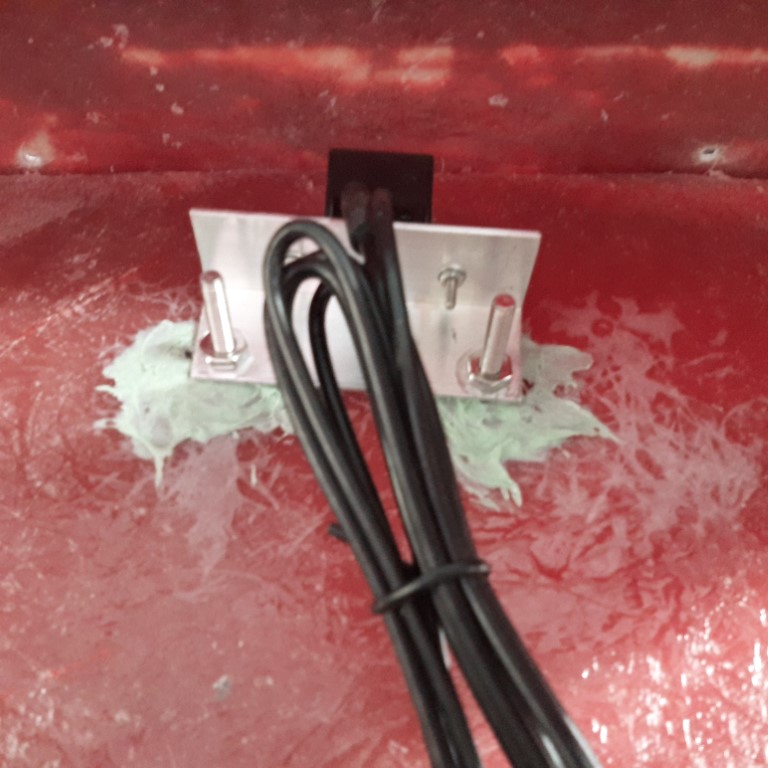
    My post 712 showed the location for my rear view mirror camera. To mount it I glued two posts to the fiberglass with HSRF. Attached to that is an aluminum angle piece and the camera is bolted to that. Straight forward and more important its removable. Camera angle makes it look unlevel. It's not.

    I received the replacement rheostat for my heater. Removed the bad one and wired in the new one. I double checked and this one works as it should. Tomorrow I'll start the car and see if it actually operates the heater valve as it should.
    Scott Pregont
    Present build: 65 Daytona Coupe #393 - Forte 427 EFI crate w/TKX 2.87/ .81 - Ordered 11/16/21 - Delivered 6/23/2022
    Location: Mechanicville, NY
    Build Thread: https://thefactoryfiveforum.com/show...na-Coupe-build
    My Albums
    Build album: https://thefactoryfiveforum.com/album.php?albumid=2151
    Build album 2: https://thefactoryfiveforum.com/album.php?albumid=2437
    Special Tools, Custom Parts, misc supplies: https://thefactoryfiveforum.com/album.php?albumid=2045
    Garage Pics: https://thefactoryfiveforum.com/album.php?albumid=2041
    POR15 First Try: https://thefactoryfiveforum.com/album.php?albumid=2068
    Silicone application tips: https://thefactoryfiveforum.com/album.php?albumid=2063

  3. #723
    Junior Member
    Join Date
    Dec 2018
    Posts
    9
    Post Thanks / Like
    I purchased a crate engine ( 351 sbf )for my gen3 coupe from a builder in Arizon. I am having air filter issues also. I have spent several hundred dollars trying to get some combination of base plate filter and top plate that will fit with no luck. The K&N drop base with X - Stream top does not fit. I’m really stuck. Any ideas are appreciated.

  4. #724
    Namrups's Avatar
    Join Date
    Sep 2021
    Location
    Mechanicville, NY
    Posts
    1,169
    Post Thanks / Like
    Bill,
    How high is your air filter element? A normal 3" element will be too high. The one I bought from Summit is only 2" high. that with the Holly Sniper drop base looks like it will clear. I will be working on fitting the hood next week. Will know for sure then.
    Scott Pregont
    Present build: 65 Daytona Coupe #393 - Forte 427 EFI crate w/TKX 2.87/ .81 - Ordered 11/16/21 - Delivered 6/23/2022
    Location: Mechanicville, NY
    Build Thread: https://thefactoryfiveforum.com/show...na-Coupe-build
    My Albums
    Build album: https://thefactoryfiveforum.com/album.php?albumid=2151
    Build album 2: https://thefactoryfiveforum.com/album.php?albumid=2437
    Special Tools, Custom Parts, misc supplies: https://thefactoryfiveforum.com/album.php?albumid=2045
    Garage Pics: https://thefactoryfiveforum.com/album.php?albumid=2041
    POR15 First Try: https://thefactoryfiveforum.com/album.php?albumid=2068
    Silicone application tips: https://thefactoryfiveforum.com/album.php?albumid=2063

  5. #725
    Black Forest, Colorado Yellville's Avatar
    Join Date
    Aug 2022
    Location
    Pahrump, Nevada
    Posts
    14
    Post Thanks / Like
    When did you receive your hatch glass? My timeline is similar to yours but I still don't have the hatch.

    Building
    : Type 65 Coupe #385, Gen 3 Coyote & TKX
    Ordered: 12/06/2021
    Received: 8/15/2022
    Build Update Videos
    Build Photos

  6. #726
    Namrups's Avatar
    Join Date
    Sep 2021
    Location
    Mechanicville, NY
    Posts
    1,169
    Post Thanks / Like
    Quote Originally Posted by Yellville View Post
    When did you receive your hatch glass? My timeline is similar to yours but I still don't have the hatch.
    About 3 weeks ago. It was the last item on my POL.
    Scott Pregont
    Present build: 65 Daytona Coupe #393 - Forte 427 EFI crate w/TKX 2.87/ .81 - Ordered 11/16/21 - Delivered 6/23/2022
    Location: Mechanicville, NY
    Build Thread: https://thefactoryfiveforum.com/show...na-Coupe-build
    My Albums
    Build album: https://thefactoryfiveforum.com/album.php?albumid=2151
    Build album 2: https://thefactoryfiveforum.com/album.php?albumid=2437
    Special Tools, Custom Parts, misc supplies: https://thefactoryfiveforum.com/album.php?albumid=2045
    Garage Pics: https://thefactoryfiveforum.com/album.php?albumid=2041
    POR15 First Try: https://thefactoryfiveforum.com/album.php?albumid=2068
    Silicone application tips: https://thefactoryfiveforum.com/album.php?albumid=2063

  7. #727
    Namrups's Avatar
    Join Date
    Sep 2021
    Location
    Mechanicville, NY
    Posts
    1,169
    Post Thanks / Like
    Jesse (blitzboy54) took the day off from work today and gave me a hand with the hood mounting. We started at 9am, broke for a short lunch and called it a day at 3pm. Got the hood mounted. Side to side measurements are good. Pontoons are close. Still need to trim at the cowl.


    Still have some issues:

    Drivers side is way out. Not sure what to do here. Fiberglass in this area is very thick. The hood sits about 1/2" higher than the body.


    Bottom of the hinges will have to be filled in. I purchased some Delrin for that.


    I was also concerned about the air filter fitting. It just fit without any extra room. I tried using the tapered spacer and that helped a little. Good to go as far as I'm concerned.
    Scott Pregont
    Present build: 65 Daytona Coupe #393 - Forte 427 EFI crate w/TKX 2.87/ .81 - Ordered 11/16/21 - Delivered 6/23/2022
    Location: Mechanicville, NY
    Build Thread: https://thefactoryfiveforum.com/show...na-Coupe-build
    My Albums
    Build album: https://thefactoryfiveforum.com/album.php?albumid=2151
    Build album 2: https://thefactoryfiveforum.com/album.php?albumid=2437
    Special Tools, Custom Parts, misc supplies: https://thefactoryfiveforum.com/album.php?albumid=2045
    Garage Pics: https://thefactoryfiveforum.com/album.php?albumid=2041
    POR15 First Try: https://thefactoryfiveforum.com/album.php?albumid=2068
    Silicone application tips: https://thefactoryfiveforum.com/album.php?albumid=2063

  8. Likes RocketF85 liked this post
  9. #728
    Senior Member
    Join Date
    Jul 2021
    Posts
    185
    Post Thanks / Like
    Install your latches and start putting some tension on the nose as you install. Put rubber bumpers in the center and then use the latch to pull it down. Obviously, you'll need to start iteratively trimming the edge in conjunction with all this. I had a similar gap on the driver side and I surprisingly made it all fit. In fact, my body to door and body to nose alignment all the way around the car is way better than I expected. I am not adding filler and sanding between panels. It was never my intention to make the car that nice but honestly it really doesn't need it anyways which shocks me.

  10. Thanks Namrups thanked for this post
    Likes Namrups liked this post
  11. #729
    Namrups's Avatar
    Join Date
    Sep 2021
    Location
    Mechanicville, NY
    Posts
    1,169
    Post Thanks / Like
    I ordered factory cut-outs. I installed my latches and the u-clamps. The initial alignment shows that I still need to move the hood 1/4" towards the body. The pic shows the PS. DS is the same.


    The clamp on the DS has room for adjustment.


    But the clamp on the PS does not!


    I measured the cutout location on the DS. It was 3 3/4" from the edge.


    The PS measured 3 1/2"!


    Not sure what to do now. Any suggestions?
    Scott Pregont
    Present build: 65 Daytona Coupe #393 - Forte 427 EFI crate w/TKX 2.87/ .81 - Ordered 11/16/21 - Delivered 6/23/2022
    Location: Mechanicville, NY
    Build Thread: https://thefactoryfiveforum.com/show...na-Coupe-build
    My Albums
    Build album: https://thefactoryfiveforum.com/album.php?albumid=2151
    Build album 2: https://thefactoryfiveforum.com/album.php?albumid=2437
    Special Tools, Custom Parts, misc supplies: https://thefactoryfiveforum.com/album.php?albumid=2045
    Garage Pics: https://thefactoryfiveforum.com/album.php?albumid=2041
    POR15 First Try: https://thefactoryfiveforum.com/album.php?albumid=2068
    Silicone application tips: https://thefactoryfiveforum.com/album.php?albumid=2063

  12. #730
    Not a waxer Jeff Kleiner's Avatar
    Join Date
    Feb 2011
    Location
    Bloomington, Indiana
    Posts
    8,719
    Post Thanks / Like
    Before you go too far and begin cutting anything check to see where your tires (especially the rear)
    fall in relation to the wheel wells. Keep in mind that you’ll need to have your ride height and alignment reasonably close when you do this. A friend thought he had everything pretty well dialed in then put the wheels on and discovered that they were way too far rearward meaning that the body was too far forward—- worst was that by this time he’d already cut the hood and when the body was moved back to where it belonged he ended up with a huge void between it and the body and had run out of adjustment.

    Jeff

  13. #731
    Namrups's Avatar
    Join Date
    Sep 2021
    Location
    Mechanicville, NY
    Posts
    1,169
    Post Thanks / Like
    I have the rear alignment set at what the manual requires. With the body where it is now all of the measurements are right on. The rear wheels are centered in the openings. The pontoons in the front align with the front splash guards. To me the body is just where it should be.
    Scott Pregont
    Present build: 65 Daytona Coupe #393 - Forte 427 EFI crate w/TKX 2.87/ .81 - Ordered 11/16/21 - Delivered 6/23/2022
    Location: Mechanicville, NY
    Build Thread: https://thefactoryfiveforum.com/show...na-Coupe-build
    My Albums
    Build album: https://thefactoryfiveforum.com/album.php?albumid=2151
    Build album 2: https://thefactoryfiveforum.com/album.php?albumid=2437
    Special Tools, Custom Parts, misc supplies: https://thefactoryfiveforum.com/album.php?albumid=2045
    Garage Pics: https://thefactoryfiveforum.com/album.php?albumid=2041
    POR15 First Try: https://thefactoryfiveforum.com/album.php?albumid=2068
    Silicone application tips: https://thefactoryfiveforum.com/album.php?albumid=2063

  14. #732
    Senior Member edwardb's Avatar
    Join Date
    Feb 2011
    Location
    Lake Orion, Michigan
    Posts
    10,861
    Post Thanks / Like
    Your large gap between the hood and the body and the misalignment at the front wheel wells between the hood and the pontoons indicates to me the hood isn't far enough back. The front edge of the pontoons should directly align with the outline of the wheel wells. It may not seem possible at first, but with enough massaging you should get there. I too found the manual directed alignment of the body was very close. It took at lot of work on the hood hinges, their placement/adjustment, and ultimately some trimming of the back edge of the hood to get the hood to line up. But don't worry about getting a perfect gap at first. Just trim enough to clear until you're positive it's where it needs to be.

    Last edited by edwardb; 03-09-2023 at 05:56 PM.
    Build 1: Mk3 Roadster #5125. Sold 11/08/2014. Build 2: Mk4 Roadster #7750. Sold 04/10/2017. Build Thread
    Build 3: Mk4 Roadster 20th Anniversary #8674. Sold 09/07/2020. Build Thread and Video. Build 4: Gen 3 Type 65 Coupe #59. Gen 3 Coyote. Legal 03/04/2020. Build Thread and Video
    Build 5: 35 Hot Rod Truck #138. LS3 and 4L65E auto. Rcvd 01/05/2021. Legal 04/20/2023. Build Thread. Sold 11/9/2023.

  15. #733
    Namrups's Avatar
    Join Date
    Sep 2021
    Location
    Mechanicville, NY
    Posts
    1,169
    Post Thanks / Like
    I follow every word and agree 100%. I need to slide the hood back toward the body. The issue is the clamp on the PS has no more room to slide back as shown in the pics. I can pull the body in place but when I go to clamp it the clamp pulls it back away again. That 1/4" difference in the cutout is killing me.
    Scott Pregont
    Present build: 65 Daytona Coupe #393 - Forte 427 EFI crate w/TKX 2.87/ .81 - Ordered 11/16/21 - Delivered 6/23/2022
    Location: Mechanicville, NY
    Build Thread: https://thefactoryfiveforum.com/show...na-Coupe-build
    My Albums
    Build album: https://thefactoryfiveforum.com/album.php?albumid=2151
    Build album 2: https://thefactoryfiveforum.com/album.php?albumid=2437
    Special Tools, Custom Parts, misc supplies: https://thefactoryfiveforum.com/album.php?albumid=2045
    Garage Pics: https://thefactoryfiveforum.com/album.php?albumid=2041
    POR15 First Try: https://thefactoryfiveforum.com/album.php?albumid=2068
    Silicone application tips: https://thefactoryfiveforum.com/album.php?albumid=2063

  16. #734
    Senior Member
    Join Date
    Jul 2021
    Posts
    185
    Post Thanks / Like
    Put the u bolt in a vise and give it a little love. Slight bend to skew it should get you what you need.

  17. #735
    Namrups's Avatar
    Join Date
    Sep 2021
    Location
    Mechanicville, NY
    Posts
    1,169
    Post Thanks / Like
    Quote Originally Posted by GT_Rich View Post
    Put the u bolt in a vise and give it a little love. Slight bend to skew it should get you what you need.
    That's my next step. I have a gentle 5 lb persuader in my drawer.
    Scott Pregont
    Present build: 65 Daytona Coupe #393 - Forte 427 EFI crate w/TKX 2.87/ .81 - Ordered 11/16/21 - Delivered 6/23/2022
    Location: Mechanicville, NY
    Build Thread: https://thefactoryfiveforum.com/show...na-Coupe-build
    My Albums
    Build album: https://thefactoryfiveforum.com/album.php?albumid=2151
    Build album 2: https://thefactoryfiveforum.com/album.php?albumid=2437
    Special Tools, Custom Parts, misc supplies: https://thefactoryfiveforum.com/album.php?albumid=2045
    Garage Pics: https://thefactoryfiveforum.com/album.php?albumid=2041
    POR15 First Try: https://thefactoryfiveforum.com/album.php?albumid=2068
    Silicone application tips: https://thefactoryfiveforum.com/album.php?albumid=2063

  18. #736
    Namrups's Avatar
    Join Date
    Sep 2021
    Location
    Mechanicville, NY
    Posts
    1,169
    Post Thanks / Like
    I learned two very important lessons today. First is to trust what other builders are telling me and the second is that I am more capable then I give myself credit for.

    I really didn't think I was going to be able to get the gaps looking good on the hood. Things just seemed to be too out of wack. Everyone told me that it would all come together, to just keep tweaking it. Well after numerous hours it did!

    Hood cowl gap one paint stick wide!


    PS pontoon


    DS pontoon


    Once I install the guide pins it should line up very well. I'm pleased with it.
    Scott Pregont
    Present build: 65 Daytona Coupe #393 - Forte 427 EFI crate w/TKX 2.87/ .81 - Ordered 11/16/21 - Delivered 6/23/2022
    Location: Mechanicville, NY
    Build Thread: https://thefactoryfiveforum.com/show...na-Coupe-build
    My Albums
    Build album: https://thefactoryfiveforum.com/album.php?albumid=2151
    Build album 2: https://thefactoryfiveforum.com/album.php?albumid=2437
    Special Tools, Custom Parts, misc supplies: https://thefactoryfiveforum.com/album.php?albumid=2045
    Garage Pics: https://thefactoryfiveforum.com/album.php?albumid=2041
    POR15 First Try: https://thefactoryfiveforum.com/album.php?albumid=2068
    Silicone application tips: https://thefactoryfiveforum.com/album.php?albumid=2063

  19. Likes DetactGarageMech liked this post
  20. #737
    Senior Member
    Join Date
    May 2021
    Location
    Fort Worth, Texas
    Posts
    476
    Post Thanks / Like
    Looks pretty dang good to me. Nice work Namrups!
    My Type 65 Coupe: Ordered May 27, 2021. Arrived November 19, 2021.
    I would like to treat my gas pedal as a binary operator. It would be nice to get the cooperation of everyone in front of me.

  21. #738
    Namrups's Avatar
    Join Date
    Sep 2021
    Location
    Mechanicville, NY
    Posts
    1,169
    Post Thanks / Like
    Quote Originally Posted by Skuzzy View Post
    Looks pretty dang good to me. Nice work Namrups!
    Thanks Skuzzy!
    Scott Pregont
    Present build: 65 Daytona Coupe #393 - Forte 427 EFI crate w/TKX 2.87/ .81 - Ordered 11/16/21 - Delivered 6/23/2022
    Location: Mechanicville, NY
    Build Thread: https://thefactoryfiveforum.com/show...na-Coupe-build
    My Albums
    Build album: https://thefactoryfiveforum.com/album.php?albumid=2151
    Build album 2: https://thefactoryfiveforum.com/album.php?albumid=2437
    Special Tools, Custom Parts, misc supplies: https://thefactoryfiveforum.com/album.php?albumid=2045
    Garage Pics: https://thefactoryfiveforum.com/album.php?albumid=2041
    POR15 First Try: https://thefactoryfiveforum.com/album.php?albumid=2068
    Silicone application tips: https://thefactoryfiveforum.com/album.php?albumid=2063

  22. #739
    Senior Member
    Join Date
    Jul 2021
    Posts
    185
    Post Thanks / Like
    Awesome! I went through this a month ago. I know how you feel. Good job.

  23. #740
    Namrups's Avatar
    Join Date
    Sep 2021
    Location
    Mechanicville, NY
    Posts
    1,169
    Post Thanks / Like
    Quote Originally Posted by GT_Rich View Post
    Awesome! I went through this a month ago. I know how you feel. Good job.
    Thanks!
    Scott Pregont
    Present build: 65 Daytona Coupe #393 - Forte 427 EFI crate w/TKX 2.87/ .81 - Ordered 11/16/21 - Delivered 6/23/2022
    Location: Mechanicville, NY
    Build Thread: https://thefactoryfiveforum.com/show...na-Coupe-build
    My Albums
    Build album: https://thefactoryfiveforum.com/album.php?albumid=2151
    Build album 2: https://thefactoryfiveforum.com/album.php?albumid=2437
    Special Tools, Custom Parts, misc supplies: https://thefactoryfiveforum.com/album.php?albumid=2045
    Garage Pics: https://thefactoryfiveforum.com/album.php?albumid=2041
    POR15 First Try: https://thefactoryfiveforum.com/album.php?albumid=2068
    Silicone application tips: https://thefactoryfiveforum.com/album.php?albumid=2063

  24. #741
    Not a waxer Jeff Kleiner's Avatar
    Join Date
    Feb 2011
    Location
    Bloomington, Indiana
    Posts
    8,719
    Post Thanks / Like
    Good job!

    Jeff

  25. #742
    Namrups's Avatar
    Join Date
    Sep 2021
    Location
    Mechanicville, NY
    Posts
    1,169
    Post Thanks / Like
    Quote Originally Posted by Jeff Kleiner View Post
    Good job!

    Jeff
    Thanks Jeff!!
    Scott Pregont
    Present build: 65 Daytona Coupe #393 - Forte 427 EFI crate w/TKX 2.87/ .81 - Ordered 11/16/21 - Delivered 6/23/2022
    Location: Mechanicville, NY
    Build Thread: https://thefactoryfiveforum.com/show...na-Coupe-build
    My Albums
    Build album: https://thefactoryfiveforum.com/album.php?albumid=2151
    Build album 2: https://thefactoryfiveforum.com/album.php?albumid=2437
    Special Tools, Custom Parts, misc supplies: https://thefactoryfiveforum.com/album.php?albumid=2045
    Garage Pics: https://thefactoryfiveforum.com/album.php?albumid=2041
    POR15 First Try: https://thefactoryfiveforum.com/album.php?albumid=2068
    Silicone application tips: https://thefactoryfiveforum.com/album.php?albumid=2063

  26. #743
    Indy Shu's Avatar
    Join Date
    Feb 2011
    Location
    Indianapolis, IN
    Posts
    174
    Post Thanks / Like
    So, did you trim any of the back edge of the hood to get there?
    John
    Gen 3 Coupe #334 received 11/4/21. Coyote, IRS, TKX, Wilwoods
    '02 GT donor, 4.6 sohc, Received #5488 on 5/29/06. 3-link, ps, pb. Hoosier Cobra member (Hoosiercobra.com)

  27. #744
    Namrups's Avatar
    Join Date
    Sep 2021
    Location
    Mechanicville, NY
    Posts
    1,169
    Post Thanks / Like
    Quote Originally Posted by Indy Shu View Post
    So, did you trim any of the back edge of the hood to get there?
    Yes. Multiple times. Initially I measured from the edge of the pontoon to the body at 22 1/2 inches (if my memory serves right). That same measurement on the hood was 23". FF intentionally leaves this long. I didn't want to overdo anything so I just shaved off small amounts at a time. The more I took off the better the hood lined up.
    Scott Pregont
    Present build: 65 Daytona Coupe #393 - Forte 427 EFI crate w/TKX 2.87/ .81 - Ordered 11/16/21 - Delivered 6/23/2022
    Location: Mechanicville, NY
    Build Thread: https://thefactoryfiveforum.com/show...na-Coupe-build
    My Albums
    Build album: https://thefactoryfiveforum.com/album.php?albumid=2151
    Build album 2: https://thefactoryfiveforum.com/album.php?albumid=2437
    Special Tools, Custom Parts, misc supplies: https://thefactoryfiveforum.com/album.php?albumid=2045
    Garage Pics: https://thefactoryfiveforum.com/album.php?albumid=2041
    POR15 First Try: https://thefactoryfiveforum.com/album.php?albumid=2068
    Silicone application tips: https://thefactoryfiveforum.com/album.php?albumid=2063

  28. #745
    Indy Shu's Avatar
    Join Date
    Feb 2011
    Location
    Indianapolis, IN
    Posts
    174
    Post Thanks / Like
    Thanks Scott, I’m looking forward to this in the near future. Lol
    Btw, I enjoy following along on your build, you’re making great progress!
    John
    Gen 3 Coupe #334 received 11/4/21. Coyote, IRS, TKX, Wilwoods
    '02 GT donor, 4.6 sohc, Received #5488 on 5/29/06. 3-link, ps, pb. Hoosier Cobra member (Hoosiercobra.com)

  29. #746
    Namrups's Avatar
    Join Date
    Sep 2021
    Location
    Mechanicville, NY
    Posts
    1,169
    Post Thanks / Like
    Quote Originally Posted by Indy Shu View Post
    Thanks Scott, I’m looking forward to this in the near future. Lol
    Btw, I enjoy following along on your build, you’re making great progress!
    Thanks Indy. Are you going to have a build thread? It's a great way to have "the pros" looking over your shoulder and keeping you on the right track!
    Scott Pregont
    Present build: 65 Daytona Coupe #393 - Forte 427 EFI crate w/TKX 2.87/ .81 - Ordered 11/16/21 - Delivered 6/23/2022
    Location: Mechanicville, NY
    Build Thread: https://thefactoryfiveforum.com/show...na-Coupe-build
    My Albums
    Build album: https://thefactoryfiveforum.com/album.php?albumid=2151
    Build album 2: https://thefactoryfiveforum.com/album.php?albumid=2437
    Special Tools, Custom Parts, misc supplies: https://thefactoryfiveforum.com/album.php?albumid=2045
    Garage Pics: https://thefactoryfiveforum.com/album.php?albumid=2041
    POR15 First Try: https://thefactoryfiveforum.com/album.php?albumid=2068
    Silicone application tips: https://thefactoryfiveforum.com/album.php?albumid=2063

  30. #747
    Namrups's Avatar
    Join Date
    Sep 2021
    Location
    Mechanicville, NY
    Posts
    1,169
    Post Thanks / Like
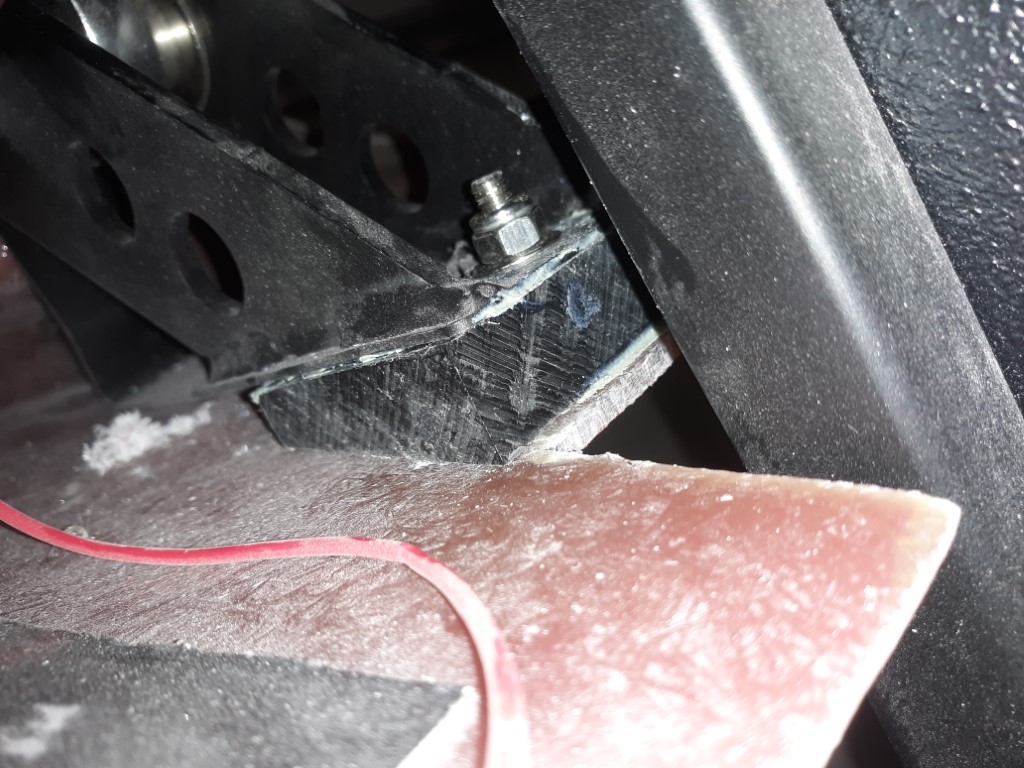
    As with others, my front hinges did not fit the curve of the body. I purchased a block of Delrin from McMaster-Carr and made filler pieces to fill the gap.

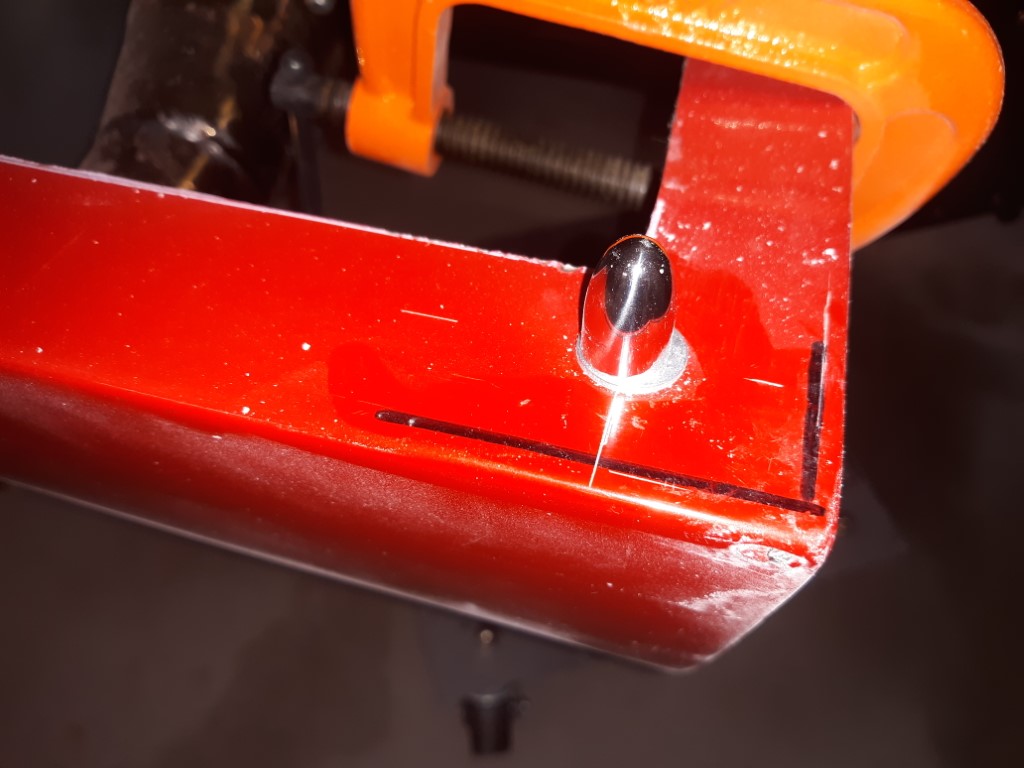
    The alignment pins are also complete.
    Scott Pregont
    Present build: 65 Daytona Coupe #393 - Forte 427 EFI crate w/TKX 2.87/ .81 - Ordered 11/16/21 - Delivered 6/23/2022
    Location: Mechanicville, NY
    Build Thread: https://thefactoryfiveforum.com/show...na-Coupe-build
    My Albums
    Build album: https://thefactoryfiveforum.com/album.php?albumid=2151
    Build album 2: https://thefactoryfiveforum.com/album.php?albumid=2437
    Special Tools, Custom Parts, misc supplies: https://thefactoryfiveforum.com/album.php?albumid=2045
    Garage Pics: https://thefactoryfiveforum.com/album.php?albumid=2041
    POR15 First Try: https://thefactoryfiveforum.com/album.php?albumid=2068
    Silicone application tips: https://thefactoryfiveforum.com/album.php?albumid=2063

  31. #748
    Senior Member
    Join Date
    Mar 2021
    Location
    Ohio
    Posts
    384
    Post Thanks / Like
    Wow! That is a big gap. I am guessing mine will be similar.

  32. #749
    Namrups's Avatar
    Join Date
    Sep 2021
    Location
    Mechanicville, NY
    Posts
    1,169
    Post Thanks / Like
    Quote Originally Posted by burchfieldb View Post
    Wow! That is a big gap. I am guessing mine will be similar.
    It was about 1/2" on the DS and slightly less on the PS.
    Scott Pregont
    Present build: 65 Daytona Coupe #393 - Forte 427 EFI crate w/TKX 2.87/ .81 - Ordered 11/16/21 - Delivered 6/23/2022
    Location: Mechanicville, NY
    Build Thread: https://thefactoryfiveforum.com/show...na-Coupe-build
    My Albums
    Build album: https://thefactoryfiveforum.com/album.php?albumid=2151
    Build album 2: https://thefactoryfiveforum.com/album.php?albumid=2437
    Special Tools, Custom Parts, misc supplies: https://thefactoryfiveforum.com/album.php?albumid=2045
    Garage Pics: https://thefactoryfiveforum.com/album.php?albumid=2041
    POR15 First Try: https://thefactoryfiveforum.com/album.php?albumid=2068
    Silicone application tips: https://thefactoryfiveforum.com/album.php?albumid=2063

  33. #750
    Not a waxer Jeff Kleiner's Avatar
    Join Date
    Feb 2011
    Location
    Bloomington, Indiana
    Posts
    8,719
    Post Thanks / Like
    I've had to make similar wedges:


    Jeff
    Attached Images Attached Images

  34. Thanks Namrups thanked for this post
    Likes Namrups liked this post
  35. #751
    Senior Member Kbl7td's Avatar
    Join Date
    Apr 2022
    Location
    Miami
    Posts
    303
    Post Thanks / Like
    For anyone reading in the future, if you want an absolutely perfect fit. Place some epoxy resin and cabosil in a ziploc bag. Place the bag in between the hinge and body. Then wait for cure. Remove from bag, trim the piece then epoxy to the nose.

  36. #752
    Namrups's Avatar
    Join Date
    Sep 2021
    Location
    Mechanicville, NY
    Posts
    1,169
    Post Thanks / Like
    Quote Originally Posted by Kbl7td View Post
    For anyone reading in the future, if you want an absolutely perfect fit. Place some epoxy resin and cabosil in a ziploc bag. Place the bag in between the hinge and body. Then wait for cure. Remove from bag, trim the piece then epoxy to the nose.
    Great idea!
    Scott Pregont
    Present build: 65 Daytona Coupe #393 - Forte 427 EFI crate w/TKX 2.87/ .81 - Ordered 11/16/21 - Delivered 6/23/2022
    Location: Mechanicville, NY
    Build Thread: https://thefactoryfiveforum.com/show...na-Coupe-build
    My Albums
    Build album: https://thefactoryfiveforum.com/album.php?albumid=2151
    Build album 2: https://thefactoryfiveforum.com/album.php?albumid=2437
    Special Tools, Custom Parts, misc supplies: https://thefactoryfiveforum.com/album.php?albumid=2045
    Garage Pics: https://thefactoryfiveforum.com/album.php?albumid=2041
    POR15 First Try: https://thefactoryfiveforum.com/album.php?albumid=2068
    Silicone application tips: https://thefactoryfiveforum.com/album.php?albumid=2063

  37. #753
    Namrups's Avatar
    Join Date
    Sep 2021
    Location
    Mechanicville, NY
    Posts
    1,169
    Post Thanks / Like
    Finished installing the hood struts today. like others have noted the struts put pressure on the hood when closed and forces the hood forward. I did add braces to the front that can be seen in the lower right of the picture. These did help a lot. I also raised the guide pins using washers which also brought the hood back where it belongs.


    I have not added the wheel guides yet. An issue I have right now is on the passengers side. If I try to raise the hood from the DS the u-clip will catch in the latch finger hole.


    In theory, a guide that spans this area should eliminate this issue. I fabbed a guide from a small piece of scrap steel and used JB Weld to attach it. Tomorrow should tell me if my theory is right.

    Scott Pregont
    Present build: 65 Daytona Coupe #393 - Forte 427 EFI crate w/TKX 2.87/ .81 - Ordered 11/16/21 - Delivered 6/23/2022
    Location: Mechanicville, NY
    Build Thread: https://thefactoryfiveforum.com/show...na-Coupe-build
    My Albums
    Build album: https://thefactoryfiveforum.com/album.php?albumid=2151
    Build album 2: https://thefactoryfiveforum.com/album.php?albumid=2437
    Special Tools, Custom Parts, misc supplies: https://thefactoryfiveforum.com/album.php?albumid=2045
    Garage Pics: https://thefactoryfiveforum.com/album.php?albumid=2041
    POR15 First Try: https://thefactoryfiveforum.com/album.php?albumid=2068
    Silicone application tips: https://thefactoryfiveforum.com/album.php?albumid=2063

  38. #754
    Namrups's Avatar
    Join Date
    Sep 2021
    Location
    Mechanicville, NY
    Posts
    1,169
    Post Thanks / Like
    I have upgraded to LED headlights. Started to assemble them today. The first issue I ran into is the LEDs have an electronic block in line. The headlight tub only has a small hole to run the wires thru.


    I drilled a hole in the back of the tub that would clear the box and used a rubber grommet to close the hole.


    Added the mounting ring to one of the headlights.


    The factory cut holes need to be opened up for the tubs to fit. That's where I will start tomorrow.
    Scott Pregont
    Present build: 65 Daytona Coupe #393 - Forte 427 EFI crate w/TKX 2.87/ .81 - Ordered 11/16/21 - Delivered 6/23/2022
    Location: Mechanicville, NY
    Build Thread: https://thefactoryfiveforum.com/show...na-Coupe-build
    My Albums
    Build album: https://thefactoryfiveforum.com/album.php?albumid=2151
    Build album 2: https://thefactoryfiveforum.com/album.php?albumid=2437
    Special Tools, Custom Parts, misc supplies: https://thefactoryfiveforum.com/album.php?albumid=2045
    Garage Pics: https://thefactoryfiveforum.com/album.php?albumid=2041
    POR15 First Try: https://thefactoryfiveforum.com/album.php?albumid=2068
    Silicone application tips: https://thefactoryfiveforum.com/album.php?albumid=2063

  39. #755
    Namrups's Avatar
    Join Date
    Sep 2021
    Location
    Mechanicville, NY
    Posts
    1,169
    Post Thanks / Like
    Spent Wednesday in the emergency room dealing with a reoccurring UTI. Back in the garage today. Completed mounting the lights. Wired everything up and it all works!


    Doors next!!
    Scott Pregont
    Present build: 65 Daytona Coupe #393 - Forte 427 EFI crate w/TKX 2.87/ .81 - Ordered 11/16/21 - Delivered 6/23/2022
    Location: Mechanicville, NY
    Build Thread: https://thefactoryfiveforum.com/show...na-Coupe-build
    My Albums
    Build album: https://thefactoryfiveforum.com/album.php?albumid=2151
    Build album 2: https://thefactoryfiveforum.com/album.php?albumid=2437
    Special Tools, Custom Parts, misc supplies: https://thefactoryfiveforum.com/album.php?albumid=2045
    Garage Pics: https://thefactoryfiveforum.com/album.php?albumid=2041
    POR15 First Try: https://thefactoryfiveforum.com/album.php?albumid=2068
    Silicone application tips: https://thefactoryfiveforum.com/album.php?albumid=2063

  40. Likes jbs72697 liked this post
  41. #756
    Namrups's Avatar
    Join Date
    Sep 2021
    Location
    Mechanicville, NY
    Posts
    1,169
    Post Thanks / Like
    Been working on the doors for the past couple of days and all I can say is I'm somewhat frustrated.

    Decided to start on the PS door first because I had more room on that side the way the car was sitting in the garage. Installed the inner hinge brackets. Didn't know I could contort myself like that!! Went to the hardware store and bought a really long drill bit! Laid out and marked the hinge openings. Pressed in the brass bushings, greased and worked the hinge pins until everything fit smoothly. Installed the hinge and was stopped dead in my tracks. When I mounted the body I triple checked all of the measurements in the manual to make sure I had the body in the right location. Well the hinge would not open because it was hitting the body. I needed to move the body ~ 1/4" forward for the hinge to clear. After moving the body forward I needed to reposition the rear window. The hood also will need some minor gap work between the body and the hood. I think the hood actually fits a little better after the move. The hinge now clears the body. I then went to attach the latch to the door frame and found out that I have two left side (DS) latches!


    I only received one latch with the kit. The other was POL. When I received the second latch I just threw it in the box with the first one. My bad! I never looked at both of them together until now. Sent an email to FF. Hope it doesn't delay things too much.

    Switched over to the DS. Measured and cut the cutouts. Installed the hinge bracket and the hinges. Started to work on the inner door frame and latch release. Everything went together as described except for the release handle. My handle looks a little different that the manual picture. It actually looks like a better unit that the one in the manual. The issue is how the wire attaches to the handle. The wire end piece is a little too big to slip thru the opening. I had to feed it from the top with a pliers.


    I didn't think this was going to be an issue until I read further. The manual states that you have to disconnect the wire from the handle, install the handle and then reinstall the wire into the handle. I don't think there is going to be enough play to pull the wire thru the hole to reattach it to the handle and doing it blindly won't work.

    On the other end the wire connects to the clevis and there is two locknuts that the manual says should be installed with blue thread locker after everything is lined up. Not being able to follow the manual on the handle side I think I can disconnect and reconnect from this end.


    This does create another issue for me. I wanted to use door poppers. They would attach to the open hole in the pic above. When I played around with this I noticed that when the popper would open the latch the wire would not move and the ball would pop out of the clevis. My initial thought was to put a tie strap around the clevis to keep the wire from coming out. I think that would have worked but now that I have to remove and reattach this wire by feel while its inside the door I don't see how I could position a tie strap properly.

    Time to step away and start fresh tomorrow.
    Scott Pregont
    Present build: 65 Daytona Coupe #393 - Forte 427 EFI crate w/TKX 2.87/ .81 - Ordered 11/16/21 - Delivered 6/23/2022
    Location: Mechanicville, NY
    Build Thread: https://thefactoryfiveforum.com/show...na-Coupe-build
    My Albums
    Build album: https://thefactoryfiveforum.com/album.php?albumid=2151
    Build album 2: https://thefactoryfiveforum.com/album.php?albumid=2437
    Special Tools, Custom Parts, misc supplies: https://thefactoryfiveforum.com/album.php?albumid=2045
    Garage Pics: https://thefactoryfiveforum.com/album.php?albumid=2041
    POR15 First Try: https://thefactoryfiveforum.com/album.php?albumid=2068
    Silicone application tips: https://thefactoryfiveforum.com/album.php?albumid=2063

  42. #757
    Senior Member
    Join Date
    Apr 2017
    Location
    Scottsdale, Arizona
    Posts
    220
    Post Thanks / Like
    You might try closing the gap of the clevis and with the same action, the hole in the clevis should turn from circular to a pinched oval, thus preventing the ball end of the cable from popping out. Try minor pliers pressure for minor closures at first until the ball end just doesn't come out. It worked for me. The clevis is easy to bend open if you need to in the future.

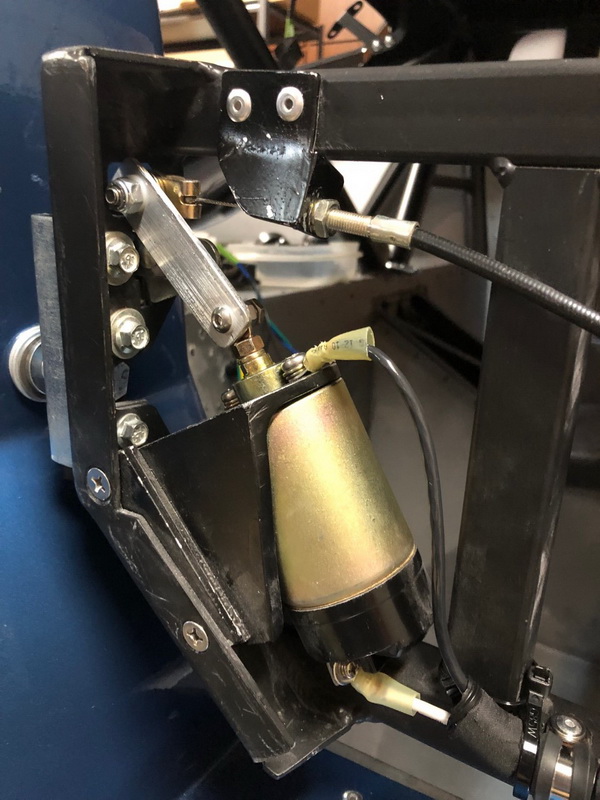
    Regarding solenoid door poppers. it's critical to have the solenoid and it's connecting end as upright as possible / as close to a 90 degree angle during action to that second latch tang hole. The secondary tang with hole rotates when pulled and the angle changes, changing the mechanical pull advantage. I actually changed my solenoid setup to actually attach a solid metal link (instead of the SS wire cable) to the large bolt that the clevis is attached with. Improved mechanical advantage. I should post a photo of that.

  43. #758
    Senior Member
    Join Date
    Apr 2017
    Location
    Scottsdale, Arizona
    Posts
    220
    Post Thanks / Like
    Here's the setup I described in my prior post. It represents just one way to rig up a door popper solenoid and not the usual setup.

    If I could do it over again, I'd try to mount the solenoid more vertically and improve the downward retraction of the solenoid rod to the small tang, but, fabricating that mounting bracket was a chore and I didn't want to fab. new ones
    .
    The link is 1/8" alum. plate, attached at the top end to the existing clevis mounting bolt. There are nylon washers everywhere about the two attachment bolts & nuts to reduce friction. It does require drilling a hole in the solenoid's 3-hole attachment tab.
    In my setup, the FFR mechanical door interior hand latch is still functional since that's how occupants will open the doors, but with that cable still in place, it does add extra resistance to the operation of the latch by the solenoid. I had to up the solenoid to a spec. of 100 lbs of retraction force.

    Bob

  44. #759
    Namrups's Avatar
    Join Date
    Sep 2021
    Location
    Mechanicville, NY
    Posts
    1,169
    Post Thanks / Like
    Thanks Bob. This info helps! Gives me something to work with.
    Scott Pregont
    Present build: 65 Daytona Coupe #393 - Forte 427 EFI crate w/TKX 2.87/ .81 - Ordered 11/16/21 - Delivered 6/23/2022
    Location: Mechanicville, NY
    Build Thread: https://thefactoryfiveforum.com/show...na-Coupe-build
    My Albums
    Build album: https://thefactoryfiveforum.com/album.php?albumid=2151
    Build album 2: https://thefactoryfiveforum.com/album.php?albumid=2437
    Special Tools, Custom Parts, misc supplies: https://thefactoryfiveforum.com/album.php?albumid=2045
    Garage Pics: https://thefactoryfiveforum.com/album.php?albumid=2041
    POR15 First Try: https://thefactoryfiveforum.com/album.php?albumid=2068
    Silicone application tips: https://thefactoryfiveforum.com/album.php?albumid=2063

  45. #760
    Senior Member edwardb's Avatar
    Join Date
    Feb 2011
    Location
    Lake Orion, Michigan
    Posts
    10,861
    Post Thanks / Like
    You did the right thing walking away and starting fresh the next day. Lots of those events for me too. Usually if I kept going I made things worse... You'll get there.
    Build 1: Mk3 Roadster #5125. Sold 11/08/2014. Build 2: Mk4 Roadster #7750. Sold 04/10/2017. Build Thread
    Build 3: Mk4 Roadster 20th Anniversary #8674. Sold 09/07/2020. Build Thread and Video. Build 4: Gen 3 Type 65 Coupe #59. Gen 3 Coyote. Legal 03/04/2020. Build Thread and Video
    Build 5: 35 Hot Rod Truck #138. LS3 and 4L65E auto. Rcvd 01/05/2021. Legal 04/20/2023. Build Thread. Sold 11/9/2023.

Page 19 of 28 FirstFirst ... 91718192021 ... LastLast

Tags for this Thread

Posting Permissions

  • You may not post new threads
  • You may not post replies
  • You may not post attachments
  • You may not edit your posts
  •  

FFMetal

Visit our community sponsor