Very Cool Parts

Visit our community sponsor

Thanks Thanks:  24
Likes Likes:  94
Page 21 of 22 FirstFirst ... 1119202122 LastLast
Results 801 to 840 of 847

Thread: Making progress on my build...

  1. #801
    Senior Member beeman's Avatar
    Join Date
    Feb 2011
    Location
    Indiana
    Posts
    1,535
    Post Thanks / Like
    Well, my exhaust tips have to exit centrally, I have dual rear trunks with access where the original exhaust exits.

    Any ideas to improve the appearance of the rear fascia with the revised exhaust tip locations? I'll have the spoiler installed as well...
    MK3.1 2004 Mach 1 donor. ABS, PS, TC.
    GTM #304 LPE 525hp LS3
    2000 C5 Lingenfelter LS1@489hp
    1999 Corvette FRC/Z06 track car

  2. #802
    Senior Member beeman's Avatar
    Join Date
    Feb 2011
    Location
    Indiana
    Posts
    1,535
    Post Thanks / Like
    Had to order some new 3"ss tubing, the Amazon stuff was junk. Getting it tacked together then off to someone who can do prettier welds than I can.

    20231210_223249.jpg20231210_223258.jpg

    I don't like how much stress is on the rear body/fiberglass where it mounts to the gearbox subframe so I 8115'd a piece of unused hood to double the thickness. This guy on eBay accepted my $45 offer, cheapest I've seen it. Ordered some more, anticipating more 'bonding' time with the GTM...
    https://www.ebay.com/itm/225585734410

    20231210_145500.jpg20231209_134211.jpg20231208_131359.jpg
    MK3.1 2004 Mach 1 donor. ABS, PS, TC.
    GTM #304 LPE 525hp LS3
    2000 C5 Lingenfelter LS1@489hp
    1999 Corvette FRC/Z06 track car

  3. Likes VRaptor SpeedWorks, LLC liked this post
  4. #803
    Senior Member beeman's Avatar
    Join Date
    Feb 2011
    Location
    Indiana
    Posts
    1,535
    Post Thanks / Like
    Shoulder surgery has laid me up, so nothing getting done that requires any significant physical effort.
    Finishing up the headlight buckets, a few revisions for the internal feature that will support the DRL/turn signal LED strip. Each revision improving positioning of the LED strip with regards to visibility from the front as well as positioning relative to the Lexan lens and overlying bodywork. Also avoiding the beam of the projector headlight which requires more effort and packaging creativity. Latest revision on the printer now, only printing enough to index the lens, to speed up the print.
    PXL_20240107_235206251.jpg
    PXL_20240107_235130790.jpg
    PXL_20240109_014130534.MP.jpg
    Attached Images Attached Images
    MK3.1 2004 Mach 1 donor. ABS, PS, TC.
    GTM #304 LPE 525hp LS3
    2000 C5 Lingenfelter LS1@489hp
    1999 Corvette FRC/Z06 track car

  5. #804
    Senior Member
    Join Date
    Jul 2014
    Posts
    1,268
    Post Thanks / Like
    One thing to keep in mind is the flexibility of the LED strips you plan on using for the DRL/Turn Signals. The ones I chose from The Retrofit Source are flexible in one axis (the surface you would stick them to, but not flexible at all trying to bend left to right. Looks like you are putting a bit of a twist on the surface for them, if I'm looking at it correctly.

    Pretty awesome being able to design, print, and iterate on the design until you get it just right. I love my printer.

  6. Thanks beeman thanked for this post
  7. #805
    Senior Member beeman's Avatar
    Join Date
    Feb 2011
    Location
    Indiana
    Posts
    1,535
    Post Thanks / Like
    One thing to keep in mind is the flexibility of the LED strips
    You are correct, I have confirmed the flexibility of the LED strip in that plane. It may be hard to visualize in the 2D images, the strip will only curve in 1 plane. The iteration (3.0) that is printing now has even more curvature than the previous 2, to better match the contour of the adjacent bodywork. I went with a longer LED strip which has required some massaging to fit, to be clear of the bodywork, and to avoid the projector headlight beam.
    Last edited by beeman; 01-09-2024 at 09:23 AM.
    MK3.1 2004 Mach 1 donor. ABS, PS, TC.
    GTM #304 LPE 525hp LS3
    2000 C5 Lingenfelter LS1@489hp
    1999 Corvette FRC/Z06 track car

  8. #806
    VRaptor SpeedWorks, LLC's Avatar
    Join Date
    Feb 2011
    Posts
    1,517
    Post Thanks / Like
    Very cool! I'm going to have to look into investing in a printer down the road here someday......love the possibilities!
    Shane Vacek
    VRaptor SpeedWorks, LLC
    www.vraptorspeedworks.com
    Turn-key GTM, SL-C & Ultima GTR Built to Your Specs!
    Offering a full line of GTM Upgrades and Custom Parts

  9. Likes rolfer liked this post
  10. #807
    Senior Member
    Join Date
    Jul 2014
    Posts
    1,268
    Post Thanks / Like
    Quote Originally Posted by beeman View Post
    You are correct, I have confirmed the flexibility of the LED strip in that plane. It may be hard to visualize in the 2D images, the strip will only curve in 1 plane. The iteration (3.0) that is printing now has even more curvature than the previous 2, to better match the contour of the adjacent bodywork. I went with a longer LED strip which has required some massaging to fit, to be clear of the bodywork, and to avoid the projector headlight beam.
    Very nice!!!!

    Quote Originally Posted by VRaptor SpeedWorks, LLC View Post
    Very cool! I'm going to have to look into investing in a printer down the road here someday......love the possibilities!
    You totally need a printer Shane. Go look at the air hose that passes through the front wheel wheels on my GTM. I didn't want some cheezy install of zip-tying the air hoses to the A-Arm, so I designed and 3D printed two separate pieces that when assembled and epoxied together would hold the 90 deg air fittings, allow me to rivet them in place, and be the passthrough in the wheel wells. Then the carbon fiber button plate on the tunnel wall on the drivers side was designed and printed in several configurations before I sent the final design to a guy to cut it out of expensive carbon fiber. Possibilities are endless.

  11. Likes VRaptor SpeedWorks, LLC liked this post
  12. #808
    Senior Member beeman's Avatar
    Join Date
    Feb 2011
    Location
    Indiana
    Posts
    1,535
    Post Thanks / Like
    MK3.1 2004 Mach 1 donor. ABS, PS, TC.
    GTM #304 LPE 525hp LS3
    2000 C5 Lingenfelter LS1@489hp
    1999 Corvette FRC/Z06 track car

  13. #809
    VRaptor SpeedWorks, LLC's Avatar
    Join Date
    Feb 2011
    Posts
    1,517
    Post Thanks / Like
    Those turned out nice!!
    Shane Vacek
    VRaptor SpeedWorks, LLC
    www.vraptorspeedworks.com
    Turn-key GTM, SL-C & Ultima GTR Built to Your Specs!
    Offering a full line of GTM Upgrades and Custom Parts

  14. #810
    Senior Member beeman's Avatar
    Join Date
    Feb 2011
    Location
    Indiana
    Posts
    1,535
    Post Thanks / Like
    Quote Originally Posted by VRaptor SpeedWorks, LLC View Post
    Those turned out nice!!
    Thanks, I think they will work well. I still need to do some post-processing/ smoothing of the ABS to make them look less "printed", but I'm very happy with how they turned out.
    MK3.1 2004 Mach 1 donor. ABS, PS, TC.
    GTM #304 LPE 525hp LS3
    2000 C5 Lingenfelter LS1@489hp
    1999 Corvette FRC/Z06 track car

  15. Likes VRaptor SpeedWorks, LLC liked this post
  16. #811
    Senior Member
    Join Date
    Feb 2019
    Location
    Houston, TX
    Posts
    1,047
    Post Thanks / Like
    ABS can be smoothed in an acetone vapor chamber. It's harder to print than PLA/PETG but easier to smooth.

  17. Likes VRaptor SpeedWorks, LLC liked this post
  18. #812
    Senior Member beeman's Avatar
    Join Date
    Feb 2011
    Location
    Indiana
    Posts
    1,535
    Post Thanks / Like

    Post

    I actually found a local shop that can pull moulds and make my new hood and front fascia, less than 10 miles from my home.
    Getting the driver's side matched to the passenger side. Gotta love cutting out previously completed work, but that's happened before on this build.
    1st step was recreating the exact position and angle of the driver's side headlight. Lots of measurements, pencil marks, paper template, etc. Tried weatherstrip instead of clay to create the edge of the new bodywork, first layer of mud done.

    20240216_144447_copy_1280x591.jpg20240216_154024_copy_1280x591.jpg20240217_113137_copy_1280x591.jpg20240217_120507_copy_1280x591.jpg20240217_121605_copy_1280x591.jpg
    MK3.1 2004 Mach 1 donor. ABS, PS, TC.
    GTM #304 LPE 525hp LS3
    2000 C5 Lingenfelter LS1@489hp
    1999 Corvette FRC/Z06 track car

  19. #813
    Senior Member egchewy79's Avatar
    Join Date
    May 2017
    Location
    Dublin, OH
    Posts
    1,950
    Post Thanks / Like
    dave, do you have a CAD design of what you envision your front to look like?

  20. #814
    Senior Member beeman's Avatar
    Join Date
    Feb 2011
    Location
    Indiana
    Posts
    1,535
    Post Thanks / Like
    dave, do you have a CAD design of what you envision your front to look like?
    The last rendering I did still had the modified Yamaha R1 headlights, these headlights were designed to fit the shape of the front of the car and help address some aerodynamic issues and design issues. I wish I had a 3D scanner though...
    MK3.1 2004 Mach 1 donor. ABS, PS, TC.
    GTM #304 LPE 525hp LS3
    2000 C5 Lingenfelter LS1@489hp
    1999 Corvette FRC/Z06 track car

  21. #815
    Senior Member
    Join Date
    Feb 2019
    Location
    Houston, TX
    Posts
    1,047
    Post Thanks / Like
    If you have an oculus, you can use gravity sketch to trace out what you have, then sculpt in the changes you want. That’s how I modeled my 818 nose.

  22. Likes beeman liked this post
  23. #816
    Senior Member beeman's Avatar
    Join Date
    Feb 2011
    Location
    Indiana
    Posts
    1,535
    Post Thanks / Like
    Front of the hood essentially done, final skims/sanding.

    20240319_160015.jpg

    Finishing up the last corner of the hood. Lots of measurements from midline and A-pillars, poster board template. Fiberglass shop owner is ready to receive the hood to make a mould then a part as soon as I get it done.

    20240319_155043.jpg

    20240319_155051.jpg
    MK3.1 2004 Mach 1 donor. ABS, PS, TC.
    GTM #304 LPE 525hp LS3
    2000 C5 Lingenfelter LS1@489hp
    1999 Corvette FRC/Z06 track car

  24. #817
    Senior Member
    Join Date
    Feb 2011
    Location
    San Diego
    Posts
    1,991
    Post Thanks / Like
    Wow. Exciting. Can't wait to see a finished product.
    www.myraceshop.com

    GTM solution kits
    Corvette and Race parts

  25. Thanks beeman thanked for this post
  26. #818
    Senior Member beeman's Avatar
    Join Date
    Feb 2011
    Location
    Indiana
    Posts
    1,535
    Post Thanks / Like
    Wow. Exciting. Can't wait to see a finished product.
    Thanks, Mike!

    So the plan was to trailer the whole car to the fiberglass shop, this would prevent distortion of the hood that could occur with removal. Instead, I decided to build a frame on the outside of the hood to get it off the vehicle, now I'll build an inner frame to allow for removal of the outer frame. Then off to the fiberglass shop.
    It's been so long since I've seen under the front hood...

    20240323_135126.jpg20240323_135609.jpg
    20240323_140853.jpg
    MK3.1 2004 Mach 1 donor. ABS, PS, TC.
    GTM #304 LPE 525hp LS3
    2000 C5 Lingenfelter LS1@489hp
    1999 Corvette FRC/Z06 track car

  27. Likes VRaptor SpeedWorks, LLC liked this post
  28. #819
    Senior Member
    Join Date
    Jul 2014
    Posts
    1,268
    Post Thanks / Like
    This will be a major step for your GTM!!!!

  29. #820
    Senior Member beeman's Avatar
    Join Date
    Feb 2011
    Location
    Indiana
    Posts
    1,535
    Post Thanks / Like
    No kidding, Sean, need to get this thing done. Too many side projects...
    20240323_175505.jpg20240323_175454.jpg
    MK3.1 2004 Mach 1 donor. ABS, PS, TC.
    GTM #304 LPE 525hp LS3
    2000 C5 Lingenfelter LS1@489hp
    1999 Corvette FRC/Z06 track car

  30. #821
    VRaptor SpeedWorks, LLC's Avatar
    Join Date
    Feb 2011
    Posts
    1,517
    Post Thanks / Like
    Wow....tons of work and time involved there! Can't wait to see the final result!
    Shane Vacek
    VRaptor SpeedWorks, LLC
    www.vraptorspeedworks.com
    Turn-key GTM, SL-C & Ultima GTR Built to Your Specs!
    Offering a full line of GTM Upgrades and Custom Parts

  31. #822
    Senior Member beeman's Avatar
    Join Date
    Feb 2011
    Location
    Indiana
    Posts
    1,535
    Post Thanks / Like
    Sometimes you just need to admit defeat and leave it to the pros. Hood might be done next week. They are still blocking it, seems I missed a couple low areas, imagine that.

    20240405_112458.jpg20240405_134648.jpg20240405_134655.jpg

    20240405_135515.jpg
    20240405_134757.jpg20240405_134812.jpg
    Last edited by beeman; 04-05-2024 at 12:57 PM.
    MK3.1 2004 Mach 1 donor. ABS, PS, TC.
    GTM #304 LPE 525hp LS3
    2000 C5 Lingenfelter LS1@489hp
    1999 Corvette FRC/Z06 track car

  32. #823
    VRaptor SpeedWorks, LLC's Avatar
    Join Date
    Feb 2011
    Posts
    1,517
    Post Thanks / Like
    Cool! Not many people understand the amount of time and effort that goes into projects like that.
    Shane Vacek
    VRaptor SpeedWorks, LLC
    www.vraptorspeedworks.com
    Turn-key GTM, SL-C & Ultima GTR Built to Your Specs!
    Offering a full line of GTM Upgrades and Custom Parts

  33. #824
    Senior Member beeman's Avatar
    Join Date
    Feb 2011
    Location
    Indiana
    Posts
    1,535
    Post Thanks / Like
    Got the hood back from the fiberglass shop. Really happy with how the part turned out, nice mould too. Gray buck, orange gel coat mould, black part. Life is busier than ever, need to make time for the GTM.

    20240418_203832.jpg20240418_203836.jpg20240418_203947.jpg
    MK3.1 2004 Mach 1 donor. ABS, PS, TC.
    GTM #304 LPE 525hp LS3
    2000 C5 Lingenfelter LS1@489hp
    1999 Corvette FRC/Z06 track car

  34. #825
    Senior Member
    Join Date
    Jul 2014
    Posts
    1,268
    Post Thanks / Like
    Now that's impressive!!!

  35. #826
    Senior Member beeman's Avatar
    Join Date
    Feb 2011
    Location
    Indiana
    Posts
    1,535
    Post Thanks / Like
    Been trying to figure out how to tie the leading edge of the roof into the roll hoop behind the targa roof so it doesn't lift at speed. Wanted to keep the rear body removable so bonding it on was not an option. Bolting it on leaves unsightly bolt heads on the roof bodywork. But had to be bolted on, and I didn't trust bonding a bracket to the underside of the roof fiberglass due to the anticipated speeds this car will see. So vortex generators to the rescue. Fabbed up with m8 bolts, replace with low profile button heads, hide under the vortex generators. I did bond squares of fiberglass at the bolt sites to reinforce those areas. Now roof is flush with the targa roof weatherstrip.

    20240621_150427.jpg20240621_150317.jpg20240621_150855.jpg20240621_151542.jpg
    MK3.1 2004 Mach 1 donor. ABS, PS, TC.
    GTM #304 LPE 525hp LS3
    2000 C5 Lingenfelter LS1@489hp
    1999 Corvette FRC/Z06 track car

  36. Likes VRaptor SpeedWorks, LLC liked this post
  37. #827
    Senior Member beeman's Avatar
    Join Date
    Feb 2011
    Location
    Indiana
    Posts
    1,535
    Post Thanks / Like
    With roof secure, the rear bodywork has found its "forever home". So need to finish up the rear. I never cared for the drop lip on the rear of the Gen 1 hatch, wanted a flush rear. So cut off the rear of the hatch and bonded it to the body. Will make a weatherstrip flange to allow the rear of the hatch to seal.

    20240614_183803.jpg20240614_195230.jpg
    MK3.1 2004 Mach 1 donor. ABS, PS, TC.
    GTM #304 LPE 525hp LS3
    2000 C5 Lingenfelter LS1@489hp
    1999 Corvette FRC/Z06 track car

  38. Likes VRaptor SpeedWorks, LLC liked this post
  39. #828
    Senior Member beeman's Avatar
    Join Date
    Feb 2011
    Location
    Indiana
    Posts
    1,535
    Post Thanks / Like
    Now time to finish the exhaust. Center exit to allow for the rear L/R trunks. Note the easy trunk access. Measured the dual tip oval for a template, cut the oval template to allow cutting the two tiers of the rear bodywork. Final mockup of the Kooks dual exhaust. Love it. Mufflers will be perfectly parallel, not slightly diverging like in the pic.

    20240620_192006.jpg
    20240621_150144.jpg20240621_145921.jpg20240621_152825.jpg

    20240621_153233.jpg
    Last edited by beeman; 06-21-2024 at 02:41 PM.
    MK3.1 2004 Mach 1 donor. ABS, PS, TC.
    GTM #304 LPE 525hp LS3
    2000 C5 Lingenfelter LS1@489hp
    1999 Corvette FRC/Z06 track car

  40. #829
    Senior Member beeman's Avatar
    Join Date
    Feb 2011
    Location
    Indiana
    Posts
    1,535
    Post Thanks / Like
    All ready to tack. Wait, why is the left Kooks muffler factory weld 1/16" behind the right side one when the exhaust tips are lined up? Pulled everything apart and took another 1/16" off the offending side... Always something...

    20240623_165754.jpg20240623_172245.jpg

    Turns out that the weld on the Kooks muffler isn't as accurate as I had hoped. I wanted the Kooks emblem facing up but will have to rotate them instead, so the welds line up when looking into the engine bay...
    20240623_173857.jpg20240623_174038.jpg
    Last edited by beeman; 06-23-2024 at 04:43 PM.
    MK3.1 2004 Mach 1 donor. ABS, PS, TC.
    GTM #304 LPE 525hp LS3
    2000 C5 Lingenfelter LS1@489hp
    1999 Corvette FRC/Z06 track car

  41. Likes VRaptor SpeedWorks, LLC liked this post
  42. #830
    VRaptor SpeedWorks, LLC's Avatar
    Join Date
    Feb 2011
    Posts
    1,517
    Post Thanks / Like
    Looks like you're making good progress! I had to do a similar mod to the rear lip of the hatch on a GTM here.....the whole rear lip was so crooked that I just couldn't figure out a way to use it as-is, so ended up cutting just the bottom portion off and bonding it to the body. Much cleaner look than the original design IMO.....as is yours. Yours is the way FFR should have done it from the start. Clean look and you can still access everything at the rear of the engine bay, unlike the Gen II hatch.

    P4010232.JPG
    Shane Vacek
    VRaptor SpeedWorks, LLC
    www.vraptorspeedworks.com
    Turn-key GTM, SL-C & Ultima GTR Built to Your Specs!
    Offering a full line of GTM Upgrades and Custom Parts

  43. Likes beeman liked this post
  44. #831
    Senior Member beeman's Avatar
    Join Date
    Feb 2011
    Location
    Indiana
    Posts
    1,535
    Post Thanks / Like
    Finishing up wiring/re-wiring the car, 90% done and much happier with the logistics of the wiring than what I had done previously. Have done a couple of other builds and gained some knowledge...

    Exhaust finalized and tacked up, ready to go to a good TIG welder. The rear support is a single SS rod which is welded to the rear of the resonators, drops down into a thick rubber grommet that sits on the gearbox subframe. Simple, light, robust, and allows movement.
    20240801_172923.jpg20240801_172912.jpg20240801_174729.jpg20240801_174745.jpg20240801_182914.jpg
    Last edited by beeman; 08-01-2024 at 07:55 PM.
    MK3.1 2004 Mach 1 donor. ABS, PS, TC.
    GTM #304 LPE 525hp LS3
    2000 C5 Lingenfelter LS1@489hp
    1999 Corvette FRC/Z06 track car

  45. #832
    Member
    Join Date
    Jan 2024
    Posts
    95
    Post Thanks / Like
    That looks great Dave! I like seeing your non-traditional build ideas.
    Sal Mennella
    Unfinished GTM #30 FFR - in progress!
    Roadster 5132 - sold

  46. Thanks beeman thanked for this post
  47. #833
    Senior Member beeman's Avatar
    Join Date
    Feb 2011
    Location
    Indiana
    Posts
    1,535
    Post Thanks / Like
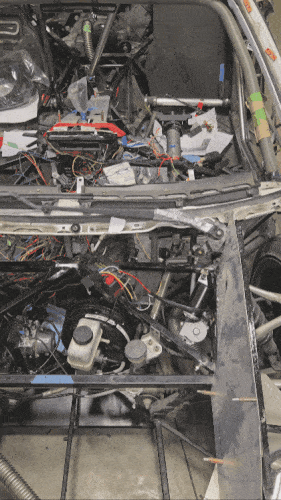
    Finishing up the under hood components so I can get cracking on the body work. Non-traditional wiper setup, single Honda S2000 wiper mount, Toyota Celica wiper arm, Jeep Wrangler wiper motor. The metal mounts on the wiper motor are the perfect size to tap to M8 X 1.25 for custom mounting . Wiper motor found itself in an odd location so that I can store the target top in the frunk. New tool in the shop, this finger sander makes short work of removing powder coat for welding. I should have bought one years ago. Highly recommended and inexpensive.


    20240830_092752.jpg
    20240830_112835.jpg
    GIF_20240830_124306_810.jpg
    Last edited by beeman; 08-30-2024 at 11:58 AM.
    MK3.1 2004 Mach 1 donor. ABS, PS, TC.
    GTM #304 LPE 525hp LS3
    2000 C5 Lingenfelter LS1@489hp
    1999 Corvette FRC/Z06 track car

  48. #834
    Senior Member beeman's Avatar
    Join Date
    Feb 2011
    Location
    Indiana
    Posts
    1,535
    Post Thanks / Like
    A few minor adjustments then it will be perfect

    MK3.1 2004 Mach 1 donor. ABS, PS, TC.
    GTM #304 LPE 525hp LS3
    2000 C5 Lingenfelter LS1@489hp
    1999 Corvette FRC/Z06 track car

  49. Likes VRaptor SpeedWorks, LLC liked this post
  50. #835
    VRaptor SpeedWorks, LLC's Avatar
    Join Date
    Feb 2011
    Posts
    1,517
    Post Thanks / Like
    Quite an assortment of parts there! Looks like it should work nicely!
    Shane Vacek
    VRaptor SpeedWorks, LLC
    www.vraptorspeedworks.com
    Turn-key GTM, SL-C & Ultima GTR Built to Your Specs!
    Offering a full line of GTM Upgrades and Custom Parts

  51. Thanks beeman thanked for this post
  52. #836
    Senior Member beeman's Avatar
    Join Date
    Feb 2011
    Location
    Indiana
    Posts
    1,535
    Post Thanks / Like
    Center air intake delete. Didn't realize that vinylester bonds pretty aggressively to plexiglass, was fun pulling that off after glassing. Next time I use a plexiglass dam/mould, I'll add masking tape.
    Picked up a hobby mill for the shop. Only weighs about 1000 lbs with the base.

    20240907_104234.jpg20240904_175123.jpg20240904_161601.jpg20240903_195353.jpg20240903_194209.jpg
    20240907_112505.jpg
    Last edited by beeman; 09-07-2024 at 10:27 AM.
    MK3.1 2004 Mach 1 donor. ABS, PS, TC.
    GTM #304 LPE 525hp LS3
    2000 C5 Lingenfelter LS1@489hp
    1999 Corvette FRC/Z06 track car

  53. Likes VRaptor SpeedWorks, LLC liked this post
  54. #837
    Senior Member
    Join Date
    Jul 2014
    Posts
    1,268
    Post Thanks / Like
    Ohhhh nice, it's like a mini bridgeport!!!

  55. Likes beeman liked this post
  56. #838
    Senior Member
    Join Date
    Feb 2011
    Location
    San Diego
    Posts
    1,991
    Post Thanks / Like
    Quote Originally Posted by beeman View Post
    Center air intake delete. Didn't realize that vinylester bonds pretty aggressively to plexiglass, was fun pulling that off after glassing. Next time I use a plexiglass dam/mould, I'll add masking tape.
    I use a sheet of wax paper. No seam lines on parts like the size you have there and much quicker to set up and remove when compared to masking tape.
    www.myraceshop.com

    GTM solution kits
    Corvette and Race parts

  57. Likes beeman liked this post
  58. #839
    Senior Member beeman's Avatar
    Join Date
    Feb 2011
    Location
    Indiana
    Posts
    1,535
    Post Thanks / Like
    Hood permanently mounted and functional. Now addressing the original side GTM body work, other than the door panel, that is currently free floating. Making brackets to tie the side body work into the main chassis taking care to line up perfectly at the gaps. Each body mount will have triangulation for strength at speed. A bit tedious but one step closer.

    20240912_171543.jpg
    20240913_100602.jpg
    20240913_100615.jpg
    20240913_103225.jpg
    MK3.1 2004 Mach 1 donor. ABS, PS, TC.
    GTM #304 LPE 525hp LS3
    2000 C5 Lingenfelter LS1@489hp
    1999 Corvette FRC/Z06 track car

  59. Likes Jkviper, VRaptor SpeedWorks, LLC liked this post
  60. #840
    Senior Member
    Join Date
    Feb 2011
    Location
    San Diego
    Posts
    1,991
    Post Thanks / Like
    Hey, you're making progress. Sometimes it seems like things take awhile(and they do) but if you commit to just keep working on it, things will get checked off the list.

    Just an aside as to how I did things in those lower fender areas. I extended the floor sheet metal out to the bottom of the fenders on all four corners in order to give them some rigidity. They won't move much at all in the vertical direction, so you just need to stop horizontal movement at the lower lip of the fenders. Sheet aluminum has worked well for me in this application.
    www.myraceshop.com

    GTM solution kits
    Corvette and Race parts

  61. Thanks beeman thanked for this post
    Likes VRaptor SpeedWorks, LLC liked this post
Page 21 of 22 FirstFirst ... 1119202122 LastLast

Posting Permissions

  • You may not post new threads
  • You may not post replies
  • You may not post attachments
  • You may not edit your posts
  •  

Martin's Dent and Collision Shop

Visit our community sponsor