-
Senior Member

-
Senior Member
-
Senior Member
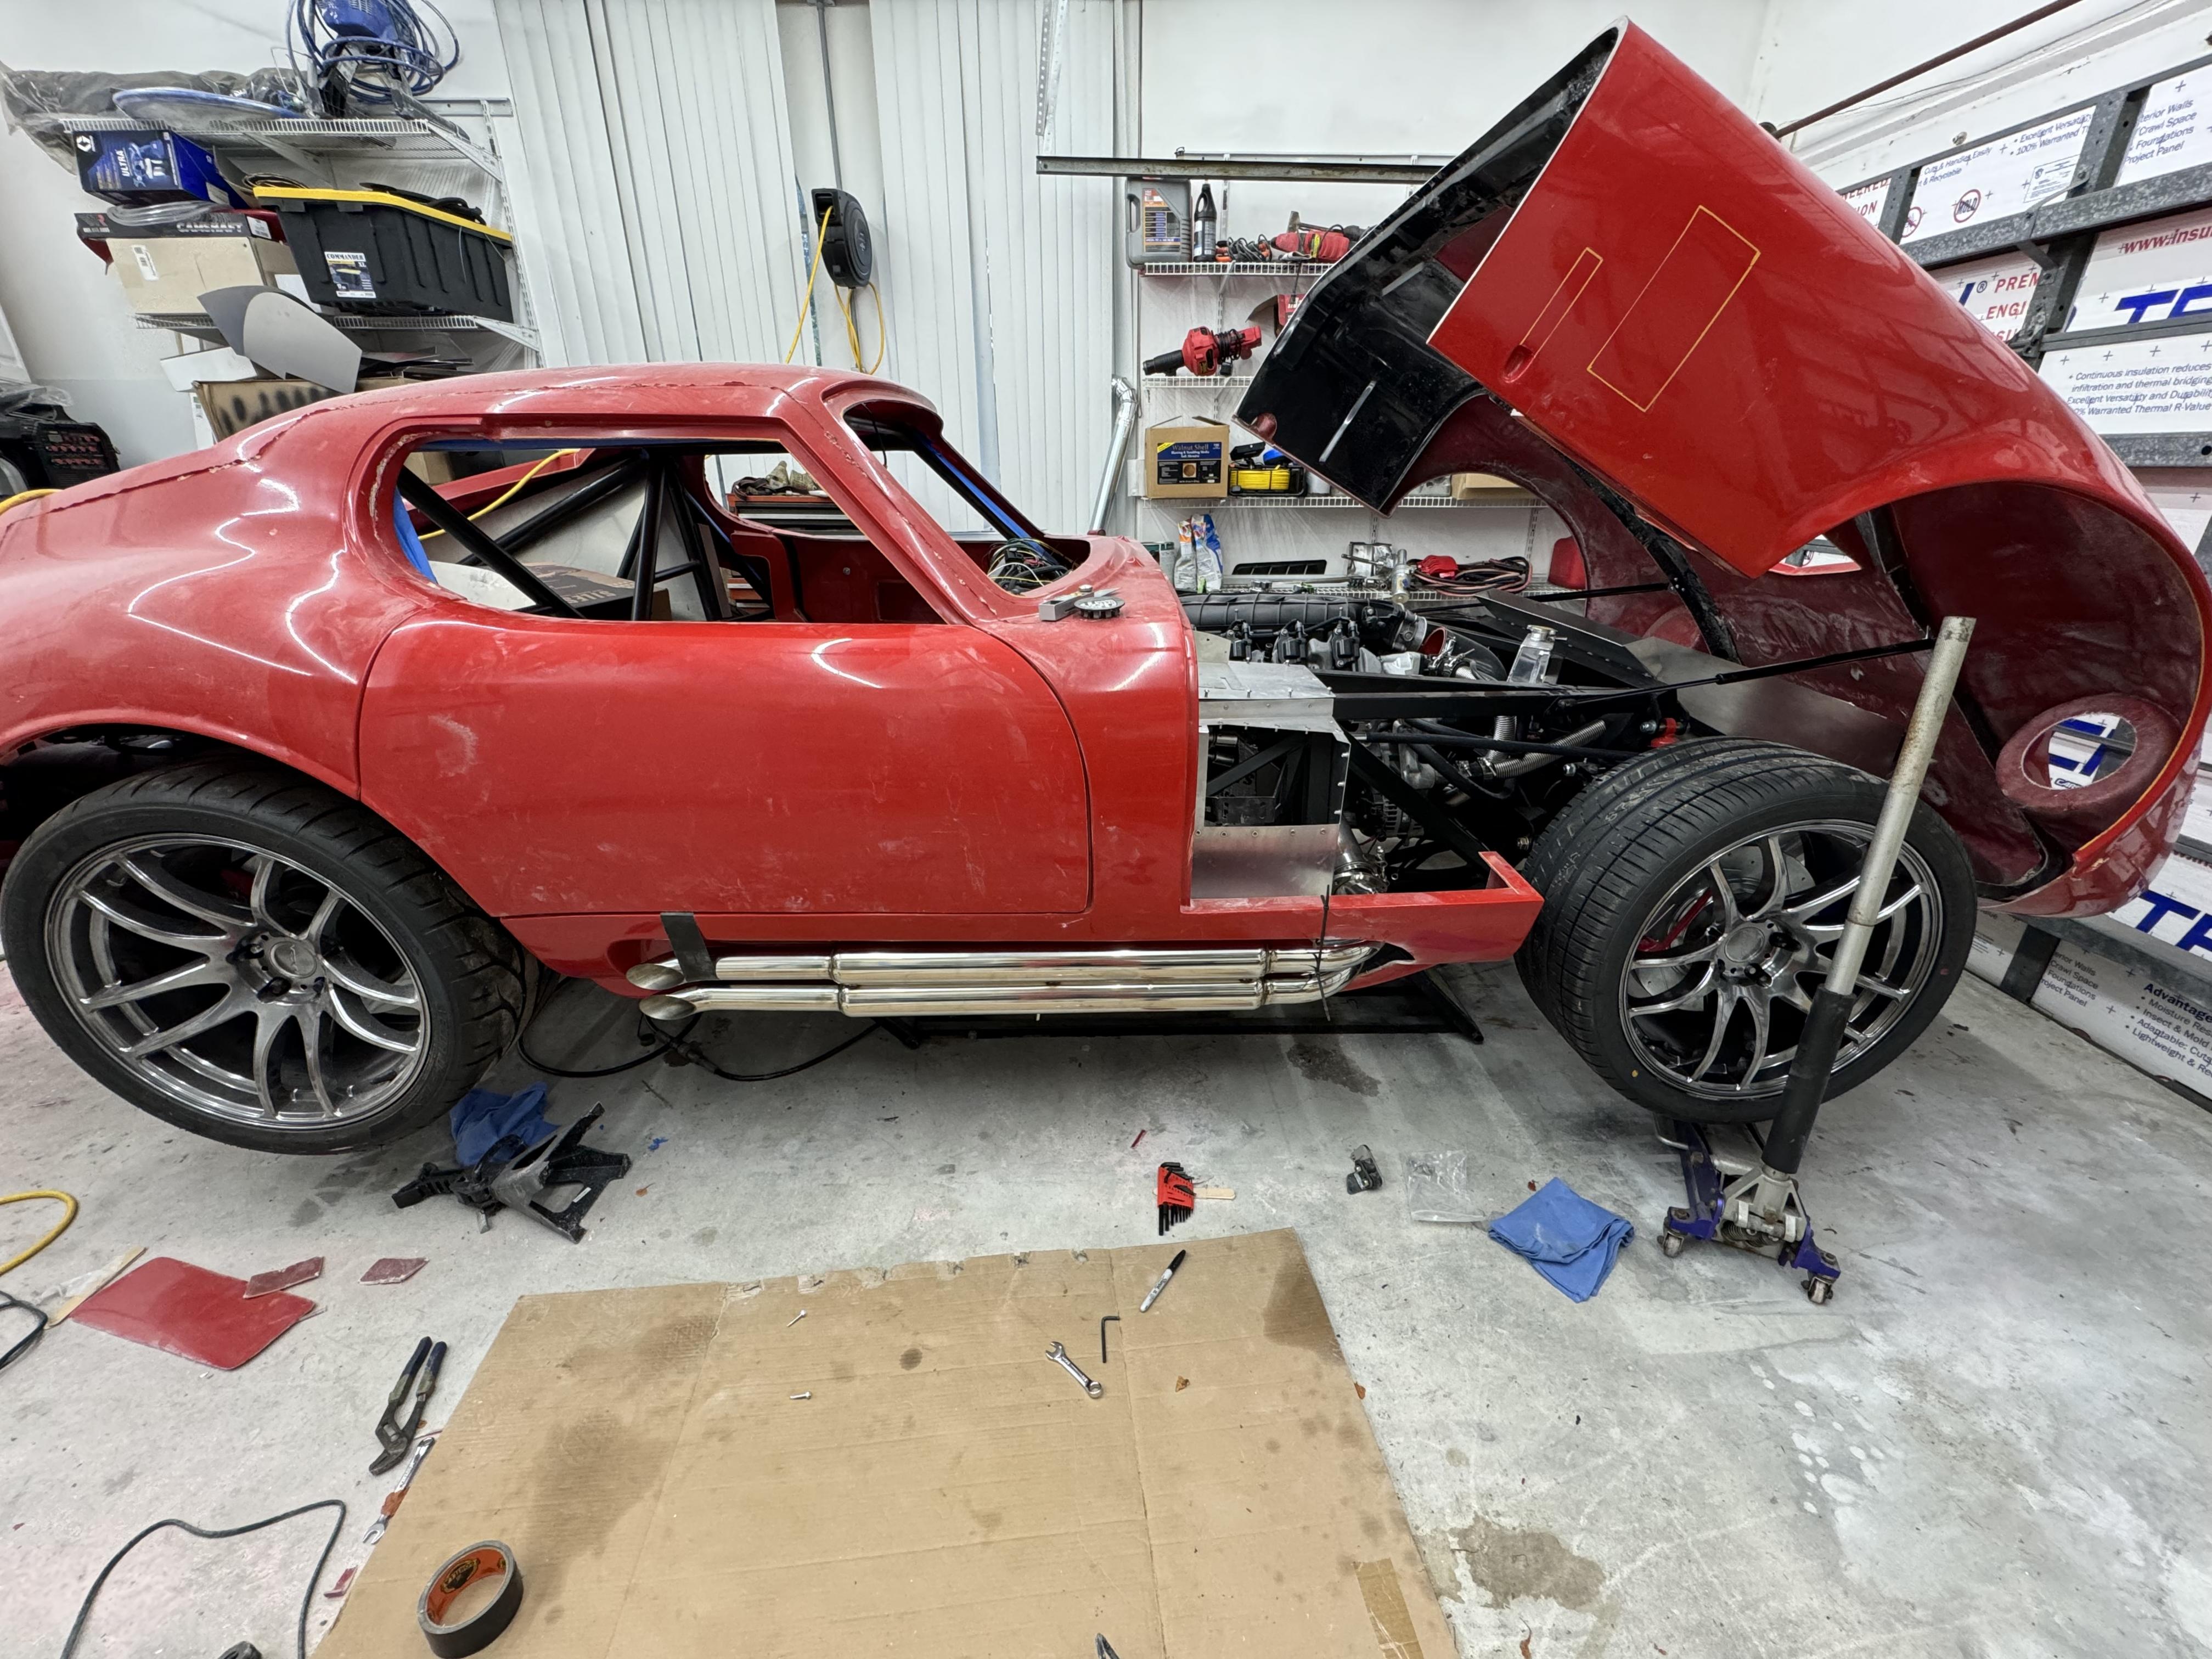
Let me start by saying this is what a real garage looks like. I swear some people polish up their cars before taking every picture, no way you can grind fiberglass and make things fit without a disaster.
Lots of progress made, not many pictures taken. Body is on and hopefully in its resting place. The back was secured to the brackets as described. The door sills don’t leave much room for securement on my car. Right now I have just a single cleco holding them while I fit the doors. I’ll 100% have to add some aluminum door sills to cover this area as the cuts made from ffr aren’t exactly straight.
The doors as described in many threads are challenging, but if you take your time you can eventually end up with a halfway decent fit until final sanding etc.
My hood fits and is mounted, I’ll need to trim the front underside more to grant full opening. Lots of final tuning to be done here though. I will definitely need located pins, rollers on the side to keep it from sucking in, and a healthy amount of final sanding at the bottom corners.
As soon as I get these panels fit enough for decent gaps and secured, I’ll work on the headers as a final segway into go kart mode.


-
Fantastic progress. The more I see your build the more I am thinking of buying a late model Camaro SS with the 10-speed auto. I was going to put the 10R80 behind a SBF, but I can generate just as much HP for less by buying a low mileage late model Camaro. They are plentiful out here in the Western states and I can sell off a lot of the donor and recover substantial money. I don't know if it is the dark or cheap side that is drawing me there, but giving it serious thought.
Keep up the good work, seeing the project move ahead at the pace you are is impressive.
MK4 base kit, 2004 Mach 1 donor, 4.6L DOHC, TR-3650 5-speed, narrowed stock axle with 3.55 gears and TruTrac, PS, PB, ABS, 17" Halibrand replica wheels, started 12/2011, registered 9/2014, sold 3/1/2018.
1970 Mustang Fastback Coyote powered Boss 302 tribute. Started 10/14/16.
Gen 3 Coupe Base Kit non-donor build. Ordered 4/5/2024 to be received August 2024.
-
Senior Member
I’ll be honest with you. The dark side thing gives me a chuckle. People putting coyotes in the cars, SBFs etc, hoping for better resale or to stay true to the history; is just pure nonsense. There is nothing about this car that is even close to the original. The frame is completely different, the body doesn’t have any of the same lines, AC installed in most, must I go on?
Again, just my opinion, but the LS is superior to the coyote or any other SBF in every way. It’s smaller, lighter, easy to tune, tons of aftermarket support, produces a lot more torque where it really matters, and you don’t have to crank it to 8k to get useable power.
Theres a reason why the LS or LT now for this generation is the most popular swap motor.
I think you might be able to make the auto work but I’d for sure look at schematics comparing the tr6060 and 10r80 sizes. There is room to move the engine forward or cut the firewall cross bars if you had to.
-
Agreed for the most part. When I was building my MK4 10 years ago, lots of threads about period correctness, which as you point out, is meaningless with these cars.
I would like something that looks good to cover the coil packs, an eyesore IMO. I have seen them remotely mounted, but not interested in going that route. I think some raised covers to cover them up and look like tall valve covers would do the trick.
When I first looked at your LT1, the intake looked like a supercharger, maybe intentional on GM's part. I am sure there are dress up items to disguise the modern nature of these engines.
MK4 base kit, 2004 Mach 1 donor, 4.6L DOHC, TR-3650 5-speed, narrowed stock axle with 3.55 gears and TruTrac, PS, PB, ABS, 17" Halibrand replica wheels, started 12/2011, registered 9/2014, sold 3/1/2018.
1970 Mustang Fastback Coyote powered Boss 302 tribute. Started 10/14/16.
Gen 3 Coupe Base Kit non-donor build. Ordered 4/5/2024 to be received August 2024.
-
Am I wrong, or are you not doing a build thread? If not, please reconsider at what you learn putting the LT1 in the coupe will be a model for anyone considering doing the same, like me.
I am 95% convinced to go the LT1 route. A stage I CAM kit from summit is said to boost HP by 60 HP and a stage II a bit more. I think I will stick with the stage I as adding headers, modified intake and a tune will add a bit more. I figure 525 flywheel HP to motivate 2500 lbs will be more than enough!
Last edited by Alan_C; 06-04-2024 at 02:46 PM.
MK4 base kit, 2004 Mach 1 donor, 4.6L DOHC, TR-3650 5-speed, narrowed stock axle with 3.55 gears and TruTrac, PS, PB, ABS, 17" Halibrand replica wheels, started 12/2011, registered 9/2014, sold 3/1/2018.
1970 Mustang Fastback Coyote powered Boss 302 tribute. Started 10/14/16.
Gen 3 Coupe Base Kit non-donor build. Ordered 4/5/2024 to be received August 2024.
-

Originally Posted by
Skuzzy

Will the 10R80 fit in the tunnel of the Type 65 Gen 3 Coupe? It is a little over 5 inches wider and about 4 inches taller than the Tremec T56 Magnum-F. It is also about 4 inches longer.
Actually, the 10R80 is only 27.9 inches in length according to Ford Performance. The T-56 Magnum F is said to be 31.8 inches in length. The big difference is that the slip joint must me included in the driveshaft, not in the transmission housing. In fitting the 6R80 to my 70 Mustang restomod, the size issue was with that the bellhousing area is taller and wider. Once about 12 inches back, no additional changes needed. We took a poor approach to modifying the tunnel for my Mustang, not the same problem for the coupe. We will find out as my plan is now to proceed with the LT1/10R80 combo.
MK4 base kit, 2004 Mach 1 donor, 4.6L DOHC, TR-3650 5-speed, narrowed stock axle with 3.55 gears and TruTrac, PS, PB, ABS, 17" Halibrand replica wheels, started 12/2011, registered 9/2014, sold 3/1/2018.
1970 Mustang Fastback Coyote powered Boss 302 tribute. Started 10/14/16.
Gen 3 Coupe Base Kit non-donor build. Ordered 4/5/2024 to be received August 2024.
-
Looking at your pictures, no headers are shown. I am learning about the LT1 and from what I have read, the headers flange for the LT1 is different that for the LS3. So what is your plan for the headers? I sent a inquiry to Gas-N regarding headers for the LT1, but so far no response. To make things worse, I would like to incorporate a small high performance muffler into the headers as well. Looks like I am going to have to buy one of the mock up kits and create my own design unless you have a better option?
I had the CAT/J-pipes on my 4.6L DOHC engine in my MK4 and I liked them a lot. The CATs quieted down the exhaust a bit and reduced the heat reaching the side pipes. Both were benefits to me. Any ideas as to how you are going to get your headers made?
MK4 base kit, 2004 Mach 1 donor, 4.6L DOHC, TR-3650 5-speed, narrowed stock axle with 3.55 gears and TruTrac, PS, PB, ABS, 17" Halibrand replica wheels, started 12/2011, registered 9/2014, sold 3/1/2018.
1970 Mustang Fastback Coyote powered Boss 302 tribute. Started 10/14/16.
Gen 3 Coupe Base Kit non-donor build. Ordered 4/5/2024 to be received August 2024.
-
Originally Posted by
Alan_C
Looking at your pictures, no headers are shown. I am learning about the LT1 and from what I have read, the headers flange for the LT1 is different that for the LS3. So what is your plan for the headers? I sent a inquiry to Gas-N regarding headers for the LT1, but so far no response. To make things worse, I would like to incorporate a small high performance muffler into the headers as well. Looks like I am going to have to buy one of the mock up kits and create my own design unless you have a better option?
I had the CAT/J-pipes on my 4.6L DOHC engine in my MK4 and I liked them a lot. The CATs quieted down the exhaust a bit and reduced the heat reaching the side pipes. Both were benefits to me. Any ideas as to how you are going to get your headers made?
Call Georgie at Gas-N, you will likely get faster response. I am in the same boat and have to make custom headers for my Cleveland. I talked to him and he said he would send me a mock up kit to get everything set, I would then send it back to him, and then he would make the headers. If you are handy at welding and 3D printing, you could make your own mockup kit, similar to the Icengineworks kit, and weld them up. This is the path that I am going to go down, since I am planning on trying to make the headers longer and add CATs as well to try and quiet things down.
-
Originally Posted by
burchfieldb
Call Georgie at Gas-N, you will likely get faster response. I am in the same boat and have to make custom headers for my Cleveland. I talked to him and he said he would send me a mock up kit to get everything set, I would then send it back to him, and then he would make the headers. If you are handy at welding and 3D printing, you could make your own mockup kit, similar to the Icengineworks kit, and weld them up. This is the path that I am going to go down, since I am planning on trying to make the headers longer and add CATs as well to try and quiet things down.
Thanks for the reply. Since you are far ahead, I will follow your lead. I can weld, but no 3D printing capability. I would be interested in any documentation you have on the engine mounts you made. Regarding the engine mounts, what did you select when you ordered? My kit won't be ready to ship till August. I specified SBF mounts, I need to call to see if there is a better choice.
MK4 base kit, 2004 Mach 1 donor, 4.6L DOHC, TR-3650 5-speed, narrowed stock axle with 3.55 gears and TruTrac, PS, PB, ABS, 17" Halibrand replica wheels, started 12/2011, registered 9/2014, sold 3/1/2018.
1970 Mustang Fastback Coyote powered Boss 302 tribute. Started 10/14/16.
Gen 3 Coupe Base Kit non-donor build. Ordered 4/5/2024 to be received August 2024.
-
Senior Member
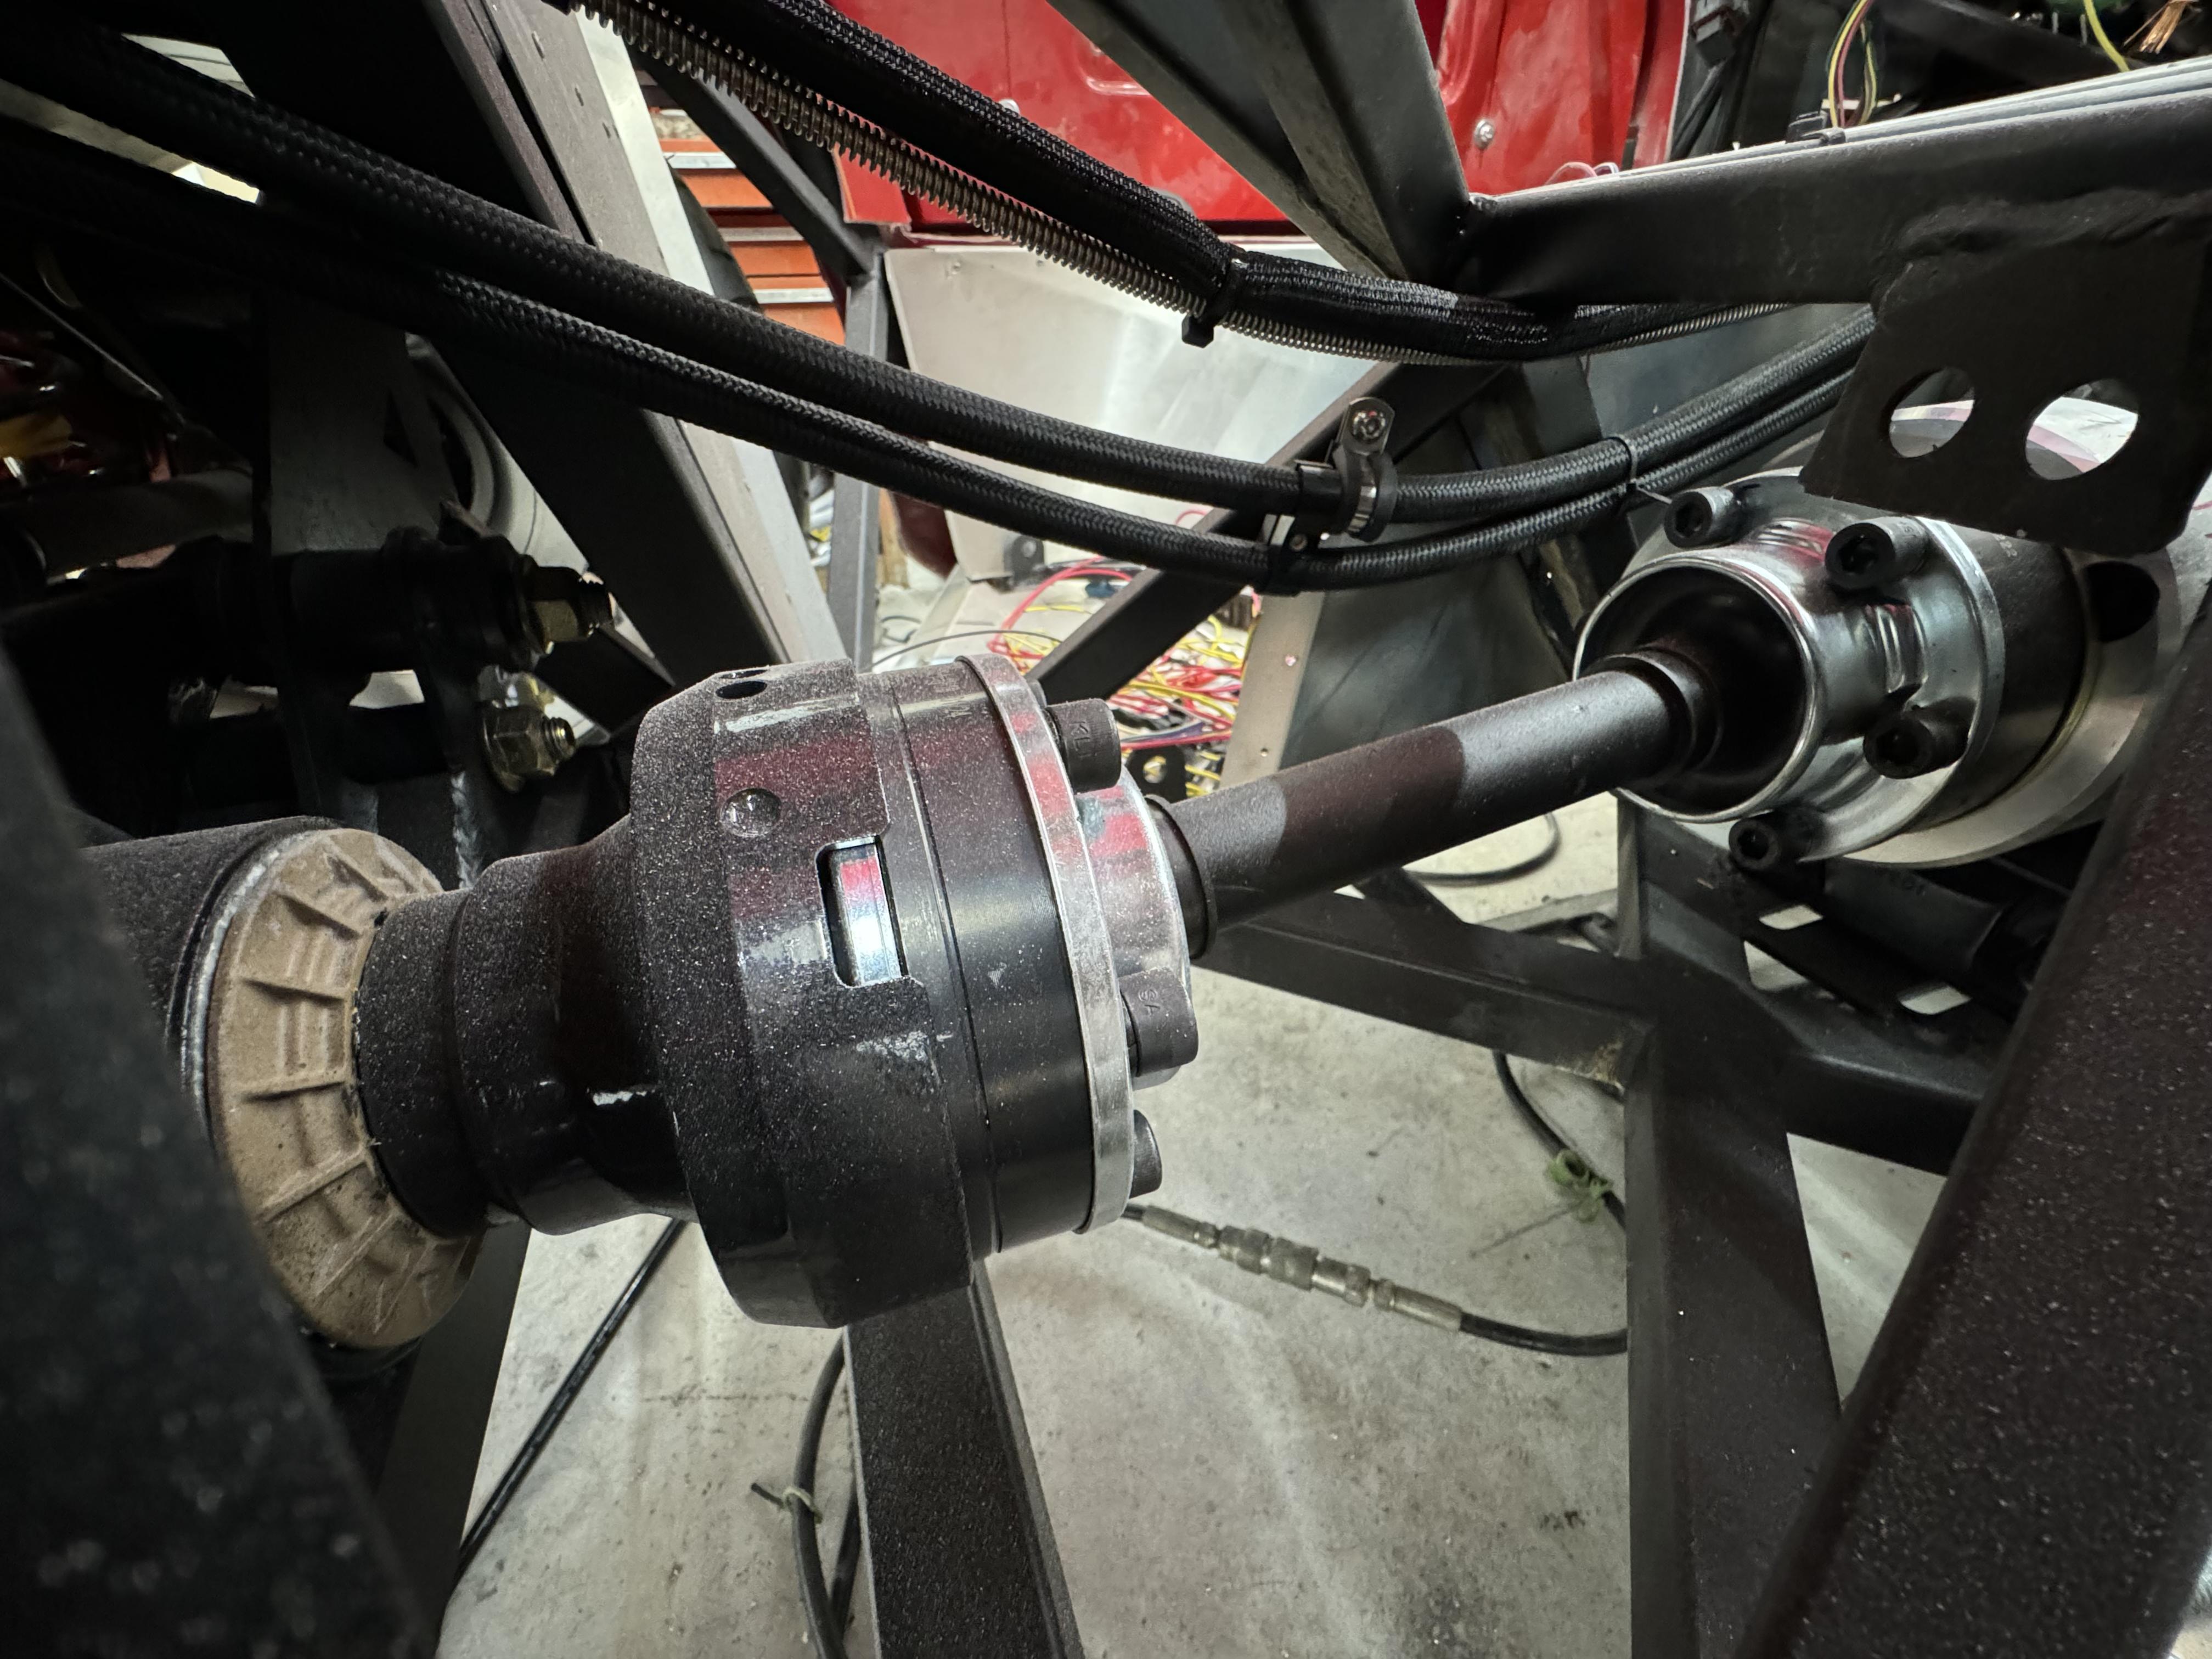
Not sure if you meant to respond to him or not. For the LT. LS mounts won’t work. At least not the portion that mounts to the engine, you can use the points that are mounted and welded to the frame of you can just chop off what factory five gives you and start from scratch. I chose an LT1/4 universal kit from eBay. Simple enough to weld onto the mounts that FFR already had on the frame.
As far as headers, yes you’ll need to make them custom. I have everything laying there I just haven’t had time to start them. No off the shelf headers will work, I’ve tried.
So to recap, new fabrication includes…
Engine mounts
Exhaust
Trans mounts
Driveshaft
Last edited by Kbl7td; 05-31-2024 at 12:49 PM.
-
Post Thanks / Like - 1 Thanks, 0 Likes
-
Read through your complete thread so far. I noticed in your intro that you are going electric PS. I did a bit of research and noted the LT1 in the Camaro uses electric PS as does the Coyote from the 2017 GT donor I bought for my Mustang restomod. I have some time to research and consider a switch to electric PS. I have a hydroboost PB system in my Mustang, so a fluid PS system made sense. In the coupe I am going with manual brakes.
For your coupe order, did you order a manual rack for use with the Saturn Vue electric PS unit?
MK4 base kit, 2004 Mach 1 donor, 4.6L DOHC, TR-3650 5-speed, narrowed stock axle with 3.55 gears and TruTrac, PS, PB, ABS, 17" Halibrand replica wheels, started 12/2011, registered 9/2014, sold 3/1/2018.
1970 Mustang Fastback Coyote powered Boss 302 tribute. Started 10/14/16.
Gen 3 Coupe Base Kit non-donor build. Ordered 4/5/2024 to be received August 2024.
-
Senior Member
-
Post Thanks / Like - 0 Thanks, 1 Likes
-
Originally Posted by
Kbl7td
Again progress to a crawl
.
Both doors now mounted with latches and handles. Satisfied, but again much fine tuning to do. Especially when considering the addition of weatherstrip.
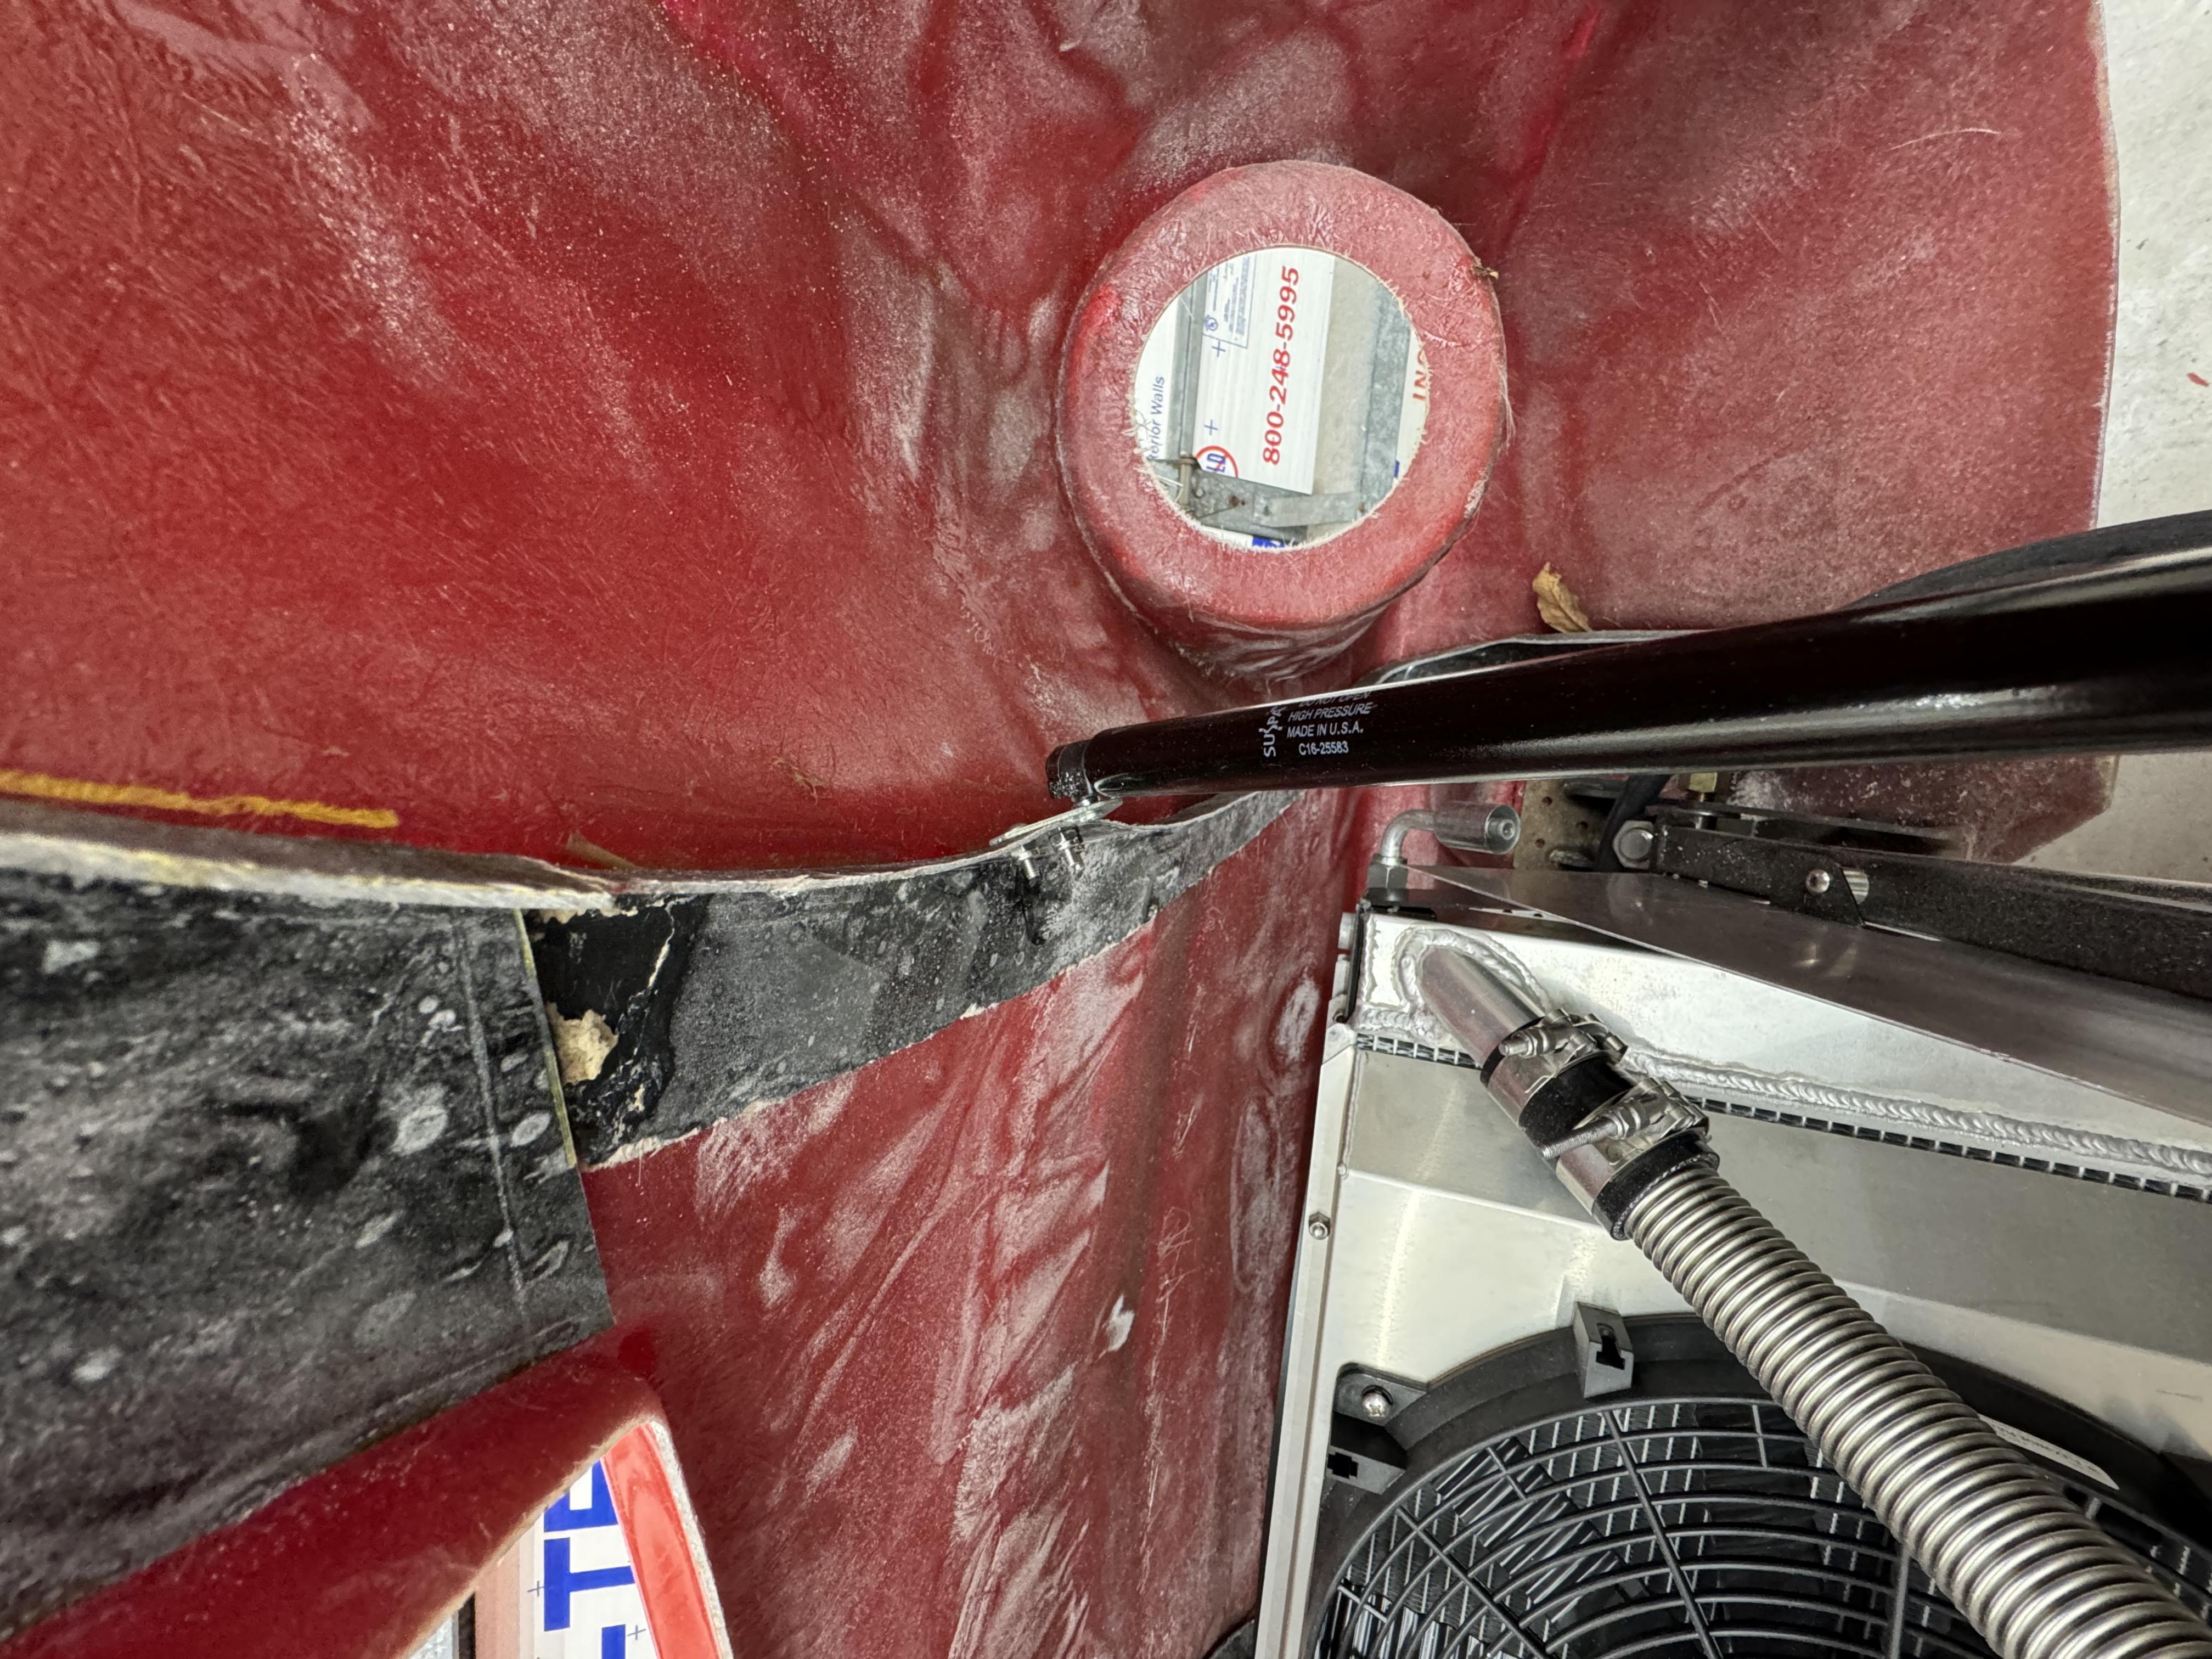
Hood struts mounted, really dont know how FFR doesnt have a better out of box solution for this. Obviously its not hard to fix but these struts really flex that flimsy body bracing.
Driveshaft has been in for awhile now, dual CV from driveshaft shop.
Headers are the priority now so I can get this thing running and driving.

Very interested in how you develop your headers. I want to incorporate a small CAT into the design. I know I can buy the flanges for the heads from many sources. When you have more details of your design, please share.
MK4 base kit, 2004 Mach 1 donor, 4.6L DOHC, TR-3650 5-speed, narrowed stock axle with 3.55 gears and TruTrac, PS, PB, ABS, 17" Halibrand replica wheels, started 12/2011, registered 9/2014, sold 3/1/2018.
1970 Mustang Fastback Coyote powered Boss 302 tribute. Started 10/14/16.
Gen 3 Coupe Base Kit non-donor build. Ordered 4/5/2024 to be received August 2024.
-
Senior Member
-
Post Thanks / Like - 1 Thanks, 1 Likes
-
Senior Member
-
Post Thanks / Like - 0 Thanks, 1 Likes
-
Interesting idea on the hood struts. Great example of thinking outside the box! But it may make things worse. With my coupe, the issue with the struts is pushing on the top of the hood making the distance between the hinge mounting surface and the top of the hood to widen. This pulls the edge of the hood that meets the body cowl forward. The location of your struts may make that worse. My solution was to attach a strap to the support ridge, thats glued to the hood, to lock the distance between the hinge location and the top of the hood.
-
Senior Member
Originally Posted by
Namrups
Interesting idea on the hood struts. Great example of thinking outside the box! But it may make things worse. With my coupe, the issue with the struts is pushing on the top of the hood making the distance between the hinge mounting surface and the top of the hood to widen. This pulls the edge of the hood that meets the body cowl forward. The location of your struts may make that worse. My solution was to attach a strap to the support ridge, thats glued to the hood, to lock the distance between the hinge location and the top of the hood.
Yes that is my next move. Right now the hood won’t even open because the pressure of the strut wants to bend the fiberglass support and pop off the strut. Like you said I’ll attach an aluminum support to the lower and upper portion. As well as add filler all along the existing supports. This should put force only in that front area of the hood where it’s already difficult to flex. Additionally should hide those struts more from view.
-
I used HSRF to fill the gap between the body and the glued on support structure to help structurally and to finish off the look better when I coated it all with Raptor. I also added a strip of 1/8" aluminum to the strut mounting location to stiffen the support structure.
-
Let us know how the hood struts work out, I may want to modify mine as well. As a heads up, you will want to point the silver rod end of the strut down, this will keep the seal in the strut oiled and keep the gas from leaking out over time.
-
Senior Member
-
Senior Member
Finishing up the tig welding, a few more hours and everything should be done. Then ready for first start/drive.


 Thanks:
  Likes:


 Reply With Quote

