-
Aluminum panel question
Quick question before i rivet the aluminum panels behind the front wheels. The manual shows this piece (non powder coated in the pic) on the outside like in pic 1. It looks much neater if you rivet it behind like in pic 2. Is it just personal preference or is there some obvious reason not to do it like i am planning to?
On the same note, i assume i can rivet it in place now or should i wait for the body to be put on?
viber_image_2024-07-07_19-03-13-671.jpgviber_image_2024-07-07_19-03-13-715.jpg
Thanks!
-
I put it behind. You really need to only cleco it until final assembly. Its hard to get the body in place with those installed. They get hung up on the pontoons. Also its easier to install them if the front aluminum is clecoed too.
Mike
-
Senior Member

I wouldn't put them in now. Installing those needs to be part of the body installation and alignment. As Mike said, the body goes on easier without them in place. Once you're fitting the body, you'll find the pontoons are floppy and needs those pieces to stabilize and help get into the best position. I put mine on the front as shown in the manual. If you're thinking about appearance, it's the same either way. The tabs are visible from the wheel well side with the hood open. On the inside, they're fairly visible next to the engine. I'd put them where they fit best. For me it was where the manual shows. Keep in mind too, these pieces mate with the splash guards in the hood to seal the wheel wells. Another reason to wait until body fitting to make sure you have them in exactly the right place.

Last edited by edwardb; 07-07-2024 at 08:44 PM.
Build 1: Mk3 Roadster #5125. Sold 11/08/2014.
Build 2: Mk4 Roadster #7750. Sold 04/10/2017.
Build Thread
Build 3: Mk4 Roadster 20th Anniversary #8674. Sold 09/07/2020.
Build Thread and
Video.
Build 4: Gen 3 Type 65 Coupe #59. Gen 3 Coyote. Legal 03/04/2020.
Build Thread and
Video
Build 5: 35 Hot Rod Truck #138. LS3 and 4L65E auto. Rcvd 01/05/2021. Legal 04/20/2023.
Build Thread. Sold 11/9/2023.
-
Thank you for the input.
I didn't plan on installing them permanently, since i can't powder coat them without at least on hole to hang the sheets by, I was wondering if i can go ahead and drill the holes and use clecos without having the body on. This idea came to me, as it looks like all of the panels i have seen in other builds are simply set along the edge of the other panel, hence making it look like the panel is more or less in the same position on all the builds, hence not needing the body to be fitted 
I had a look at the rear upright corner panels behind the seats last night and mine seem to fit poorly. The top rubs against the roll cage and there is like 1cm gal to the rear hatch side panel where they are meant to be riveted together. Are you meant to bend the corner upright pieces or manipulate it in other ways? Anybody had any issues with those panels? I plan on installing them before putting the body on as many have done in their builds.
-
Senior Member
Obviously your choice whether to mount these panels now or later while fitting the body. Agree there needs to be a hole for the powder coater wire to hang the parts. It only needs to be very small and once coated and the panel installed basically disappears. I personally wouldn't use that as a reason to drill rivet holes. As for that corner piece, not unusual to have to tweak bends on this or any other parts. I also waited for the final body fitting to install this part, as per the manual, and found some variation in how it fits. So glad I waited to get it just right including adjusting bends or whatever. I've also seen multiple builds where guys put it on without the body and don't seem to have issues. I personally don't see any advantage or understand the motivation. I'm a big believer in having everything placed in final locations as much as possible before committing the assembly. But that's just me and how I work. We all are different and no one way is the only or right way.
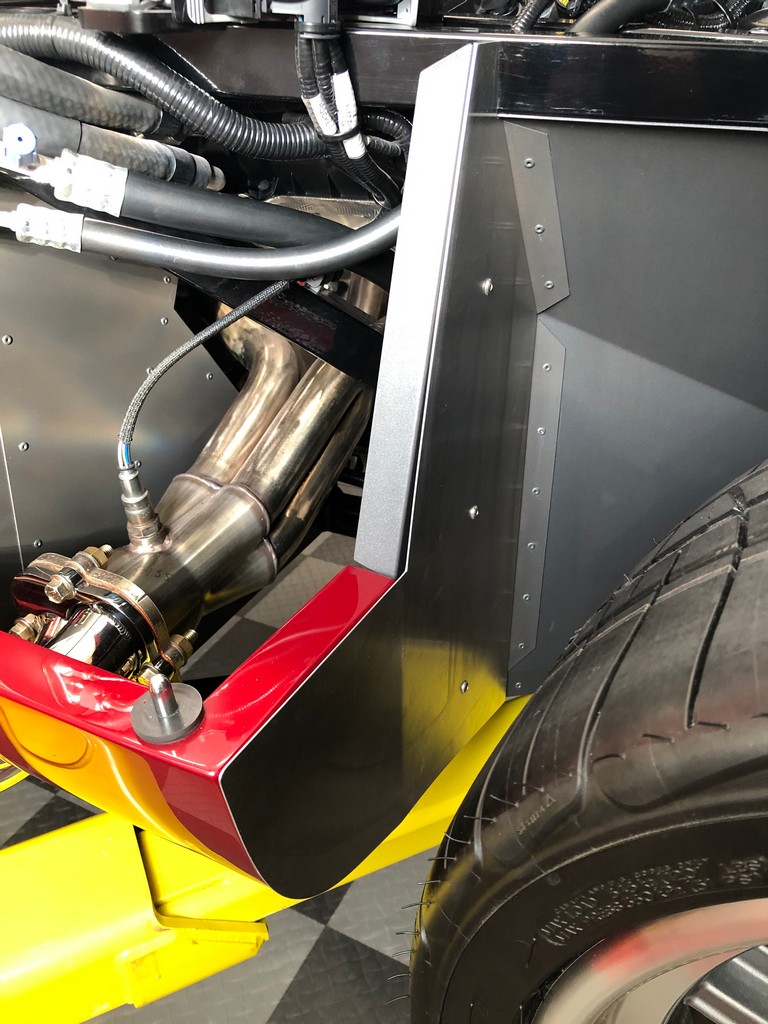
One other thing I thought of as I looked again at the previous picture I posted. I received feedback during my build that the painted area on the front of the pontoons will get hammered by dirt, rocks, whatever, coming off the front tires. Not necessarily worried about protecting the paint. But it wouldn't look nice because the damage over time will be significant. I actually made another set of liners that covered the entire lower section. Held on with nutserts and with several coats of bedliner/undercoat material. I used UPOL Raptor. There are other choices. This picture is with them fitted before spraying with Raptor. With now 7,000 miles on my Coupe, I can confirm that area in fact does take a beating. Something to consider.
Last edited by edwardb; 07-08-2024 at 06:42 AM.
Build 1: Mk3 Roadster #5125. Sold 11/08/2014.
Build 2: Mk4 Roadster #7750. Sold 04/10/2017.
Build Thread
Build 3: Mk4 Roadster 20th Anniversary #8674. Sold 09/07/2020.
Build Thread and
Video.
Build 4: Gen 3 Type 65 Coupe #59. Gen 3 Coyote. Legal 03/04/2020.
Build Thread and
Video
Build 5: 35 Hot Rod Truck #138. LS3 and 4L65E auto. Rcvd 01/05/2021. Legal 04/20/2023.
Build Thread. Sold 11/9/2023.
-
Post Thanks / Like - 0 Thanks, 1 Likes
-
Thank you!
I think i will just drill the unpainted panel, and once it is painted and the body is fitted, i will use the pre-drilled holes as a guide for the other panel holes - makes sense at least in my head. I used this method for the hatch side panels, drilled through the hatch bottom panels all the way to the frame, and used the holes of the bottom panels to drill through the hatch side panels later on in the build.
Great tip on the extra liners, i think this is what i am going to do too. Initially i was planning on using Upol Raptor or some other rubber based bedliner type stuff for the wheel wells, but making an extra sheet which is removable makes so much more sense than painting the fixed panels. Did you do the same for the rear wells too?
-
Senior Member

Originally Posted by
nick729

Great tip on the extra liners, i think this is what i am going to do too. Initially i was planning on using Upol Raptor or some other rubber based bedliner type stuff for the wheel wells, but making an extra sheet which is removable makes so much more sense than painting the fixed panels. Did you do the same for the rear wells too?
UPOL Raptor is a 2K polyurethane catalyzed coating. Very different and much more durable than a rubber based bedliner product. I've used about every latex and solvent based bedliner product. None are close to the Raptor for durability. Plus Raptor sets up relatively quickly and is easy to keep clean. (No I'm not on commission...) The rear wheel wells don't have any exposed paint like the front pontoons. So I didn't add anything. But I did coat the rear splash panels with Raptor.
Build 1: Mk3 Roadster #5125. Sold 11/08/2014.
Build 2: Mk4 Roadster #7750. Sold 04/10/2017.
Build Thread
Build 3: Mk4 Roadster 20th Anniversary #8674. Sold 09/07/2020.
Build Thread and
Video.
Build 4: Gen 3 Type 65 Coupe #59. Gen 3 Coyote. Legal 03/04/2020.
Build Thread and
Video
Build 5: 35 Hot Rod Truck #138. LS3 and 4L65E auto. Rcvd 01/05/2021. Legal 04/20/2023.
Build Thread. Sold 11/9/2023.
-
Originally Posted by
edwardb
UPOL Raptor is a 2K polyurethane catalyzed coating. Very different and much more durable than a rubber based bedliner product. I've used about every latex and solvent based bedliner product. None are close to the Raptor for durability. Plus Raptor sets up relatively quickly and is easy to keep clean. (No I'm not on commission...) The rear wheel wells don't have any exposed paint like the front pontoons. So I didn't add anything. But I did coat the rear splash panels with Raptor.
Great to know! I have the inside of the body coated in Upol Raptor as well as the inside of the hood, I got a shop to do it for me though. I saw Upol Raptor 2k aerosol cans, do you know by any chance if it's any good for DIY application, or should i just get the same shop to do a proper coating on those panels with the normal spray gun?
-
Originally Posted by
nick729
Great to know! I have the inside of the body coated in Upol Raptor as well as the inside of the hood, I got a shop to do it for me though. I saw Upol Raptor 2k aerosol cans, do you know by any chance if it's any good for DIY application, or should i just get the same shop to do a proper coating on those panels with the normal spray gun?
I've been following your thread. What I did with the Raptor coating on the panels in question was to use a sponge to apply by dabbing it. Depending on the sponge you use it gives a slightly raised texture. I also used a roller. The kit I used came with a very open cell sponge type of roller. I used a paint roller instead. I did it this way because I didn't want to deal with any overspray. Worked well for me.
Scott
-
I have used the 1K Raptor in spray cans for the bottom of my vintage Mustang build, I like it. I also bought some of the adhesion promotor too. My only issue was some of the spray nozzles did not work well while others did. I kept and recycled the good ones so that when I came upon a poorly working one, I would just swap it out. I used 6 cans of the Raptor and 3 of the adhesion promotor on the bottom of a 1970 Mustang Fastback. You would need far less for your Factory Five.
I have seen a lot of people install some of their aluminum panels too early and find they actually get int the way of accessing areas of the car when installing brake and fuel lines as well as wiring. On my MK4, I waited to do the final install of many of the interior aluminum panels until after everything was complete behind them. Clecos are easy to remove, rivets and silicone not so much. It sometimes looks like progress to install the aluminum panels only for them to get in the way making other tasks a PITA.
MK4 base kit, 2004 Mach 1 donor, 4.6L DOHC, TR-3650 5-speed, narrowed stock axle with 3.55 gears and TruTrac, PS, PB, ABS, 17" Halibrand replica wheels, started 12/2011, registered 9/2014, sold 3/1/2018.
1970 Mustang Fastback Coyote powered Boss 302 tribute. Started 10/14/16.
Gen 3 Coupe Base Kit non-donor build. Ordered 4/5/2024 to be received August 2024.
-
Senior Member
Originally Posted by
nick729
Great to know! I have the inside of the body coated in Upol Raptor as well as the inside of the hood, I got a shop to do it for me though. I saw Upol Raptor 2k aerosol cans, do you know by any chance if it's any good for DIY application, or should i just get the same shop to do a proper coating on those panels with the normal spray gun?
I haven't used their RAPTOR 2K Bedliner Aerosol product. I just did a little research and found it's similar to some other aerosol 2K products I've used where you have to activate the catalyst that's also packaged in the can and then you have about one hour of pot life to spray out the contents. No reason to think that wouldn't be as good and as durable as the more conventional approach using a spray gun. I suspect though on a per ounce basis it's going to be more expensive at $35 - $40 per can. I've used the conventional material on a couple builds and they make it pretty easy. The can with the base material has space for the catalyst to be added and then it screws directly onto either of their offered spray guns. So there's no spray gun cup to clean out. It has a similar pot life once mixed.
Build 1: Mk3 Roadster #5125. Sold 11/08/2014.
Build 2: Mk4 Roadster #7750. Sold 04/10/2017.
Build Thread
Build 3: Mk4 Roadster 20th Anniversary #8674. Sold 09/07/2020.
Build Thread and
Video.
Build 4: Gen 3 Type 65 Coupe #59. Gen 3 Coyote. Legal 03/04/2020.
Build Thread and
Video
Build 5: 35 Hot Rod Truck #138. LS3 and 4L65E auto. Rcvd 01/05/2021. Legal 04/20/2023.
Build Thread. Sold 11/9/2023.
-
Senior Member

Originally Posted by
edwardb
I haven't used their RAPTOR 2K Bedliner Aerosol product. I just did a little research and found it's similar to some other aerosol 2K products I've used where you have to activate the catalyst that's also packaged in the can and then you have about one hour of pot life to spray out the contents. No reason to think that wouldn't be as good and as durable as the more conventional approach using a spray gun. I suspect though on a per ounce basis it's going to be more expensive at $35 - $40 per can. I've used the conventional material on a couple builds and they make it pretty easy. The can with the base material has space for the catalyst to be added and then it screws directly onto either of their offered spray guns. So there's no spray gun cup to clean out. It has a similar pot life once mixed.
I used the aerosol product on my aluminum panels that nick is asking about. Seemed to go on fairly easy. I waited until the body was on before installing those panels
Build 1: Mk4 Complete Kit #9312 Ordered 1/27/18, Delivered 3/24/18, CA SB100 Registered 9/11/19 - Gen 2 Coyote TKO600, IRS, Power Steering, Wilwood Brakes, 17" Halibrand.
Build 2: Gen3 Coupe Complete Kit #309 Ordered 1/25/21, Delivered 6/9/21, CA SB100 Registered 8/27/24 - BluePrint GM 427 LS T56, IRS, AC, Power Steering.
Album Here
-
Here is a link to the 1K Raptor product I used, at $23 a can, far cheaper than the 2K product at $45 to 50 a can.
https://tcpglobal.com/collections/be...s/upo-4879-3pk
MK4 base kit, 2004 Mach 1 donor, 4.6L DOHC, TR-3650 5-speed, narrowed stock axle with 3.55 gears and TruTrac, PS, PB, ABS, 17" Halibrand replica wheels, started 12/2011, registered 9/2014, sold 3/1/2018.
1970 Mustang Fastback Coyote powered Boss 302 tribute. Started 10/14/16.
Gen 3 Coupe Base Kit non-donor build. Ordered 4/5/2024 to be received August 2024.
-
I went a little different route to protect this area.
After installing everything, I made a template and created a cover for the entire area (plus an oversized lobe at the bottom to protect the paint in the pontoon area as much as possible) I used a semi truck mud flap, as I wasn't able to source other thick rubber locally).
Works great, no mess or cleanup, easily replaceable or removeable down the road if I wish
!! Flap.jpg
Rian
-
@Namrups, i gave up on the build diary, just no cup of tea taking pictures of the build, also kids and other things are slowing down the build a lot, sometimes going 3-4months without any work being done to the car.
@Alan_C, agree on the aluminum panels seeming like progress and the desire to install them too soon. I've been putting off some of those for ages now, but getting round to it now, hence why i don't want to install them too early or in the wrong order. I will try the Raptor 2k areosol as apparently it is up to 10 times more durable, so spending a little bit extra money on a more expensive product is not really an issue on a 100-120k car
@edward, great tips as usual, thank you very much for your input on all of my questions!
@lemwa, i probably did not make it clear, but i am not planning on installing these panels now, i just wanted to set them in the right place and use clecos to keep them in place, as i need to drill at least one hole through the panel for them to be powder coated. The general consensus is not to drill them until i have the body on and see the final position of it, so i will just drill a single hole through the panel for powder coating and will drill the rest after the body is fitted. Note to be taken, that you can drill all the rivet holes on the unpainted panel with the help of the spacing tool, but it is probably best to wait for the body to decide on the final position of the panel in relation to the other panel until the body is on (not sure if i expressed myself clearly on what i mean).
@Rian_Colorado, that's also a sensible idea.
Thank you all your thoughts and input!


 Thanks:
  Likes:


 Reply With Quote
