-
Great job Shakey. Big step.Two items: 1) I noticed how you routed your heater hoses in one of your pictures. I had mine the same way and could not get heat. The manual shows the heater hose that is coming from the top footbox connection should be attached to the heater valve outlet closest to the firewall. Once I changed mine I had heat. 2) I followed the manual as far as positioning my body but when it came time to mount the door hinges they would not swing fully and I had to reposition the body for clearance. I would suggest cutting your hinge openings and mocking up the hinges for clearance before securing the body down.
-

Originally Posted by
Namrups

Great job Shakey. Big step.Two items: 1) I noticed how you routed your heater hoses in one of your pictures. I had mine the same way and could not get heat. The manual shows the heater hose that is coming from the top footbox connection should be attached to the heater valve outlet closest to the firewall. Once I changed mine I had heat. 2) I followed the manual as far as positioning my body but when it came time to mount the door hinges they would not swing fully and I had to reposition the body for clearance. I would suggest cutting your hinge openings and mocking up the hinges for clearance before securing the body down.
Great observations! I have not run the heater yet. The vents and ducts still need to be plumbed. I will definitely keep this in mind and it will be the first thing I do if the heat isn't working. I already bolted the body on but there is still some adjustment in the rear brackets. If needed I suppose I can re-drill the screw holes near the doors. Thanks for the comments. I will do the doors next for sure before I get any further into the body work.
V/R
Shakey
-
Post Thanks / Like - 0 Thanks, 1 Likes
-

Originally Posted by
Shakey

Great observations! I have not run the heater yet. The vents and ducts still need to be plumbed. I will definitely keep this in mind and it will be the first thing I do if the heat isn't working. I already bolted the body on but there is still some adjustment in the rear brackets. If needed I suppose I can re-drill the screw holes near the doors. Thanks for the comments. I will do the doors next for sure before I get any further into the body work.
V/R
Shakey
I had to move my body as far forward as I could get it.
-
I did as well and modified the hinges so that I could get the door to open more without hitting the body. Otherwise it is a real bear to get out.
-
Good to read this info regarding where to mount the body. I am 6’ 5” so I need all the room I can get! Thanks guys!
-
Walk around video.
Posted a video walking around and discussing the build a bit on youtube. Close to getting the car registered. Just waiting on the Washington State Patrol for a VIN inspection now.
https://www.youtube.com/watch?v=mNF-gFY2lQA
Shakey
-
Post Thanks / Like - 0 Thanks, 1 Likes
-
 Quick Update
I just dropped the car off at the dyno/tuner in my area. Plan is to get them to do a base tune on the Termintor X and if they think the engine is healthy enough and has enough break-in miles on it, they will put it on the dyno. First time the car had been in anothers hands. I imagine it's similar to what the feeling of dropping your first born off at college is like.
I did get the car registered and it's now street legal in WA state. Standby for another thread on that specifically. Lots of waiting and bureaucracy.
Odometer is at 260mi. So far everything is great and hopefully once tuner is done with the EFI and alignment it will be ready for the spring/summer driving season.
V/r
Shakey
-
Great news! Enjoy the summer driving your dream. I look for reasons to take the car out. Hmmmm I need a loaf of bread... Wheres my coupe keys!!!
-
Post Thanks / Like - 0 Thanks, 1 Likes
-
Just viewed your first start and go kart videos, awesome and congrats on the achievements!
My coupe arrives in August, can't wait to get started. I love the bronze wheels, doing something similar on mine, just a different wheel pattern.
MK4 base kit, 2004 Mach 1 donor, 4.6L DOHC, TR-3650 5-speed, narrowed stock axle with 3.55 gears and TruTrac, PS, PB, ABS, 17" Halibrand replica wheels, started 12/2011, registered 9/2014, sold 3/1/2018.
1970 Mustang Fastback Coyote powered Boss 302 tribute. Started 10/14/16.
Gen 3 Coupe Base Kit non-donor build. Ordered 4/5/2024 to be received August 2024.
-
Hey Alan, sounds like a fun build. I basically went for the Forgestar wheels because I could get the offset right and not run wheel spacers. More custom wheels are out there but are much more expensive. My wife is from Prescott Valley AZ. If we are gonna be in that area I'm might shoot you a PM and we can compare notes.
Last edited by Shakey; 04-30-2024 at 08:26 PM.
-
Post Thanks / Like - 0 Thanks, 1 Likes
-

Originally Posted by
Shakey

Hey Alan, sounds like a fun build. I basically went for the Forgestar wheels because I could get the offset right and not run wheel spacers. More custom wheels are out there but are much more expensive. My wife is from Prescott Valley AZ. If we are gonna be in that area I'm might shoot you a PM and we can compare notes.
If you don't mind, please share your exact offsets or backspacing on your wheels. You indicate that your wheels are just about ideal as they don't require spacers. It would help greatly when I go to order in July as maybe I can get APEX to match your backspacing.
MK4 base kit, 2004 Mach 1 donor, 4.6L DOHC, TR-3650 5-speed, narrowed stock axle with 3.55 gears and TruTrac, PS, PB, ABS, 17" Halibrand replica wheels, started 12/2011, registered 9/2014, sold 3/1/2018.
1970 Mustang Fastback Coyote powered Boss 302 tribute. Started 10/14/16.
Gen 3 Coupe Base Kit non-donor build. Ordered 4/5/2024 to be received August 2024.
-
Question About Rear Wheel Offset

Originally Posted by
Shakey

Greetings all,
Forgestar F14 Golden Bronze Front: 18x10 +12mm offset, Rear: 19x12 -25mm offset(Thanks Logan!)
Tires Nitto INVO Front: 275/40R18 Rear: 325/30R19
-Shakey
So you are showing a -25mm offset at the rear, is that correct?
I am looking at the Apex ARC-8 wheels and all of their offset options are positive. I can select 19x11 +11mm at the front and 19x12 +25mm at the rear. Just checking in advance. Given the set are $2500 wheels, I am going to get one of the fitment tools to check the offsets needed. That or I can the 18 inch wheels from my Mustang restomod and add spacers as needed.
MK4 base kit, 2004 Mach 1 donor, 4.6L DOHC, TR-3650 5-speed, narrowed stock axle with 3.55 gears and TruTrac, PS, PB, ABS, 17" Halibrand replica wheels, started 12/2011, registered 9/2014, sold 3/1/2018.
1970 Mustang Fastback Coyote powered Boss 302 tribute. Started 10/14/16.
Gen 3 Coupe Base Kit non-donor build. Ordered 4/5/2024 to be received August 2024.
-
Alan,
Yes, its a -25mm offset in the rear. That is why the Forgestar wheels were so appealing was because they can do this uncommon offset at a reasonable price. Also, check that they offer the ARC-8 with a 5X114.3 bolt pattern. Didn't see that option on their website.
Here are the exact specs from my order sheet with Get Your Wheels.
Wheels:
Front: FORGESTAR F14 SDC 18X10 Backspace: +12 Bolt pattern: 5X114.3
Rear: FORGESTAR F14 UDC 19X12 Backspace: -25 Bolt pattern: 5X114.3
Finish: GLOSS BRUSHED ANTIQUE BRONZE
Tires: Goodyear Eagle F1 Supercar 3
Front: 275/40 R18
Rear: 325/30 R19
V/R
Shakey
-

Originally Posted by
Shakey

Alan,
Yes, its a -25mm offset in the rear. That is why the Forgestar wheels were so appealing was because they can do this uncommon offset at a reasonable price. Also, check that they offer the ARC-8 with a 5X114.3 bolt pattern. Didn't see that option on their website.
Here are the exact specs from my order sheet with Get Your Wheels.
Wheels:
Front: FORGESTAR F14 SDC 18X10 Backspace: +12 Bolt pattern: 5X114.3
Rear: FORGESTAR F14 UDC 19X12 Backspace: -25 Bolt pattern: 5X114.3
Finish: GLOSS BRUSHED ANTIQUE BRONZE
Tires: Goodyear Eagle F1 Supercar 3
Front: 275/40 R18
Rear: 325/30 R19
V/R
Shakey
Had not seen the standard 5x4.5 inch Mustang bolt pattern being shown in mm, took me a minute to think about it and do the conversion to inches.
I was looking for a set of wheels for my Saturn Sky Redline from Forgeline, expensive stuff. Since I am just looking to fix it up and flip it, way too much money to spend on it. Now for the Coupe, that is another matter.
MK4 base kit, 2004 Mach 1 donor, 4.6L DOHC, TR-3650 5-speed, narrowed stock axle with 3.55 gears and TruTrac, PS, PB, ABS, 17" Halibrand replica wheels, started 12/2011, registered 9/2014, sold 3/1/2018.
1970 Mustang Fastback Coyote powered Boss 302 tribute. Started 10/14/16.
Gen 3 Coupe Base Kit non-donor build. Ordered 4/5/2024 to be received August 2024.
-
Post Thanks / Like - 0 Thanks, 1 Likes
-
Here are the specs for the 18 inch Halibrand wheels that Factory Five sells.
Front Wheel Size (Diameter x width): 18″x 9″
Rear Wheel Size (Diameter x width): 18″x 11″
Front Wheel Backspace: 6.00″ (24mm Offset)
Rear Wheel Backspace: 6.46″ (12mm Offset)
Wheel Lug Pattern: Ford style 5 lug x 4.5″ bolt circle
So with this as a baseline as the FFR wheels are said to work on the coupe, I have made a quick table in Excel.
Source Front Width Offset Rear Width Offset
FFR 18x9 +24mm 18x11 +12mm
Shakey 18x10 +12mm 19x12 -25mm
AC 19x11 0mm 19x12 0mm
The offset at the front for all three configurations make sense as for each 1 inch of wheel width the offset is changed by 1/2 inch. So why did you push your rear wheel face out another inch? Just curious and trying to put a reason behind the number the rear wheel offset numbers.
Last edited by Alan_C; 05-10-2024 at 03:25 PM.
MK4 base kit, 2004 Mach 1 donor, 4.6L DOHC, TR-3650 5-speed, narrowed stock axle with 3.55 gears and TruTrac, PS, PB, ABS, 17" Halibrand replica wheels, started 12/2011, registered 9/2014, sold 3/1/2018.
1970 Mustang Fastback Coyote powered Boss 302 tribute. Started 10/14/16.
Gen 3 Coupe Base Kit non-donor build. Ordered 4/5/2024 to be received August 2024.
-
Member


Originally Posted by
Shakey

Thanks for the posts and feedback!
Edwardb,
I have been trying to jump around in the manual as much as I can. Your build thread really has helped to look at to see what items you can get taken care of and when so that you don't back your self into a corner. I have been working on things like the trunk box and all the aluminimum fitting. I posted some pics below of the charcoal canister and brake reservoir routing. Probably going to start the dash and electrical next.
As far as the engine goes, I placed and order with Ford Strokers in Feb of 2022 and I knew it would be a long wait time. That was why I ordered the motor six months prior to my kit arriving. I got an update from Nicole and she said they are still hurting from the Dart production backup so I probably won't have my engine completed until March. Probably worth mentioning that Nicole and Woody have been awesome to work with. It can't be easy to deal with a bunch of eager customers waiting a year plus for a motor. Their customer service is top notch.
When I do get my motor, I am probably going to have to rearrange the shop and remove the radiator(thanks for the heads up) like you mentioned to get the motor in from the front. I would very cautiously make an attempt from the side but we will see how stable everything looks when the install day arrives.
Rian_Colorado,
Yeah having a supporting wife and some friends nearby was a huge help getting the kit delivered. Stewart was also really accommidating dealing with me being out of town.
Scott,
Thanks, Looks like I'm on the same timeline as you just a month behind. I got an e-mail from FFR saying a 12lb box will be delivered this weekend so hopefully that's the front spindles.

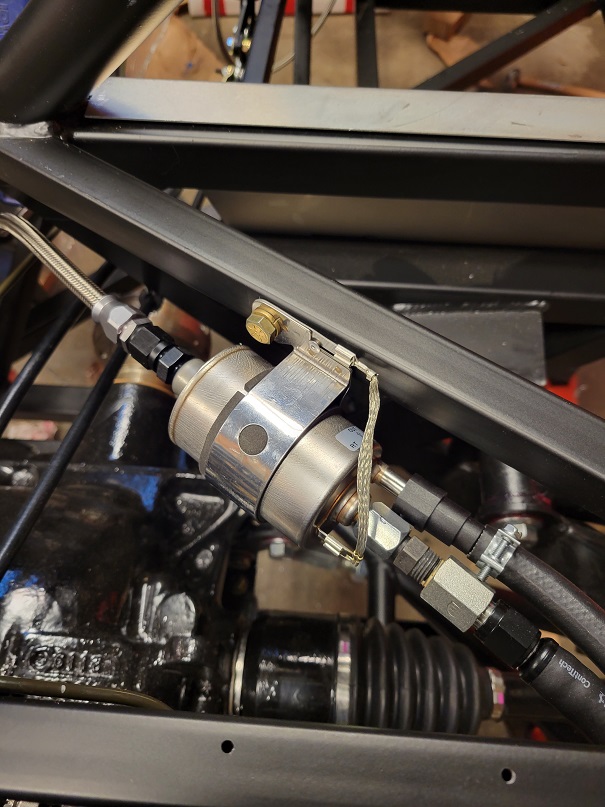
This is a good shot of the fuel filter/regulator combo that I got from Breeze. The install was really easy with the single SS/teflon fuel line running up to the engine.

This is the charcoal canister I made from PVC and fish tank charcoal bags. I put it on the left side because the Breeze install instructions for the big vent kit recommended it. Makes sense to me, if you are turning hard to the left, fuel is going to have to fight the Gs to flow out of the vent tube.


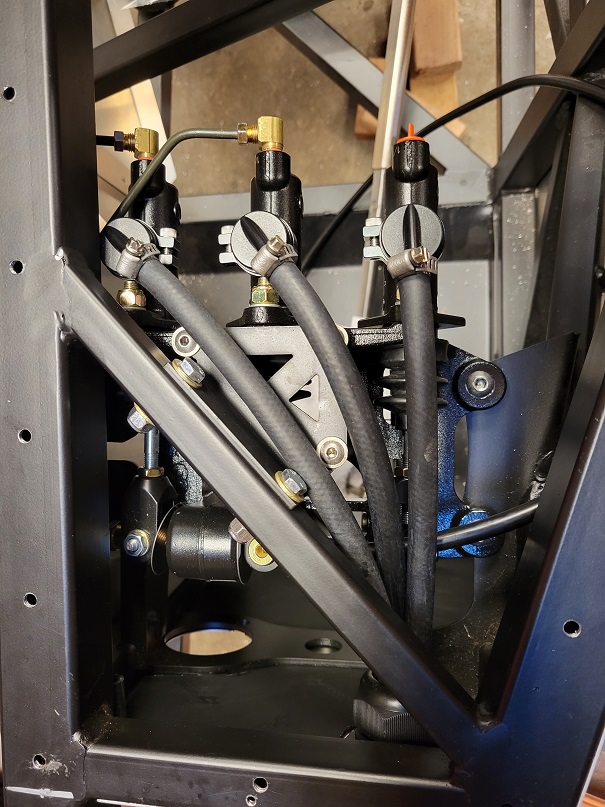
I used a plastic cable glad to insulate the brake reservoir hoses as they pass through the foot box. I ordered a set of various sizes from amazon to use for electrical routing but this one fit the hole that was already drilled perfectly.

I swapped the front and rear master cyliders for the 5/8in size that Rsnake reccomended on his youtube channel. I used the 3/4 that came with the kit for the hydraulic clutch I am planning.
V/r
Shakey
I thought the front and MC were 3/4 and the rear was 5/8? What is the up side to all of them being 5/8?
Retired Army. 2020 Roadster Complete Kit, Gen 2 Coyote w/Gen 3 Intake, and 3.55 IRS. 2024 Coupe Gen 3 Coyote Complete kit, 3.73 IRS, T56 Mag.
-
Your fuel vent canister will be in the way of the splash panel installation.
-
Post Thanks / Like - 1 Thanks, 0 Likes
-
Hi Shakey,
Congratulations on all your progress. I haven't been on here for a while because of moving house and other things that have gotten in the way. I'm now looking at getting my engine in soon and started to look at what is involved in plumbing the radiator and condenser. I see some of your photos show some of the plumbing but was wondering, if you get a chance, could you post some more pictures?
Thanks
John
-

Originally Posted by
Alan_C

Here are the specs for the 18 inch Halibrand wheels that Factory Five sells.
Front Wheel Size (Diameter x width): 18″x 9″
Rear Wheel Size (Diameter x width): 18″x 11″
Front Wheel Backspace: 6.00″ (24mm Offset)
Rear Wheel Backspace: 6.46″ (12mm Offset)
Wheel Lug Pattern: Ford style 5 lug x 4.5″ bolt circle
So with this as a baseline as the FFR wheels are said to work on the coupe, I have made a quick table in Excel.
Source Front Width Offset Rear Width Offset
FFR 18x9 +24mm 18x11 +12mm
Shakey 18x10 +12mm 19x12 -25mm
AC 19x11 0mm 19x12 0mm
The offset at the front for all three configurations make sense as for each 1 inch of wheel width the offset is changed by 1/2 inch. So why did you push your rear wheel face out another inch? Just curious and trying to put a reason behind the number the rear wheel offset numbers.
Hey Alan,
Sorry I have been away for a bit. I been out driving the car instead of working on it which has been nice.
For my wheel offsets, I did a bunch of calculations like you did and also looked at the wheel and tire repository. In the end, I basically copied what Snowman did on this post of his. https://thefactoryfiveforum.com/show...l=1#post448741
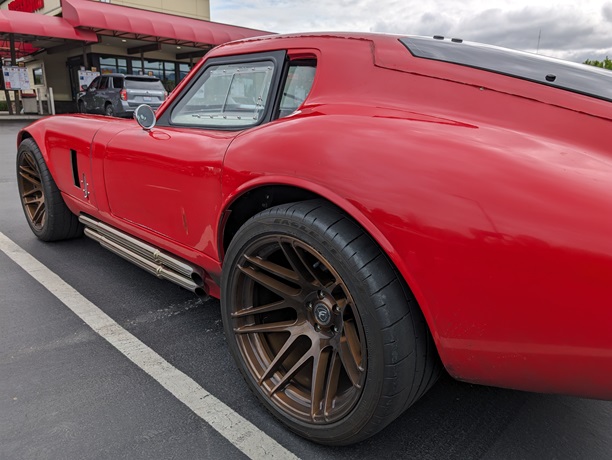
Also, in the FFR wheels you mentioned, most people run 1 inch wheel spacers with them. I didn't wanna run wheel spacers so I found a wheel that would be 19in in diameter, 12in wide and allow for basically a 5in backspace(-25mm offset.) I have about 500mi on the car and before my alignment the were rubbing on the inside of the wheel well. Now with the alignment they don't rub anymore from what I can tell. If I did any offset closer to 0, I feel like they would rub constantly.
Here are some pic of the wheels with the alignment done and no spacers. Set at 4in ride height in all 4 corners. And a Pic from top down showing how far the wheel sticks out.


-
05-29-2024, 09:14 PM
#100
Nelsond003,
What is the up side to all of them being 5/8?
Scientifically, I'm not 100% sure. I put a lot of trust in Rsnake's youtube channel and just followed his lead. We are running the exact brakes so I though it would apply to me and he switched from 3/4 to 5/8 on both. According to google, a smaller diameter master cylinder moves less volume of fluid but generates more force. I think this gives you more pedal travel and feel as well as less effort to push it. According to an Rsnake video, the brakes we have with a 3/4 MC are like a rock and go from nothing to a lot of braking with very little pedal travel.
HTH,
Shakey
-
05-29-2024, 10:39 PM
#101
Senior Member


Originally Posted by
Shakey

Nelsond003,
What is the up side to all of them being 5/8?
Scientifically, I'm not 100% sure. I put a lot of trust in Rsnake's youtube channel and just followed his lead. We are running the exact brakes so I though it would apply to me and he switched from 3/4 to 5/8 on both. According to google, a smaller diameter master cylinder moves less volume of fluid but generates more force. I think this gives you more pedal travel and feel as well as less effort to push it. According to an Rsnake video, the brakes we have with a 3/4 MC are like a rock and go from nothing to a lot of braking with very little pedal travel.
HTH,
Shakey
I followed his lead too and just bought the 5/8" MC's straight away. So I guess I'll never know if it was really necessary, but it's easy now just starting my build.
BTW, what color are you thinking for your car? Love the bronze wheels. But now you have to match them to your paint!
-
05-30-2024, 02:04 PM
#102
-
Post Thanks / Like - 1 Thanks, 0 Likes
 jgray
jgray thanked for this post
-
05-30-2024, 11:21 PM
#103

Originally Posted by
JimStone

I followed his lead too and just bought the 5/8" MC's straight away. So I guess I'll never know if it was really necessary, but it's easy now just starting my build.
BTW, what color are you thinking for your car? Love the bronze wheels. But now you have to match them to your paint!
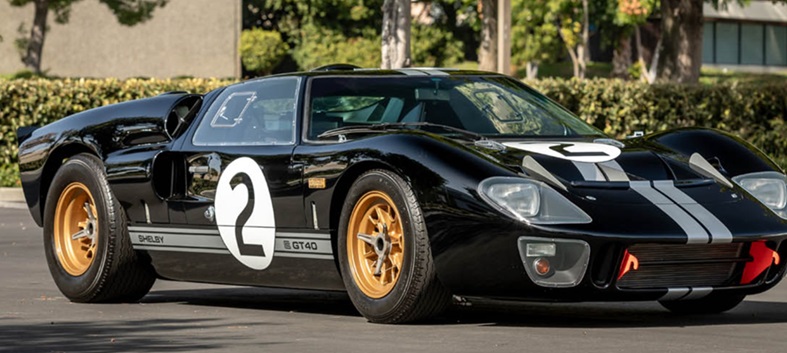
Right now, pretty sure I am gonna paint it similar to the 1966 Lemans winner GT40. Black with silver stripes. Maybe some meatballs and other accents. Similar to this:

V/r
Shakey
-
Post Thanks / Like - 0 Thanks, 1 Likes
-
07-08-2024, 10:00 AM
#104
Hey Shakey, Back in post number 80 you mentioned that you would share more info on mounting the hood. The reason I’m asking is because I am installing my radiator and condenser and seeing that the hood hinge will hit the aluminum panels and the lower condenser hose connector. I’m wondering if I should position the radiator more upright to increase the clearance? Even if I do that the passenger side hinge still touches the connector. I see in Paul’s build he notes this issue and I saw Thomas on the Oak Hollow YouTube channel had to cut the hinge. I would rather not cut it because it seems like there will be a lot of stress on the hinges. So any wisdom and experience you can share would be gratefully appreciated!
-
07-15-2024, 12:58 PM
#105
Senior Member


Originally Posted by
Shakey

Right now, pretty sure I am gonna paint it similar to the 1966 Lemans winner GT40. Black with silver stripes. Maybe some meatballs and other accents.
I think that would look great! Lots of blue and red Coupes so I think a black one is a nice visual change.
I'm still looking at silver for mine so if I ever get mine done we'll need to have a photo shoot together!
Gen 3 Type 65 Coupe builder
-
Post Thanks / Like - 0 Thanks, 1 Likes
-
07-15-2024, 03:24 PM
#106
Senior Member


Originally Posted by
jgray

Hey Shakey, Back in post number 80 you mentioned that you would share more info on mounting the hood. The reason I’m asking is because I am installing my radiator and condenser and seeing that the hood hinge will hit the aluminum panels and the lower condenser hose connector. I’m wondering if I should position the radiator more upright to increase the clearance? Even if I do that the passenger side hinge still touches the connector. I see in Paul’s build he notes this issue and I saw Thomas on the Oak Hollow YouTube channel had to cut the hinge. I would rather not cut it because it seems like there will be a lot of stress on the hinges. So any wisdom and experience you can share would be gratefully appreciated!
The actual body will have to be cut no matter what. Even with the condenser all the way to the top of the radiator. Your hood hinge clearance will only be dictated by how far you personally want the hood to open. For me I find the hood opening to be sufficient without cutting the hinge. There’s little to actually work on the more forward you go in the bay. Best advice is to mount everything, open, then trim as needed.
-
07-15-2024, 07:08 PM
#107
I appreciate the input. I had not thought about the fact that there isn't much at the front of the engine bay. I will do as you suggest, mount everything and trim as needed. One less thing to worry about for now!
-
07-15-2024, 07:47 PM
#108
Senior Member


Originally Posted by
jgray

I appreciate the input. I had not thought about the fact that there isn't much at the front of the engine bay. I will do as you suggest, mount everything and trim as needed. One less thing to worry about for now!
Yep! That’s the way.
-
07-18-2024, 04:46 PM
#109
Senior Member


Originally Posted by
q4stix

I think that would look great! Lots of blue and red Coupes so I think a black one is a nice visual change.
I'm still looking at silver for mine so if I ever get mine done we'll need to have a photo shoot together!
IMG_9069.jpeg
Here’s a nice black one! 
-
Post Thanks / Like - 0 Thanks, 1 Likes
-
07-25-2024, 06:25 PM
#110
I posted in a separate thread my experience registering the car. If you wanna know about registering your car in Washington State you can check it out here:
https://thefactoryfiveforum.com/show...shington-State
V/R
Shakey


 Thanks:
  Likes:


 Reply With Quote


