-
"Thinking about an angled cover that I can put over the top of the panel in the event of moisture getting in or the MCs leaking so that it drains away but haven't fabricated anything yet."
I was thinking about making something like that, too  if I decide to keep my fuseblock in the standard location. I like GoDadGo's approach (Passenger-side), but I also have the heater box and haven't checked all the fitment issues yet. Then there's a small possibility to mount in a central location since I'm going to make a glovebox/cubby like John Ibele
Looking good!
Craig C
-
Post Thanks / Like - 0 Thanks, 1 Likes
-
Senior Member

I played around trying to make a cover over the fuse panel a couple builds ago. It's a busy place and gave up after I decided my solution likely wouldn't help if one of the MC's decided to leak. Getting it actually sealed wasn't successful and decided even deflecting would eventually find the fuse panel. Brake fluid is just plain evil... Maybe you're more creative (or patient) than me. Fortunately, multiple builds with the MC's above the fuse panel and no brake fluid leaks to date. Now water infiltration from the windshield posts hitting the fuse panel? I was a slow learner on that one. Two failed turn signal flashers later decided I needed to seal around the posts. Problem solved.
Last edited by edwardb; 03-15-2024 at 07:56 AM.
Build 1: Mk3 Roadster #5125. Sold 11/08/2014.
Build 2: Mk4 Roadster #7750. Sold 04/10/2017.
Build Thread
Build 3: Mk4 Roadster 20th Anniversary #8674. Sold 09/07/2020.
Build Thread and
Video.
Build 4: Gen 3 Type 65 Coupe #59. Gen 3 Coyote. Legal 03/04/2020.
Build Thread and
Video
Build 5: 35 Hot Rod Truck #138. LS3 and 4L65E auto. Rcvd 01/05/2021. Legal 04/20/2023.
Build Thread. Sold 11/9/2023.
-
Post Thanks / Like - 1 Thanks, 0 Likes
-

Originally Posted by
edwardb

I Now water infiltration from the windshield posts hitting the fuse panel? I was a slow learner on that one. Two failed turn signal flashers later decided I needed to seal around the posts. Problem solved.
Thanks Paul. Didn’t think about that one. I’ll give it a go and see what evolves.
Last edited by cv2065; 03-15-2024 at 09:03 AM.
-
Senior Member

Too hot to work down there or what?!!
MK4#? Ordered 11/30/24
MK4 #11012 picked up 04/16/24
MK4 #10616 picked up 4/10/23 SOLD
MK4 #9759 picked up 4/3/19 SOLD
-

Originally Posted by
Higgybulin

Too hot to work down there or what?!!
I'm up to 2 clothes changes a day in the garage. When I get to 3, then I know I'm into the true Summer. 
Last edited by cv2065; 05-18-2024 at 10:48 PM.
-
Post Thanks / Like - 0 Thanks, 1 Likes
-
-
-
-


Carbon Fiber Dash
Ah, one of my favorite parts, the carbon fiber dash. Another one mistake and shell out the $$$ activity! The drill press really earned its purchase price with the one. I was able to get every bit of the dash underneath when cutting with the 6 different sizes of hole saws. As others have said, the fine CF dust can get everywhere, including your lungs, so I did use a respirator and also cleaned up with my shop vac after each cut. Bought my drill press off Facebook marketplace for $150 new. What a deal!
I bought custom gauges from Speedhut. I worked directly with one of their designers. The service is free and they are very patient to give you exactly what you want. After about 4 proofs, we were good to go. I'm going for a red/black Roush theme for the car, and Speedhut did not disappoint. I also went with oversized gauges instead of the standard FFR. That would be 4.5" gauges for the Speedo and Tach, as well as 2 5/8" gauges for the others. Shout out to Michael Craven (aka Hacksaw) for that idea.
In order to get my holes right, I ordered some metal discs off of Etsy in the exact sizes of the gauges faces and had a 1/8" hole put into the middle of each disk. Covered the dash in blue tape, aligned the discs the way that I wanted them and dotted the mid-point. Used that as my starting point with the hole saws and came out great. I buffered out 3/4" from the top of the dash to give me plenty of room after the initial fitting to the hoop. The larger gauges need some planning.
Not a lot of info out there yet for the CF dash, so winging it a little based on what I could find. When level, the dash is a little uneven to the hoop, especially on the far sides. I started by aligning the middle of the dash with the middle top of the hoop. The right side aligned about 3/16" under the tube, but the driver side was higher when the dash was level. I drew a line on the back of the dash where it exceeded the top of the hoop and measured 3/4" from that line which is where my gauges on that side started. Then I trimmed a little off the top right to level it out a bit. Came out nicely. Bottom of the dash was ~38.5" from the floor, side to side and the glove box butts up against the support, so can't go any further to the driver's side. That makes it really close to a vertical alignment with the trans tunnel. I think with every carbon fiber dash, there is a spot mid drivers side that doesn't align with the hoop like the rest of the dash. Seems to be the same for most everyone.
Measuring:
_IMG_9261.png?width=960&height=720&fit=bounds)
Drilling:

Hoop Fitting:


I also notched out a small area on the passenger side as it conflicted with the door hinge:

Test fit the gauges and am loving the look! Still need to powder coat the key bezels and add the turn signal mod, which I decided to get from Frank at i.e.427. I will have to say that the ignition key bezel that I received from FFR was a bit disappointing. I upgraded with one from Ron Francis. Once the bezel is powder coated black, RF includes a colored trim ring, which in this case will be red. All in the details!
URL=https://hosting.photobucket.com/images/c310/cv2065/(edited)_IMG_9346.png?width=960&height=720&fit=bou nds]_IMG_9346.png?width=960&height=720&fit=bounds) [/URL]
[/URL]
Last edited by cv2065; 05-18-2024 at 11:45 PM.
-
Post Thanks / Like - 0 Thanks, 1 Likes
-
-
Post Thanks / Like - 0 Thanks, 1 Likes
-
Senior Member


Originally Posted by
cv2065

I up to 2 clothes changes a day in the garage. When I get to 3, then I know I'm into the true Summer.

"Sweating like a gypsy with a mortgage"
Mk.4 FFR supplied Right hand drive
Received 12/2012 completed 12/2019
Gen1 Coyote / TKO600 / IRS
Lots of mods to make compliant for Australian design rules
-
Post Thanks / Like - 0 Thanks, 2 Likes
-
-
Post Thanks / Like - 1 Thanks, 2 Likes
-
Senior Member

-
Post Thanks / Like - 0 Thanks, 1 Likes
-
Senior Member

It’s funny you were just ahead of me the first time and now seem to be right about the same place the second time. I went with gloss black in the engine bay in my first one. I was pleasantly surprised how it held up. You know how hard a dark car is to keep clean. It obviously gets dusty but all the road grime blends in.
Lookin good man. Between you and me your first car had more design influence on my build than any other I followed. Maybe by a lot.
Your build is looking really clean so far.
Last edited by Blitzboy54; 06-08-2024 at 08:03 PM.
-

Originally Posted by
Blitzboy54

It’s funny you were just ahead of me the first time and now seem to be right about the same place the second time. I went with gloss black in the engine bay in my first one. I was pleasantly surprised how it held up. You know how hard a dark car is to keep clean. It obviously gets dusty but all the road grime blends in.
Lookin good man. Between you and me your first car had more design influence on my build than any other I followed. Maybe by a lot.
Your build is looking really clean so far.
Thanks man! I'm sure I've looked at your build thread many times as well. Trying to step this one up another notch. I thought about doing a hammered look but settled back on the gloss. Just have to be extra careful not to scratch it! Glad to see that you are venturing out again. I look forward to watching your build as well. I just have to get better at updating this thread. 
Last edited by cv2065; 06-08-2024 at 09:58 PM.
-
Senior Member

Did you get to a final decsion on the power rack tie rods? I see someone else is asking about shorting the inners on a replacement they got from FF.
Higgy
MK4#? Ordered 11/30/24
MK4 #11012 picked up 04/16/24
MK4 #10616 picked up 4/10/23 SOLD
MK4 #9759 picked up 4/3/19 SOLD
-

Originally Posted by
cv2065

Completed the pedal box with no issues. I was going to use straight fittings instead of the 90 degree elbows with the MCs, but as I bent the brake lines, they seem to extend a bit far to the rear of the box and wasn't sure if I was going to have any clearance issues with the harness, as I like to run up the left side of the box instead of the right, so I went back to the 90 degree ones. The concern was rotating those around to the right position without overtightening. I think I'm good to go.
I cut 5/8" off of the MC rods and they fit perfectly. I also cut 3 separate holes for into the front of the box for the hoses. Drilling through that plate is NOT a great time. I also scored some grommets from McMaster car that were suited for 1/4" material thickness. Trying to get the grommet between the plate and sheet metal is difficult when all buttoned up. These fit perfectly. I used part #9307K63. The larger orange grommets are the only ones I could find that were high temp. Seemed like the Mac Truck grommet I found last time has a temperature issue, as it was always gooey during the build after a run. I had to take one of these out as the harness has its own grommet.
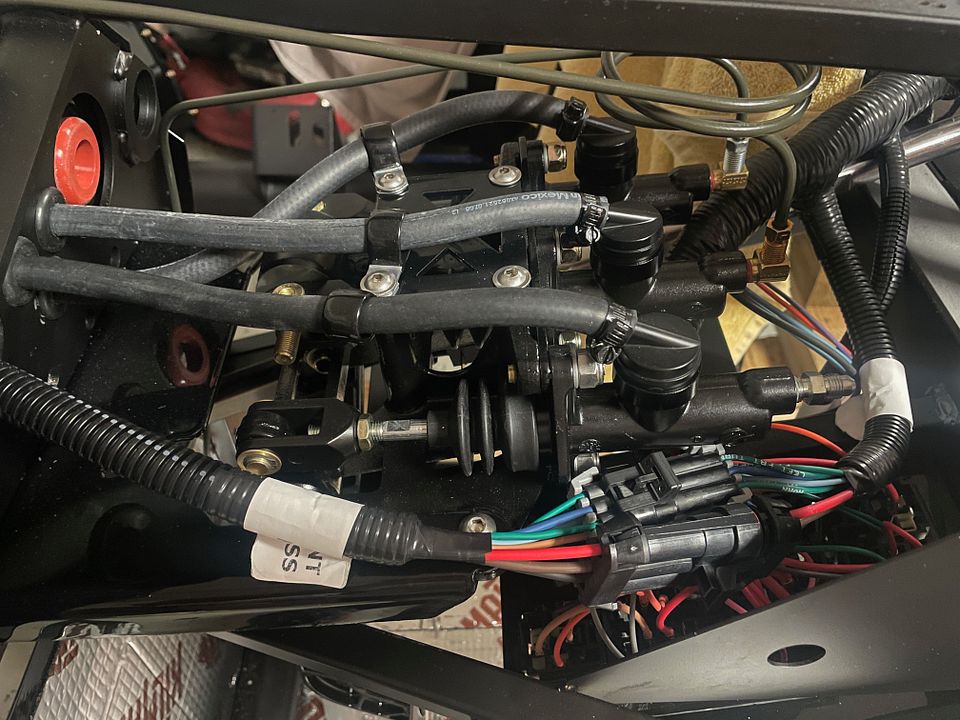
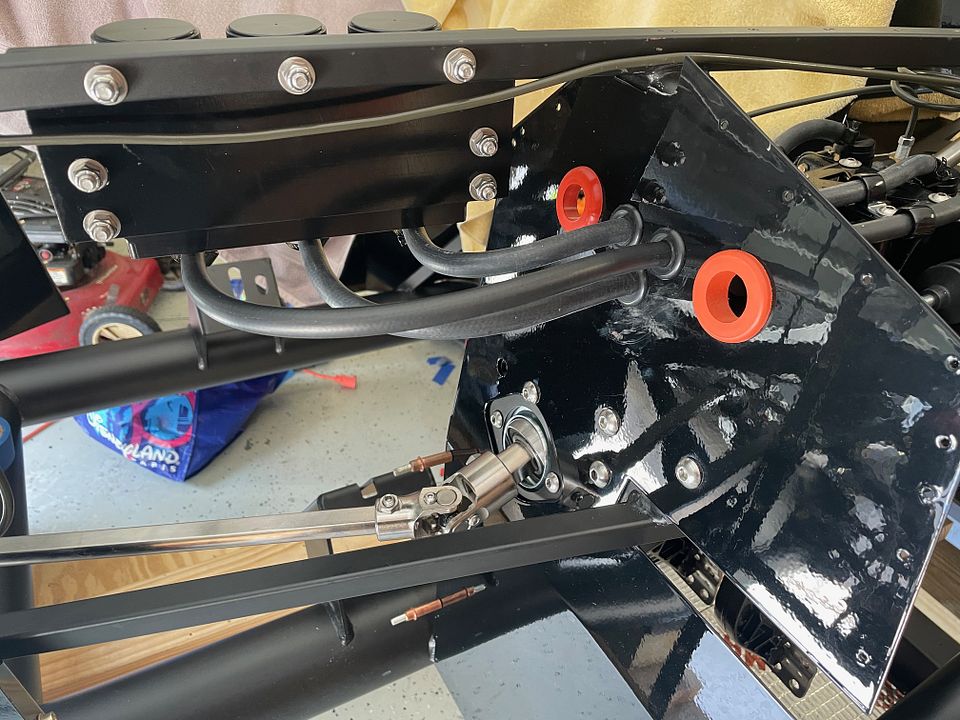
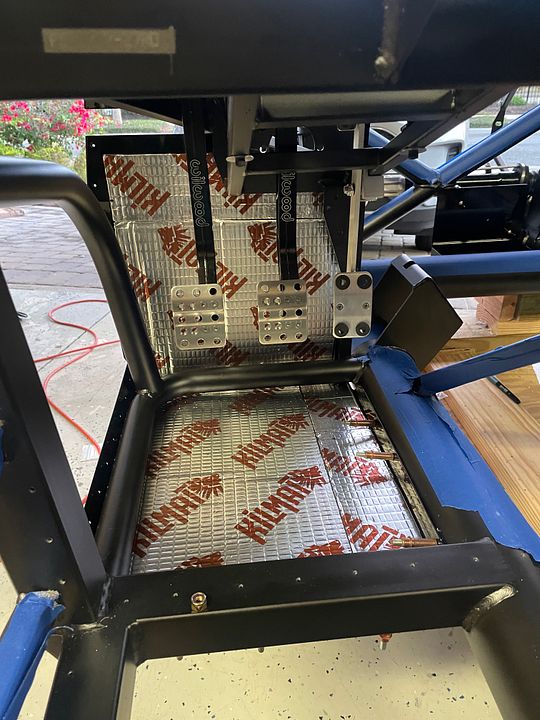
When I partially assembled the driver's foot box, I put the sound deadener in before hand. Last time I cut the patterns and put in after the fact, but its a small space, so makes it easier this way. I might have to go back and seal up a couple of spots when I do the 'light' test for heat leaks. I used the 80 mil Kil Mat this time around instead of the ThermoTec. It's a bit cheaper and also comes in smaller sheets so its easier to use for smaller panels and I don't seem to have as much waste. Function and material seems to be the same.
I received my Russ Thompson pedal from TJ at Mountain Metalworks. He's done a great job carrying on Russ' legacy with these pieces. They are identical to his design and function. That will be hooked up to Forte's throttle assembly once installed. Can't recall why I have those big washers under the cap screws that hold the pedal box, but I'll be replacing that hardware.
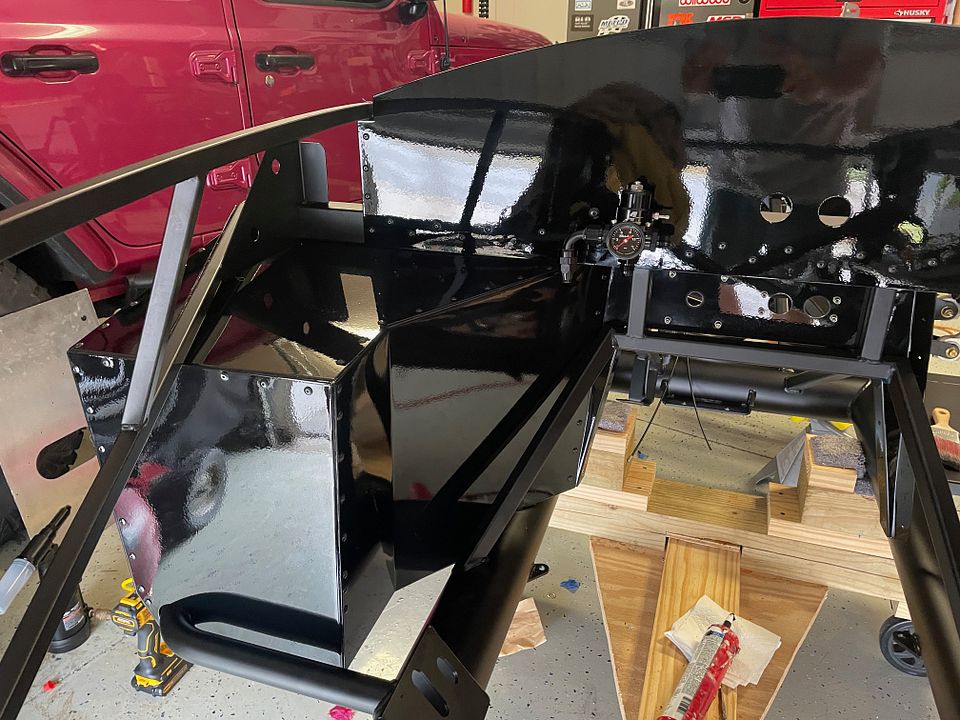
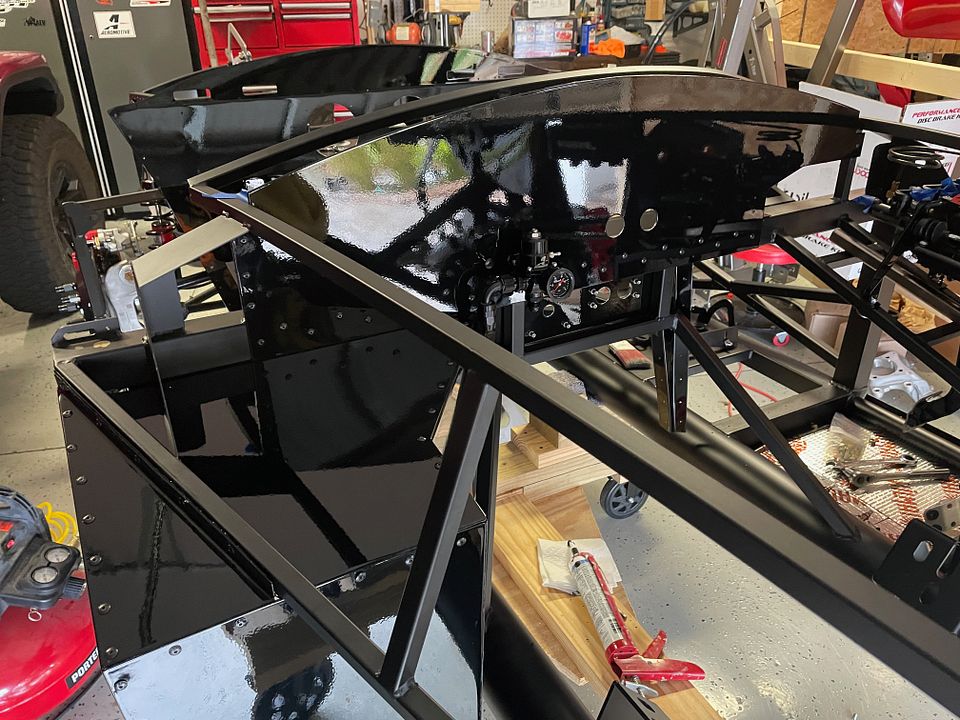
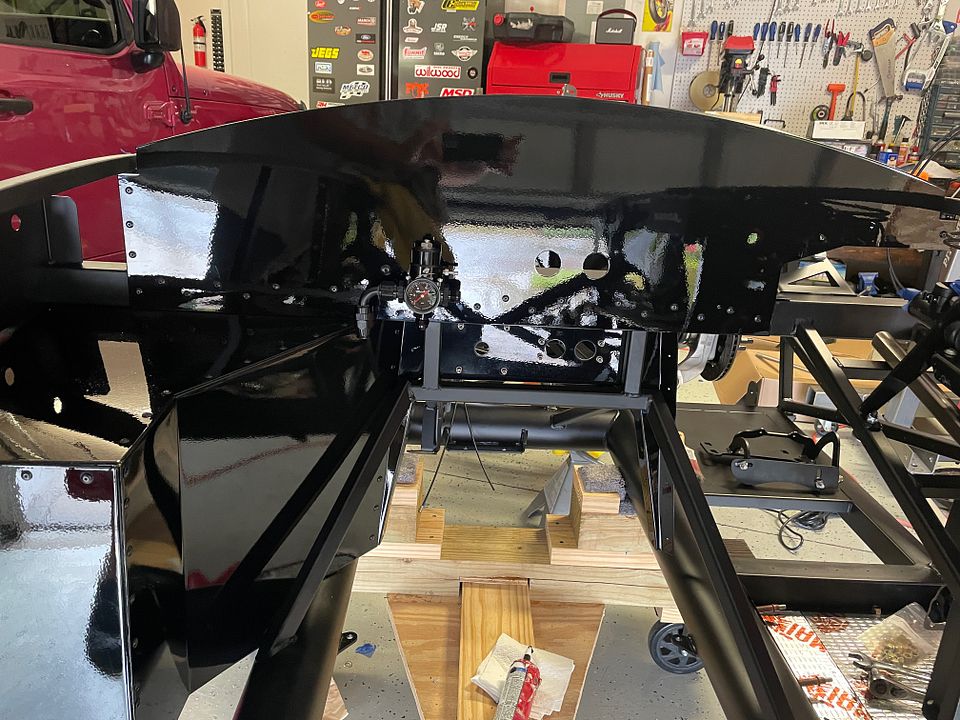
While I was at it, I also completed the passenger side footbox. I buttoned this up with black oversized headed rivets and more Kil Mat. I tucked all of my joining tabs inside the box for a smooth look top to bottom. Came out really nice.
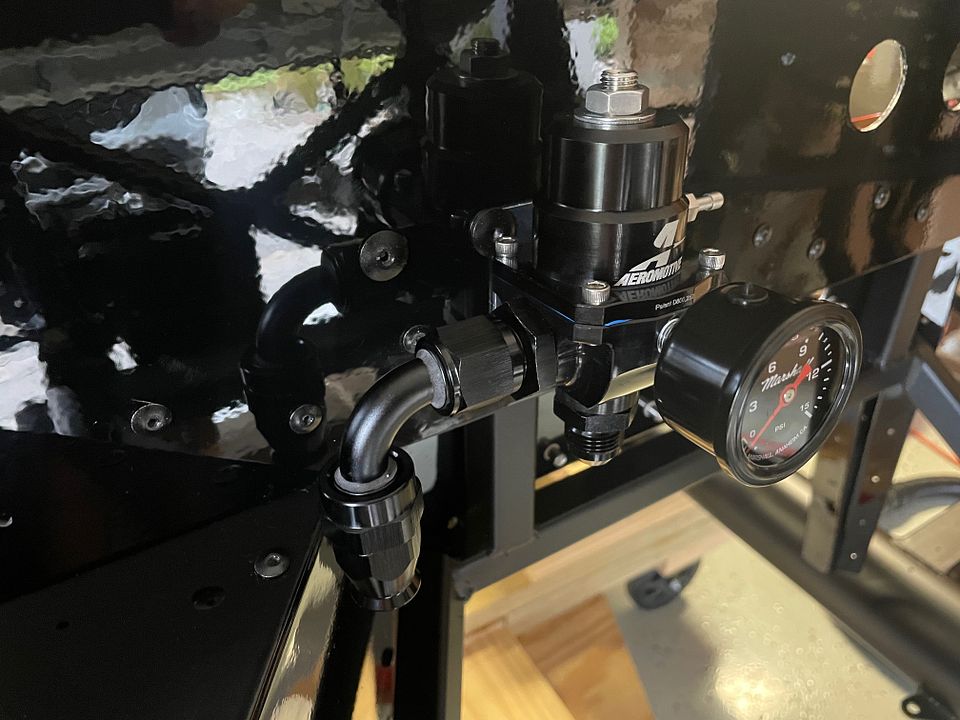
You'll also notice the Aeromotive X1 Series fuel regulator (13304) that I installed for my carb'd setup. Very versatile if I want to swap out to FI later. What a top-quality piece! I also added the Marshal Instruments Fuel Pressure Gauge as it was the only one I could find in black. You can find that here:
https://www.amazon.com/gp/product/B0...?ie=UTF8&psc=1
URL=https://hosting.photobucket.com/images/c310/cv2065/IMG_9106.JPG?width=960&height=720&fit=bounds]
[/URL]
Loving the build so far!! I have a quick question, as far as the sound deadening is concerned, are you only using the Killmat for this build or do you plan on using an additional layer of another material for the footboxes? I am concerned about the heat transfer from the exhaust headers and would like to use one material if possible. It seems that the Killmat is a sound deadening material, but it does offer some heat protection as it seems very similar to other products used by other builders like Fatmat and other similar butyl rubber products.
-


Originally Posted by
Jespinosa

Loving the build so far!! I have a quick question, as far as the sound deadening is concerned, are you only using the Killmat for this build or do you plan on using an additional layer of another material for the footboxes? I am concerned about the heat transfer from the exhaust headers and would like to use one material if possible. It seems that the Killmat is a sound deadening material, but it does offer some heat protection as it seems very similar to other products used by other builders like Fatmat and other similar butyl rubber products.
I used two different materials on the footboxes on my last build. I'm not sure how much the extra layer actually provided, but my footboxes were never hot. Others haven't used anything other than sound deadening with no crazy temps. What did get hot was the lower area by the driver's side door from the side pipes. I've insulated this build in that area with this stuff:
https://www.amazon.com/gp/product/B0...?ie=UTF8&psc=1
I've cut some for the front of the footboxes but haven't decided if I'm going to use or not. The gloss black is too pretty to cover up! 
-
Senior Member


Originally Posted by
cv2065

Seats did show up! Yay! But they had headrests..

Don't get me wrong, the headrests are a work of art, but they don't go with my build and one rollbar. So, reached out to Rob at Intatrim and he's making me a new set. Honest mix up and he's making it right.
I do have these and am helping him sell, so if anyone is interested, just hit me up! They are really nice marine upholstery with Cobra logo in the headrests. Black and Red diamond stitching. First picture is of the seat and second/third of the actual headrests. All still in shrinkwrap in the box.


All I've got for now. I do need to revise a couple of things. One, the brake lines at the front of the car need 90 degree fittings. I had already purchased these but forgot to put them in place and the tires will rub, so I'll need to install and re-bleed the front end. Speaking of which, I'm using this vacuum bleeder from Harbor Freight. Best $99 I've spent in a long time. 5 minute bleed on each corner with no mess. In case anyone is interested:
https://www.harborfreight.com/pneuma...kit-57057.html
I am also fitting my wheels and it turns out that the studs I had pressed in at the local machine shop, one of the hubs has a flaw and the stud is not completely straight. Wish I had known this before as I'm going to have to tear down the rear passenger side and pull the hub.

Tried to pm you but your box is full…
Seats still available?
-

Originally Posted by
danmas

Tried to pm you but your box is full…
Seats still available?
I cleared it out. Thanks for the heads up. Seats were sold.
-
Post Thanks / Like - 1 Thanks, 0 Likes
-
Build is really looking good so far.. The gloss black panels are sharp....
-
Post Thanks / Like - 0 Thanks, 1 Likes
-

Originally Posted by
BadAsp427

Build is really looking good so far.. The gloss black panels are sharp....
Thanks Carl. Hope all is well Bud!
-


Fuel Line Routing - Take 2
Ok, so I haven't posted in a while, but lots going on. Good news is that its starting to cool off a bit and I can spend more time in the garage. Although a Mr. Cool garage mini split wall unit has been looking good lately. Not sure if anyone has put one of these in, but I always say I'm going to put one in, procrastinate, then the heat goes away and I forget about it until I'm sweating bullets the next summer. Rinse and Repeat! Thinking of something like this:

In the meantime, lots to report, but not as much as I'd like. First off, I had to redo my fuel lines. Wasn't happy about that at all. I had to change out the black monofilament to the stainless for durability. Wish they had mentioned that during the initial purchase, but live and learn. On the positive side, the second routing I think was a lot tighter as I was able to reduce the length by 2" and looks a little better overall.
I did learn that the stainless steel helix clamps need to be widened a bit in the vice before installing or they squeeze the tubing too tightly. I mixed and matched the singles and doubles for the best look throughout the length to get it straight. No one will ever see it, but didn't want any slop, especially with respect to road debris, etc.


Last edited by cv2065; 09-29-2024 at 10:58 PM.
-
Post Thanks / Like - 0 Thanks, 1 Likes
-


Brake Bleeding
Once done here I circled back and bled my brakes. I used two bleeders. For the main bleed I used the Harbor Freight Pneumatic bleeder. Hooked it up to my pancake air compressor and I literally did each side in about 5 minutes. I have the Wilwood brakes, which makes bleeding a BREEZE compared to the old mustang brakes on the last build. Banjo fittings are for the birds! Just hold the rubber nipple of the bleeder on the bleeder fitting, open the bleeder valve on the tank for suction, open the bleeder screw 1/4 turn and BAM, you are in business. Lots of reviews say that air gets in at the fitting and causes a lot of bubbles, which is true, but it's still bleeding the system. Just close the bleeder screw before you close the valve on the tank so it keeps sucking. When you do this it sucks any remaining brake fluid around the fitting and makes for a very clean, drip free exercise. I did not use the autofill tank. Just have to refill the reservoir after each wheel. Here's the unit:
https://www.harborfreight.com/pneuma...kit-57057.html
I then came back and double checked my work with a simple one-man bleeder from Autozone to ensure that there were no bubbles in the line. Rock Hard pedal every time and zero leaks. Nice!!
https://www.autozone.com/test-scan-a...directUrl=true
-
-
Post Thanks / Like - 1 Thanks, 1 Likes
-
-


Bell, Clutch and Fly
I've been trying to get to the engine and trans, but I've been routing a lot of time to other things. The first thing up was the flywheel and backplate. Roush has a universal plate on their engines that wasn't up to snuff for the Quicktime bellhousing, so had to swap it out. Roush was telling me that any other backplate might interfere with the oil pan lip. Took off the flywheel, slapped it on and no interference. YAY! You can see the differences and clearance below:
No block plate (Roush 427R)

Roush Block Plate

QT Block Plate

Oil Pan Lip Clearance (About 3/16")

Dowel pins were installed using Green 620 loctite in the holes and a brass hammer to avoid any mushrooming. They went in without much effort but they do need a good whacking. Hard to source a brass hammer anywhere these days, even at the big box stores, so ordered from Amazon. Had it here in a day. Here's the hammer that I used:
https://www.amazon.com/gp/product/B0...?ie=UTF8&psc=1
Flywheel went on using ARP Flywheel Bolts. Nothing but the best! I used ARP 200-2802 PRO series. These babies torque up to 85 ft/lbs with ARP's Ultralube under the bolt head and used blue loctite on the threads, just as they instruct. ARP informed me that the HP 100-2801 series that I used last time have been discontinued, and the Pro series is all that will be produced. There's a 10 ft/lb torque difference between the two, so make sure you have the right ones as Summit is sending out 200-2802 series bolts with a 100-2801 sticker. Not sure why they are doing that. Flywheel is the McLeod steel 463100. If you look closely at the pic, you'll also see the OTC flywheel stop that I used to keep it from turning while torquing down the bolts. Simple but really effective vs. a screwdriver or something like that. I always try to use the right tool for the job. You can get that here:
https://www.amazon.com/gp/product/B0...?ie=UTF8&psc=1

Next up was aligning the QT bellhousing. This was a real PITA and not something I really want to do again. I have to take the blame (LOL) as I got my dial indicator from Harbor Freight. That was OK when I just had the stock aluminum bell that you really can't adjust, but not with the QT. I didn't want to spend a ton of money, but after quite a bit of frustration with very random readings time after time, I ponied up for the Noga DG1033 base with Mitutoyo 24165 dial indicator. WOW, what a difference. The base alone was incredibly stable and rotated much easier than the HF junk. Do yourself a favor and don't do what I did. You can find them here:
https://www.amazon.com/gp/product/B0...?ie=UTF8&psc=1
https://www.amazon.com/gp/product/B0...?ie=UTF8&psc=1
Anyhow, finally produced some very repeatable readings and my QT bell was just outside of the .005 tolerance. So now it was time to get some offset dowels. Before install, I needed to take the old ones out. That's not a fun job even when I had access to the back of the pin. I tried tapping it out from the rear, pulling with plyers and a host of other creative methods, and none of them worked. There is a tool for everything, and I found a dowel pin puller., the Cal Van Tools, Model #95400. After the tool was setup, I had each dowel out in about 2 minutes with zero collateral damage. You can find it here:
https://www.amazon.com/gp/product/B0...?ie=UTF8&psc=1
Afterwards, I bought the RobbMC .007 offset dowel kit (Item #1014) right from his website. High quality pieces. I coated with Green 620 Loctite (made for cylinders), installed them at the correct angle (which happened to be between 25-26 degrees), and tightened down the set screw to 50 in/lbs. I highly recommend allowing the green Loctite to cure before reinstalling the bellhousing. If the dowels move you may have to start all over again BUT can avoid that if you record the angle of your dowels when you first set them in place with an angle finder. With offset dowels in place, we got to a very happy place with readings. Repeated 3 times and moved on. Don't forget a very thin coat of grease on the dowels or they will surface rust.

Lots of clutches to choose from and I selected the CenterForce Dual Friction 10.5" Clutch Kit #DF161830. I had a CenterForce the last time and loved it. This model will give you performance up to 600 ft/lbs of torque while having good street manners. Perfect for my setup. Used ARP bolts once again, ARP #150-2202. These 8mm pressure plate bolts come with washers, so I did the same as with the flywheel bolts. ARP Ultra lube under the bolt head and washer with blue Loctite on the threads. Torque to 25 ft/lbs as per ARP instructions.
I don't recommend the plastic clutch disc alignment tool. I already had the RAM billet steel version 03-048 but used the plastic one when I knew better. Clutch disc was not aligned correctly with the plastic tool even as I held the disc up a bit while tightening the screws. I pulled it off and used the RAM alignment tool and it was perfect. Didn't have to hold or monitor anything. It's $50 of peace of mind as the trans is already a bit of a struggle to insert, so why make it more complicated? Final product is right on the money.

Last edited by cv2065; 10-05-2024 at 04:41 PM.
-
Post Thanks / Like - 0 Thanks, 1 Likes
-
Senior Member

Great update! I guess you have been busy! I will be down in a few weeks and be by to lay eyes on this beast if we can work it out. Keep on thrashing!
Higgy
MK4#? Ordered 11/30/24
MK4 #11012 picked up 04/16/24
MK4 #10616 picked up 4/10/23 SOLD
MK4 #9759 picked up 4/3/19 SOLD
-
Post Thanks / Like - 0 Thanks, 1 Likes
-
Senior Member

Awesome updates. Looks really good.
I figured the heat was slowing you down. I did in fact put a mini split kit in my house like you showed (4 units). My house has radiators and no ducts so it was the only real option. I can say with confidence if you can build one of these mini splits are a piece of cake.
Build looks amazing and I am 100% going to steal you charcoal can idea. 
-
Post Thanks / Like - 0 Thanks, 1 Likes
-


Slippery Pete!
The QT bellhousing uses an adjustable pivot ball. Mike Forte agreed that he prefers the fixed pivot ball over the adjustable, and so do I, so he sent one out and it arrived today! Look at that beast! For the price one pays for a QT Bellhousing, they need to get with the program! Based on some other posts and where many of the adjustable pivot balls landed in terms of height, from the bottom of the bolt head to the bottom of the adjustable nut it was 1.293". I haven't tested this yet, but ironically, what Mike sent to me after doing his calculations it was just about identical with the added locking washer he included. Mike knows his stuff! The real difference is the thread engagement of the bolts, which is much greater on the fixed bolt. Anxious to get it all hooked up this weekend.

While I was thinking about the trans, and getting this puppy on the ground soon for the engine install, I almost forgot to fill the rear differential. Again, the forum provides and I got the good stuff. Motorcraft SAE 75W-85 with the XL3 Friction Modifier. My IRS was new from FFR and was filled maybe 2/3'rds of the way with fluid. I drained that and used 2 full quarts of product and was able to feel it at the top of the fill hole. I also used the Slippery Pete Quart sized fluid pump. Not a drop spilled and works in those awkward angles like the IRS fill hole.
I did make the mistake of cleaning out my Slipper Pete pump in the kitchen sink. The wife and kids came in and literally started gagging. I had no idea that smell would stay in the sink that long. LOL. Here's a couple of pics and you can buy the Slipper Pete pump here:
https://www.amazon.com/gp/product/B0...e?ie=UTF8&th=1


Last edited by cv2065; 10-05-2024 at 04:22 PM.
-
-
Footbox and Floor Insulation
I extended the Kill Mat into the floorboards and tunnel, but because my dash 'workstation' is sitting on top of that, I don't have any pics right now. However, I did remember that the one place I used to get heat from in the last build was right at the door where the side pipes ran. The heat didn't blow in, but the radiant heat was certainly noticeable on hot days. I decided to insulate that part of the door on both sides. I used a 10 mil black tunnel heat shielding from Design Engineering. It's rated to 1,750 degrees. I may put some on the front of my footboxes but haven't decided yet. It's pretty stout but cuts fairly easily. I bought it here:
https://www.amazon.com/gp/product/B0...?ie=UTF8&psc=1

-


Engine Bay Electrical
Well, I've gotten into the middle of wiring and I'm adding so many additional buttons and what not, it really takes some time to figure out what I'm doing. Thanks to everyone on the forum for looking at my diagrams and ensuring my car isn't a dumpster fire one day. 
Engine bay was first and the 4-post cutoff switch was new territory for me. Again, something I'll use as somewhat of a theft deterrent, but in fairness, it looks cool too. I bought the Joe's Racing version:
https://www.summitracing.com/parts/joe-46216
I probably should have just gone with the 2-post, but it was already here so hooked it up. Again, with the help of the forum I was able to get this all sorted out. Diagram explains everything but the cable going down the driver side with mega fuse is the amplifier from the trunk area. I have it running straight to the battery instead of the distribution block. The water temp, oil temp and oil pressure gauge wires are also running down that stretch and pop out where I'll have plenty of slack to hook up once the engine is in. I didn't use any of the harness connections for these with the new Speedhut gauges. Everything is still loose and not completely locked down. I'll do that once I've got my proper lengths cut on the starter/battery/alternator wiring and additional terminals made and booted. Engine mounts are just hanging for now. I thought it came out pretty clean. Here's the diagram and pics. Hopefully it helps someone else.


Speaking of engine mounts, if you have a DART block and the mounts run interference with the webbing on the block, if you don't want to grind your mounts or block, Mike Forte to the rescue. For a very reasonable charge, Mike will cut these and reweld them so that the fit right up to the block. He did this for me on the last build as well.

Last edited by cv2065; 09-30-2024 at 09:29 PM.
-
-
Post Thanks / Like - 0 Thanks, 1 Likes
-
Senior Member

I used the billet buttons, they are very nice pieces. You can order them without the pigtails, they'll send you the connectors loose so you don't end up splicing a bunch of wires.
Here's a tip if you're using these, wire the switch lights to be on all the time. I have pushbuttons for my headlights and high beams and it's nice to be able to easily see it when it's dark to turn the headlights on.
-

Originally Posted by
Mike.Bray

I used the billet buttons, they are very nice pieces. You can order them without the pigtails, they'll send you the connectors loose so you don't end up splicing a bunch of wires.
Here's a tip if you're using these, wire the switch lights to be on all the time. I have pushbuttons for my headlights and high beams and it's nice to be able to easily see it when it's dark to turn the headlights on.
Thanks Mike. I opted for the pigtails. I think the only two wires I don't use are the two middle white ones, except for the start switch. I was deciding which way to run the LED. My lights will be a pull switch and the high beams will be on the column (ie 427 turn signal). I'm running billet buttons for start, fan, hazards, auxiliary and cockpit lighting. Would look cool at night when illuminated and wouldn't eat up space on the IGN/ACC switch connector. I think I will just run all to my distribution block. Thanks!
-
Senior Member


Originally Posted by
cv2065

Thanks Mike. I opted for the pigtails. I think the only two wires I don't use are the two middle white ones, except for the start switch. I was deciding which way to run the LED. My lights will be a pull switch and the high beams will be on the column (ie 427 turn signal). I'm running billet buttons for start, fan, hazards, auxiliary and cockpit lighting. Would look cool at night when illuminated and wouldn't eat up space on the IGN/ACC switch connector. I think I will just run all to my distribution block. Thanks!
What are you doing for the horn? I ended up using the button on my RT turn signal and I'm glad I did.
I can attest the Billet Buttons look very cool lit up at night.
-

Originally Posted by
Mike.Bray

What are you doing for the horn? I ended up using the button on my RT turn signal and I'm glad I did.
I can attest the Billet Buttons look very cool lit up at night.
On the ie. 427 turn signal Frank has it wired where you just pull back on the turn signal stalk for the horn. Pretty cool setup and easy to grab similar to the RT version. I had the dash button for a horn on the last build and it was useless as I never could find it in time when I needed it.
-
Post Thanks / Like - 0 Thanks, 1 Likes
-
Senior Member


Originally Posted by
cv2065

On the ie. 427 turn signal Frank has it wired where you just pull back on the turn signal stalk for the horn. Pretty cool setup and easy to grab similar to the RT version. I had the dash button for a horn on the last build and it was useless as I never could find it in time when I needed it.
Iím going with Franks setup as well. Really excited about it. Used buttons on my last build. Really glad to have a stalk this time.
-
Post Thanks / Like - 0 Thanks, 1 Likes
-
if I decide to keep my fuseblock in the standard location. I like GoDadGo's approach (Passenger-side), but I also have the heater box and haven't checked all the fitment issues yet. Then there's a small possibility to mount in a central location since I'm going to make a glovebox/cubby like John Ibele


 Thanks:
  Likes:


 Reply With Quote


_IMG_9261.png?width=960&height=720&fit=bounds)


_IMG_9346.png?width=960&height=720&fit=bounds) [/URL]
[/URL]


 Don't get me wrong, the headrests are a work of art, but they don't go with my build and one rollbar. So, reached out to Rob at Intatrim and he's making me a new set. Honest mix up and he's making it right.


 [/URL]


_IMG_9421_wERaPavFbERwk3ZvVYsYJu.png?width=960&height=720&fit=bounds)


_IMG_9418.png?width=960&height=720&fit=bounds)


_IMG_9563.png?width=960&height=720&fit=bounds)
_(edited)_IMG_9564.png?width=960&height=720&fit=bounds)


