-
12-06-2024, 10:37 AM
#121
Senior Member


Originally Posted by
topherchrisb

so I'm hoping I can maybe get arranged for a test fitment this weekend.
If you need an extra hand shoot me a note. I’m 20 minutes from you…
-
12-06-2024, 10:58 AM
#122
Great build! What part/model did you use for the third brake/reverse light? I've been considering options here...bought a few different reverse lights from Amazon, but not really happy with anything so far. -Joel
----------------
Ordered Aug 2023; Delivery Dec 2023.
MK IV Complete Kit w/ IRS, Forte SBF 427W w/Edelbrock ProFlo 4, TKX, Wilwood 12.88, Willwood EPB.
Power steering, manual clutch
-
12-06-2024, 12:16 PM
#123

Originally Posted by
jklapp

Great build! What part/model did you use for the third brake/reverse light? I've been considering options here...bought a few different reverse lights from Amazon, but not really happy with anything so far. -Joel
I'm using this at the moment for that third brake light. It doesn't fit flush with the body at the moment though. The profile of the curve is nearly identical but there is a counter sunk portion to the light you'd either have to cut a larger whole into the body... or build up a form to match the outer profile. I haven't decided which way I'm going to go yet. If you look at the picture of the back of the light with the wiring... the portion with the foam gasket is the section I'm talking about. It'd be a rather large hole. Because of that I'm leaning towards building up the body instead. I could probably see about modifying the light casing as well but just not a priority for now.
https://www.amazon.com/gp/product/B0...e?ie=UTF8&th=1
MK4 #10255 project: "Mako"
Coyote Gen 3, TKX, IRS, Wilwood brakes, power steering
Order date: 6/24/21, Received date: 1/12/22, First Gocart date: TBD, Registration date: TBD
Build thread
-
12-06-2024, 12:27 PM
#124

Originally Posted by
danmas

If you need an extra hand shoot me a note. I’m 20 minutes from you…
Thanks for the offer. There are at least four people in the area that have roadsters in flight or just driving that I know of. It's hard for me to schedule any of my progress. It's usually a "I don't have anything to do for an hour, I'm headed to the shop" situation. I could be out there with my lunch, or with my computer while I'm waiting on work, or in the middle of the night when I can't sleep. I have been thinking about hosting a gathering of those people though. We don't necessarily need to work on a car or anything but have some snacks and drinks and just talk shop.
MK4 #10255 project: "Mako"
Coyote Gen 3, TKX, IRS, Wilwood brakes, power steering
Order date: 6/24/21, Received date: 1/12/22, First Gocart date: TBD, Registration date: TBD
Build thread
-
Post Thanks / Like - 0 Thanks, 1 Likes
-
12-06-2024, 03:23 PM
#125
Senior Member


Originally Posted by
topherchrisb

Thanks for the offer. There are at least four people in the area that have roadsters in flight or just driving that I know of. It's hard for me to schedule any of my progress. It's usually a "I don't have anything to do for an hour, I'm headed to the shop" situation. I could be out there with my lunch, or with my computer while I'm waiting on work, or in the middle of the night when I can't sleep. I have been thinking about hosting a gathering of those people though. We don't necessarily need to work on a car or anything but have some snacks and drinks and just talk shop.
I had many offers to help shove my engine in the chassis, but it ended up being a spur of the moment, 'hey, I've got an hour' activity. Plus, I think I kind of wanted to do it on my own. Can't really explain why. I will say, though...my 427/TKX, while doable by myself, would have been much easier with a 2nd pair of hands, even with the engine leveler in play. Could've saved a lot of wiggling/shoehorning if I had someone to push the tranny snout down a few inches to clear the frame near the firewall. I can imagine the Coyote is even more of a challenge without any helping hands. Good luck, though, and post up some pics! I love seeing pics of folks dropping in their engines. It's an exciting event.
Greg
Built an early MkIII years ago, sold years ago. Back after 18 years to build a MkIV
Build Thread Here Partners: Summit Racing, LMR, Breeze, Forte's Parts, Speedhut, Amazon
MkIV Complete Kit Ordered 4/18/23, Delivered 7/11/23, Boss 427W, Edelbrock Pro Flo 4, TKX (.68 5th), IRS, Wilwood Brakes, 18" Halibrands, Toyo R888R Tires, Custom Speedhut Gauges
-
12-09-2024, 05:49 PM
#126
Power steering
Well I was no where near a position where I could do a test fitment of the engine in the car. My original plan was just to push it in as is to do some fitment marks and checks for firewall mounted items like fuel pressure regulator, AC evaporator, brackets for hood pins and such. The amount of effort to even get to that point seemed like I may not want to pull it out once I have it in place. So I decided to start prepping it for a permanent placement. Maybe I'll be ready to do that next weekend... but probably the weekend after that if I'm realistic.
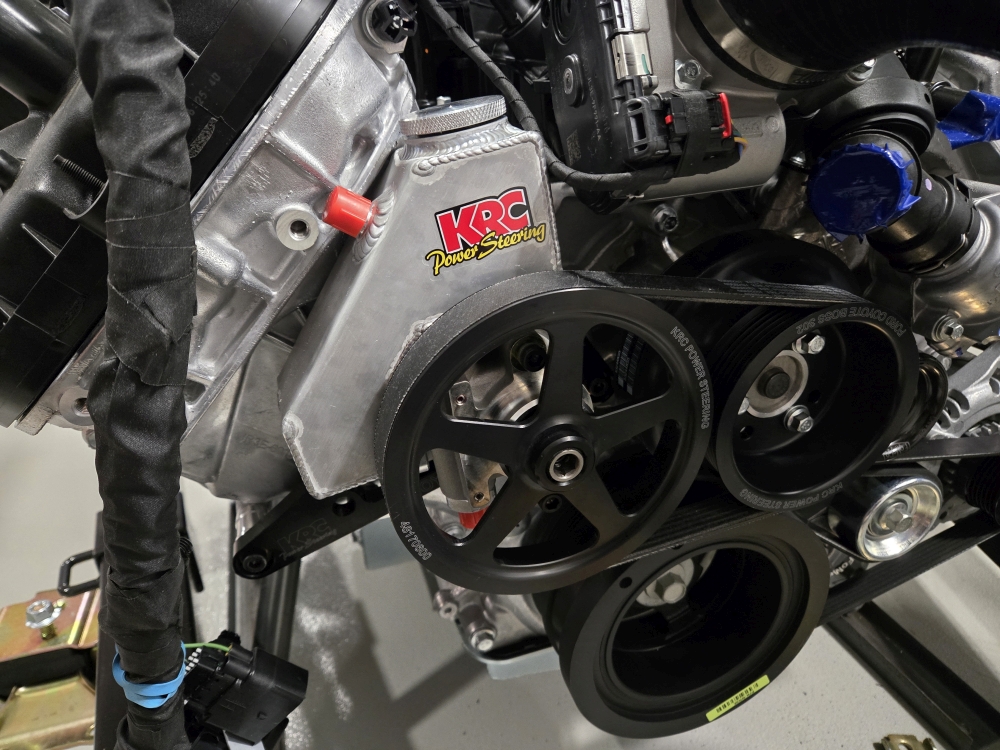
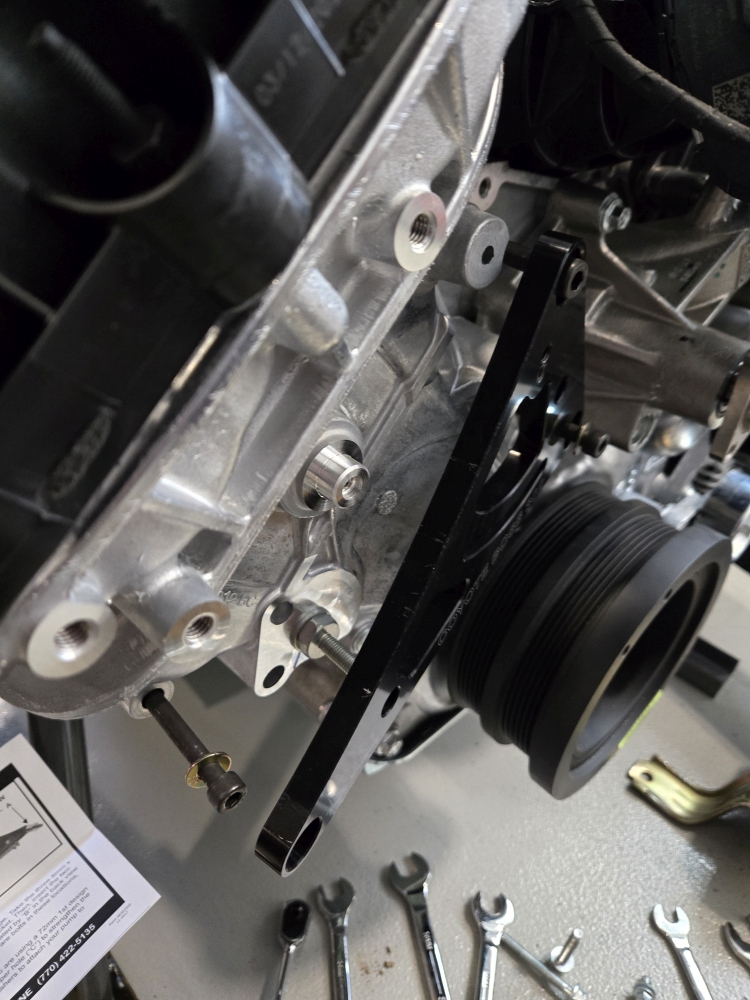
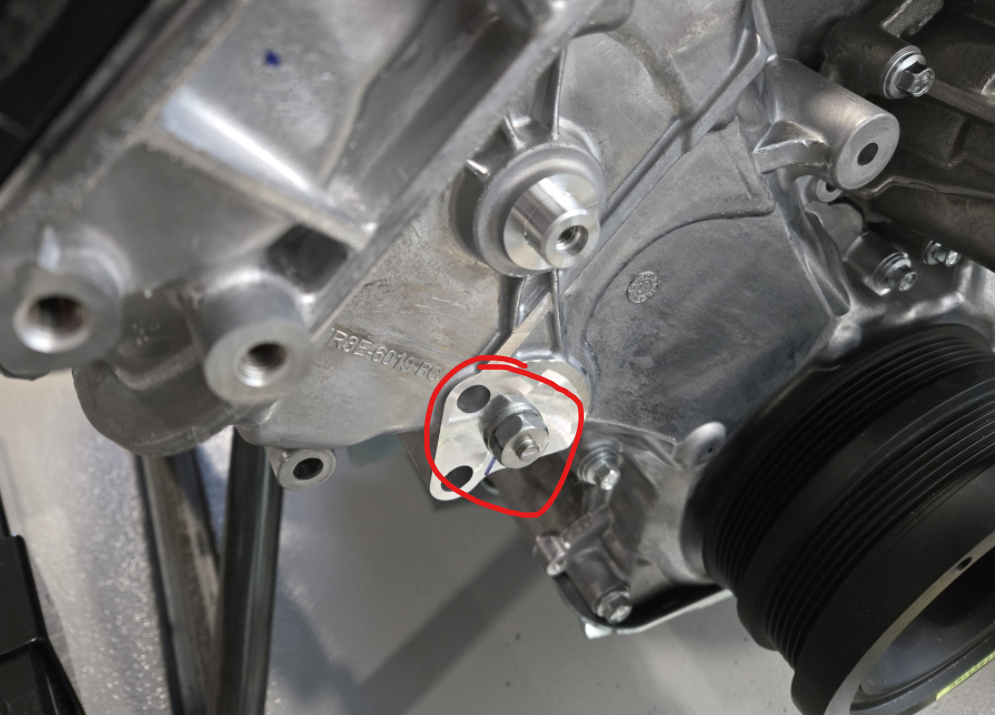
First the power steering. I went with the KRC option from FFR. There are two pools of people with that pump placement: 1. everything fits nicely and although it's tight... it fits. 2. There is interference on the upper corner of the reservoir with the head and it's nearly impossible to get the belt on with the amount of travel the interference allows you. I was in camp 2.  I took the angle grinder and ground a little on the head and the reservoir to be able to get the thing on. What's funny is with the pump and pulleys sitting on the bench I couldn't get the belt to get around them gracefully. The belt could be just bit longer in my opinion. It was obvious it would be a pain with the pulleys on the engine. I ended up getting it to fit by doing things in this order: mount the pump, pre route the serpentine belt as much as I could without tension, get the steering belt on both pulleys, mount/torque the water pump pulley, tension the serpentine belt, then adjust the steering pulley tension. I didn't even mention the time cover bolt that had some extra stand off threads on it I had to grind down to get the bracket to fit... or that one of the spacers is no longer the right depth so I replaced with a stack of washers for correct depth. Early adopter problems.
Final form:
Initial interference (Looks like it should fit that bracket hole... but it doesn't):
Stand off that I ground down:
MK4 #10255 project: "Mako"
Coyote Gen 3, TKX, IRS, Wilwood brakes, power steering
Order date: 6/24/21, Received date: 1/12/22, First Gocart date: TBD, Registration date: TBD
Build thread
-
12-09-2024, 06:00 PM
#127
Senders
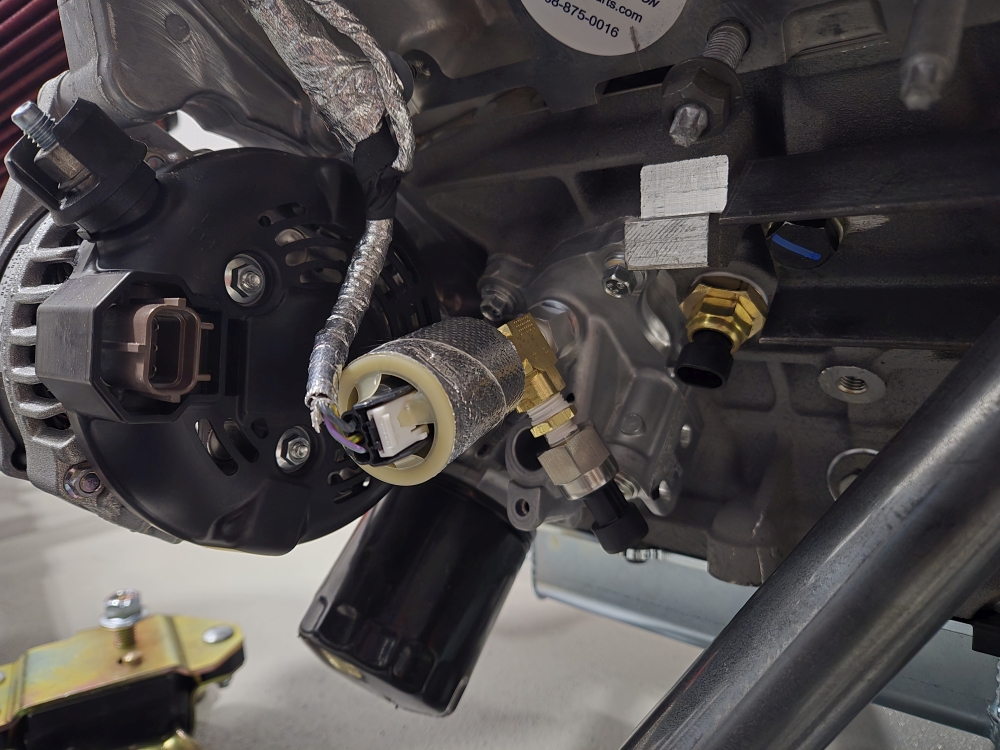
Then I tackled the senders. This went just as the FFR documentation says it should. On the gen4 there is a false hole and mount you can see just behind the third party oil sender in the picture below. I'm sure it's a parts efficiency thing... but it's weird to have non functional castings of that nature. It definitely looks like some sort of fluid will come shooting out when the engine is running. I almost got the bore scope out to verify the documentation that it's not machined through. I was feeling too lazy for that kind of action at that point though. I did opt to get a 3/4 to 1/8 npt adapter instead of going with the daisy chain set of three you get in the FFR kit. Just a little cleaner... couldn't find a tee with direct sizing for the oil side of things. So that went as the FFR package is intended.
Senders:
MK4 #10255 project: "Mako"
Coyote Gen 3, TKX, IRS, Wilwood brakes, power steering
Order date: 6/24/21, Received date: 1/12/22, First Gocart date: TBD, Registration date: TBD
Build thread
-
12-09-2024, 06:08 PM
#128
Timing cover gasket anomolies
One thing I forgot to mention that feels bad is the gasket around the timing cover. More specifically there are a few spots where the gasket is protruding from the valley it supposed to reside in. I looked up images of the gaskets for the gen3 and it doesn't seem like there are locations for overflow like this. It's hard to believe that if this was a problem it wouldn't have been noticed till now though. I think ford runs all these engines for a bit before shipment... right? There were three places that I found of a similar nature to the one pictured below. I think I might send the pictures to Forte and see what they think.

MK4 #10255 project: "Mako"
Coyote Gen 3, TKX, IRS, Wilwood brakes, power steering
Order date: 6/24/21, Received date: 1/12/22, First Gocart date: TBD, Registration date: TBD
Build thread
-
12-09-2024, 06:29 PM
#129
Engine fuse box/harness
Well... ford is definitely not taking this harness back. I've already mutilated it quote a bit. So much bloat... another one of those manufacturing efficiency things. This part is not as straight forward with FFRs instructions anymore. It seems to be making sense to me so far though. An example being... one of the first things the FFR instructions mentions when getting to wiring in the coyote instructions is handle connector C400 for the intercooler pump. Well in the new version of the wire harness there are two intercooler connectors C1217 and C1743. So now you handle both of those in the same way. Also there is no mention of dealing with a PATS module connector in the instructions(FFR or Ford)... but I'm hesitant diet that out till I have a successful start and can verify I don't need any of that. There isn't anything in the connector that seems scary... ground, key on, HAAT, and can bus.
Diet out some wires and leave labeled. Will probably diet them out completely after first start.

Then tear the whole thing apart anyway so you can reroute the fan feed into the cockpit cleanly for the relay/PWM fan contoller.

MK4 #10255 project: "Mako"
Coyote Gen 3, TKX, IRS, Wilwood brakes, power steering
Order date: 6/24/21, Received date: 1/12/22, First Gocart date: TBD, Registration date: TBD
Build thread
-
12-23-2024, 06:11 PM
#130
Exhaust flange
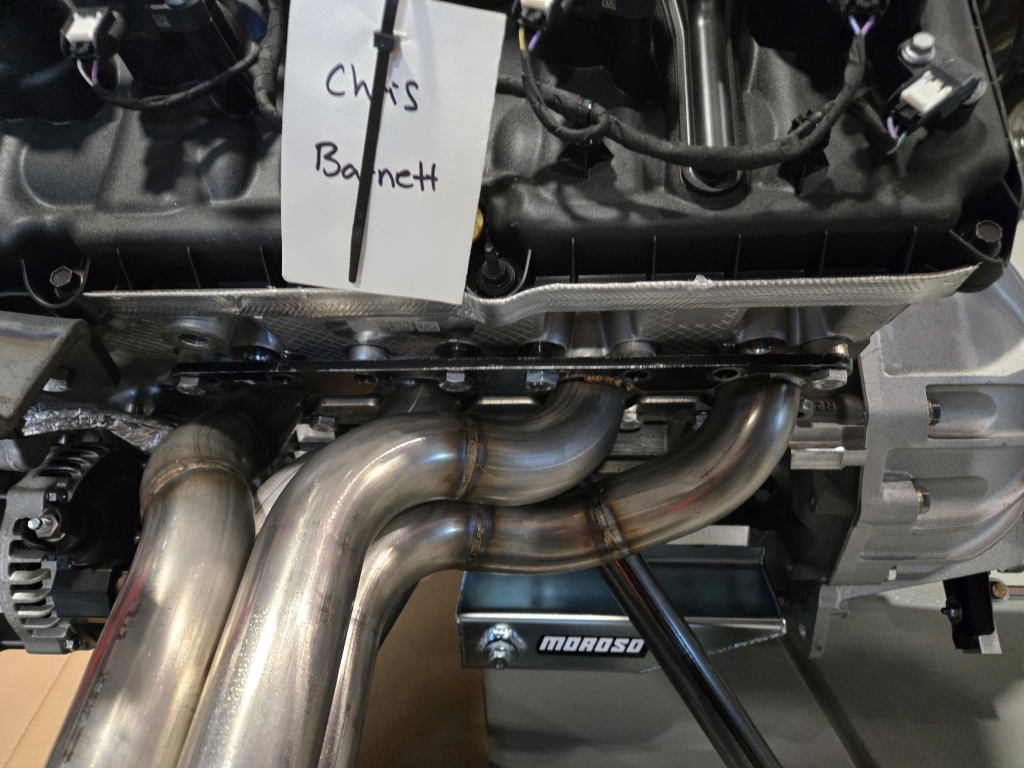
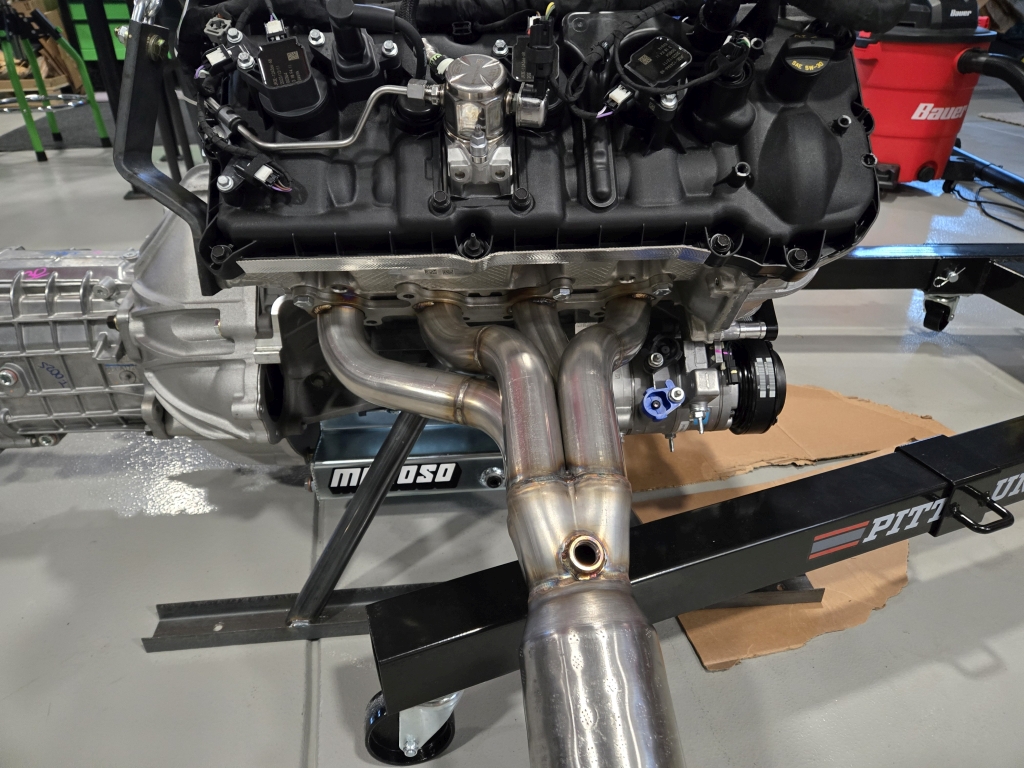
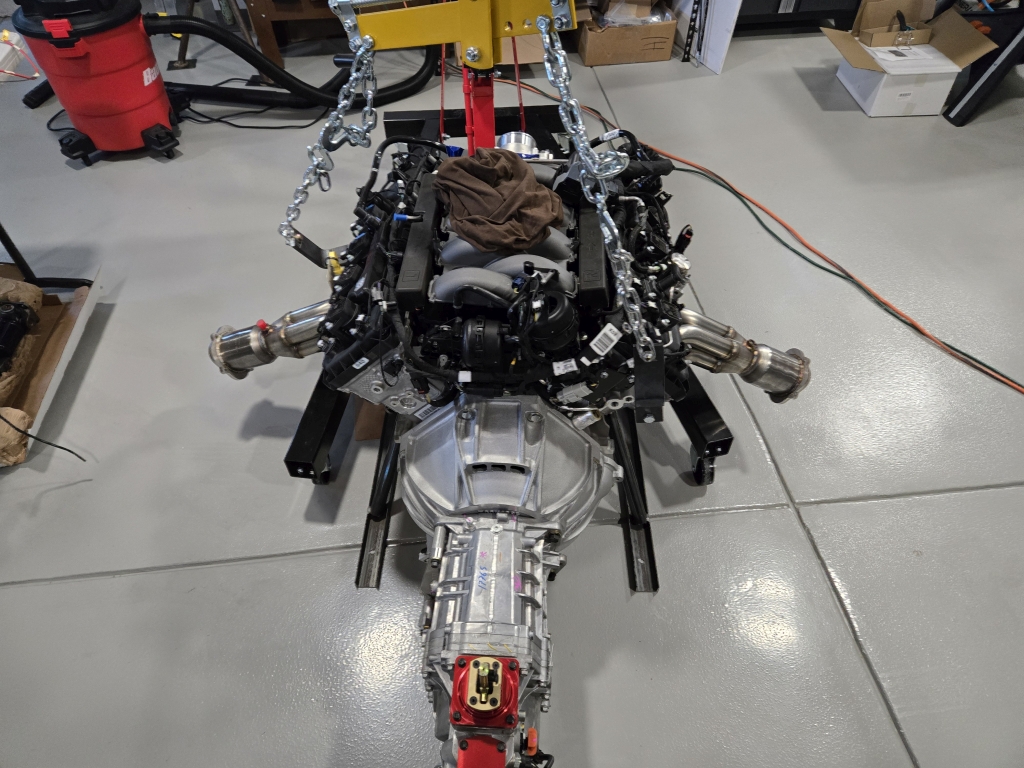
So an eventful number of days has passed as I've been prepping to drop the engine in. I have this thread on the roadster forums about adapting the gen3 left side header to the new gen4 bolt pattern using Forte's new offering. I don't want to rehash all of that here but here are the end results of test fitting the headers and how they look inside the engine bay. I'll do an engine install post next for more detail as to how I got there.
Left side with adapter:
Right side no adapter needed:
From the rear:
Left side in the bay:

MK4 #10255 project: "Mako"
Coyote Gen 3, TKX, IRS, Wilwood brakes, power steering
Order date: 6/24/21, Received date: 1/12/22, First Gocart date: TBD, Registration date: TBD
Build thread
-
12-23-2024, 06:30 PM
#131
Engine fitment
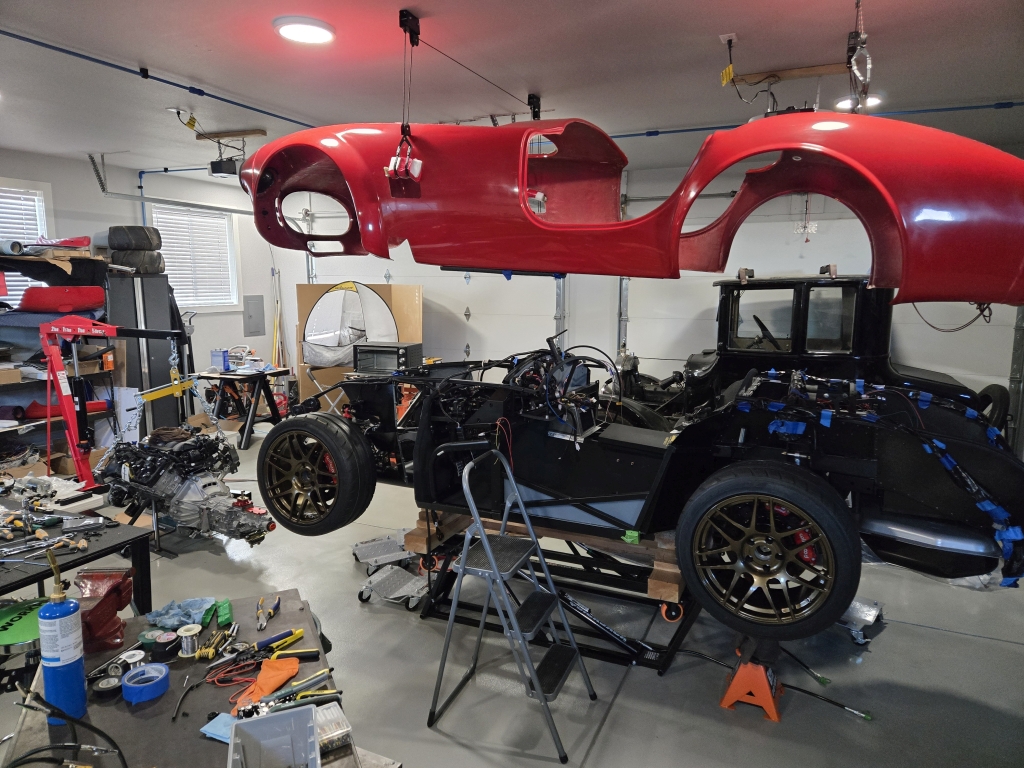
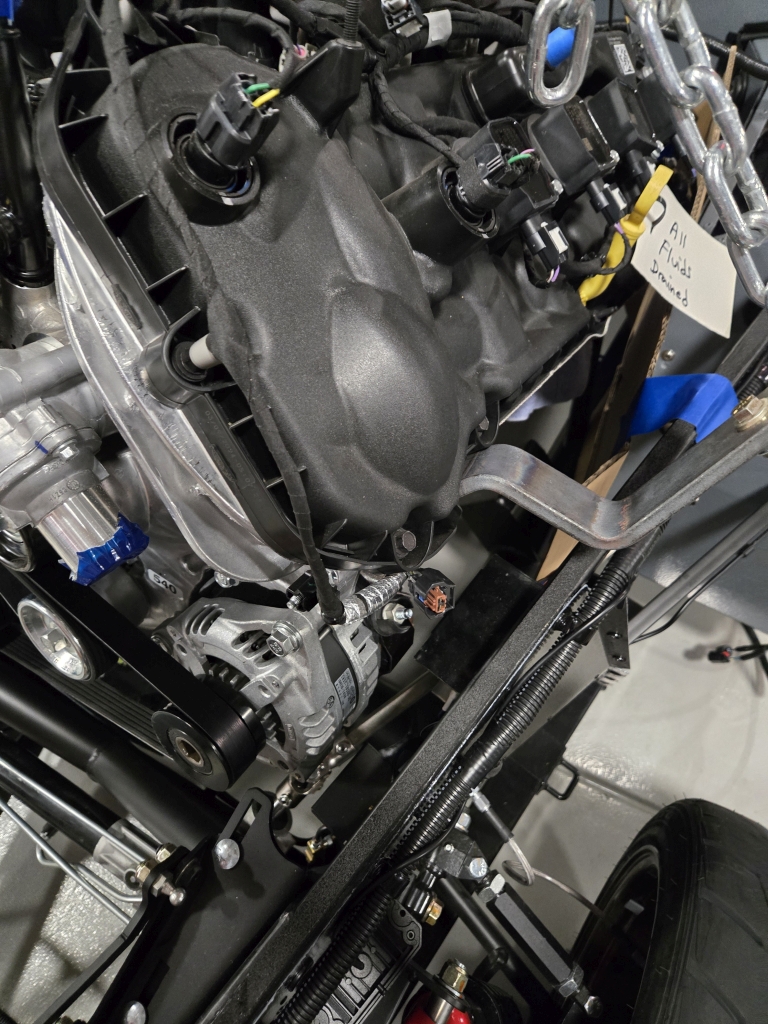
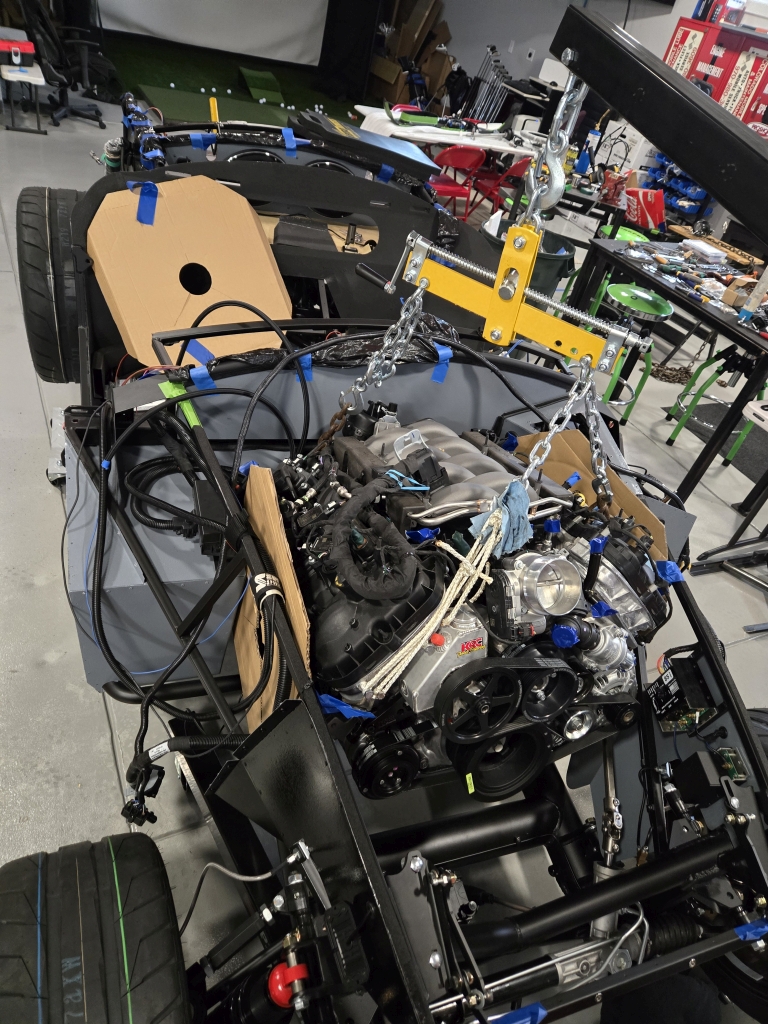
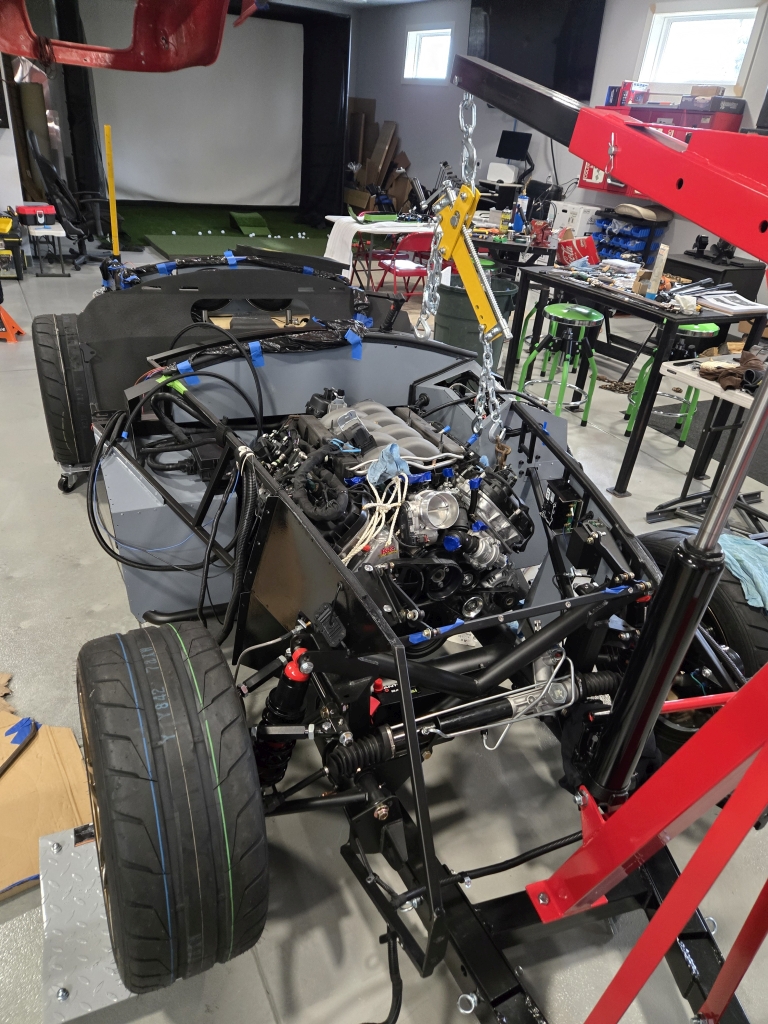
I know I've read so many posts about how tight the fitment of the coyote is for this roadster setup... I don't think you can actually verbalize how tight it is. My best way to describe it is... I had to remove a piece of cardboard I was using as protection between the left side valve cover and the foot well to get it to slide in properly. When I was rocking the engine back and forth to adjust the height on the ends of the header collectors I scratched the foot well wall with a bolt stand off on top of the valve cover. It's the only scratch I got from the install... but jeesh there is no extra room at all in this setup.
I definitely want to give everyone on the forum props for all the info provided. There were definitely things I knew about ahead of time, but there were also things I had to adapt to that had some form of motivation from info received here. Like I was having a hard time mating both mounts into the plates on the frame at the same time. It was SO much easier just detaching one of them, placing it in the mount plate loosely and then attaching it as the engine came down. I would like to say it only took me a half hour like most... but two attempts and the tight squeeze made it about three hours for me. But you couldn't have smacked the smile off my face after it was done. I can still say I've done all of this work by myself. Paint and body work is the only thing on my list that is questionable on keeping the integrity on that statement.
My first attempt I setting up everything perfect...
Stage the engine:
Lift the engine and roll the car under on casters(it was easier to move the car than the engine crane under load):
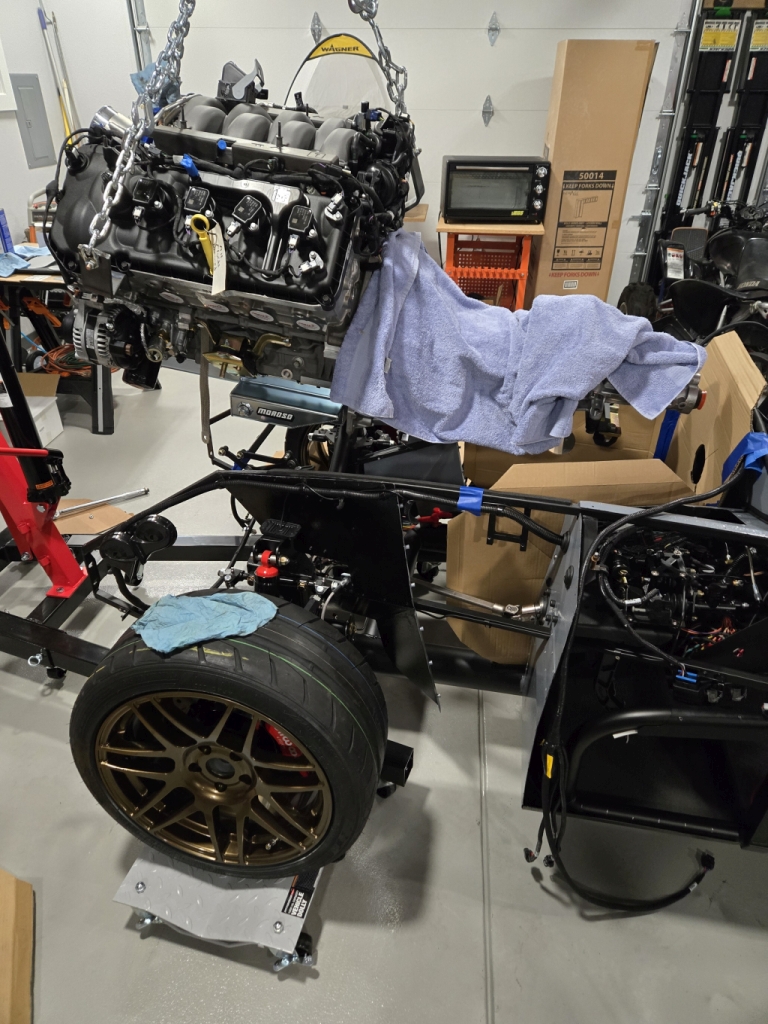
Tilt the car, the engine and lower into place:

And then hit your engine hoist bracket on the top rail cause the damn engine is soooooo wide:
Then cut up some old tow chains and some rip chord for less profile and your golden:
And it's in!!!:
Last edited by topherchrisb; 12-23-2024 at 06:32 PM.
MK4 #10255 project: "Mako"
Coyote Gen 3, TKX, IRS, Wilwood brakes, power steering
Order date: 6/24/21, Received date: 1/12/22, First Gocart date: TBD, Registration date: TBD
Build thread
-
12-23-2024, 06:54 PM
#132
Some primary wiring
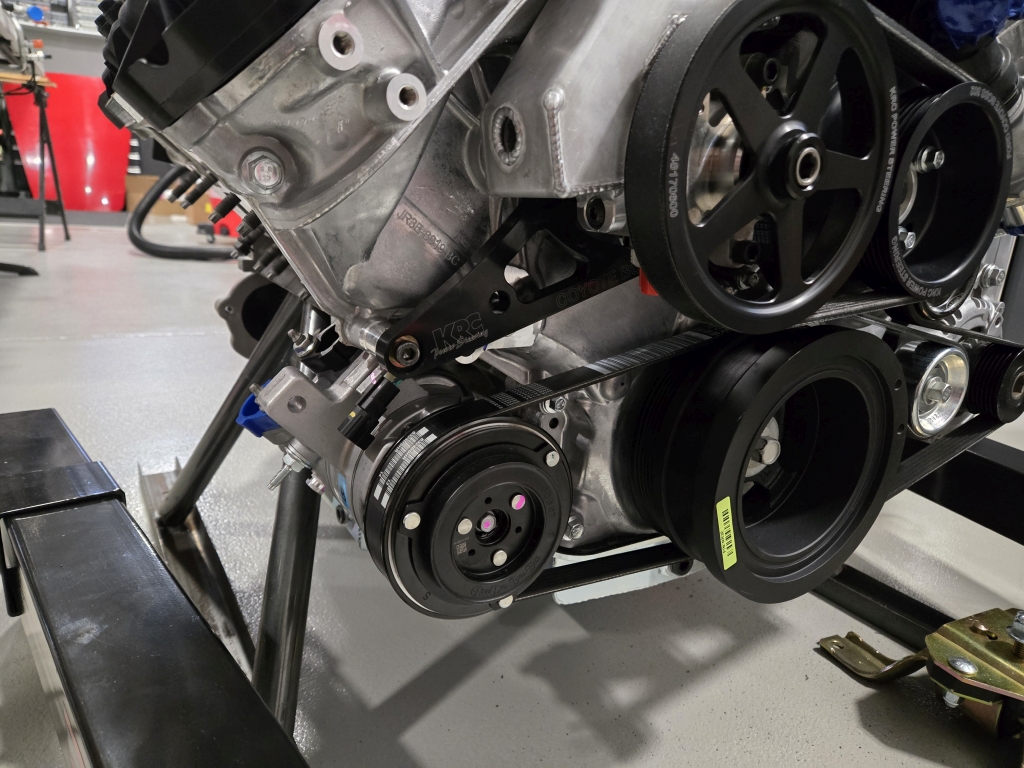
I may be doing things a little out of order but a lot has been done and I'm not good for attention when it comes to producing content. A couple wiring things I did before the engine install. I did end up getting the OEM AC compressor setup. Ford performance had a 20% off sale this month so I ordered from them for an extra $200 off. I also had it two days after I ordered. Pretty impressive. I still hate installing those stretch belt setups though. After struggling on that install for a while I ended up using the slide the belt behind the crank pulley with the zip tie technique. Way easy that way... just took me a lot of struggling before I was deflated enough to try it. Wasn't comfortable putting the belt behind the pulley... doesn't feel good when you're doing it, but it's a hidden gem for sure.
OEM AC compressor:
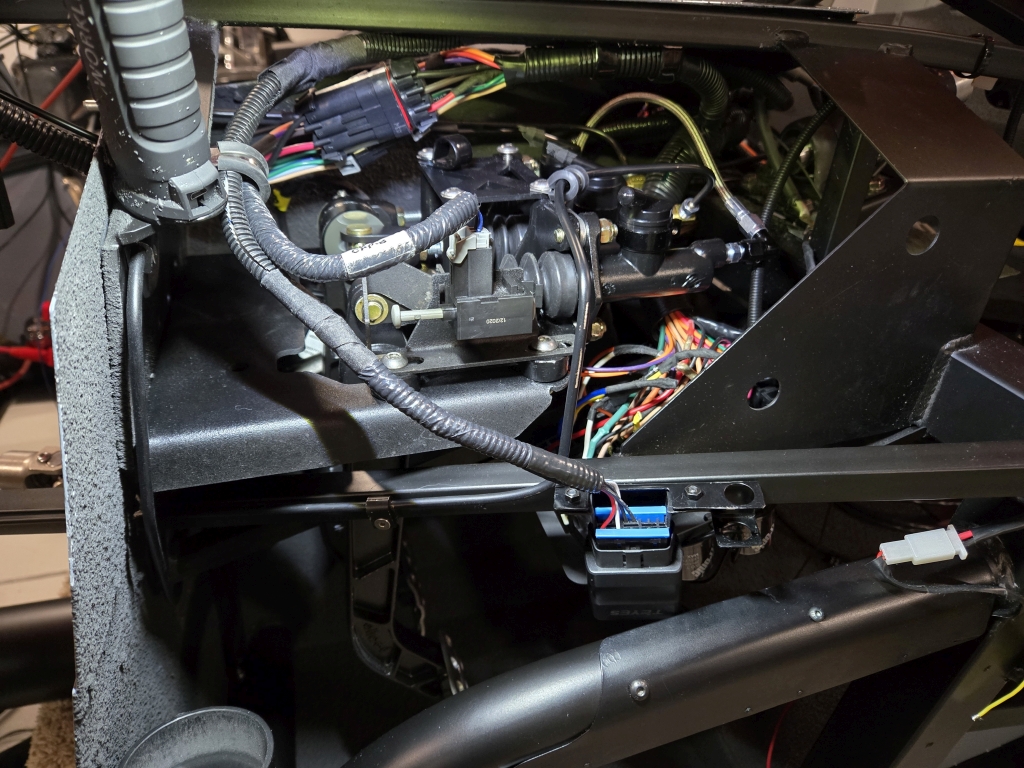
I decided to wire up my OBD2 setup near the clutch wiring so I didn't have to mess with changing the harness from that regard. I placed it so I can barely get my bluetooth reader in it. The reader connects to my stereo so I can use any android app from the screen to get diagnostics on the road. I did modify the check engine wiring to use the light I installed in the dash previously. That's why you don't see it in the bracket.
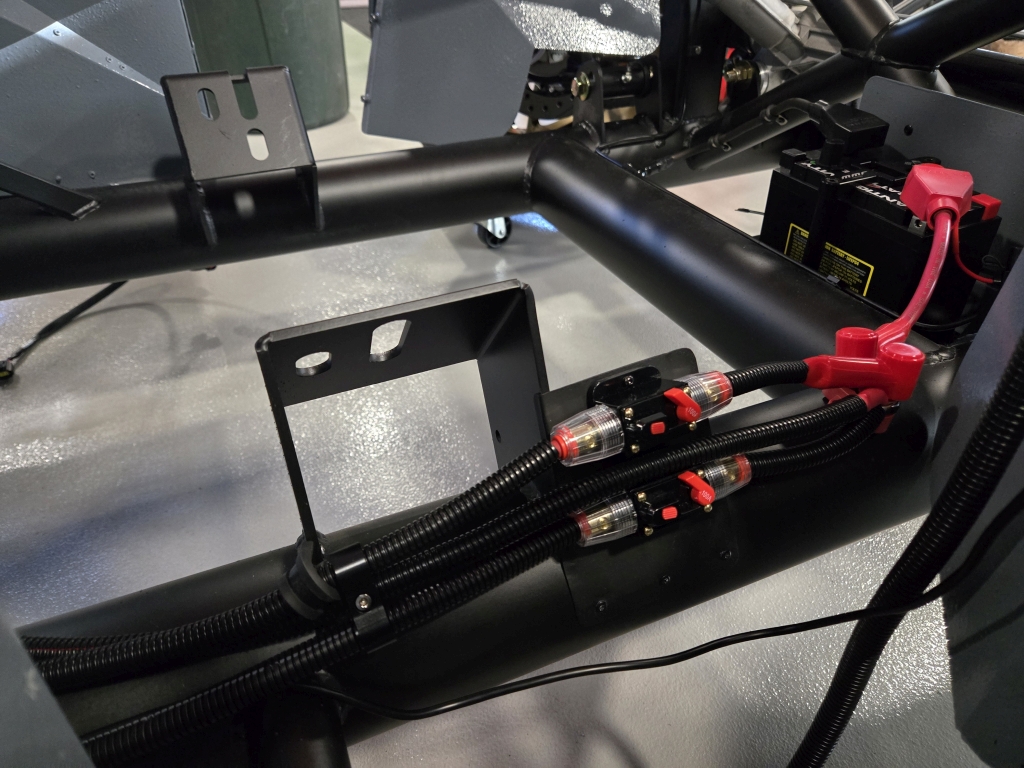
This one may not get very well received but I actually like the setup. I'm using a two post distribution near the battery to split off all my main power lines. I made a plate that is attached to the 4" frame and the engine mount as a bracket to hold a couple breakers and also used it for wire management. The top breaker goes into the cabin for the main power there, the bottom goes to the trunk fuse box for use there. They are 100amp breakers but I think I can reduce them more. My fan runs off it's own fused circuit (small wire on the battery termination), my lights are LED using WAY less power, and my other components use capacitors and batteries as buffers to reduce large load spikes. The rear runs two speaker amps and the seat heaters however... might have to increase that one after some real life sea trials. The line down the middle runs to the starter position.
My coyote fuse block I slid out away from the firewall as much as possible while still being able to route the cables up the edge and down the top frame rail. I wanted to have as much room as possible for my future AC upgrade while still being able to route the wiring cleanly out of the way once the body is on. You can also see I pre-ran the flex fuel lines as I thought I wouldn't have enough room to tighten those when the engine was in place.

Last edited by topherchrisb; 12-23-2024 at 06:58 PM.
MK4 #10255 project: "Mako"
Coyote Gen 3, TKX, IRS, Wilwood brakes, power steering
Order date: 6/24/21, Received date: 1/12/22, First Gocart date: TBD, Registration date: TBD
Build thread
-
Post Thanks / Like - 0 Thanks, 1 Likes


 Thanks:
  Likes:


 Reply With Quote

 I took the angle grinder and ground a little on the head and the reservoir to be able to get the thing on. What's funny is with the pump and pulleys sitting on the bench I couldn't get the belt to get around them gracefully. The belt could be just bit longer in my opinion. It was obvious it would be a pain with the pulleys on the engine. I ended up getting it to fit by doing things in this order: mount the pump, pre route the serpentine belt as much as I could without tension, get the steering belt on both pulleys, mount/torque the water pump pulley, tension the serpentine belt, then adjust the steering pulley tension. I didn't even mention the time cover bolt that had some extra stand off threads on it I had to grind down to get the bracket to fit... or that one of the spacers is no longer the right depth so I replaced with a stack of washers for correct depth. Early adopter problems.
