-
Removing molding clay from the mold parting lines
What's the best way to remove the molding clay from the mold parting lines? I've used a small, homemade plastic scraper and some plastic "sculpting" tools but that doesn't come close to getting all of the itty bitty little spots.
I've tried using the search function to find the answer, but it leaves a little to be desired.
-
Senior Member

-
Post Thanks / Like - 0 Thanks, 1 Likes
-
Senior Member

For the life of me I don't understand the use of molding clay in a mold for fiberglass parts. I used to work in a small race boat building company laying up fiberglass boat hulls, decks, hatches and other glass parts and never used anything like that. We shot the gelcoat on first, a fab mat next (which cuts down on print through) and after that we used whatever layup schedule that boat was going to made from. No filler of any sort unless it was fiberglass. I have seen that gooie crap at the mold parting lines on my car but never understood why. Everyone knows this is a nightmare so why is it done? If you're trying to do tight curves where the glass doesn't want to lay down, we used a chopper gun and then layup woven roving over top of that. Does someone out there have an answer to this? When I was at Factory Five on a tour, we walked through the molding shop fairly quickly and never got to see any lap up process. Had I known at that time I would have asked that question. Maybe Jeff knows why.
FFR 9883 MKIV ,427 Windsor engine
TKX 5 speed, Three Link 3.55 gears
Power Steering, Leather Seats
18" Wheels and Tires, Drop Trunk
Fun Package
-
Not a waxer


Originally Posted by
ggunter

For the life of me I don't understand the use of molding clay in a mold for fiberglass parts. I used to work in a small race boat building company laying up fiberglass boat hulls, decks, hatches and other glass parts and never used anything like that. We shot the gelcoat on first, a fab mat next (which cuts down on print through) and after that we used whatever layup schedule that boat was going to made from. No filler of any sort unless it was fiberglass. I have seen that gooie crap at the mold parting lines on my car but never understood why. Everyone knows this is a nightmare so why is it done? If you're trying to do tight curves where the glass doesn't want to lay down, we used a chopper gun and then layup woven roving over top of that. Does someone out there have an answer to this? When I was at Factory Five on a tour, we walked through the molding shop fairly quickly and never got to see any lap up process. Had I known at that time I would have asked that question. Maybe Jeff knows why.
You kind of answered your question when you said "we shot the gelcoat on first". As the molds are used and broken down multiple times they get chipped, cracked, etc. along the parting seams. The clay is used to plug these holes or voids prior to gelcoat otherwise it would run through. This should be a thing of the past going forward. Mold cycles were a topic of much conversation when I consulted on the Mk5. They are committed to a high standard for the new bodies and a big part of this is by significantly reducing the number of cycles that the molds are used before they are taken out of service. BTW, when you visited FFR you would not have seen body production---those are done offsite by a third party. The moving panels (hoods, doors, trunk lids) are done in house in FFR's new molding facility.
To the original question, I remove the wax by using picks, synthetic abrasive wheel in a die grinder  and power washing.
Jeff
Last edited by Jeff Kleiner; 01-22-2025 at 08:53 AM.
-
Post Thanks / Like - 0 Thanks, 2 Likes
-
Jeff, any chance that FFR are going to use this new molding process (with the mk5) moving foward with the 65 coupe?
-
Senior Member
Ok, I see what you are saying Jeff. I know molds wear out over time and some would chip out gelcoat when popping a part off. When our molds got chipped or cracked, we repaired them like any fiberglass repair and then put them back in service.
FFR 9883 MKIV ,427 Windsor engine
TKX 5 speed, Three Link 3.55 gears
Power Steering, Leather Seats
18" Wheels and Tires, Drop Trunk
Fun Package
-
Post Thanks / Like - 0 Thanks, 1 Likes
-
Originally Posted by
egchewy79
Yeah, I'm using https://www.harborfreight.com/6-piec...set-34152.html not as sharp so hopefully less likely to leave scratches, also trying a nylon brush. Jeff's post about the abrasive wheel and die grinder helps.
Will isopropyl alcohol, denatured alcohol or anything like that help cut it or at least make it smear lessor be less sticky?
Thanks, Steve
-
If you think it's bad now should have seen it when I built my 33 Hot Rod back in 2015.
There was so much clay in all the seams, when you picked it out I had to redo the fiberglass holes and seams. most seams you could see thru, it was so thin in those areas.
I spent a better part of a month fixing the body.
Regards, Dodeman
-
Senior Member

I used a dremel to get it all out then had to repair the holes
Build 1: Mk4 Complete Kit #9312 Ordered 1/27/18, Delivered 3/24/18, CA SB100 Registered 9/11/19 - Gen 2 Coyote TKO600, IRS, Power Steering, Wilwood Brakes, 17" Halibrand.
Build 2: Gen3 Coupe Complete Kit #309 Ordered 1/25/21, Delivered 6/9/21, CA SB100 Registered 8/27/24 - BluePrint GM 427 LS T56, IRS, AC, Power Steering.
Album Here
-
Originally Posted by
lewma
I used a dremel to get it all out then had to repair the holes
 I would not like to have to get quite that aggressive if I don't have to.
-
Senior Member
Hsrf 
Build 1: Mk4 Complete Kit #9312 Ordered 1/27/18, Delivered 3/24/18, CA SB100 Registered 9/11/19 - Gen 2 Coyote TKO600, IRS, Power Steering, Wilwood Brakes, 17" Halibrand.
Build 2: Gen3 Coupe Complete Kit #309 Ordered 1/25/21, Delivered 6/9/21, CA SB100 Registered 8/27/24 - BluePrint GM 427 LS T56, IRS, AC, Power Steering.
Album Here
-
Speaking of HSRF, I was going to build a Rutan Long EZ back in the day. It was a foam and epoxy composite build.
They used glass microballoons, cabosil fumed silica, and flocked cotton fiber mixed with the resin for surface finishing and repairs. Are any of these used on the FFR bodies?
IIRC the flock was used for more “structural” type repairs and the microballoons and cabosil were used as filler because they were easy to sand and form.
-
Senior Member

Originally Posted by
ggunter
Ok, I see what you are saying Jeff. I know molds wear out over time and some would chip out gelcoat when popping a part off. When our molds got chipped or cracked, we repaired them like any fiberglass repair and then put them back in service.
gg, A major part of my career was in the marine industry and I have been in boat maufacturing facilities small and huge. More recently I have seen RV manufacuring. In all cases they did not want to repair production parts, so the tools are repaired as necessary. I can visualize this FRP flaw and I have seen photos. I suspect the flaws are not only damaged tools, but poor "band aid" techique.
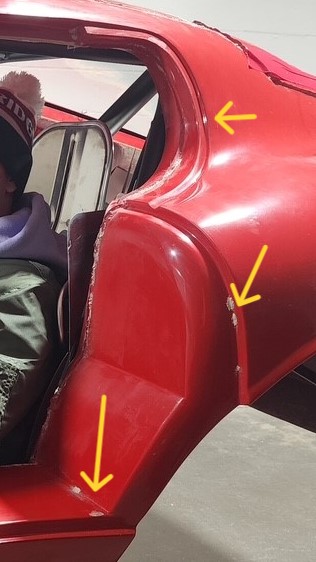
The mold is a "negative" of the part. If there is a flaw in the tool it was patched by spreading clay in the flaw. The repair is temporary but with a flush tool surface, the part should be correct, or almost perfect. The body flaws are not almost perfect, they are hollow and/or full of clay.
If the clay repair patch is displaced, it should be on the outside of the part gel coat, not underneath it. It appears that the laminators do not make the clay flush with the tool surface, it is just gobbed on the tool flaw. The "gob" promotes air pockets and clay in the part lamination. My best guess.
jim
-
Post Thanks / Like - 0 Thanks, 1 Likes
-

Steve >> aka: GoDadGo

Originally Posted by
Jeff Kleiner
"we shot the gelcoat on first". As the molds are used and broken down multiple times they get chipped, cracked, etc. along the parting seams. The clay is used to plug these holes or voids prior to gelcoat otherwise it would run through.
Jeff
Sir Jeffski,
1. This is why my brother B-Nard and I would use packing tape on the mold parting lines when we built split mold boats.
2. We used clay once or twice and then started using packing tape, which we waxed, before shooting the gel-coat.
3. We also tried masking tape but that stuff got stuck in the gel-coat so it wasn't the best option.
4. It did make our molds last longer but you need to clean up the lines on your hull/body.
5. If the guys at Factory-5 would try this trick then they would be shocked.
Steve
Shown Below Is A Great Example Of How Packing Tape Can Be Used To Make A Flat Panel:
https://youtu.be/7GA1I5fjD1E
Last edited by GoDadGo; 01-22-2025 at 08:57 PM.
-
Post Thanks / Like - 0 Thanks, 1 Likes
-
Senior Member

It's been awhile since I had to work at parting line clean up, but I believe I used small bronze wire brushes and acetone. I then wiped down the entire body with a wax remover/degreaser.
Years ago the instructor at Mott build class apparently recommended a PPG product called P-177 Dx103. WEPS Pepsol is another good one.
-
Post Thanks / Like - 0 Thanks, 1 Likes
-
-
Senior Member

Guys simple. Brass hand wire brush and mineral spirits. It will literally melt the clay.
-
Originally Posted by
Kbl7td
Guys simple. Brass hand wire brush and mineral spirits. It will literally melt the clay.
You have mentioned this before. It should be a sticky.
-
I would think a wire brush is a little aggressive for a plastic car.
-
Senior Member
Can’t knock what works. My friend the 100-180 grit on the car when you paint will be much harsher! Hopefully you didn’t get the plastic version of the car FFr sells, I kid. But I’m talking a simple small hand brush, not a wire wheel.
-
Senior Member
Originally Posted by
Smiley
I would think a wire brush is a little aggressive for a plastic car.
Brass wire brush was fine. No damage at all. No need to get aggressive with it, the solvent does most of the work, but the brush works the wax out of the little pockets that it gets trapped in.
Example...
https://www.grainger.ca/en/product/p...B&gclsrc=aw.ds
FFR6803RD, MK 3.1, 302 EFI, fr/rr disc brakes, WC-T5, c/w Hurst Competition Plus shifter, 3 link rear, Koni adjustable coil over shocks, dual roll bars, BBK 4-4 headers, 3.55 rear gears, BBK rear lower control arms c/w poly bushings. Ivy Green Metallic Arrived-02/08, On road 09/2010


 Thanks:
  Likes:


 Reply With Quote