-
01-14-2025, 08:11 AM
#401
Senior Member

One of the things I really love about this part of the project is being extremely granular when it comes to understanding how something does what it does. Topically, everyone knows what a carb does (meters fuel into the engine). But there's TONS of design and testing that goes into flow rates and whatnot that all happens behind the scenes during the design phase that nobody sees. That's the stuff I love. It's the "why" aspect of taking a deep dive.
Case in point, here's how I'm tuning my carb. I know there's a relationship between AFR and jet/needle size. At cruise, constant throttle, the metering rod is down and there's only two sources for fuel into the engine (the idle mixture screws, and much more applicable is the thick part of the metering rod and main jet). If the jet and rod have a relationship where the more area available to flow fuel, the richer my burned mixture will be. I discovered there's a sweet spot, and that seems to be around .0028 in^2.
My notes below:
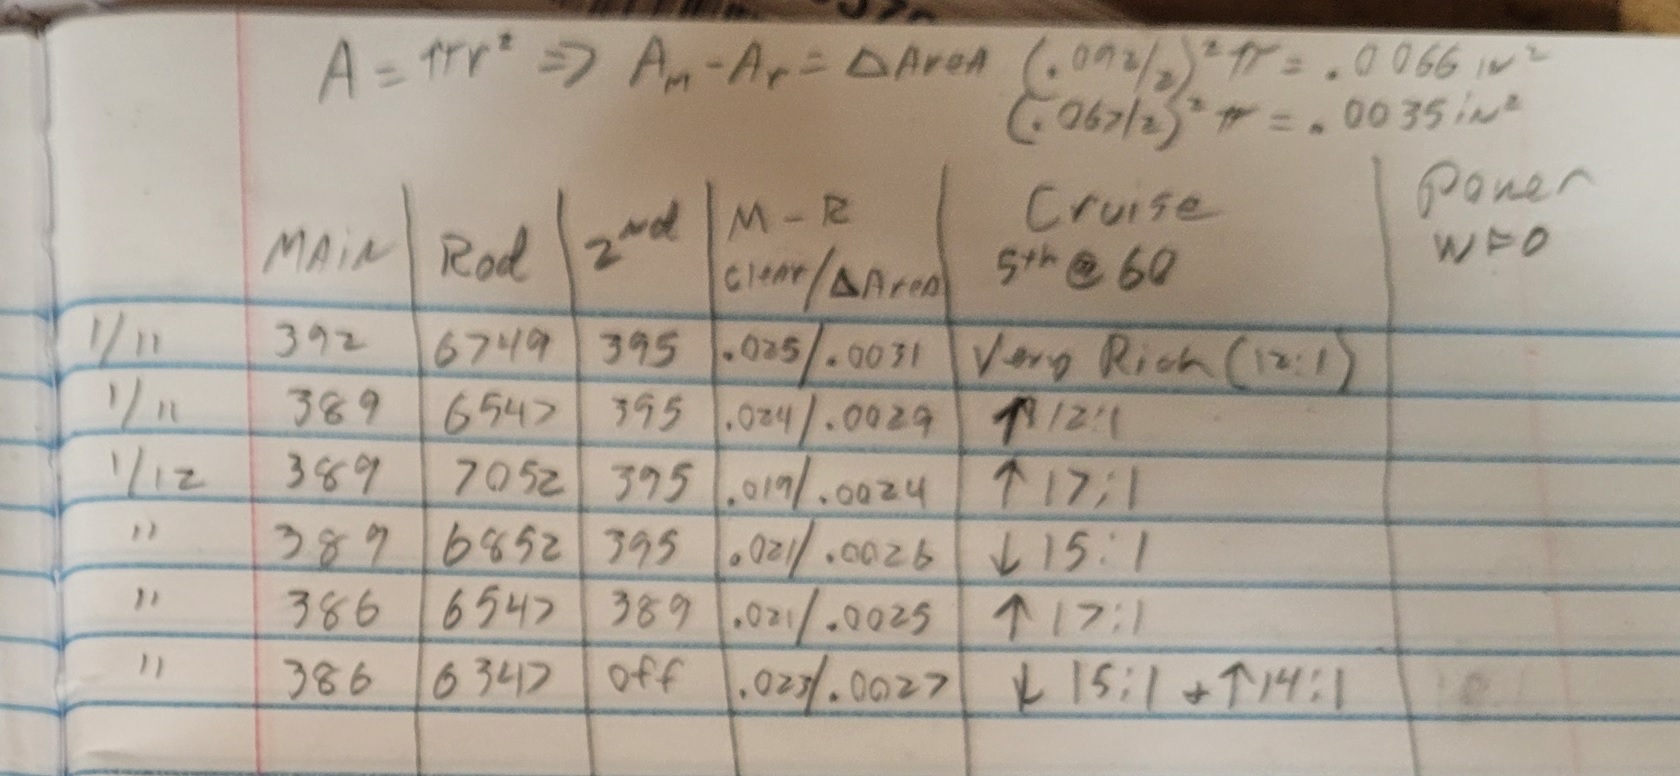
Jet, rod, clearance between the two, and one thing I was missing was the difference in area between those two. The clearance might be the same, but as you reduce the diameter of an orifice you're inherently reducing the area as well so that clearance measurement wasn't the most accurate.
Now, knowing this I can see what "delta area" works best to get me the best cruise AFR. Then it's just swapping jets and needles to get me there.
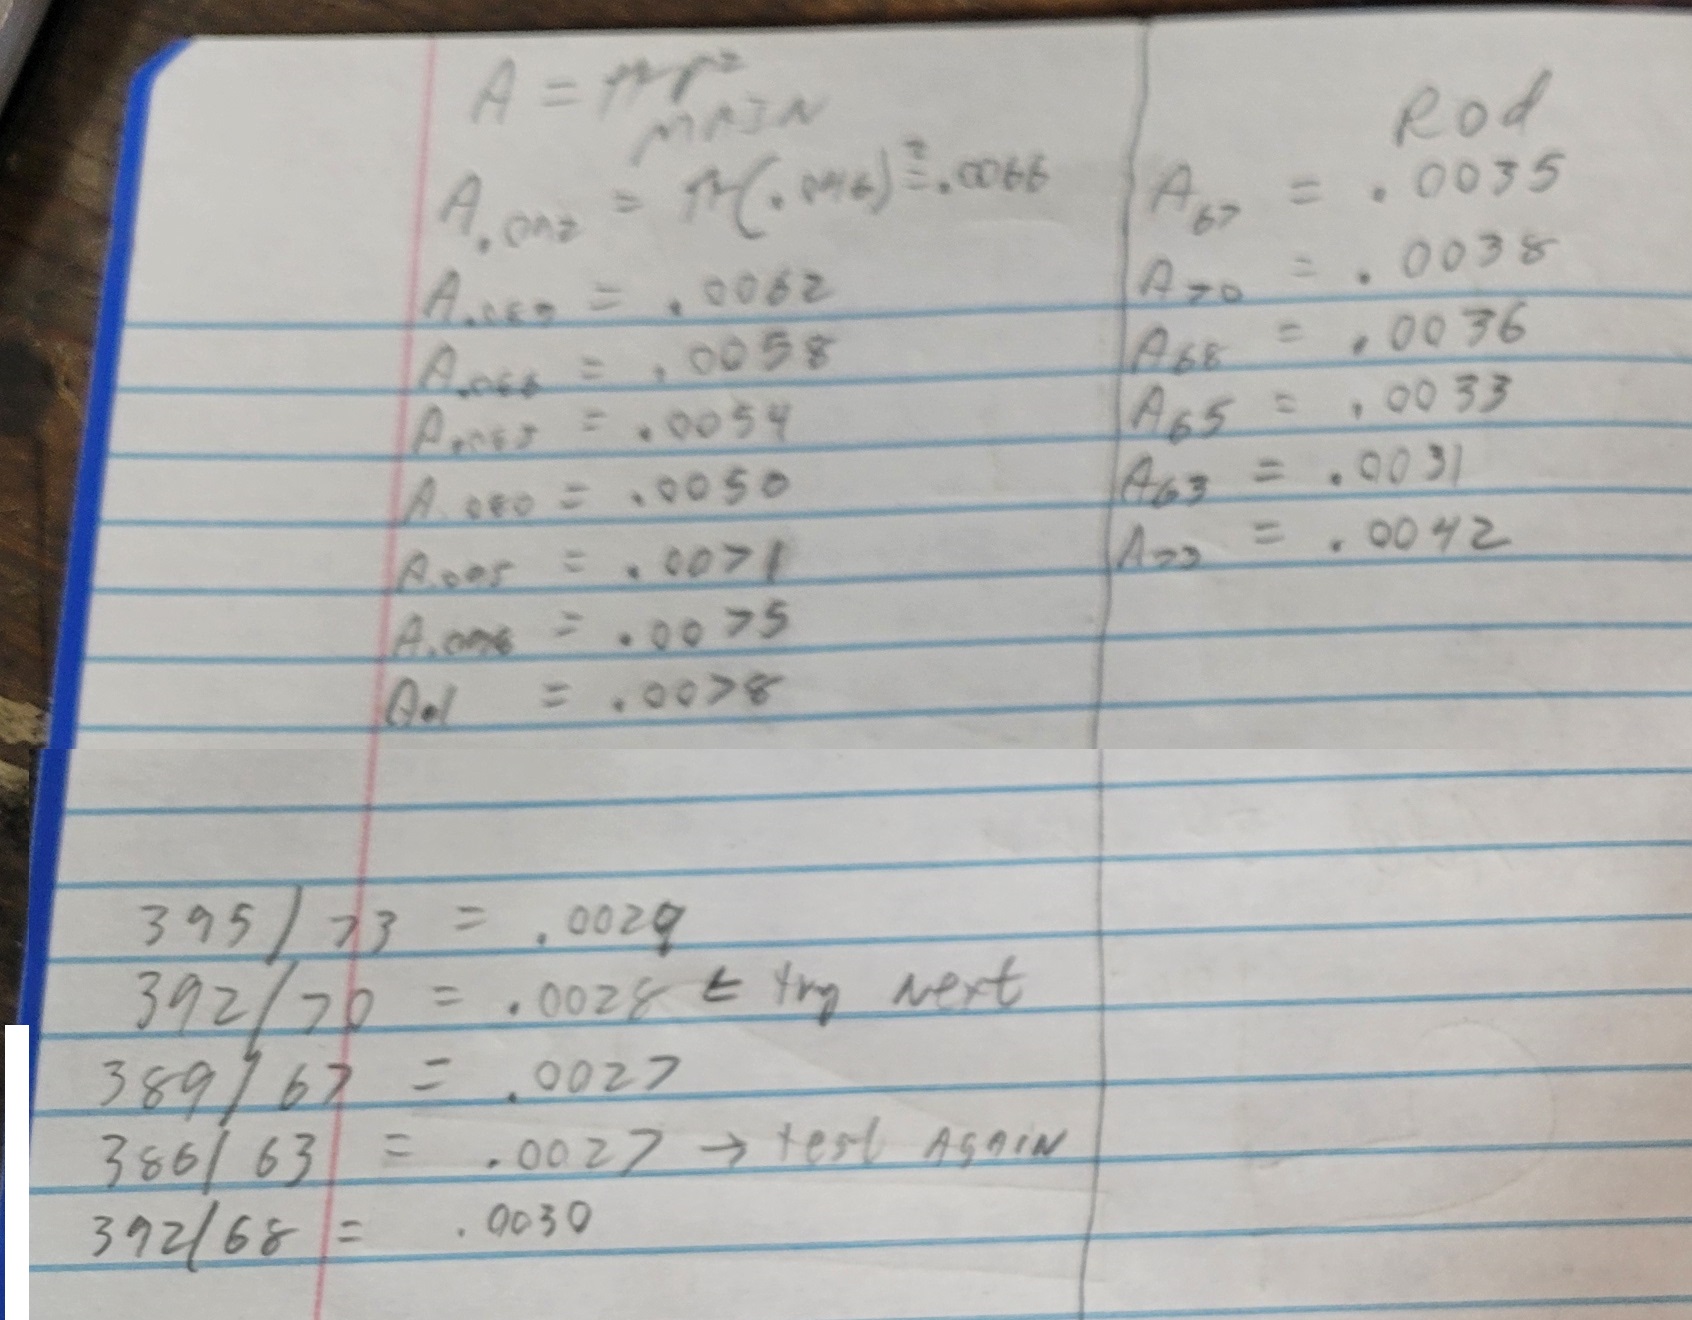
Here's more notes. It's me calculating the area of each needle and jet, and also at the bottom proposing a few different combinations that are in the "sweet spot" of flow area:
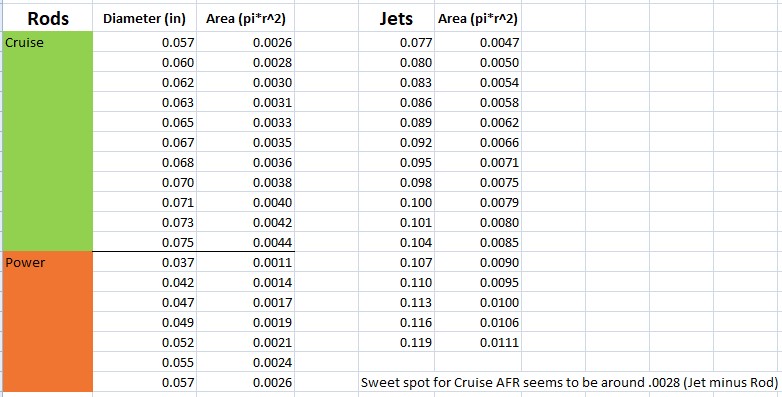
I also made a spreadsheet in Excel for quicker math:
For what it's worth, I'd be doing the exact same type of stuff for an EFI conversion.
Last edited by MB750; 01-14-2025 at 08:14 AM.
Matt
My build thread
here
-
01-14-2025, 08:24 AM
#402
Senior Member
I also watched a really interesting video from David Vizard about vacuum advance tuning optimization. Basically what you do is hook a vacuum gauge up to the carb and fix it to the windshield so you can see it on the fly. You also disconnect the vacuum advance from the carb and hook it up to a mighty vac hand pump. (Stay with me here...)
Set your initial timing to something where the car can go down the road. Then when you're out, maintain a speed and RPM on a flat road (set cruise if you have it). Let's just say 50 mph is 2000 rpm. As your speed is locked in, start drawing a vacuum on the mighty vac. This will slowly advance the timing. Consequently, you will also need less throttle input, which will cause the engine vacuum to increase.
The goal here is to keep drawing vacuum on the advance until your throttle is as light as possible and your engine vacuum is as deep as possible. Then, note that data (RPM and engine vacuum level). Then back in your garage, adjust the vacuum advance so it mimics those values. Many vacuum advance devices can be adjusted internally with a 3mm allen wrench.
I need to do some fiddling with my timing anyway. I initially set it at 10 degrees advanced, but that was during engine cranking and I haven't touched it since. I know I can spice that up a little as well.
Matt
My build thread
here
-
Post Thanks / Like - 0 Thanks, 1 Likes
-
01-14-2025, 10:36 AM
#403
Did you connect your distributor vacuum advance to manifold vacuum (back of carb) or the purpose-built port vacuum on the side of the carb?
-
01-14-2025, 01:25 PM
#404
Senior Member

Originally Posted by
Windsor

Did you connect your distributor vacuum advance to manifold vacuum (back of carb) or the purpose-built port vacuum on the side of the carb?
Manifold vacuum, not port (or timed) vacuum. The AVS2 has two ports on the front of the carb, one of each.
I've done the research, manifold vacuum makes the most sense for me.
Matt
My build thread
here
-
01-17-2025, 07:30 AM
#405
Senior Member
Over the last few days I got the timing squared away. Lemme explain something...
I've tuned quite a few vehicles in my day. Mostly motorcycles, but they all operate under the same combustion theory. I've never messed with ignition timing before, except on my 88 GT back in high school.
On this build, the timing was set to 10 degrees BTDC during cranking. Once I got it started I just left it alone because the car started fine and ran fine, although it was running fat almost everywhere. I've been tweaking jets and needles to lean it out, which has helped, but this week I tuned the timing.
I know how my distributor works. Vacuum and mechanical advance, RPM ranges, ramp rates, vacuum levels and whatnot. I started with a suggested 14 degrees BTDC (disconnected vacuum adv) but noticed my total advance only went to 30. So then I had my wife hold the throttle at 3500 rpm (where I was certain the mech. adv. was done) and locked down the dizzy at 35 degrees BTDC. Then I hooked the vacuum back up, lowered the idle, and went for a spin.
With the jetting untouched my AFR's somehow automatically were much more ideal. My cruise got a little leaner, WFO was in the high 11's on just the primaries. That all made more sense than I was seeing before. Now it's back to the drawing board on the jetting.
TL;DR - set timing first, then tweak fuel.
Matt
My build thread
here
-
01-21-2025, 11:41 AM
#406
Senior Member
Testing LS coils for my eventual Megasquirt Coil-near-plug ECM conversion (because this carby isn't difficult enough...)
Matt
My build thread
here
-
01-26-2025, 04:46 PM
#407
Senior Member
Nailed it!
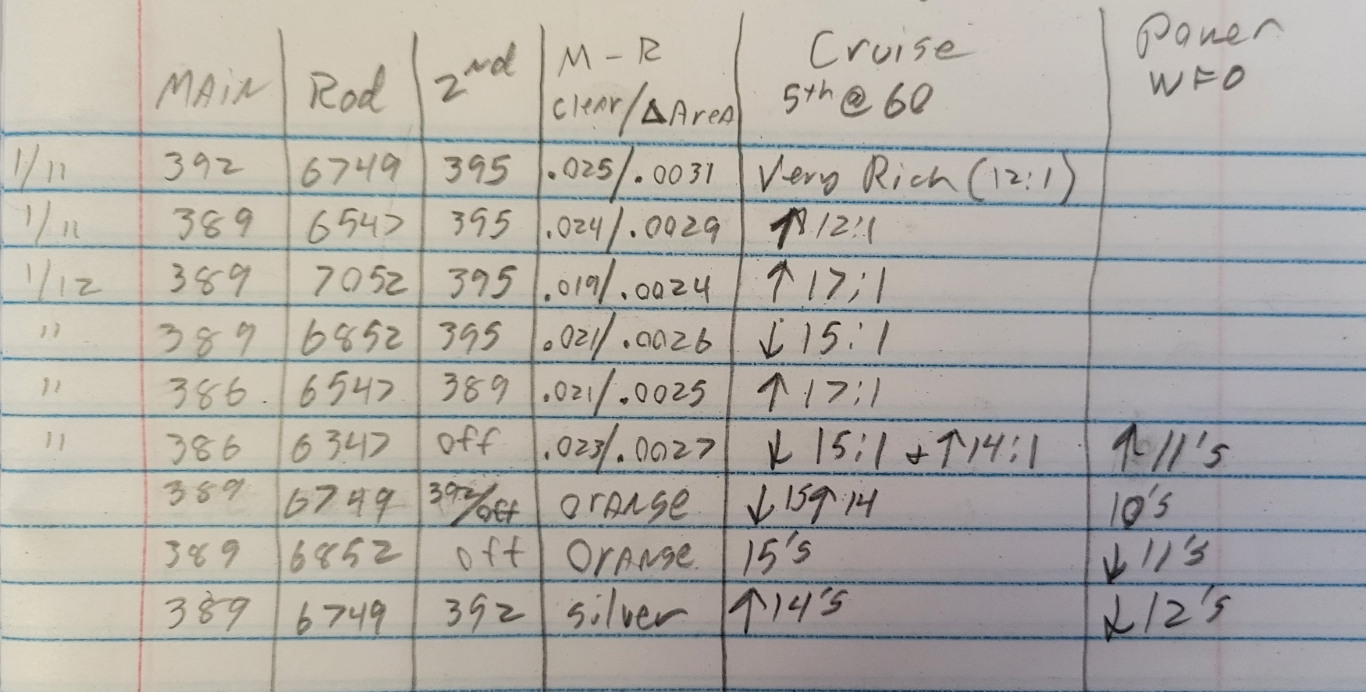
That's how many trials I needed to get the jetting nailed perfect. Steady cruise is right at stoich, WFO with the secondaries involved is in the low 12's, and when I switched to the silver spring (stiffest one to push the rod up quicker) that got rid of my lean light throttle acceleration. The accelerator pump was helping, but getting the needle up at 8" rather than at 5" was a treat thanks to driving around with a vacuum gauge taped to my windshield. Low speed cruise was at 16", and high speed cruise was 11". The needle didn't start rising until 5", so any light acceleration in that window led to a lean surge because the needle was still being held down.
Another neat aspect is my gas gauge moves a lot slower now. I'm at 190 miles total on the car so I haven't actually done any MPG testing, but anecdotal evidence has me eager to go for a long cruise with the tank topped off just to see what my mileage is.
Last edited by MB750; 01-26-2025 at 04:50 PM.
Matt
My build thread
here
-
02-01-2025, 04:04 PM
#408
Senior Member
Finished my tunnel cover. I'm proud of the e-brake thing. It's just some aluminum pieces welded, sanded, machined, and painted. Then I bought some 1/16" silicone rubber sheet to make the gasket and cut a slot for the handle to move thru its sweep.
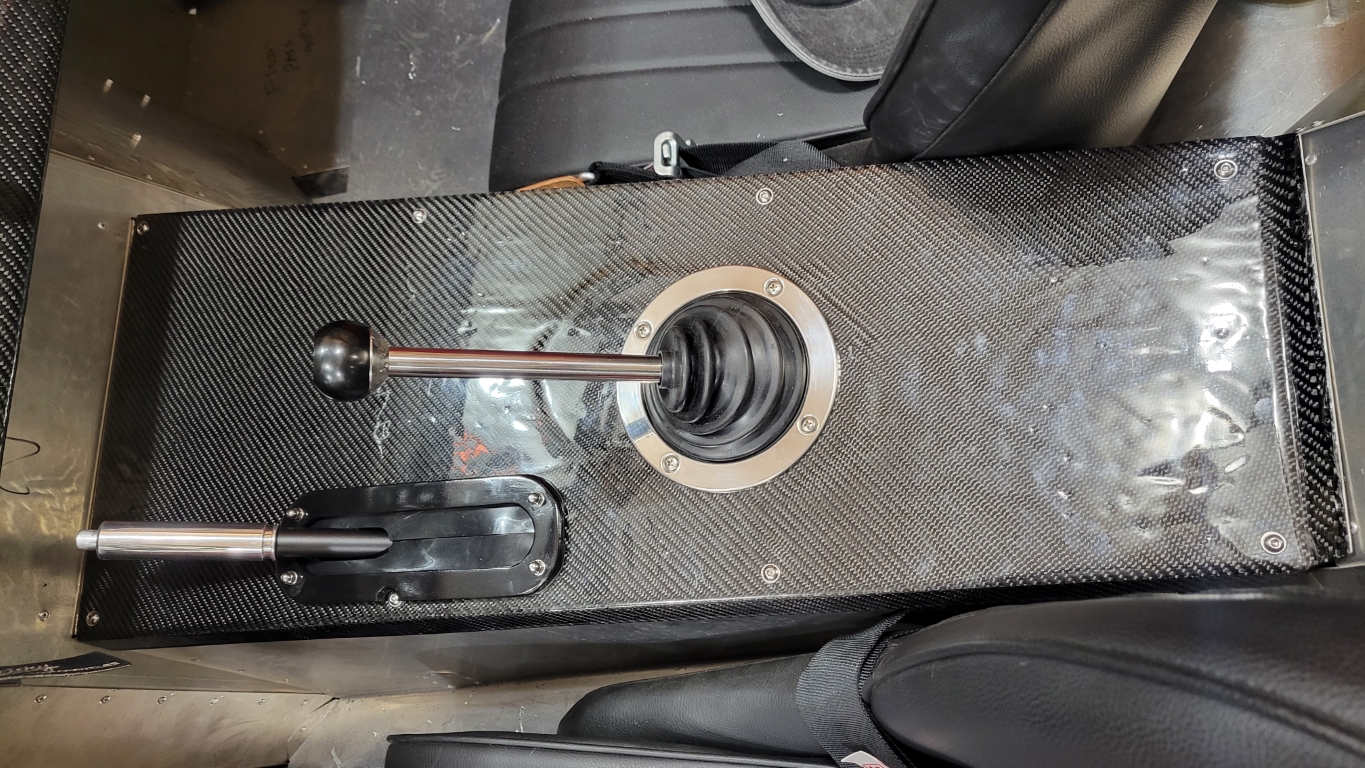
I should probably paint the trim ring on the shifter black now.
Matt
My build thread
here
-
02-02-2025, 06:07 PM
#409
Senior Member
Put a healthy 50 miles on her today, now I'm up to 240. Mostly 55 zones with a short blast on the interstate for a couple miles. Everything went swimmingly.
Matt
My build thread
here
-
Post Thanks / Like - 0 Thanks, 1 Likes


 Thanks:
  Likes:


 Reply With Quote
