-
01-28-2025, 11:56 AM
#121
Senior Member


Originally Posted by
gbranham

See post #113 above for a picture of what I used.
I just want to say that I used this tool as well and dealt with zero leaks (surprisingly).
MK4, 427LS3, IRS, T56 Magnum, Wilwoods
-
Post Thanks / Like - 0 Thanks, 1 Likes
-
01-28-2025, 01:37 PM
#122
You say that you used an "Eastwood style" flaring tool. What are you using, exactly? FWIW - I never used the FFR-provided brake lines so I have no direct experience with those but my only guess would be that whatever that green coating is is affecting the tool's ability to grip the line. With the "real" Eastwood tool I was able to get perfect double flares on both Nicopp and stainless steel lines every time.
Edit: another possibility I just thought of is that whatever lines FFR is providing are marginally smaller OD than typical 3/16" brake lines. You may want to check them with a pair of calipers against Nicopp or SS lines and see if they're the same OD. If they're a touch smaller, the tool will never grip them properly.
Last edited by JohnK; 01-28-2025 at 01:39 PM.
MkIV Roadster build: Gen 2 Coyote, IRS, TKO600. Ordered 10/24/18. Delivered 1/29/19. Engine installed 8/8/21. First start 9/12/21. First go-kart 9/17/21. Off to paint 4/11/22. Back from paint 12/30/22.
Build thread here.
-
01-28-2025, 01:49 PM
#123
Originally Posted by
JohnK
You say that you used an "Eastwood style" flaring tool. What are you using, exactly? FWIW - I never used the FFR-provided brake lines so I have no direct experience with those but my only guess would be that whatever that green coating is is affecting the tool's ability to grip the line. With the
"real" Eastwood tool I was able to get perfect double flares on both Nicopp and stainless steel lines every time.
Edit: another possibility I just thought of is that whatever lines FFR is providing are marginally smaller OD than typical 3/16" brake lines. You may want to check them with a pair of calipers against Nicopp or SS lines and see if they're the same OD. If they're a touch smaller, the tool will never grip them properly.
I used the same eastwood tool with FF lines, no issues. Well... other than the inevitable forgotten fitting.. or the fitting sliding behind a bend.
MK4 Complete Kit #10315 / Coyote G3 / TKX / 427 HardTop
Build Thread Production Date: 2/26/22, Registered 5/19/22, Graduated 3/1/2023
-
01-28-2025, 01:53 PM
#124
I'm guessing that the line OD is a long shot, but I know that FFR changes up vendors from time to time due to supply constraints, cost, etc. so it's entirely possible that what they're providing now is different than was was shipped in the past.
MkIV Roadster build: Gen 2 Coyote, IRS, TKO600. Ordered 10/24/18. Delivered 1/29/19. Engine installed 8/8/21. First start 9/12/21. First go-kart 9/17/21. Off to paint 4/11/22. Back from paint 12/30/22.
Build thread here.
-
01-28-2025, 03:43 PM
#125
Senior Member

I think there's some overthinking going on here. It's the tool, or how it's being used. It's not the kit-supplied brake line.
Built an early MkIII years ago, sold years ago. Back after 18 years to build a MkIV
Build Thread Here Partners: Levy Racing, Summit Racing, LMR, Breeze, Forte's Parts, Speedhut, ReplicaParts
MkIV Complete Kit Ordered 4/18/23, Delivered 7/11/23, Boss 427W, Edelbrock Pro Flo 4, TKX (.68 5th), IRS, Wilwood Brakes, 18" Halibrands, Toyo R888R Tires, Custom Speedhut Gauges
-
01-28-2025, 04:03 PM
#126
Not a waxer

Originally Posted by
gbranham
I think there's some overthinking going on here. It's the tool, or how it's being used. It's not the kit-supplied brake line.
M22, remenber when you told us this?
Originally Posted by
M22_COBRA
...unpacked two new tools from amazon. My budget Rivnut pliers and my budget knockoff Eastwood brake line flare...
Jeff
-
01-28-2025, 04:32 PM
#127
Senior Member

These flares were leaking?
I have the Eastwood style system and never had that much trouble. I do as well clamp with some body weight force to keep the tubing from moving in the clamp. Have used on the included steel lines, stainless, nicopp. The included rhino lines seem to be easier than SS in the mount. nothing ever moved though. Definitely nicopp should feel soft compared to both. have a picture of your actual system?
-
01-28-2025, 08:41 PM
#128
Senior Member

Just to clear up, no they were not leaking I never got that far. I wasn't getting a double flare, the first OP never happened. It just pushed the tube back. Single flare was bullets, if I was just doing AN fittings.
JohnK you win the virtual beer ��. While I can't say the OD of the rhino is off but it is definitely out of round. At least 0.020" worth on average and in every piece. I could feel it with my hand. Is that the only cause IDK but now I'm awfully suspicious. Would not be a big deal if you just bend and use the full length.
I'm going down to the race shop this week for work and I'm bringing my tool and a section of rhino tube. I'm gonna let the pro in the shop have a crack at it, and try some premo line we use in the car, and let him use his tools on the rhino. The Nicopp should be here Thursday to try also. Stay tuned.
Last edited by M22_COBRA; 01-29-2025 at 06:58 AM.
-
01-29-2025, 09:24 AM
#129
Senior Member
Your 'budget knockoff Eastwood brake line flare' tool is your problem. There's no magic to this. No undersized brake line, no out of round brake line...just a bad tool. I'd be willing to bet a virtual beer that if you sent me a length of your kit-supplied brake line, I'd make a perfect flare the first time. It's really not that difficult with the right tools.
Good luck!
Greg
Built an early MkIII years ago, sold years ago. Back after 18 years to build a MkIV
Build Thread Here Partners: Levy Racing, Summit Racing, LMR, Breeze, Forte's Parts, Speedhut, ReplicaParts
MkIV Complete Kit Ordered 4/18/23, Delivered 7/11/23, Boss 427W, Edelbrock Pro Flo 4, TKX (.68 5th), IRS, Wilwood Brakes, 18" Halibrands, Toyo R888R Tires, Custom Speedhut Gauges
-
02-11-2025, 08:18 AM
#130
Senior Member
It has been a hot minute, the fallout post Daytona kept me busy. But... Im back with results on the budget brake flare tool, and for all those in the fellowship of the negative I got news for you. Ain't nothing wrong with it.
While I was down in the shop, I enlisted a specialist on the job and I can say with confidence he has made more brake lines that anyone on this forum. He's worked with Gurney, Bondurant, Foyt, Foose, Earnhardt.... you get the point he's been around forever and I trust him.
We both ran the tool, 37, 45, AN single flare, double flare, Nicopp, Steel w/ rubber coating, and annealed stainless, and the steel Rhino FFR supplied material. Same results for both of us.
Nicopp - No surprise it was perfect on every setup this could even be done with min / no lube (not recommended). Just dont over travel the die on an AN single OP or you will get HUGE 37 deg flares.
Steel w rubber coating - Only issue was it needed a good amount of lube to work to get the bubble flare, other than that it was fine.
Stainless (annealed) - No issues in any form, if it was picky about anything it was that you really needed to get a good ID chamfer with the roundy round deburring tool to have really nice seat. The annealing helped to make it a bit softer. (we dont carry standard stainless so no data there - sorry)
Rhino - It would not do double flares, period. No amount of lubrication, chamfering, or prepping would make it go. we even trued the line up on the lathe, nope.
So the final conclusion is I have a nice tool and I saved $130 over the brand name that can do 37, 45, brakes, fuel, in multiple sizes. So for all those reading here and looking for tools to support your build, its likely that you will not be able to use the FFR supplied material in a off brand tool like mine.
But for $130 savings, I'll take that tradeoff.
I did get a bit of work done on routing and plumbing. I will be redoing the line inside the foot box since I dont like the route at all. Its a bit late to go down the RF corner like most have but I got a plan to get there to the AN fitting in the floor. The Nicopp also polishes up nice! 2 mins with the diamond polish while its a straight section and done.
PXL_20250209_222800285.jpgPXL_20250209_222659366.jpgPXL_20250209_222354372.jpgPXL_20250209_222339546.jpgPXL_20250209_222958048.jpg
Last edited by M22_COBRA; 02-11-2025 at 04:49 PM.
-
02-17-2025, 03:22 PM
#131
Senior Member
Had a great weekend of working on the car. When there is FEET of snow outside and 40 mph winds there is not much else to do, maybe tip a good Whiskey  . Tackled the brake lines some more but redid 2 of them because I just didn't like them. The rears at first were going to be straight fitting to fitting after the "T" on the cross bar, but on second thought even though they were short runs I didn't like that they had no "pull out" or "droop loop" capability to accommodate for flex. If it would have been straight then it could be in straight tension based on any flex in the car. Will I flex the car (shrug) likely not across that bar but it made me feel better. I don't want to put one in tension and find out the hard way by failing a thread in the "T".
PXL_20250216_195400257.jpgPXL_20250216_205238912.jpgPXL_20250216_195311486.jpg
Before I get too far I should mention that I am using the stock 2018 Rear brake lines and fittings. I found two locations using the rear mounting tabs from the kit. I think that it has reasonable accessibility once the full car and sheet metal is in. I'll use 3/16 rivets for main mounts and for stabilizing p clips I will use the self tapping screws and a dab of Loctite (when the time comes). I'm happy with it. The next steps are bleeding and just got my pressure bleeder from Summit today. We will see how many leaks I get to chase. Hopefully not many. If we hold pressure and no leaks, the Clecos will be replaced by rivets, and the self tapping screws on the cross bar will be Loctite-ed.
The other line I messed with was the rear out of the MC. Most everyone goes down the RF corner of the drivers box but I was worried I would not be able to get it out if it was trapped by the frame. Chances are if it needs to be removed it going to do so via tin snips.
So I ran down the LS angle bar, looped under the firewall main plate and then down the RS 1x1 tube and into a SS AN bulkhead fitting. I'm marginally worried about that fitting leaking but not sure how to get around that other than get it tight.
PXL_20250216_220446606.jpg
Last edited by M22_COBRA; 02-17-2025 at 04:37 PM.
-
Post Thanks / Like - 0 Thanks, 1 Likes
-
02-18-2025, 07:53 AM
#132
Senior Member

Interesting results on the test!
Regarding the “knockoff” tool. FWIW, I ordered one from Amazon and relieve it to be identical to the Eastwood model… other than the logo. I have an Eastwood store down the road and compared the two quite closely, though not side by side.
Build 1: Type 65 Coupe
-
Album: Coupe Album
-
Delivered: February 24, 2022,
Legal: April 20, 2024,
Complete: TBD
Build 2: Mk3 Roadster (Acquired as a partially started build)
- Build Thread: TTimmys MK3 Basket Case Build Thread - Album: Mk3 Album
-
Originally Delivered: 2004,
Acquired by me: August 2024
-
Post Thanks / Like - 0 Thanks, 1 Likes
-
02-26-2025, 05:09 PM
#133
Senior Member
I moved on to bleeding the lines, setup a bench bleed in car and ran a section of the unused kit line from the pressure side of the MC and into the reservoirs. Not much to see there, just pumped the pedal lightly until the bubbles ceased. Then it fell apart somewhere about here, but I'll get to that. First off this nifty little pressure bleeder is a great product, it made the actual bleed process super simple. I saw it on a few builders threads and it came highly recommended, I can add myself to those believers. http://https://www.amazon.com/dp/B09...fed_asin_title
image000002.jpg image000003.jpg
I hooked it all up, filled the reservoir, and put it to 5psi and opened the valve. I planned to do the sequence RR, LR, RF, LF. But after returning from the RR back to the drivers foot box after what I felt was the limit to not empty the resi, there was quite a puddle in the footbox. Durring the bench bleed, I was too focused on the rear fitting on the MC to even notice if it was leaking at this point. Luckily I planned ahead and placed a large plastic sheet down in the footbox just in case. On further review the rear Wilwood 3/4 MC was pouring fluid out the front seal and the boot was FULL. Im thinking the boot held it back long enough on the bench bleed and really let loose on the pressure bleed. It was almost like it had no seal in it at all. Talked to Dan at FFR and they got a new one in the Mail last night Tuesday & that will be here Thursday. Speedy Delivery. I'll pull it apart and diagnose further since it seems they don't want it back.
image000000.jpg image000001.jpg image000000 (2).jpg
But I had a extra MC as I was going with a hydraulic clutch but decided not to later, so I put that spare one in. Bled the brakes per the procedure, maybe made 6-8 rounds to be sure I got it all, mallet tapped the calipers. The pedal is pretty firm and I only had one weeper in the back. It turned out to just need another 1/8 of a turn on the wrench and it stopped. Pretty awesome to get thru this part and not have to remake any flares. My next step will be to go round and replace the clecos with rivets. This was just in case I did need replacement line due to a bad flare, I'm not having to drill out rivets to do so. Super Happy, build rolls on.
-
02-26-2025, 10:00 PM
#134
Senior Member

Tilton's are a step away...
-
Post Thanks / Like - 0 Thanks, 1 Likes
-
02-26-2025, 10:15 PM
#135
Senior Member
Originally Posted by
F500guy
Tilton's are a step away...
Maybe....
-
02-26-2025, 10:28 PM
#136
Senior Member

And another Wilwood MC failure....
-
02-26-2025, 11:07 PM
#137
Senior Member
Originally Posted by
Mike.Bray
And another Wilwood MC failure....
Right. I saw this and thought "ugh".
Built an early MkIII years ago, sold years ago. Back after 18 years to build a MkIV
Build Thread Here Partners: Levy Racing, Summit Racing, LMR, Breeze, Forte's Parts, Speedhut, ReplicaParts
MkIV Complete Kit Ordered 4/18/23, Delivered 7/11/23, Boss 427W, Edelbrock Pro Flo 4, TKX (.68 5th), IRS, Wilwood Brakes, 18" Halibrands, Toyo R888R Tires, Custom Speedhut Gauges
-
Post Thanks / Like - 0 Thanks, 1 Likes
-
02-27-2025, 07:54 AM
#138
Senior Member
I know. I'm trying to have a positive attitude on it. I didn't get to pull the BAD one apart last night but will tonight and report back.
-
02-27-2025, 11:21 AM
#139
Senior Member
Originally Posted by
M22_COBRA
I know. I'm trying to have a positive attitude on it. I didn't get to pull the BAD one apart last night but will tonight and report back.
I wouldn't go so far as to say Wilwood has a fundamental design problem but the Tilton is a better design. I do think Wilwood has a quality issue, yours is not the first MC to fail right out of the box. If you haven't seen it here's some good reading, including how much of a pain it is to change them later.
https://thefactoryfiveforum.com/show...for-Wilwood-MC
-
02-27-2025, 11:45 AM
#140
Senior Member
Yeah Mike.Bray, I poured thru all those the night it happened. Seems to be "a thing" in other car forums also. Eye opening. I think it is a quality issue also but wont start that discussion.
10-4 on the pain of changing once the top and body goes on.
-
02-27-2025, 05:43 PM
#141
Senior Member
I posted this in another thread, but I want it here for information.
This is what I saw. I do not have a tool to measure surface finish but I'm not really sure this is ra4-16. Looks pretty rough, and you can see some fissures which may be porosity. But I'm not a metallurgist so that's not really my Lane. You can see one pitt in the chamfer but that shouldn't effect sealing. I checked the bore and the o-ring size and it checks out on the Parker website to be to spec.
PXL_20250227_221935059.jpg PXL_20250227_221858407.jpg PXL_20250227_222204793.jpg PXL_20250227_222137273.jpg
-
03-03-2025, 07:32 AM
#142
Senior Member
This weekend I buttoned up all the brake lines and swapped Clecos for Rivets, then moved on to the E-stopp install.
Pretty straight forward, I ran out of the proper fasteners at the end so the self tapping screws and the zip tie is just a temp solution.
NOTE: The torque note on the axle nut was found later to be for a used nut and the note has since been changed. Using a new nut is closer to 250Ft Lb, which I put the front to. Unless anyone else has different info?? I cant torque the rear nuts yet unless I put it on the ground which Im not ready to. I would have to change the bias to get the rear brakes to hold. It started slipping via the pedal around 220ft#. I'll just wait till later and leave the note.
PXL_20250301_215509578.jpg PXL_20250301_190147020.jpg PXL_20250301_215455117.jpg PXL_20250301_190134513.jpg PXL_20250301_190120666.jpg
Last edited by M22_COBRA; 03-03-2025 at 07:56 AM.
-
03-09-2025, 12:26 PM
#143
Senior Member
I started electrical yesterday. I AM GOING TO NEED HELP FROM THE COMMUNITY ON THIS!
It is definitely my weakest area and I have little to no experience with wiring. Hanging and connecting a PI data system yes, designing wiring layouts no.
Note: I'm doing a coyote and have the RF harness, but not the control pack ( yet). I'll call Forte tomorrow and get that ordered along with my trans ect . I'm starting to realize how much the control pack does and negates so much of the RF harness. But SO MUCH of exactly what that is / what to cut out is where I am lost as a ball in high weeds.
Took some time just laying the harness out and zip tying it roughly into place. I did not drill holes thru The firewall yet. It sounds like I will need one for the coyote harness and one for the rear harness? I got the fuse box installed with the front corner support per the recommendations, no drama there.
PXL_20250308_220454098.jpg
Instructions for the rear were a little odd because the chassis and the pictures didn't exactly match, went to find other examples.
I ran it how I would have done it in a race car, but I'm not sure that's the right way. Need some feedback on the rear layout and if you think I will have enough length in the tail lights?
PXL_20250309_170203257.jpg. PXL_20250309_170359886.jpg. PXL_20250309_170444367.jpg
I'm working off of revision w for the wiring harness instructions. On page 21, when you get to the fuel injected engine section, the hand up talks about running the coyote to defer to the fitment instructions. At what point in the instructions does that hand up stop? Is there something I need to do with the fuel pump wiring since that would be controlled by the Ford ECM? Can I continue?
Where does that hand up for the coyote stop?
I think it's best today to work on mounting The radiator with the breeze mounts, and waiting for the community's feedback. I think having the control pack harness will make this make a little more sense.
Thanks in advance.
-
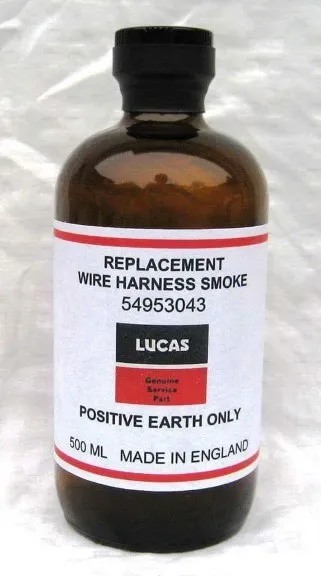
03-09-2025, 01:10 PM
#144
Senior Member
Order you up a bottle of this. Pretty sure Amazon has it.
-
Post Thanks / Like - 0 Thanks, 1 Likes
-
03-09-2025, 05:40 PM
#145
Senior Member
Originally Posted by
Mike.Bray
Order you up a bottle of this. Pretty sure Amazon has it.
Mike.Bray thanks. I needed a laugh. I'm sure it does it all it's own when you hook it up wrong... Then I start smoking cuz I'm mad...lol
Last edited by M22_COBRA; 03-09-2025 at 06:14 PM.
-
Senior Member
Placed my order from Forte yesterday. Got my Trans, clutch, control pack, and all the supporting goodies on the way. I read thru the ford control pack and the FFR Coyote instructions again and I'm feeling better about this now that "I think" I understand the bridge between the two harnesses. Having real parts in hand I'm hoping closes the gap further.
Worked on the fan and shroud in the mean time. I am not using the FFR fan but the one i.e427 recommended in one of his videos. Looked up the specs on it and yeah, its a nice part. Bought it way back during a sale for $50 thru Summit. Its out of a 94 thunderbird application and I really liked the whole package. Just one problem... Frank put this on a different radiator in his video and not the FFR ( which I knew ) but the FFR radiator inlet and outlet give the shroud a little more interference than I expected. I do this a bunch at work on prototype military applications using OTS products so it no big deal. So, we adapt and overcome.... Spent most of the day trying to place my cuts.
PXL_20250309_202314732.jpg PXL_20250309_213300054.jpg PXL_20250309_202152433.jpg PXL_20250309_213404945.jpg PXL_20250309_202209210.jpg
The plan is to cap off the clearances I made, paint them, silicone and rivet in place. Its going to be almost impossible to see the mod anyway.
This is what it started life as https://www.summitracing.com/parts/RNB-620-118
Last edited by M22_COBRA; Yesterday at 10:07 AM.
-
If we can help, please let us know. We can make your life easier regarding your wiring. Please let me know if I can help.
www.infinitybox.com
Regards,
Anthony
-
Senior Member

Originally Posted by
M22_COBRA
I started electrical yesterday. I AM GOING TO NEED HELP FROM THE COMMUNITY ON THIS!
It is definitely my weakest area and I have little to no experience with wiring. Hanging and connecting a PI data system yes, designing wiring layouts no.
Note: I'm doing a coyote and have the RF harness, but not the control pack ( yet). I'll call Forte tomorrow and get that ordered along with my trans ect . I'm starting to realize how much the control pack does and negates so much of the RF harness. But SO MUCH of exactly what that is / what to cut out is where I am lost as a ball in high weeds.
Took some time just laying the harness out and zip tying it roughly into place. I did not drill holes thru The firewall yet. It sounds like I will need one for the coyote harness and one for the rear harness? I got the fuse box installed with the front corner support per the recommendations, no drama there.
PXL_20250308_220454098.jpg
Instructions for the rear were a little odd because the chassis and the pictures didn't exactly match, went to find other examples.
I ran it how I would have done it in a race car, but I'm not sure that's the right way. Need some feedback on the rear layout and if you think I will have enough length in the tail lights?
PXL_20250309_170203257.jpg.
PXL_20250309_170359886.jpg.
PXL_20250309_170444367.jpg
I'm working off of revision w for the wiring harness instructions. On page 21, when you get to the fuel injected engine section, the hand up talks about running the coyote to defer to the fitment instructions. At what point in the instructions does that hand up stop? Is there something I need to do with the fuel pump wiring since that would be controlled by the Ford ECM? Can I continue?
Where does that hand up for the coyote stop?
I think it's best today to work on mounting The radiator with the breeze mounts, and waiting for the community's feedback. I think having the control pack harness will make this make a little more sense.
Thanks in advance.
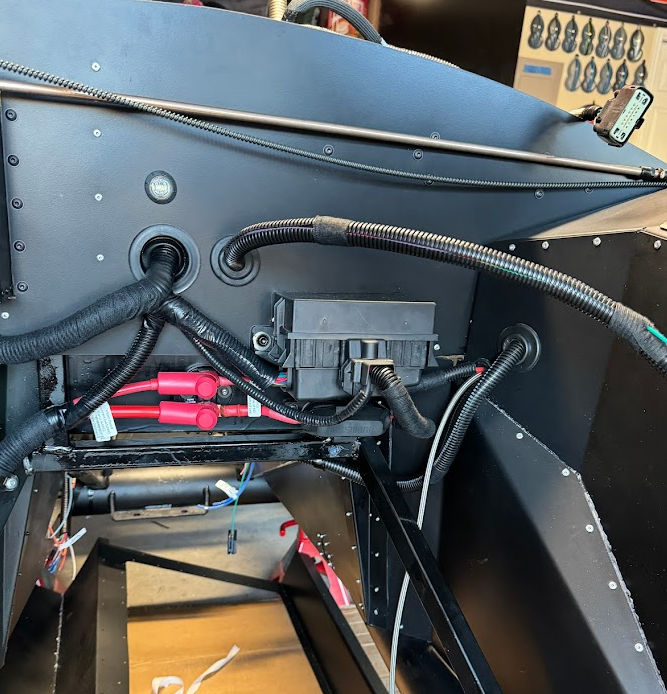
Not sure which version of the Coyote you are doing but I'd suggest reading through edwardb's build thread. He does a great job documenting the Coyote & Controls Pack install and many of us have copied his harness & power install because it's clean and it works. For the firewall, you'll need holes for the Coyote harness and most add one for the sender unit harness (alternator, oil pressure, water temp, and the tach wire to tap into the tack on the Coyote cylinder #4). You can see both of these in the picture below:
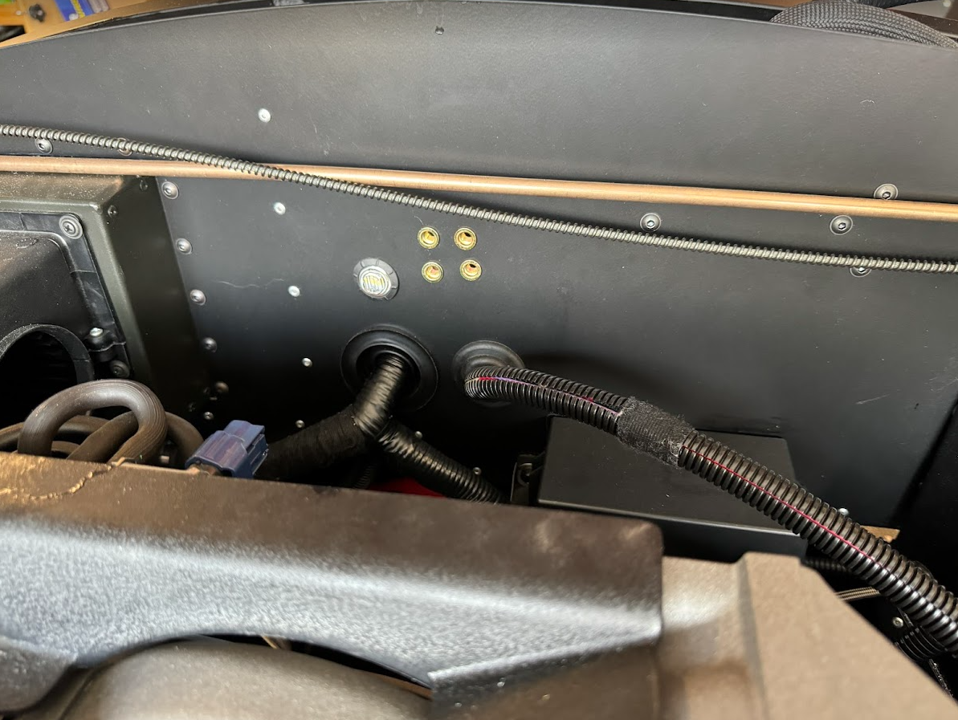
For the rear harness, you can either put the hole in the firewall, or run it through the DS footbox. I chose to go through the footbox - not sure if there's advantages one way or the other but that's what I did. On my DS footbox inner panel I have a hole for the rear harness, and another one that I run the power from my master cutoff into the dash (to a busbar). I also run my hydraulic clutch line through that 2nd smaller grommet. You can kind of see them in this photo:

Darryl [dbo_texas]
MKIV #9644 (build thread) (Index)
MK4 Complete Kit | Gen2 crate Coyote | Tremec T56, 3.55 IRS | power steering | hydroboost | dual roll bars | FFR carbon fiber dash | 18" Halibrands + Wilwoods | RT drop trunk kit & turn signal | front battery mount | saddle leather Intatrim Stoneleigh seats + interior accents
-
Post Thanks / Like - 1 Thanks, 1 Likes
-
Senior Member
Originally Posted by
dbo_texas
Not sure which version of the Coyote you are doing but I'd suggest reading through edwardb's build thread. He does a great job documenting the Coyote & Controls Pack install and many of us have copied his harness & power install because it's clean and it works. For the firewall, you'll need holes for the Coyote harness and most add one for the sender unit harness (alternator, oil pressure, water temp, and the tach wire to tap into the tack on the Coyote cylinder #4). You can see both of these in the picture below:....
Thank you so much! I'm real sketch on popping holes in the firewall, this helps a TON! I was getting lost on Edwards thread as I wasn't sure if he thinned the heard and combined the harnesses into one ( his stuff is so clean sometimes I can't tell ).
THANKYOU, THANKYOU, THANKYOU!!!
-
Senior Member

For as complicated an engine the Coyote is internally its remarkably easy to wire up the RF harness. There are very few connections. As for where to mount stuff Pauls builds are the gold standard.
-
Post Thanks / Like - 0 Thanks, 1 Likes
-
Senior Member
Originally Posted by
M22_COBRA
Thank you so much! I'm real sketch on popping holes in the firewall, this helps a TON! I was getting lost on Edwards thread as I wasn't sure if he thinned the heard and combined the harnesses into one ( his stuff is so clean sometimes I can't tell ).
THANKYOU, THANKYOU, THANKYOU!!!
I hear you - on electrical I put it off so long because it was the part that I was dreading the most. I still don't like it, but just finished it on my build. I'm about to start posting updates with custom circuits/schematics that worked for me. For the RF harness, I did diet out the hotrod leg of the harness as this is basically just a parallel leg that isn't needed in the Roadster build. That gets rid of a few wires behind the dash. It isn't necessary - some people just coil it and tuck it out of the way but I have not idea how you'd find the room to do that....the area behind my dash is absolutely jam packed. I did de-loom some of the RF harnesses to add some new wires/circuits (such as reverse light, power wires for USB/Aux ports in multiple locations, etc). I think I re-routed the Starter leg of the harness and sent the alternator wire through the sender unit harness because on the Coyote those are all going to the same area on the engine (DS, front lower area), and the power wires went to a busbar mounted to the inside of the firewall (same as edwardb used on his builds). I also copied him on the power routing for the Coyote --> I de-loomed the leg of the ECU harness and re-routed the starter motor wire along the left side of the engine bay along with the battery cable from the master cutoff switch). Also sent the Coyote ECU orange fan wire along the PS to route it to the fan controller. These were all a bit intimidating, but in the end it wasn't too bad and gave me confidence to understand the wiring better and try new things (like adding a ton of new circuits/features which aren't needed, but are fun!).

Darryl [dbo_texas]
MKIV #9644 (build thread) (Index)
MK4 Complete Kit | Gen2 crate Coyote | Tremec T56, 3.55 IRS | power steering | hydroboost | dual roll bars | FFR carbon fiber dash | 18" Halibrands + Wilwoods | RT drop trunk kit & turn signal | front battery mount | saddle leather Intatrim Stoneleigh seats + interior accents
-
Post Thanks / Like - 1 Thanks, 0 Likes
-
Senior Member
Here's a better view of the holes in the firewall and DS footbox. On the firewall, going left-to-right is the Coyote Harness (splits into 3 branches...one to the ECU across the PS footbox top, one to the starter motor & chassis ground homerun by the battery, and one to the PDB), then the sender unit harness (between Coyote harness and PDB), then on the side of the DS footbox panel are 2 openings - one for the power (coming from master cutoff switched side) and hydraulic clutch line, and the other larger one is for the RF rear harness.
Darryl [dbo_texas]
MKIV #9644 (build thread) (Index)
MK4 Complete Kit | Gen2 crate Coyote | Tremec T56, 3.55 IRS | power steering | hydroboost | dual roll bars | FFR carbon fiber dash | 18" Halibrands + Wilwoods | RT drop trunk kit & turn signal | front battery mount | saddle leather Intatrim Stoneleigh seats + interior accents
-
Post Thanks / Like - 1 Thanks, 0 Likes
-
Senior Member

Originally Posted by
Blitzboy54
For as complicated an engine the Coyote is internally it’s remarkably easy to wire up the RF harness. There are very few connections. As for where to mount stuff Paul’s builds are the gold standard.
X2 on this comment. For a coyote to interface to the Ron Francis harness, you only need 4 connections:
- Ignition signal
- start signal
- output to the fuel pump
- output to cooling fan
That's it! You have a living and breathing engine.
Of course I have ignored items like oil, tach and temp temp wiring. These are the same for any installation.
I think you will look back at the electrical later and think, 'that wasn't too bad'
All the best,
Nige
Mk.4 FFR supplied Right hand drive
Received 12/2012 completed 12/2019
Gen1 Coyote / TKO600 / IRS
Lots of mods to make compliant for Australian design rules
-
Post Thanks / Like - 0 Thanks, 1 Likes
-


Originally Posted by
M22_COBRA
I am not using the FFR fan but the one i.e427 recommended in one of his videos. Looked up the specs on it and yeah, its a nice part. Bought it way back during a sale for $50 thru Summit. Its out of a 94 thunderbird application and I really liked the whole package. Just one problem... Frank put this on a different radiator in his video and not the FFR ( which I knew ) but the FFR radiator inlet and outlet give the shroud a little more interference than I expected. I do this a bunch at work on prototype military applications using OTS products so it no big deal. So, we adapt and overcome....
I believe the one in the video you are referring to was a generic rad we sourced from Griffin. F5R was out of stock for a long time during Covid. We've also used this rad fan a dozen other times on the F5R rad. Up and until they switch from the Afco to the Chinese one, the fan fit with little or no modification. Now, the inlet/outlets are a bit different so a little modding is in order. Dollar for dollar, I still like this one vs some of the other options.
Frank
Last edited by i.e.427; Yesterday at 07:11 PM.
-
Senior Member
Originally Posted by
i.e.427
I believe the one in the video you are referring to was a generic rad we sourced from Griffin.....
Frank
Yes sir, I am following the method you used to get it on the radiator. Incidentally thats pretty close to how we did on our the race cars. I just may beef up the lower pin connections by reusing the FFR laser cut parts bonded to the shroud. This way over time it prevents the pins from ever opening the holes in the plastic due to vibration (100,000 miles later fingers crossed), and we reuse stuff I have in the kit. win win.
I do need to go back and rewatch to get the connector you used, unless you made a custom 3 pin weather pack to mount to the harness.??
Originally Posted by
dbo_texas
Here's a better view of the holes in the firewall and DS footbox....
Yes this is making so much more sense now, Thanks Darryl for the photos and explanation. I'm more of a visual learner most of the time, and others it just takes a slight change in the perspective and it starts clicking.
Confidence is rising.
Last edited by M22_COBRA; Today at 10:51 AM.


 Thanks:
  Likes:


 Reply With Quote


