-
Hinge mounting to hood during fitment question
Hi. I have read that many mount the hood to the hinges for the final part of hood fitment (gapping) to verify that all fits and adjusts well before paint and final assembly. If this is the case for many of you, how do most mount the hood to the hinge during fitment? I can go ahead and install the rivets, but wouldn't I have to drill them out and reinstall others later after I paint the hood? If so, are there any precautions I should be aware of to keep from damaging the fiberglass when removing the rivets (other than basic caution with the drill)? Is there another way to temporarily attach the hood to the hinges that won't affect final riveting later? I am assuming most don't leave the hinge L-brackets riveted to the hood for painting, but I haven't really paid attention to that in photos. Thanks in advance for any insight.
-
Not a waxer

Yes, EVERYTHING (hood, doors, trunk, roll bars, sidepipes, windshield) needs to be mounted and mocked up to perform the necessary bodywork, adjusting and gapping prior to paint. Some leave the hood brackets on and paint them; I don't. Simply drill the rivets out after you've done the mock up and then rivet the brackets back on after paint. No real precautions other than be careful that you don't drill too deep when removing the rivets because if you do you can go all the way through the top side of the hood.
Jeff
-
Post Thanks / Like - 0 Thanks, 1 Likes
-
Thanks, working on it now. I just wanted to make sure I wasn't missing something with the hinge-to-hood mounting. I'll drill the rivets out after final fitment of the hood. I have mounted all of the other items like doors, trunk, rollbars, mirrors, windshield, side pipes, O2 sensor (body hole), and all lights to make sure I won't have to drill into a painted body if I don't have to. I am working to gap the trunk, hood, and doors now. My trunk lid, after some rebuilding of factory overcutting, is about done. I will finish up with allowances for the hood latches, hood scoop, upgraded side louvers, and trunk latch parts. I think that is everything for my build?
I mounted the hood hinges to the chassis today, and glad I did. I won't mess with it now, but I just found out that my coolant cap and housing are directly beneath the PS hinge. I've got an older style engine with a somewhat odd placement/angle for the water pump coming from the top of the radiator. It's not going to work as is, but I can fix that after gapping everything and removing the body. I am pretty sure a trip to roam the back of a few local parts stores will result in the hoses to reroute the coolant cap assembly away from the hinge.
-
Hi, I am still tweaking the hood placement and gapping it. I am close. Is it normal to have some movement in the hood with all fasteners tight? What I mean is, I believe I have all fasteners tight or snug but if I even lightly pull or push on the sides of the hood near the windshield, it appears that the hinge assemblies flex enough to change how the hood sits in the body opening. The flex seems to come from the shoulder bolts and bushings. It isn't much movement, but it is enough that a little push or pull "adjusts" the gapping enough on the sides of the hood that I feel like I am chasing my tail to get a consistent gap.
Also, I have the hood adjusted vertically so it is flush with the body everywhere but in one area when it is closed. I did so by adjusting the hood hinges in the front, and by installing the rubber spacers at the rear, near the windshield. The rear driver's side, near the windshield, looks like the hood is "sprung" upward a little. It doesn't take much effort to push it down with a finger, and I am hoping the hood latch on that side will pull it down flush (see pic of lifted area, everywhere else around the hood is nice and flush with the body). Just looking for insight or suggestions. It is hard to tell in the photo, but exactly where the overhead light is shining on the hood, there is a ripple in the hood that came that way. I do not feel it with my hand, but it is visible. I'm not sure if it has anything to do with the "sprung" corner or not.
hoodsprung.jpg
Thanks.
-
Member

Hood latches should bring it down a tad. Wait till they are on to judge.
-
Not a waxer

Originally Posted by
Valkster

...Is it normal to have some movement in the hood with all fasteners tight? What I mean is, I believe I have all fasteners tight or snug but if I even lightly pull or push on the sides of the hood near the windshield, it appears that the hinge assemblies flex enough to change how the hood sits in the body opening. The flex seems to come from the shoulder bolts and bushings. It isn't much movement, but it is enough that a little push or pull "adjusts" the gapping enough on the sides of the hood that I feel like I am chasing my tail to get a consistent gap....
Your problem is that you're putting it together like the manual tells you do---don't do that!!!! Ditch the wave washers or you'll never get the slop out of it. Instead put all of the pivot points together like I show here with a thin washer under the head of the shoulder bolt then on the threaded end add a thick washer.
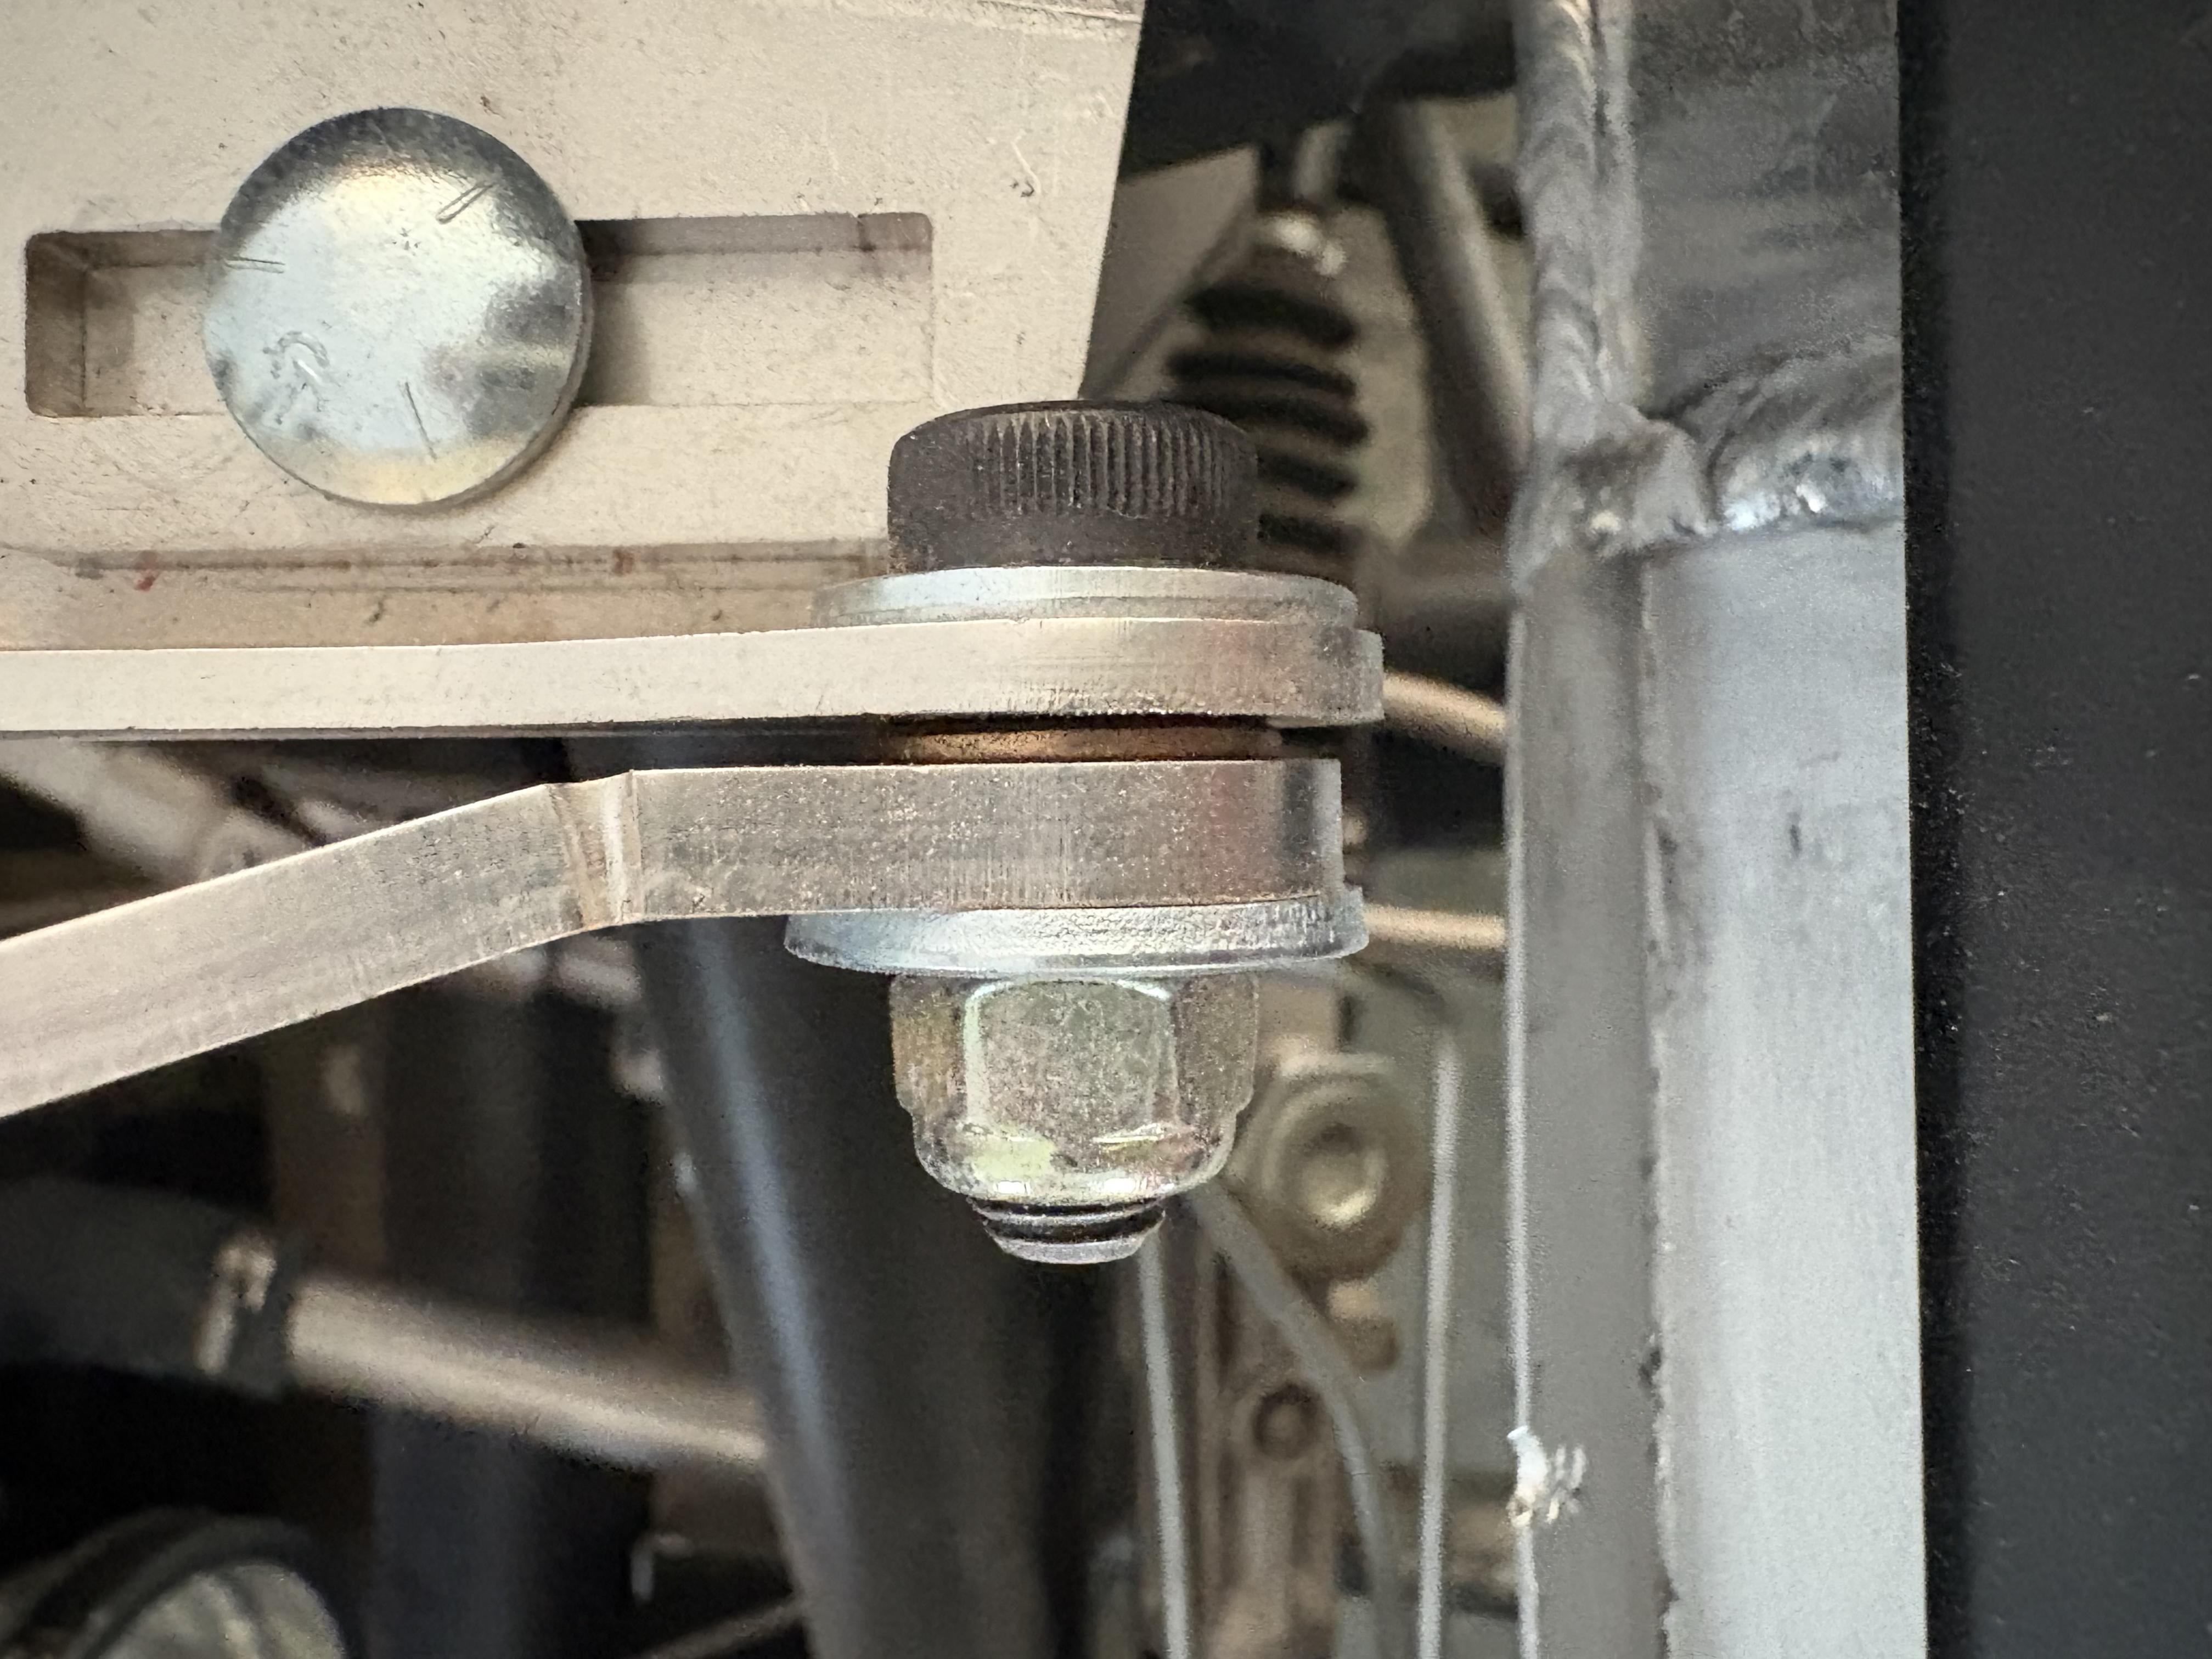
The goal is so that the shoulder does not protrude farther than the washer. You tighten the nylock nut to squeeze everything together then back it off just enough so that the joint will pivot but not so much that it gets sloppy. Make sure that your washers have an actual I.D. of 3/8" (TIP: hardware variety stamped flat 5/16" washers actually have a 3/8" hole  ). Put all of the hinge points together like this and it will eliminate 99% of the wiggle.
Regarding the hood corner---I always use one of the large bumpers dead center on the body flange. This gets the center flush and then you'll use the latches to pull the outer corners to the body. I think the manual says to locate the hinges 12" from center but I go 14" specifically so that they can pull the corners better (fact is that in addition to flexing the hood down they are also flexing the body upward to meet it). When you start block sanding the hood you'll find those ripples all along the perimeter; this is caused by the heat from the adhesive when the inner and outer layers of the hood are bonded together and is not abnormal.
Cheers,
Jeff
Last edited by Jeff Kleiner; 02-19-2025 at 09:53 AM.
-
Post Thanks / Like - 1 Thanks, 0 Likes
-
Thanks much for the detailed response. I'll fix my hinges this evening. My son showed me in the manual that they recommend 12" but to move to 13" if you have hood flex...I'll measure out 14" as you suggest.
Cheers, thanks much!
-
I removed the wave washers and installed regular washers per Jeff's pic. Much better! Thanks. I have hardly any movement side to side with the hood now. It made it much easier to gap the hood. I think one more pass and it will be done.
-
Senior Member

Jeff said, "Make sure that your washers have an actual I.D. of 3/8" (TIP: hardware variety stamped flat 5/16" washers actually have a 3/8" hole )". Also at the hardware store don't skip over metric washers. Not necessarily on 3/8 but many times a metric washer is a tighter fit on a fractional bolt than standard washers. Often they are a much nicer looking washer also w/ a better coating.
FFR MkII, 408W, Tremec TKO 500, 2015 IRS, DA QA1s, Forte front bar, APE hardtop.
-
Yeah, my last car build was a restoration of a Triumph Spitfire...on it, the Brits liked fine thread standard fasteners with a lot of variations on washer sizes for what seemed like the same application...crazy. I had a bunch of leftover washers from it to get a nice setup for the hinges here. For sure, the local hardware store can yield a lot of great stuff when you are roaming for what will work. Where I live, the local Ace Hardware has an awesome selection of fasteners that I cannot find anywhere else locally. They even carry chromed fasteners.


 Thanks:
  Likes:


 Reply With Quote
