Forte's

Visit our community sponsor

Thanks Thanks:  0
Likes Likes:  0
Results 1 to 15 of 15

Thread: Dry Sump details and ARE group buy.

  1. #1
    Member noother's Avatar
    Join Date
    Jun 2012
    Location
    Oakland, CA
    Posts
    38
    Post Thanks / Like

    Dry Sump details and ARE group buy.

    I've been slowly gathering up dry sump system parts for a while and I'm ready for a pan. I called ARE a few weeks ago and inquired about a group buy. With three units ordered they are offering about a 12.5% discount. I specifically inquired about a group buy on their Ultra Shallow pan #1009 but I would guess that other pans would qualify as well if you wanted to go with a different one. If you are intersted, let me know, they stock the pans, fittings and timing chains so if I can get two more people to commit, it should happen fast. I'd like to have a pan in the next month or two.

    Here's a link to their LS pans:

    http://www.drysump.com/corvpan1.htm


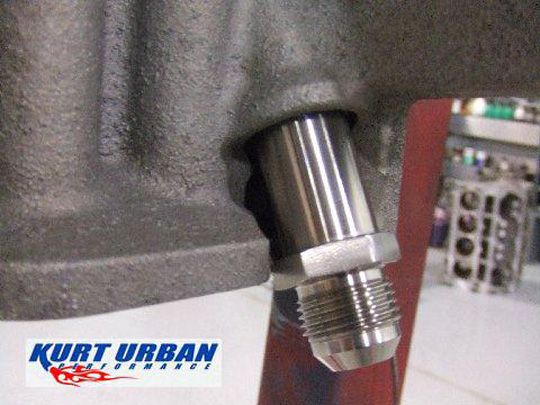
    There is tons of general info out there on dry sump systems so I'll just concentrate on GTM specifics here.
    Some things I have learned on this dry sump journey:

    If you don't want to spend a whole bunch of time on modifications, go with an external scavenge pump and keep the LS internal pump for the pressure side. ARE calls this a Stage I System. http://www.drysump.com/ls1.htm This system will simplify plumbing and probably not require any frame mods. The pump mounts on a modified A/C bracket and uses an ATI damper.


    Their Stage II system adds the pressure pump for an external 3-stage setup and I think could get by without frame mods, just a bit more plumbing.


    Once you go to a pump with four or more stages it gets a bit more involved. Frame mods come into play as the pump is longer and the drive needs to be forward of the damper on a mandrel (unless you go with a front motor plate and inverted exhaust, ie- Crash). This gets into the passenger side tunnel diagonal and some of the ports on the bottom of the pump end up right on top of the crossmember under the engine. The crossmember may not be an issue if you don't lower the engine but If you're looking at a serious 4-5 stage system, you're probably planning on making some serious g's and you're going to want the biggest mass in the car as low as possible.

    I'll be removing my engine/trans soon to get at all the frame mods I want to do and mounting the pump, pan and plumbing to the engine. I also need to mill the bottom off the Kennedy adapter as the low profile pan does not tie into it and I want to get the engine as low as practical. I'll post more later on specifics of the system, there are so many.

    Mark

    Last edited by noother; 08-31-2012 at 02:12 PM.

  2. #2
    Member noother's Avatar
    Join Date
    Jun 2012
    Location
    Oakland, CA
    Posts
    38
    Post Thanks / Like
    Here's the low profile pan from ARE:


  3. #3
    Member noother's Avatar
    Join Date
    Jun 2012
    Location
    Oakland, CA
    Posts
    38
    Post Thanks / Like
    I was dreaming up the most elegant system I could imagine while I was laying on the beach on Kauai last month and assembled these thoughts:

    A low pressure switch/alarm is essential. I installed a 10 psi switch on the engine but may want it up a bit higher. Maybe an adjustable switch. I've got a mechanical Murphy Switchgage that has an adjustible switch contact.

    A low level switch/alarm on the oil tank would be nice. I'm going to work on this one. McMaster-Carr has various level switches.

    What if I could get all the pumps for the car into one unit? Oil scavenge, oil pressure, trans oil cooler pump and fuel pump. No electrical loads for pumping, one drive belt, and if you lose the belt the engine dies from no fuel pressure instead of dying from no oil pressure. It turns out KSE makes a power steering (could be used for trans) and fuel pump that has a hex drive that is driven off the back end of some dry sump pumps. I thought about this alot but figured there was no way I was going to fit it with headers, It's just too long. I didn't think about inverting a set of shorty headers or the LS3 manifolds that reportedly flow very well (Crash figured both of these out). So it could be done.

    Last edited by noother; 08-31-2012 at 02:45 PM. Reason: ocd

  4. #4
    Member noother's Avatar
    Join Date
    Jun 2012
    Location
    Oakland, CA
    Posts
    38
    Post Thanks / Like

    Oil routing on block

    If you go to an external pressure stage you get to remove the internal oil pump. It is behind the front cover and looka like this after removal:


    To plug the oil passage left in the block I ordered this piece for $6.06 from here: http://s41657.storefront-solutions.c...l.aspx?ID=3290


    I found this diagram on LS1Tech forum:


    Some dry sump pans have fittings on the pan rail and some don't. The ARE low profile pan doesn't so the next best spot to get the oil into the engine is the diagonal 16mm port just above where the oil filter and bypass plate used to be. This company makes an extended 16mm to AN10 male fitting:
    http://www.kurturbanperformance.com/...d-adapter.html
    At $98.95 I think I will keep searching though.


  5. #5
    Member noother's Avatar
    Join Date
    Jun 2012
    Location
    Oakland, CA
    Posts
    38
    Post Thanks / Like

    Oil Cooler

    In my book you can't go wrong with Setrab coolers. Being an engineer I deeply appreciate and respect a company that gives you engineering details on their products. BTU's, GPM, Delta P's, inlet temperature differentials, airspeed, yes, yes, yes!!!..........Sorry, got excited. Here's a link to their oil cooler info:

    http://www.setrabusa.com/oilcoolers.html

    Where in the sytem should it go? The ARE guys say it can go before the tank or on the pressure side. I was thinking that you wouldn't want air in your cooler because it lowers heat transfer efficiency, less hot oil in contact with the tubes. They said they just havn't found it to be a factor in their experience. If you locate it before the tank, as I chose to, the pressure drop of the cooler will not effect oil pressure to the engine, which may allow a cheaper, more restrictive cooler to be used without a pressure loss penalty to the engine.

    I went with the 50-172-7612, overkill maybe. It fits the space where I want it just outboard of my tank and inside of the starboard side scoop. I don't want a direct path for rocks to the cooler so I will turn the air 90 degrees and diffuse into the cooler.

    Last edited by noother; 08-31-2012 at 03:50 PM. Reason: details, details

  6. #6
    Member kabacj's Avatar
    Join Date
    Mar 2011
    Location
    Long Island
    Posts
    1,103
    Post Thanks / Like
    Great info Mark.

    Clearly you have done your homework.

    In an earlier post you mentioned the kooks exhaust clearance and the bell housing as the limiting factor to lowering the motor.

    Here is a shot of my bell housing on the Mendiola. I was a little disappointed how far it comes down. I was originally thinking oh great ill get a 2 inch pan and drop the motor down 4 inches.... Well not without dealing with the bell housing...


    The kooks would need some modification or modify the frame as suggested.


    Thanks for posting all that info on the dry sump systems. That will come in handy.

    John
    XTF #2
    build start date June 19 2023

    GTM # 344
    Build Start December 2010
    First track day April 2013

  7. #7
    Member noother's Avatar
    Join Date
    Jun 2012
    Location
    Oakland, CA
    Posts
    38
    Post Thanks / Like
    John, thanks for the detail photos, that one of the Kooks will help me plan my frame mods while I'm awaiting the group buy on my Kooks headers. If you've got your tape measure out, could you please measure the verticle clearance from the header to the fwd A-arm mount for me? I don't have a good feel for where the header is there. Thanks.

    For the bellhousing, I have seen this area milled right down to expose the flywheel on some race cars. Maybe ask Mendeola about this. I've got a 930 box and the bell is only maybe 3/8" below the flywheel and starter ring, probably not worth fussing with. You've got some meat down there that's just begging to be milled off. Is that a separate piece and is it structural? What's the diameter of your flywheel? A 4" drop is mighty ambitious, I was thinking a 3-1/4" ballpark target with 3/4" skid plates on the frame.

    Mark
    Last edited by noother; 08-31-2012 at 04:26 PM.

  8. #8
    Senior Member CHOTIS BILL's Avatar
    Join Date
    May 2011
    Posts
    427
    Post Thanks / Like
    Blog Entries
    1
    One thing I would suggest is a filter after the scavenge pump and before the tank or cooler to keep trash out of them.

    Bill Lomenick
    Chotis Bill

  9. #9
    Member noother's Avatar
    Join Date
    Jun 2012
    Location
    Oakland, CA
    Posts
    38
    Post Thanks / Like

    Drive System

    I don't know of a way to do a drive without going to an aftermarket ballancer, the GM unit has no bolt holes or a flat face on the front.

    ATI makes several specific hubs with either an HTD or a small diameter serpentine pulley where the A/C pulley would be. Here's the HTD drive but I think this an F body ballancer because it looks to stick out a little further than the corvette.


    I would have gone this route if my pump wasn't so long. I like the 25% underdrive on the accessory drive pulley and it puts a full size inertia ring out the front for good damping of crank vibes. I called them for a recommendation on a setup for me. I wanted a 25% underdrive pulley for my alternator (my only accessory) and a drive mandrel out the front. Unfortunately the tech stated the 25% underdrive units are not intended for high performance and their drive mandrel would require custom machining to mate to the front face. The problem is the serp pulley is the inertia ring and is a small diameter and aluminum so I guess it doesn't have the recommended damping ability for racing.

    As far as I can tell there is no difference in ballancer mating between LS1's through 6's, L76's 33's and LS376's. This was key to finding a ballancer since I found many units that stated LS1 fitment and I have the 376/480. You just need to get the Y-body (corvette) spacing to retain the pulley inline with the FFR setup.

    I moved on and searched out another solution. I have a racer account (small discount) with Jegs and found this unit they offer:
    http://www.jegs.com/i/JEGS+Performan...51613/10002/-1


    It's SFI rated, 25% underdrive, has the front-end (3-bolt, 3.2" dia bolt circle) that will accomodate a flanged mandrel and the inertia ring is 1045 steel and as you can see increases in diameter of it between the pulleys so I decided to give it a shot. It weighs a full pound less than the LS3 piece and appears to be a quality piece.

    For the mandrel, I went with a Moroso 63860. I didn't need the v-pulleys and already had the spacers and 16 tooth gilmer drive pulley to match my 32 tooth gilmer on my pump. Moroso doesn't list the mandrel by itself but I gave them a call and if you add a '100' to the part number you get just the bare mandrel. I was unable to get the 63860100 on the Jegs website so I gave them a call yesterday and while I waited they gave Moroso a call, got me a price and availability. $82 normally, $78 with my NHRA racer discount, should be here next week. I'll have to report back if it requires any custom machine work to mate up after I get it. It mounts with the three bolts and has a recess to go over the standard LS ballancer bolt head.
    http://www.moroso.com/catalog/catego...?catcode=16385
    http://www.jegs.com/i/Moroso/710/63860/10002/-1


  10. #10

    Join Date
    Feb 2011
    Location
    Colorado Springs
    Posts
    1,388
    Post Thanks / Like
    Quote Originally Posted by CHOTIS BILL View Post
    One thing I would suggest is a filter after the scavenge pump and before the tank or cooler to keep trash out of them.

    Bill Lomenick
    Does the pan have some kind of filter or screen in it? As you said, if something bad happens, wouldn't the trash destroy the oil pump?
    .boB "Iron Man"
    NASA Rocky Mountain, TTU #42, HPDE Instructor
    BDR 1642: Coyote, 6 Speed Auto, Edelbrock Supercharger
    Member: www.MileHiCobraClub.com
    www.RacingTheExocet.com

  11. #11
    Member noother's Avatar
    Join Date
    Jun 2012
    Location
    Oakland, CA
    Posts
    38
    Post Thanks / Like
    Quote Originally Posted by CHOTIS BILL View Post
    One thing I would suggest is a filter after the scavenge pump and before the tank or cooler to keep trash out of them.

    Bill Lomenick
    Nice lead in to the filter chapter Bill and Bob!

    First we screen the scavenge fittings at the oil pan. This should keep the large crap from eating up the scavenge stages of the pump.

    Although most generic system diagrams don't show one, as Bill points out here, and I totally agree, you should not allow trash into your cooler or your deaeration tank. My used system came with a bunch of -12 and -16 lines and this -16 100 micron inline filter. Oil (and air) will flow from the scavenge pump sections through the inline filter to the cooler and then into the tank.


    ARE recommends a Fram HP4 filter on a remote filter head between the pressure pump and the engine. I have a 6" diameter Oberg UFO filter (now made by Holley) with a cleanable 60 micron SS element I may use. I'll add a pic later, can't find it now.

    Mark
    Last edited by noother; 08-31-2012 at 05:49 PM.

  12. #12
    Member noother's Avatar
    Join Date
    Jun 2012
    Location
    Oakland, CA
    Posts
    38
    Post Thanks / Like
    You can get a very easy 1/4" drop from removing the aluminum spacer place under the motor mounts. You just need to saw/gring off the little indexing post the sticks down out of the corvette piece. I know it isn't much, but every little bit adds up.

    There is a guy selling custom solid mounts on ebay right now and will build to your spec. He's even offering to trim them at no charge if you mount them and decide you want lower, just pay the shipping. $99 shipped seems like a good deal. If the add is expired, search for 'solid corvette mounts':

    http://www.ebay.com/itm/01-02-03-04-...5ff998&vxp=mtr

    Mark


    Quote Originally Posted by kabacj View Post


    John

  13. #13
    Member kabacj's Avatar
    Join Date
    Mar 2011
    Location
    Long Island
    Posts
    1,103
    Post Thanks / Like
    Quote Originally Posted by noother View Post
    You can get a very easy 1/4" drop from removing the aluminum spacer place under the motor mounts. You just need to saw/gring off the little indexing post the sticks down out of the corvette piece. I know it isn't much, but every little bit adds up.

    There is a guy selling custom solid mounts on ebay right now and will build to your spec. He's even offering to trim them at no charge if you mount them and decide you want lower, just pay the shipping. $99 shipped seems like a good deal. If the add is expired, search for 'solid corvette mounts':

    http://www.ebay.com/itm/01-02-03-04-...5ff998&vxp=mtr

    Mark
    Thanks for the link to the solid mounts. 99 bucks is a nice price. I dont know how much harsher the solid mounts will feel. I was thinking of just going with Pfadt mounts as I know they will last and will not be overly harsh. Yep its true I could drop the motor with the spacers, however I have the ride height pretty low so the pan is already close to the ground. I did not want the make the pan any closer to the tarmac.

    The flywheel cover on the mendiola is not a structural piece and I could remove quite a bit of material before I hole the cover.

    If im really lucky ill get the car out on the track the second week of october. That will help me decide how crazy I want to get lowering the motor.

    In an earlier post you had asked how close the front lower control arm mount is to the kooks headers. I measure 4 inches. Its out of your way if you are dropping the motor lower as long as you deal with the frame support directly below.


    John
    XTF #2
    build start date June 19 2023

    GTM # 344
    Build Start December 2010
    First track day April 2013

  14. #14
    Member noother's Avatar
    Join Date
    Jun 2012
    Location
    Oakland, CA
    Posts
    38
    Post Thanks / Like
    Quote Originally Posted by kabacj View Post
    ...................In an earlier post you had asked how close the front lower control arm mount is to the kooks headers. I measure 4 inches. Its out of your way if you are dropping the motor lower as long as you deal with the frame support directly below.


    John
    Awesome John, thanks a bunch, that helps with planning. This will be the second time I strip the car back down to the frame. It sure goes back together fast after you've already built most of it though. If I could ever stop modding everything I might get close to making it to a track, happy to see you so close!

    Mark

  15. #15
    Senior Member
    Join Date
    Feb 2011
    Location
    San Diego
    Posts
    1,965
    Post Thanks / Like
    Quote Originally Posted by noother View Post
    Some dry sump pans have fittings on the pan rail and some don't. The ARE low profile pan doesn't so the next best spot to get the oil into the engine is the diagonal 16mm port just above where the oil filter and bypass plate used to be. This company makes an extended 16mm to AN10 male fitting:
    http://www.kurturbanperformance.com/...d-adapter.html
    At $98.95 I think I will keep searching though.

    ARE sells an adapter. It's quite a bit cheaper than that, but it will make your oil return line the lowest thing on the engine. I didn't like this, so I sent that fitting back and welded an aluminum block onto the 1009 pan under the filter boss and it is now a -10 supply that isn't any lower than the pickups on the other side. I talked to the owner at ARE about casting this modification into the pan, but he didn't seem very enthused about doing it.
    www.myraceshop.com

    GTM solution kits
    Corvette and Race parts

Posting Permissions

  • You may not post new threads
  • You may not post replies
  • You may not post attachments
  • You may not edit your posts
  •  

Breeze

Visit our community sponsor