BluePrint Engines

Visit our community sponsor

Thanks Thanks:  3
Likes Likes:  3
Page 1 of 4 123 ... LastLast
Results 1 to 40 of 141

Thread: Simplifying the EJ

  1. #1
    fasterer and furiouser longislandwrx's Avatar
    Join Date
    Aug 2012
    Location
    Long Island
    Posts
    2,546
    Post Thanks / Like
    Blog Entries
    6

    Simplifying the EJ

    Looking at the EJ motor can be intimidating so I wanted to start a thread about what can go in the trash to make the motor easier to work on, and what can be done clean it up quite a bit.

    These are just a few of the things I will be doing personally, and is by no means complete and or necessary. I'll just touch on everything briefly and we can discuss any of them in other threads if necessary.


    Emissions Equipment

    The motor has several fuel emissions componants mounted to the engine. Connected to the turbo inlet/intake manifold/hose that runs to the back of the car is the Evap diaphragm and valving. Its job is to burn fumes that would otherwise escape from the fuel tank. It is used with a charcoal canister at the rear of the vehicle. since the 818 utilizes a different fuel tank and most likely a vented gas cap this entire system is unnecessary and can be removed.

    EvapPurgeSolenoid2.jpgpcv0yp.gif

    remove this, cap off the nipple on the turbo inlet and use a cap to close the tube on the intake manifold (also a easy place to hook up a boost gauge) You will have to turn off evap codes with your tuning software

    TGVs! the tumbler valves on the car are bulky restrictive and heavy. People argue that they help with cold starts but really their main purpose is cold start emissions. Removing them saves a ton of weight, and the accompanying motors/wiring/vent tube really cleans up the top of the motor. Its also good for about 8-15hp depending on who you talk to. This is an easy and pretty much free mod anyone can do at home with a drill and a tap, a few bolts and some grinding equipment. It is well documented.

    ditch this

    P7240006.jpg

    for this

    IMG_7976.jpg

    Air Pump

    The 06 and up have an air pump that feeds air to the heads to improve emissions. the system is hideous and heavy at about 10lbs. The who assembly and wiring can be removed. You'll have to remove some codes with your tuning software and purchase some block-off plates $30-$80. But the difference is huge.


    Engine Venting

    There is a mess of hoses that accomplishes the venting of both heads, and the crankcase. These hoses travel around the engine bay in a series of rubber hose and hard pipes. The problem this presents is that it forces your engine to suck up and try and burn a ton of oil. leading to messy intercoolers, and lower octane ratings. the system also includes a pcv functionality sensor, which is typically bypassed (by closing the circuit in the harness and removing the sensor, and plugging the extra nipples). You can go a step farther and remove the wiring altogether from the harness. Don't remove the PCV itself, just the monitor, it limits the vacuum flow that the crankcase receives. Removing it altogether may cause problems. If doing this mod though its a great time to clean your PCV with solvent so make sure it moves freely.

    pcv connection sensor.JPG

    As far as what to do with the venting, a good quality catch can or air oil separator should be utilized to capture the oil from the intake system, and in the case of the aos, return it to the crankcase.

    a few plastic elbows tees and careful hose routing can really clean up the venting system

    not the cleanest aos install, but you can see what is happening here

    IMG_3329.jpg

    AC and PS removal

    Removing ac and power steering will make a big difference in the front of the motor as to how much room you have, and you'll also be able to remove the wiring from both (not sure if all power steering pumps have a pressure switch. The factory bracket for the alternator and ac is massive, luckily you can use a alternator bracket for the 2.5RS with no factory AC which is a fraction of the size. Subaru P/N: 11711AA051, they are like $25 or less from the dealer . The item is shown in my post cool parts thread as well.

    Throttle Body

    See my blog post on this one, the factory throttle body has a coolant passage to keep the throttle and IAC from icing up.. many people just remove the hoses from both ends and connect them with a nipple. Pretty sure you can remove these hoses altogether but I will verify. You can go the extra mile and remove the nipples from the TB and even machine the passages all together if you want to really trim it down. Cooler air is always better so running it through a hot throttle body makes little sense.

    untitled.png

    Fuel system

    the fuel system on the wrx is pretty visually complex when you look at it, it's also run in series meaning certain cylinders run the risk of getting less fuel. Aftermarket fuel rails, while not a necessity until about 400 whp really clean up the look of the fuel system and let you ditch the spider under the manifold. They also eliminate having lean cylinders. Ditching the green brackets of death, designed to protect the injectors in a front end crash, make the injectors a lot easier to get to.

    trash these before you lose your fingers

    IMG_4925.jpg


    replace this:

    DSC00231.jpg

    with something like this:

    2332-44934-l.jpg


    I may be missing a few but that's a start.
    Last edited by longislandwrx; 03-01-2013 at 12:37 PM. Reason: added bracket pn
    A well stocked beverage fridge is the key to any successful project.

  2. #2
    Mechie3's Avatar
    Join Date
    May 2012
    Location
    Indianapolis
    Posts
    5,176
    Post Thanks / Like
    Only your last pic shows up. The others all say invalid attachment. Good idea for a thread though.
    Zero Decibel Motorsports
    Check out my new website!
    www.zerodecibelmotorsports.com
    www.facebook.com/zero.decibel.motorsports

  3. #3
    Senior Member
    Join Date
    Sep 2011
    Location
    NH
    Posts
    178
    Post Thanks / Like
    As a novice car guy, thank for posting this. Only suggestion is place it in your blog so that it does not get lost in the fourm.

  4. #4
    Senior Member Rasmus's Avatar
    Join Date
    Mar 2012
    Location
    Las Vegas, USA
    Posts
    983
    Post Thanks / Like
    Nice write up Longislandwrx. Get those photos fixed.

  5. #5
    Mechie3's Avatar
    Join Date
    May 2012
    Location
    Indianapolis
    Posts
    5,176
    Post Thanks / Like
    Photos show up on my phone.
    Zero Decibel Motorsports
    Check out my new website!
    www.zerodecibelmotorsports.com
    www.facebook.com/zero.decibel.motorsports

  6. #6
    fasterer and furiouser longislandwrx's Avatar
    Join Date
    Aug 2012
    Location
    Long Island
    Posts
    2,546
    Post Thanks / Like
    Blog Entries
    6
    Yup Fixed.
    A well stocked beverage fridge is the key to any successful project.

  7. #7
    Senior Member rjh2pd's Avatar
    Join Date
    Jul 2012
    Location
    Detroit MI
    Posts
    159
    Post Thanks / Like
    Thanks!! there was a post on nasioc about the coolant lines to the throttle body and it shows a decent drop in intake temperature by removing the coolant lines.

  8. #8
    Senior Member Turboguy's Avatar
    Join Date
    Feb 2011
    Location
    Canada
    Posts
    416
    Post Thanks / Like
    Great tips, man! All pics are showing up here on my Chrome-equipped machine.

  9. #9
    Senior Member Rasmus's Avatar
    Join Date
    Mar 2012
    Location
    Las Vegas, USA
    Posts
    983
    Post Thanks / Like

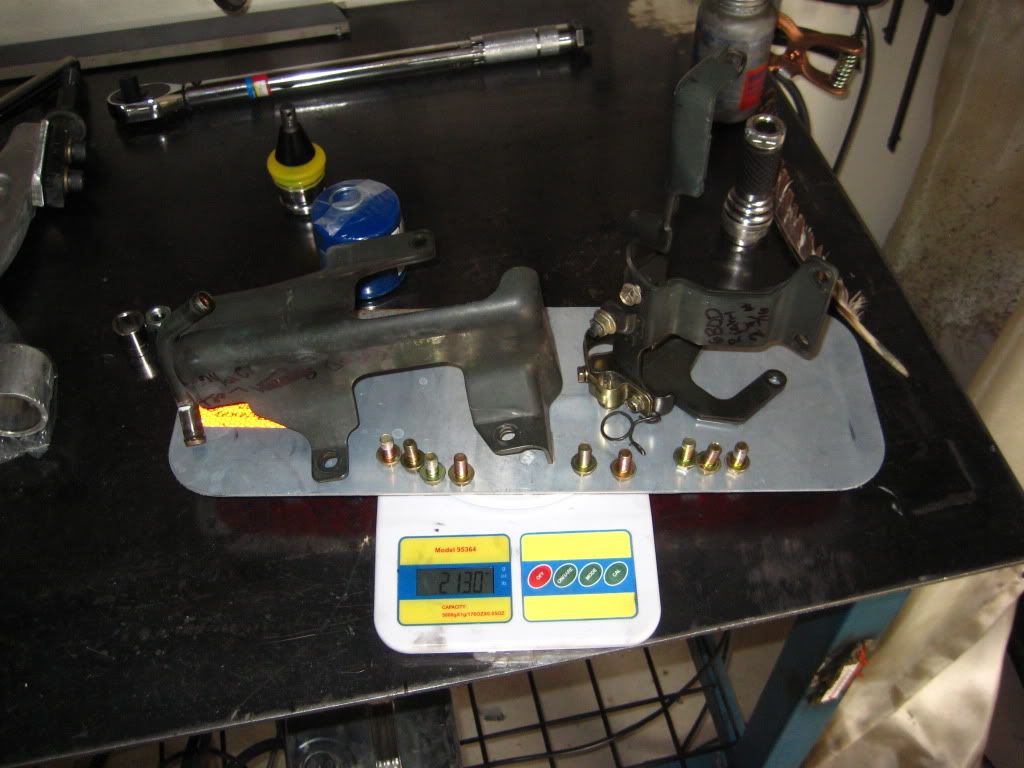
    Green Brackets of Death and hardware weight from a 2004 WRX. Whopping 2.130 kg. Yes, I tared out the old sign on which the GBoD sit.


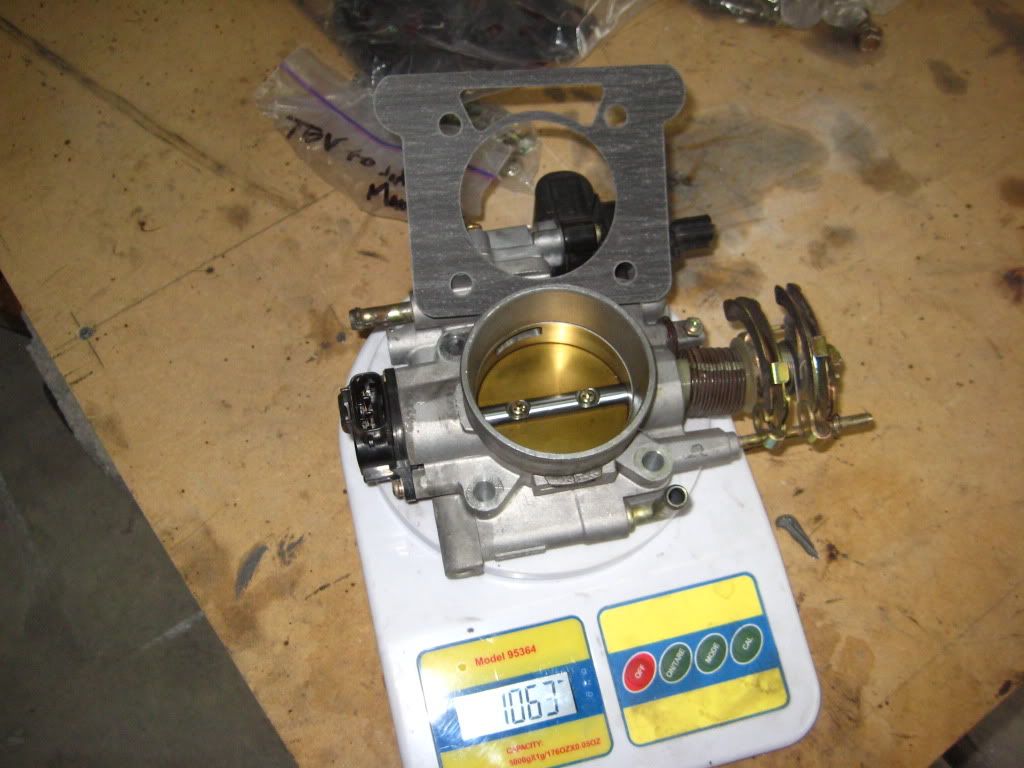
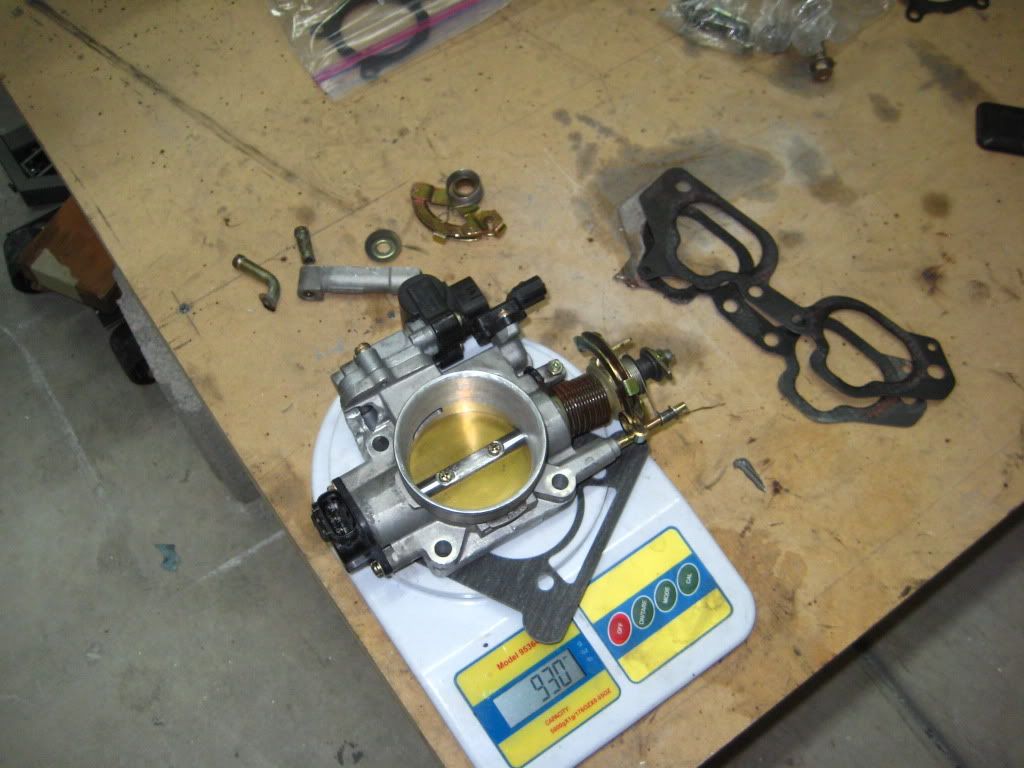
    Unused cruise control throttle cable cam, the coolant passages and brass fitting on the throttle body. Started at 1063 grams.

    Ended up at 930 grams. A savings of 133 grams (0.29 lb).


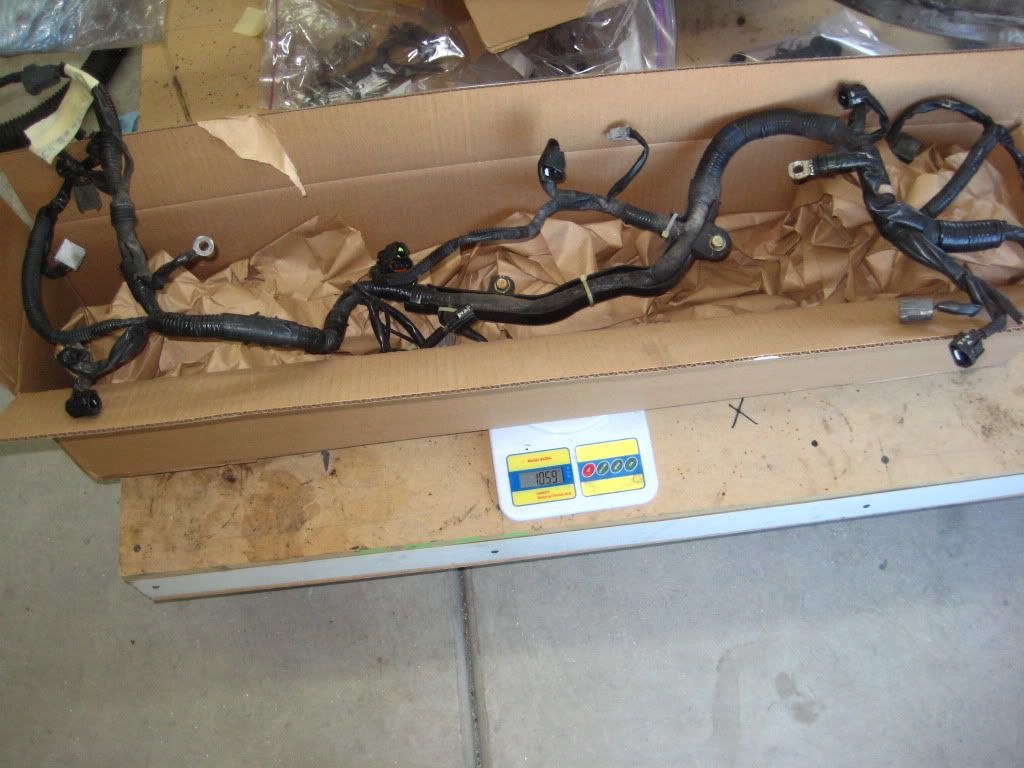
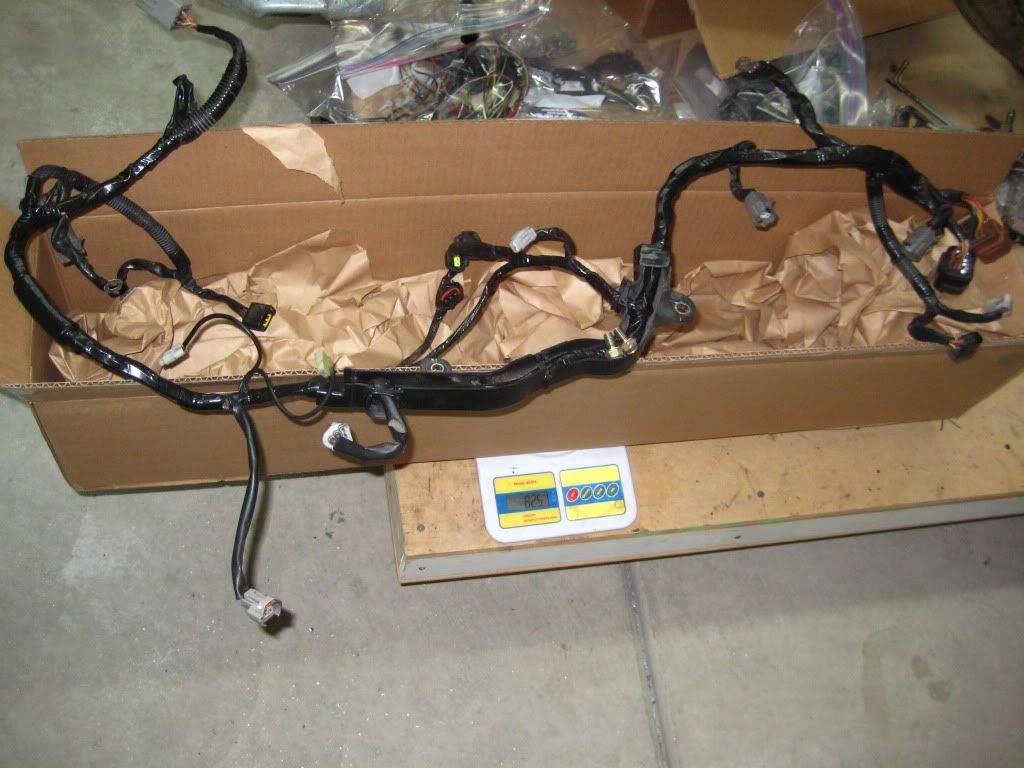
    The intake manifold wiring harness. 1059 grams.


    Deleted all TGV, EVAP wires, and PCV detection wires from the harness. I still run the PCV. Reduced to 815 grams. I found an additional 10 grams after the photo. Coppers heavy. I never suspected I'd remove 244 grams from the harness. Additional photo 01, photo 02, and photo 03.


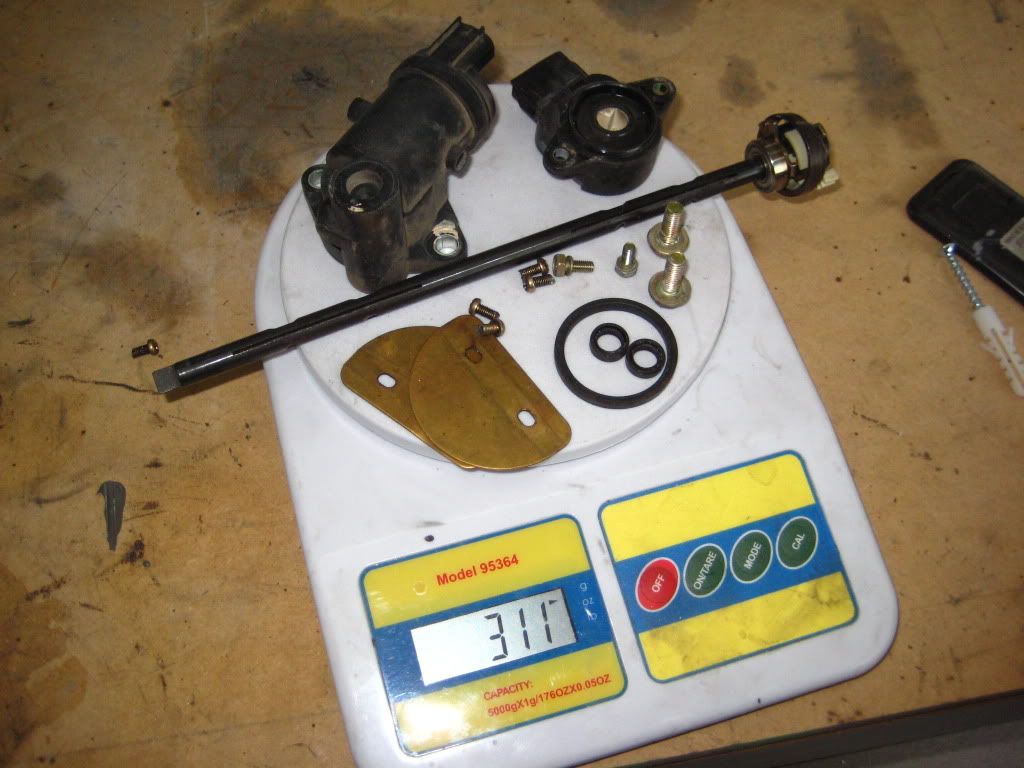
    The hardware from just one side of the Tumble Generator Valve system weighs in at 311 grams. So for the both that comes to 622 grams (1.37 lb) if you just delete the TGV hardware.

  10. #10
    Senior Member Rasmus's Avatar
    Join Date
    Mar 2012
    Location
    Las Vegas, USA
    Posts
    983
    Post Thanks / Like


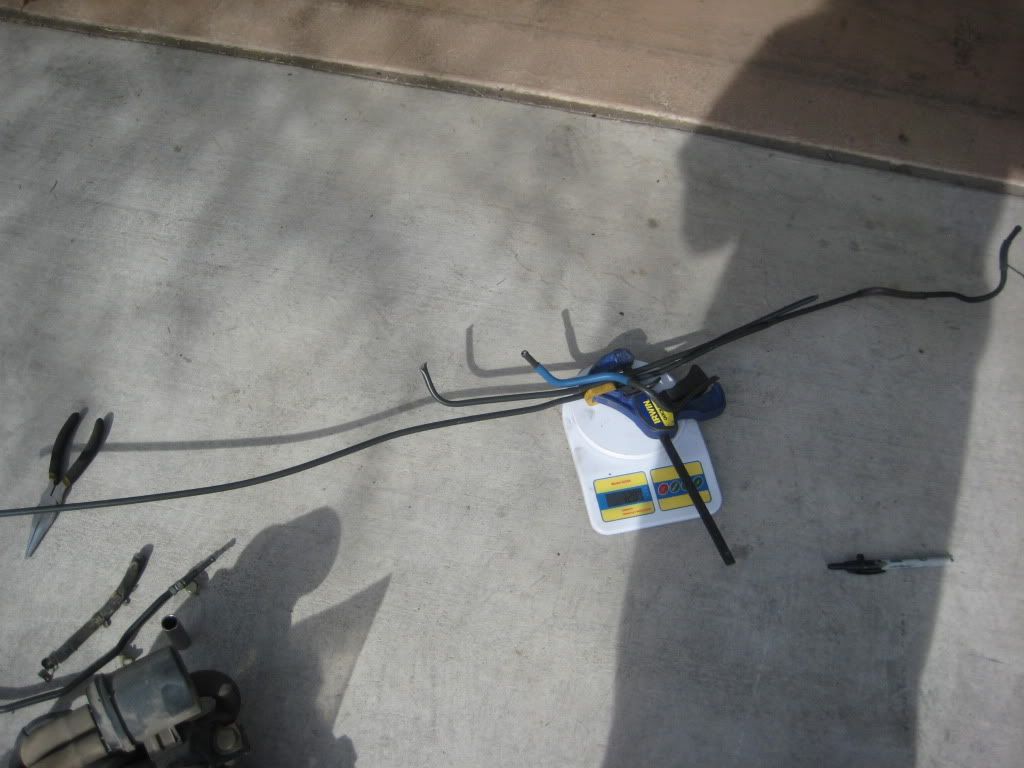
    EVAP system. Including everything but the hard line that runs over the top of the fuel tank. 4.080 kg!


    Yes that 4.080 includes the hard line that runs from the engine to the rear.

    Altogether this would remove 7.209 kg from the car.

  11. #11
    fasterer and furiouser longislandwrx's Avatar
    Join Date
    Aug 2012
    Location
    Long Island
    Posts
    2,546
    Post Thanks / Like
    Blog Entries
    6
    Thanks Rasmus for more awesome pics and specs. I had no idea the gbod were that heavy almost 5 lbs!. I also updated the original post if I was not clear... don't remove the PCV itself, just the monitor. it limits the vacuum flow that the crankcase receives. Removing it may cause problems.
    Last edited by longislandwrx; 02-28-2013 at 01:06 PM. Reason: props to rasmus
    A well stocked beverage fridge is the key to any successful project.

  12. #12
    Member
    Join Date
    Feb 2011
    Location
    split time between South Florida and Western North Carolina
    Posts
    58
    Post Thanks / Like
    Blog Entries
    1
    This is a wonderful thread, thanks for the massive dose of info we WILL USE. I'm on for delivery next year, and haven't started full-immersion into Subie lore yet. This helps a LOT. Keep it coming, guys, and thanks again. John Phillips

  13. #13
    Mechie3's Avatar
    Join Date
    May 2012
    Location
    Indianapolis
    Posts
    5,176
    Post Thanks / Like
    Another thing to do is make a new bracket for the alternator. The current driver side bracket shares features with the AC mounting, the passenger side shares features with the PS mounting. You can either minimize the stock brackets, or make new ones, and reduce the clutter.

    In stock configuration, the wiring harness runs over the top of the turbo inlet hose. This can be trimmed down and then routed under the inlet to hide it.
    Zero Decibel Motorsports
    Check out my new website!
    www.zerodecibelmotorsports.com
    www.facebook.com/zero.decibel.motorsports

  14. #14
    Senior Member RM1SepEx's Avatar
    Join Date
    Jul 2011
    Location
    Freeport, ME
    Posts
    3,801
    Post Thanks / Like
    very nice! Just added some dieting and a TGV delete to my action item list... Thanks!!!!

  15. #15
    Senior Member Rasmus's Avatar
    Join Date
    Mar 2012
    Location
    Las Vegas, USA
    Posts
    983
    Post Thanks / Like
    Quote Originally Posted by longislandwrx View Post
    I had no idea the gbod were that heavy almost 5 lbs!
    Weird, right? It's disproportionate how weight removal/simplifying goes. I probably spent 4 hours removing that 133 grams from the throttle body, and 20 minutes for the 2.130 kg GBoD.
    Last edited by Rasmus; 02-28-2013 at 02:42 PM. Reason: engrish be reel hard, yo

  16. #16
    Mechie3's Avatar
    Join Date
    May 2012
    Location
    Indianapolis
    Posts
    5,176
    Post Thanks / Like
    I don't think in Kg and grams. lol
    Zero Decibel Motorsports
    Check out my new website!
    www.zerodecibelmotorsports.com
    www.facebook.com/zero.decibel.motorsports

  17. #17
    Senior Member Flamshackle's Avatar
    Join Date
    Jun 2011
    Location
    Aotearoa (New Zealand)
    Posts
    648
    Post Thanks / Like
    No one here will worry about it but don't forget that for older motors the idle speed control also ran hot water lines to it. Deleting the water lines and adding thermo spacers makes a good difference in inlet temps.
    __________________________________________________ _____________

    That man is no fool, who gives what he cannot keep to gain what he cannot lose
    __________________________________________________ _____________

  18. #18
    Senior Member Nuul's Avatar
    Join Date
    Sep 2011
    Location
    Indianapolis, IN
    Posts
    247
    Post Thanks / Like
    You can't do the Columbian math in your head I see. 2.2Kg = 1 pound.

  19. #19
    Senior Member slopoke's Avatar
    Join Date
    Feb 2011
    Posts
    159
    Post Thanks / Like
    I could be wrong but .... IIRC 1 kilo = 2.2 pounds ... its been a long time
    If at first you don't succeed ... get a bigger hammer.

  20. #20
    Senior Member rjh2pd's Avatar
    Join Date
    Jul 2012
    Location
    Detroit MI
    Posts
    159
    Post Thanks / Like
    Quote Originally Posted by Nuul View Post
    You can't do the Columbian math in your head I see. 2.2Kg = 1 pound.
    lol its 1 kg = 2.2 lbs

  21. #21
    Senior Member Nuul's Avatar
    Join Date
    Sep 2011
    Location
    Indianapolis, IN
    Posts
    247
    Post Thanks / Like
    Quote Originally Posted by slopoke View Post
    I could be wrong but .... IIRC 1 kilo = 2.2 pounds ... its been a long time
    No, you're right I wrote it down wrong. Thinking one thing and typing another.

  22. #22
    fasterer and furiouser longislandwrx's Avatar
    Join Date
    Aug 2012
    Location
    Long Island
    Posts
    2,546
    Post Thanks / Like
    Blog Entries
    6
    Quote Originally Posted by Nuul View Post
    You can't do the Columbian math in your head I see. 2.2Kg = 1 pound.

    who cant?
    A well stocked beverage fridge is the key to any successful project.

  23. #23
    Mechie3's Avatar
    Join Date
    May 2012
    Location
    Indianapolis
    Posts
    5,176
    Post Thanks / Like
    Me.
    Zero Decibel Motorsports
    Check out my new website!
    www.zerodecibelmotorsports.com
    www.facebook.com/zero.decibel.motorsports

  24. #24
    Senior Member FFR-ADV's Avatar
    Join Date
    Oct 2011
    Location
    NH
    Posts
    597
    Post Thanks / Like
    Great Thread! Thanks guys!

  25. #25
    Senior Member
    Join Date
    Mar 2011
    Location
    Houston
    Posts
    477
    Post Thanks / Like
    How about the air pump valves. Be careful...as there is an atmospheric pressure sensor integrated into one of the valves on 07's and some 06's, so removing it will cause an error in the way the car reads atmospheric pressure and as a result it will cause an error in the way it reads manifold relative pressure as well, throwing things off across the board.

    I have an 06 donor and it definitely has the integrated pressure sensor, although the NASIOC threads all state "only" 07's + have it (http://forums.nasioc.com/forums/show...highlight=pump)

  26. #26
    Mechie3's Avatar
    Join Date
    May 2012
    Location
    Indianapolis
    Posts
    5,176
    Post Thanks / Like
    What is the production date on your 06? I removed everything on my 06 back in the day.
    Zero Decibel Motorsports
    Check out my new website!
    www.zerodecibelmotorsports.com
    www.facebook.com/zero.decibel.motorsports

  27. #27
    fasterer and furiouser longislandwrx's Avatar
    Join Date
    Aug 2012
    Location
    Long Island
    Posts
    2,546
    Post Thanks / Like
    Blog Entries
    6
    Thanks freds... added the air pump to the original post... My donor is an 05 so I forgot to drop some air pump love on the 06+ers. It wouldn't let me add pictures, Max of 10 per post so here is


    PART 2.


    Air Pump

    The 06 and up have an air pump that feeds air to the heads to improve emissions. the system is hideous and heavy at about 10lbs. The whole assembly and associated wiring can be removed. You'll have to remove some codes with your tuning software and purchase some block-off plates $30-$80. But the difference is huge.

    ditch this:

    airpump.jpg

    for these

    8c261c98-9037-4ee1-93a6-26f5305e22b1-800.jpg

    Coolant reservoir

    The EJ has a coolant fill at the top of the motor since the turbo is higher than the radiator. However, being right on top of the motor it looks sloppy. On the 02-04s it's more prevalent than the 05+ but it still gets in the way on all models.
    This is easily relocated to the firewall or other discrete location (as long as its higher than the turbo) If you replace your turbo with a non water cooled variant, you can remove this fill altogether (although this doesn't apply to most aftermarket turbos.) We'll have to see how the coolant routes on the 818 before finalizing the coolant routing. My thought is they will use this reservoir mounted high as a fill/burp for the coolant system.

    relocated:

    IMG_3781.jpg


    EGT Probe

    Many WRXs came with a catted up-pipe. removing this cat is a great upgrade making both power and decreasing spool time. In order to keep tabs of this cat, Subaru installed an EGT probe in the uppipe to make sure the cat doesn't overheat. This probe is useless one the cat is removed but just removing it will cause you to throw a code. two options, use your tuning software to delete the codes or remove the probe from its wiring harness, and insert a 2.2 K Ohm resistor, available at any radio shack. There are only two pins in the plug, so just insert one end of the resistor into each lead of the plug. Wrap up the end with electrical tape to make sure your resistor doesn't fall out. You can also pull the wiring all the way back to the harness and save even more weight.

    here's the dead weight
    images.jpg


    Shame on me for not putting placeholder posts in.
    Last edited by longislandwrx; 03-04-2013 at 10:14 AM.
    A well stocked beverage fridge is the key to any successful project.

  28. #28
    Senior Member
    Join Date
    Mar 2011
    Location
    Houston
    Posts
    477
    Post Thanks / Like
    Quote Originally Posted by Mechie3 View Post
    What is the production date on your 06? I removed everything on my 06 back in the day.
    I don't know, I only have the VIN to go on and that confirms it is an 06 WRX and not the door plate. The production sequence # is "5092xx" if that helps anyone to find a closer mnfg. date.

  29. #29
    Senior Member
    Join Date
    Mar 2011
    Location
    Houston
    Posts
    477
    Post Thanks / Like
    Quote Originally Posted by freds View Post
    I don't know, I only have the VIN to go on and that confirms it is an 06 WRX, and not the door plate. The production sequence # is "5092xx" if that helps anyone to find a closer mnfg. date.
    Here are pics of the LH valve and connector on my 06, also I chose to tap the "air holes" and bolt-with-washer seal the holes. The Cosworth plates do look nice though Longisland.

    The RH (which is already removed) "valve has the standard two pin connector.

    I haven't decided where to mount or remount the valve yet. Or whether to cut the top with the connector and sensor off the valve and locate it somewhere convenient.

    20130301_125713.jpg20130301_125639.jpg20130301_125656.jpg

  30. #30
    Mechie3's Avatar
    Join Date
    May 2012
    Location
    Indianapolis
    Posts
    5,176
    Post Thanks / Like
    Cut the top.
    Zero Decibel Motorsports
    Check out my new website!
    www.zerodecibelmotorsports.com
    www.facebook.com/zero.decibel.motorsports

  31. #31
    Senior Member
    Join Date
    Mar 2011
    Location
    Houston
    Posts
    477
    Post Thanks / Like

    Now I've got the manifold and TGVs off........

    Now that I'm "into it" I realize the massive value of this thread for anyone previously unfamiliar with WRXs. (like me!)

    Thanks again.

    fred

  32. #32
    Senior Member THE ITALIAN's Avatar
    Join Date
    Feb 2011
    Location
    Coastal So Cal
    Posts
    229
    Post Thanks / Like
    Good informative Thread here, BUT this all depends on your state emission regulations & if you are building an S or R for track, does it not ?

    Don't get me wrong here , Carbon Global warming & carbon emissions are Phony gov stuff(especially where I am from), but rules are rules, and if some guy pulls all this off w/o looking up regulations he's in trouble
    Last edited by THE ITALIAN; 07-27-2013 at 07:41 AM.

  33. #33
    Senior Member C.Plavan's Avatar
    Join Date
    Mar 2011
    Location
    Clovis, Ca
    Posts
    2,225
    Post Thanks / Like
    Great Thread! Thank you!
    Thanks- Chad
    818R-SOLD!!!- Go Karted 7/20/14/ Officially raced NASA ST2- 2/28/15
    2016 Elan NP01 Prototype Racecar Chassis #20
    1969 Porsche 911ST Vintage Race Car
    1972 Porsche 911T (#'s matching undergoing nut & bolt resto in my garage)

  34. #34
    Senior Member shinn497's Avatar
    Join Date
    Aug 2011
    Posts
    578
    Post Thanks / Like
    Blog Entries
    1
    The question then is, for people who live in states with restrictive emissions laws, how much of this would be legal?

  35. #35
    Senior Member slopoke's Avatar
    Join Date
    Feb 2011
    Posts
    159
    Post Thanks / Like
    Threads like this ... ( THANK YOU LIWRX!! ) should receive "Sticky" status. Great stuff!!
    If at first you don't succeed ... get a bigger hammer.

  36. #36
    Member
    Join Date
    Jul 2013
    Posts
    57
    Post Thanks / Like
    I noticed some of those grams saved on the throttle body are from porting!

  37. #37
    Senior Member C.Plavan's Avatar
    Join Date
    Mar 2011
    Location
    Clovis, Ca
    Posts
    2,225
    Post Thanks / Like
    How about some acronym explanations for us EJ Turbo Noobs.

    ie BOV (Blow Off Valve) etc.

    There are a lot of acronyms being throw around in threads, I feel like I'm trying to guess stuff on Wheel of Fortune.
    Thanks- Chad
    818R-SOLD!!!- Go Karted 7/20/14/ Officially raced NASA ST2- 2/28/15
    2016 Elan NP01 Prototype Racecar Chassis #20
    1969 Porsche 911ST Vintage Race Car
    1972 Porsche 911T (#'s matching undergoing nut & bolt resto in my garage)

  38. #38
    Member
    Join Date
    Oct 2013
    Posts
    42
    Post Thanks / Like

    Duning software recommendation?

    Quote Originally Posted by longislandwrx View Post
    remove this, cap off the nipple on the turbo inlet and use a cap to close the tube on the intake manifold (also a easy place to hook up a boost gauge) You will have to turn off evap codes with your tuning software

    Is there a tuning software that you found works well?
    Also - cap to close the tube on intake manifold - do you put a small hose clamp on the hose and pinch it shut or is there an actual cap you can get someplace?

    Thanks

  39. #39
    Mechie3's Avatar
    Join Date
    May 2012
    Location
    Indianapolis
    Posts
    5,176
    Post Thanks / Like
    Cobb Tuning makes the Access Port and Race Tuner software. Expensive (relatively) but works well. There is also open source and romraider that requires a tactrix cable (~$100) and a laptop.

    They make vacuum port caps. It's a vinyl closed end cap. Stick it on and zip tie it in place.
    Zero Decibel Motorsports
    Check out my new website!
    www.zerodecibelmotorsports.com
    www.facebook.com/zero.decibel.motorsports

  40. #40
    fasterer and furiouser longislandwrx's Avatar
    Join Date
    Aug 2012
    Location
    Long Island
    Posts
    2,546
    Post Thanks / Like
    Blog Entries
    6
    Slight Correction...

    access tuner race is FREE for personal use if you own an Accessport (expensive). just fill out the form.

    http://www.cobbtuning.com/accesstune...st-s/70716.htm
    A well stocked beverage fridge is the key to any successful project.

Page 1 of 4 123 ... LastLast

Posting Permissions

  • You may not post new threads
  • You may not post replies
  • You may not post attachments
  • You may not edit your posts
  •  

Stewart Transport

Visit our community sponsor