
Visit our community sponsor

Thanks:
0

Likes:
0
-
Senior Member

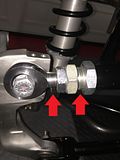
Not sure if it will help you but here's a pic from my build earlier this year showing the bolts I used:
20180405_230919.jpg
Build 1: Mk4 Complete Kit #9312 Ordered 1/27/18, Delivered 3/24/18, CA SB100 Registered 9/11/19 - Gen 2 Coyote TKO600, IRS, Power Steering, Wilwood Brakes, 17" Halibrand.
Build 2: Gen3 Coupe Complete Kit #309 Ordered 1/25/21, Delivered 6/9/21 - BluePrint GM 427 LS T56, IRS, AC, Power Steering.
Album Here
-
Senior Member


Originally Posted by
lewma

Not sure if it will help you but here's a pic from my build earlier this year showing the bolts I used:
20180405_230919.jpg
Neither nut pictured here has the threads going all the way through the nut. The lower control arm looks like it isn't tightened yet. The flange on the head of the bolt isn't tight against the mount. Hopefully that's the case and when tightened is OK. But if that upper control arm nut is tight, I don't think that's acceptable. You'll get different opinions, but for something as critical as a suspension joint, I would expect it to be flush at the absolute minimum, and ideally 1-2 threads exposed. Especially in this case since it's a distortion lock nut, and the locking mechanism is at the outside part of the nut. Are you positive you have the right bolts and nuts? I've done two of these, and never had a condition like that.
Second and unrelated, just a hint. On that upper control arm camber adjustment, ideally it should be set so there's equal threads exposed on each side of the adjustment sleeve. Your is off center quite a bit. You'll only get about half the possible adjustment with it installed like that.
Build 1: Mk3 Roadster #5125. Sold 11/08/2014.
Build 2: Mk4 Roadster #7750. Sold 04/10/2017.
Build Thread
Build 3: Mk4 Roadster 20th Anniversary #8674. Sold 09/07/2020.
Build Thread and
Video.
Build 4: Gen 3 Type 65 Coupe #59. Gen 3 Coyote. Legal 03/04/2020.
Build Thread and
Video
Build 5: 35 Hot Rod Truck #138. LS3 and 4L65E auto. Rcvd 01/05/2021. Legal 04/20/2023.
Build Thread. Sold 11/9/2023.
-
Senior Member
Originally Posted by
edwardb
Neither nut pictured here has the threads going all the way through the nut. The lower control arm looks like it isn't tightened yet. The flange on the head of the bolt isn't tight against the mount. Hopefully that's the case and when tightened is OK. But if that upper control arm nut is tight, I don't think that's acceptable. You'll get different opinions, but for something as critical as a suspension joint, I would expect it to be flush at the absolute minimum, and ideally 1-2 threads exposed. Especially in this case since it's a distortion lock nut, and the locking mechanism is at the outside part of the nut. Are you positive you have the right bolts and nuts? I've done two of these, and never had a condition like that.
Second and unrelated, just a hint. On that upper control arm camber adjustment, ideally it should be set so there's equal threads exposed on each side of the adjustment sleeve. Your is off center quite a bit. You'll only get about half the possible adjustment with it installed like that.
That was just an early pic trying to show the nuts/bolts that I used. It's all been tightened down since.
Camber adjustment has not been setup yet.
mark
Build 1: Mk4 Complete Kit #9312 Ordered 1/27/18, Delivered 3/24/18, CA SB100 Registered 9/11/19 - Gen 2 Coyote TKO600, IRS, Power Steering, Wilwood Brakes, 17" Halibrand.
Build 2: Gen3 Coupe Complete Kit #309 Ordered 1/25/21, Delivered 6/9/21 - BluePrint GM 427 LS T56, IRS, AC, Power Steering.
Album Here
-
Senior Member
Originally Posted by
lewma
Camber adjustment has not been setup yet.
mark
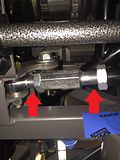
OK, but that doesn't matter. When assembling and installing the adjuster, put it together so there are equal threads on both sides. To adjust camber, the jamb nut is loosened, and the large nut turned which moves the end of the UCA in and out. One side is standard direction threads. The other reverse direction. Like a turnbuckle. If the threads aren't the same, you could run out of threads on one side and still have threads available on the other. Same for the toe arm. Should look something like this.
It's not well explained in the instructions, and unfortunately the mounting bolts need to be removed so they can be corrected. But once done, you won't have to take things apart again. It's one of the nice features of the newer design IRS. The previous version, in stock form, required the bolts to be removed every time it was adjusted. I'm sharing because I didn't know about this on my first build with the new IRS, and had to disassemble late in the build to correct. Just trying to help.
Build 1: Mk3 Roadster #5125. Sold 11/08/2014.
Build 2: Mk4 Roadster #7750. Sold 04/10/2017.
Build Thread
Build 3: Mk4 Roadster 20th Anniversary #8674. Sold 09/07/2020.
Build Thread and
Video.
Build 4: Gen 3 Type 65 Coupe #59. Gen 3 Coyote. Legal 03/04/2020.
Build Thread and
Video
Build 5: 35 Hot Rod Truck #138. LS3 and 4L65E auto. Rcvd 01/05/2021. Legal 04/20/2023.
Build Thread. Sold 11/9/2023.
 Posting Permissions
- You may not post new threads
- You may not post replies
- You may not post attachments
- You may not edit your posts
-
Forum Rules

Visit our community sponsor


 Reply With Quote
