Forte's

Visit our community sponsor

Thanks Thanks:  0
Likes Likes:  0
Results 1 to 40 of 40

Thread: Kerns' FFR #8849

  1. #1
    Member
    Join Date
    Dec 2015
    Location
    Golden Valley, MN
    Posts
    58
    Post Thanks / Like

    Kerns' FFR #8849

    Today I took delivery of FFR #8849; it was truly a great afternoon. I was able to inventory everything tonight and will start up on the build tomorrow. The anticipation of the build is almost more than delivery.

    The base of the build plan is as follows (not including lots of little tweaks everyone does):

    2015 IRS
    2015 Coyote
    TKO600 with Hydro Clutch
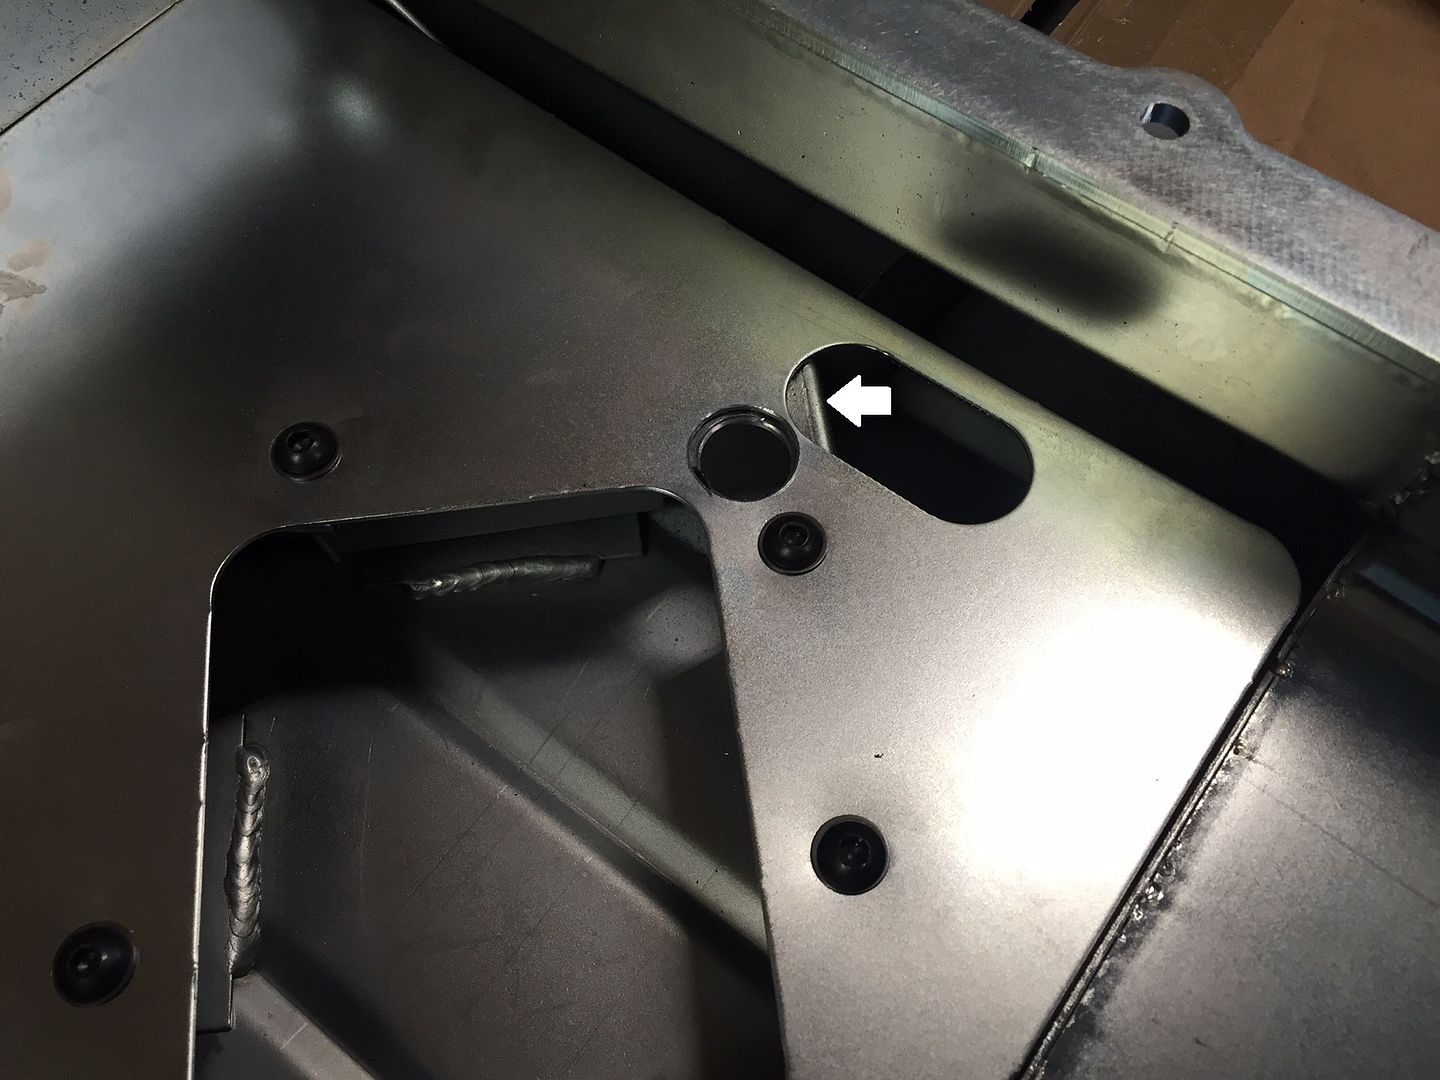
    17' Wheels
    Wilwood Brakes
    Wilwood Pedal Box
    Power Steering
    Heated Seats, Wheel, and Summit Heater (I live in Minnesota)
    Full Width Roll Bar
    High Back Seats from Kirkey
    Footbox Vents
    Quickjack and Bumper Removal

    And the obligatory pictures...

    IMG_1499.JPGIMG_1411.JPG
    Attached Images Attached Images

  2. #2
    PLATNUM Supporting Member
    wallace18's Avatar
    Join Date
    Apr 2012
    Location
    Trenton, Florida
    Posts
    5,382
    Post Thanks / Like
    Congrats!

  3. #3
    2bking's Avatar
    Join Date
    Jul 2013
    Location
    Garland, Texas
    Posts
    799
    Post Thanks / Like
    Congratulations and welcome to the forum. I like your choices and keep the pictures coming. As you probably already know, there is a wealth of information available here when you get stuck or just want confirmation on some aspect of the build. We will also help you spend some money as well.
    King
    Roadster #8127, ordered 7/12/13, received 9/11/13
    http://thefactoryfiveforum.com/showt...4-Coyote-Build

  4. #4
    Member
    Join Date
    Dec 2015
    Location
    Golden Valley, MN
    Posts
    58
    Post Thanks / Like
    I know many are aware of this already, but what a help this forum has been. Little things like knowing the correct orientation of the ball joint fittings on the upper a-arms (and that they are often backwards as mine were) have saved a lot of time. All the input and advise from other members has been great so far. Thank you!

    I have been on the road for work and haven't been able to get a lot of work in but so far have put in the front corners (missing the hubs and spindles).
    The beginnings of the aluminum work has begun. I plan on powder coating everything so lots of clecos will be used for now. I am using Kirkey high back seats for some neck protection; those are in the background.
    IMG_1519.JPG

    The Wilwood pedal box is temporarily in place.
    IMG_1522.JPG


    And I had my Nitto G2s mounted today. These are some big tires!
    IMG_1525.JPG

  5. #5

    Steve >> aka: GoDadGo
    GoDadGo's Avatar
    Join Date
    Feb 2015
    Location
    Slidell, Louisiana
    Posts
    6,573
    Post Thanks / Like
    Blog Entries
    1
    Welcome to the madness for it is truly a great adventure that just started today.

    Please make sure that you do an extremely detailed inventory, not just checking the bulk items.
    It will help you become extremely familiar with every part and you might find a few items that may be missing.
    Also, look at the build threads of the fellows that have done multiple build because these guys are Factory Five's Finest!

    Good Luck, Congratulations & Welcome The Factory Five Family!

    Steve >> aka: GoDadGo
    Last edited by GoDadGo; 04-22-2016 at 06:32 PM.

  6. #6
    2bking's Avatar
    Join Date
    Jul 2013
    Location
    Garland, Texas
    Posts
    799
    Post Thanks / Like
    Quote Originally Posted by Kerns BBO View Post
    The DS foot box front aluminum panel you have installed is for the hydro boost brake system. You should have another panel that has a cut out that fits around the steering shaft bearing mount that will give a cleaner look. It looks like this one.
    DS Coyote FB mod.JPG
    King
    Roadster #8127, ordered 7/12/13, received 9/11/13
    http://thefactoryfiveforum.com/showt...4-Coyote-Build

  7. #7
    Member
    Join Date
    Dec 2015
    Location
    Golden Valley, MN
    Posts
    58
    Post Thanks / Like
    Quote Originally Posted by GoDadGo View Post
    Please make sure that you do an extremely detailed inventory, not just checking the bulk items.
    I initially did a bulk inventory as I didn't want to count every nut and bolt. The first build day I was missing a spring seat for the Koni's and decided after that to do a more detailed inventory. I did find a few more missing things during that...

    Quote Originally Posted by 2bking View Post
    The DS foot box front aluminum panel you have installed is for the hydro boost brake system. You should have another panel that has a cut out that fits around the steering shaft bearing mount that will give a cleaner look. It looks like this one.
    DS Coyote FB mod.JPG
    ...which leads me to this. I did notice after my detailed inventory that I was missing that panel as well. It is now on my backorder list. Thank you for bringing it up, all the input you guys have is appreciated.

  8. #8
    Senior Member
    Join Date
    Feb 2011
    Location
    Myrtle Beach, SC
    Posts
    2,108
    Post Thanks / Like
    Congratulations on the delivery and good start!

    King, nice catch on the DS footbox. I missed it when I looked at the posts!

    I think you will find an occasional small piece missing. FFR has been very good on the few items I overlooked in my inventory; and I have bought a few nuts and bolts too.

    Keep up the good work, and hopefully the warm weather coming will allow you more free time in the garage.

    Regards,

    Steve

  9. #9
    Member
    Join Date
    Dec 2015
    Location
    Golden Valley, MN
    Posts
    58
    Post Thanks / Like
    I temporarily mounted the front brakes today (I still need to coat the front spindles before final assembly). I ran into two problems.

    The first was fitting a socket and torque wrench on the castle nuts. There simply wasn't room. I ended up purchasing a few new crows feet to accomplish the proper torque settings.

    Additionally, three of my four spinners will not rotate off of the center hub. I removed the set screws and attempted to rotate them the correct direction for removal. I ended up putting one of the jammed bases in a vice and rapped on the spinner with a dead blow with no luck. Has anyone else encountered this? Thoughts?

    IMG_1549.JPG
    IMG_1550.JPG
    IMG_1551.JPG

  10. #10
    Member
    Join Date
    Dec 2015
    Location
    Golden Valley, MN
    Posts
    58
    Post Thanks / Like
    Ah yes, and Mike Forte received my check for the drivetrain today. Paid in full, what a fantastic sinking feeling writing so many checks causes. I am excited to see some more parts showing up!

  11. #11
    Member Lancaster Lad's Avatar
    Join Date
    Mar 2016
    Location
    High Desert, CA
    Posts
    73
    Post Thanks / Like
    re stuck spinners

    I too had 3 out of 4 spinners stuck with the set screws removed. What I did was to spray some lock lube on both
    sides of the spinner and worked the spinner cw and ccw sprayed some more and finally it broke loose. I think any
    kind of spray lube will work. I will be using anti seize when they are mounted on the car.
    The problem I had was I unboxed all spinners and didn't know if it lh of rh till the spinners loosened a little bit.


    Cecil
    #8851 just finished inventory

  12. #12
    Member
    Join Date
    Dec 2015
    Location
    Golden Valley, MN
    Posts
    58
    Post Thanks / Like
    That worked well for me as well! I put the center section in a vice, sprayed with WD-40, and rocked them until they came loose. Two of them took quite a bit of force and time.

    I cleaned up the threads with some files and wire wheels. All four now spin on and off with zero binding.

  13. #13
    Senior Member rmiller64's Avatar
    Join Date
    Aug 2014
    Location
    Ferndale, WA
    Posts
    337
    Post Thanks / Like
    Good luck with your new adventure. As you can see lots of help here on forum. The best way to search is to type the question in Google and add ffr to the end. This will pull up past questions and responses

    Enjoy the experience
    Rick
    #8442 MK4 Complete kit, 331 Stroker, T5, 3.73 Posi 3-Link, 15", Goodyear Billboards
    Order 8/22/14 Del 11/7/14 First Start 3/9/15 Go Cart 3/14/15 Paint 2/25/16
    http://thefactoryfiveforum.com/showt...MK4-8442-Build

  14. #14
    Senior Member edwardb's Avatar
    Join Date
    Feb 2011
    Location
    Lake Orion, Michigan
    Posts
    10,576
    Post Thanks / Like
    Quote Originally Posted by Kerns BBO View Post
    I cleaned up the threads with some files and wire wheels. All four now spin on and off with zero binding.
    Put some anti-seize on them before assembly next time. Spin on and off a few times to make sure it's well distributed. That should also help. Most (including me) attach or pin the adapter to the wheel. Otherwise it very likely could happen again. Methods range from silicone glue to drive pins to set screws through the wheel to the adapter. Lots of ideas in multiple threads.
    Build 1: Mk3 Roadster #5125. Sold 11/08/2014. Build 2: Mk4 Roadster #7750. Sold 04/10/2017. Build Thread
    Build 3: Mk4 Roadster 20th Anniversary #8674. Sold 09/07/2020. Build Thread and Video. Build 4: Gen 3 Type 65 Coupe #59. Gen 3 Coyote. Legal 03/04/2020. Build Thread and Video
    Build 5: 35 Hot Rod Truck #138. LS3 and 4L65E auto. Rcvd 01/05/2021. Legal 04/20/2023. Build Thread. Sold 11/9/2023.

  15. #15
    Member
    Join Date
    Dec 2015
    Location
    Golden Valley, MN
    Posts
    58
    Post Thanks / Like
    I coated the hubs with POR 15 and torqued down the front end only to pull it all apart again to install the front sway bar. I am sure I will end up doing nearly everything two or three times on the car before it is complete.
    IMG_1558.JPG

    Nearly all of the aluminum from the passenger compartment forward is fitted and drilled.
    IMG_1556.JPG

    I installed a Summit heating unit as others have done previously. only to realize it was too far outboard and the heater core box would interfere with the body (first picture). I put a cover plate over the previous holes and re-mounted it another 1.5 inches inboard for clearance (second picture). Hopefully this will not be one of the items which gets re-done again.
    IMG_1555.JPG
    IMG_1560.JPG

  16. #16
    Member
    Join Date
    Dec 2015
    Location
    Golden Valley, MN
    Posts
    58
    Post Thanks / Like
    Quote Originally Posted by rmiller64 View Post
    Good luck with your new adventure. As you can see lots of help here on forum. The best way to search is to type the question in Google and add ffr to the end. This will pull up past questions and responses

    Enjoy the experience
    Thank you, I was searching in the forum but this method works much better.

  17. #17
    Member
    Join Date
    Dec 2015
    Location
    Golden Valley, MN
    Posts
    58
    Post Thanks / Like
    This week was a bit slow on progress, my other money pit (the boat) needed some tlc.

    The engine, transmission, and rear end all show up on Wed. I spend yesterday making space and consolidating items in the boxes. Adding the engine and transmission to my single stall will take a new level of organization. The other garage stall will remain free for my wife. She puts up with me and made cookies for my new best friend of the last month the UPS driver.
    IMG_1567.JPG

    Today I started working on the brakes; the mounting plate for the reservoir was made and I routed the hard lines for the front. This was my first time bending brake lines. They are not perfect but I am satisfied overall. Between a Harbor Freight tube bender and a D cell Maglite everything went smoothly.

    IMG_1574.JPG
    IMG_1575.JPG
    IMG_1576.JPG
    IMG_1577.JPG

  18. #18
    Member
    Join Date
    Dec 2015
    Location
    Golden Valley, MN
    Posts
    58
    Post Thanks / Like
    Two pallets from Fortes showed up yesterday with my drivetrain front to rear. I have never seen my garage so cluttered up in my life. Anyone like me trying to do this in a single stall should question their sanity.

    Disclaimer: do not look at the following pictures if clutter scares you.

    IMG_1593.JPG
    IMG_1594.JPG

  19. #19
    Member
    Join Date
    Dec 2015
    Location
    Golden Valley, MN
    Posts
    58
    Post Thanks / Like
    Even with the clutter I had a productive day. I put Por15 on the fuel tank, rear center section, and hubs.

    I installed the power steering rack; I did have to bend the mounting tabs apart slightly to get the rack in. They were just a bit too narrow.

    I am using Breeze's cooling package on FFRs radiator. I am impressed with the mounts for the radiator from Breeze, what a great setup and made for a quick mount.

    IMG_1590.JPG
    IMG_1595.JPG
    IMG_1596.JPG

  20. #20
    Member
    Join Date
    Dec 2015
    Location
    Golden Valley, MN
    Posts
    58
    Post Thanks / Like
    The rear diff is in. I was able to do it myself using lifting straps, an engine hoist, and four drift pins without too much trouble. The difficulty came into play when attempting to torque down the bolts. I slipped off a nut and fractured my finger. After finishing up the job I self medicated with a good scotch and a netflix movie.

    IMG_1612.JPG
    IMG_1608.JPG

  21. #21
    Member
    Join Date
    Dec 2015
    Location
    Golden Valley, MN
    Posts
    58
    Post Thanks / Like
    I also started work on the engine. I installed the Moroso oil pan. I drilled a hole in the bottom to allow for the dipstick as others have done. I also trimmed 1/4 inch from the bottom of the dip stick. The pan aligned properly and mounted up with ease.

    IMG_1617.JPG
    IMG_1618.JPG


    The power steering pump was from Forte. It doesn't come with any directions at first was quite confusing. The clarity came about when I realized you have to swap the pulley that comes on the tensioner with the other included with the kit. (pulleys 1 and 2 in the picture). It also seems that he is using a different pump than this kit was originally designed for. I had 6 mounting bolts of the same length but only needed two. The other four spots use two long through bolts instead (marked with arrows in the picture). Additionally, the bolt going between the pulley and pump was the wrong size (#3 in the picture). Like I said, I would imagine the pump itself had changed slightly and I have the old bolts.

    IMG_1615.JPG
    IMG_1616.JPG

  22. #22
    Senior Member edwardb's Avatar
    Join Date
    Feb 2011
    Location
    Lake Orion, Michigan
    Posts
    10,576
    Post Thanks / Like
    Quote Originally Posted by Kerns BBO View Post
    I also started work on the engine. I installed the Moroso oil pan. I drilled a hole in the bottom to allow for the dipstick as others have done. I also trimmed 1/4 inch from the bottom of the dip stick. The pan aligned properly and mounted up with ease.
    I must be living under a rock... This is the first I've heard of an issue with the Moroso oil pan and the dipstick. I did a search on the other forum and found a fairly long thread on the subject from 2014. Mike Forte was very involved, including working with Moroso. Seemed that a fix was determined and would be on all future pans. Now you bought an engine (and Moroso pan?) from Mike two plus years later and it still needed the fix? I bought my Moroso Coyote pan about six months ago. I'm wondering if I should drop it and check. Now is the time. It's not in the chassis yet and has no oil in it.

    The old thread BTW: http://www.ffcars.com/forums/45-ford...-much-oil.html
    Build 1: Mk3 Roadster #5125. Sold 11/08/2014. Build 2: Mk4 Roadster #7750. Sold 04/10/2017. Build Thread
    Build 3: Mk4 Roadster 20th Anniversary #8674. Sold 09/07/2020. Build Thread and Video. Build 4: Gen 3 Type 65 Coupe #59. Gen 3 Coyote. Legal 03/04/2020. Build Thread and Video
    Build 5: 35 Hot Rod Truck #138. LS3 and 4L65E auto. Rcvd 01/05/2021. Legal 04/20/2023. Build Thread. Sold 11/9/2023.

  23. #23
    Member
    Join Date
    Dec 2015
    Location
    Golden Valley, MN
    Posts
    58
    Post Thanks / Like
    Quote Originally Posted by edwardb View Post
    I must be living under a rock... This is the first I've heard of an issue with the Moroso oil pan and the dipstick. I did a search on the other forum and found a fairly long thread on the subject from 2014. Mike Forte was very involved, including working with Moroso. Seemed that a fix was determined and would be on all future pans. Now you bought an engine (and Moroso pan?) from Mike two plus years later and it still needed the fix? I bought my Moroso Coyote pan about six months ago. I'm wondering if I should drop it and check. Now is the time. It's not in the chassis yet and has no oil in it.

    The old thread BTW: http://www.ffcars.com/forums/45-ford...-much-oil.html
    As you can see in my picture, there is a slot machined into the pan next to my drilled hole. I am assuming that was the fix yet that was not where my dipstick enters the pan.

  24. #24
    Senior Member Duke's Avatar
    Join Date
    Dec 2015
    Location
    Taxachusetts
    Posts
    401
    Post Thanks / Like
    Odd, I have the exact motor and pan that you have (and EdwardB has) and mine fit without issue. Dipstick enters the oval slot fine. I wonder if the dipstick may have been bent a little?

  25. #25
    Senior Member 6t8dart's Avatar
    Join Date
    Apr 2015
    Location
    Irving, TX
    Posts
    545
    Post Thanks / Like
    Quote Originally Posted by Kerns BBO View Post
    I installed a Summit heating unit as others have done previously. only to realize it was too far outboard and the heater core box would interfere with the body (first picture). I put a cover plate over the previous holes and re-mounted it another 1.5 inches inboard for clearance (second picture). Hopefully this will not be one of the items which gets re-done again.
    IMG_1555.JPG
    IMG_1560.JPG
    You did the exact same thing I did, I have still not fixed mine yet, still trying to figure it out.

  26. #26
    Member
    Join Date
    Dec 2015
    Location
    Golden Valley, MN
    Posts
    58
    Post Thanks / Like
    Quote Originally Posted by Duke View Post
    Odd, I have the exact motor and pan that you have (and EdwardB has) and mine fit without issue. Dipstick enters the oval slot fine. I wonder if the dipstick may have been bent a little?
    Without the drilled hole my dipstick bottomed out and would not seat itself. As the photos show, it didn't even come close to the oval. The dipstick is not bent at all. Strange that they are so different from each other.
    FFR MK4 #8849. 2015 Coyote, 2015 IRS.

  27. #27
    Member
    Join Date
    Dec 2015
    Location
    Golden Valley, MN
    Posts
    58
    Post Thanks / Like
    Quote Originally Posted by 6t8dart View Post
    You did the exact same thing I did, I have still not fixed mine yet, still trying to figure it out.

    i didn't want to build a whole new firewall and in the end I am ok with a patch. I will be the only person who will notice once the car is done. Nobody will concentrate on the firewall when the car is complete.
    FFR MK4 #8849. 2015 Coyote, 2015 IRS.

  28. #28

    Steve >> aka: GoDadGo
    GoDadGo's Avatar
    Join Date
    Feb 2015
    Location
    Slidell, Louisiana
    Posts
    6,573
    Post Thanks / Like
    Blog Entries
    1
    Are you adding windshield wipers?
    If so, your heater is where the wiper motor goes.

  29. #29
    Member
    Join Date
    Dec 2015
    Location
    Golden Valley, MN
    Posts
    58
    Post Thanks / Like
    Quote Originally Posted by GoDadGo View Post
    Are you adding windshield wipers?
    If so, your heater is where the wiper motor goes.
    I am not planning on using wipers. I am a strong believer in rain-ex for those few times this will get stuck out in the rain.
    FFR MK4 #8849. 2015 Coyote, 2015 IRS.

  30. #30
    Senior Member edwardb's Avatar
    Join Date
    Feb 2011
    Location
    Lake Orion, Michigan
    Posts
    10,576
    Post Thanks / Like
    Quote Originally Posted by edwardb View Post
    I must be living under a rock... This is the first I've heard of an issue with the Moroso oil pan and the dipstick. I did a search on the other forum and found a fairly long thread on the subject from 2014. Mike Forte was very involved, including working with Moroso. Seemed that a fix was determined and would be on all future pans. Now you bought an engine (and Moroso pan?) from Mike two plus years later and it still needed the fix? I bought my Moroso Coyote pan about six months ago. I'm wondering if I should drop it and check. Now is the time. It's not in the chassis yet and has no oil in it.

    The old thread BTW: http://www.ffcars.com/forums/45-ford...-much-oil.html
    Quote Originally Posted by Kerns BBO View Post
    As you can see in my picture, there is a slot machined into the pan next to my drilled hole. I am assuming that was the fix yet that was not where my dipstick enters the pan.
    Thought I would follow up on this since I raised the question yesterday. And explain how I spent my day today. I loosened the bolts on my Moroso pan enough to peek inside and see what was happening with the dip stick. Sure enough it was hitting something and deflecting. So I completely removed it. It does have the oval cut-out, so it's obviously been updated. I could see some scratching in the area where Kerns BBO drilled the hole. But to confirm, I put some plumbers putty in the area and put the pan back in place. Pushed the dip stick down until it hit, removed, rotated 180 degrees, and back in again. Removed the pan and there were two marks, about 1/4-inch apart. They hit in the area of the oval (barely) but also exactly in the area where the metal baffle underneath crosses into the oval cutout. Apparently the dipstick was deflecting and causing the scratches noted earlier. I debated just trimming a little off the end of the dipstick. But decided to go ahead and clearance the area that was hitting. Took about 5 minutes with a Dremel and die grinder, and a lot longer to clean everything up. No place for metal shavings. Put everything back together and the dipstick now drops through the oval cutout. I annotated Kerns BBO's picture with where mine was hitting, since I didn't take any pictures of my own while working today.

    By the way, for anyone doing any drilling or modifying in that area, I would remove those 5 allen head screws and remove that plate for clean-up. I found a whole bunch of metal chips under there that didn't come out with my initial clean-up. Now gone.

    One last comment. In the link to the other forum there is a post from Mike Forte showing where to drill a hole in the unmodified pan. That is exactly where the dipstick was hitting on my pan. I'm not sure how there would be a lot of variation. The dipstick could be bent one way or the other I guess, but it doesn't go straight in. It gets bent several directions on its way to the pan and seems like it would be about the same location in all cases.

    Last edited by edwardb; 05-26-2016 at 04:56 PM.
    Build 1: Mk3 Roadster #5125. Sold 11/08/2014. Build 2: Mk4 Roadster #7750. Sold 04/10/2017. Build Thread
    Build 3: Mk4 Roadster 20th Anniversary #8674. Sold 09/07/2020. Build Thread and Video. Build 4: Gen 3 Type 65 Coupe #59. Gen 3 Coyote. Legal 03/04/2020. Build Thread and Video
    Build 5: 35 Hot Rod Truck #138. LS3 and 4L65E auto. Rcvd 01/05/2021. Legal 04/20/2023. Build Thread. Sold 11/9/2023.

  31. #31
    Member TMScrogins's Avatar
    Join Date
    Nov 2013
    Location
    Rescue, CA
    Posts
    33
    Post Thanks / Like
    I was the unlucky one to have identified this issue a while back. Moroso was of no help when I brought it to their attention. However, Mike Forte, as usual, jumped in and did whatever he did with Moroso to get them to recognize the problem and get it fixed going forward for the rest of us. I still think Moroso has an underlying design problem and, EdwardB just touched on it. The understructure to the baffle still interferes with the dipstick path (at least in some cases).

    I drilled right through the understructure to be sure it had the required clearance. The problem with not fixing it (at least in my case), is the dipstick would deflect with the tip bending more horizontal causing me to dump more oil in the crankcase until the right level read on the dipstick which really was not the right level. I had 1 quart more oil in the pan than I should have had, thus the concern.

    Moroso is the only one that I've seen out there with this problem. The "others" seem to be better designed in this area with no obstructions.

    FYI

    Trevor
    Last edited by TMScrogins; 05-26-2016 at 06:53 PM. Reason: error on overage volume

  32. #32
    Member
    Join Date
    Dec 2015
    Location
    Golden Valley, MN
    Posts
    58
    Post Thanks / Like
    Quick question, does the bolt on the inside of the bell housing that serves as a pivot for the throw out arm use a split lock washer? I have one left over and I didn't put one there.

    This is a Coyote to TKO600 and a bell housing and clutch from Forte.
    Last edited by Kerns BBO; 05-29-2016 at 07:45 PM.
    FFR MK4 #8849. 2015 Coyote, 2015 IRS.

  33. #33
    Senior Member edwardb's Avatar
    Join Date
    Feb 2011
    Location
    Lake Orion, Michigan
    Posts
    10,576
    Post Thanks / Like
    Quote Originally Posted by Kerns BBO View Post
    Quick question, does the bolt on the inside of the bell housing that serves as a pivot for the throw out arm use a split lock washer? I have one left over and I didn't put one there.

    This is a Coyote to TKO600 and a bell housing and clutch from Forte.
    The Quicktime bellhousing instructions don't show using a lock washer. Only the threaded pivot ball and jam nut. I just did mine last week. After finding the right location, I used blue Loctite and cinched it down nice and tight. Not something you want coming loose.
    Build 1: Mk3 Roadster #5125. Sold 11/08/2014. Build 2: Mk4 Roadster #7750. Sold 04/10/2017. Build Thread
    Build 3: Mk4 Roadster 20th Anniversary #8674. Sold 09/07/2020. Build Thread and Video. Build 4: Gen 3 Type 65 Coupe #59. Gen 3 Coyote. Legal 03/04/2020. Build Thread and Video
    Build 5: 35 Hot Rod Truck #138. LS3 and 4L65E auto. Rcvd 01/05/2021. Legal 04/20/2023. Build Thread. Sold 11/9/2023.

  34. #34
    Member
    Join Date
    Dec 2015
    Location
    Golden Valley, MN
    Posts
    58
    Post Thanks / Like
    The engine and transmission have finally been joined together. In the end I installed the bell housing nine different times to test fitment and correct my mistakes. Hopefully It will stay on from here on out. It is hard to believe that small transmission can take 400+ ft-lbs of torque!

    IMG_1624.JPG
    IMG_1642.JPG

    I am stumped on the air line which comes out from under the manifold on the right side. It originates from the back of the engine in the manifold. Can anyone give me some help as to what this is and where it goes?

    IMG_1644.JPG

    This is the same line where it attaches at the back.

    IMG_1645.JPG
    Last edited by Kerns BBO; 06-04-2016 at 12:00 PM.
    FFR MK4 #8849. 2015 Coyote, 2015 IRS.

  35. #35
    Senior Member edwardb's Avatar
    Join Date
    Feb 2011
    Location
    Lake Orion, Michigan
    Posts
    10,576
    Post Thanks / Like
    Quote Originally Posted by Kerns BBO View Post
    I am stumped on the air line which comes out from under the manifold on the right side. It originates from the back of the engine in the manifold. Can anyone give me some help as to what this is and where it goes?

    IMG_1644.JPG
    The vacuum line on the RH (PS) of the 2015 Coyote intake is for the power brakes. The connection near the front of the engine doesn't actually attach anywhere on the engine. There is plumbing under the hood of the Mustang that takes this vacuum source over to the power brake booster. I couldn't figure it out either, but looked at a new Mustang to see what it was. Needless to say, seems like kind of a roundabout path... The vacuum line can be removed. I'm going to use the nipple on the back of the manifold for the fuel regulator.
    Build 1: Mk3 Roadster #5125. Sold 11/08/2014. Build 2: Mk4 Roadster #7750. Sold 04/10/2017. Build Thread
    Build 3: Mk4 Roadster 20th Anniversary #8674. Sold 09/07/2020. Build Thread and Video. Build 4: Gen 3 Type 65 Coupe #59. Gen 3 Coyote. Legal 03/04/2020. Build Thread and Video
    Build 5: 35 Hot Rod Truck #138. LS3 and 4L65E auto. Rcvd 01/05/2021. Legal 04/20/2023. Build Thread. Sold 11/9/2023.

  36. #36
    Member
    Join Date
    Dec 2015
    Location
    Golden Valley, MN
    Posts
    58
    Post Thanks / Like
    Quote Originally Posted by edwardb View Post
    I'm going to use the nipple on the back of the manifold for the fuel regulator.
    I will be doing the same for simplicity. It will be a nice short run with low visibility.

    I have been working on lots of little details lately while waiting on my backordered rear suspension arms. They are the hold up on getting the rear end complete and being able to install the tank, lines, and brakes.

    I started mocking up the dash today. I have tried a few different layouts but keep coming back to the standard street setup. It was fun to finally sit in the car having three pedals and a wheel to play with.

    IMG_1653.JPG
    FFR MK4 #8849. 2015 Coyote, 2015 IRS.

  37. #37
    Member
    Join Date
    Dec 2015
    Location
    Golden Valley, MN
    Posts
    58
    Post Thanks / Like
    It has been a while since my last update. I am so much further in this build than I imagined would be possible at this stage.

    I purchased and installed Forte's hydraulic clutch. It was a seamless bolt in affair (other than cutting the shaft to length). I am impressed with the build quality.
    IMG_1657.JPG

    I have the Coyote in for a test fit. I managed to get it in by myself using a few ratchet straps to change the angle of the assembly during the process. One thing to note for future builds was in fitting the coolant line from the top of the radiator to the motor. Some people have purchased the line from the F-150; I didn't want to spend the money and found that if I reversed the Mustang hose while cutting a few inches from either end it fit quite well. To get the hose off of the quick disconnect I simply cut the factory hose clamp (plastic).
    IMG_1768.JPG

    I used two 90 degree fittings and the FFR stainless hose for the lower attach.
    IMG_1770.JPG

    To mount the reservoir I cut the unused FFR fan mounts and bent them into mounting tabs. They are located off the upper tube and upper fan mount. you can see the tank mounted in the next post.
    IMG_1773.JPG
    FFR MK4 #8849. 2015 Coyote, 2015 IRS.

  38. #38
    Member
    Join Date
    Dec 2015
    Location
    Golden Valley, MN
    Posts
    58
    Post Thanks / Like
    The dash has been cut with the gauges and switches mounted.
    IMG_1723.JPG

    The rear suspension arms arrived this week concluding all my missing backorders. It took three months but I am happy to finally complete the rear end. One note with the Wilwood parking brakes. They were mis-labled and the left and right calipers needed to be reversed. Not a big deal but something for others to look out for.
    IMG_1777.JPG

    With the rear suspension in I mounted the battery box, fuel tank, and routed the rear harness.
    IMG_1789.JPG
    FFR MK4 #8849. 2015 Coyote, 2015 IRS.

  39. #39
    Member
    Join Date
    Dec 2015
    Location
    Golden Valley, MN
    Posts
    58
    Post Thanks / Like
    Most importantly, she is finally on her own feet! This is one low car!

    IMG_1796.JPG
    FFR MK4 #8849. 2015 Coyote, 2015 IRS.

  40. #40
    Member
    Join Date
    Dec 2015
    Location
    Golden Valley, MN
    Posts
    58
    Post Thanks / Like
    I haven't worked on my car in over a month at this point due to life obligations. I have been busy at work, building a deck at home, and taking care of life. Today I had the opportunity to drive an original 1965 Shelby 427 Cobra with 6000 miles on the odometer. I have never been so motivated to finish my build after today. Hopefully by spring I will have a go-cart of my own!!!IMG_1860.JPGIMG_1861.JPGIMG_1862.JPG
    FFR MK4 #8849. 2015 Coyote, 2015 IRS.

Posting Permissions

  • You may not post new threads
  • You may not post replies
  • You may not post attachments
  • You may not edit your posts
  •  

FFMetal

Visit our community sponsor