Forte's

Visit our community sponsor

Thanks Thanks:  0
Likes Likes:  0
Results 1 to 17 of 17

Thread: Kirkey High-back seat height

  1. #1
    Senior Member lahrs37's Avatar
    Join Date
    Jul 2014
    Location
    Philadelphia
    Posts
    377
    Post Thanks / Like

    Kirkey High-back seat height

    Hey folks,

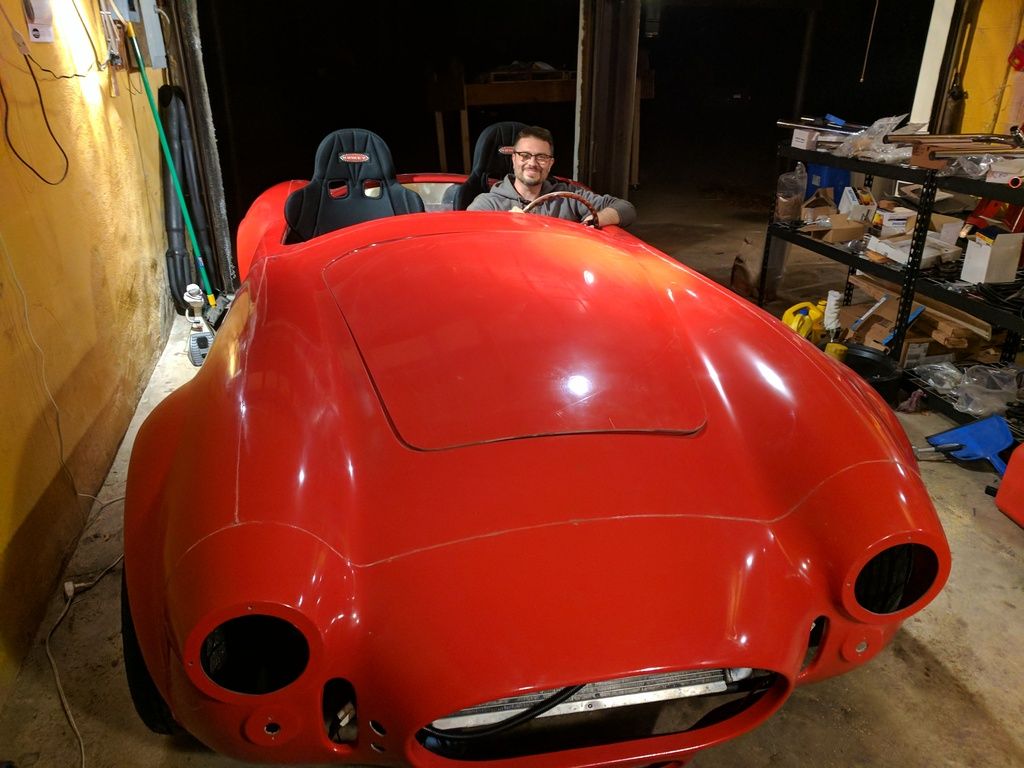
    So I decided to pop the body on so that I could figure where to mount my seats. I have read that having the body on is a must when mounting the Kirkey high-backs. I am glad I did. The problem is that the seat is a little too low for me. I know that the slider will raise it up a tad, but that probably won't be enough for my wife. (Yes she will be driving it. That was part of the deal when I got the kit. And yes we will be going to an autocross for her to learn how to control it first.)

    I have seen some solutions that raise the seat up, but not with the sliders. Any ideas or input before I dive in? Here are some pictures:


    5.0 HO from a '93 Mustang, SVE heads, Trickflow stage 1 cam, Trickflow Street Burner intake manifold, T-5 w/mid shift, IRS
    Delivery 9-10-16, First Start 12-28-16, First Go-Kart 2-18-17
    Build thread: http://thefactoryfiveforum.com/showt...MK4-8951-Build

  2. #2
    Ol Skool
    Join Date
    Oct 2013
    Location
    upstate NY
    Posts
    816
    Post Thanks / Like
    Simplest first:
    A while back Dicks Sporting Goods had a pile of seat warmer/cushions on sale. They were about 1" in thick firm foam rubber with a carry handle and fit in the Kirkey seat perfect. Put the handle where the center belt comes up through. This lets you swap it out for you or your wife easily from passenger to drivers seat. I put mine under the Kirkey foam.
    Adding the Lumbar cushion helps smaller drivers. I also built a sub frame of 1" tubing on my 33 to mount the slider. All this gains about 1 1/2". On my truck I actually built a "stacked" slider or compound of two sliders so she could reach the pedals and see over the steering wheel.

  3. #3
    Senior Member lahrs37's Avatar
    Join Date
    Jul 2014
    Location
    Philadelphia
    Posts
    377
    Post Thanks / Like
    Quote Originally Posted by erlihemi View Post
    Simplest first:
    A while back Dicks Sporting Goods had a pile of seat warmer/cushions on sale. They were about 1" in thick firm foam rubber with a carry handle and fit in the Kirkey seat perfect. Put the handle where the center belt comes up through. This lets you swap it out for you or your wife easily from passenger to drivers seat. I put mine under the Kirkey foam.
    Adding the Lumbar cushion helps smaller drivers. I also built a sub frame of 1" tubing on my 33 to mount the slider. All this gains about 1 1/2". On my truck I actually built a "stacked" slider or compound of two sliders so she could reach the pedals and see over the steering wheel.
    Cool ideas. Any possibility that you have a part number for that seat cushion/heater or a picture?
    5.0 HO from a '93 Mustang, SVE heads, Trickflow stage 1 cam, Trickflow Street Burner intake manifold, T-5 w/mid shift, IRS
    Delivery 9-10-16, First Start 12-28-16, First Go-Kart 2-18-17
    Build thread: http://thefactoryfiveforum.com/showt...MK4-8951-Build

  4. #4
    Ol Skool
    Join Date
    Oct 2013
    Location
    upstate NY
    Posts
    816
    Post Thanks / Like
    IMG_20160830_205105_910 - Copy (361x640).jpg

    Sporting mats, camping supplies, all have similar materials

  5. #5
    Senior Member lahrs37's Avatar
    Join Date
    Jul 2014
    Location
    Philadelphia
    Posts
    377
    Post Thanks / Like
    Quote Originally Posted by erlihemi View Post
    IMG_20160830_205105_910 - Copy (361x640).jpg

    Sporting mats, camping supplies, all have similar materials
    Cool, thanks.
    5.0 HO from a '93 Mustang, SVE heads, Trickflow stage 1 cam, Trickflow Street Burner intake manifold, T-5 w/mid shift, IRS
    Delivery 9-10-16, First Start 12-28-16, First Go-Kart 2-18-17
    Build thread: http://thefactoryfiveforum.com/showt...MK4-8951-Build

  6. #6
    Member Toy4me's Avatar
    Join Date
    Dec 2015
    Location
    Voorhees NJ
    Posts
    94
    Post Thanks / Like
    I am a little vertically challenged myself. My high back seats on the drivers side has a 1 inch square tubing between the bracket and the slider. The passenger side I stacked 2 1 inch square tubes to keep them about the same height. Works very well for me. We have no big people in the family so I'm not worried about it. Pretty much going to be only me driving it though. I also have the slider adjuster on the inside rail. Took a little work but it's much better there than on the outside rail

  7. #7
    Senior Member CraigS's Avatar
    Join Date
    Feb 2011
    Location
    Blacksburg, Va
    Posts
    4,730
    Post Thanks / Like
    You look fine in there to me, maybe even a little high. I am 5'9" and I do not put my arm on top of the door. I have an UltraShield seat which is very similar to the Kirkey. I have it pushed over tight against the tunnel and this allows plenty of room for my left arm to be inside the door. Erlihemi has a great idea for adapting the car for your wife. I would get 2-3 of those as an experiment before buying a slider.
    FFR MkII, 408W, Tremec TKO 500, 2015 IRS, DA QA1s, Forte front bar, APE hardtop.

  8. #8
    Not a waxer Jeff Kleiner's Avatar
    Join Date
    Feb 2011
    Location
    Bloomington, Indiana
    Posts
    8,087
    Post Thanks / Like
    The Kirkeys don't really lend themselves well to sliders. You'll find that back is intended to be rigidly mounted (as specified in Kirkeys intructions) otherwise it is pretty "floppy floppy" (to use the technical terminology ) and will allow a lot of upper body movement.

    Jeff

  9. #9
    Seasoned Citizen NAZ's Avatar
    Join Date
    Feb 2016
    Location
    "The High Country", beautiful Flagstaff, AZ
    Posts
    2,443
    Post Thanks / Like
    I agree with Jeff. These are race seats and sanctioning bodies typically require you to hard mount the backs as well as the seat bottoms. Kirkey sells back mounts for this purpose as the lightweight seats are not designed to hold up to upper body side and rear loading without additional bracing. Of course custom seat mounts with sliders and elevation adjustments can be fabricated but you should also include support for the backs. This would likely end up being either heavy, large, or both. There's no shame in using a booster pad like has been suggested here previously.

  10. #10
    Senior Member lahrs37's Avatar
    Join Date
    Jul 2014
    Location
    Philadelphia
    Posts
    377
    Post Thanks / Like
    OK, no sliders! I got the Kirkey brackets and got the seats in the perfect position. My wife is going to use a booster. We experimented with foam I had lying around. She will need 2 inches on the seat bottom and 4" on the seat back, but it will work. I am not exactly happy with the wings, but i have seen people bend them. For the mounts, I had to drill and tap into the frame at one place. On another section it the bracket has nothing to attach to. I am going to reread Wareaglescott's post to see what I can do. He used a metal plate...
    5.0 HO from a '93 Mustang, SVE heads, Trickflow stage 1 cam, Trickflow Street Burner intake manifold, T-5 w/mid shift, IRS
    Delivery 9-10-16, First Start 12-28-16, First Go-Kart 2-18-17
    Build thread: http://thefactoryfiveforum.com/showt...MK4-8951-Build

  11. #11
    Seasoned Citizen NAZ's Avatar
    Join Date
    Feb 2016
    Location
    "The High Country", beautiful Flagstaff, AZ
    Posts
    2,443
    Post Thanks / Like
    Lahrs37, you may want to consider using a .080" - .090" 6061 T6 aluminum plate to adapt your seats to chassis points that make sense and that spread the load appropriately. Drilling through structural tubing just any old place can quickly compromise the integrity of the chassis. With a mounting plate you can add several 10-32 size screws through one wall of a tube which may have less affect on diminishing strength than drilling through two sides with a larger size fastener. If you're going to drill through your chassis its usually better to make the hole in the longitudinal center line of the tubing rather than near an edge and usually better to stay far away from mid span. Using a plate can help you fasten the seats to the chassis where you minimize compromising the strength of that structural element and if done right, it will add to the strength. There are several online sources for small / short lengths of metal so you don't have to deal with a large sheet. When I need a small piece and don't want to run to Phoenix for metal or don't want to store a bunch of something I seldom use, I go to www.onlinemetals.com and they provide quick service.

  12. #12
    Senior Member wareaglescott's Avatar
    Join Date
    Apr 2016
    Location
    Auburn, AL
    Posts
    2,146
    Post Thanks / Like
    Quote Originally Posted by NAZ View Post
    Lahrs37, you may want to consider using a .080" - .090" 6061 T6 aluminum plate to adapt your seats to chassis points that make sense and that spread the load appropriately. Drilling through structural tubing just any old place can quickly compromise the integrity of the chassis. With a mounting plate you can add several 10-32 size screws through one wall of a tube which may have less affect on diminishing strength than drilling through two sides with a larger size fastener. If you're going to drill through your chassis its usually better to make the hole in the longitudinal center line of the tubing rather than near an edge and usually better to stay far away from mid span. Using a plate can help you fasten the seats to the chassis where you minimize compromising the strength of that structural element and if done right, it will add to the strength. There are several online sources for small / short lengths of metal so you don't have to deal with a large sheet. When I need a small piece and don't want to run to Phoenix for metal or don't want to store a bunch of something I seldom use, I go to www.onlinemetals.com and they provide quick service.
    I am no structural engineer but this is interesting advice. For the record I just drilled one hole in the center of the tube and tapped the threads and inserted the 1/4" bolt that way. I did not drill through two sides to secure it. I cant imagine I weakened anything with the attachment of a steel plate. On the surface it seems like that would strengthen it but again I am no engineer and may very well be wrong. I'd be curious what the loading capability of 10-32 size screws would be? That seems pretty small to hold my 215 pounds and the seat under load. I really enjoy the broad knowledge base on the forum because NAZ has provided some good additional information I would not have thought of otherwise. On a related topic I am curious what NAZ thinks of the hundreds of holes we drill in the tubing to attach the aluminum panels?
    Ultimately if I am in an accident bad enough to displace the seat anyways I am likely pretty beat up or dead anyways and the car is likely totaled. If this is more of an issue concerning structural rigidity of the frame for performance purposes I seriously doubt I will ever exceed 80% of the cars capability anyways in my street driving. If I have inadvertently weakened the situation I can accept that.
    MK4 #8900 - complete kit - Coyote, TKO600, IRS - Delivered 6/28/16 First Start 10/6/16 Go cart - 10/16/16 Build completed - 4/26/17 - 302 days to build my 302 CI Coyote Cobra - Registered and street legal 5/17/17
    Build Thread http://thefactoryfiveforum.com/showt...e-build-thread
    PHIL 4:13 INSTAGRAM - @scottsrides

  13. #13
    Seasoned Citizen NAZ's Avatar
    Join Date
    Feb 2016
    Location
    "The High Country", beautiful Flagstaff, AZ
    Posts
    2,443
    Post Thanks / Like
    Wareaglescott, the advice I gave was "very" general and not a one size fits all applications -- that's where sound engineering principles should be employed. I gave the advice knowing that most here are not engineers and are doing the best they can with what they have. This general advice may help guide folks from diminishing the structural integrity of their chassis. Once you know the expected load of what you're mounting to the chassis you can size the fasteners to suit (and you should also determine if the structural element can carry the load). You may choose to use a couple fasteners that will handle the load or use several smaller fasteners that together will handle the load and distribute it over a greater area which is what I was suggesting above. Do some research on strength of fasteners (and remember, there are a large variety of fasteners with different strengths out there) and you will see that many times (but not always) you can downsize the fastener and still handle the load by simply using more of the smaller ones. About the best site I've found for explaining fasteners is the Fastenal website. Our you can do a Google search for strength charts and get a better understanding of strength of fasteners and compare different sizes and grades. The two strengths we are normally concerned with are tension capability and shear capability. The reason I was suggesting to consider smaller vs. bigger is you make a smaller hole in the tubing (minimizing the cross section reduction) and the higher thread count results in more thread engagement in the thin wall tubing. My preference is not to drill holes in structural tubing and some sanctioning bodies will not allow you to drill chassis tubing unless you add doubling plates. But FFR directs us to drill holes in the chassis so that's the route most here will take. Consider this: If you drill and tap for a ¼-20 screw in the 1.5" x .100 square tubing you have only 2-threads engaged but a 10-32 has 3.2 threads engaged. That ¼-20 fastener has only a fraction of its tensile strength with that little thread engagement as the threads will pull out long before loading the fastener to its potential. While the 10-32 has less than full tensile strength with only .100" thread engagement it still has more percentage wise than the higher strength ¼-20. Use enough 10-32 screws and you will equal the full tensile strength of one ¼-20 fastener even with full thread engagement. Of course you can use the larger ¼-20 and drill through both side of the tubing and install a nut of the other end and have maximum fastener strength but what does that do to the strength of the tubing? The takeaway here is that there is a lot to consider before drilling holes in a structure and way beyond what anyone could possibly cover in this forum. The basic tips I provided may help you to minimize the impact to the structural integrity of your chassis when breaking out the drill motor to mount things. They are not a replacement for engineering and will not 100% prevent you from affecting structural strength but may be better than just winging it. And these considerations are not limited to just race cars, they are applicable to any structure that must carry a load.

  14. #14
    Senior Member wareaglescott's Avatar
    Join Date
    Apr 2016
    Location
    Auburn, AL
    Posts
    2,146
    Post Thanks / Like
    Quote Originally Posted by NAZ View Post
    Wareaglescott, the advice I gave was "very" general and not a one size fits all applications -- that's where sound engineering principles should be employed. I gave the advice knowing that most here are not engineers and are doing the best they can with what they have. This general advice may help guide folks from diminishing the structural integrity of their chassis. Once you know the expected load of what you're mounting to the chassis you can size the fasteners to suit (and you should also determine if the structural element can carry the load). You may choose to use a couple fasteners that will handle the load or use several smaller fasteners that together will handle the load and distribute it over a greater area which is what I was suggesting above. Do some research on strength of fasteners (and remember, there are a large variety of fasteners with different strengths out there) and you will see that many times (but not always) you can downsize the fastener and still handle the load by simply using more of the smaller ones. About the best site I've found for explaining fasteners is the Fastenal website. Our you can do a Google search for strength charts and get a better understanding of strength of fasteners and compare different sizes and grades. The two strengths we are normally concerned with are tension capability and shear capability. The reason I was suggesting to consider smaller vs. bigger is you make a smaller hole in the tubing (minimizing the cross section reduction) and the higher thread count results in more thread engagement in the thin wall tubing. My preference is not to drill holes in structural tubing and some sanctioning bodies will not allow you to drill chassis tubing unless you add doubling plates. But FFR directs us to drill holes in the chassis so that's the route most here will take. Consider this: If you drill and tap for a ¼-20 screw in the 1.5" x .100 square tubing you have only 2-threads engaged but a 10-32 has 3.2 threads engaged. That ¼-20 fastener has only a fraction of its tensile strength with that little thread engagement as the threads will pull out long before loading the fastener to its potential. While the 10-32 has less than full tensile strength with only .100" thread engagement it still has more percentage wise than the higher strength ¼-20. Use enough 10-32 screws and you will equal the full tensile strength of one ¼-20 fastener even with full thread engagement. Of course you can use the larger ¼-20 and drill through both side of the tubing and install a nut of the other end and have maximum fastener strength but what does that do to the strength of the tubing? The takeaway here is that there is a lot to consider before drilling holes in a structure and way beyond what anyone could possibly cover in this forum. The basic tips I provided may help you to minimize the impact to the structural integrity of your chassis when breaking out the drill motor to mount things. They are not a replacement for engineering and will not 100% prevent you from affecting structural strength but may be better than just winging it. And these considerations are not limited to just race cars, they are applicable to any structure that must carry a load.
    Good info Naz. Thanks
    MK4 #8900 - complete kit - Coyote, TKO600, IRS - Delivered 6/28/16 First Start 10/6/16 Go cart - 10/16/16 Build completed - 4/26/17 - 302 days to build my 302 CI Coyote Cobra - Registered and street legal 5/17/17
    Build Thread http://thefactoryfiveforum.com/showt...e-build-thread
    PHIL 4:13 INSTAGRAM - @scottsrides

  15. #15
    Member
    Join Date
    Aug 2014
    Posts
    77
    Post Thanks / Like
    Quote Originally Posted by wareaglescott View Post
    Good info Naz. Thanks
    The seat cradles you while you are in the car. The 5 point harness' job is to keep you and the seat in the car in case you are in an accident.

  16. #16
    Ol Skool
    Join Date
    Oct 2013
    Location
    upstate NY
    Posts
    816
    Post Thanks / Like
    Quote Originally Posted by GSides9 View Post
    The seat cradles you while you are in the car. The 5 point harness' job is to keep you and the seat in the car in case you are in an accident.
    Gotta be careful. The Kirkey seat back plate is for lateral and rear acceleration. While the harness does pretty good it depends on the seat being secure. Most sanctioning bodies do require a cross bar behind the seat back to anchor to. Imagine getting hit from behind and there is a 3-4" gap for the seat to fall back. At that point your Harness is loose and then you get T-boned or roll. This is straight forward with the MK design. the 33 Hotrod has an issue here.

  17. #17
    Senior Member lahrs37's Avatar
    Join Date
    Jul 2014
    Location
    Philadelphia
    Posts
    377
    Post Thanks / Like
    This is all really good information. I will take a step back and reevaluate how to mount these seats. I asked FFR just to see what was recommended and they said mount them like the standard seats which doesn't work once you add in the brackets. Anyways, thanks for the insight y'all!
    5.0 HO from a '93 Mustang, SVE heads, Trickflow stage 1 cam, Trickflow Street Burner intake manifold, T-5 w/mid shift, IRS
    Delivery 9-10-16, First Start 12-28-16, First Go-Kart 2-18-17
    Build thread: http://thefactoryfiveforum.com/showt...MK4-8951-Build

Posting Permissions

  • You may not post new threads
  • You may not post replies
  • You may not post attachments
  • You may not edit your posts
  •  

Replica Parts

Visit our community sponsor