-
Senior Member


Originally Posted by
Mark Eaton

The rest of the #2 and #4 lugs are heavy duty crimp style.
Paul, after you crimp on those heavy duty lugs do you also solder or just heat shrink tubing and call it good?
Thanks,
Mark
Just crimped. The hydraulic crimper I showed puts a full 360 degree crimp around the conductors. Not just a single dent or flat spot. I've done some practice crimps and then did pull tests and also cut several apart. The section is basically solid copper. Very solid. The heat shrink I use for those lugs is triple wall that includes an adhesive. Mainly meant to seal things up, but adds some strength as well. They're not going anywhere.
Build 1: Mk3 Roadster #5125. Sold 11/08/2014.
Build 2: Mk4 Roadster #7750. Sold 04/10/2017.
Build Thread
Build 3: Mk4 Roadster 20th Anniversary #8674. Sold 09/07/2020.
Build Thread and
Video.
Build 4: Gen 3 Type 65 Coupe #59. Gen 3 Coyote. Legal 03/04/2020.
Build Thread and
Video
Build 5: 35 Hot Rod Truck #138. LS3 and 4L65E auto. Rcvd 01/05/2021. Legal 04/20/2023.
Build Thread. Sold 11/9/2023.
-
Senior Member
Gen 3 Coyote Final Assembly
Very productive last couple of days getting the Gen 3 Coyote assembled and ready to put into the chassis. Just a couple more details to wrap up on both. Then with a little help hope to get installed. A few little challenges along the way, but I think it’s good to go.
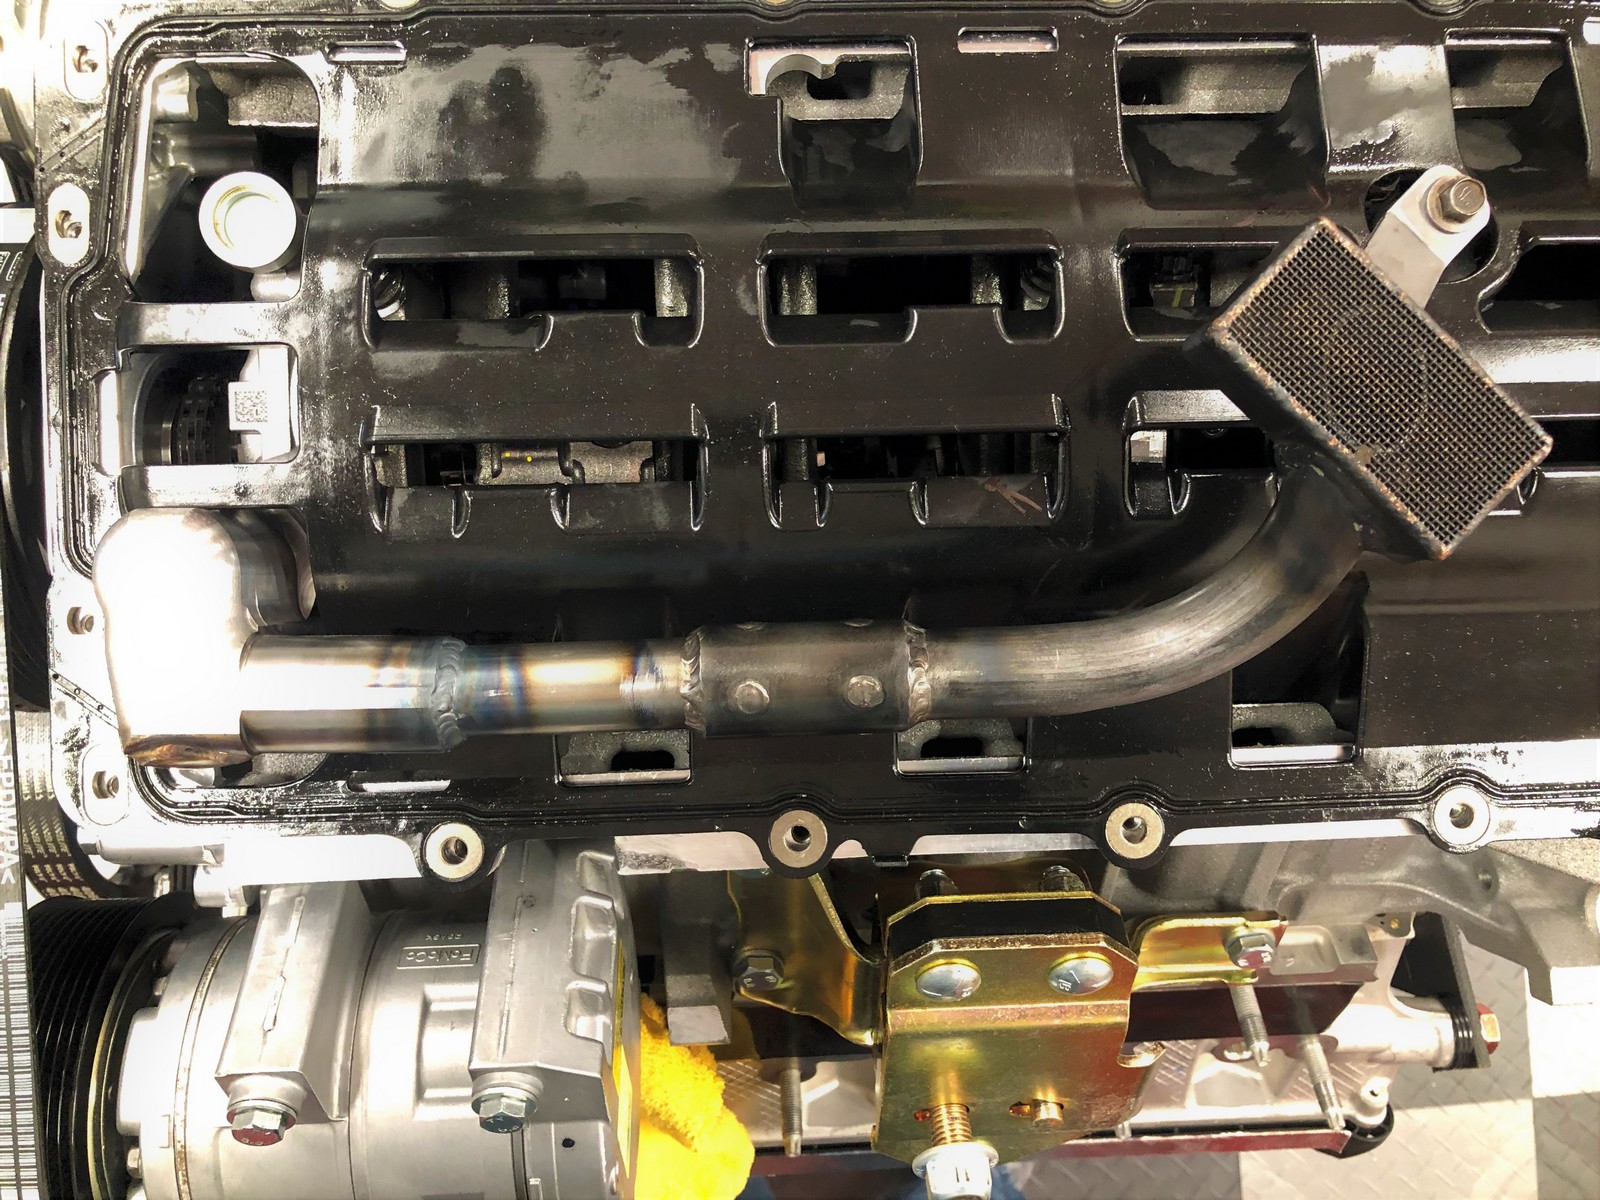
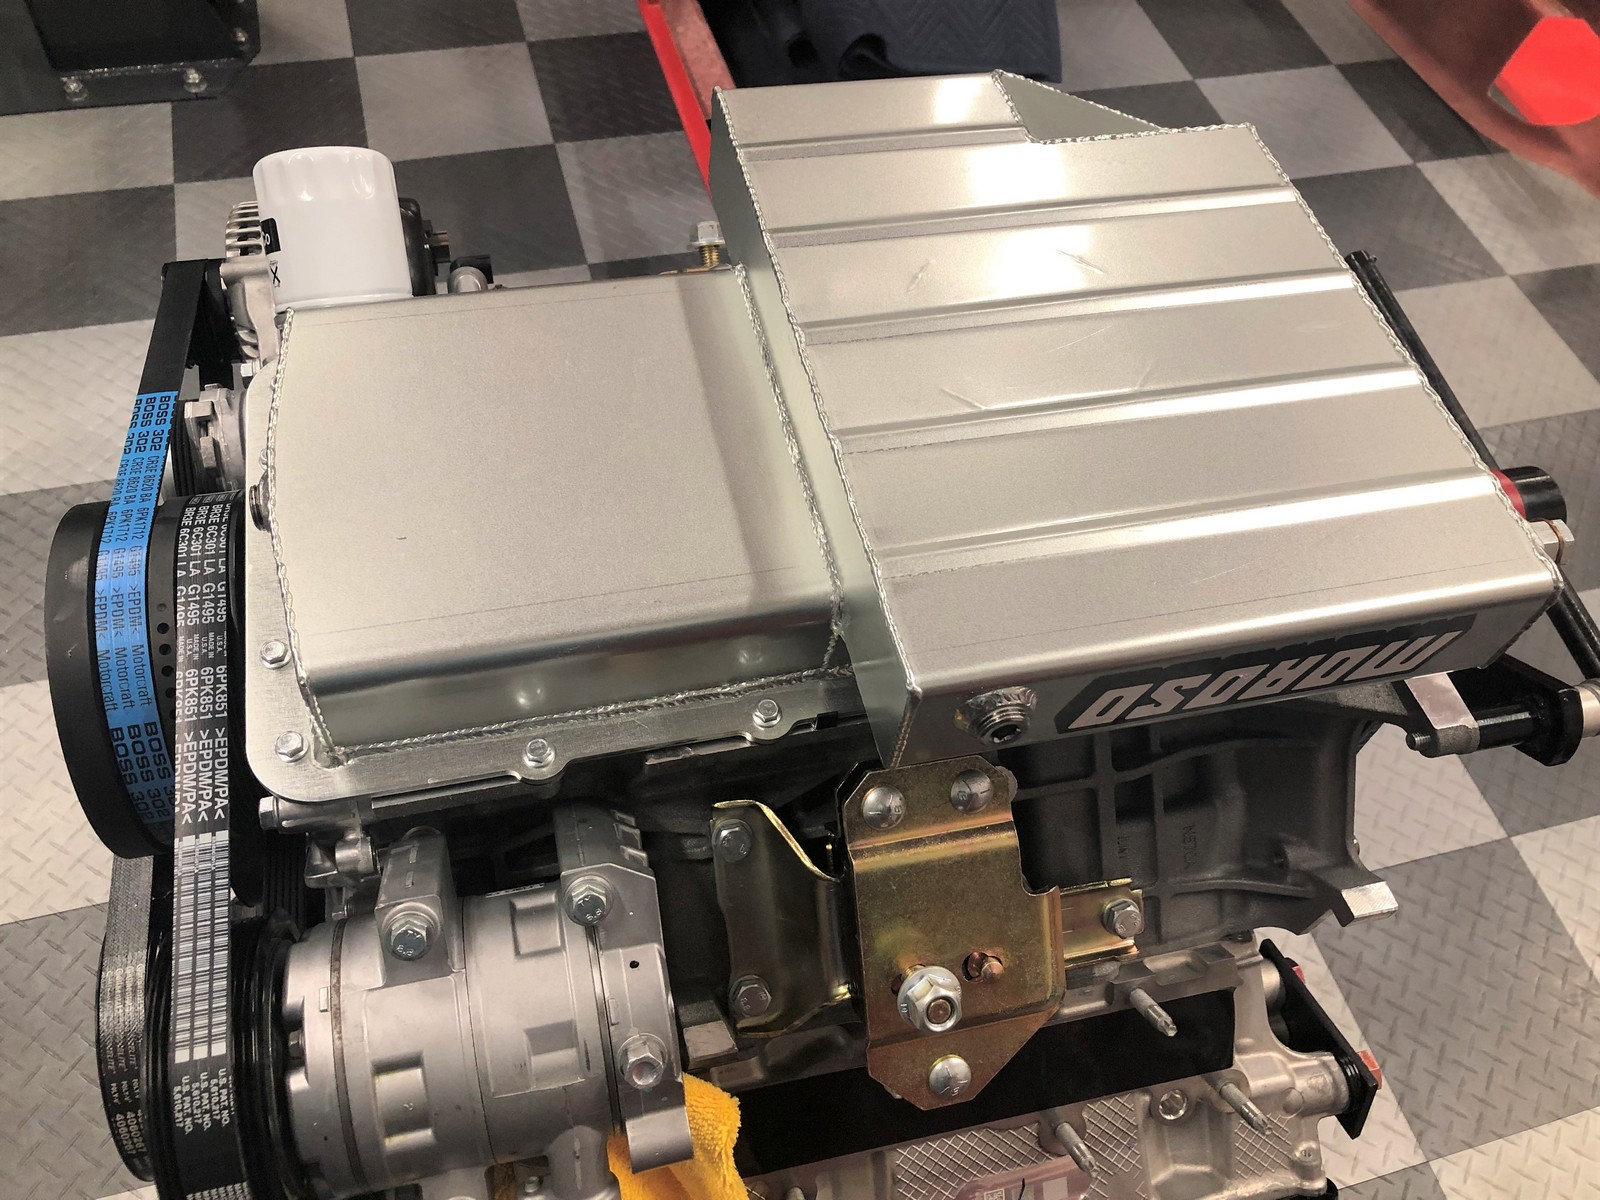
First up was the oil pan pickup tube. That chapter is now officially closed. Had the grafted together pickup tube welded. Still lined up perfectly. I cleaned up the rubber gasket and all mating surfaces and installed using some Permatex Ultra Black at the oil pump inlet. Probably not necessary but made me feel better. That plus how the windage tray engages one side, as shown previously, I’m confident it's sealed and won’t come out. Picture of the now completed pickup tube installed, and the other picture I’ve been waiting for. The Moroso pan bolted down for the final time.
Update: A proper Gen 3 pickup is now available from Moroso. No longer necessary to make a custom pickup as shown here.
Next up I decided to tackle the Speedhut water temp and oil pressure sending units. Couple of bumps, but now complete. First the easy one. The water temp sender goes into a 3/4-inch NPT fitting in the block by the oil filter. Same as before. The FF Coyote installation kit includes an adapter. The instructions say to thread the 1/2-inch NPT adapter that comes with the gauges into this adapter. Unfortunately, the adapter included with the gauges is 3/8-inch NPT. Had this exact issue with #8674. So ordered up the same Edelmann 210926 3/4-inch NPT to 3/8-inch NPT adapter used on #8674, and installed the sender. For the oil pressure sender, the Gen 3 Coyote has some differences from previous Coyotes. I pointed this out earlier. There are two wired devices by the oil filter, not just the single oil pressure sender. Similar as it turns out to what’s on the F-150 version of the Coyote. Seen here:

Through my contact at Ford, I was able to find out that “A” is a traditional oil pressure sender. “B” is an oil control valve that decreases oil pressure at low rpm to promote fuel economy. Interesting because some of the reviews I’ve read about the Gen 3 Coyote people who’ve had previous Coyotes have commented that the oil pressure reads lower than before. Clearly Ford is looking for every possible way to increase economy. But the rest of the story is my Ford contact confirmed that neither are used by the crate motor control pack PCM program. Also upon further review I found the inlet on the oil pressure sender is a metric O-ring fitting and I was unable to find any kind of adapter to fit it. So took the bull by the horns and removed the oil filter/sender assembly from the engine (4 bolts and has an O-ring gasket, so easy) and tapped the hole to 1/4-inch NPT. No way I was going to drill and tap the hole with the piece still on the engine. Would have been nearly impossible to keep chips and such out of there. With the hole tapped, used the gauge package provided 1/4-inch NPT adapter, installed the Speedhut oil pressure sender, and it’s done. I’m leaving the oil control valve in place, even though it doesn’t do anything. Doesn’t hurt a thing and saves finding something to plug the hole. Tied the other unused lead out of the way.
Update March 2020: Information above is not correct. The OE oil pressure sender is required for the Gen 3 Coyote. Discussed later in the build thread.

With that done, time to wrap up the final driveline pieces to the engine. I had previously installed the M-7600-C pilot bearing. Set the QuickTime block plate in place, and bolted on the M-6375-M50 billet steel flywheel using a M-6379-C bolt kit. The bolts are torqued to 177 in-lbs then turned another 60 degrees in a star pattern. Sounds light, but at 60 degrees very tight. Note the addition of the pilot bearing and flywheel are necessary because the Gen 3 Coyote has the unusable (for me anyway) dual mass flywheel and no pilot bearing in the end of the crank, as discussed several times already. Previous Coyotes had a nodular flywheel, which seems to work fine. This billet steel version is 9 pounds lighter and is SFI certified. Used the same one on #8674. Nice piece.

No pictures, but next up I installed the Quicktime RM-8080 bell housing and dial indicated the opening. Because of the way the two indexing dowels on a Coyote bell housing have mounting bolts through the center, the traditional methods of adjusting with offset dowels is challenging. But still good practice to take this step and confirm where you’re at. Tremec apparently specifically says their warranty doesn’t apply unless the bell housing is indexed and in spec. Interesting. Anyway, initial measurements weren’t great. Borderline to spec and certainly not my experience with previous QuickTime bell housings. Took it back apart trying to talk myself into it being close enough. Upon disassembly, I noticed how a foil/plastic heat shield around the crank sensor was being trapped between the block plate/bell and the block. There are several of these on the Gen 3 Coyote, including the two oil sensor pieces discussed previously. Also different than before. Looking further at the available clearance and the thickness of the shield, looked like this could be a problem. Removed the heat shield, bolted everything back together, and dial indicated the opening again. Surprise! Within .002 to .003 all around. Well within spec and similar to what I’ve seen before. This picture shows the shield removed next to where it was. Obviously, there’s a reason Ford added those. But haven’t used them before so leaving them off.

Last edited by edwardb; 10-08-2021 at 03:58 AM.
Build 1: Mk3 Roadster #5125. Sold 11/08/2014.
Build 2: Mk4 Roadster #7750. Sold 04/10/2017.
Build Thread
Build 3: Mk4 Roadster 20th Anniversary #8674. Sold 09/07/2020.
Build Thread and
Video.
Build 4: Gen 3 Type 65 Coupe #59. Gen 3 Coyote. Legal 03/04/2020.
Build Thread and
Video
Build 5: 35 Hot Rod Truck #138. LS3 and 4L65E auto. Rcvd 01/05/2021. Legal 04/20/2023.
Build Thread. Sold 11/9/2023.
-
Senior Member
Gen 3 Coyote Final Assembly (continued)
Next up was the clutch. Using the same M-7560-T46 clutch as #8674. It’s actually a dual friction Centerforce part, sold by Ford Performance. It chattered a bit in the first couple hundred miles in #8674 (not unusual) but once broken in I’ve been real happy with it. Nice quality piece. Installed with a M-6397-B46 bolt and dowel kit. The bolts are torqued to 46 ft-lbs then turned another 60 degrees in a star pattern. Sounds a little heavy, compared to the flywheel, but they turned the full 60 degrees without feeling like I was forcing anything. Here’s the clutch installed, also showing a stop piece I made instead of trying to hold the front crankshaft bolt like I’ve done before. Also used it when torqueing the flywheel using one of the pressure plate bolt holes.

Then on with the bell housing. Used some blue Loctite and torqued to 50 ft/lbs.

As mentioned before, using a Tilton 60-6104 Hydraulic Release Bearing (HRB) instead of the traditional clutch arm and Ford throw-out bearing. First time for me on this, so we’ll see how it works and holds up. The installation is pretty simple. Just followed the directions. The inside sleeve is threaded and you set to end up 1/8-inch away from the clutch pressure plate fingers when fully retracted. In use, it will move out against the fingers and according to the instructions is self-adjusting. Similar to a disk brake caliper. The HRB includes an anti-rotation pin that goes into a threaded hole already in the T-56. I also removed the installed clutch arm pivot. But I'll save it. I’m using the HRB along with a Wilwood 260-10373 13/16 inch MC in the pedal box. That’s the size recommended by Tilton for this installation. The instructions are also very insistent that it have a pedal stop. So I’ll deal with that when it’s installed, bled, and checked out.


Then on the with T-56, which once lined up slid right into place. Can’t tell too much yet, but with the trans in gear the output yoke turns without any unusual drag or noises. I guess that’s good.


That's a chunk right there. My body feels it from dragging everything around for a day or two. Next step, into the chassis. But first some turkey and football, and some time spent being thankful which I truly am. For so many things. Happy Thanksgiving everyone!
Last edited by edwardb; 11-22-2018 at 09:36 AM.
Build 1: Mk3 Roadster #5125. Sold 11/08/2014.
Build 2: Mk4 Roadster #7750. Sold 04/10/2017.
Build Thread
Build 3: Mk4 Roadster 20th Anniversary #8674. Sold 09/07/2020.
Build Thread and
Video.
Build 4: Gen 3 Type 65 Coupe #59. Gen 3 Coyote. Legal 03/04/2020.
Build Thread and
Video
Build 5: 35 Hot Rod Truck #138. LS3 and 4L65E auto. Rcvd 01/05/2021. Legal 04/20/2023.
Build Thread. Sold 11/9/2023.
-
Post Thanks / Like - 0 Thanks, 1 Likes


 Thanks:
  Likes:


 Reply With Quote