-
Senior Member


Originally Posted by
Railroad

Those black oxide coated fastners will rust ASAP. By the quality of your work, I think you would want to avoid the rust. I bought a small can of Rustoleum black and coated them while accessible.
I noticed you did not trim your upper control arm adjustment sleeves. I did not trim mine either.
My max caster was 6.9 degrees. It seems some need trimming and some do not.
I would trim mine, if I had the opportunity.
Your tie rod ends will also rust. I used SharkHide on mine. Natural finish and no rust.
I always enjoy seeing the clean assembly of parts.
Hi Railroad. Great tip on the black oxide fasteners. I didn't even think of that. I will do the same and coat them, as well as the tie rods.
Yes, I've read about the UCA trimming. I'm a little on the fence about it, so figured I would take my chances and start with full length. I may regret that.
Thanks for your review and suggestions! Very helpful.
Chris
Coupe complete kit delivered: 4/22/24.
Build Thread. Coyote. T-56. IRS w/3.55. Wilwoods. PS. HVAC. Side windows.
MK4 Complete kit.
Build Thread Index. Delivered: 10/15/2020. Legal: 7/25/23. Coyote Gen3. TKO600 (0.64 OD). IRS w/3.55. PS. Wilwoods. Sway bars. This build is dedicated to my son, Benjamin.
Build Thread.
-
Senior Member
Thanks for the encouragement, Jiriza84641! I'm having a blast! Sometimes a little frustrating, but mostly rewarding.
Chris
Coupe complete kit delivered: 4/22/24.
Build Thread. Coyote. T-56. IRS w/3.55. Wilwoods. PS. HVAC. Side windows.
MK4 Complete kit.
Build Thread Index. Delivered: 10/15/2020. Legal: 7/25/23. Coyote Gen3. TKO600 (0.64 OD). IRS w/3.55. PS. Wilwoods. Sway bars. This build is dedicated to my son, Benjamin.
Build Thread.
-
Originally Posted by
460.465USMC
Hi Carl. No, I haven't centered the steering rack. I have this nice set of instructions bookmarked by "karlos":
https://thefactoryfiveforum.com/show...l=1#post215142
I think I will take your suggestion and put it high on my To Do list. I'm not sure what you mean by "metal clamps are still on your rubber boots on your steering rack". Are those removed during the centering process? Although the instructions above are good, I may reach out to you with a PM on this topic.
Thanks for your input!
Yup, you will have to remove those clamps... Many are heavy duty zip ties, you will most likely find this is the easiest way to replace those when you are doing this adjustment. The instruction that you have are very detailed and the ones that I used as well.
-
Senior Member
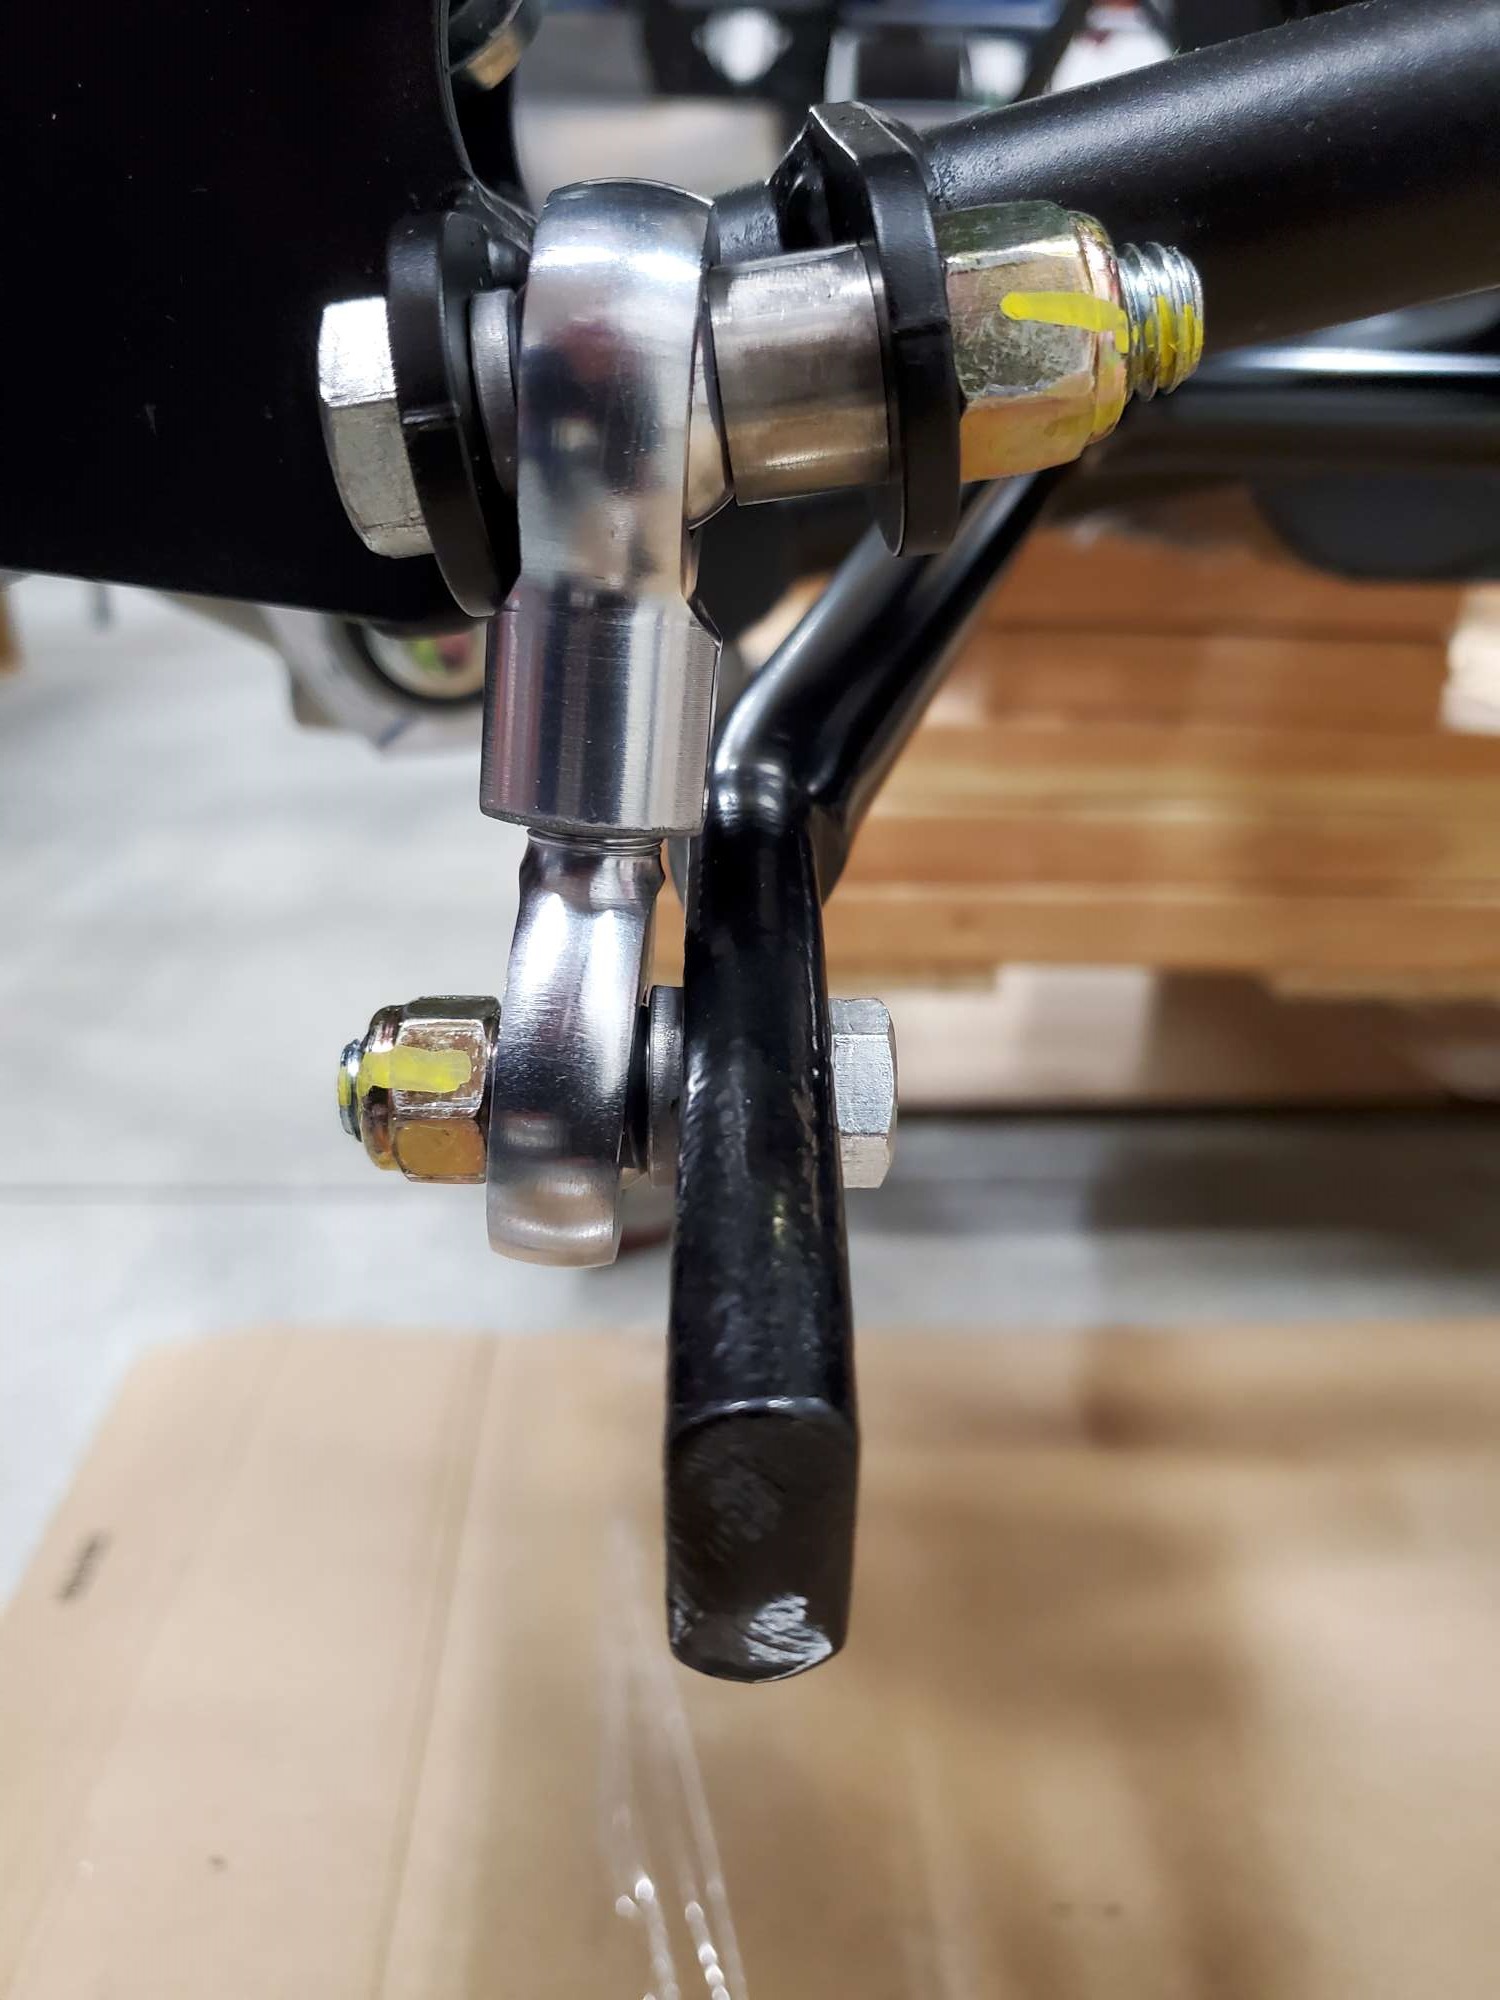
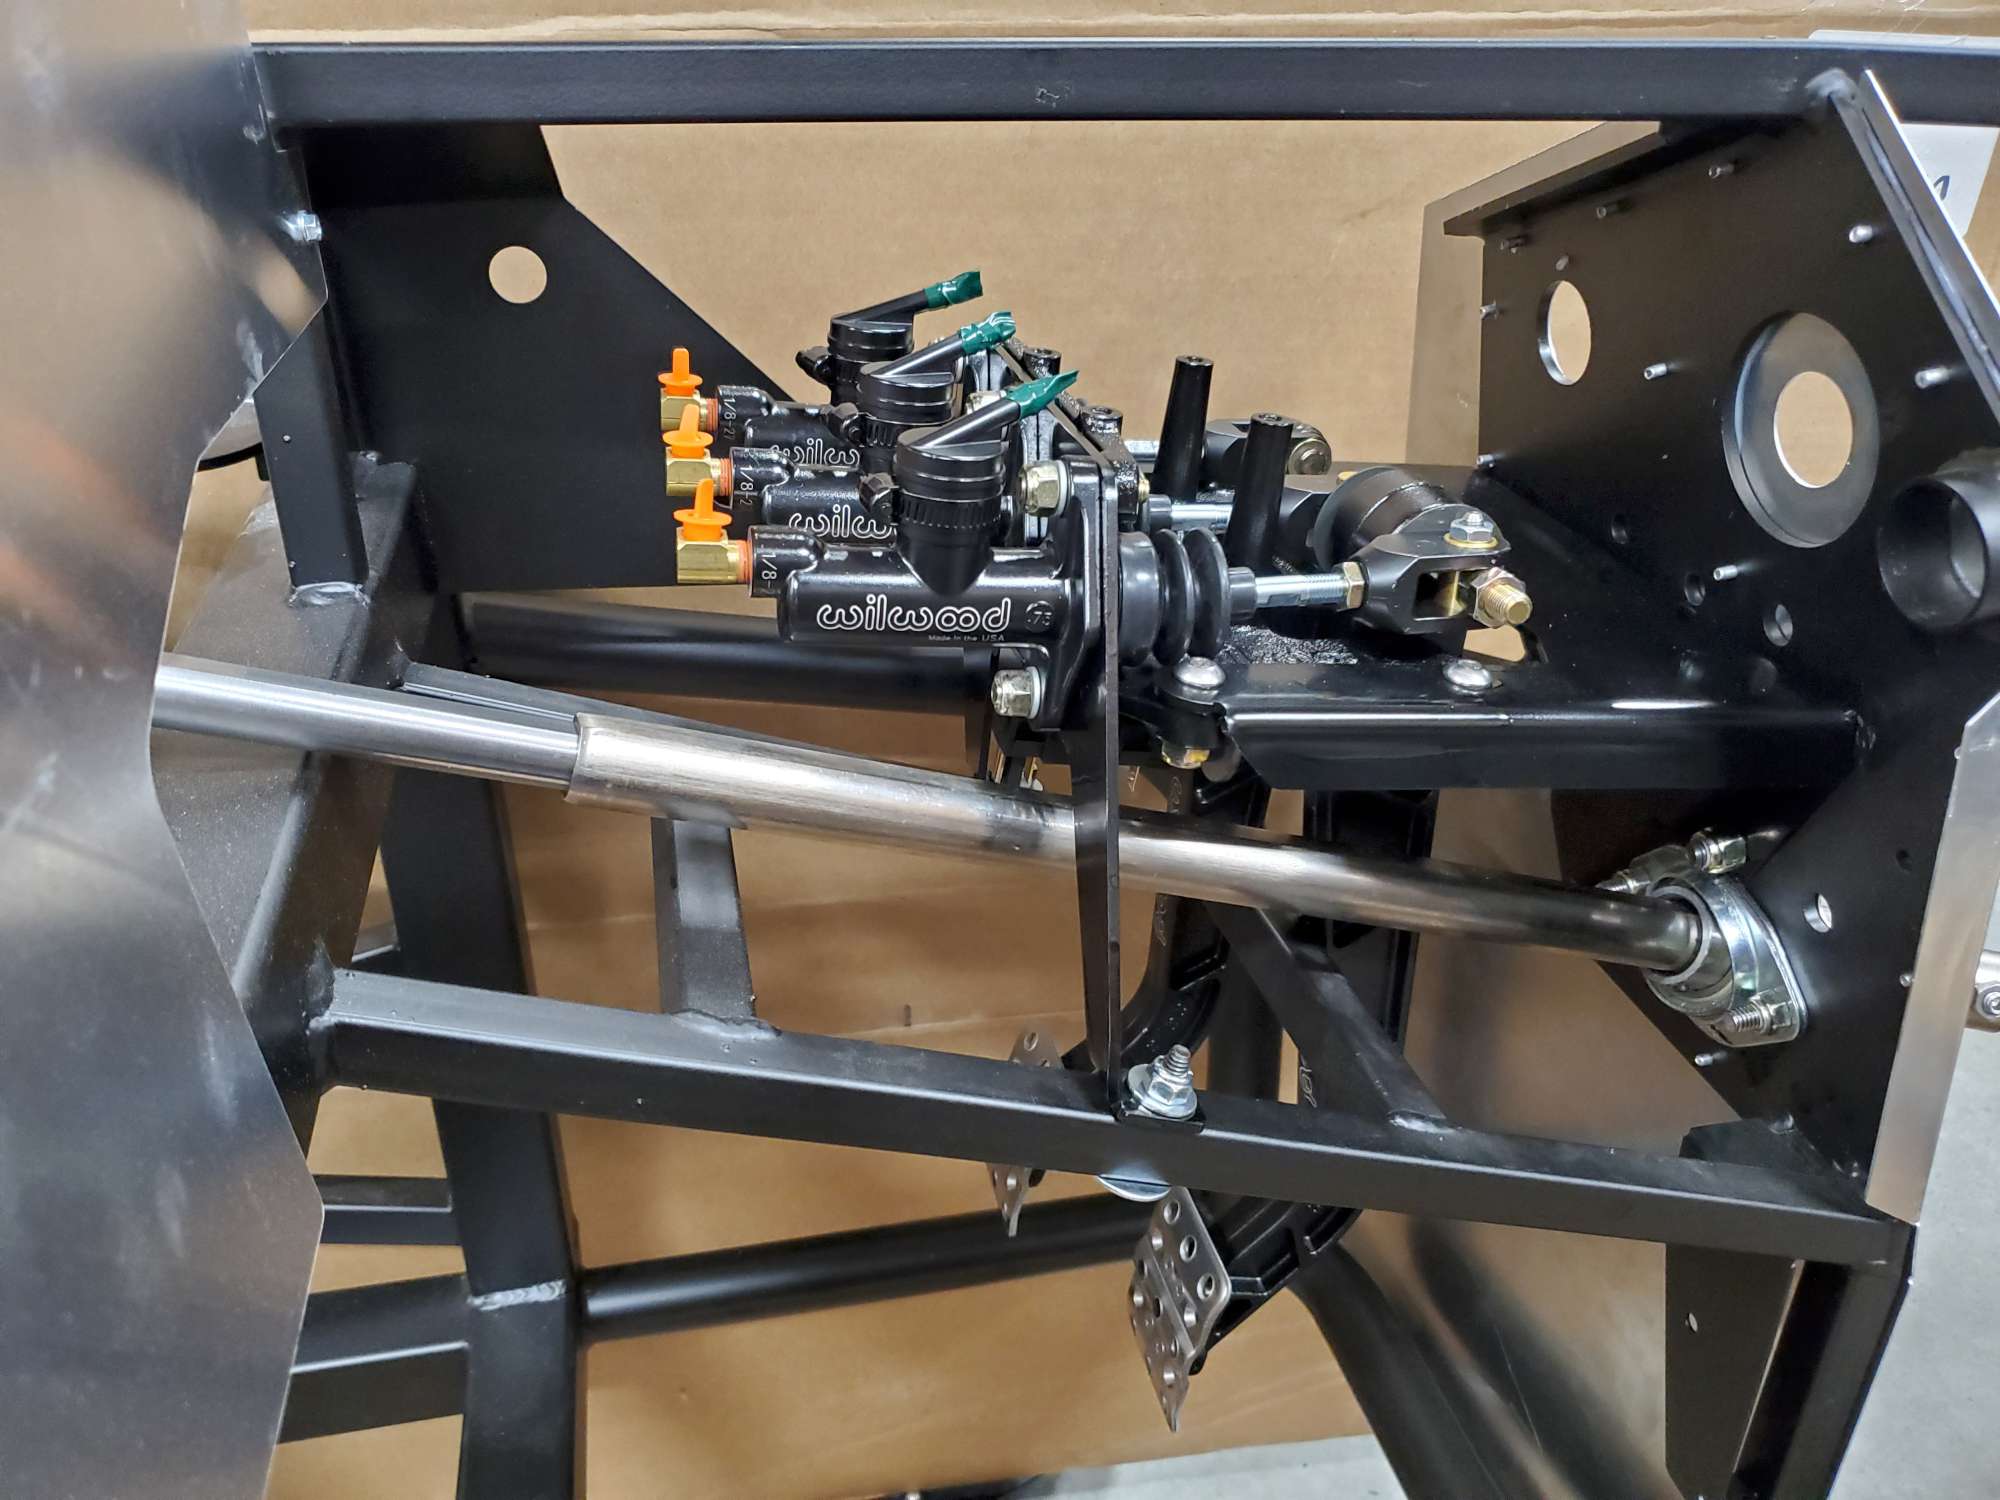
Rear Sway Bar Installation Issue Corrected
Won a minor battle today with my rear sway bar. During initial installation, I couldn't get the heim joints to install on the outside of the sway bar on both sides. I could get one side, but not the other. It turns out I didn't have the sway bar as centered as I should have. I missed that detail.
The fix: I loosened the bolts on the heim joints, as well as the socket head bolts on the mounting clamps. This allowed me to tap the sway bar toward the passenger side just enough to get the heim joints attached per the instructions.
Phew! It feels good to get this corrected. This demonstrates to me the value of stepping away from a particular installation step to clear my head, then come back later with a fresh perspective.
I received some good tips from the forum on how to correct (thanks again JohnK), but it turned out to simply be a case of operator error.
View of corrected sway bar showing heim joints on outside on both sides.

Close-up of DS installation now corrected.
On an even more minor note, I also riveted and applied silicone to the DS side front footbox panel--Wilwood pedal box version that's packed inside the pedal box. Baby steps! Just like Bill Murray in the movie "What About Bob?".
BTW: that metal piece the front panel attaches to is thick (3/16"). Wow! Broke a new Cobalt drill bit, and put some good wear on a second. Hopefully, not too many other panels require drilling through 3/16" thick metal.
Last edited by 460.465USMC; 12-05-2020 at 08:41 PM.
Reason: Added comment about front panel frame piece thickness.
Chris
Coupe complete kit delivered: 4/22/24.
Build Thread. Coyote. T-56. IRS w/3.55. Wilwoods. PS. HVAC. Side windows.
MK4 Complete kit.
Build Thread Index. Delivered: 10/15/2020. Legal: 7/25/23. Coyote Gen3. TKO600 (0.64 OD). IRS w/3.55. PS. Wilwoods. Sway bars. This build is dedicated to my son, Benjamin.
Build Thread.
-
Post Thanks / Like - 0 Thanks, 3 Likes
-
Senior Member
Drivetrain is Here!
Last Friday was a fun day. I picked up my drivetrain from Central Pro Transport! Of course it was snowing as the forklift loaded it on the trailer, and for the 30 minute trip home. I bought my Coyote Gen 3 crate and TKO600 from Forte. He did a good job wrapping it, so none of the slush/snow/water penetrated the shipping crate on the way home.
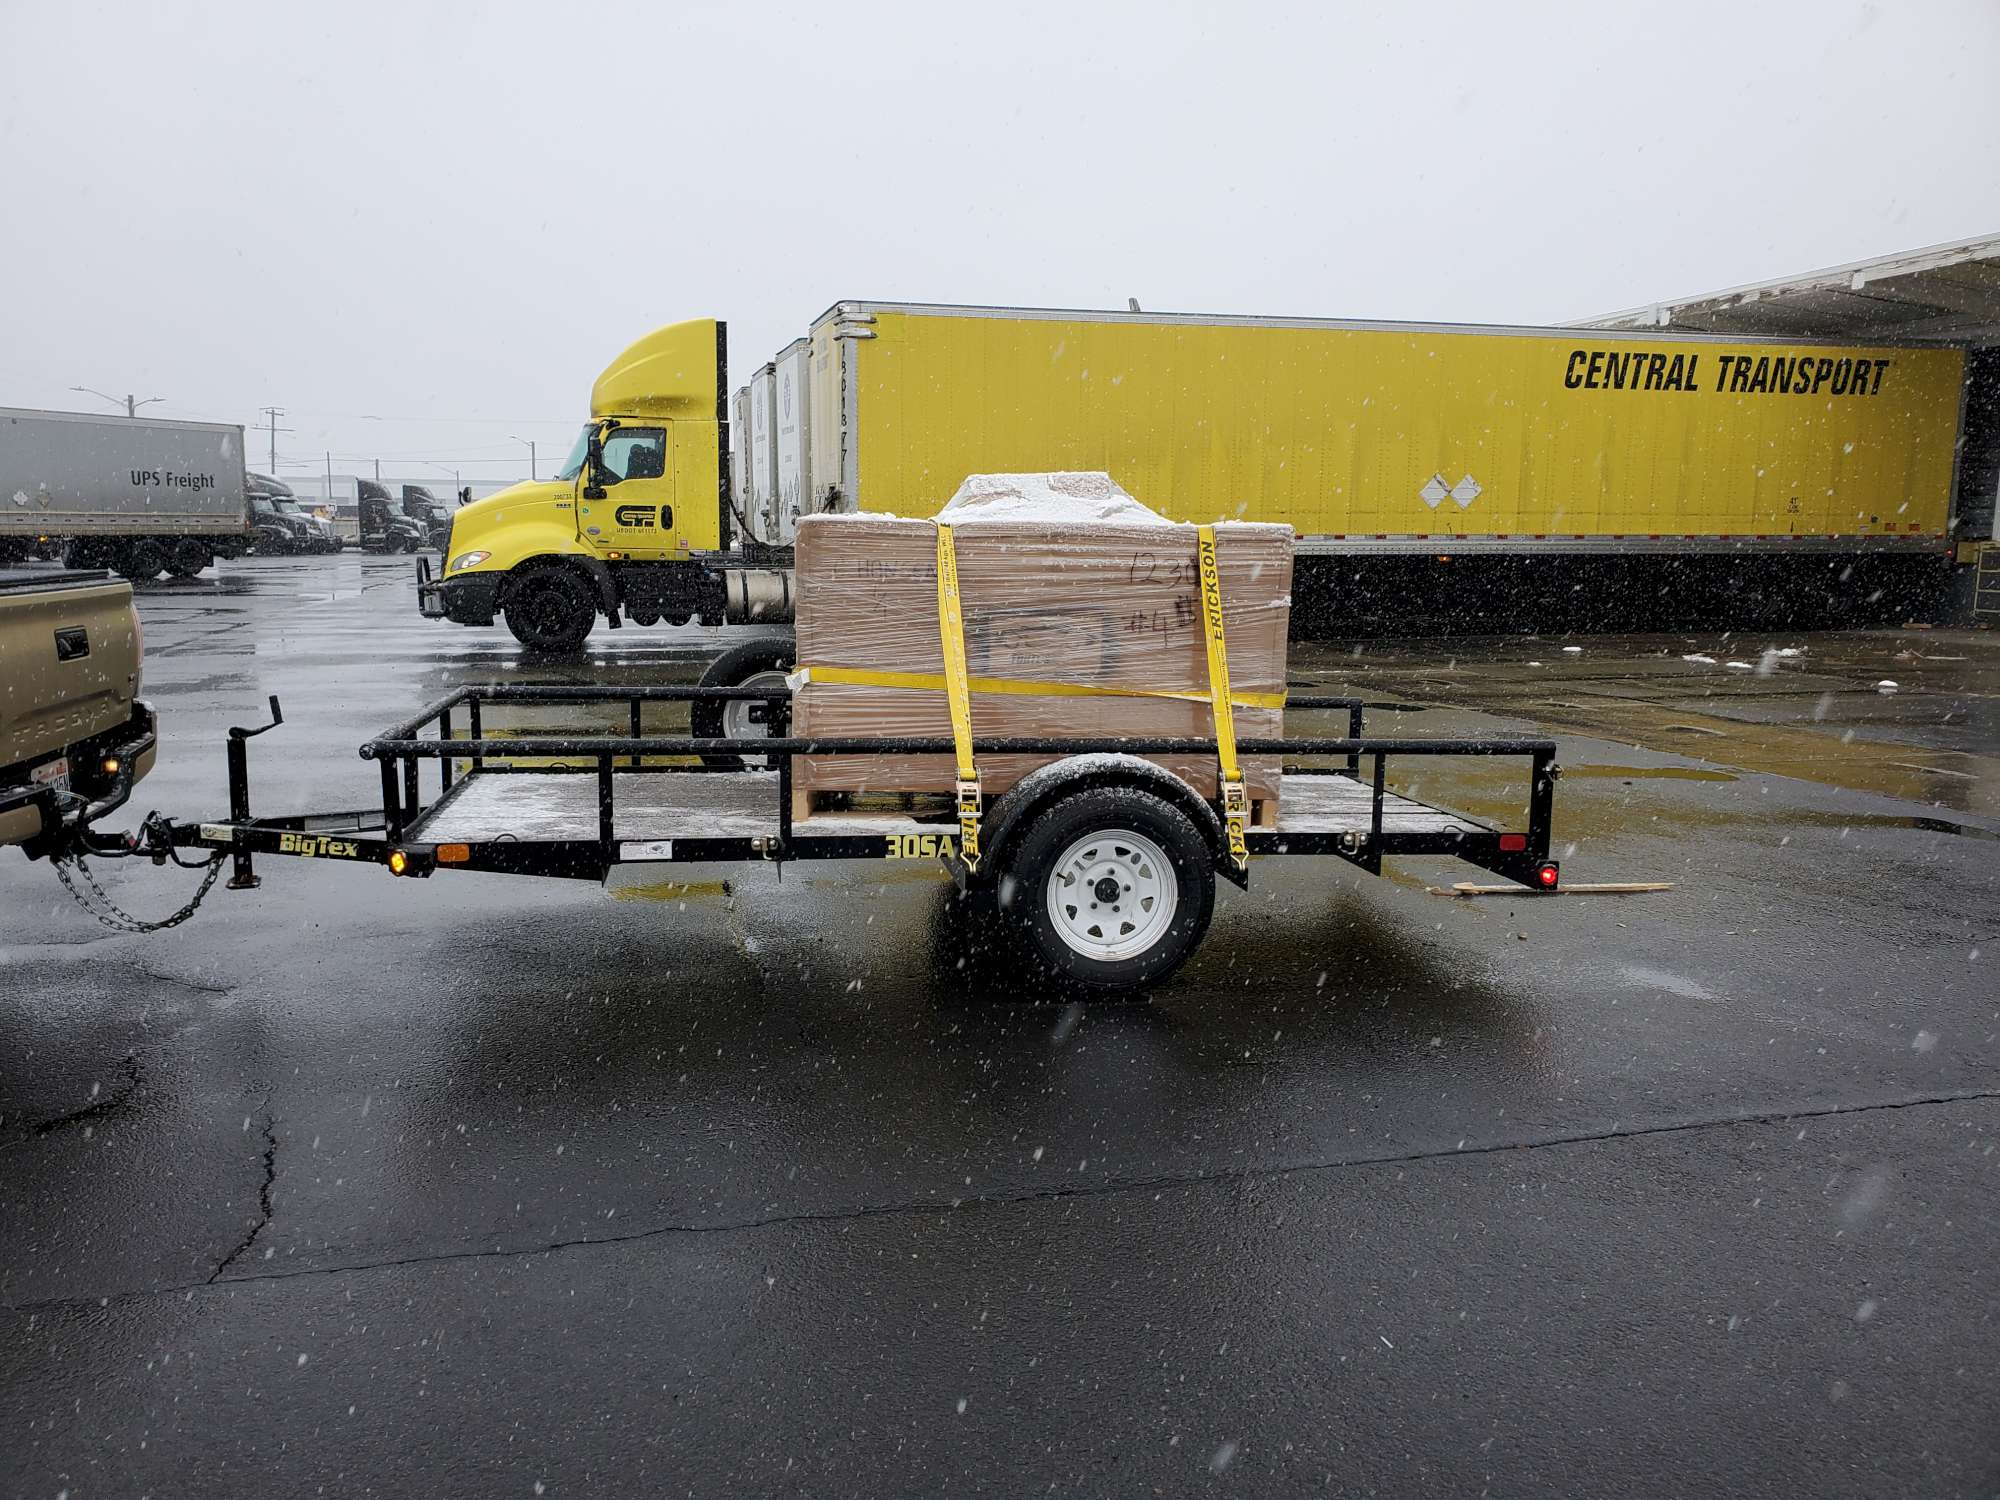
Unfortunately, a forklift tangled with the crate somewhere along the way. However, the best I can tell is the damage is limited to a nice crease in the bottom of the oil filter. Fortunately, I don't see any other damage.

It was really good to get it home safe and in the garage.

Tearing the crate apart was a job. Must have been a thousand nails/staples holding it together. Glad to have it so secure though. I used my four-post lift to hoist the drivetrain off of my trailer. I'm flying solo; it went pretty well. No damage to the drivetrain (or to me!).
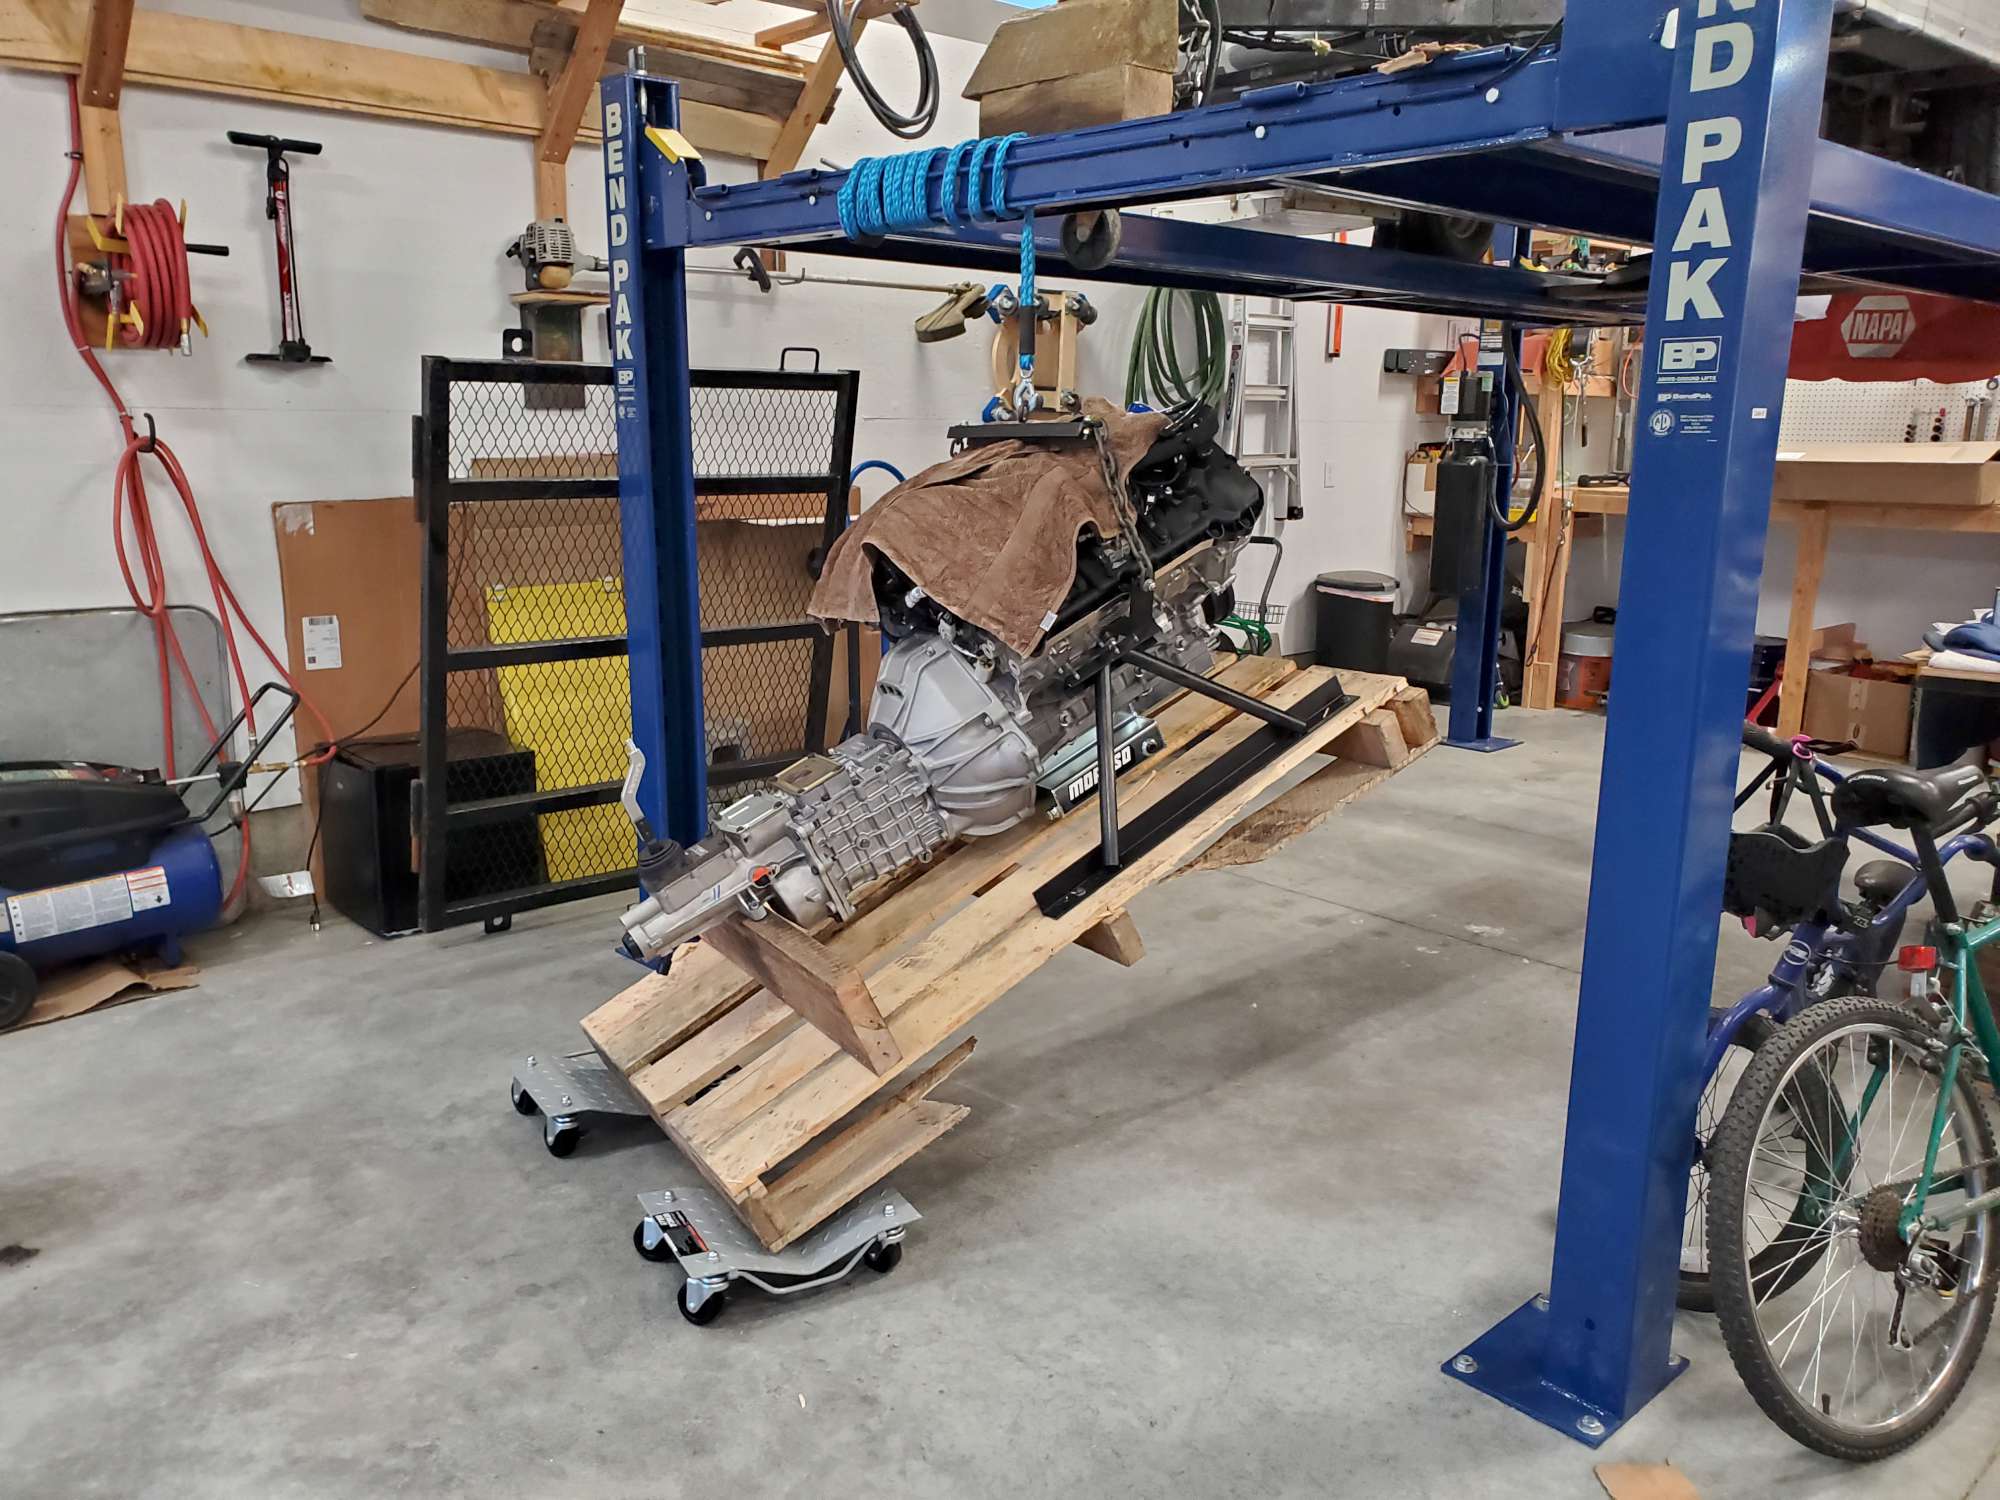
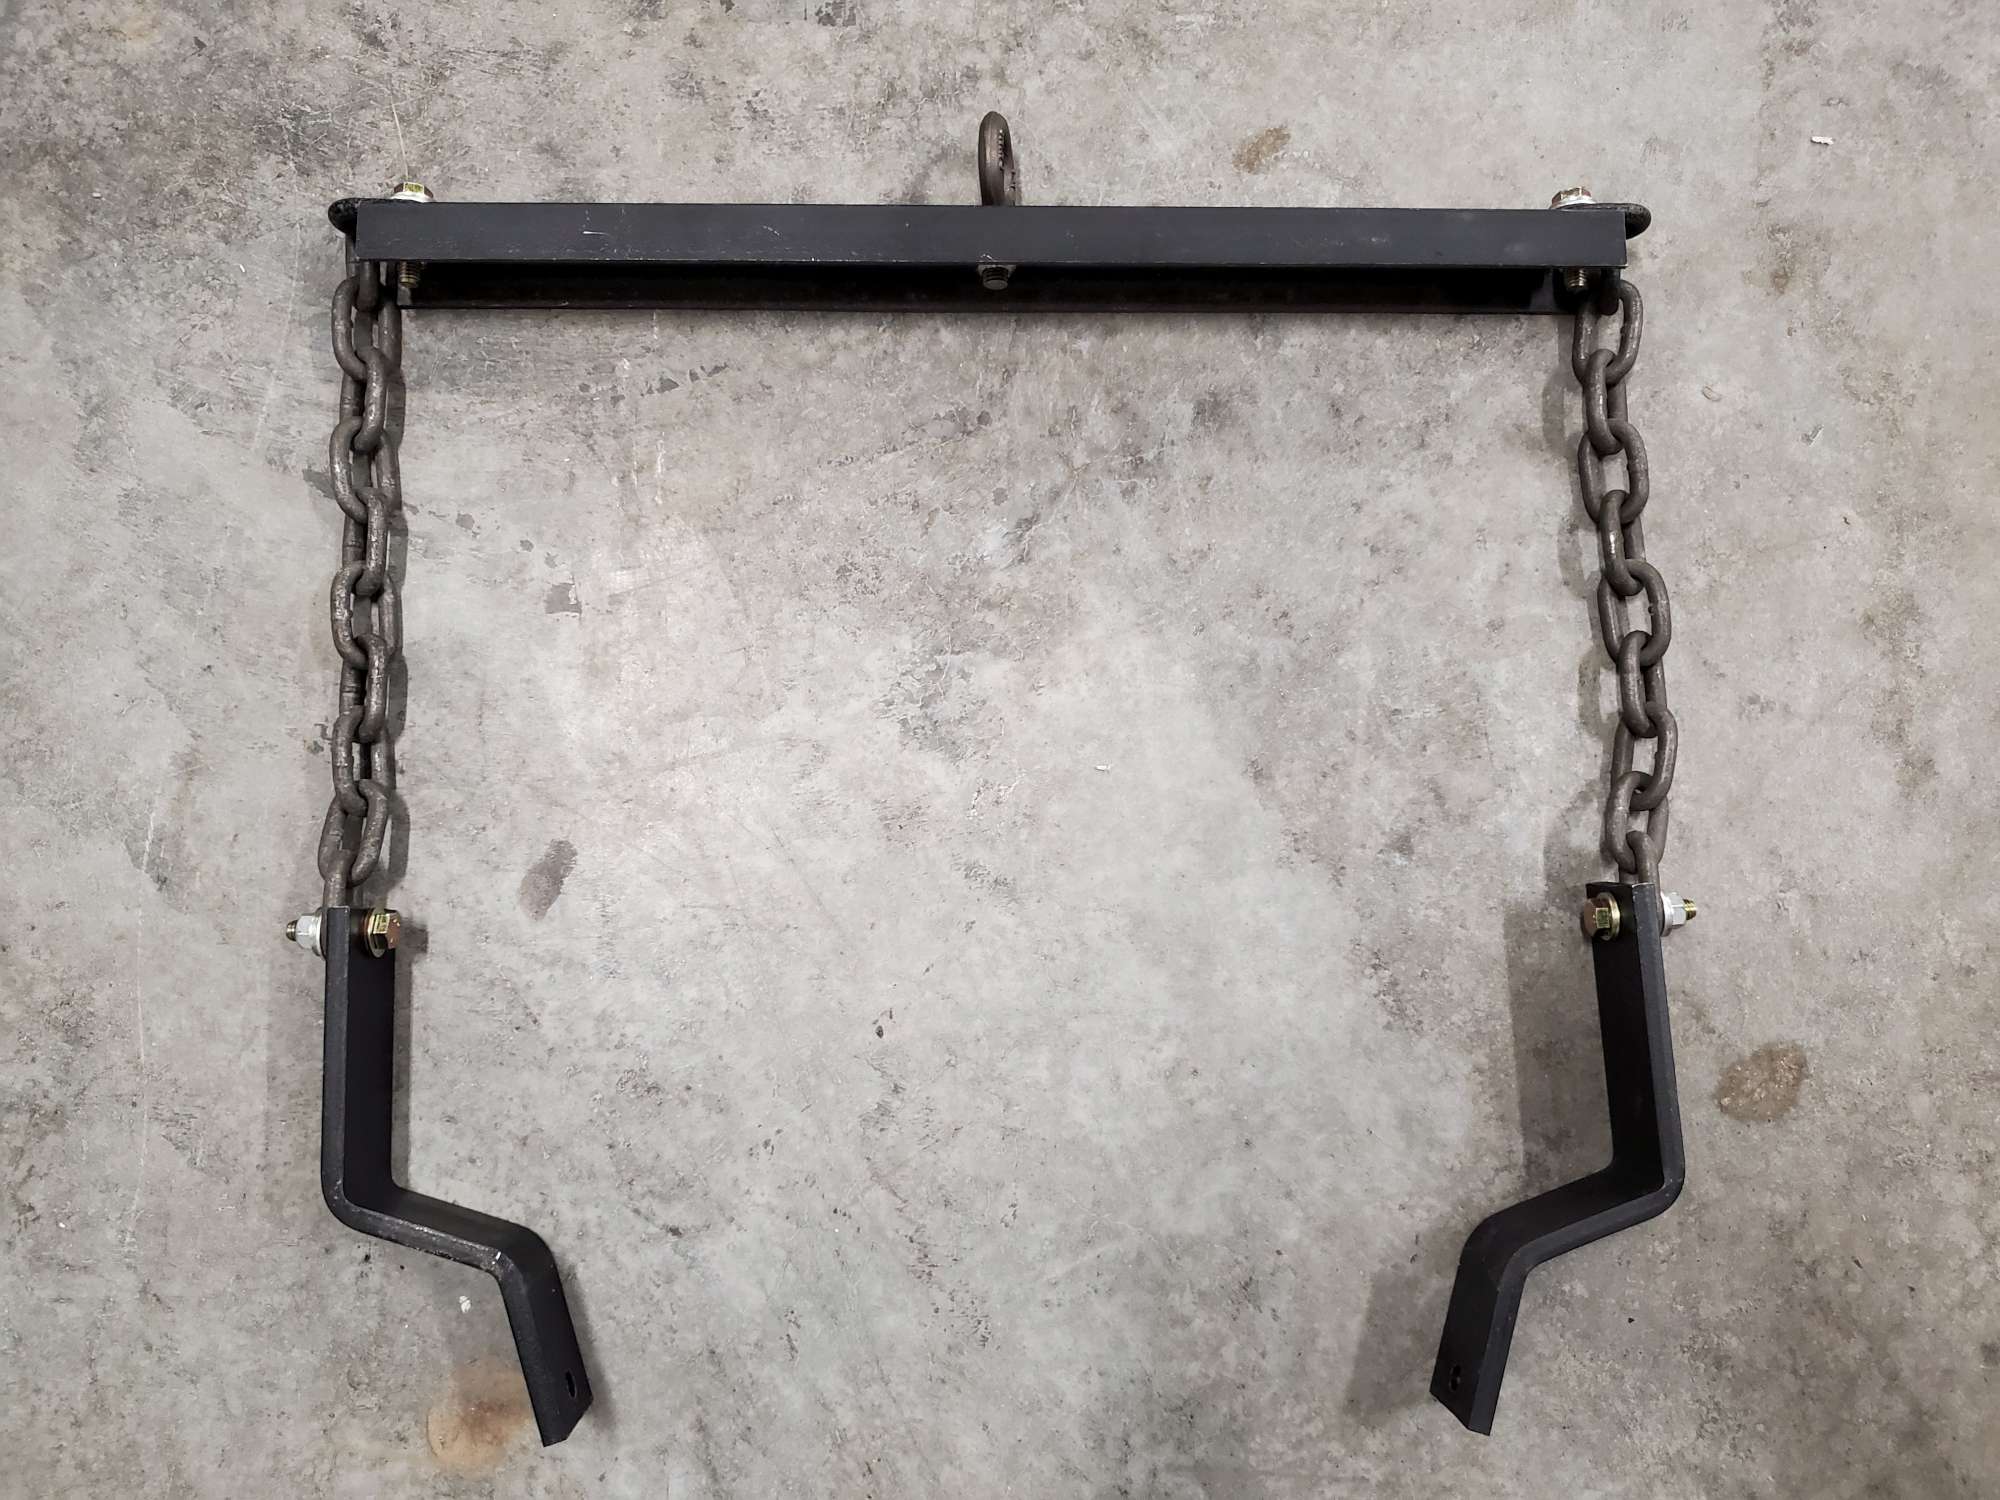
Here's the hoist attachment I used from Forte. It attaches to the bottom studs below cylinders 3 and 7. It is a bit pricey at $95, but very solid and it will get some use before I'm done. He offered to refund if I ship it back, but I think it will be nice to have something on-hand in the long run.
It's a beautiful thing! Great to see the drivetrain in its new home. I had the HF wheel dollies on-hand, and they should work well to move the drivetrain around my garage as needed. They are rated at 1,500 lbs. each.
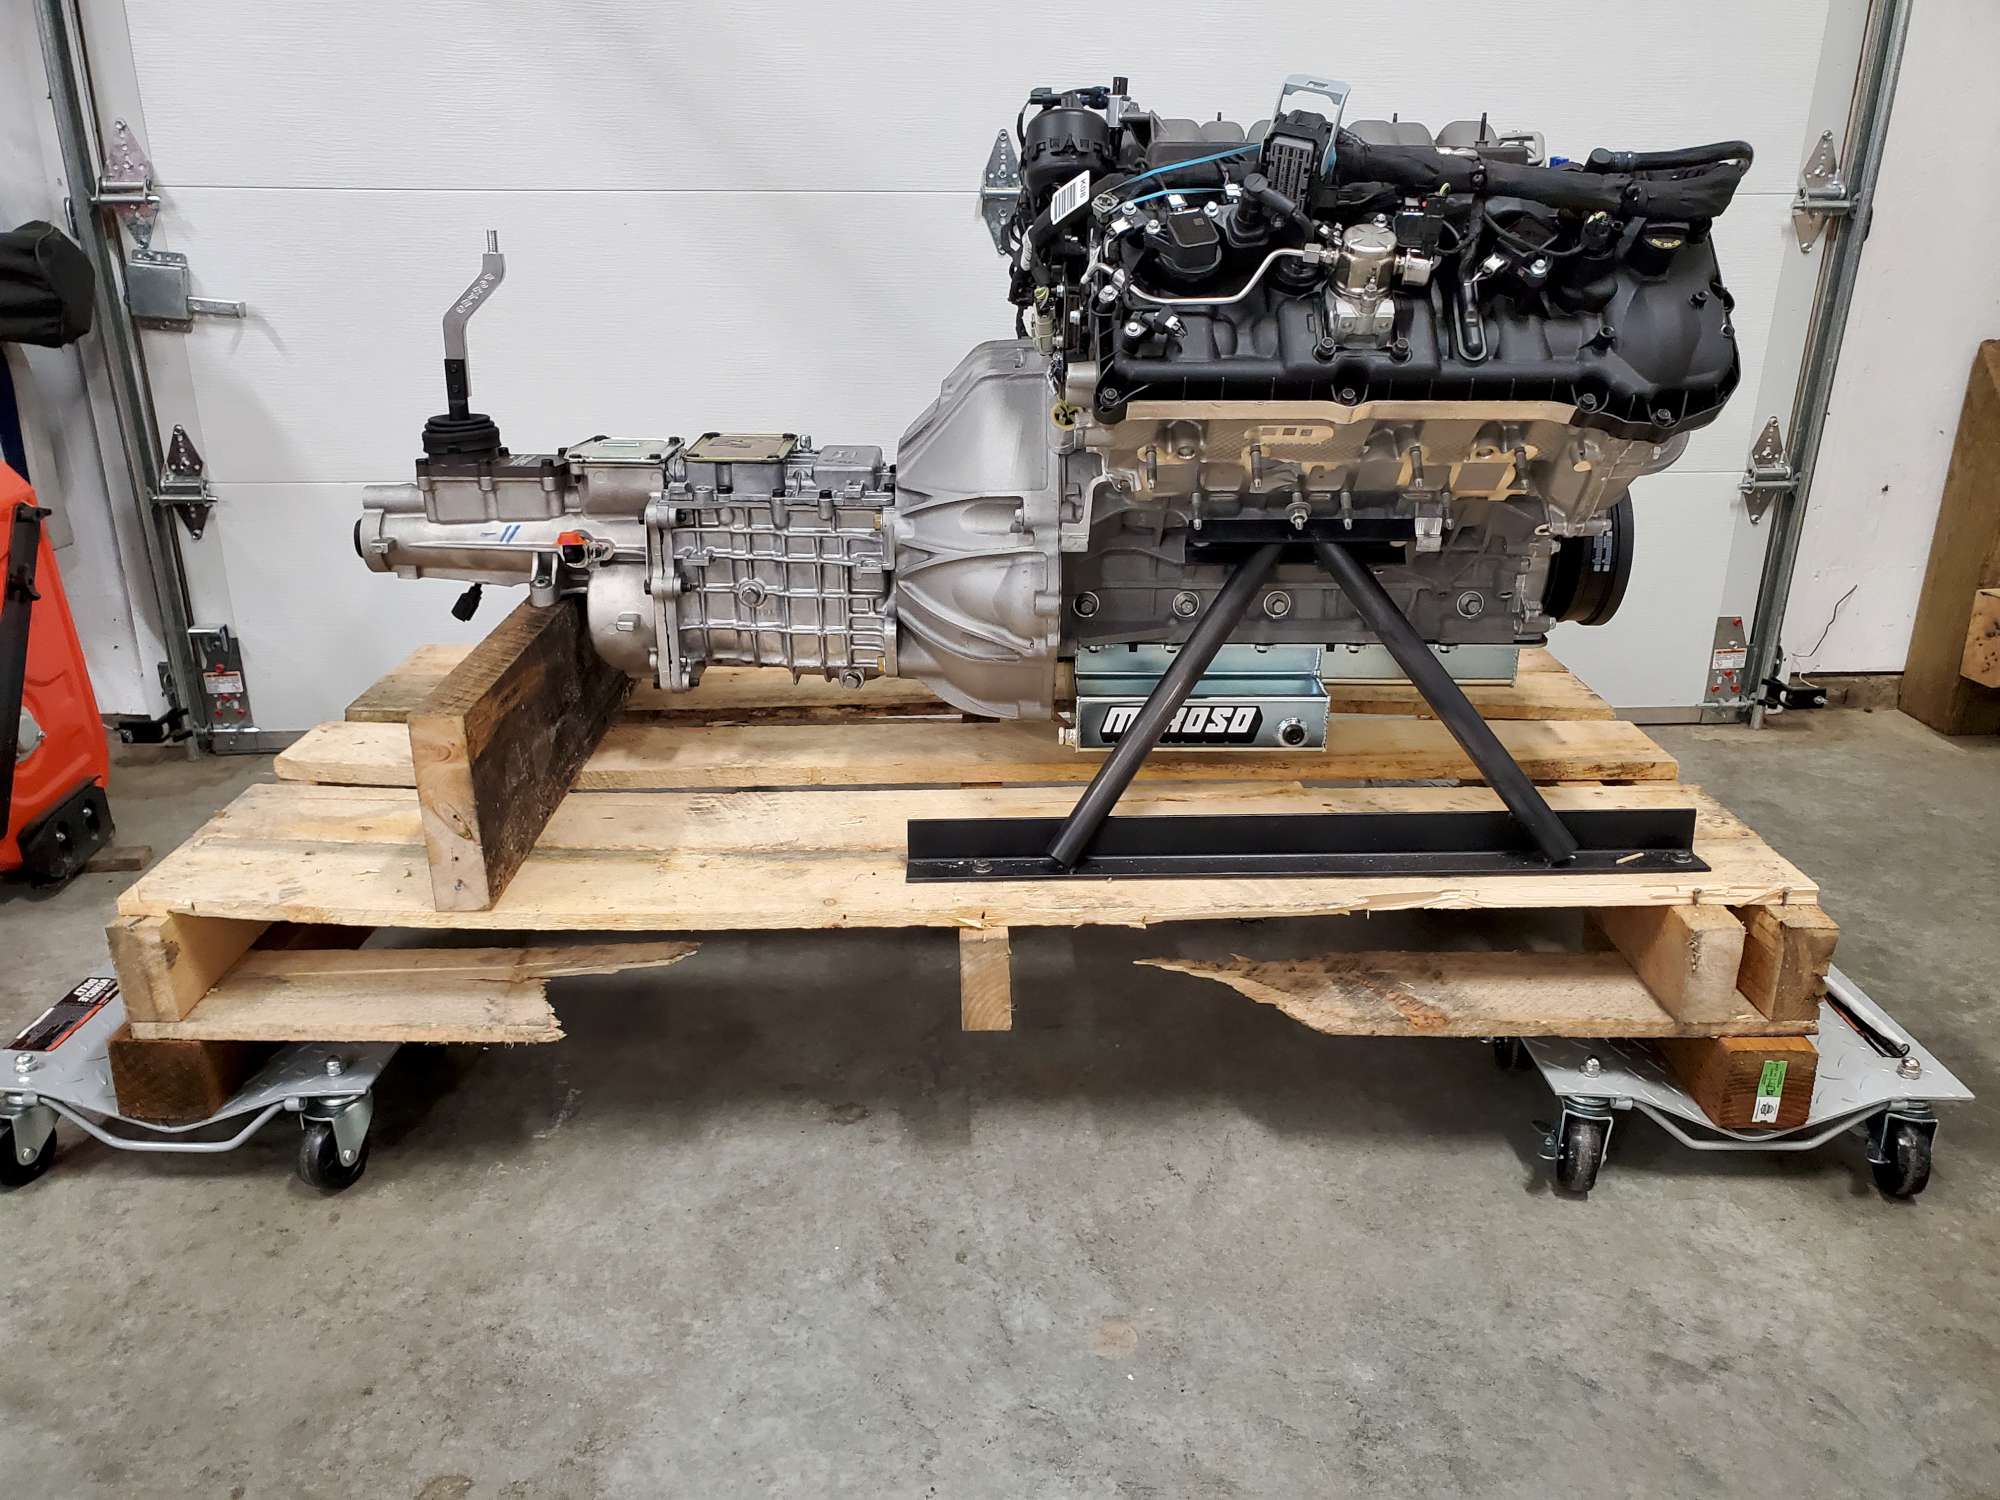
My SS may now suffer from garage inadequacy as its LT1 is a mere 455 HP, while the Gen 3 Coyote is 460 HP. The LT1 6.2L handily wins the torque side of the argument at 455 lb-ft.  Regardless, this Coyote motor is going to be way more than enough to scoot the light Roadster around, and put big smiles on my face!
The bent shifter I also purchased from Forte. I will be flipping the rear shift position cover 180 deg., which moves the shifter forward about 2.5". The bent shifter moves it forward another another 2". That will put it very close to the mid-shift position. If I want it even a little further forward, then I'll use a small bracket at the base. I got this idea from Wareaglescott's build.
Last edited by 460.465USMC; 12-20-2020 at 11:35 PM.
Chris
Coupe complete kit delivered: 4/22/24.
Build Thread. Coyote. T-56. IRS w/3.55. Wilwoods. PS. HVAC. Side windows.
MK4 Complete kit.
Build Thread Index. Delivered: 10/15/2020. Legal: 7/25/23. Coyote Gen3. TKO600 (0.64 OD). IRS w/3.55. PS. Wilwoods. Sway bars. This build is dedicated to my son, Benjamin.
Build Thread.
-
Senior Member
Drivetrain is Here! (Continued)
I also registered the TKO600 with Tremec, and they will sending me a free black resin shift knob. White resin shift knob is also available.

How much lumber does it take to crate at Gen 3/TKO600? About this much--not counting the bottom pallet.

I wasn't planning to worry much about the Gen 3 flying saucer engine cover at this early stage. It so happened Forte did not order the cover with my Gen 3 crate. I was surprised not to see it included, so I asked him where it was. He said it's an add-on, like an accessory I guess (~$125). He then mentioned he can supply the Gen 1 covers, which look much better than the stock Gen 3 cover. Sold! One thing to check off my list. I will probably have the painter add some body color along the parallel grooves. Forte sent me an example picture.

Chris
Coupe complete kit delivered: 4/22/24.
Build Thread. Coyote. T-56. IRS w/3.55. Wilwoods. PS. HVAC. Side windows.
MK4 Complete kit.
Build Thread Index. Delivered: 10/15/2020. Legal: 7/25/23. Coyote Gen3. TKO600 (0.64 OD). IRS w/3.55. PS. Wilwoods. Sway bars. This build is dedicated to my son, Benjamin.
Build Thread.
-
Post Thanks / Like - 0 Thanks, 1 Likes
-
Senior Member

Nice! That engine is some motivation to keep your build going! Congrats on the engine those Coyotes are legit.
-
Post Thanks / Like - 1 Thanks, 1 Likes
-
Senior Member

Impressive! And it looks like you have a nice set up to drop it in when the time comes. I look forward to following your progress.
MKIV Complete Kit #9822 l BluePrint 347 EFI l TKO600 l Power Steering l Heater/Defrost l
Build Thread
-
Post Thanks / Like - 0 Thanks, 1 Likes
-
Senior Member

Fun to have that power plant in house and ready to go, isn't it! For a Chevy guy, you sure made a nice choice  Nice progress you're making.
MK4 #7838: IRS 3.55 TrueTrac T5z Dart 347
The drawing is from ~7th grade, mid-1970s
Meandering, leisurely build thread is
here
-
Post Thanks / Like - 1 Thanks, 1 Likes
-
Congrats on getting the power plant in! That's going to be a fun ride!
Mark IV Complete kit delivered 7/7/20
Blueprint 427 ordered 11/23/20
-
Post Thanks / Like - 0 Thanks, 1 Likes
-
Senior Member
Pedal Box Question (Stupid Attack?!?!)
Maybe this is a sign I should close down the garage for the evening?
I'm installing the pedal box, and can't figure out what I'm doing wrong. The rear pedal box bracket is too high. The mounting tabs of the rear bracket are resting on the 3/4" as they should so I can mark the spots to drill. As best I can tell, I have the forward bracket mounted correctly to the Wilwood pedal assembly, and to the front of the footbox--the holes only line up one way. The Wilwood assembly came partially assembled: I haven't changed it--I'm assuming it's correct.
Am I having a stupid attack here, or do I need to mount the Wilwood pedal assembly on the top side of the forward bracket? This would raise the pedal assembly 16 MM, the exact amount the rear bracket sits above. However, the F5 instructions clearly say the forward bracket is mounted to the bottom side of the pedal assembly.
Does anyone have some wisdom for me? (Yes, I know you can't fix stupid!  ).
).


Chris
Coupe complete kit delivered: 4/22/24.
Build Thread. Coyote. T-56. IRS w/3.55. Wilwoods. PS. HVAC. Side windows.
MK4 Complete kit.
Build Thread Index. Delivered: 10/15/2020. Legal: 7/25/23. Coyote Gen3. TKO600 (0.64 OD). IRS w/3.55. PS. Wilwoods. Sway bars. This build is dedicated to my son, Benjamin.
Build Thread.
-
Senior Member
Chris, are you saying the bracket will not align with studs because it is hitting on something not allowing you to drill the mounting hole in the lower channel? A little hard to tell in the pics... It looks like you have the forward section mounted properly.
This is how I mounted mine, so hopefully this will give you some reference...

-
Chris, I think you're on the right track and closer than you think. The pedal assembly looks like it's correctly mounted to the forward bracket, and the forward bracket looks correctly mounted to the firewall. I think the rear bracket looks high because the 3/4" tubes slope down as they go forward, so as that rear bracket moves forward to meet the pedal assembly it should drop into the right position. Here's what mine looks like, in case it helps.

MkIV Roadster build: Gen 2 Coyote, IRS, TKO600. Ordered 10/24/18. Delivered 1/29/19. Engine installed 8/8/21. First start 9/12/21. First go-kart 9/17/21. Off to paint 4/11/22. Back from paint 12/30/22.
Build thread here.
-
Senior Member

Originally Posted by
JohnK
Chris, I think you're on the right track and closer than you think. The pedal assembly looks like it's correctly mounted to the forward bracket, and the forward bracket looks correctly mounted to the firewall. I think the rear bracket looks high because the 3/4" tubes slope down as they go forward, so as that rear bracket moves forward to meet the pedal assembly it should drop into the right position. Here's what mine looks like, in case it helps.
what he said ^^^.
try removing the front bracket from the footbox wall, attaching the rear bracket to the pedal box assembly, and then sliding the entire unit into place.
-
Senior Member
Pedal Box Rear Bracket - Issue Resolved
Originally Posted by
Fman
Chris, are you saying the bracket will not align with studs because it is hitting on something not allowing you to drill the mounting hole in the lower channel? A little hard to tell in the pics... It looks like you have the forward section mounted properly.
Travis, thanks for the reference picture. Very helpful!
Originally Posted by
JohnK
Chris, I think you're on the right track and closer than you think. The pedal assembly looks like it's correctly mounted to the forward bracket, and the forward bracket looks correctly mounted to the firewall. I think the rear bracket looks high because the 3/4" tubes slope down as they go forward, so as that rear bracket moves forward to meet the pedal assembly it should drop into the right position. Here's what mine looks like, in case it helps.
Bingo, John! I just couldn't "see" it last night. I had to loosen the forward mounting bracket, which gave enough wiggle to slide the rear bracket into position. Sure enough, with them together the rear bracket mounting tabs slid right into position, resting on the 3/4" tube so I could mark for drilling. Thanks so much!
Originally Posted by
egchewy79
what he said ^^^.
try removing the front bracket from the footbox wall, attaching the rear bracket to the pedal box assembly, and then sliding the entire unit into place.
Hi Egchewy79, thanks for chiming in. Between you and John I was able to get the rear bracket on and drilled. Onward!
In hindsight I think the F5 instructions were basically telling me to do the above. Taking a break and getting the forum's knowledge was just the thing I needed to move forward. Thanks again, Gents!

Chris
Coupe complete kit delivered: 4/22/24.
Build Thread. Coyote. T-56. IRS w/3.55. Wilwoods. PS. HVAC. Side windows.
MK4 Complete kit.
Build Thread Index. Delivered: 10/15/2020. Legal: 7/25/23. Coyote Gen3. TKO600 (0.64 OD). IRS w/3.55. PS. Wilwoods. Sway bars. This build is dedicated to my son, Benjamin.
Build Thread.
-
Post Thanks / Like - 0 Thanks, 1 Likes
-
Senior Member
chris, while you're at it, you may want to consider removing the bracket and hitting it w/ some rattle can paint since it is bare metal. I neglected to do that to my ebrake handle until after i had it installed and had to spray it while attached to the bracket in the car.
-
Senior Member
Originally Posted by
egchewy79
chris, while you're at it, you may want to consider removing the bracket and hitting it w/ some rattle can paint since it is bare metal. I neglected to do that to my ebrake handle until after i had it installed and had to spray it while attached to the bracket in the car.
Good call, egchewy79. I'm in the process of setting up a little oven to try my hand at powder coating many of the bits and brackets like these. My powder gun isn't in yet, so these are getting the rattle can treatment.
Chris
Coupe complete kit delivered: 4/22/24.
Build Thread. Coyote. T-56. IRS w/3.55. Wilwoods. PS. HVAC. Side windows.
MK4 Complete kit.
Build Thread Index. Delivered: 10/15/2020. Legal: 7/25/23. Coyote Gen3. TKO600 (0.64 OD). IRS w/3.55. PS. Wilwoods. Sway bars. This build is dedicated to my son, Benjamin.
Build Thread.
-
Senior Member
Power Steering and Pedal Box
I installed the KRC power steering pump/pulley and belt. It was a straight forward and pretty easy process--even for me! Had to wiggle/maneuver the pump a bit when installing the belt. The upper weld on the pump (facing engine) didn't allow it to easily rotate into position. Not a big issue and done now.
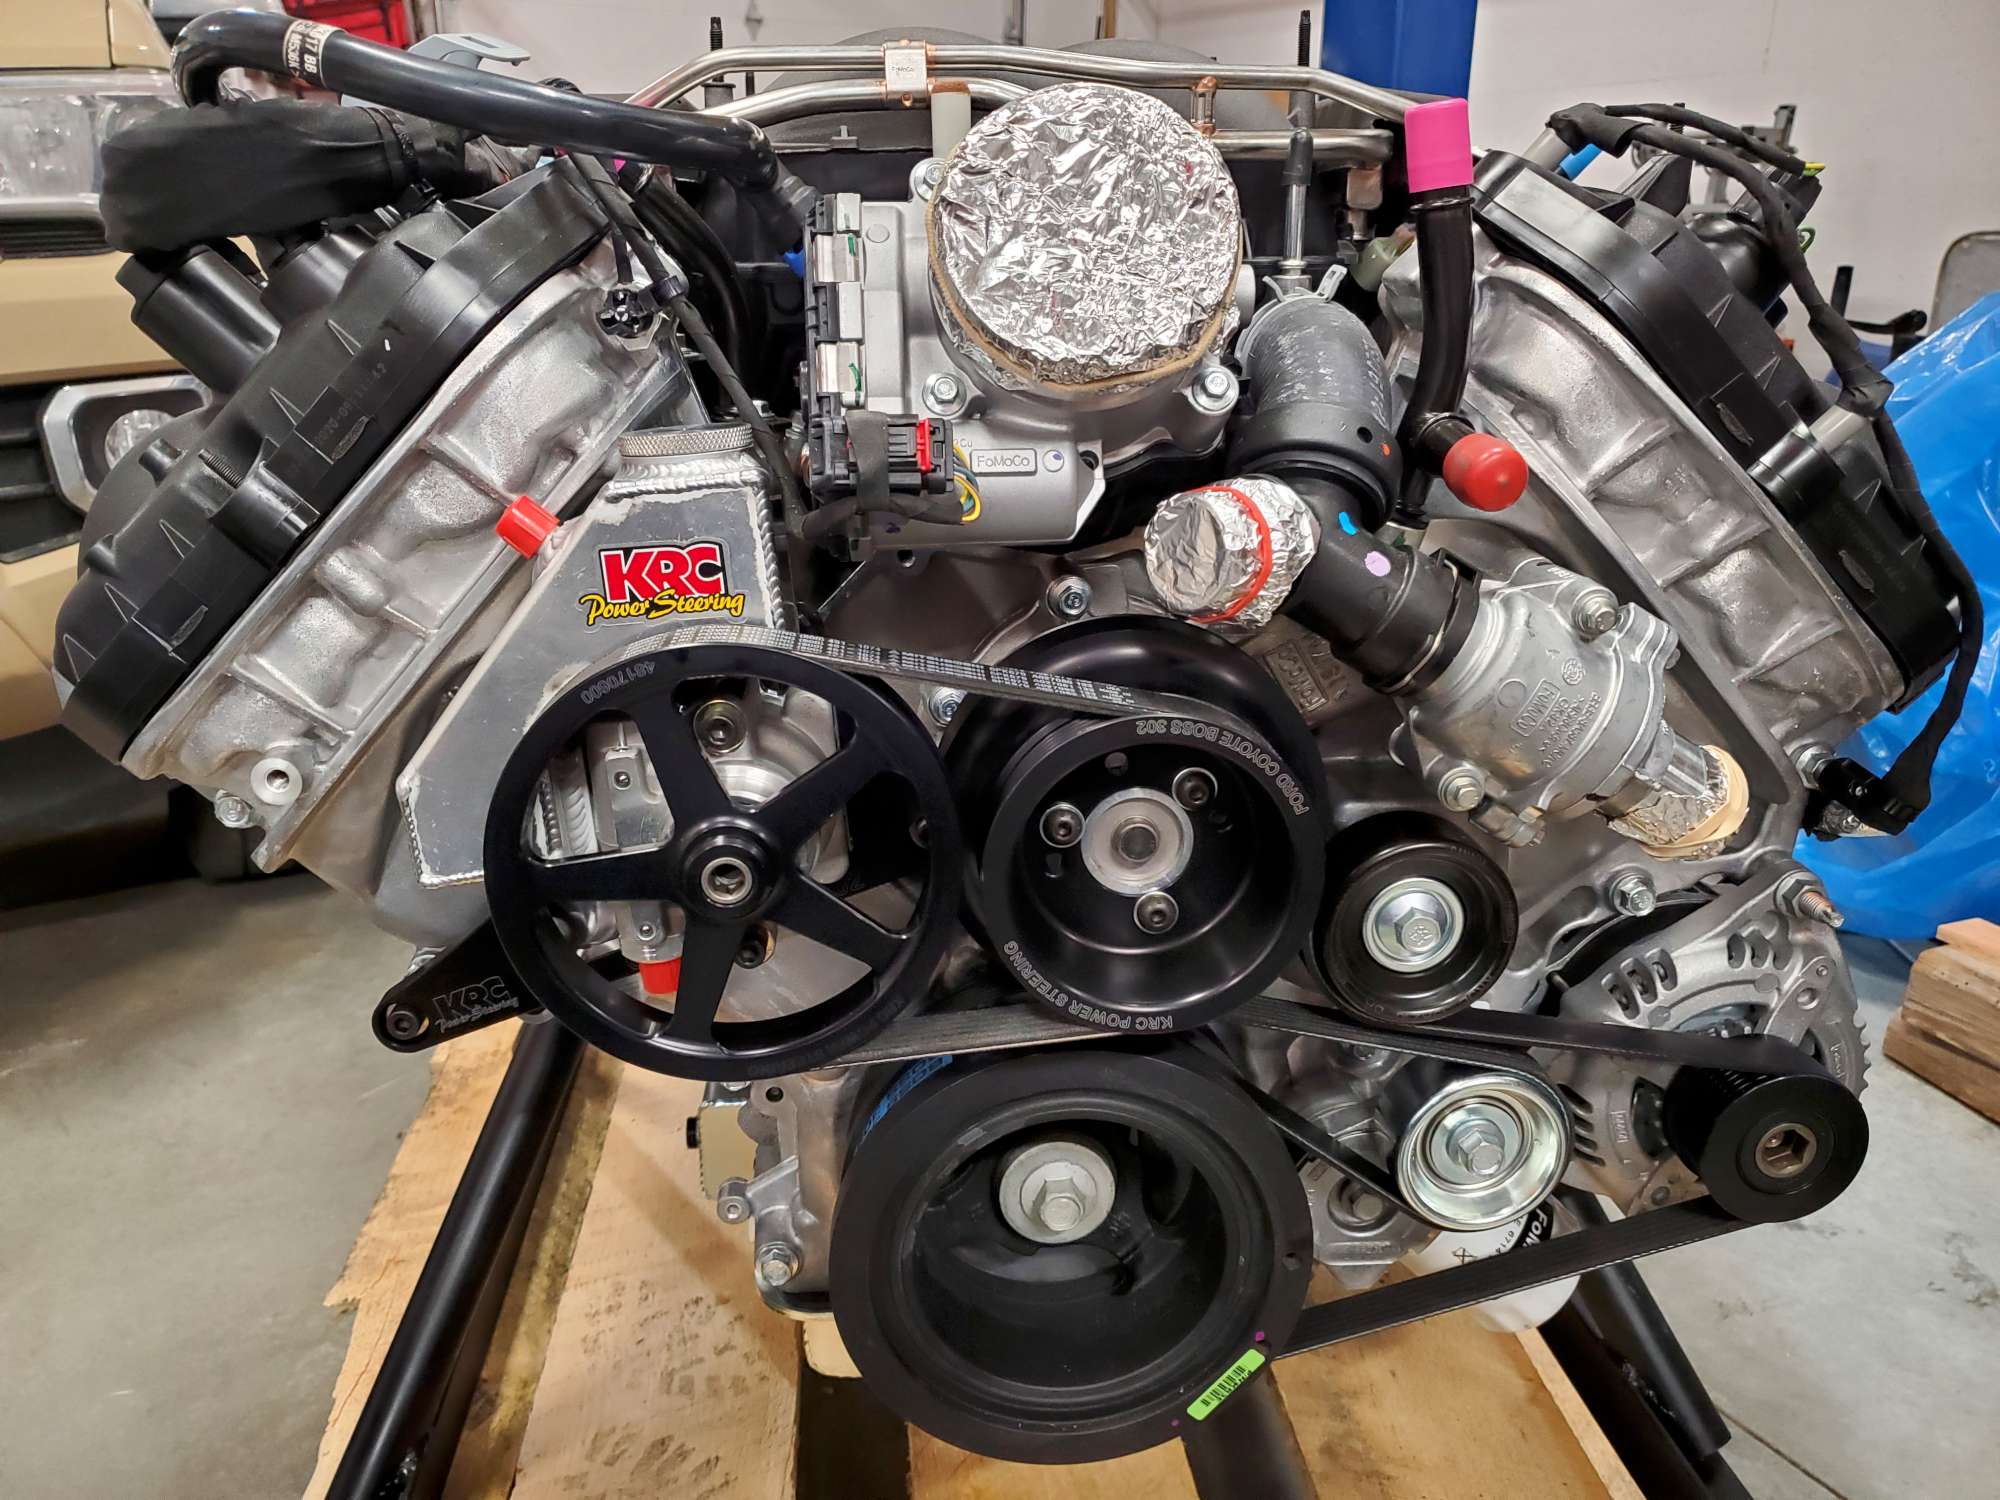
Over the years I have saved misc. doo-dads. Why? Who knows. As long as it's relatively small and seems like it could be reusable. Take for instance the various size caps I had in a hardware bin. Used eight of them to cap the various openings on the Coyote. Call it a sickness or genius (can I choose genius? ), but these will protect until I install the drivetrain. Forte used duct tape on many of these, including the eight exhaust ports. I know what happens if you leave duct tape in place too long, so I removed it and stuffed in clean paper towels (into the exhaust ports).

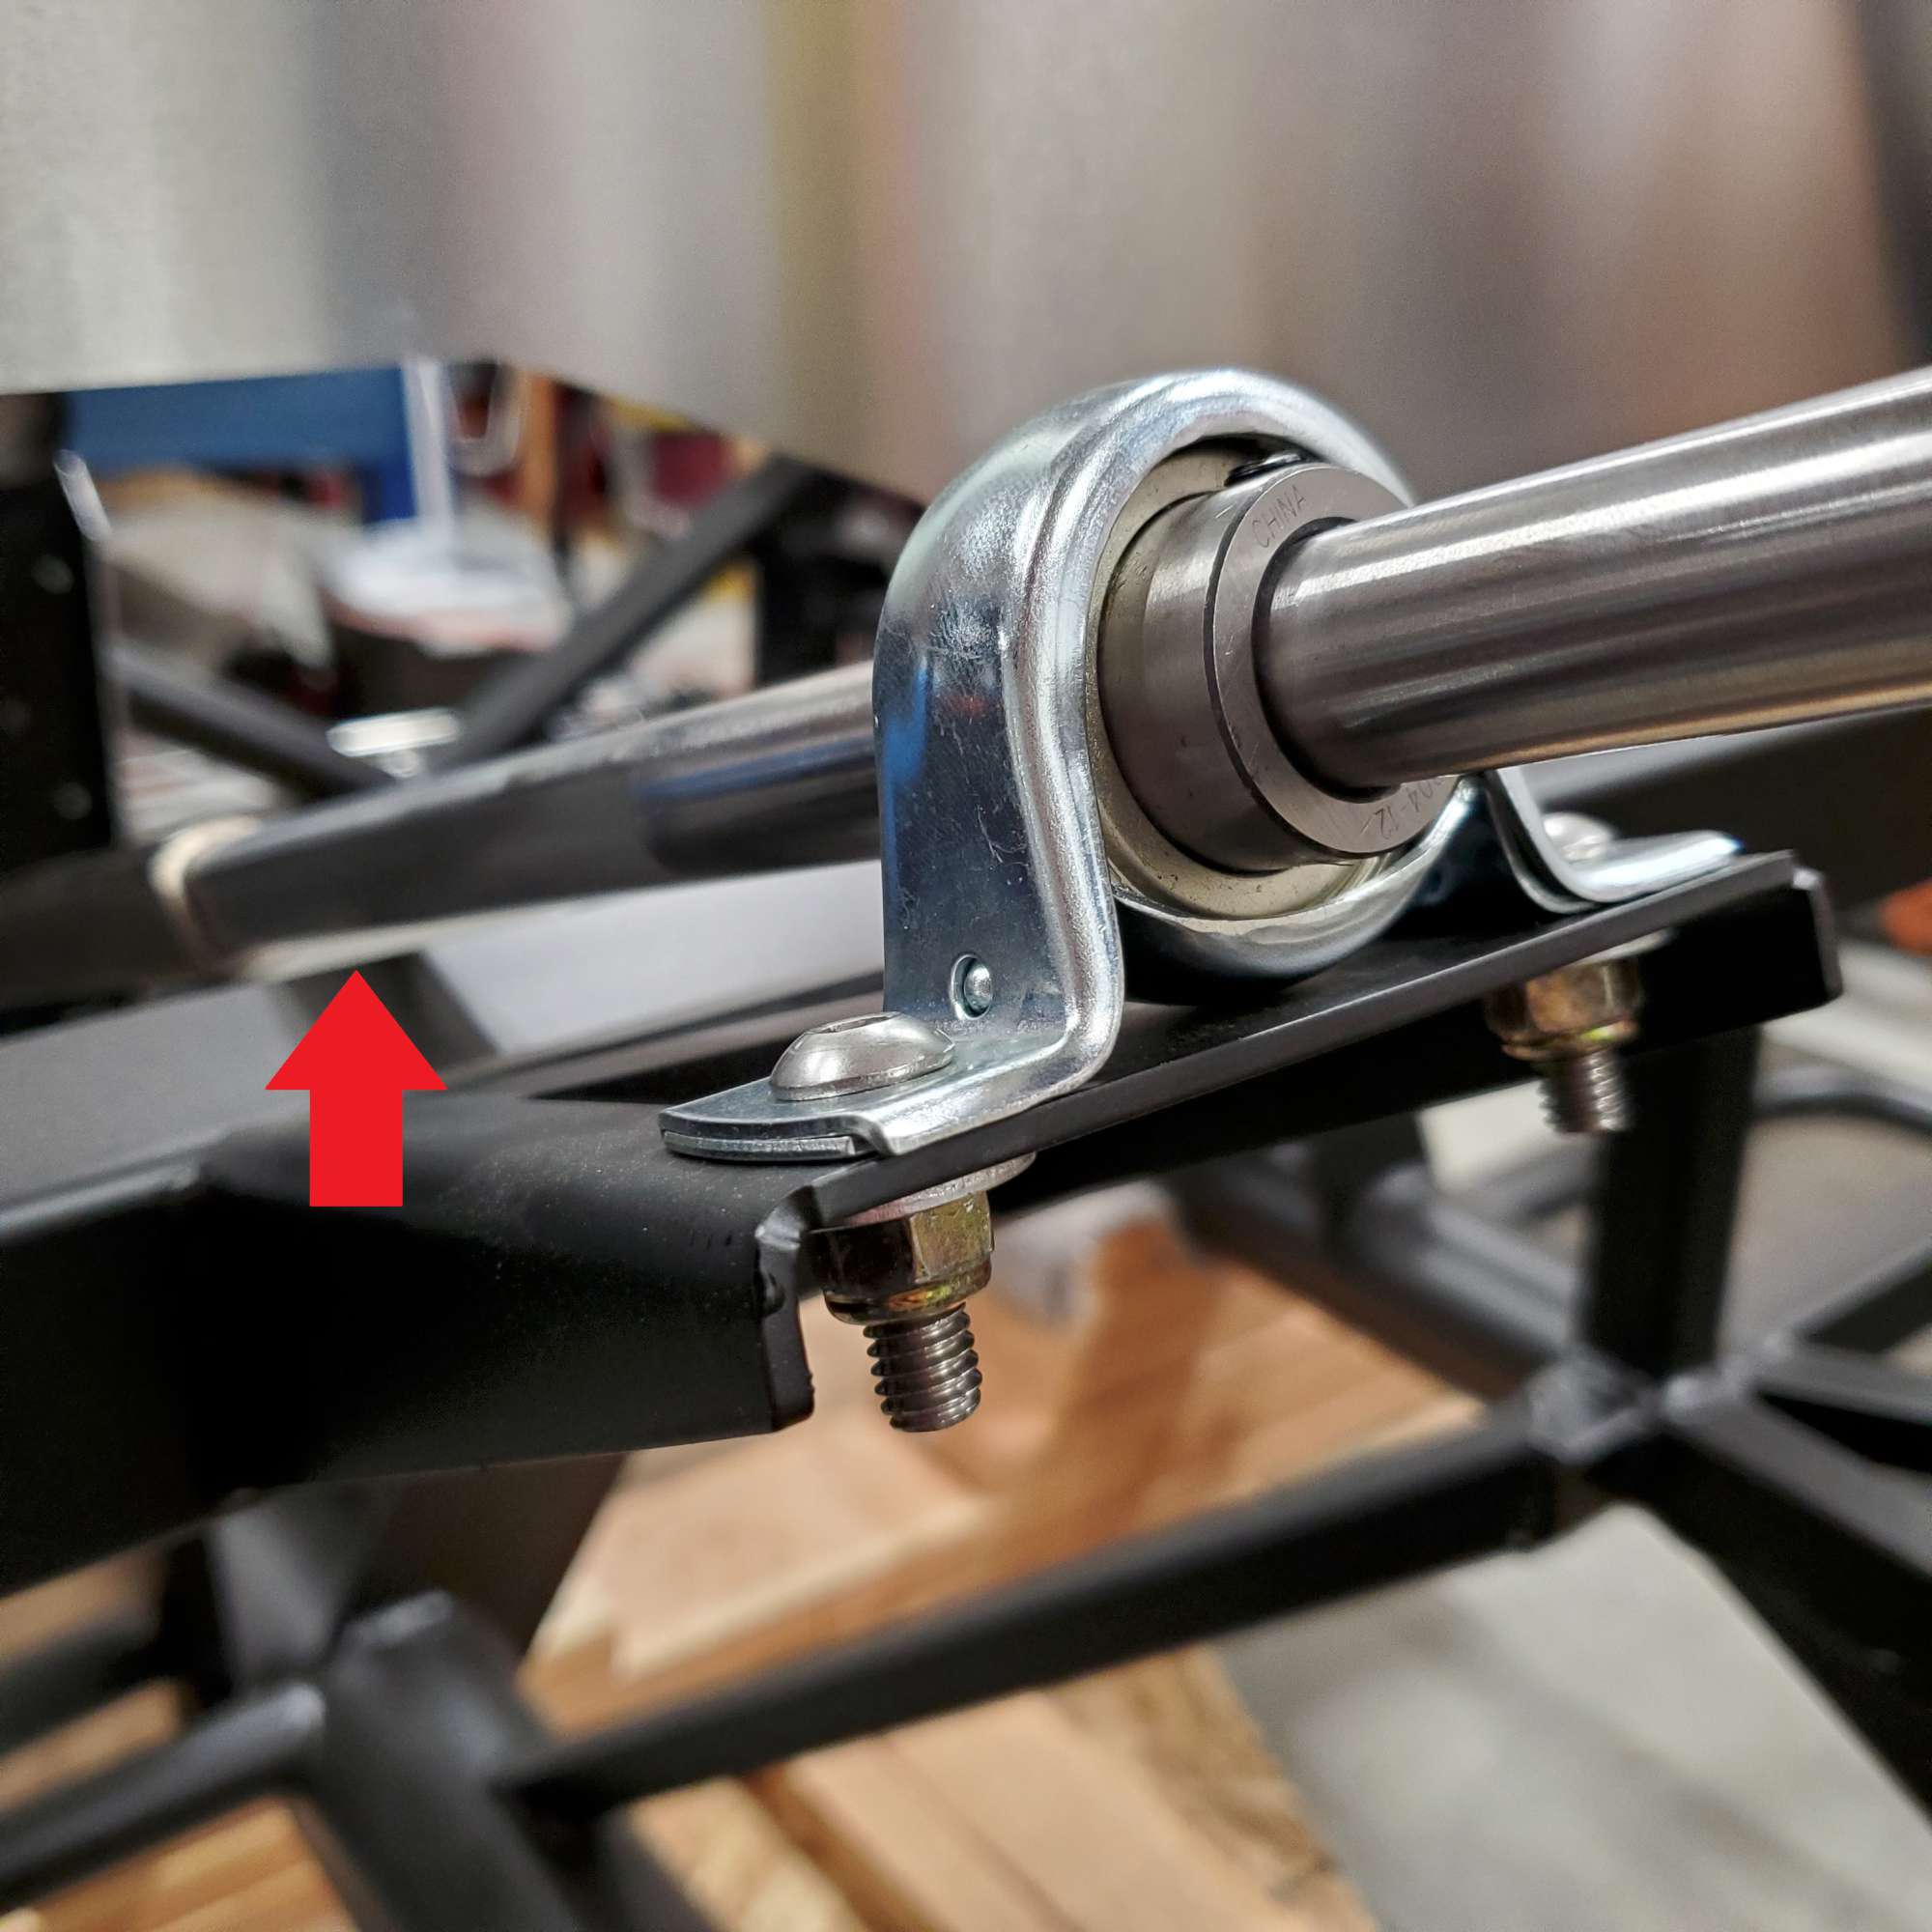
Followed the F5 instructions to assemble the lower steering shaft and knuckles.

Installed flange bearing on the inside of the footbox per recommendation of forum for adjustability. Like others who've done this, I had to shave flat the top portion of the flange bearing to provide clearance for the lower right mounting hole of the pedal box rear bracket. Bench grinder was just the ticket.
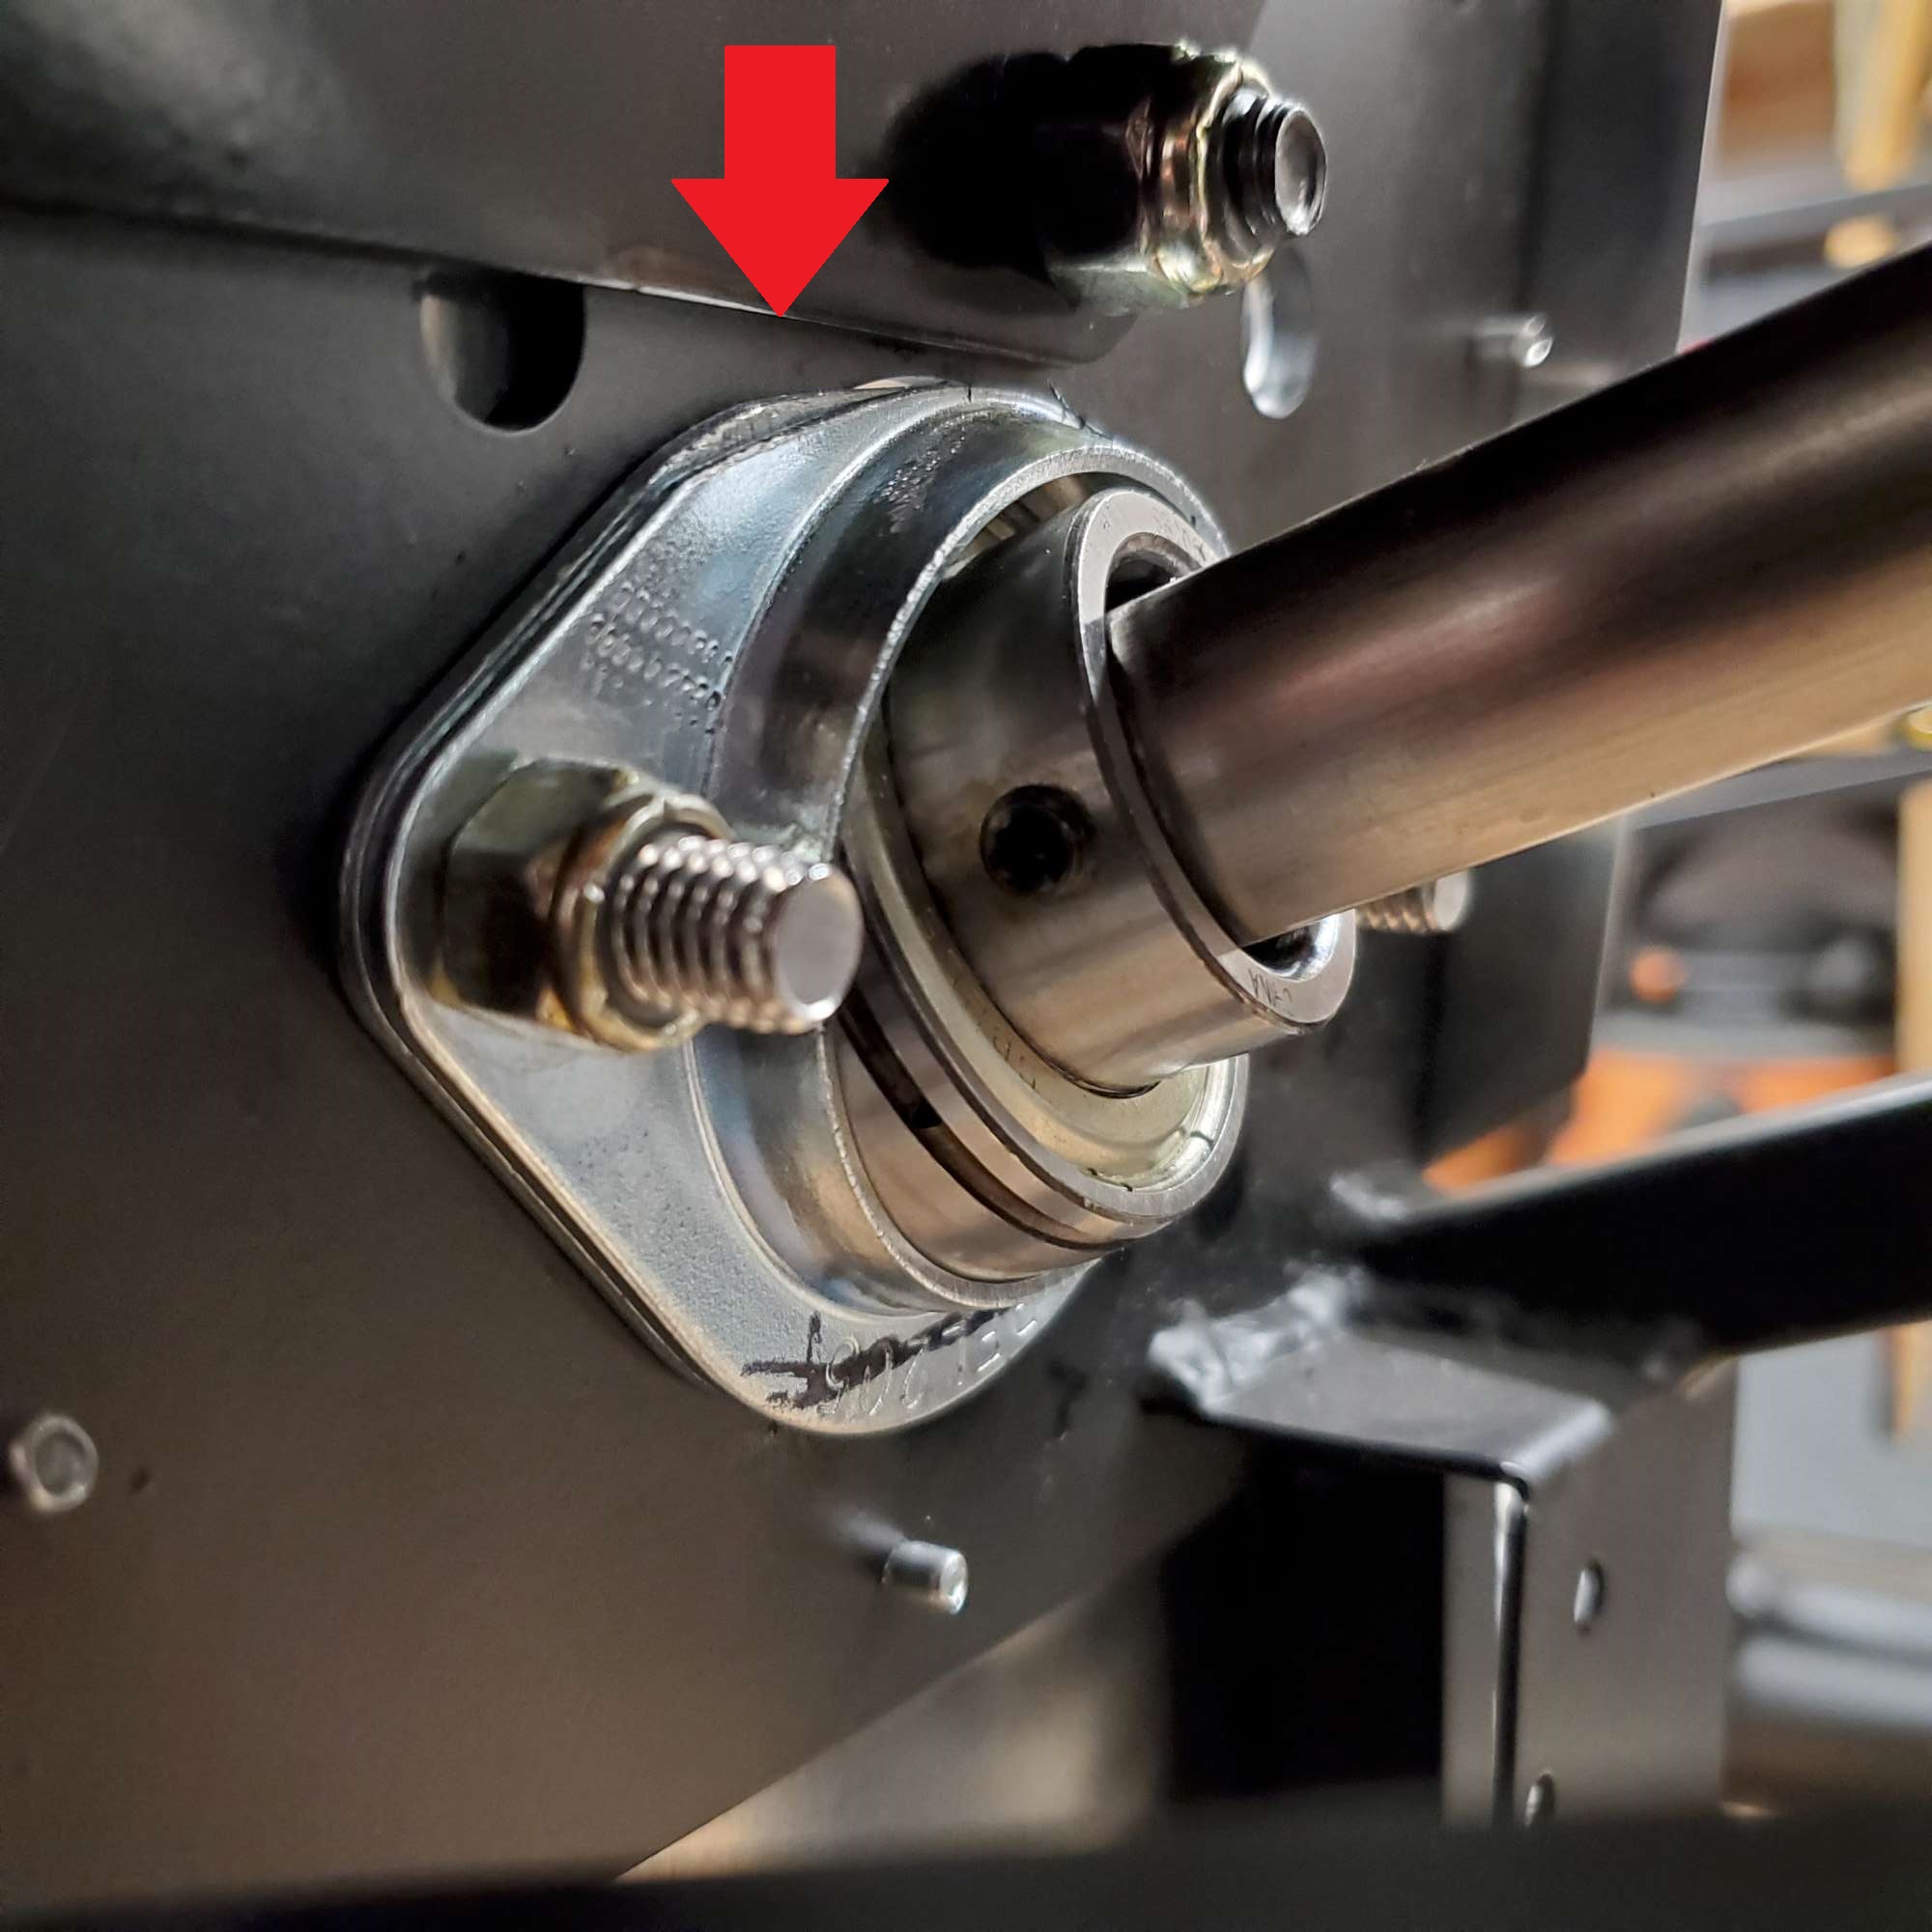
No shims required beneath the pillow block on my setup. I have about 3/16" clearance between the shaft and 2" square tube. The clearance is a bit blurry, but I think you can get the idea.
And finally, the pedal box is in for the final time (hopefully). I guessed on the amount to thread in the 90 deg. brake line adapters. There's still a couple threads showing, but I didn't want to chance it by threading in too far. Don't look too closely at the rattle can paint job on the forward and rear brackets. Oof! Been a long time since I've used an aerosol can, and boy does it show. (Thanks again for the reminder to coat these, egchewy79). Oh well, I think this area will be out of site in the end.
Thanks again to JohnK, Fman, and egchewy79 for helping me figure out the rear pedal box bracket.
Nothing new or too exciting to show, but I'm having a blast!
Last edited by 460.465USMC; 12-31-2020 at 08:15 PM.
Chris
Coupe complete kit delivered: 4/22/24.
Build Thread. Coyote. T-56. IRS w/3.55. Wilwoods. PS. HVAC. Side windows.
MK4 Complete kit.
Build Thread Index. Delivered: 10/15/2020. Legal: 7/25/23. Coyote Gen3. TKO600 (0.64 OD). IRS w/3.55. PS. Wilwoods. Sway bars. This build is dedicated to my son, Benjamin.
Build Thread.
-
Post Thanks / Like - 0 Thanks, 1 Likes
-
Senior Member
While you are at it might want to confirm you have the correct MC for your hydraulic clutch. It should be a 13/16 (stamped .81 on the side). I am swapping mine out this week because I was sent the wrong MC. Just something to confirm before you fill up your system.
-
Senior Member
This wasn't even on my radar, Travis. First I've heard of it. I will check mine today. Thanks for the tip! Much better to do now than later, as you mentioned.
Chris
Coupe complete kit delivered: 4/22/24.
Build Thread. Coyote. T-56. IRS w/3.55. Wilwoods. PS. HVAC. Side windows.
MK4 Complete kit.
Build Thread Index. Delivered: 10/15/2020. Legal: 7/25/23. Coyote Gen3. TKO600 (0.64 OD). IRS w/3.55. PS. Wilwoods. Sway bars. This build is dedicated to my son, Benjamin.
Build Thread.
-
Senior Member
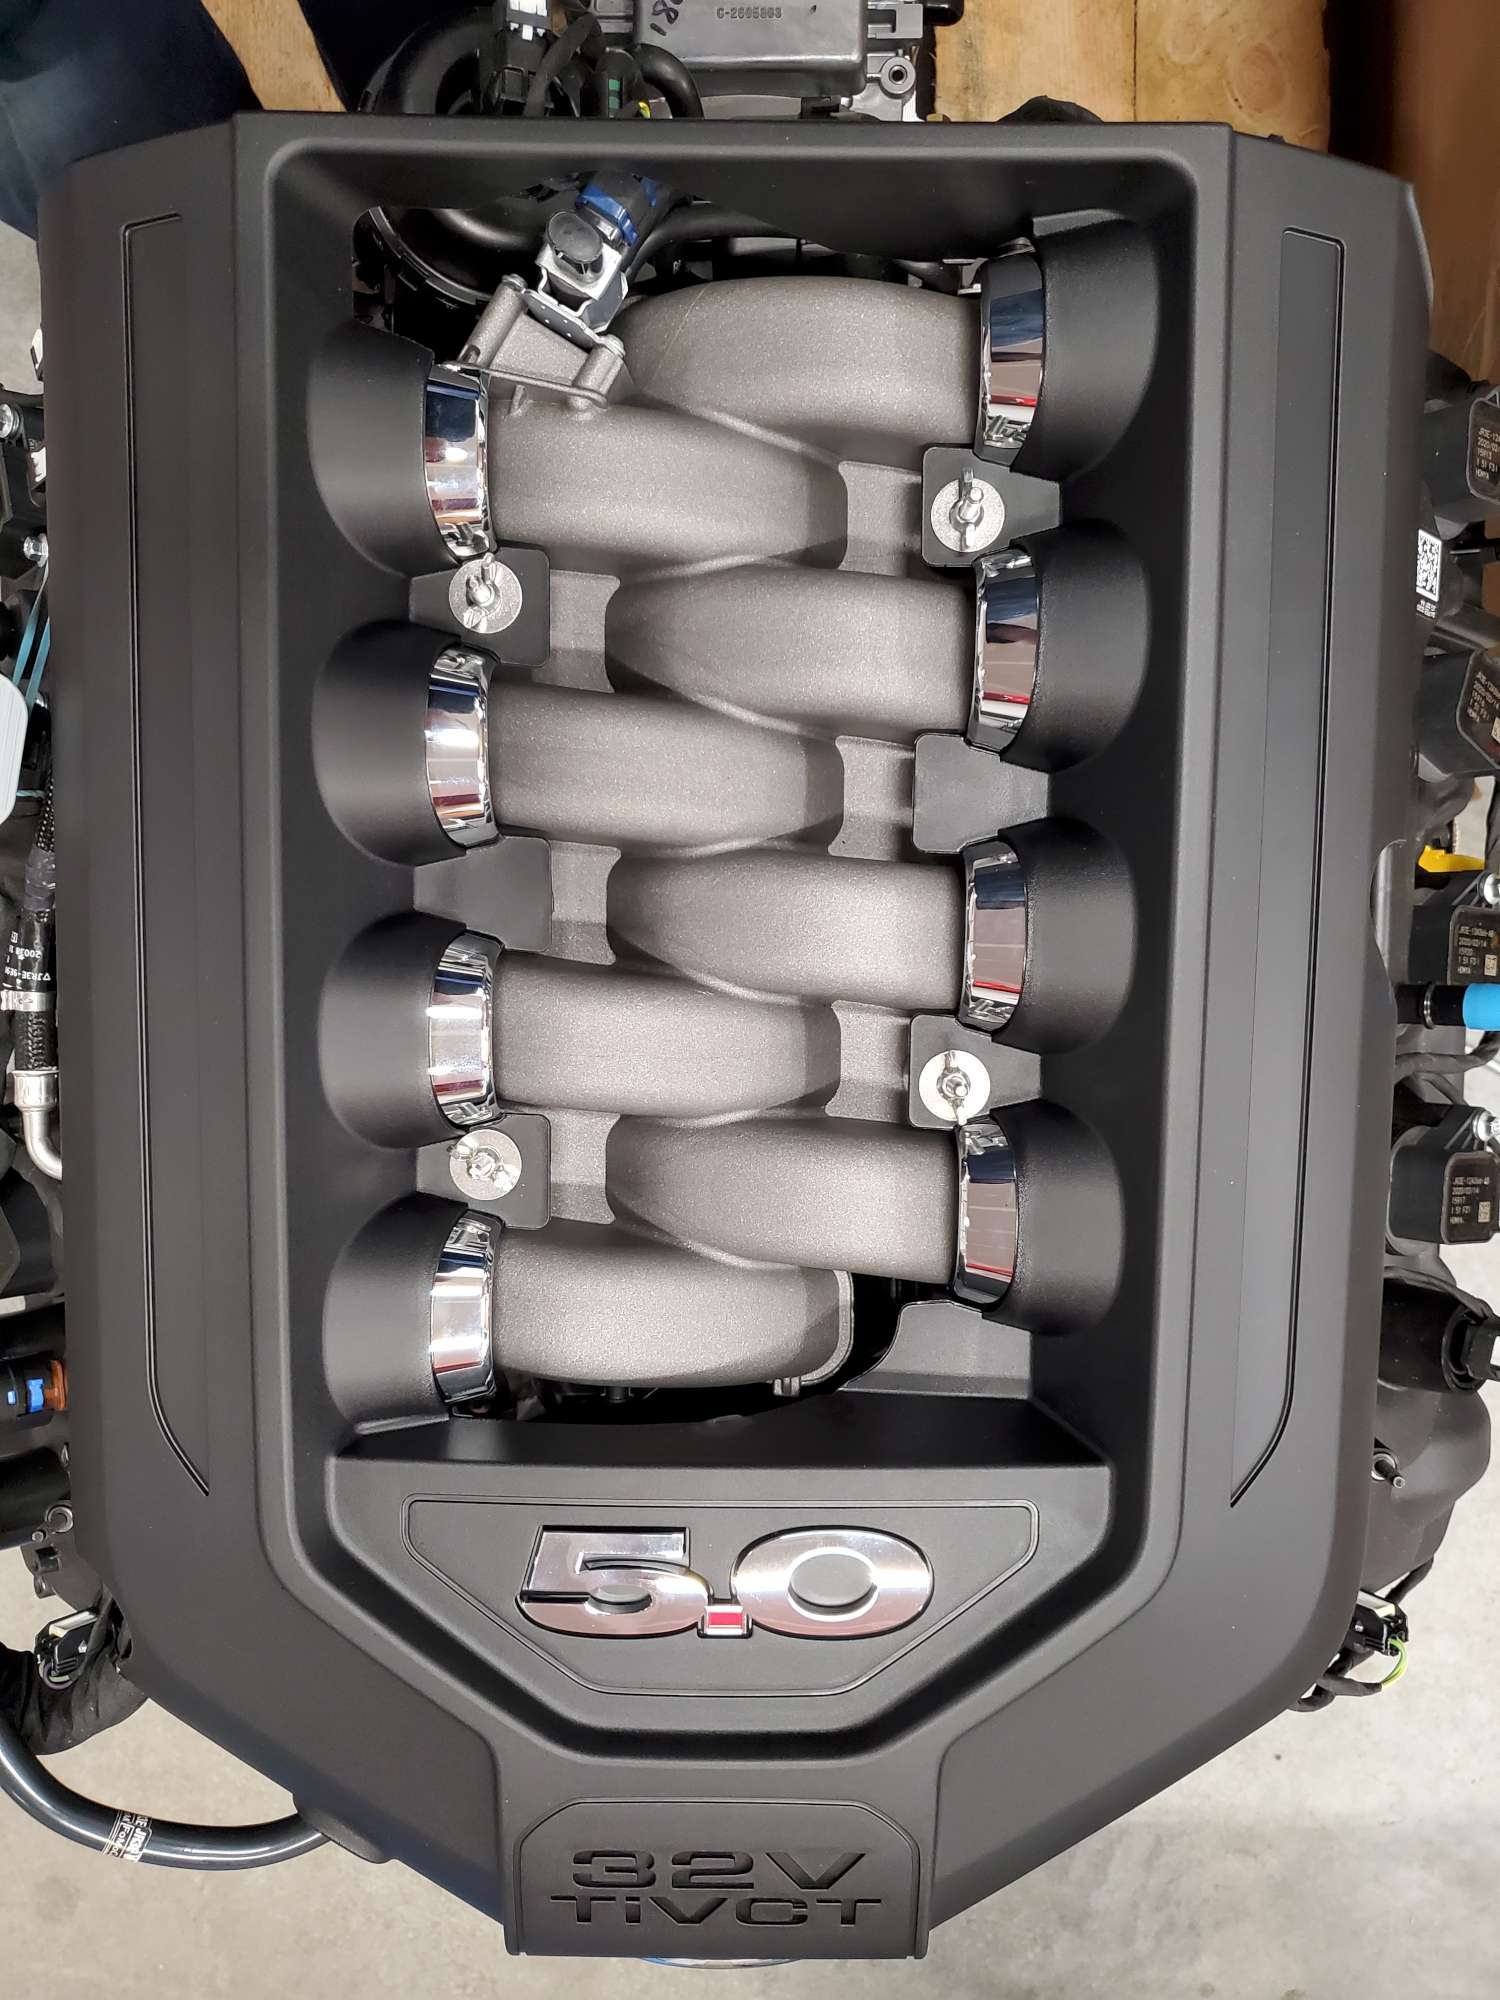
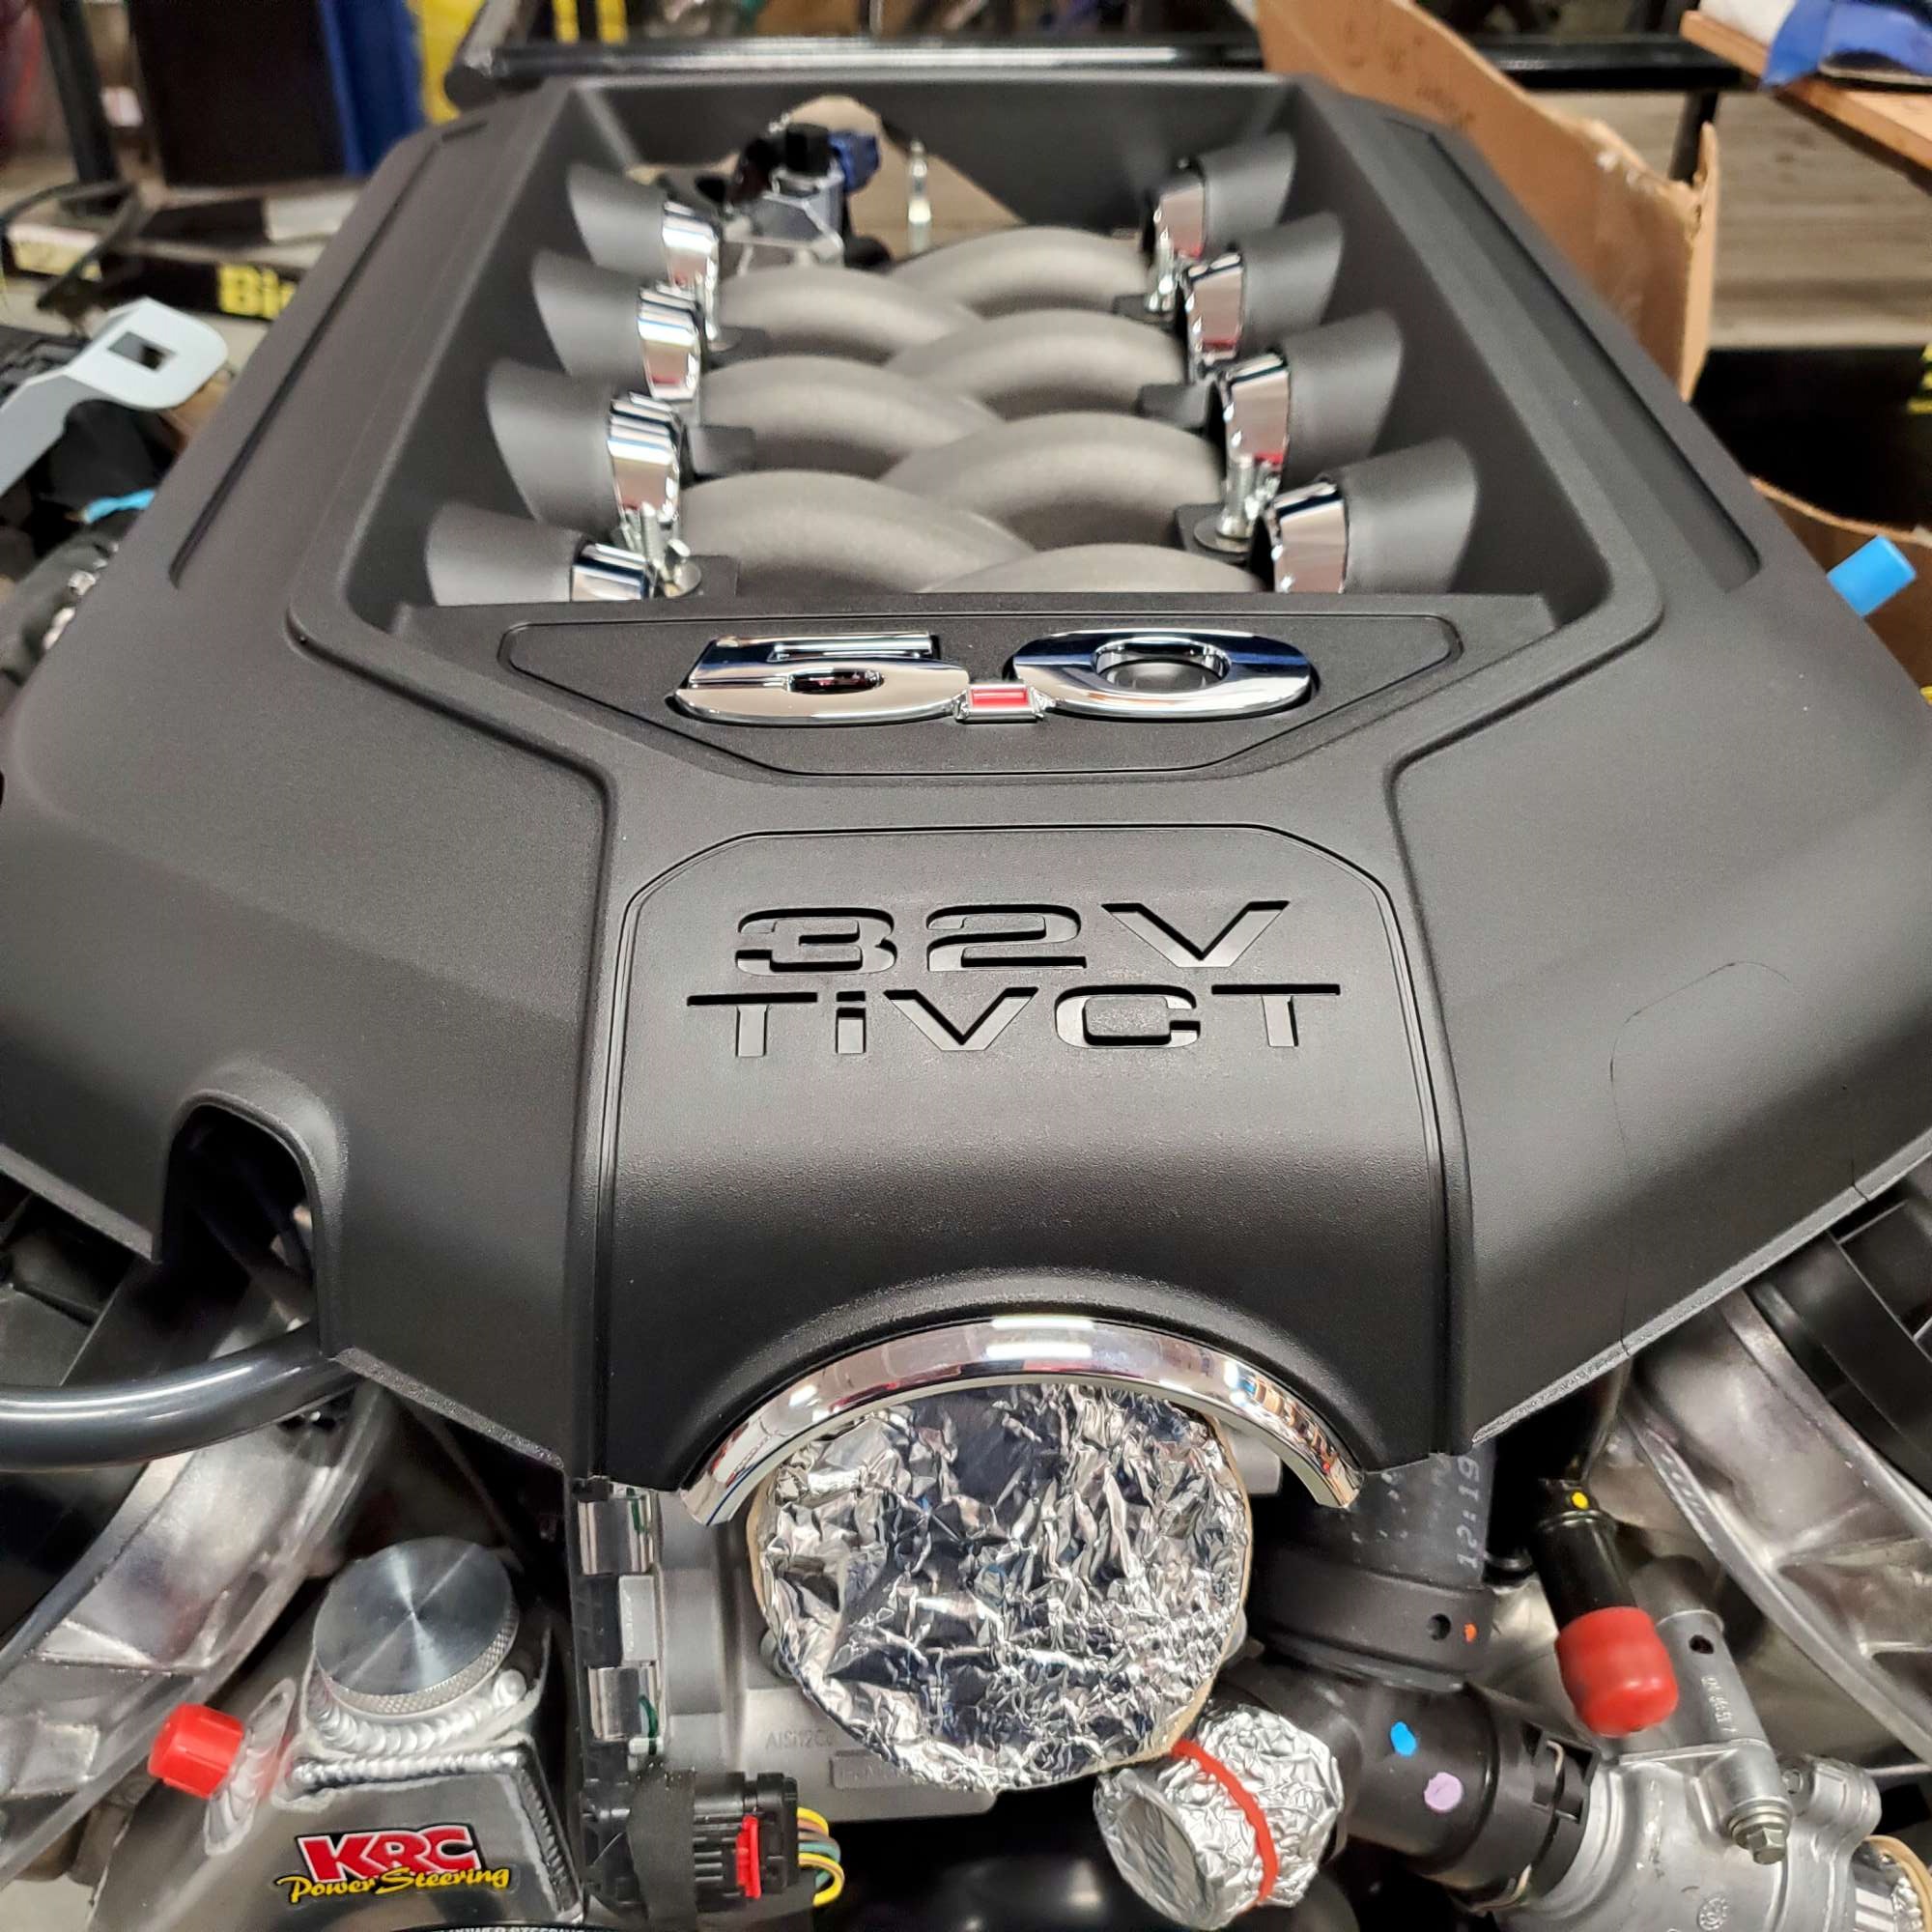
Gen 1 Coyote Cover on a Gen 3?
Here is a view of the Forte bend shift handle in combination with the rear cover/handle swapped 180 deg. (moves the handle forward ~2.75"). This is a view of it in the Neutral gear position. If I want it another inch or so forward, I will copy Wareaglescott and add an extension piece at the bottom (see his build, post #140). Obviously, the "right" way would be to complete the TKO600 mid-shift modification, but I think his workaround will be as effective, and much easier/cheaper. Of course, I won't know for certain until I'm actually driving it. FWIW, in case this is helpful to anyone.

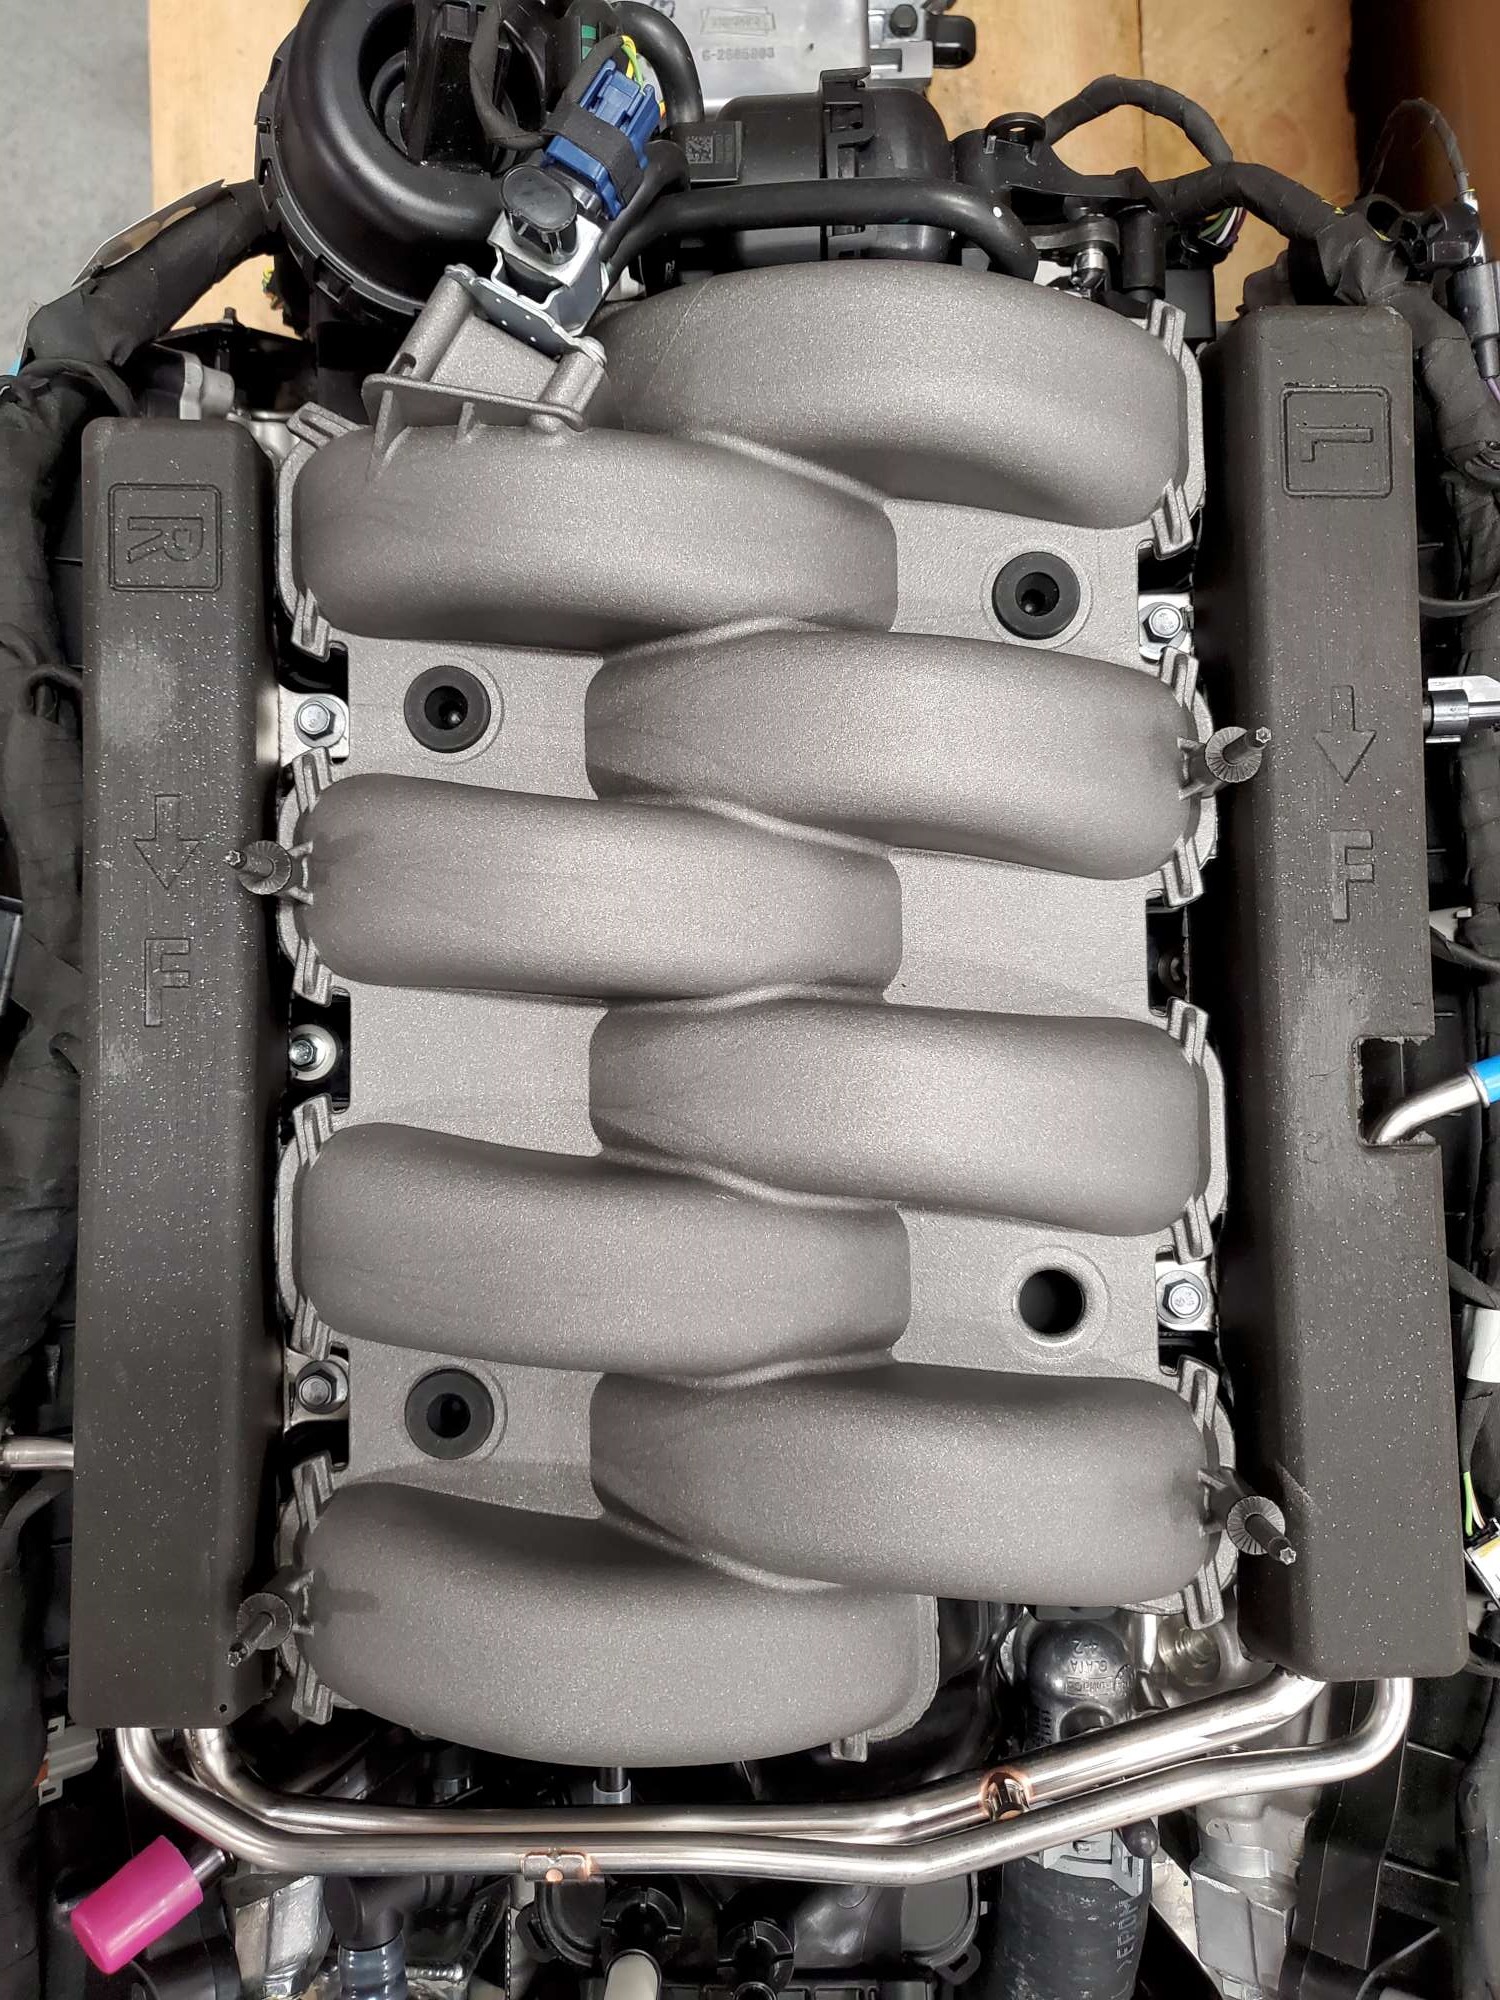
I mentioned before I stumbled upon an engine cover solution from Forte that greatly improves (IMHO) the Gen 3 flying saucer look. I'm a long ways away from worrying about eye candy, but this was an obvious solution that works for me, so I jumped on it. Again, since I would have had to buy the Gen 3 cover anyway (~$125), for a few extra bucks I bought Forte's modified version of a Gen 1 cover. It even has shiny plastic-chromie-looking eye candy. Ooooooh!
He uses the same OEM rubber grommet-like base that pops into the four holes on top of the motor. These are what the Gen 3 cover would normally pop into, and held in place as a friction fit. The one on the bottom is one I pulled from the motor to show they are the same. He supplies the aluminum spacer, fender washer, and wing nut to secure the cover to the same four holes. Pretty clever, if you ask me!

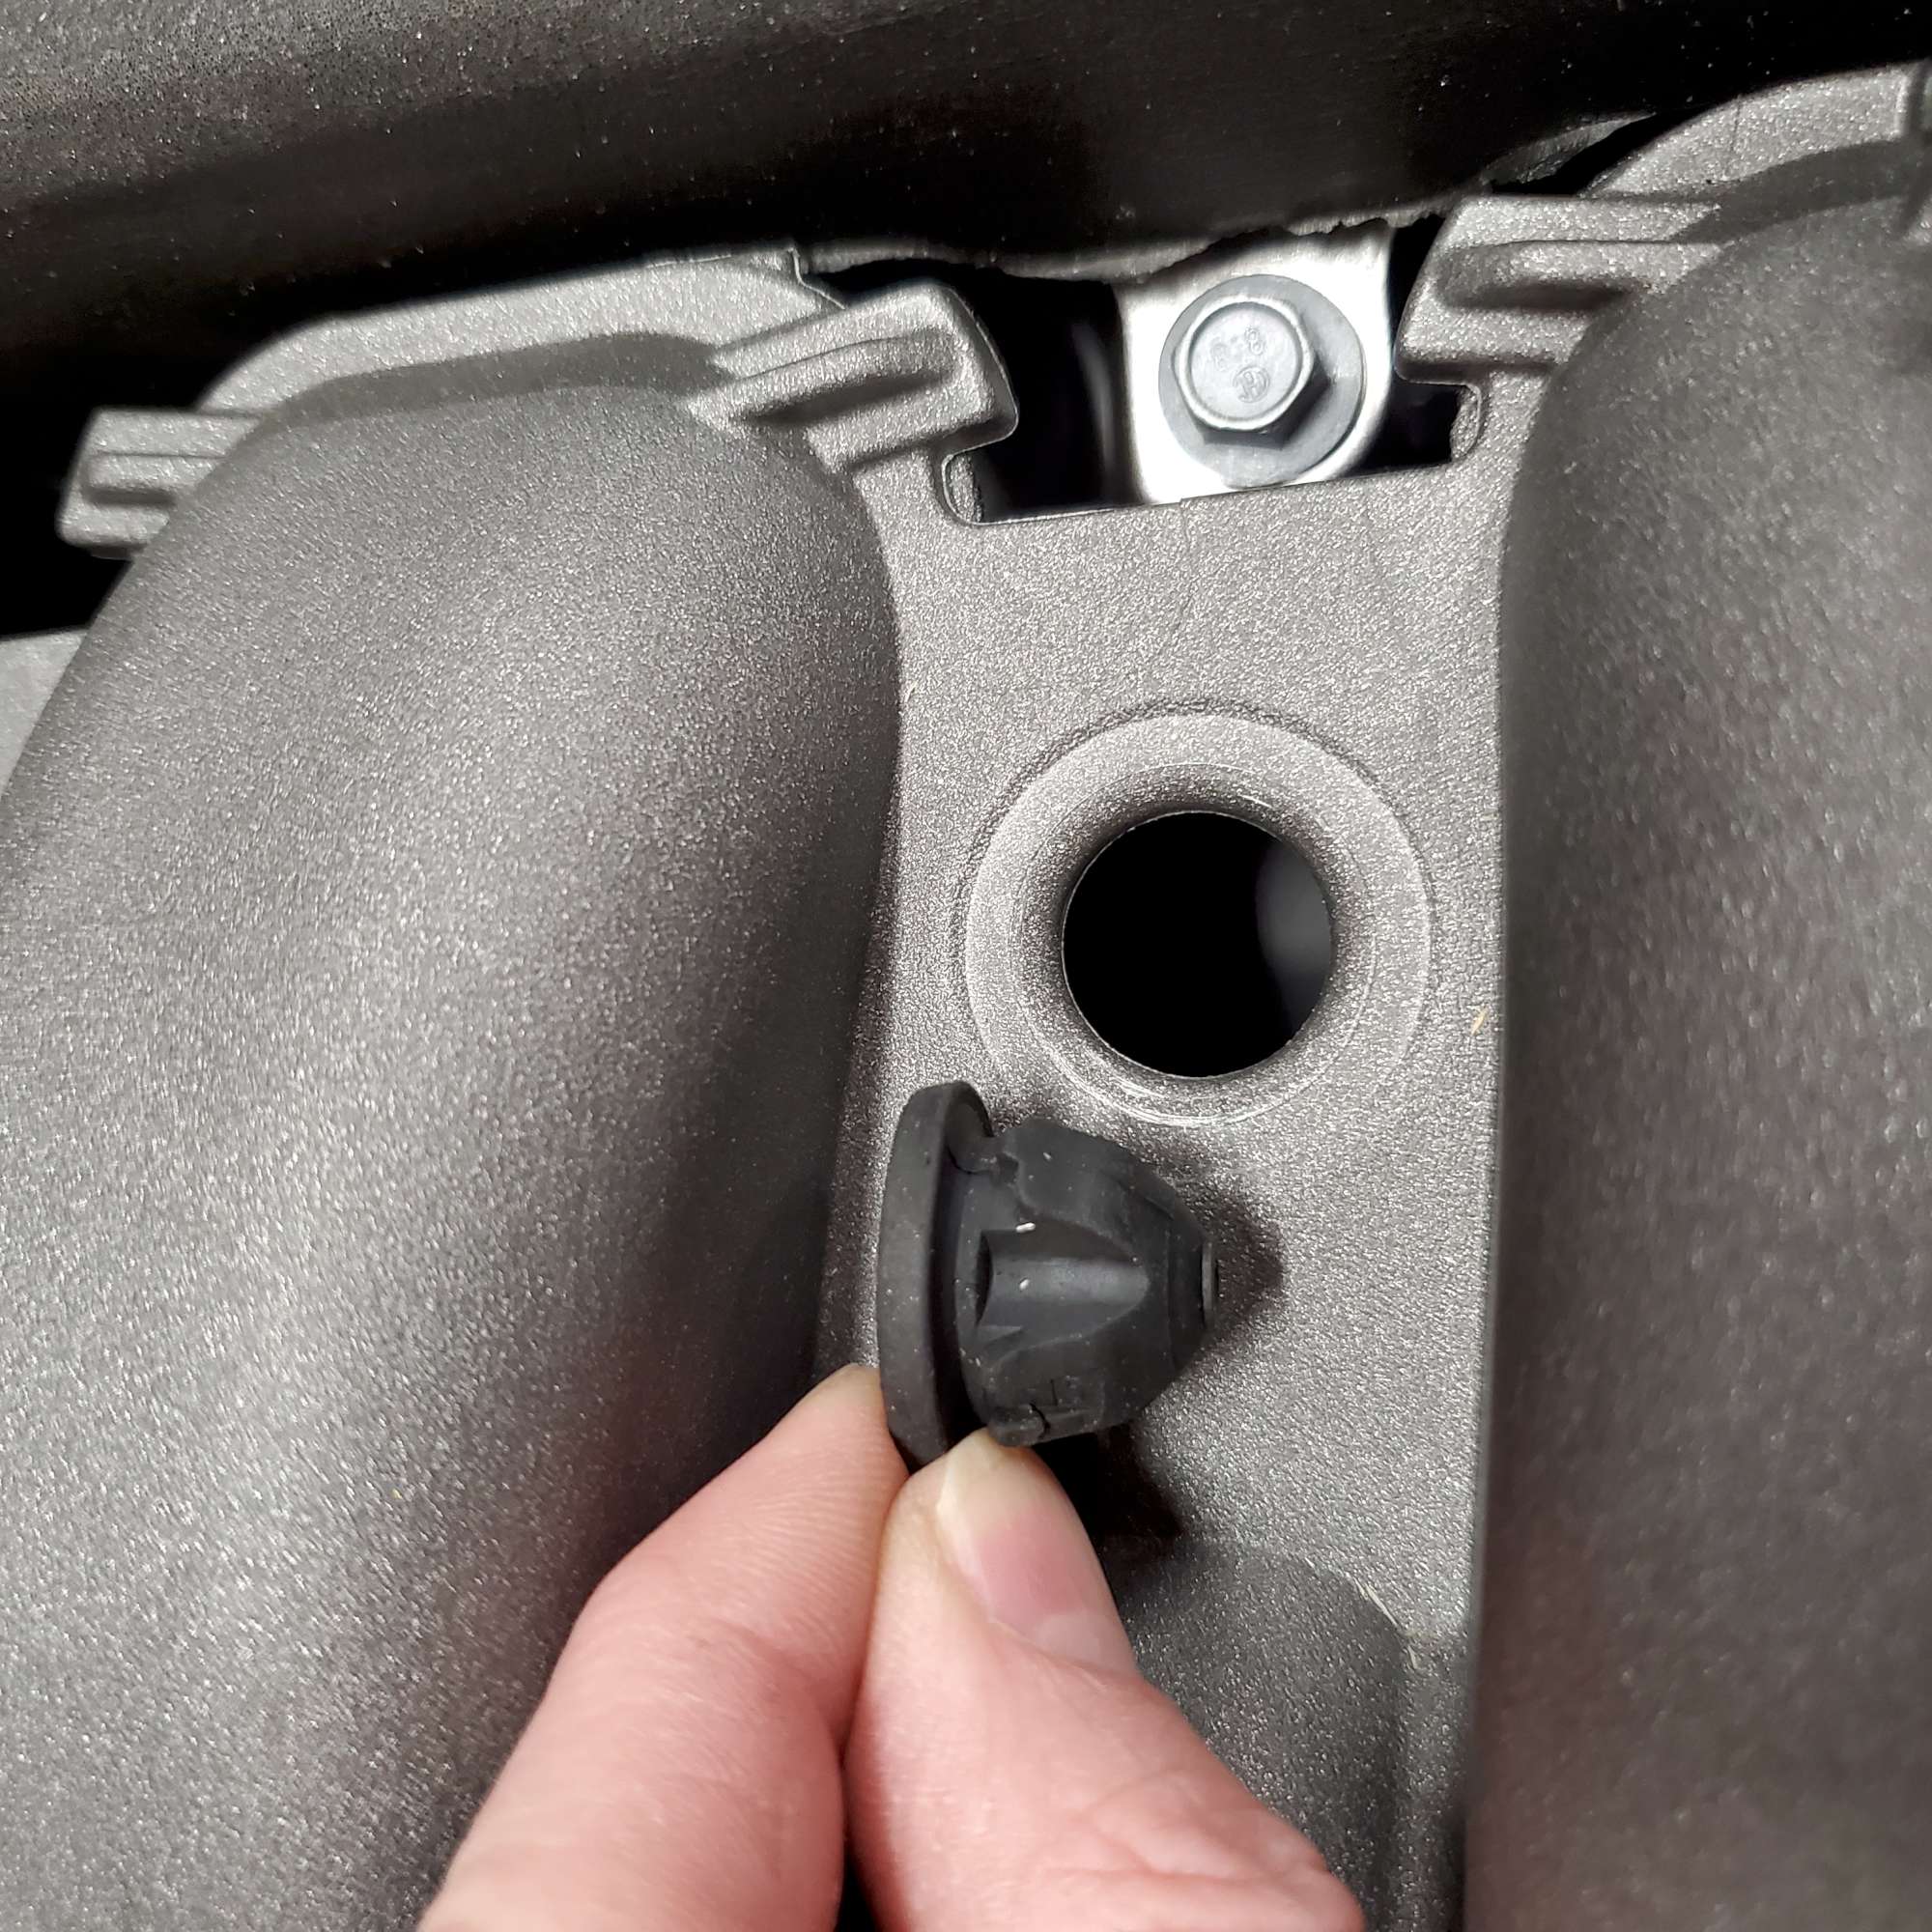
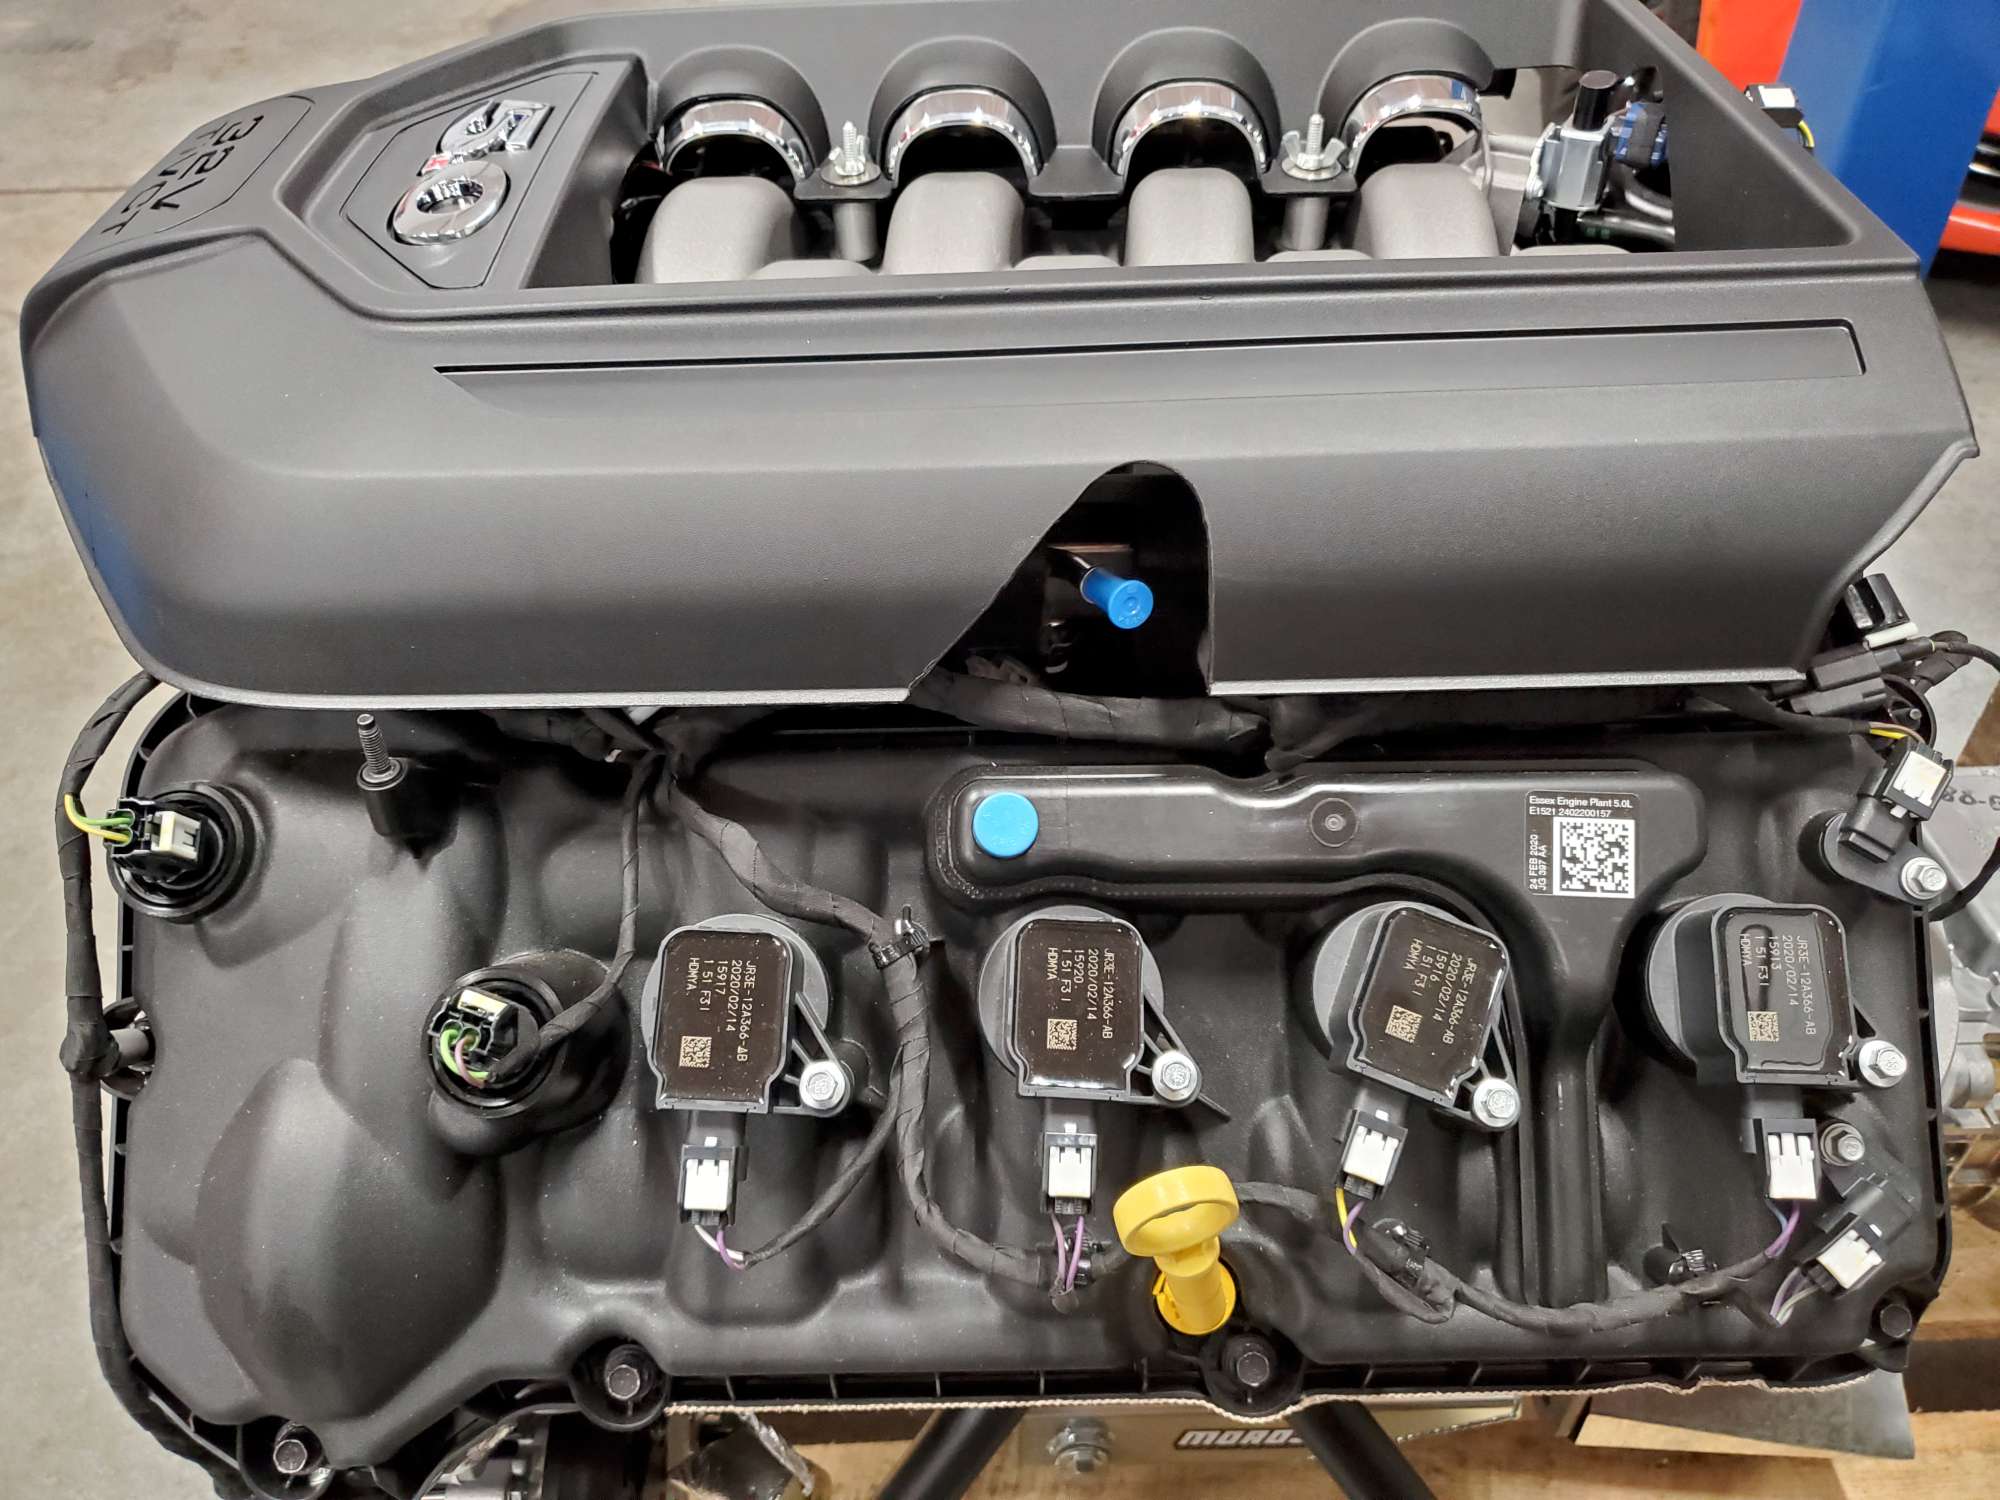
Here you can see the four rubber "grommets" (I'm not sure of the correct term) as they come from Ford. The Gen 3 cover pops right into these.
Here you can see one removed.
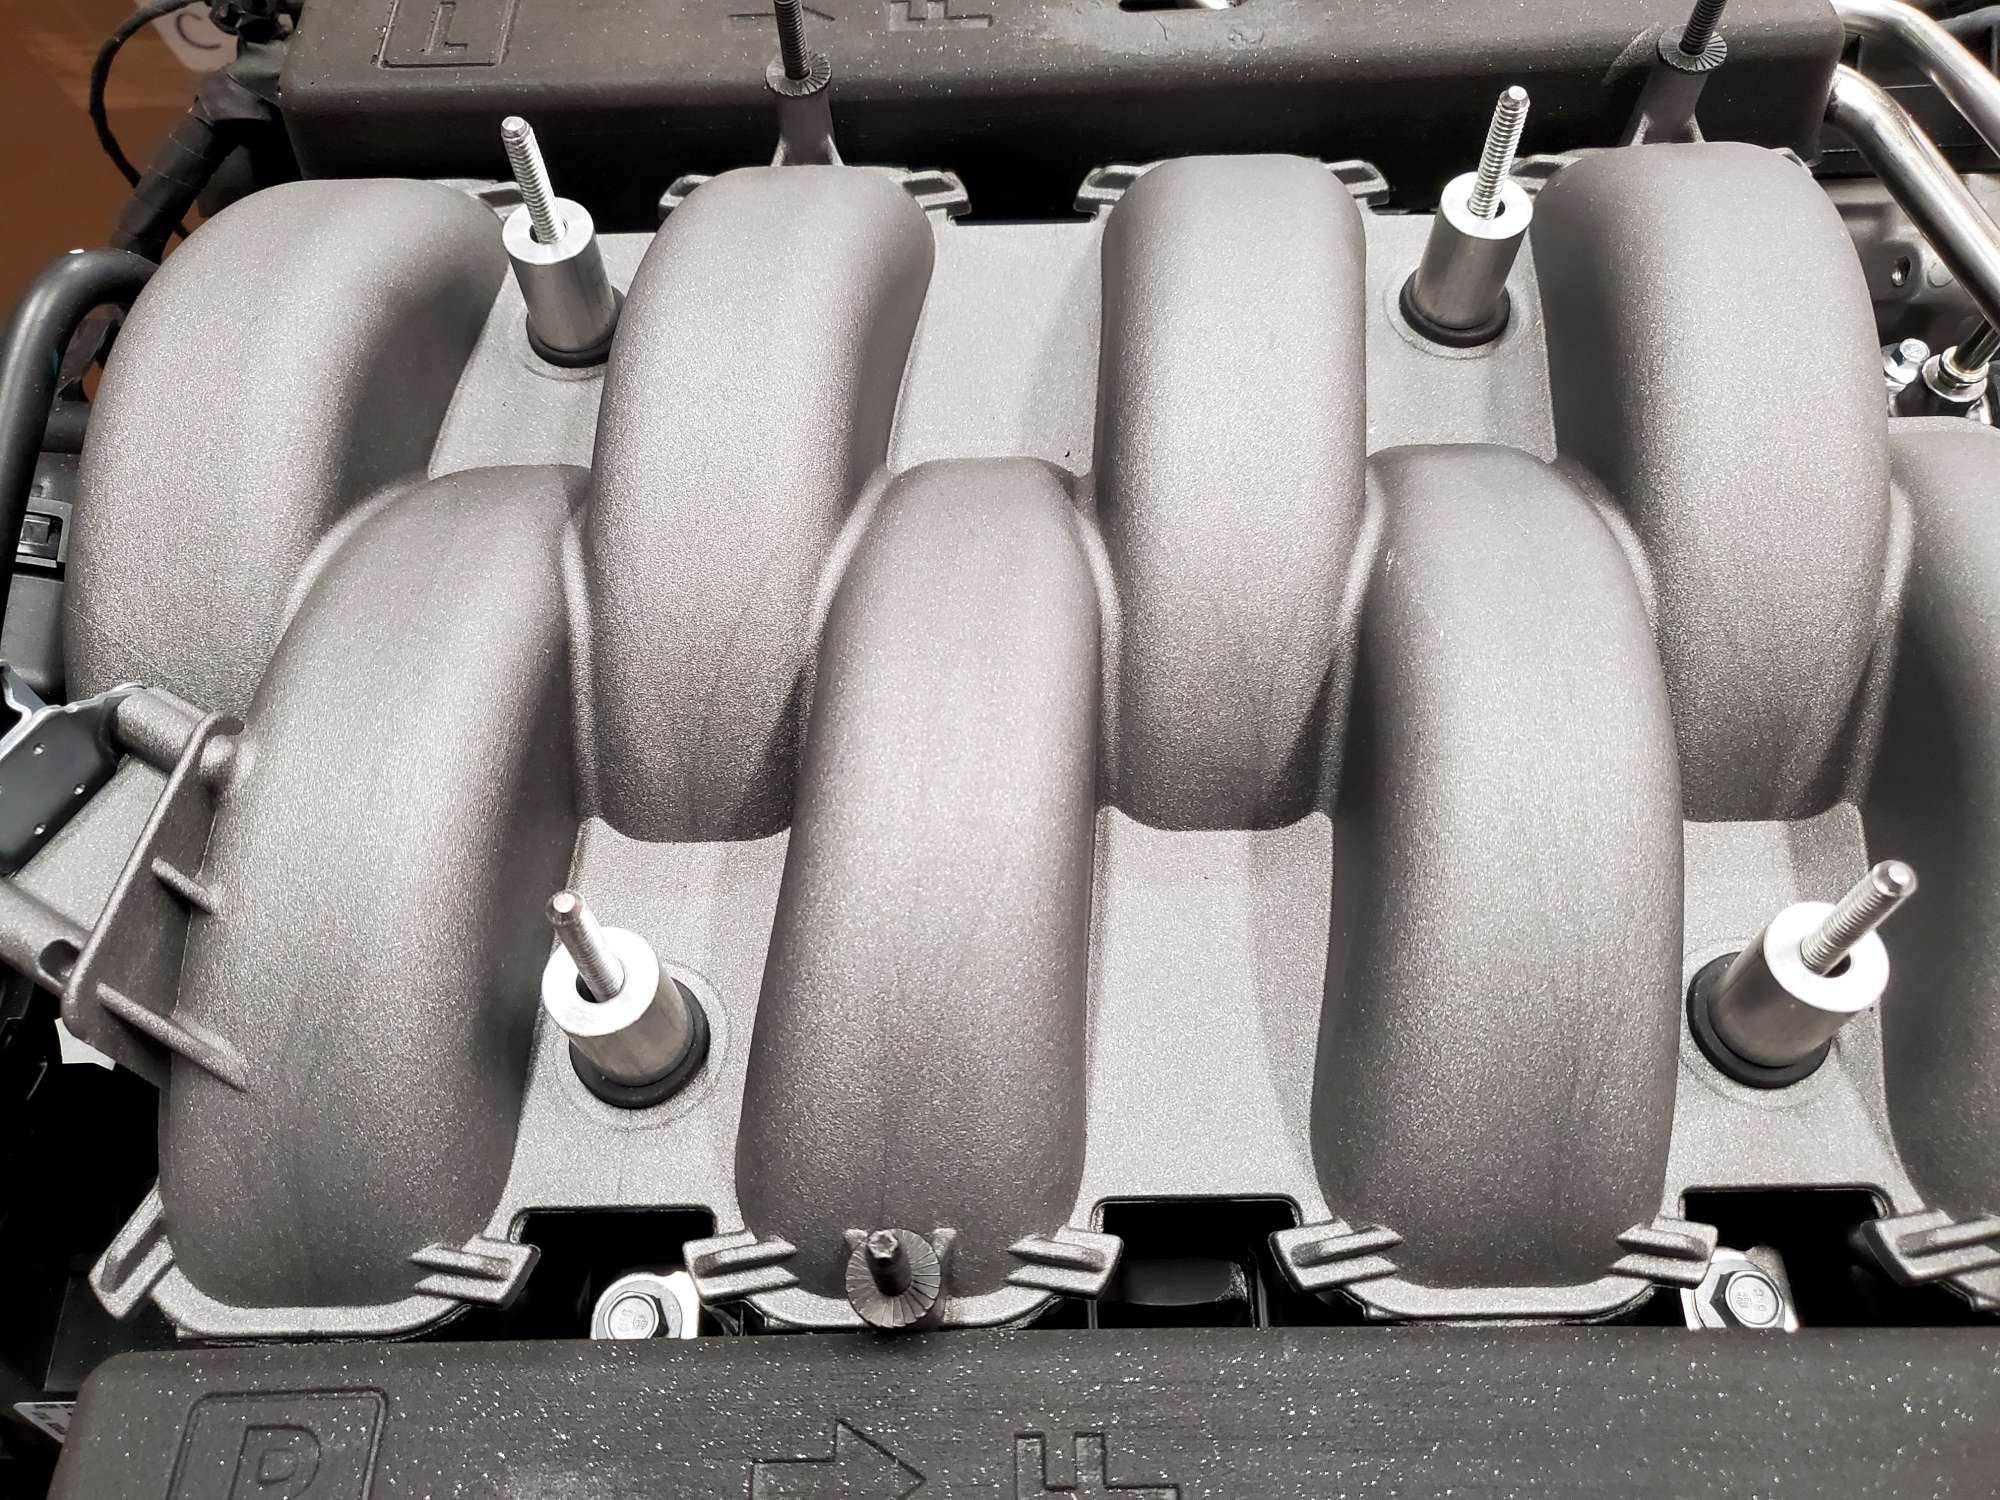
Now with the Forte modified grommets installed.

Side view of the same, and with the aluminum provided spacers in place.
Chris
Coupe complete kit delivered: 4/22/24.
Build Thread. Coyote. T-56. IRS w/3.55. Wilwoods. PS. HVAC. Side windows.
MK4 Complete kit.
Build Thread Index. Delivered: 10/15/2020. Legal: 7/25/23. Coyote Gen3. TKO600 (0.64 OD). IRS w/3.55. PS. Wilwoods. Sway bars. This build is dedicated to my son, Benjamin.
Build Thread.
-
Senior Member
Gen 1 Coyote Cover on a Gen 3? (continued)
And with the Gen 1 cover secured in place. (I may cut off some of the extra screw length.)
Some additional views to show fitment.


This could be old news to the forum, but posting just in case it's useful to someone.
Last edited by 460.465USMC; 01-01-2021 at 01:43 PM.
Chris
Coupe complete kit delivered: 4/22/24.
Build Thread. Coyote. T-56. IRS w/3.55. Wilwoods. PS. HVAC. Side windows.
MK4 Complete kit.
Build Thread Index. Delivered: 10/15/2020. Legal: 7/25/23. Coyote Gen3. TKO600 (0.64 OD). IRS w/3.55. PS. Wilwoods. Sway bars. This build is dedicated to my son, Benjamin.
Build Thread.
-
Post Thanks / Like - 1 Thanks, 2 Likes
-
Senior Member
Good Customer Service is Rare but Appreciated!
I was just chatting with my brother-in-law recently about how rare it is to find good customer service nowadays. Well, I was pleasantly surprised yesterday when I called McMaster-Carr to return a couple things. An actual human being answered the phone within two rings. I asked about their return process, because I ordered the wrong thread count on the hardware for the Kleiner quick jack mod. He offered to credit me for the couplers and socket head bolts (don't bother to return the wrong ones), and said the replacements will arrive Thursday this week. Wow! He made it easy, and it was done in two minutes. I'm impressed! I so appreciate good customer service. I will likely be a McMaster-Carr customer for life--and I of course like their hardware as well. Thanks to Edwardb for the tip on these guys!
I've also experienced good customer service from Factory Five, Forte, and Russ Thompson. Thanks vendors!
Chris
Coupe complete kit delivered: 4/22/24.
Build Thread. Coyote. T-56. IRS w/3.55. Wilwoods. PS. HVAC. Side windows.
MK4 Complete kit.
Build Thread Index. Delivered: 10/15/2020. Legal: 7/25/23. Coyote Gen3. TKO600 (0.64 OD). IRS w/3.55. PS. Wilwoods. Sway bars. This build is dedicated to my son, Benjamin.
Build Thread.
-
Post Thanks / Like - 0 Thanks, 1 Likes
-
25th Anniversary #9772

that's pretty cool! that's the Gen1 cover - correct? I think 2011-2014?
FMS-M-9680-M50_ml.jpg
2015-2017 - no chrome
fms-m-9680-m50a_ml.jpg
and of course Gen3 2018+ as the flying saucer
fms-m-9680-m50b_ml.jpg
-
Senior Member
Yes, it's the Gen 1 cover. It does come with the valve covers as shown in your picture, but I don't see any way to make those fit.
Chris
Coupe complete kit delivered: 4/22/24.
Build Thread. Coyote. T-56. IRS w/3.55. Wilwoods. PS. HVAC. Side windows.
MK4 Complete kit.
Build Thread Index. Delivered: 10/15/2020. Legal: 7/25/23. Coyote Gen3. TKO600 (0.64 OD). IRS w/3.55. PS. Wilwoods. Sway bars. This build is dedicated to my son, Benjamin.
Build Thread.
-
Post Thanks / Like - 0 Thanks, 1 Likes
-
25th Anniversary #9772
Originally Posted by
460.465USMC
Yes, it's the Gen 1 cover. It does come with the valve covers as shown in your picture, but I don't see any way to make those fit.
easy sell on ebay, or craiglist - lots of mustang guys like to paint them so this will save them some time with an extra set 
-
Senior Member
Coyote Accel Pedal Mounting Question
Here's another one I must be looking at from the wrong angle. I'm trying to mock up the Coyote accelerator pedal, but scratching my head as to why the bracket that attaches to the frame seems like the upper portion should have been bent the other way. If it were, then it seems everything (the mounting holes, clearance for the 3/4"' tube, and even the slight angle of the lowest mounting hole/tab is bent the correct direction) would line up perfectly. Can someone please straighten me out on this one?
Picture of bracket as installed in the F5 instruction manual:
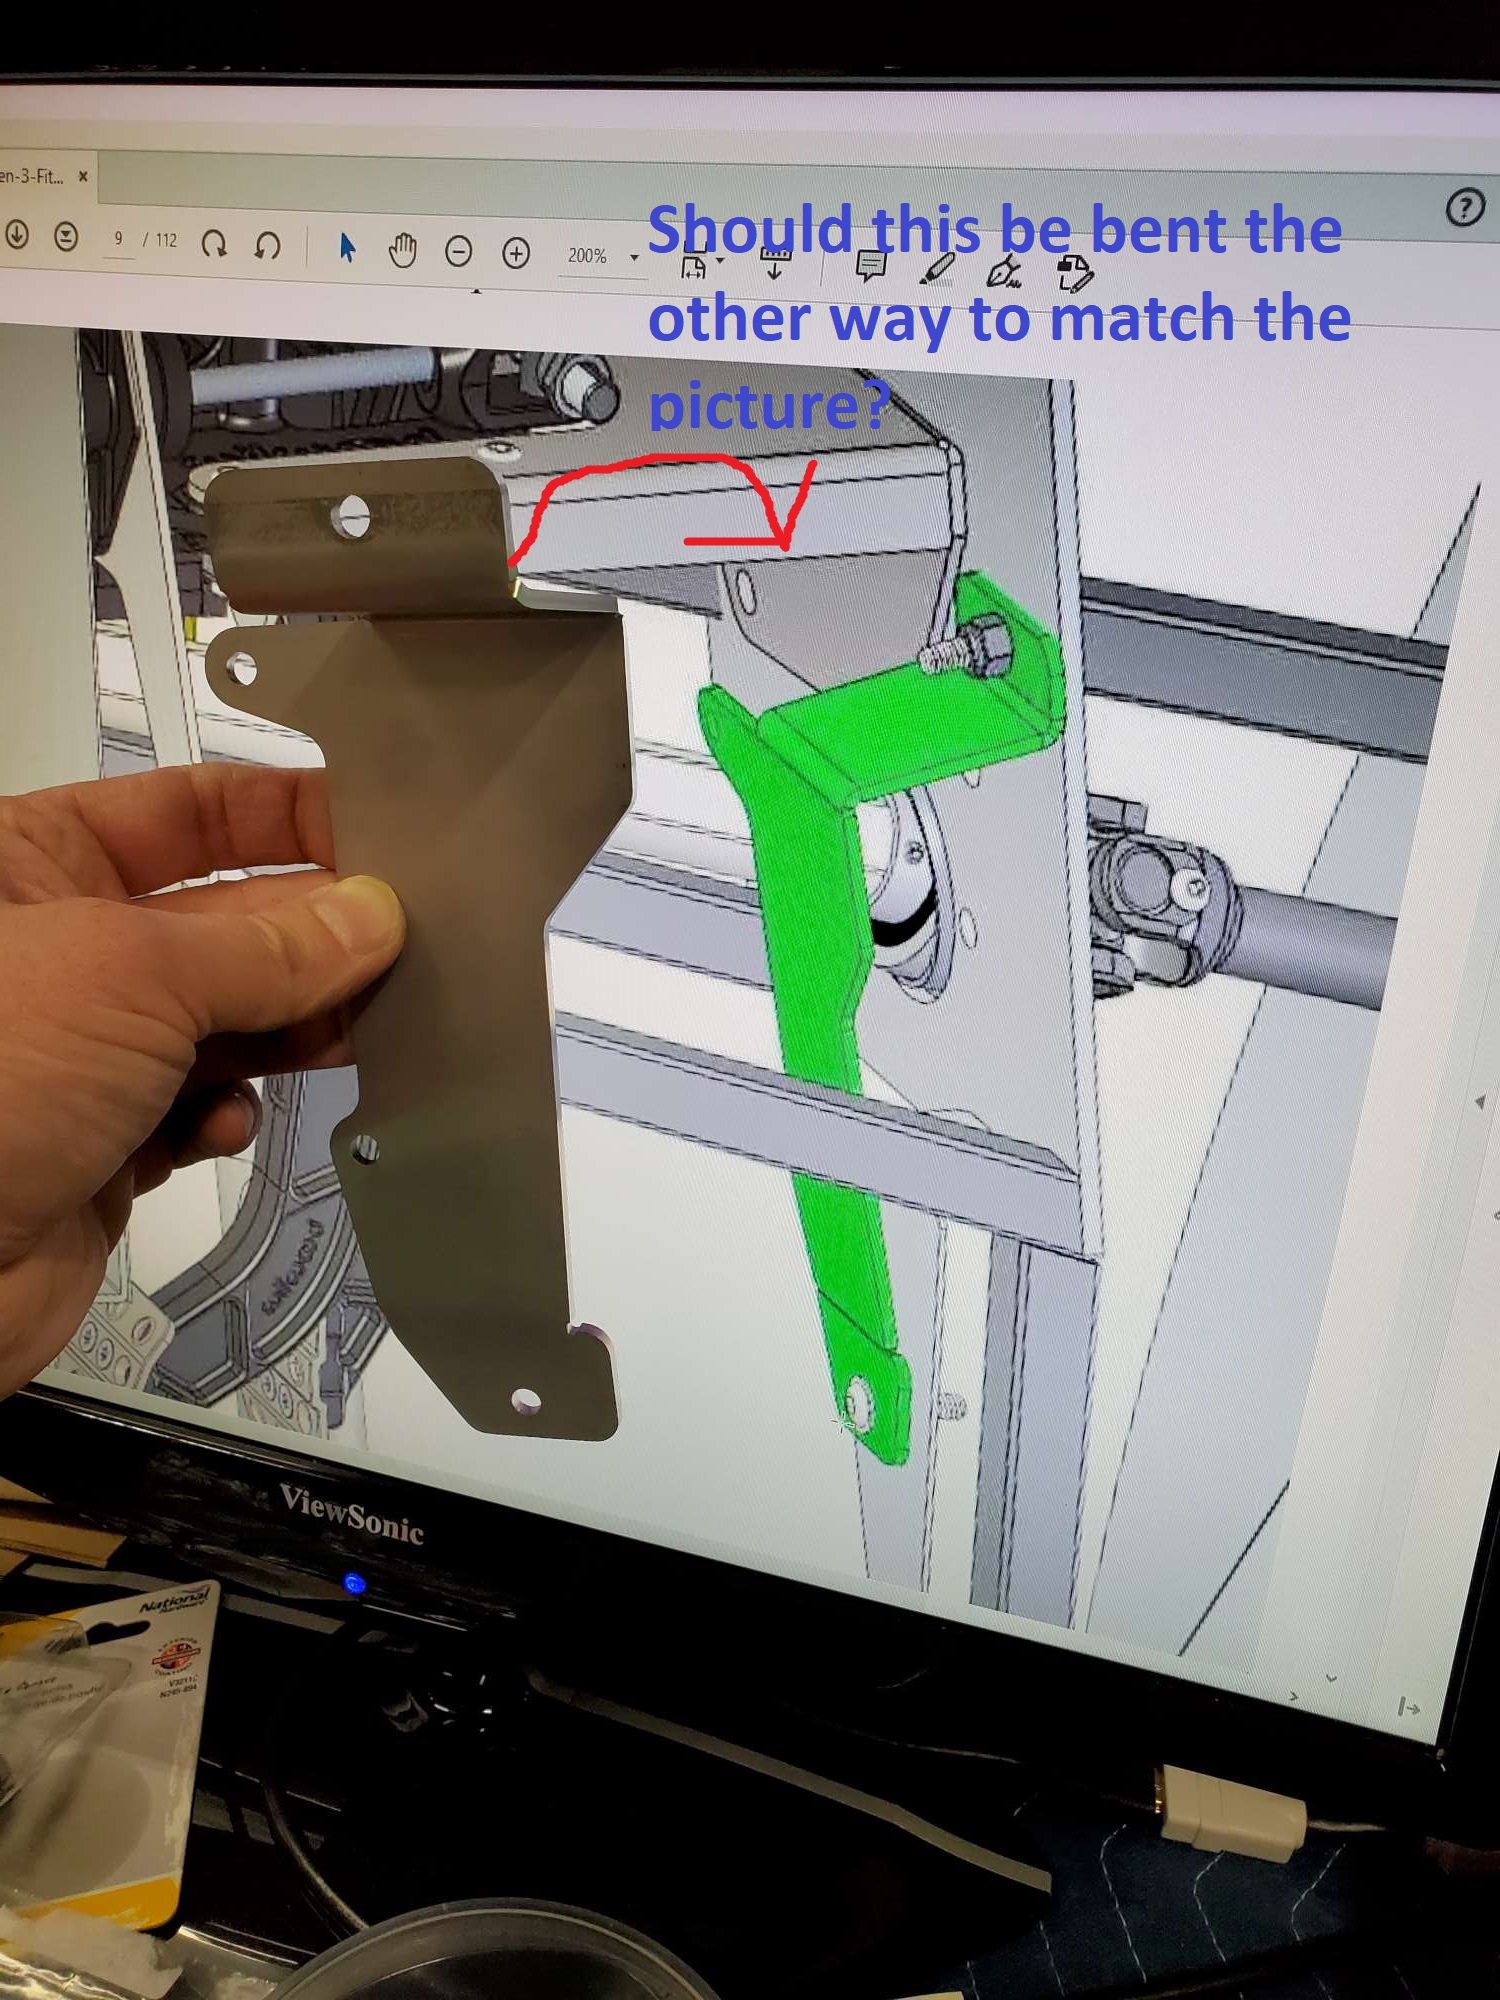
Next to the DBW Coyote pedal the bracket's mounting holes are on the wrong side of the bracket. What am I missing?
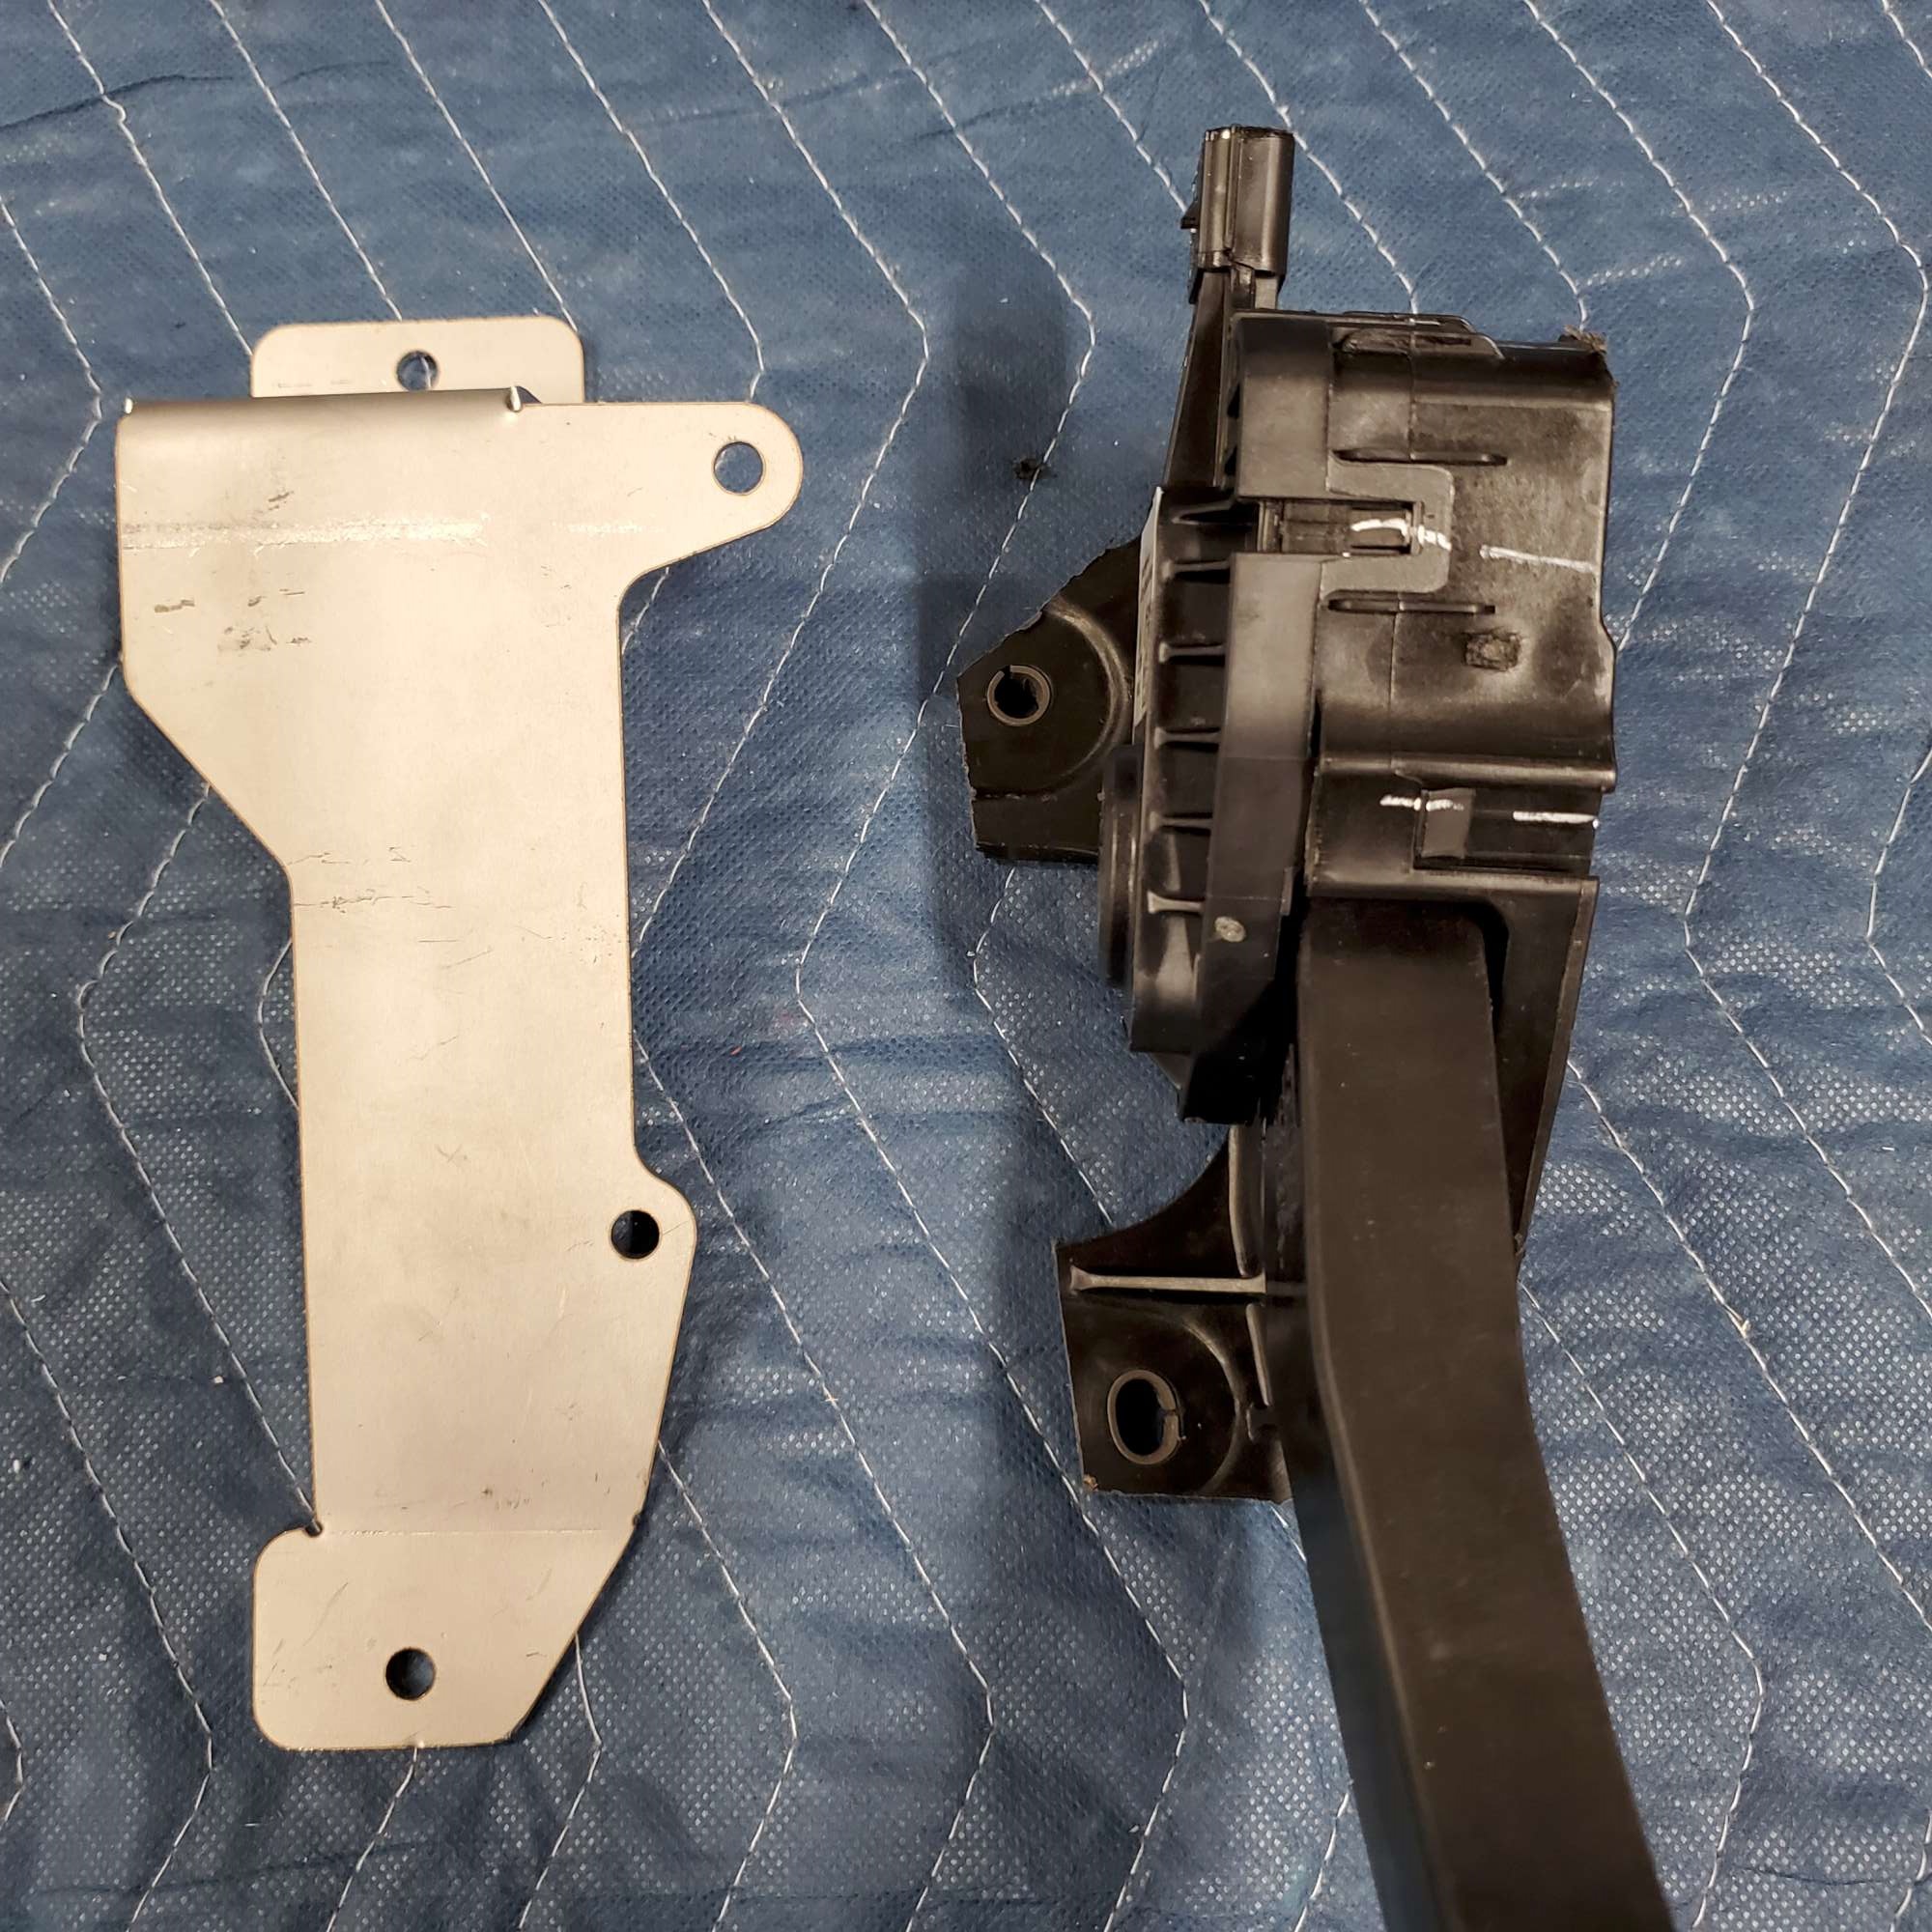
Last edited by 460.465USMC; 01-10-2021 at 09:05 PM.
Chris
Coupe complete kit delivered: 4/22/24.
Build Thread. Coyote. T-56. IRS w/3.55. Wilwoods. PS. HVAC. Side windows.
MK4 Complete kit.
Build Thread Index. Delivered: 10/15/2020. Legal: 7/25/23. Coyote Gen3. TKO600 (0.64 OD). IRS w/3.55. PS. Wilwoods. Sway bars. This build is dedicated to my son, Benjamin.
Build Thread.
-
Senior Member

Bent backwards. It happens. Call FFR and they should replace it.
Build 1: Mk3 Roadster #5125. Sold 11/08/2014.
Build 2: Mk4 Roadster #7750. Sold 04/10/2017.
Build Thread
Build 3: Mk4 Roadster 20th Anniversary #8674. Sold 09/07/2020.
Build Thread and
Video.
Build 4: Gen 3 Type 65 Coupe #59. Gen 3 Coyote. Legal 03/04/2020.
Build Thread and
Video
Build 5: 35 Hot Rod Truck #138. LS3 and 4L65E auto. Rcvd 01/05/2021. Legal 04/20/2023.
Build Thread. Sold 11/9/2023.
-
Post Thanks / Like - 1 Thanks, 0 Likes
-
Senior Member
Originally Posted by
edwardb
Bent backwards. It happens. Call FFR and they should replace it.
Phew! Thought I was losing it last night. Thanks, Paul!
Chris
Coupe complete kit delivered: 4/22/24.
Build Thread. Coyote. T-56. IRS w/3.55. Wilwoods. PS. HVAC. Side windows.
MK4 Complete kit.
Build Thread Index. Delivered: 10/15/2020. Legal: 7/25/23. Coyote Gen3. TKO600 (0.64 OD). IRS w/3.55. PS. Wilwoods. Sway bars. This build is dedicated to my son, Benjamin.
Build Thread.
-
Senior Member
Fuel Tank, Filter, and Firewall
Making some progress....baby steps.
Fuel tank is installed. A few things I had to work through:
- I left all of the strap hardware loose for now.
- I had to "adjust" the front mount 3/4" tubes between 1/8" to 1/4" to keep them away from the sides of the tank. Now they are flush with the horizontal lip around the perimeter.
- Discovered the 3/8" black socket head bolt would not slide into the rear strap openings. I wasn't interested in hogging out the painted openings with a drill, file, or other means (not looking to expose metal), so off to the hardware store for 5/16" x 2" SS bolts.
- Following recommendation of this forum I picked up the Ford OEM fuel neck gasket, as many have found the kit supplied gasket leaks: F4ZZ-9072-DA, ~$30 on Amazon. Easy to do now. See third picture below.
- I liked Edwardb's approach of verifying the fuel sender operation now (before installation). Measured 19 ohms(empty) and ranges up to max of 162 ohms (full).
- The ubiquitous Kleiner rear quick jack mod: I finally got the right hardware. I wanted 7/16"-14 to match the hardware from the kit. I'm assuming I will still use the rest of the kit supplied hardware? Attempted to follow Edwardb by measuring the vertical and horizontal distances between the rear quick jack holes, so the couplers will line up when the time comes. It's a great idea, no doubt, but I couldn't figure out how to easily transfer my measurements to the couplers without a template. So, I centered each in its respective hole, and hope (naively) they are reasonably close once the body goes on.
I thought I could be clever and avoid getting the 2.5" x 3/8" socket head bolts for the front tank straps. Nope. The 2" versions that come with the kit are just too short to get the nut threaded (at least for me). It was a bona-fide saga, and cost me some time. Oh well. Off to the hardware store...again.

Fuel tank is in (temporarily until I install the Russ Thompson drop box).
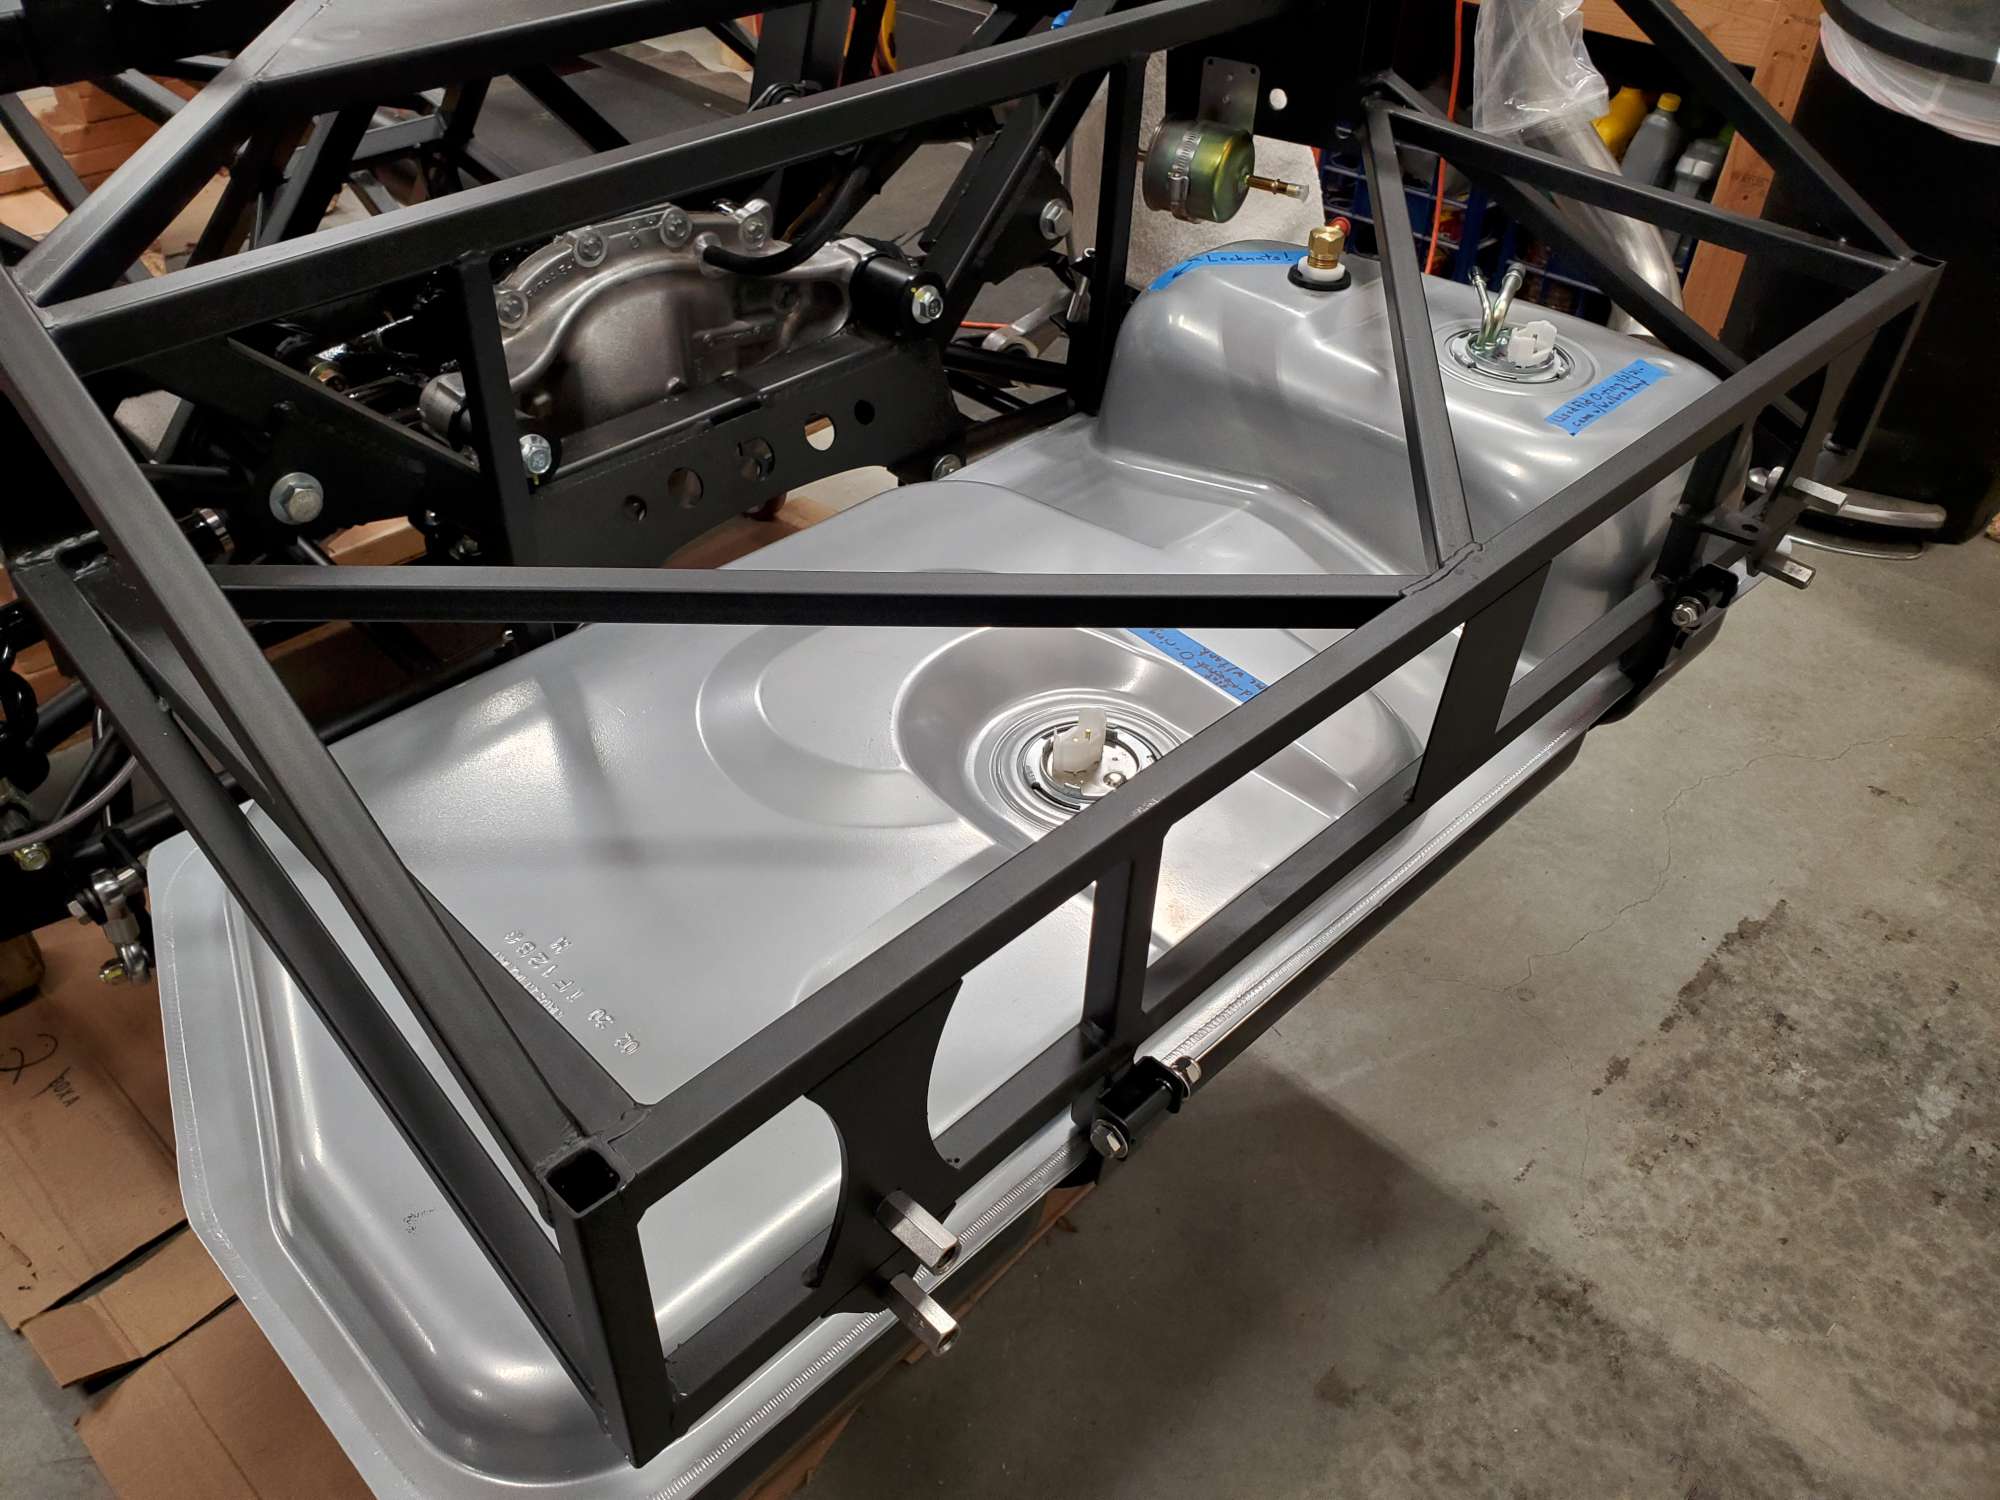
Ford OEM gasket is on the left. Kit supplied gasket on the right.

Verified with F5 the fuel flow of the kit supplied fuel filter is sufficient for the Gen 3 Coyote. They say it's fine. I installed it in what seems to be a popular location. It should provide ease of access in case of future maintenance.

Firewall:
- Made my first visit to my local metal supplier, and purchased a 48" x 16" scrap piece of 0.090 aluminum for $30. I wanted a more robust firewall. Cut it out using my jigsaw and a 12 TPI blade. Wow! This thing is WAY more stout than the 0.040 that came with the kit. I don't think it needs the vertical support bracket treatment many give the 0.040 firewall, but I may attempt to make one anyway just to see if I can make a bracket. Something I'm excited to try.
- As I mentioned previously I'm not going to PC my panels. I actually like the look of the brushed aluminum (in what little areas it can be seen), and this is an area I can save a few shekels without losing any functionality. The first I saw of this was Straversi's build--thanks, Steve! I have PLENTY of other areas to upgrade and spend my shekels. Used the ScotchBrite and Dupli-Color Clear Ceramic engine enamel combination on the front side of the firewall (thanks for the idea, GTBradley!). It's hard to tell it's been treated in this picture. It has some streaks/stripes. Hopefully, I'll do better on my next one. I don't think much of this one can be seen after the Coyote and body are in place, so a good one on which to cut my teeth.

Gee whiz! I didn't intend to have such a lengthy post here, as I really haven't done much.
Last edited by 460.465USMC; 01-15-2021 at 12:26 AM.
Reason: Added sources for panel treatment (Straversi and GTBradley)
Chris
Coupe complete kit delivered: 4/22/24.
Build Thread. Coyote. T-56. IRS w/3.55. Wilwoods. PS. HVAC. Side windows.
MK4 Complete kit.
Build Thread Index. Delivered: 10/15/2020. Legal: 7/25/23. Coyote Gen3. TKO600 (0.64 OD). IRS w/3.55. PS. Wilwoods. Sway bars. This build is dedicated to my son, Benjamin.
Build Thread.
-
Post Thanks / Like - 0 Thanks, 1 Likes
-
Senior Member
Looking good! Nice work on that firewall.
MKIV Complete Kit #9822 l BluePrint 347 EFI l TKO600 l Power Steering l Heater/Defrost l
Build Thread
-
Post Thanks / Like - 1 Thanks, 0 Likes
-
Senior Member
That firewall looks great! Are you planning on doing a drop trunk mod? Asking because if yes that fuel tank will need to come back out. I think I had to remove mine a couple times after installing.
-
Post Thanks / Like - 1 Thanks, 0 Likes
-
Senior Member
Originally Posted by
Fman
That firewall looks great! Are you planning on doing a drop trunk mod? Asking because if yes that fuel tank will need to come back out. I think I had to remove mine a couple times after installing.
Hi Travis. I have a trunk box coming from Russ Thompson this week. I don't want to tell you how many times I've already dropped the tank. That's why I left the nuts loose for now. Saving the lock nuts until final assembly. Thanks for the heads-up!
Chris
Coupe complete kit delivered: 4/22/24.
Build Thread. Coyote. T-56. IRS w/3.55. Wilwoods. PS. HVAC. Side windows.
MK4 Complete kit.
Build Thread Index. Delivered: 10/15/2020. Legal: 7/25/23. Coyote Gen3. TKO600 (0.64 OD). IRS w/3.55. PS. Wilwoods. Sway bars. This build is dedicated to my son, Benjamin.
Build Thread.
-
Post Thanks / Like - 0 Thanks, 1 Likes
 Fman
Fman liked this post
-
-
Senior Member
What to do with F5 Stickers?
I'm not much of a sticker guy, but found a good home for one of my F5 stickers.

It may or may not see ice with frequent pours of Bulleit.  The insulated cup doesn't sweat. Handy. Only after garage time is over in the evenings, of course. It becomes a good conversation starter when friends and family are over: "Hey, want to check out my garage"?
Now, back to building...
Chris
Coupe complete kit delivered: 4/22/24.
Build Thread. Coyote. T-56. IRS w/3.55. Wilwoods. PS. HVAC. Side windows.
MK4 Complete kit.
Build Thread Index. Delivered: 10/15/2020. Legal: 7/25/23. Coyote Gen3. TKO600 (0.64 OD). IRS w/3.55. PS. Wilwoods. Sway bars. This build is dedicated to my son, Benjamin.
Build Thread.
-
Post Thanks / Like - 0 Thanks, 2 Likes
-

Super Moderator

Originally Posted by
460.465USMC
...Finally...I must be honest up front and say I'm a Chevy guy at heart. I'm a huge fan of pretty much anything from the 60's (Chevy II/Nova, Chevelle, bubble tops, Camaros, etc.), and Tri-Fives. I like modern Chevrolet muscle as well. My forum name also references my Chevy roots from the HP/Torque in a C7 I used to own; the USMC reference is from my five years in the Marines as an avionics technician...
Chevy in a Cobra.JPG
Ray
I'm not getting gray, I'm adding chrome....
Under-steer is when you hit the wall with the front of the car and over-steer is when you hit the wall with the rear of the car. Horsepower is how fast you hit the wall and torque is how far you take the wall with you.
-- Jacques Schnauzee "World Famous Racecar Driver"
"If you can make black marks on a straight from the time you turn out of a corner until the braking point of the next turn, then you have enough horsepower."--Mark Donohue
-
Post Thanks / Like - 0 Thanks, 2 Likes
-
Senior Member
That's funny, Ray! I know I'm a bit of an odd duck. But, these Roadsters are so dang cool it was too tempting! Having a blast so far!
Chris
Coupe complete kit delivered: 4/22/24.
Build Thread. Coyote. T-56. IRS w/3.55. Wilwoods. PS. HVAC. Side windows.
MK4 Complete kit.
Build Thread Index. Delivered: 10/15/2020. Legal: 7/25/23. Coyote Gen3. TKO600 (0.64 OD). IRS w/3.55. PS. Wilwoods. Sway bars. This build is dedicated to my son, Benjamin.
Build Thread.
-
Senior Member
POL Fully Received!
Thought I'd provide a quick note my POL is fully received. The final pieces I received yesterday: radiator, 90 deg. silicone tube, and 4" mass air flow tube. I pulled the radiator out of the box, and it looks like a solid unit. As far as timelines go, I ordered my complete kit in early July, received it Oct. 15, and POL fully received yesterday. Not complaining, just detailing here in case it's a useful point of reference for someone.
In the meantime, I ordered and received the Russ Thompson drop trunk, and Russ Thompson turn signal. Looking forward to installing the trunk box in the not so distant future.
I'm making good (but slow!) progress on my PS footbox. I'm painting the bottom side horizontals (e.g. bottom side of floor box) with Rustoleum enamel, but not happy with the results. Not only does the Satin (nor Matte) Rustoleum not match the powder coat of the frame, but the roller marks from the foam roller I'm using really stand out! Uff da! Not sure what I'm going to do about this. (This was all triggered after thinking more about how I probably won't be happy about exposed aluminum panels underneath the car. I decided I wanted to coat these exposed surfaces myself for a more finished look). I keep telling myself it's only the underside of the car, which I believe is mostly not visible unless one is....well, underneath the car.
I'm also installing Thermo Tec sound/heat shield to the footbox panels (and the rest of the cockpit) while the panels are still loose. I should probably install the carpet pieces now as well, but probably won't.
Several things progressing in parallel (slowly), but nothing picture worthy to share.
I always welcome suggestions and advise from the forum!
Last edited by 460.465USMC; 01-21-2021 at 04:04 PM.
Chris
Coupe complete kit delivered: 4/22/24.
Build Thread. Coyote. T-56. IRS w/3.55. Wilwoods. PS. HVAC. Side windows.
MK4 Complete kit.
Build Thread Index. Delivered: 10/15/2020. Legal: 7/25/23. Coyote Gen3. TKO600 (0.64 OD). IRS w/3.55. PS. Wilwoods. Sway bars. This build is dedicated to my son, Benjamin.
Build Thread.
-
Senior Member
This is the road-facing side of the bottom footbox panel, right? How about just roughing up the panel and painting on some bed liner with a chip brush? Should look good and stay looking good after some driving.
MK4 #7838: IRS 3.55 TrueTrac T5z Dart 347
The drawing is from ~7th grade, mid-1970s
Meandering, leisurely build thread is
here
-
Post Thanks / Like - 1 Thanks, 0 Likes
-
Senior Member
That's an interesting idea, John. Hadn't considered a textured finish, but it would eliminate brush and/or roller lines/marks. I'm going to coat the underside of the body anyway with U-Pol Raptor or Duplicolor Bed Armor, so maybe I buy it now and treat the exposed portions of the underside panels? Not familiar with a "chip" brush. I'll have to research that.
Thanks for your suggestion!
Chris
Coupe complete kit delivered: 4/22/24.
Build Thread. Coyote. T-56. IRS w/3.55. Wilwoods. PS. HVAC. Side windows.
MK4 Complete kit.
Build Thread Index. Delivered: 10/15/2020. Legal: 7/25/23. Coyote Gen3. TKO600 (0.64 OD). IRS w/3.55. PS. Wilwoods. Sway bars. This build is dedicated to my son, Benjamin.
Build Thread.


 Thanks:
  Likes:


 Reply With Quote


