-
Senior Member

Disposable brush 
MK4 #7838: IRS 3.55 TrueTrac T5z Dart 347
The drawing is from ~7th grade, mid-1970s
Meandering, leisurely build thread is
here
-
Senior Member

Ah! A very technical tool, indeed! Thanks, John. Looks only a couple bucks at the hardware store. Going to give your idea serious consideration. Thanks again!
Chris
Coupe complete kit delivered: 4/22/24.
Build Thread. Coyote. T-56. IRS w/3.55. Wilwoods. PS. HVAC. Side windows.
MK4 Complete kit.
Build Thread Index. Delivered: 10/15/2020. Legal: 7/25/23. Coyote Gen3. TKO600 (0.64 OD). IRS w/3.55. PS. Wilwoods. Sway bars. This build is dedicated to my son, Benjamin.
Build Thread.
-
Senior Member
Panel Progress...Finally!
I finally have something to show in the way of progress on panels. I'll spare you the saga of the various trial-and-errors along the way. Hopefully, this will work out well for what I'm looking for.
As I mentioned previously, I'm going with the brushed aluminum finish for the panels that will be exposed in the engine bay. Getting the Dupli-color ceramic to dry in my 60 degree garage with 50% humidity has proved challenging. So, I did what any guy would do and moved the panels inside the house for drying. Yes, I have an amazing wife of almost 30 years...no, I didn't ask her ahead of time (easier to ask for forgiveness than permission, right?  ).
).
Here are the side footbox panels drying in the mud room closet. (The black panels on the left are PS and DS footbox lowers. This was taken when I was trialing-but-mostly-erroring on different coatings for panels that will be visible when underneath the car looking up).

Poor man's paint booth in the garage. Got this idea from another forum member.

Panels drying in the living room next to the wood stove.

This is the product I used to coat the bottom side of floors, footboxes, upper/lower trunk, and any others I think will be visible when looking up from underneath the car. Thanks for the suggestion, John Ibele.
Happened to catch a nice sale at a local auto parts store. The kit came with roller, brush, and pan as well. I have most of a gallon left, and will use it to coat the underside of the fiberglass body. Water clean-up and no smell. Especially helpful when applying in the closed garage (it's 30 deg. outside!) and drying inside the house!

Concerned about keeping a smooth surface for silicone where the panel surfaces contact the frame, I put down painter's tape. This example is the upper trunk floor.

And here's what the Dupli-color Bed Armor product looks like up close (PS footbox floor panel). I put on three coats.

Though I certainly saved some money by not powder coating, it was a HUGE time investment. (I'm referring to the panels that are getting Bed Armor).
Last edited by 460.465USMC; 02-01-2021 at 03:58 PM.
Chris
Coupe complete kit delivered: 4/22/24.
Build Thread. Coyote. T-56. IRS w/3.55. Wilwoods. PS. HVAC. Side windows.
MK4 Complete kit.
Build Thread Index. Delivered: 10/15/2020. Legal: 7/25/23. Coyote Gen3. TKO600 (0.64 OD). IRS w/3.55. PS. Wilwoods. Sway bars. This build is dedicated to my son, Benjamin.
Build Thread.
-
Senior Member
Continued
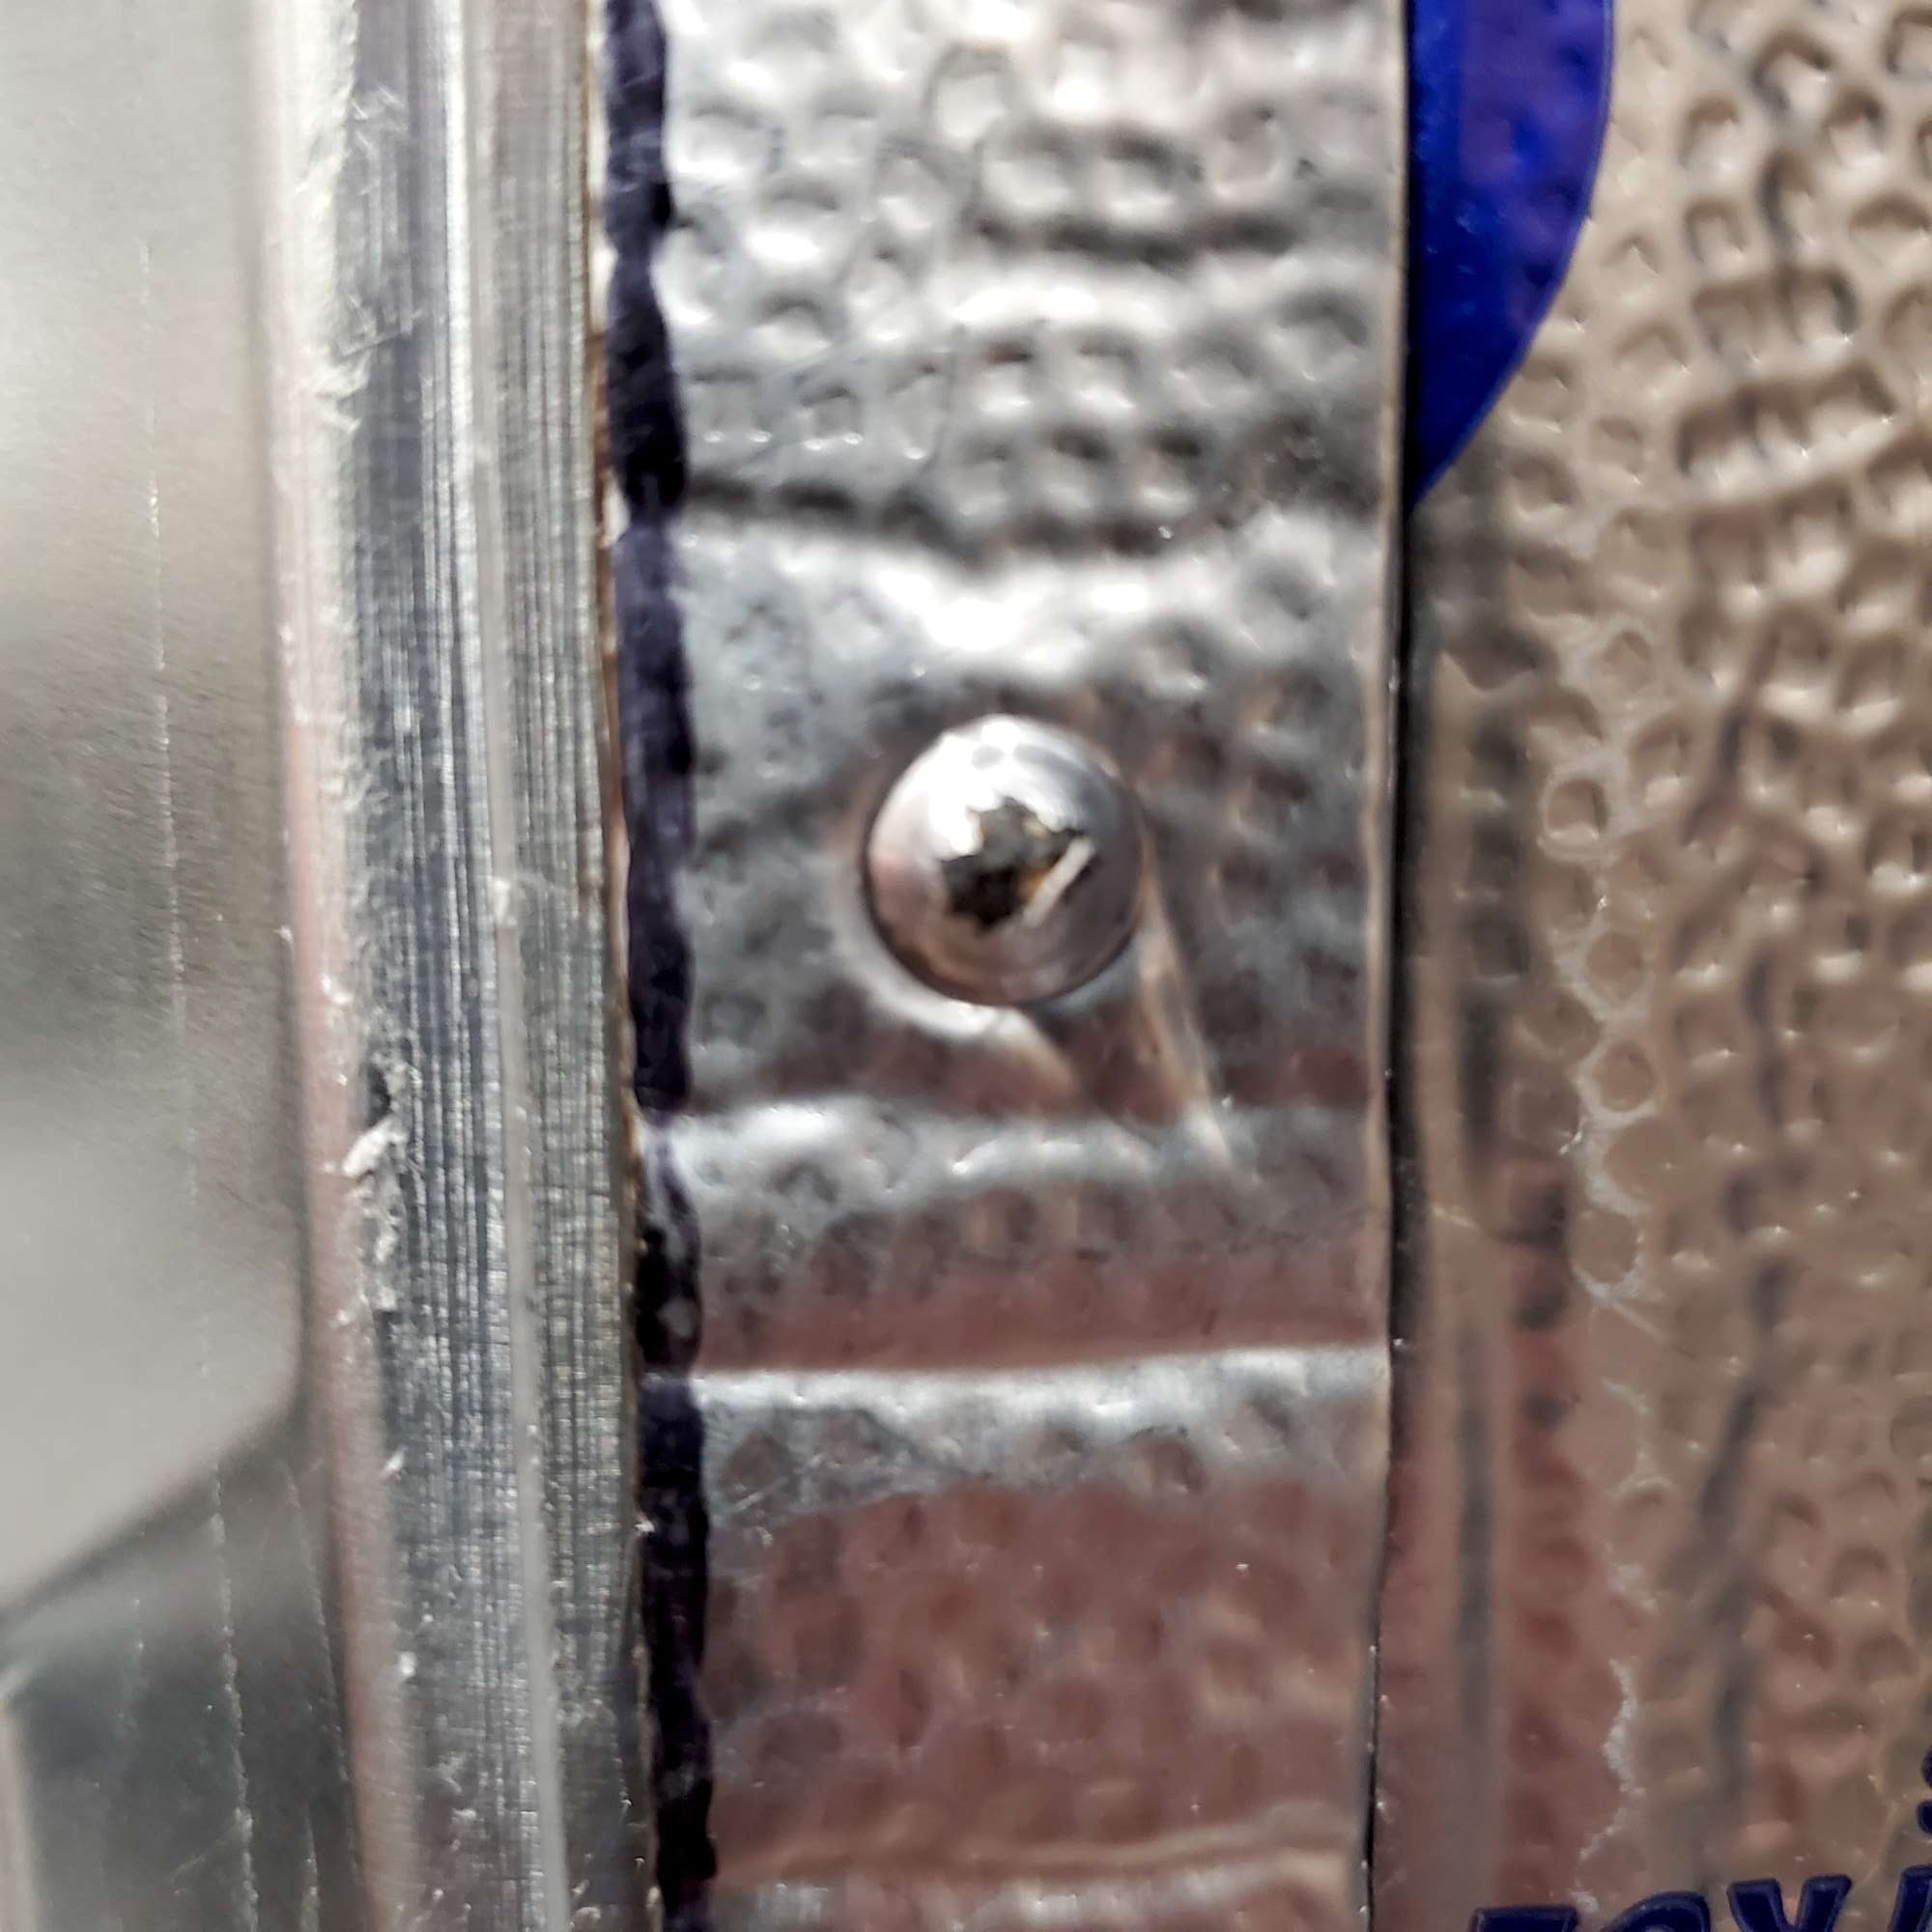
I'm using Thermo-Tec throughout the footboxes and cockpit. I found a way to get it to fit snuggly around the collapsed side of the rivets (I'm installing them so the flat side is visible in the engine bay--looks better to me this way). Drilled a slightly oversized hole in a piece of scrap wood, laid the Thermo-Tec over the hole in the wood, then used a sharp punch to create a hole just the right size to match the collapsed rivet. Should provide a good seal.

This is how it looks installed. Also, found a socket slightly larger than the collapsed rivet to even further persuade the Thermo-Tec to seal around the rivet. Had trouble getting my phone to focus, but I think you get the idea.
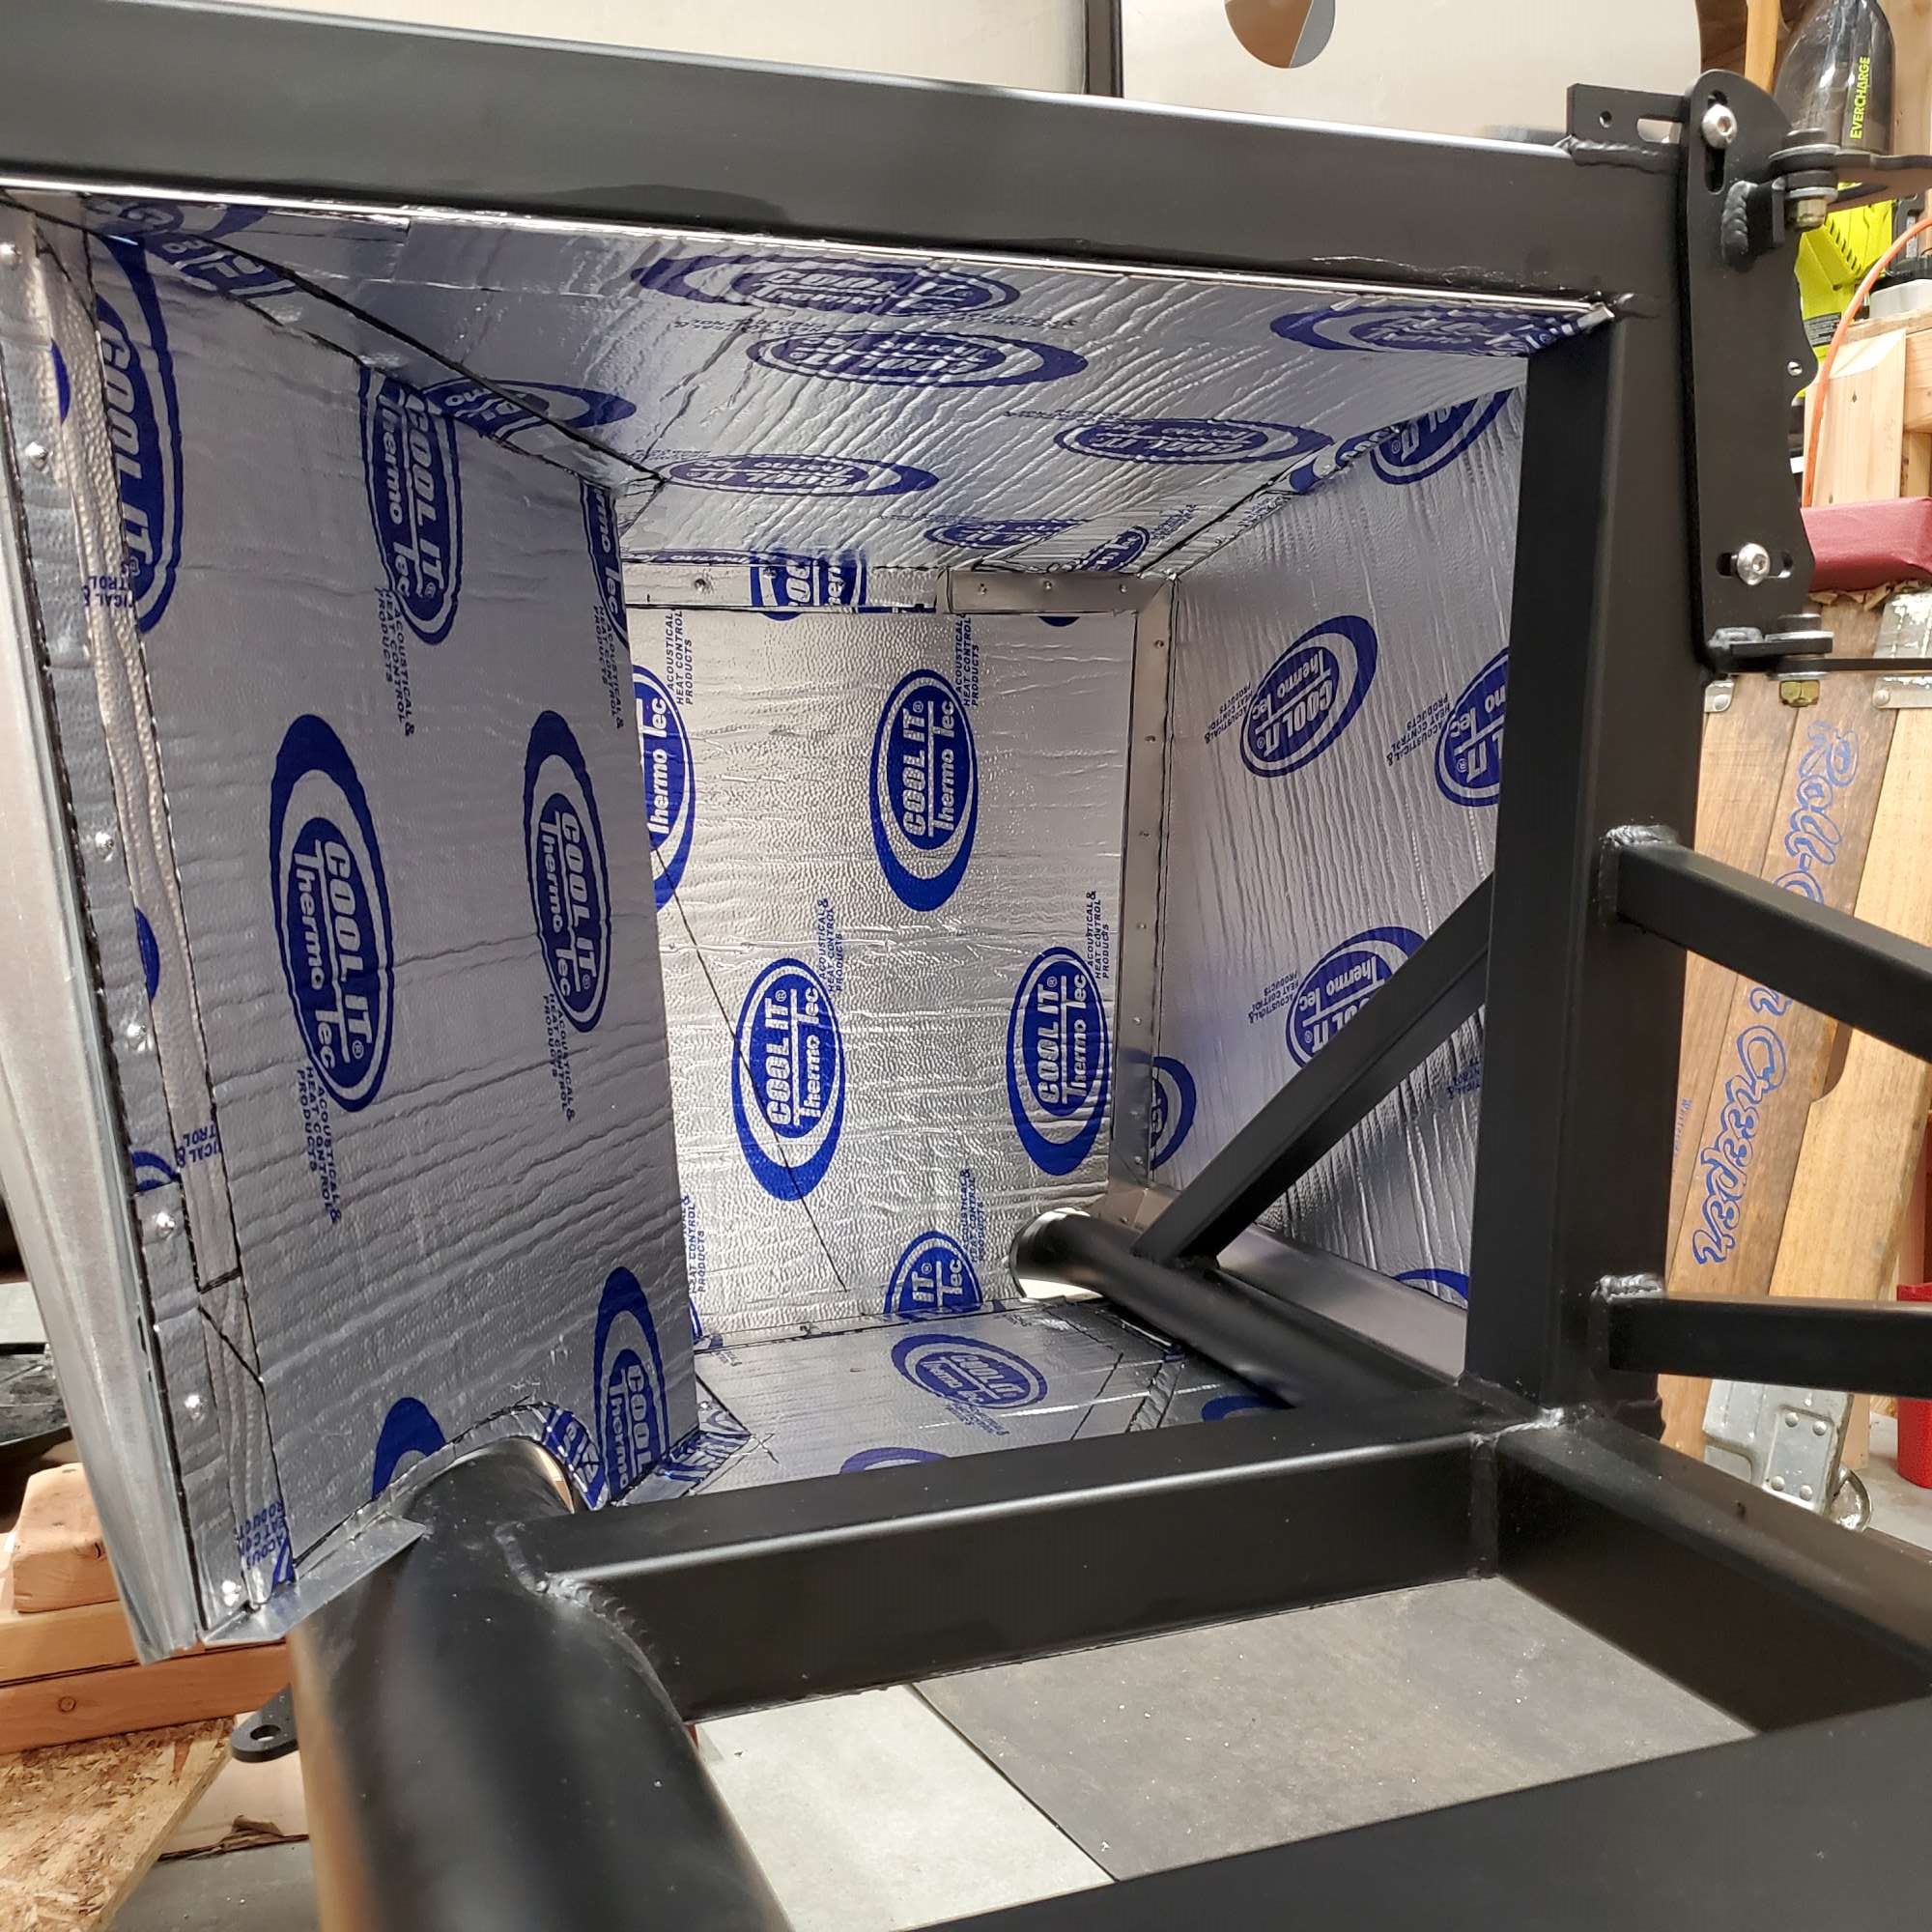
Passenger side footbox installed! (Difficult to keep the rivet tool from scratching my finished ceramic paint, but I'm getting better).

I installed the Thermo-Tec before assembling the panels. Decided to do this after reading from several forum members about the contortion exercises if installing the material after the panels are in place. (Though I will undoubtedly face similar contortion challenges when I install the carpet later on).
Looking forward to finishing the PS floor and rest of cockpit panels.
Always welcome recommendations and suggestions from the forum!
Chris
Coupe complete kit delivered: 4/22/24.
Build Thread. Coyote. T-56. IRS w/3.55. Wilwoods. PS. HVAC. Side windows.
MK4 Complete kit.
Build Thread Index. Delivered: 10/15/2020. Legal: 7/25/23. Coyote Gen3. TKO600 (0.64 OD). IRS w/3.55. PS. Wilwoods. Sway bars. This build is dedicated to my son, Benjamin.
Build Thread.
-
Senior Member
Hey Chris - great progress. Fun to see it coming together. I get your point in relation to the huge time sink involved in doing ... anything ... with the panels, other than taking them to a powder coater. The only DIY option I would consider doing, after spending many hours with hammer tone paint, would be to use SharkHide and call it good.
Footboxes ... looking good. You're going to plug any holes you see before carpet, right? I'm sure you know, but just in case (and seeing the gap around the round frame exiting the footbox) I can't help mentioning ... you're gonna plug all gaps in the footboxes and seal them up tight, right? Those gaps are there on every car, but need to be completely sealed to prevent any air from the engine bay getting into your footbox. Otherwise all your Thermo-Tec will be for naught ") .
.
MK4 #7838: IRS 3.55 TrueTrac T5z Dart 347
The drawing is from ~7th grade, mid-1970s
Meandering, leisurely build thread is
here
-
Senior Member

Originally Posted by
John Ibele

Footboxes ... looking good. You're going to plug any holes you see before carpet, right? I'm sure you know, but just in case (and seeing the gap around the round frame exiting the footbox) I can't help mentioning ... you're gonna plug all gaps in the footboxes and seal them up tight, right? Those gaps are there on every car, but need to be completely sealed to prevent any air from the engine bay getting into your footbox. Otherwise all your Thermo-Tec will be for naught
.
Hi John. Thanks for mentioning the gaps in the footbox. Yes, I plan to seal these, but may need to do some more research on the best solution, especially for the largest gap around the two inch round tube. What do you recommend?
For the smaller gap around the 4" main chassis rail I was going to use silicone once I have the PS floor in place. Is that a good choice to stop the heat? That gap is at most 1/8" at its widest point.
Chris
Coupe complete kit delivered: 4/22/24.
Build Thread. Coyote. T-56. IRS w/3.55. Wilwoods. PS. HVAC. Side windows.
MK4 Complete kit.
Build Thread Index. Delivered: 10/15/2020. Legal: 7/25/23. Coyote Gen3. TKO600 (0.64 OD). IRS w/3.55. PS. Wilwoods. Sway bars. This build is dedicated to my son, Benjamin.
Build Thread.
-
Senior Member
Hey Chris, I haven't done much looking around myself, but I think most folks have done either aluminum patches, sealant, or aluminum foil tape. For the aluminum patch, could do riveted (if in an area where its not going to show in the engine compartment), or glue it in place. I'll probably do the latter for the big spot that shows in your picture, stuck in place with either silicone or 3M 77. For the smaller gaps I think silicone is just fine. Gasket maker is another option, probably more expensive but dries flat dark gray or black, if its going to show at all.
MK4 #7838: IRS 3.55 TrueTrac T5z Dart 347
The drawing is from ~7th grade, mid-1970s
Meandering, leisurely build thread is
here
-
Post Thanks / Like - 1 Thanks, 0 Likes
-
Last edited by Papa; 02-02-2021 at 03:02 PM.
-
Post Thanks / Like - 1 Thanks, 3 Likes
-
Senior Member
Originally Posted by
Papa
I did what was described by John and used aluminum patches siliconed in for the big gaps and silicone for the small gaps.
Then did the insulation.
Really appreciate you weighing in, Dave! Your pictures are very helpful--I'm a visual guy! Looks like I'll need to scrape off some Thermo-Tec and silicone in a patch for the large gap around the 2" tube. I also like your idea of aluminum tape along the seams. Is that off-the-shelf tape like what's used in HVAC ducting? I'm pretty sure I have a roll of it I've been hanging on to for far too long! Time to put it to good use.
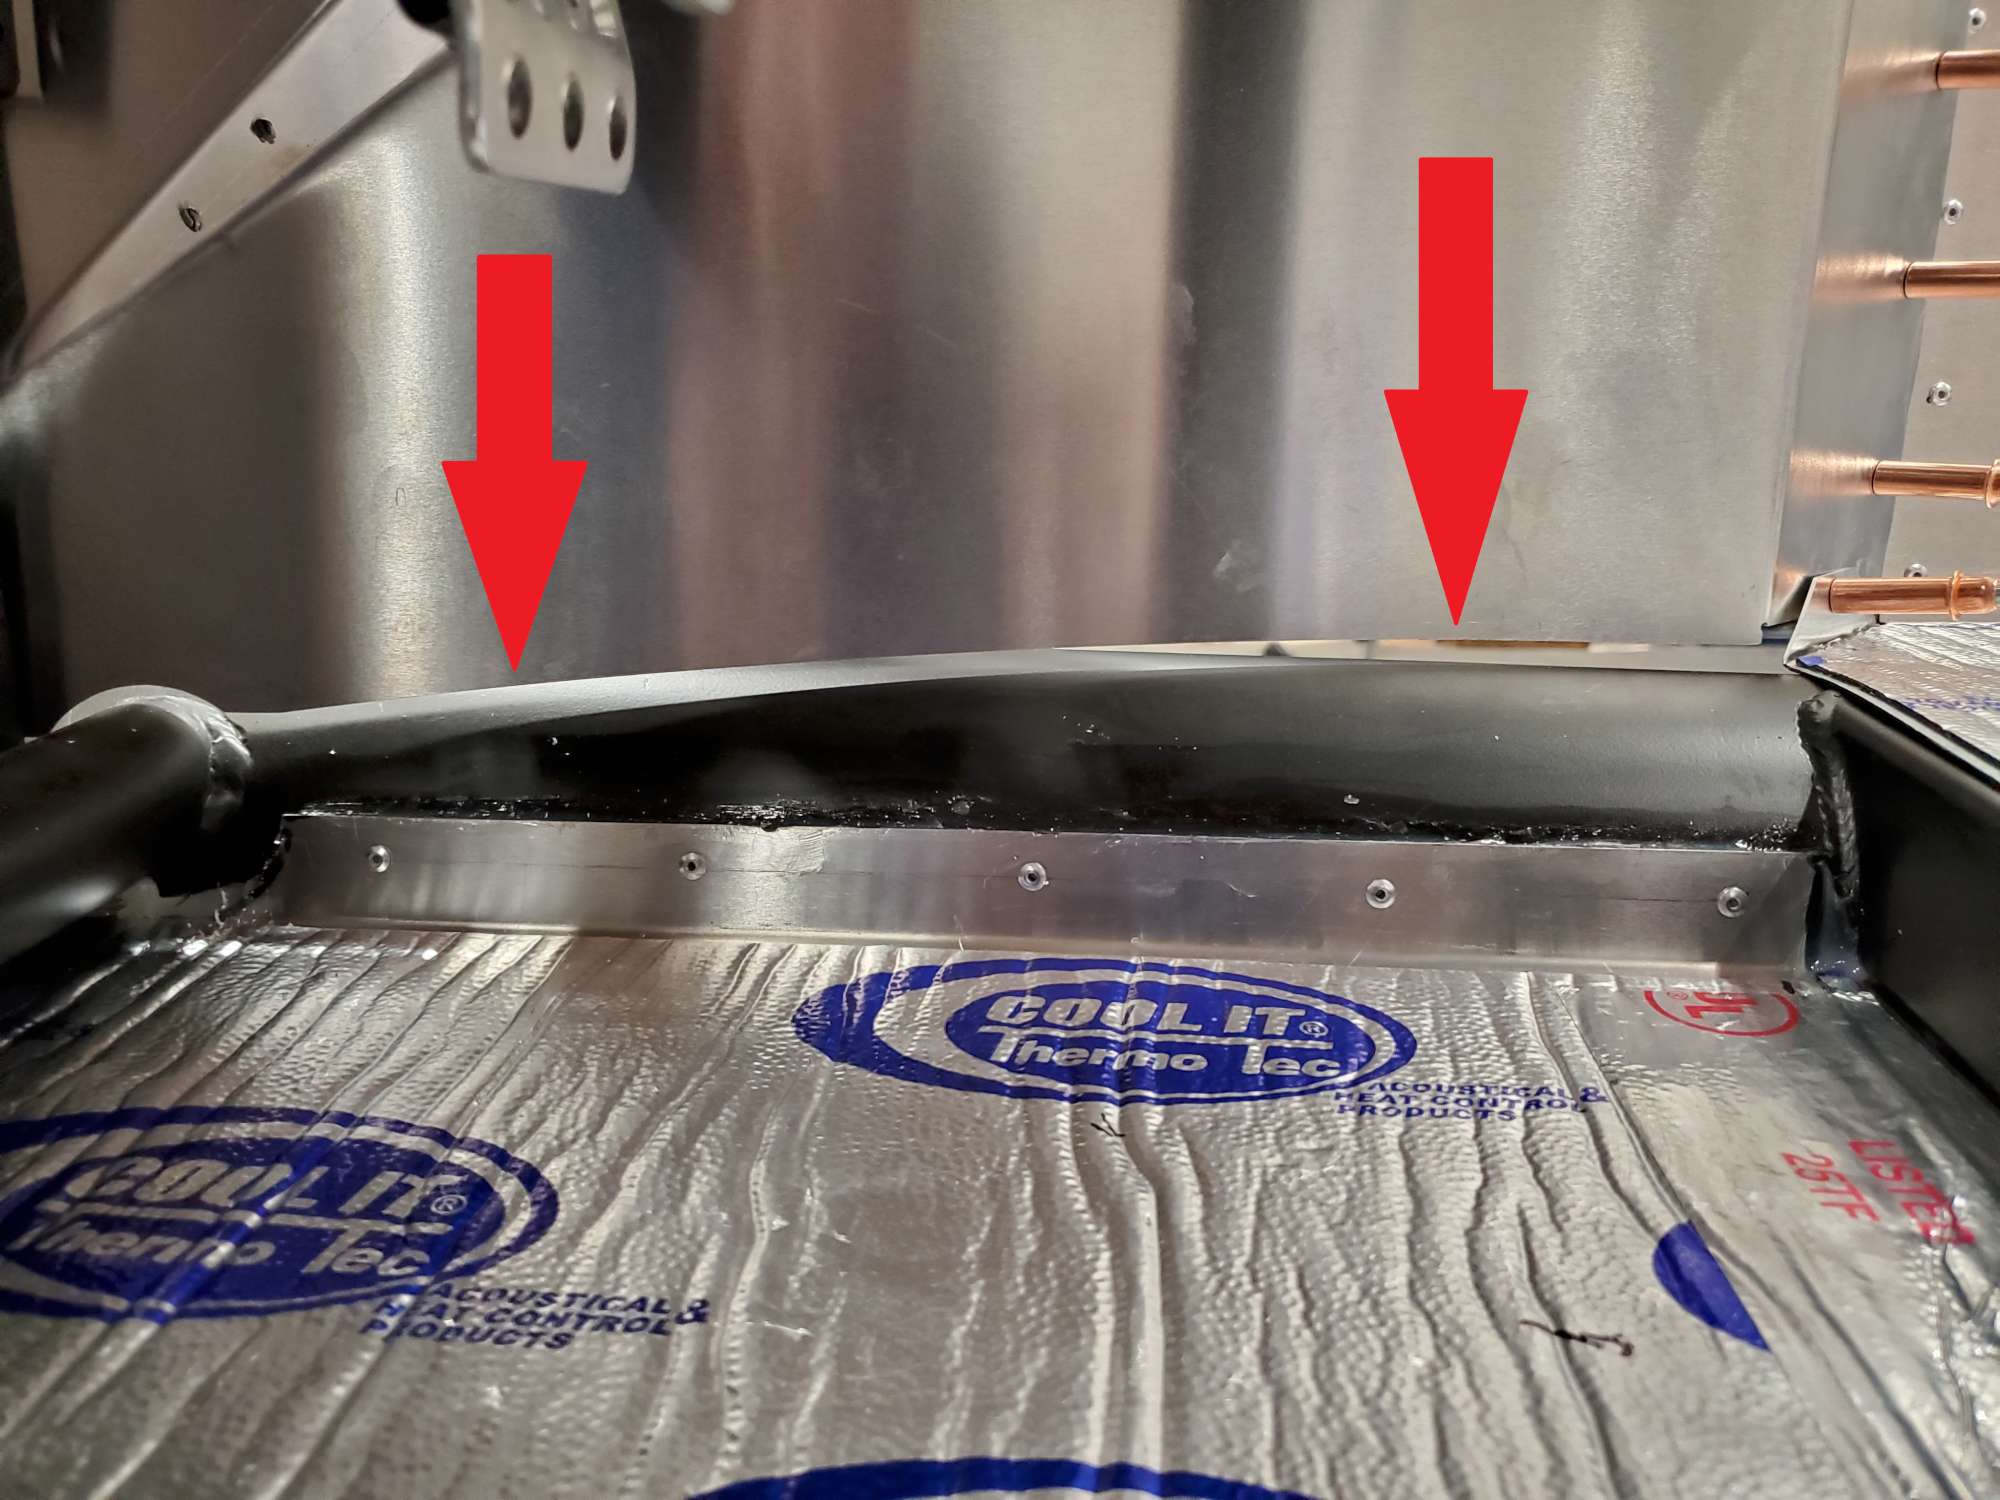
Question: did you guys rivet or silicone along the lower area of the outer footbox panel--see red arrows in picture below? Or, is this left as is, i.e. no rivets or silicone. The manual doesn't call for rivets or silicone here.

P.S. Dave, I remember your comment about chestnuts roasting on an open fire--reference to heat coming in from a gap somewhere in your DS footbox. Still makes me chuckle. Sounds like one can't be too careful to get all the gaps/seams sealed up tight.
Chris
Coupe complete kit delivered: 4/22/24.
Build Thread. Coyote. T-56. IRS w/3.55. Wilwoods. PS. HVAC. Side windows.
MK4 Complete kit.
Build Thread Index. Delivered: 10/15/2020. Legal: 7/25/23. Coyote Gen3. TKO600 (0.64 OD). IRS w/3.55. PS. Wilwoods. Sway bars. This build is dedicated to my son, Benjamin.
Build Thread.
-
Chris,
The tape is exactly what you'll find in the HVAC isle of your favorite home improvement store, nothing special about it at all. It's probably not really needed, but I like to go a little beyond sometimes and it's easy to apply, so why not. On the lower edge of the foot box, I just siliconed it and didn't put any rivets in as I was concerned about trying to hit the right spot every time and once all the other edges are riveted in, the panel is solid and water tight with the silicone.
Man that June drive was HOT! A couple of pieces of AC insulation to fill in the gaps at the top of the driver's foot box and it's much better now.
Keep up the great work! Your build is looking really nice.
Dave
-
Post Thanks / Like - 1 Thanks, 0 Likes
-
[QUOTE=460.465USMC;444035]Really appreciate you weighing in, Dave! Your pictures are very helpful--I'm a visual guy! Looks like I'll need to scrape off some Thermo-Tec and silicone in a patch for the large gap around the 2" tube. I also like your idea of aluminum tape along the seams. Is that off-the-shelf tape like what's used in HVAC ducting? I'm pretty sure I have a roll of it I've been hanging on to for far too long! Time to put it to good use.
Question: did you guys rivet or silicone along the lower area of the outer footbox panel--see red arrows in picture below? Or, is this left as is, i.e. no rivets or silicone. The manual doesn't call for rivets or silicone here.
P.S. Dave, I remember your comment about chestnuts roasting on an open fire--reference to heat coming in from a gap somewhere in your DS footbox. Still makes me chuckle. Sounds like one can't be too careful to get all the gaps/seams sealed up tight.[/QUOTE
I riveted mine, just need to do the DS foot box.
-
Senior Member
A Patch. A Little Progress. A DS FB Question.
I made a patch out of the original DS FB front panel that won't get used in my build. This is probably my first "fabrication"--I use that term very loosely--of the build. Spent more time on it than I care to admit. It does however, reduce the huge gap around the PS 1.5" curved tube. The remaining 1/16" to 1/8" I filled with silicone. By the time I was done hacking up this patch, the scratches were many and deep. Gave it the brushed/ceramic treatment for good measure anyway. I'm hoping this area isn't very visible once the body is and and engine in place.
After silicone fill.

Before silicone fill.

Since I'm working on the cockpit panels I figured it was a good time to install the Edwardb E-brake pulley mod. I bought the same ones from Amazon I saw Mark Eaton pick up, as they advertise weather resistance.


After the PS footbox build, and some cockpit panel progress I know how to speak fluent Cleco.

Question: what is a good way to close this horizontal gap in the DS footbox, between the bottom of the inner wall and the 4" main chassis tube? At current mock-up it's a 1/4" gap, which seems a bit too much for silicone. On the other hand, making a fill-in piece doesn't seem like a great idea either. What did you guys do?
From the engine bay looking toward the DS footbox.

Chris
Coupe complete kit delivered: 4/22/24.
Build Thread. Coyote. T-56. IRS w/3.55. Wilwoods. PS. HVAC. Side windows.
MK4 Complete kit.
Build Thread Index. Delivered: 10/15/2020. Legal: 7/25/23. Coyote Gen3. TKO600 (0.64 OD). IRS w/3.55. PS. Wilwoods. Sway bars. This build is dedicated to my son, Benjamin.
Build Thread.
-
Senior Member

Originally Posted by
460.465USMC
Question: what is a good way to close this horizontal gap in the DS footbox, between the bottom of the inner wall and the 4" main chassis tube? At current mock-up it's a 1/4" gap, which seems a bit too much for silicone. On the other hand, making a fill-in piece doesn't seem like a great idea either. What did you guys do?
From the engine bay looking toward the DS footbox.
That gap does seem a little wider than I've experienced. If you're positive the panel(s) are properly positioned and it's not going to get any better, probably going to need some fill pieces from aluminum. I've seen some guys do that. Or you might get away with a couple layers of aluminum tape. The ones I've done were sitting down more on the tube and I used a bead of structural epoxy on each side.
Just a constructive hint FWIW. I'd recommend trying to clean up the silicone a little better than showing in the pictures. Once you place the panel and pull the rivets, try to get all the squeeze-out cleaned up. That stuff is nasty and not much is going to stick to it. Plus just looks neater.
Build 1: Mk3 Roadster #5125. Sold 11/08/2014.
Build 2: Mk4 Roadster #7750. Sold 04/10/2017.
Build Thread
Build 3: Mk4 Roadster 20th Anniversary #8674. Sold 09/07/2020.
Build Thread and
Video.
Build 4: Gen 3 Type 65 Coupe #59. Gen 3 Coyote. Legal 03/04/2020.
Build Thread and
Video
Build 5: 35 Hot Rod Truck #138. LS3 and 4L65E auto. Rcvd 01/05/2021. Legal 04/20/2023.
Build Thread. Sold 11/9/2023.
-
Post Thanks / Like - 1 Thanks, 0 Likes
-
Member

I am glad to have found this build post. I will be following your build to gain allot more understanding of the processes, guidance and tips you are learning.. My build is schedule for later this year. Keep up the great documentation!
1969 C10 w/383 Stroker Loud & Obnoxious
-
Post Thanks / Like - 1 Thanks, 0 Likes
-
Senior Member
Originally Posted by
edwardb
That gap does seem a little wider than I've experienced. If you're positive the panel(s) are properly positioned and it's not going to get any better, probably going to need some fill pieces from aluminum. I've seen some guys do that. Or you might get away with a couple layers of aluminum tape. The ones I've done were sitting down more on the tube and I used a bead of structural epoxy on each side.
Just a constructive hint FWIW. I'd recommend trying to clean up the silicone a little better than showing in the pictures. Once you place the panel and pull the rivets, try to get all the squeeze-out cleaned up. That stuff is nasty and not much is going to stick to it. Plus just looks neater.
Paul, thanks for reviewing my situation. I wrestled with the fitment of the DS FB inner wall panels for some time. I think it's about as good as my skills can get it, i.e. I'm stuck with the 1/4" gap. (I wish we were neighbors...I'd buy you a cup of coffee for a few minutes of your time for some pointers. ). I spend a lot of time on these seemingly "easy" scenarios, and often still not sure if it's done right. For example, the rear edge of this same panel overlapped the "A" panel on the transmission tunnel by almost an inch at the top, tapering to less than 1/2" on the bottom. After head scratching I decided it shouldn't be there, and removed the overlap with my jigsaw. (The pictures I took before removing panels at delivery confirmed it was assembled that way). It fits perfect now, but leaves me wondering why I had to remove so much material?!?
After more consideration (and your helpful comments above) I'm leaning toward fitting an aluminum patch, then I should only have to deal with 1/8" gap or less (hopefully!). I will probably attach it on the engine bay side like I did on the PS FB patch shown above. Any concerns with that approach?
Chris
Coupe complete kit delivered: 4/22/24.
Build Thread. Coyote. T-56. IRS w/3.55. Wilwoods. PS. HVAC. Side windows.
MK4 Complete kit.
Build Thread Index. Delivered: 10/15/2020. Legal: 7/25/23. Coyote Gen3. TKO600 (0.64 OD). IRS w/3.55. PS. Wilwoods. Sway bars. This build is dedicated to my son, Benjamin.
Build Thread.
-
Senior Member
Originally Posted by
460.465USMC
Paul, thanks for reviewing my situation. I wrestled with the fitment of the DS FB inner wall panels for some time. I think it's about as good as my skills can get it, i.e. I'm stuck with the 1/4" gap. (I wish we were neighbors...I'd buy you a cup of coffee for a few minutes of your time for some pointers.
). I spend a lot of time on these seemingly "easy" scenarios, and often still not sure if it's done right. For example, the rear edge of this same panel overlapped the "A" panel on the transmission tunnel by almost an inch at the top, tapering to less than 1/2" on the bottom. After head scratching I decided it shouldn't be there, and removed the overlap with my jigsaw. (The pictures I took before removing panels at delivery confirmed it was assembled that way). It fits perfect now, but leaves me wondering why I had to remove so much material?!?
After more consideration (and your helpful comments above) I'm leaning toward fitting an aluminum patch, then I should only have to deal with 1/8" gap or less (hopefully!). I will probably attach it on the engine bay side like I did on the PS FB patch shown above. Any concerns with that approach?
Yeah, if you're cutting that much material off something isn't right. The pieces are surprisingly accurate. On my last Mk4 build, the only cutting I had to do was around a couple welds (e.g. small notches) and right along the top of the transmission tunnel. The upright section of the floor piece was just a bit taller than the tunnel. Other builders I've seen with the same issue. The rest of the pieces were just about perfect once properly positioned with the right overlaps. One of the keys in my experience is don't get locked into the location(s) where Factory Five temporarily anchored the pieces with screws for shipping. Typically pretty close but maybe not exact.
But don't let this keep you up at night. It will all work just fine. What I've seen guys do with the DS inside panel on the 4-inch tube is put a number of right angle pieces on the inside. Each piece as long as possible but also short enough to navigate the curve. Riveting to the panel and the 4-inch tube. Closes the gap plus ties down the panel. Then later covered by insulation and carpet. That's how I would do it. Maybe someone reading the thread could post a picture of how they did it.
Build 1: Mk3 Roadster #5125. Sold 11/08/2014.
Build 2: Mk4 Roadster #7750. Sold 04/10/2017.
Build Thread
Build 3: Mk4 Roadster 20th Anniversary #8674. Sold 09/07/2020.
Build Thread and
Video.
Build 4: Gen 3 Type 65 Coupe #59. Gen 3 Coyote. Legal 03/04/2020.
Build Thread and
Video
Build 5: 35 Hot Rod Truck #138. LS3 and 4L65E auto. Rcvd 01/05/2021. Legal 04/20/2023.
Build Thread. Sold 11/9/2023.
-
Post Thanks / Like - 1 Thanks, 0 Likes
-
Senior Member
Brilliant, Paul! I really like your idea of right angle pieces on the inside: adds rigidity. I was in the garage "fabricating" a piece so didn't see your reply.
With the panels back in position I will let this piece--see picture below--rest along the 4" chassis tube on the engine side. Then drill through the existing holes in the patch into the inner wall panel. Then silicone and rivet. From there I will take your idea of the right angle pieces for rigidity. I think about three or four will probably do. I'm feeling better about about solving my gap issue. Now to execute!
Using my jigsaw, 1.5" hole saw, and Dremel I cut this piece out of the 0.040" firewall that I'm not using. I traced the outline of the factory panel to copy the curve. Once it's mocked up, I will disassemble and apply the brushed/ceramic clear. Then back together for the final time (hopefully!).

Chris
Coupe complete kit delivered: 4/22/24.
Build Thread. Coyote. T-56. IRS w/3.55. Wilwoods. PS. HVAC. Side windows.
MK4 Complete kit.
Build Thread Index. Delivered: 10/15/2020. Legal: 7/25/23. Coyote Gen3. TKO600 (0.64 OD). IRS w/3.55. PS. Wilwoods. Sway bars. This build is dedicated to my son, Benjamin.
Build Thread.
-
-
Post Thanks / Like - 1 Thanks, 1 Likes
-
Senior Member
Nice! That's much better than my humble patch panel. How did you form the aluminum to the 4" chassis tube?
Chris
Coupe complete kit delivered: 4/22/24.
Build Thread. Coyote. T-56. IRS w/3.55. Wilwoods. PS. HVAC. Side windows.
MK4 Complete kit.
Build Thread Index. Delivered: 10/15/2020. Legal: 7/25/23. Coyote Gen3. TKO600 (0.64 OD). IRS w/3.55. PS. Wilwoods. Sway bars. This build is dedicated to my son, Benjamin.
Build Thread.
-
02-20-2021, 07:28 PM
#100
I had a spare piece of tubing that I chucked up in the vise and formed it with a bodywork hammer until it looked right. No one will see it after carpet so however you accomplish it works.
I see that you are in Spokane. I picked my kit up from Spokane partially built about two years ago.
-
02-21-2021, 11:27 PM
#101
Senior Member

Chris, I'm arriving late to this party, and it looks like Edward B has already answered your questions (and you should definitely defer to him over me on any build-related issues). I just wanted to mention that aluminum flashing material works well to make small patches for sealing the footboxes and other areas. It is very thin (you can easily cut it with scissors), and it can be bent into complex shapes. I found I didn't even need rivets -- I just "glued" the patches in place using the same silicone sealant I used everywhere else.
Anyway, your build is looking great!
MKIV Complete Kit #9822 l BluePrint 347 EFI l TKO600 l Power Steering l Heater/Defrost l
Build Thread
-
Post Thanks / Like - 1 Thanks, 0 Likes
-
02-22-2021, 12:01 PM
#102
Senior Member
Originally Posted by
D Stand
I had a spare piece of tubing that I chucked up in the vise and formed it with a bodywork hammer until it looked right. No one will see it after carpet so however you accomplish it works.
I see that you are in Spokane. I picked my kit up from Spokane partially built about two years ago.
That's cool. I bet you were able to save quite a few shekels on your kit.
I recently changed positions in my company, but used to have much of Puget Sound as my territory, so got over there all the time.
Thanks again for the tip.
Chris
Coupe complete kit delivered: 4/22/24.
Build Thread. Coyote. T-56. IRS w/3.55. Wilwoods. PS. HVAC. Side windows.
MK4 Complete kit.
Build Thread Index. Delivered: 10/15/2020. Legal: 7/25/23. Coyote Gen3. TKO600 (0.64 OD). IRS w/3.55. PS. Wilwoods. Sway bars. This build is dedicated to my son, Benjamin.
Build Thread.
-
02-22-2021, 01:04 PM
#103
Senior Member
Originally Posted by
JB in NOVA
Chris, I'm arriving late to this party, and it looks like Edward B has already answered your questions (and you should definitely defer to him over me on any build-related issues). I just wanted to mention that aluminum flashing material works well to make small patches for sealing the footboxes and other areas. It is very thin (you can easily cut it with scissors), and it can be bent into complex shapes. I found I didn't even need rivets -- I just "glued" the patches in place using the same silicone sealant I used everywhere else.
Anyway, your build is looking great!
Great idea, JB. I can definitely see how flashing would come in very useful in some spots. And, easy to work with to boot. Thanks!
Chris
Coupe complete kit delivered: 4/22/24.
Build Thread. Coyote. T-56. IRS w/3.55. Wilwoods. PS. HVAC. Side windows.
MK4 Complete kit.
Build Thread Index. Delivered: 10/15/2020. Legal: 7/25/23. Coyote Gen3. TKO600 (0.64 OD). IRS w/3.55. PS. Wilwoods. Sway bars. This build is dedicated to my son, Benjamin.
Build Thread.
-
02-23-2021, 03:52 PM
#104
Senior Member
DS FB Inner Wall Panel Patched...Much Better
Here's how the inner wall of my DS FB panel turned out. The gap is minimized now, 1/8" at its widest point. The simple "brackets" I cut from 0.040 scrap really serve to strengthen this wall. All in all, it's much better than when I started with the 1/4" gap.
Thanks to everyone who weighed in and gave me great guidance/ideas! Now, I just need to learn to sweat less on the small stuff.
The top half of the brackets are cleco'd in the picture, but the bottom half is riveted and glued. Once it's permanently installed I plan to glue in a small patch to fill in the gap at the transition toward the tunnel.

Chris
Coupe complete kit delivered: 4/22/24.
Build Thread. Coyote. T-56. IRS w/3.55. Wilwoods. PS. HVAC. Side windows.
MK4 Complete kit.
Build Thread Index. Delivered: 10/15/2020. Legal: 7/25/23. Coyote Gen3. TKO600 (0.64 OD). IRS w/3.55. PS. Wilwoods. Sway bars. This build is dedicated to my son, Benjamin.
Build Thread.
-
Post Thanks / Like - 0 Thanks, 2 Likes
-
02-27-2021, 02:12 PM
#105
Senior Member
Seasoned Builders...Thanks for Sticking Around!
I just got out to my garage this morning, and it really hit me. It's been on my mind for some time: seasoned builders who stick around long after their builds (or four!) are done to give us "freshmen" suggestions, advice, and good ol' fashioned encouragement. I've needed all three many times, and I'm barely out of the starting blocks on my build. Likewise, I have great appreciation for those of you who are mid-build, offering your time and guidance. But for you seasoned builders who keep following along on the various builds underway, and answering questions (many of them duplicate) from us Noobies, thanks! Thanks for sticking around!
Chris
Coupe complete kit delivered: 4/22/24.
Build Thread. Coyote. T-56. IRS w/3.55. Wilwoods. PS. HVAC. Side windows.
MK4 Complete kit.
Build Thread Index. Delivered: 10/15/2020. Legal: 7/25/23. Coyote Gen3. TKO600 (0.64 OD). IRS w/3.55. PS. Wilwoods. Sway bars. This build is dedicated to my son, Benjamin.
Build Thread.
-
Post Thanks / Like - 1 Thanks, 5 Likes
-
03-24-2021, 10:54 PM
#106
Senior Member
drilling. Drilling. DRILLING!
Yeah, since my last update about a month ago it's been drilling, drilling, and more drilling. Insert not a few clecos, silicone, and lots of jigsaw puzzle work applying the Thermo-Tec sound/heat barrier, and that's been a big portion of my time lately. I enjoyed aspects of this part of the build. It's somewhat mindless, so I can put on some tunes and go to work.
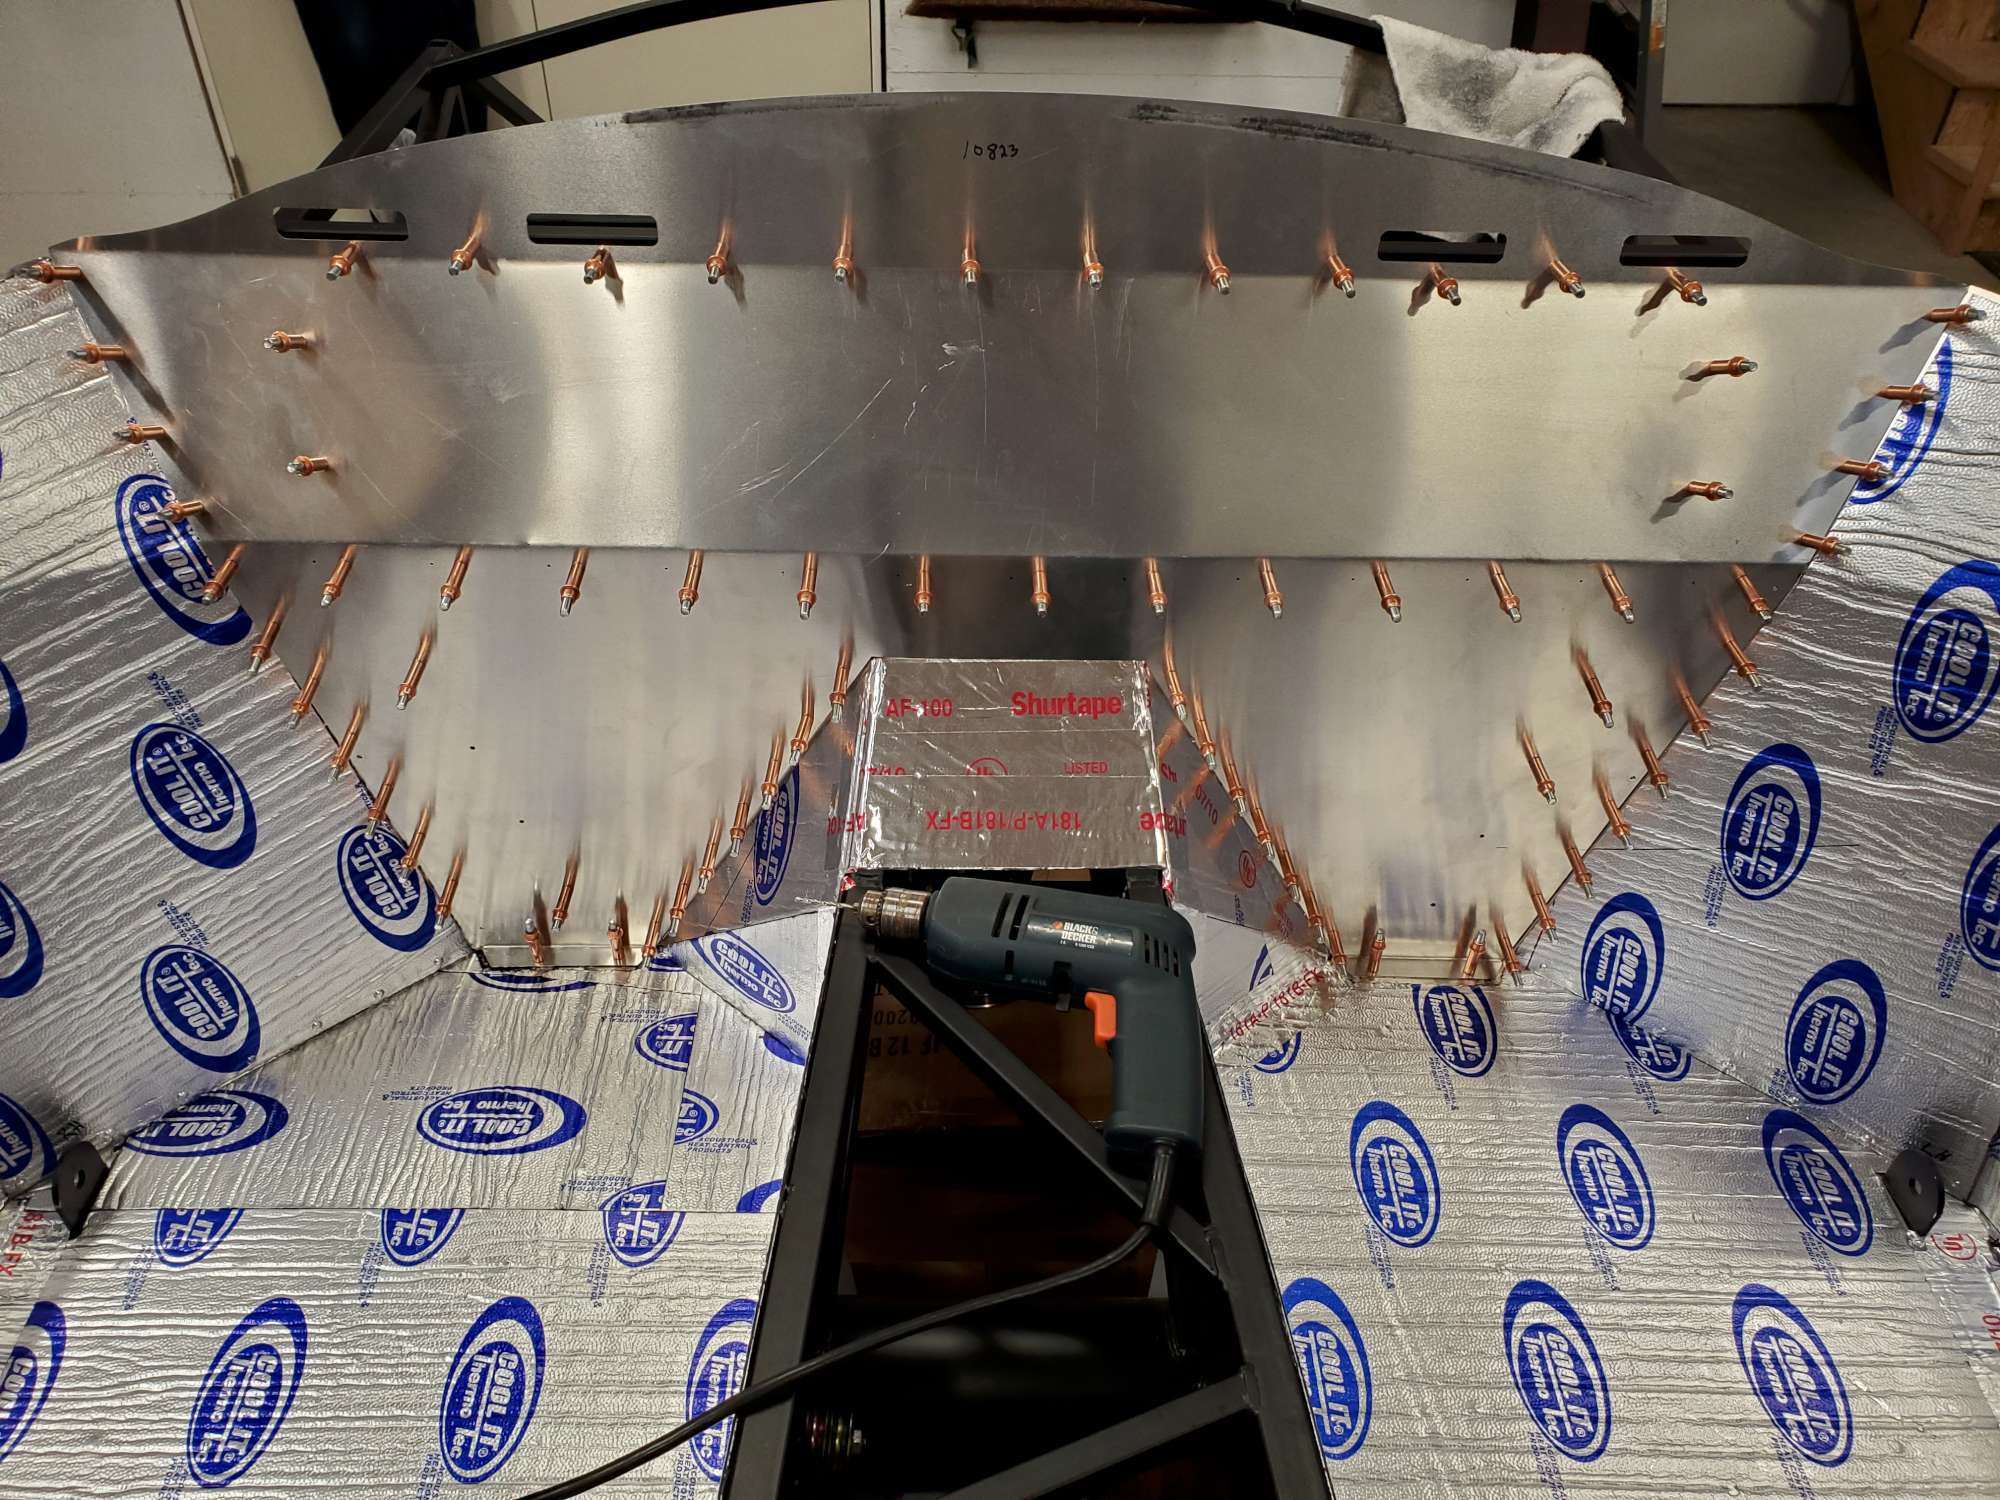
All of my floor pieces in the cockpit are riveted, silicone applied, and Thermo-Tec installed. Here's a shot looking rearward at the rear cockpit wall. The fit wasn't perfect--probably due to my noobiness--but it is solid, and should function as well as something that looks prettier. Pretty sure this is my personal best for number of clecos used! I will apply the Thermo-Tec to it once I have the fuel lines, brake lines, and e-brake installed, so as to leave me easier access. My trusty Black & Decker electric drill my wife bought for my birthday 25+ years ago is still working well!
It was fun to try my hand at making my first bracket (firewall support). I'm sure this is overkill because my firewall is 0.090, and already very rigid. But, it gave me a good excuse to try my hand at making a bracket that won't be seen. Plus, I needed a good excuse to pull the trigger on a new tool: this is a metal brake made by Klutch. True confession: I had to YouTube how to use it, as this is new to me as well. The bracket came together just fine.


Finished mocking up the DS footbox. Clecos only for now, of course, until the body is ready to put on.

I couldn't think of any reason not to rivet and silicone the push-out section on the left side of the DS footbox, so it's done too.

Another fun thing (and a new tool as well) I did was try my hand at powder coating. I picked up a small toaster-style oven for dirt cheap off Amazon (~$40), and a powder coating gun from Eastwood. I PC'd the accelerator pedal bracket, and the circular bracket for the metal fuel filler tube on the gas tank. This color is matte black. I put two coats on the pedal bracket. It was fairly straight forward after I went through the whole process. Quick, and not very messy and no odor (had plenty of that recently from my clear coat rattle can work). The original pedal bracket I received was bent backwards (middle). I show it here to give a before and after comparison. F5 sent me a replacement, which I PC'd (right).

Chris
Coupe complete kit delivered: 4/22/24.
Build Thread. Coyote. T-56. IRS w/3.55. Wilwoods. PS. HVAC. Side windows.
MK4 Complete kit.
Build Thread Index. Delivered: 10/15/2020. Legal: 7/25/23. Coyote Gen3. TKO600 (0.64 OD). IRS w/3.55. PS. Wilwoods. Sway bars. This build is dedicated to my son, Benjamin.
Build Thread.
-
Post Thanks / Like - 0 Thanks, 1 Likes
-
03-24-2021, 10:57 PM
#107
Senior Member
drilling. Drilling. DRILLING! (continued)
It seemed like I had some momentum with the panels, so I kept chugging along into the trunk. Fitted and drilled the upper and lower trunk panels. I purchased the Russ Thompson drop trunk kit. It wasn't too bad to assemble. I followed his instructions. You can see it below. Again, not perfection, but I'm learning a lot, and it is satisfying to tackle these challenges along the way. See, even the world's slowest builder can make a little progress!


Chris
Coupe complete kit delivered: 4/22/24.
Build Thread. Coyote. T-56. IRS w/3.55. Wilwoods. PS. HVAC. Side windows.
MK4 Complete kit.
Build Thread Index. Delivered: 10/15/2020. Legal: 7/25/23. Coyote Gen3. TKO600 (0.64 OD). IRS w/3.55. PS. Wilwoods. Sway bars. This build is dedicated to my son, Benjamin.
Build Thread.
-
Post Thanks / Like - 0 Thanks, 2 Likes
-
03-25-2021, 06:25 AM
#108
Senior Member

just when you think you're done drilling have all the shrapnel swept up, there'll be more drilling that is necessary. looking good!
-
Post Thanks / Like - 1 Thanks, 0 Likes
-
03-25-2021, 09:14 AM
#109
Use the rest of the Dura line for the undercoating of the body!
-
03-25-2021, 10:36 AM
#110
David aka Ducky2009

Originally Posted by
460.465USMC
.[/IMG]
Are you installing a heater? If so, double check your hole size and location. Will the heater hoses fit?
MK4 Build #9035 Delivered 2/17/17, First Start & Go-Kart 6/2/17, Licensed 9/1/17
Paint - Lightning Blue Metallic, No Hood Scoop, No Stripes
Gen 2 Coyote Engine & TKO-600. Solid Axle, 8.8-3.55, Power Steering, Power Brakes, Dual Roll Bars
Heater and Glove Box, Drop Trunk, Wipers, Radio, FFR Vintage Gauges, Custom Dash
Build Thread:
http://thefactoryfiveforum.com/showt...MK4-Build-9035
-
03-25-2021, 09:30 PM
#111
Senior Member
Originally Posted by
jiriza84641
Use the rest of the Dura line for the undercoating of the body!
Definitely! I have at least 3/4 of the gallon left of the Dupli-Color Bed Armor. It adheres pretty darn good to aluminum with appropriate metal prep.
Chris
Coupe complete kit delivered: 4/22/24.
Build Thread. Coyote. T-56. IRS w/3.55. Wilwoods. PS. HVAC. Side windows.
MK4 Complete kit.
Build Thread Index. Delivered: 10/15/2020. Legal: 7/25/23. Coyote Gen3. TKO600 (0.64 OD). IRS w/3.55. PS. Wilwoods. Sway bars. This build is dedicated to my son, Benjamin.
Build Thread.
-
03-25-2021, 09:34 PM
#112
Senior Member
Originally Posted by
Ducky2009
Are you installing a heater? If so, double check your hole size and location. Will the heater hoses fit?
No, sir, but thanks for asking. I can see why you would think so, given the climate here in Spokane. It should be just wiring that I might pull through the 1.5" hole. Not sure if I will even use it, but chose to drill it just in case.
Chris
Coupe complete kit delivered: 4/22/24.
Build Thread. Coyote. T-56. IRS w/3.55. Wilwoods. PS. HVAC. Side windows.
MK4 Complete kit.
Build Thread Index. Delivered: 10/15/2020. Legal: 7/25/23. Coyote Gen3. TKO600 (0.64 OD). IRS w/3.55. PS. Wilwoods. Sway bars. This build is dedicated to my son, Benjamin.
Build Thread.
-
03-25-2021, 11:08 PM
#113
Senior Member

Nice work, drop trunk looks great! Aren't those Cleco's the best thing ever made? They are like little helpers for your build that never complain and always work
-
Post Thanks / Like - 1 Thanks, 0 Likes
-
03-26-2021, 12:07 PM
#114
Senior Member
Oh, man! Some of the best money I spent on tools for my build. Not sure what I would do without them!
Chris
Coupe complete kit delivered: 4/22/24.
Build Thread. Coyote. T-56. IRS w/3.55. Wilwoods. PS. HVAC. Side windows.
MK4 Complete kit.
Build Thread Index. Delivered: 10/15/2020. Legal: 7/25/23. Coyote Gen3. TKO600 (0.64 OD). IRS w/3.55. PS. Wilwoods. Sway bars. This build is dedicated to my son, Benjamin.
Build Thread.
-
03-26-2021, 05:33 PM
#115

Steve >> aka: GoDadGo

Remember to run your rear wiring harness before you pop rivet the trunk floor into place.
Consider drilling your roll bar(s) too before you pop rivet the back of the cockpit.
After That Have A Hap-Hap-Happy Riveting Weekend!
Last edited by GoDadGo; 03-26-2021 at 05:36 PM.
-
03-26-2021, 07:08 PM
#116
Senior Member
Originally Posted by
GoDadGo
Remember to run your rear wiring harness before you pop rivet the trunk floor into place.
Consider drilling your roll bar(s) too before you pop rivet the back of the cockpit.
After That Have A Hap-Hap-Happy Riveting Weekend!
Great tips! Thanks, Steve!
Chris
Coupe complete kit delivered: 4/22/24.
Build Thread. Coyote. T-56. IRS w/3.55. Wilwoods. PS. HVAC. Side windows.
MK4 Complete kit.
Build Thread Index. Delivered: 10/15/2020. Legal: 7/25/23. Coyote Gen3. TKO600 (0.64 OD). IRS w/3.55. PS. Wilwoods. Sway bars. This build is dedicated to my son, Benjamin.
Build Thread.
-
03-26-2021, 09:42 PM
#117
Steve >> aka: GoDadGo
Originally Posted by
460.465USMC
Great tips! Thanks, Steve!
Just passing the advice that was given to me long, long ago.
-
03-28-2021, 06:19 PM
#118
Senior Member

Hey Chris. Great thread. Enjoying your progress. How much thermo tec did you end up purchasing. I am getting close to ordering some but not sure how much I'll need.
Thanks
Jesse
MK4 #10008 - Ordered 10/06/20, Delivered 03/03/21, First Start 7/22/21, First Go Kart 7/24/21
Paint by Metal Morphous 5/14/22, Legally registered 6/8/22, Graduated 7/20/22
Build Thread
https://thefactoryfiveforum.com/show...been-delivered
Complete Kit, Ford 306, Sniper/Dual Sync, T5, Hydraulic clutch
-
03-28-2021, 08:36 PM
#119
Senior Member
Hi Jesse. I bought four of the 36" X 60" size rolls (heat + sound barrier). This gave me enough to cover both footboxes, floor panels, transmission tunnel sides, and rear cockpit wall. I have enough left over to do the inside of the Russ Thompson drop trunk, and probably the upper trunk panel. Hope this helps.
Chris
Coupe complete kit delivered: 4/22/24.
Build Thread. Coyote. T-56. IRS w/3.55. Wilwoods. PS. HVAC. Side windows.
MK4 Complete kit.
Build Thread Index. Delivered: 10/15/2020. Legal: 7/25/23. Coyote Gen3. TKO600 (0.64 OD). IRS w/3.55. PS. Wilwoods. Sway bars. This build is dedicated to my son, Benjamin.
Build Thread.
-
03-30-2021, 08:34 PM
#120
Senior Member
Coyote Accel Pedal Question
So, I'm a bit stumped, and looking for your help on how to mount the Coyote accelerator pedal. It seems pretty straight forward from the F5 manual, but something is not right.
In this picture you can see the accelerator mount bracket attached to the accelerator mount that's welded to the chassis. This is where the F5 manual shows to mount it. However, look at the position of the pedal: it's quite a bit too high. In fact, a portion of it is rubbing on 3/4" tube--see red arrow. This can't be right, because the upper pedal mounting hole won't line up with the mount bracket because of the contact of the upper pedal body and the 3/4" tube.

Here you can see how high the pedal sits in comparison to the other pedals. I know accelerator pedal height is a preference item, but this is obviously too high. I'm following the pedal mod. that Shark92651 designed, thus the aluminum brackets on the rear of the pedal--more on that later. Looking at his mounting position, and that of Edwardb's mounting position, my pedal is like 2+ inches too high. I'm wondering how others did this, and if anyone is using the bent mounting bracket, or are others fabricating their own brackets to place the pedal in the correct position?

Thanks in advance for your help!
Chris
Coupe complete kit delivered: 4/22/24.
Build Thread. Coyote. T-56. IRS w/3.55. Wilwoods. PS. HVAC. Side windows.
MK4 Complete kit.
Build Thread Index. Delivered: 10/15/2020. Legal: 7/25/23. Coyote Gen3. TKO600 (0.64 OD). IRS w/3.55. PS. Wilwoods. Sway bars. This build is dedicated to my son, Benjamin.
Build Thread.


 Thanks:
  Likes:


 Reply With Quote


