-
Senior Member

-
Senior Member
-
Post Thanks / Like - 0 Thanks, 1 Likes
-
Senior Member
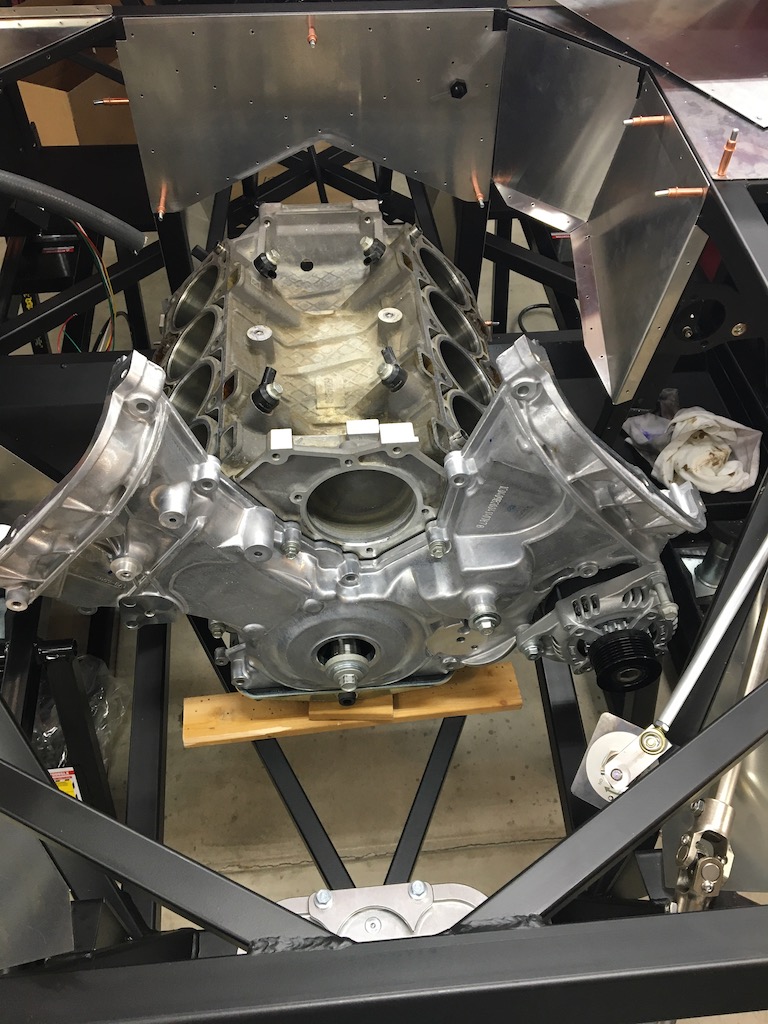
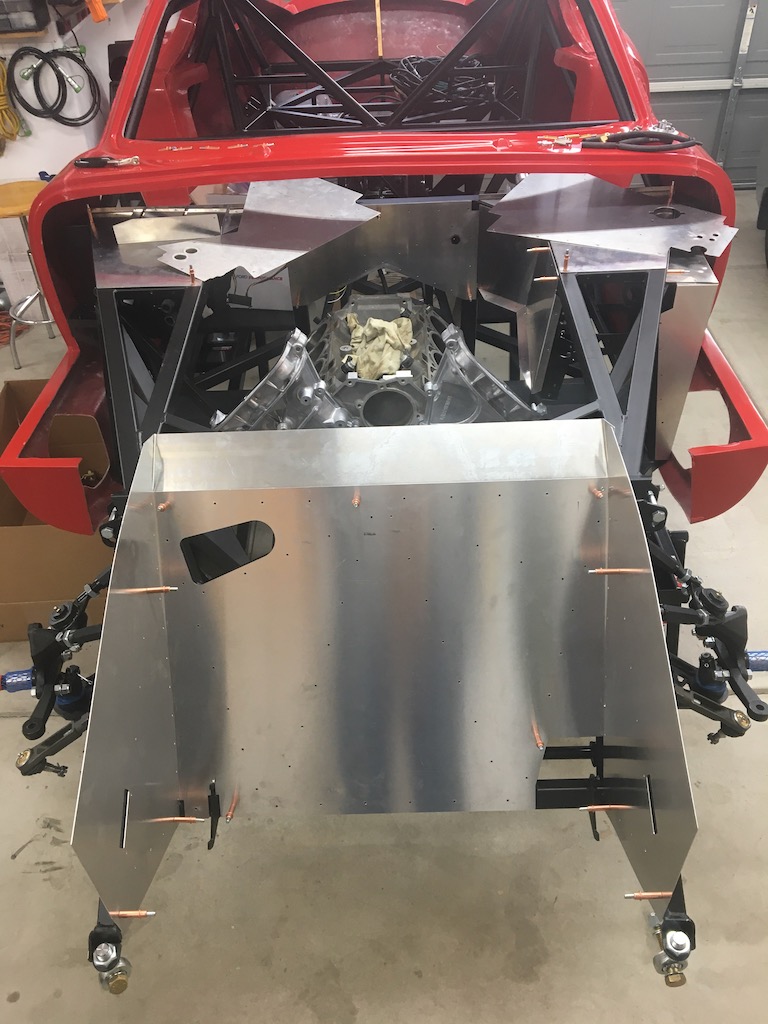
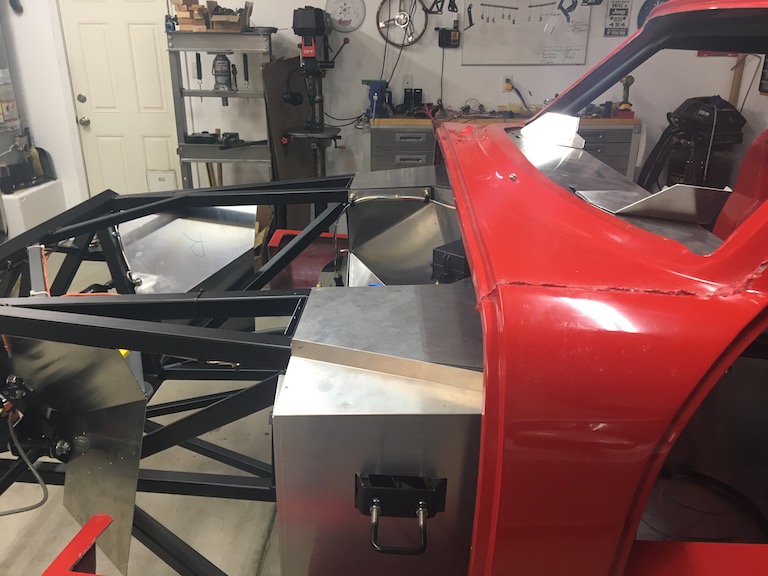
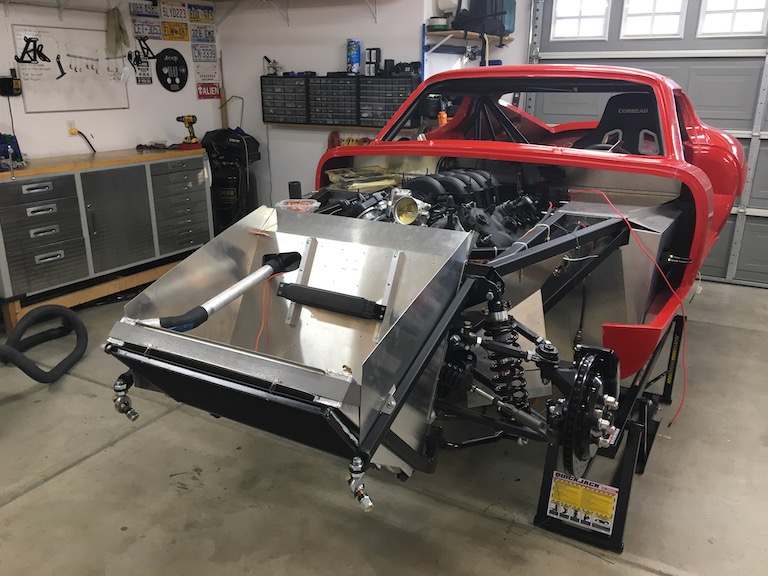
Engine Mock Up
Felt like it was time to plunk the block between the frame rails so I could start mocking up some of the other system components like the previously mentioned oil system. It took me longer to find the oil pan bolts (neatly stored in their own little baggy), the timing cover and the alternator kit than it did to actually mount the engine. The harbor freight 2 ton hoist did it's job admirably, although the block with just the crank in it probably only weighs about 150lbs.
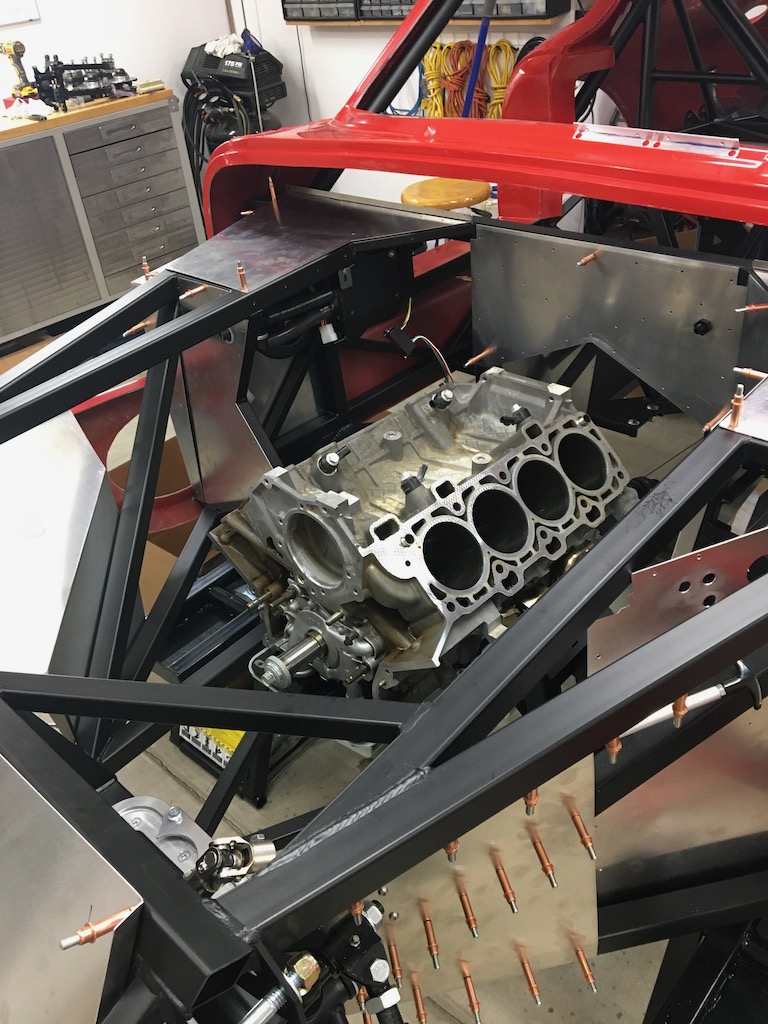
Amazing what an engine block does for a project, I may have sat in the car making some engine noises")
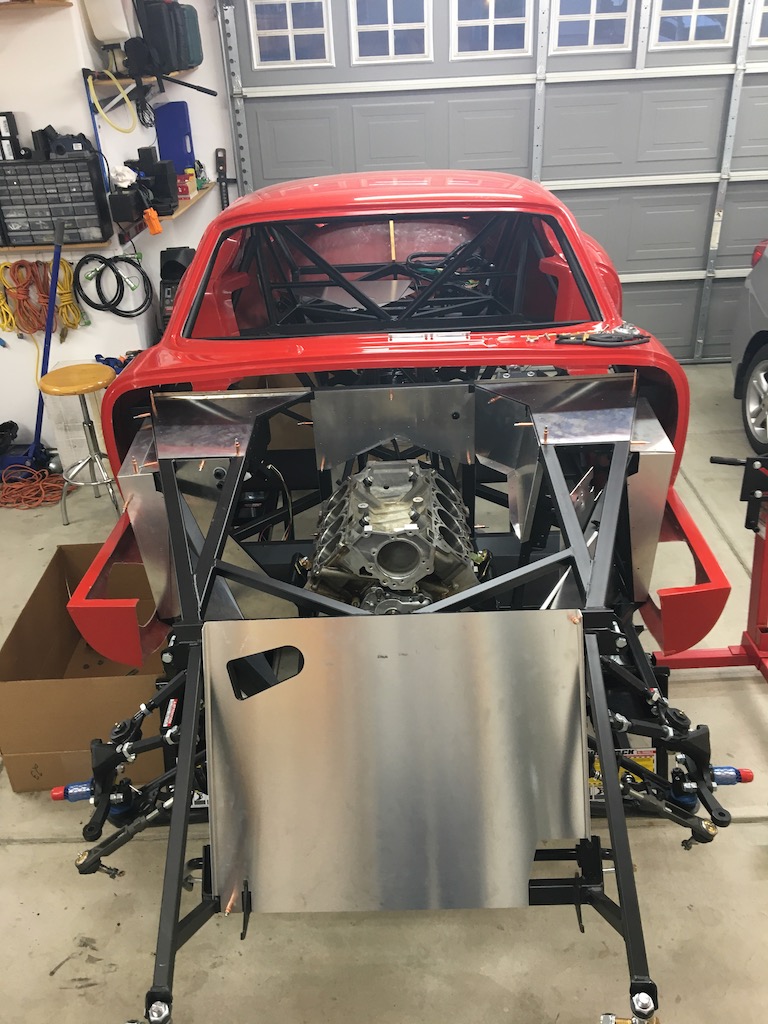
With the timing cover loosely installed (heads are still out with the machinist for porting and valve job) and alternator in place to facilitate measuring oil lines. I also realized with the the timing cover in place I can check the valve covers for clearance issues too. I was delighted to find out the FPCP PDB is going to fit exactly where I was hoping it would
I also tackled drilling the radiator tunnel. The top panel threw me for a loop since there was no mention of it in the assembly guide (I think of it as more of a guide than a step-by-step manual), but a quick look at the inventory for the panel box fixed that for me quickly.
I'm trying to slowly peck away at the panels that can be drilled with the body on the car (most of the footboxes, rad tunnel, front splash guards, trans tunnel, back wall, seat floors and so on). I feel like spreading out that task makes it a little less tedious. Not bad, but definitely tedious. I thought I was doing really well with the #30 bit I was using, but obviously got over-confident and snapped my first one I've been using ones I got from McMaster that are shortys and 135 degree. They seem to stay sharp quite well and make a very nice clean hole (I guess those are the things you really look for in a drill bit, lol). I shifted my weight while drilling and that's when it snapped, it was cutting just fine prior to my buffoonery. They weren't terribly expensive and are worth it IMO. Thankfully I grabbed two so changed bits and just kept chugging along.
That's it for this slew of updates. More to come after next week's/weekend's garage sessions.
Cheers,
Patrick
-
Post Thanks / Like - 0 Thanks, 1 Likes
-
Senior Member
-
Post Thanks / Like - 0 Thanks, 1 Likes
-
Senior Member
Time flies when you're having fun!
Holy cow! Can't believe I let over a month slip past without posting an update. I had some old friends visit, work picked up a little and some good outdoor wx was too tempting an excuse to get out of the house, lol. Lot's of excuses
Even though I haven't been posting I have been working on the car here and there. Plus most exciting of all...I'm down to one POL part!! The Aston Lemans fuel cap which won't hold anything up for a very long time. There was a slight mixup with the certificate of origin when it was accidentally sent to another Gen 3 coupe owner in El Paso. The gentleman there was kind enough to call me and we both contacted FFR. True to form FFR made it right and even threw in a free T-shirt! Thanks to the FFR crew for holding high customer service standards in these incredibly challenging times, no small task I'm sure!
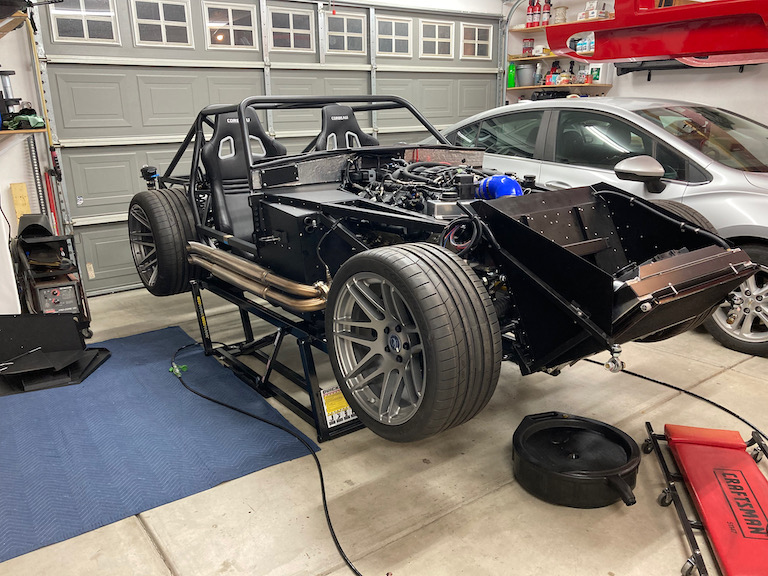
I'll do multiple postings over the next couple of days with pics, but the summary is: the rear suspension is in, front and rear brakes in, transmission on order from Bowler (thanks to Logan for the recommendation), Coyote computer mounted, started shortening the coyote harness, cockpit aluminum is drilled and fitted, emergency brake in and quite functional, drilled the front hubs for metric studs to match the stock ones from the rear and pressed in new studs.
In Logan's build there is a good bit of discussion about Forgestar's new F14s in the Ultra deep concave profile which will allow custom offsets so no wheel spacers in the rear, yay! The F14 is my second favorite wheel they offer, but the CF5s (my #1) would require wheel spacers and for me, in this case, function trumps form. Yes, I know wheel spacers are perfectly acceptable, I run them on my jeep presently and have had no issues. I just didn't want to run them if I could avoid it. Probably some silly purist thought in my head. I have a fixture I picked up on Amazon to measure for offset and clearance. We'll see how well that works out. Hoping to get those measurements knocked out this weekend so I can get wheels on order.
Also came to the realization I only have 5 major (expensive) parts left to acquire. This is exciting to me as the logistics have felt quite daunting at times. I'm convinced Edwardb is a master at logistics, he makes it look so easy, lol!
1. Wheels and tires
2. Gas N side pipes
3. Seats (copying Edwardb's Corbeau's)
4. QA1 double adjustable coilers and springs
5. AEM digital dash
Of course the last and probably third biggest expense is body and paint, but thankfully is still quite a ways off. I have a very rough concept in my head, but that evolves as I read everyone else's threads (love the forum!).
Like I said more posts with pics to come in short order.
Cheers,
Patrick
-
Senior Member
Oil Lines
Got the -12 oil lines from the engine remote adapter to the remote oil filter/t-stat assembly complete. Need one more clamp so I can isolate the braided ss line from the aluminum boig tube. The ss would cut the tube like a hot knife through butter.
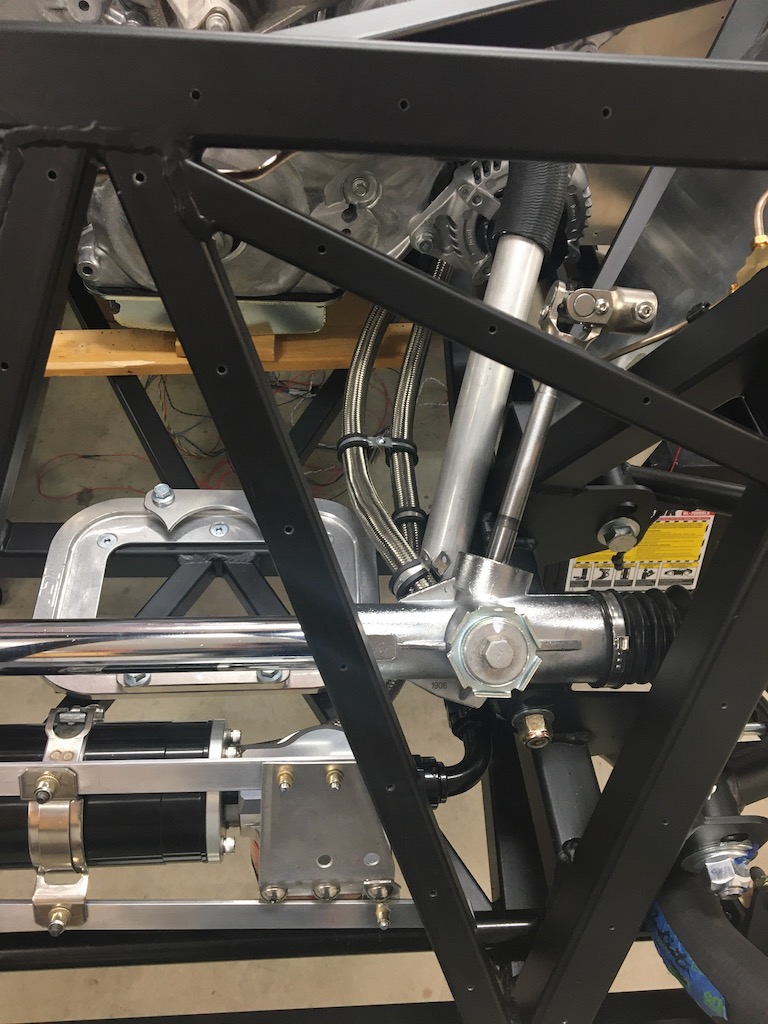
I still need to mount and plumb the oil cooler and then the oil system will be complete.
On another note, I called Bowler transmission today to get a status on the T56 and they are waiting for the quicktime bell housing to come in, I guess that's another supplier impacted by the rona. Oh well, gives me time to get more small, time eating stuff done.
-
Senior Member
-
Senior Member
-
Senior Member
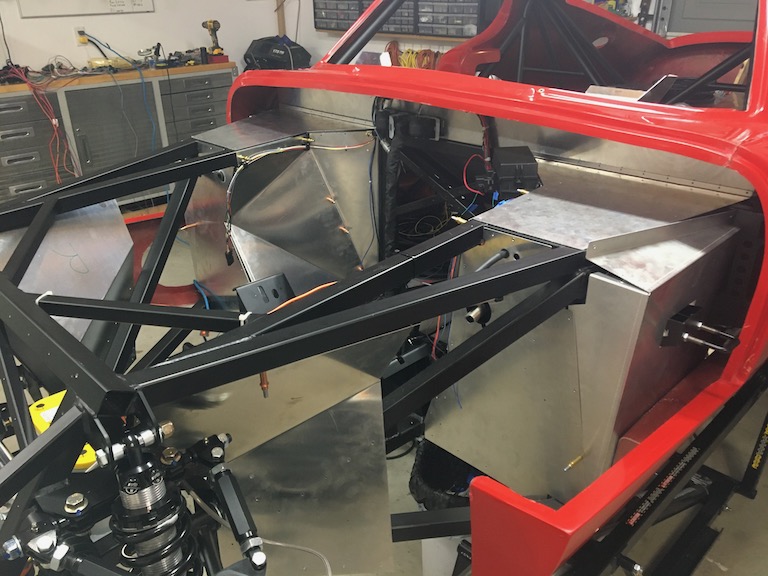
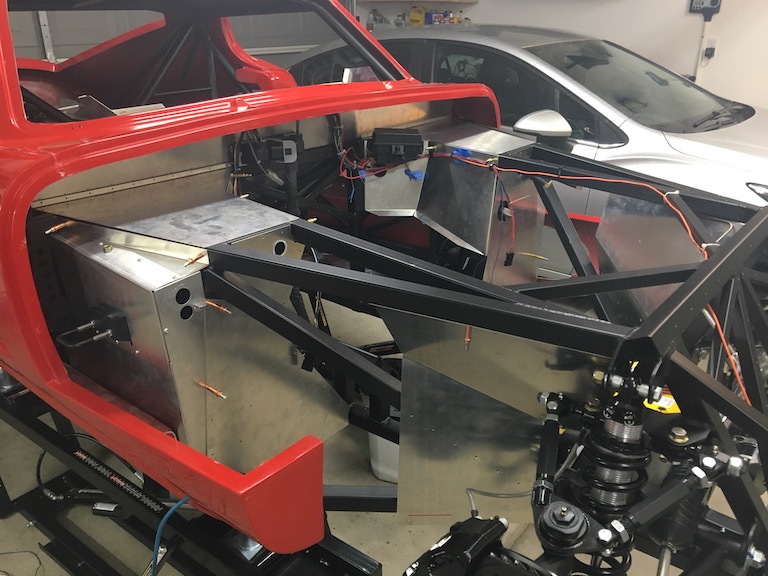
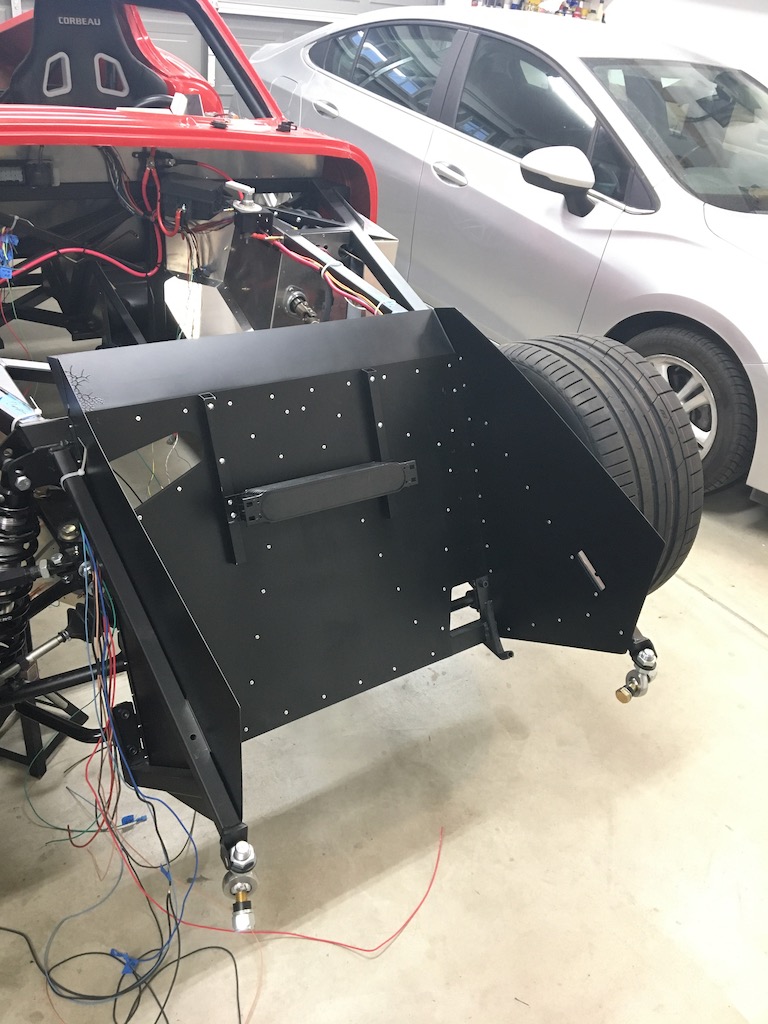
Cockpit aluminum
The cockpit aluminum is now all fitted and drilled. Biggest aluminum left is the rear hatch stuff, but I feel like I'm somewhere around the 50% mark on drilling aluminum. That might be a little optimistic, lol.

I was doing pretty darn good with my #30 bits, even went through a few welds with them, but got careless again and snapped another. I picked up some cobalt steel ones from McMaster and they really do the trick quite well. They stay sharp no matter how fast I drill and unfortunately I end up breaking them before they dull. All user error, can't blame the equipment.
-
East Coast Speed Machines

just an observation - on the front suspension - if your A-Arms are torqued and that's why they appear to be able to support the disk and all without any aid? You will want to loosen all the attachment bolts and re-torque them at after ride height is set with weight on the suspension - it appears that you have the "relaxed" state of the bushing at full compression right now.... again only an observation.
FFR 1879, Blown DSS 306,REDLINE management, VeryCoolParts Tuned 460RWHP
FFR 818S, The Flash, Chassis #5, 2.0L, LSD, Electromotive TEC-S, VCP Tuned, 278RWHP 265 RWTQ
FFR 6651, Green Lantern, 408W Crate, Hellion 66mm Turbo, JGS Waste gate / Blowoff valve, Tec-GT management, VCP Tuned, 575 RWHP, 690 RWTQ
FFR 8335, Black Mamba, 289 FIA CSX 2001 tribute car, 347, 48 IDA webers, VCP Tuned, 311 RWHP 386 RWTQ, 3-link, Trigo's
FFR 0004, Gen 3 , Hawk Coupe, Coyote twin turbo, 683 RWHP 559 RWTQ, IRS, VCP Tuned. "not too shabby"
US ARMY Maintenance Test Pilot (CW4 Retired)
-
Post Thanks / Like - 1 Thanks, 0 Likes
-
Senior Member

Originally Posted by
Erik W. Treves

just an observation - on the front suspension - if your A-Arms are torqued and that's why they appear to be able to support the disk and all without any aid? You will want to loosen all the attachment bolts and re-torque them at after ride height is set with weight on the suspension - it appears that you have the "relaxed" state of the bushing at full compression right now.... again only an observation.
Thanks for the advice! Torquing with weight on the vehicle at ride height makes sense, added to the list
-
Top Notch Builder

Huge fan of your build thread. Your technical knowledge and out of the box approach lend another way to building this car.
-
Post Thanks / Like - 1 Thanks, 1 Likes
-
Senior Member
Originally Posted by
P100DHG
Huge fan of your build thread. Your technical knowledge and out of the box approach lend another way to building this car.
Thanks! Means a lot coming from a guy that leather wrapped his roll bars. I love that touch and can't wait to see it in person!
-
Senior Member
-
Post Thanks / Like - 0 Thanks, 2 Likes
-
Senior Member
Coilovers, vents, wiring and a conversation with Dabat
Not a ton of note worthy progress since last update, but still plugging away.
Coilovers arrived and I like them quite a bit. I especially like that they can be mounted upside down making the adjustment knobs very easy to access. It's one of the reasons I went with QA1's vs the Koni. Also ride height adjustments shouldn't be too terribly painful either. The only downside of this route is I need to get some new bushings cut for the upper and lower mounts since the bearings on the QA1's are obviously different than the ones supplied in the kit for the Koni's. FYI the QA1 bearing measure exactly 1 inch wide for anyone that's interested in trying them. I don't have the right equipment to make new bushings so I'll order up some Aluminum stock and have a local machine shop cut them for me. Should be a piece of cake.
As P100DHG mentioned in his thread, we were able to meet up the previous weekend. First time I've been able to meet another forum member in person and man Danny is a great guy! Can't wait until Covid stuff is better and we can spend some serious time talking coupe and car stuff. Anyways, Danny offered up some cessna vents a while back and I took him up on the offer. They were a little smaller than I had realized and Danny suggested testing them with the A/C unit so...
They work pretty darn good and I think I can incorporate them into the dash nicely. They do help me understand why airplanes are so expensive as they are...um, how do I put this...highly engineered pieces, lol. I think they are way cool and I'm excited to incorporate them into the project.
The Coyote control pack harness shortening is ongoing and that will definitely consume many hours for me, but as tedious as that work is I find it extremely rewarding. Plus now I know how the whole thing is wired up, lol. In case anyone cares the two high speed can bus wires are spliced from the same wires that lead to the OBDII port so if you use a digital dash connected to the CAN bus either way of connecting it will produce the same results. Electrically they are no different and come from the same source. I'll save the pictures of the harness for one comprehensive write-up. It just looks like a mess right now, controlled chaos at best, LOL!
I did get some other critical components on the way, Gas-N side pipes (to match the headers), Corbeau Evolution X seats, the previously discussed 19 inch Forgestar F14s with custom offsets and no wheel spacers (I'm very excited about this!) and those will be wrapped in Continental Extreme Contact Sports. 325/30 in the rear and 305/30 up front. Final offsets are -25 in the rear for the 19x12 UDC and +14 in the front for the 19x10 SDC. I measured for a +20 up front, but with the wilwood brake clearance they recommended +14 and since they know their wheels best I went with their advice. The 1/4 inch or so difference should be fine up front. These things will definitely fill up the wheel wells! Lead time is 6-8 weeks and that means I should have a rolling chassis by Memorial day so that's the goal I'm driving towards. Wish me luck!
Last update, talked with Jeff Miller yesterday about paint. Yet another awesome member of this builder community and has a great sense of humor. Pretty sure he's the guy I want doing my paint. No idea what color yet, but the goal is to get it to go-kart by labor day and ready for paint shortly after. In the mean time I might actually do some research on paint colors...maybe
That's all for this update.
Cheers,
Patrick
-
Post Thanks / Like - 0 Thanks, 2 Likes
-
do you want to sell the tire offset fixture?
Originally Posted by
Snowman
I wanted to stuff as big a tire as I could under the car, common theme amongst the community, and since I didn't go the Halibrand direction it seemed prudent to try and measure as best I could before committing to anything. I picked up a measuring fixture from amazon for cheap and I think it served it purpose well.

Installed on the rear.
The little tab sticking out just past the fender represents the widest part of the tire, the sidewall. The tread should still be well under the fender at this point.
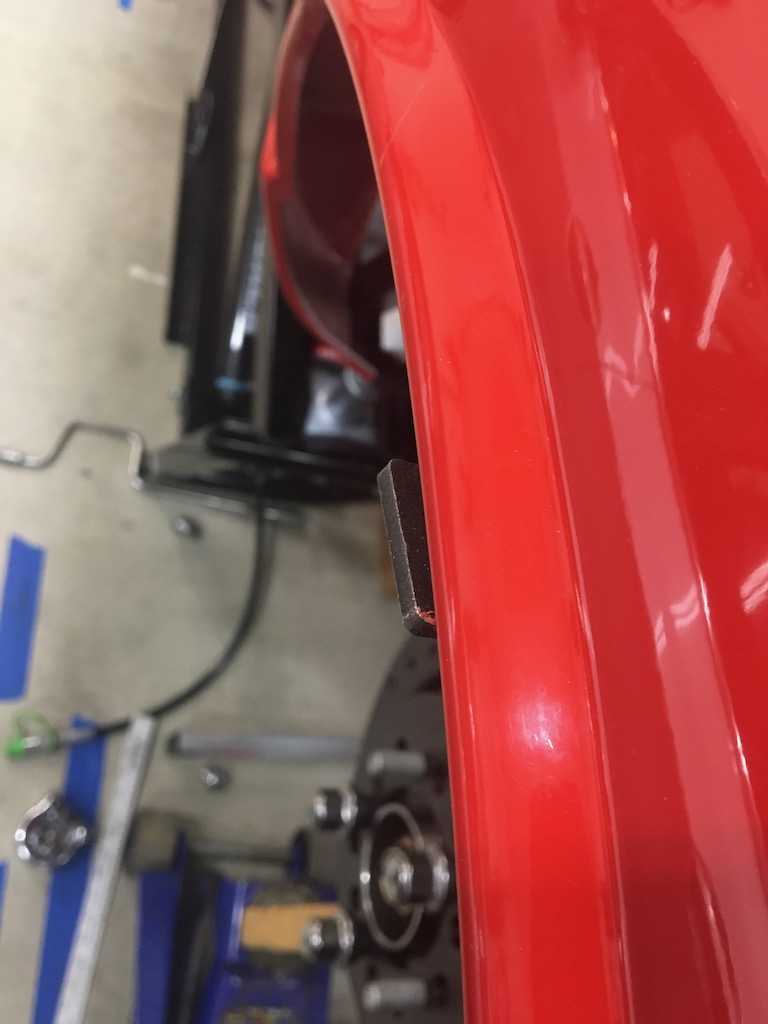
This is a very poor picture of the typically tire fitment offending cross brace. The nice part about this fixture is the ability if gives in finding clearance issues.
Installed on the front.

It's kinda hard to see, but in this one the red line on the tab sticking past the fender is the farthest outside point of the tire.

The results:
Front will be 305/30R19 on a 19x10 with +20mm offset Forgestar F14 in the Super Deep Concave profile
Rear will be 325/30R19 on a 19x12 with -25mm offset Forgestar F14 in the Ultra Deep Concave profile
Tires are planned to be Continental Extreme Contact Sport.
Huge thanks to Logan for sharing info and being an excellent sounding board. I measured about a dozen times to be sure, checked and re-checked...then checked again and I'm confident in my numbers, again with a huge thanks to Logan.
The fixture is pretty straightforward to use, but it's a little crud in some regards so I just used a tape measure to verify all the measurements. If anyone is interested in using it I'm happy to send it, pay it forward kind of thing. Just PM me for details.
Cheers,
Patrick
would you like to sell your offset tire fixture , i looked on amazon but they are out of them
-
Post Thanks / Like - 1 Thanks, 0 Likes
-
Senior Member
Originally Posted by
ken33
would you like to sell your offset tire fixture , i looked on amazon but they are out of them
PM sent
-
Senior Member
Coyote FPCP Harness
Since I'm waiting on wheels and tires, transmission and other various bits and pieces to arrive I've been working on little things. Spring has finally arrived and that means weather good enough to start painting a bunch of little brackets (some I made, some kit pieces).
Onc piece that is coming together very nicely is shortening the Coyote computer harness. It's about 90% done since I need the engine and intake mocked up to get the Alternator harness and MAF harness at the length I want them.
I started off by making a bit of mess...


The cool thing, I think, is that once I got the harness all unwrapped I found that many of the wires already had a splice in them. Most of the wires coming off of the PDB are that way and there is a massive gang ground that everything is common to. In a couple cases like the clutch switch, I just ran the ground wire to a frame ground that I made on the frame in the footbox, one less wire in the bundle. Another thing I think I really lucked out on is the length of the O2 sensor wires was basically perfect for where I mounted the computer. That even goes for the offset to the passenger side which is about 6 inches shorter than the O2 lead for the driver's side. As one of my buddies at work always says...even a blind squirrel finds a nut once in a while.
The next step is to fish through all of the convoluted tubing I removed and re-wrap everything. The O2 and PDB harness are now all bundled as one which should clean up some of the unwieldy convo snakes running all over the place. I guess this is one of the tradeoffs on running the coyote, gotta put some labor in to get the wiring cleaned up. All in all, I'm very happy with the results.
Unneeded wire...

A couple of other wiring notes. I tried to get terminals for the connectors on the computer, but Ford has that info on LOCKDOWN, lol. Contacted the company that Ford uses for the connectors and they require a notice from Ford before they release any "proprietary" information. This would have made for a super clean harness customization, dang...oh well no one will know the difference once it's all wrapped up.
Since I had to cut some wires, I wired the inertia switch into the ground circuit on the fuel pump relay in the PDB. Completely frees up a relay circuit on the RF harness, which will likely be used for the driving lights (the only ones I'm not converting to LED, I actually like the look of them). I'm also going to let the coyote computer take care of the cooling fan control so there's another relay circuit available for use on the RF harness, not sure what that will be used for yet as I'm not adding a lot of electrical...maybe future expansion.
I will say that after digging into the RF harnesses that I would probably either delete or sell them off if I do another build. I'm not terribly impressed with them. I don't think its a poor quality unit and I totally get why the RF harness is a good solution, but I enjoy designing my own circuits. Since I've already pulled the harness all apart I wouldn't try to unload that on anyone, lol. I'll be making some modifications to the chassis harness setups that hopefully will turn out very clean. I'll save that info for those posts.
-
Senior Member

Nice work customizing that Coyote harness. I don't normally shy away from electrical challenges. But that's one thing I've left alone on my Coyote builds. One thing to check on. You mention using the Coyote cooling fan wire and not using the RF cooling fan circuit and relay. The Factory Five A/C setup uses the RF cooling fan circuit for the trinary switch. One of the Dk Green Fan Thermo Switch wires goes to the trinary switch. When it switches, grounds the wire and runs the cooling fan. So the cooling fan ends up potentially being powered by two different sources depending on the reason. A/C system pressure from the trinary or engine temp from the Coyote PCM. I questioned Factory Five during my build if this was OK and they assured me it was. A season of driving and both work as designed. Maybe it's possible to wire the trinary differently. But something you should look at.
Build 1: Mk3 Roadster #5125. Sold 11/08/2014.
Build 2: Mk4 Roadster #7750. Sold 04/10/2017.
Build Thread
Build 3: Mk4 Roadster 20th Anniversary #8674. Sold 09/07/2020.
Build Thread and
Video.
Build 4: Gen 3 Type 65 Coupe #59. Gen 3 Coyote. Legal 03/04/2020.
Build Thread and
Video
Build 5: 35 Hot Rod Truck #138. LS3 and 4L65E auto. Rcvd 01/05/2021. Legal 04/20/2023.
Build Thread. Sold 11/9/2023.
-
Senior Member
Originally Posted by
edwardb
Nice work customizing that Coyote harness. I don't normally shy away from electrical challenges. But that's one thing I've left alone on my Coyote builds. One thing to check on. You mention using the Coyote cooling fan wire and not using the RF cooling fan circuit and relay. The Factory Five A/C setup uses the RF cooling fan circuit for the trinary switch. One of the Dk Green Fan Thermo Switch wires goes to the trinary switch. When it switches, grounds the wire and runs the cooling fan. So the cooling fan ends up potentially being powered by two different sources depending on the reason. A/C system pressure from the trinary or engine temp from the Coyote PCM. I questioned Factory Five during my build if this was OK and they assured me it was. A season of driving and both work as designed. Maybe it's possible to wire the trinary differently. But something you should look at.
Paul, thanks for the heads up!
My initial thought is to do similar to what I did for the fuel pump relay and inertia switch. I'll have to look closer at how the trinary switch functions, but if I can make it provide a ground to the FPCP PDB cooling fan relay circuit then it would keep cooling fan control with the Coyote computer. Glad I haven't wrapped the harness yet, that would suck to dive back into it again, lol.
If the trinary switch doesn't work that way I'm sure I can figure out another way to make it work that won't be too painful.
-
Top Notch Builder
Patrick,
I completely agree with you about the Ron Francis (RF) chassis harness provided. I can't stand those bulky connectors and frankly don't know why they are needed. Jegs has a nice looking harness I can't speak for the quality but I think it would be a much cleaner install.
I am planning the next build already and what I realized is, the credit FFR gives for deleting some items makes it so it's just not worth deleting that item. I haven't checked what they will give for deleting the wire harness yet but it's one of my biggest gripes. My behind dash wiring on my Coupe could have been 100 times cleaner if it wasn't for those bulky connectors.
-Danny
-
Post Thanks / Like - 0 Thanks, 1 Likes
-
Senior Member
-
Senior Member
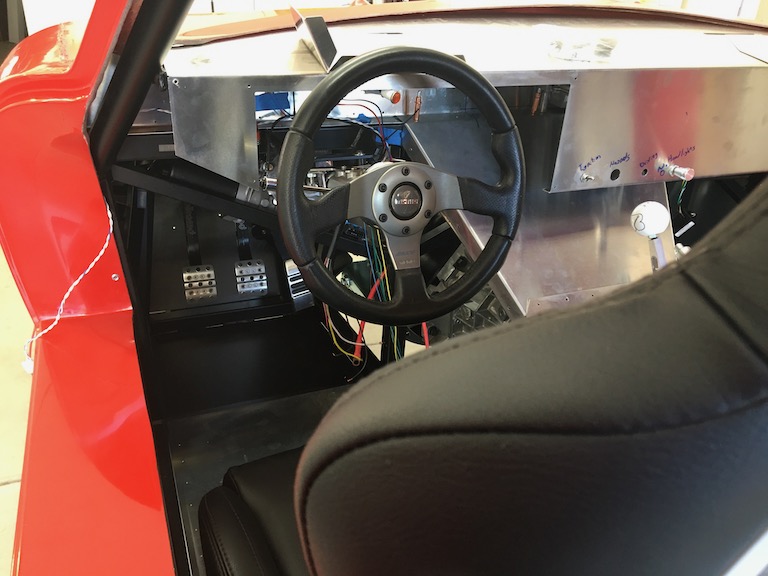
Steering almost done
When I installed the electric power steering unit shortly after receiving the kit I had prematurely and incorrectly cut the upper steering shaft too short...oops. I didn't have the Russ Thompson turn signal unit yet and and had cut the shaft about 1.5 inches too short. Thankfully not a huge deal as FFR had plenty available and got one out to me. I've had it for about a month, but finally got around to getting it cut to proper length and fitting up the momo steering wheel I've been wanting to use. I'm glad I decided to go this path and very thankful Russ was able to get the momo pattern drilled when he machined the hub. The momo is about 2 inches smaller in diameter than the FFR wheel, this makes it pretty easy for me to get in and out and I'm happy to report that I don't think I'll be needing a quick release steering wheel. Also, if I ever want to put on the FFR wheel that pattern is still available and the nice thing is both are correctly clocked so no further adjustments would be needed.
The coupler from the upper steering shaft to the input of the power steering unit provided a couple of challenges as it's a smooth 3/4" bore on the steering shaft side so I had to come up with a method for attaching it. I settled on a system of set screws because the coupler is not a perfect fit and if the steering shaft is not exactly centered you end up with a noticeable amount of steering wheel runout. Overall happy with how that turned out and I'm also pleased that there is zero play in the steering, or at least not while it's unloaded. I'm geeking out a little about the fact that when wheels and tires arrive next month it will be a rolling chassis with power steering, (as long as there's juice in the battery).
Last thing on the steering. I'll be using the trick from P100DHG for the horn button in the center of steering wheel https://thefactoryfiveforum.com/show...l=1#post451887. A friend is printing the parts for that this weekend. Again huge shout out to Danny for his ingenuity and willingness to share it in this community.
-
Post Thanks / Like - 0 Thanks, 1 Likes
-
Senior Member
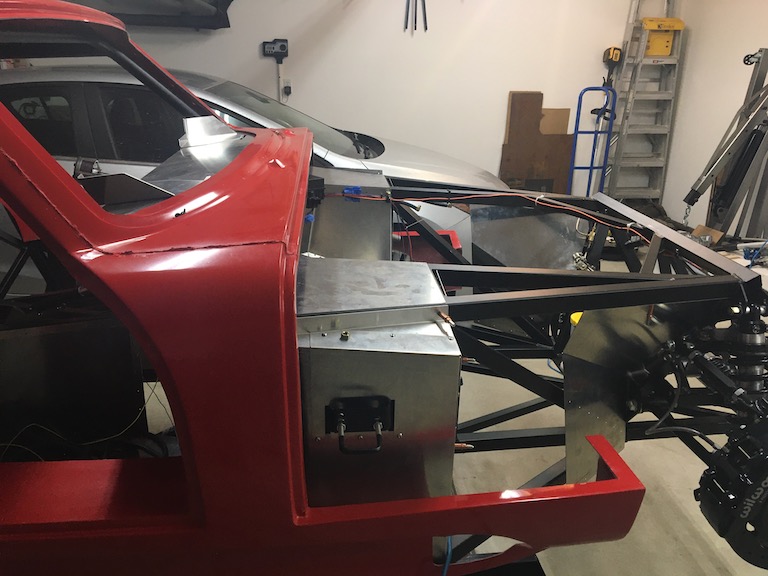
Oil Cooler
Since the factory oil cooler is a no-go on the coyote I wanted to run a remote mount unit. Also since the factory unit is a fluid heat exchanger with the coolant I though it might be a good idea run an oil thermostat to help get the oil up to temp a little quicker and maintain it there. Much of those details are covered in a previous post. Now it was time to get the last piece of the oil system wrapped up, mounting the the oil cooler and plumbing that in place.
I was pretty sure I saw this on another coupe build (my apologies to whoever that was for not making a book mark of their post) where they had the oil cooler mounted in the radiator tunnel. I liked that location since there should be plenty of air flow and the oil cooler shouldn't need ambient air to do what I need it to on this build (similar to the temp exchange in the factory fluid type). I also didn't want to just mount it on the sheet metal as I wanted something a little sturdier. So with some scrap 3/4 aluminum square tube I fabbed up a mount to my liking. I left the tube long so I have options to move the cooler up or down in the rad tunnel if for some reason this location doesn't work out. Of course that means re-fitting lines and cutting new holes in the sheet metal, but not the end of the world. Also one last benefit of mounting in this fashion...I think this is one of the smallest -10AN units made by Derale and they have several larger models that have the same width dimension, just have more plates. I can easily upgrade to a larger oil cooler by simply swapping it out.
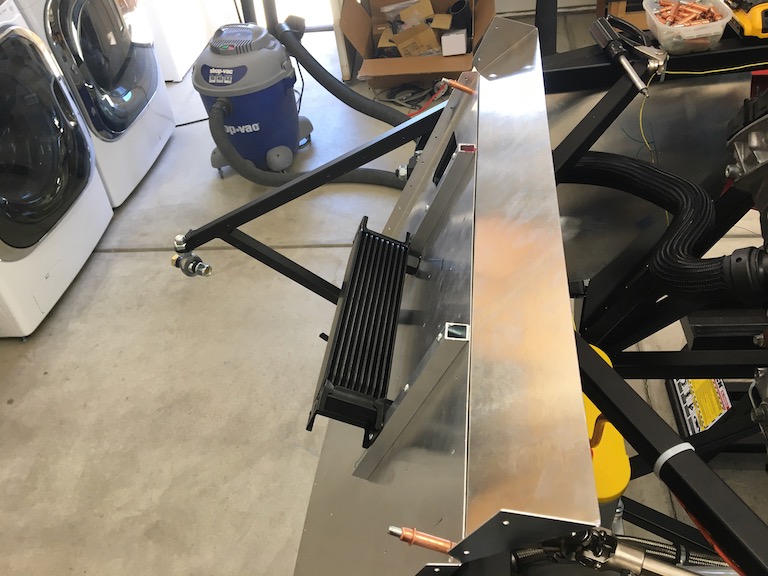
This location also made the lines to/from the oil t-stat nice and short, plus it keeps everything up and out of the way from the road.

The oil t-stat and cooler are probably murderous overkill for what I'll be using the car for 99% of the time. Hopefully when I do take it to the track (Willow Springs) it will be plenty capable and reliable.
-
Senior Member
Radiator
With the oil cooler knocked out I finally felt comfortable mocking up the radiator and that proved to be an incredibly quick and easy task so I grabbed the A/C condenser and got that mocked up as well. Now I just need to order up the breeze fan shroud to get the fan mounted. I should be able to get the A/C drier and lines all fitted up in the very near future.
Also for those following my build you'll notice the engine seems much more complete...I promise it isn't, LOL! There was a slight set back with my machinist who had the heads for porting and valve job. His normal business is Jeep stuff, but he's been hot rodding for decades. Initially when I asked him if he was interested in doing the job he was happy to give it a go, but as with many businesses in this industry his orders have been through the roof and he's been backlogged for many months. So in order to maintain my schedule I'm taking the heads to MMR for their port work. No ill feelings toward my preferred machinist (he's very interested to see how this project turns out) and he'll be getting more work from me on the Jeep after the coupe project is all completed. Two main reasons I wanted him to do the work: 1. It would have saved me 4-500 bucks. 2. Having an engine machinist you know and trust is priceless.
I picked up the heads from him last weekend and just set them on the block which allowed me to get the wiring for the MAF all squared away. It also gave me a chance to see what type of elbow I'll need as the GT350 intake requires a larger throttle body so the elbow that came with the kit won't work. I think that's a good thing in the end because I didn't like where the 90 degree bend landed the filter. I'll be using a 45 degree bend and putting the filter straight ahead instead of off to the side.
The heads will get pulled tomorrow and taken down to MMR in Camarillo. They quoted me 5 weeks until their CNC machine is up and running then it should be a 7 day turn around once they start machining. Hopefully they don't have too much of a back log. If all that holds true then I should still be on track to start assembling the engine shortly after I return from vacation on the July 4th weekend. The goal there is to get to go-kart by Labor Day. Shortly after that it will likely go to Jeff Miller for body and paint. At least I have a plan from which I can begin to deviate
That's all for this round of updates. More to come in the next couple of weeks.
Cheers,
Patrick
-
Senior Member
Looking good. You're making great progress. Interesting approach on the trinary switch wire. I didn't consider breaking into the PDB for it. But that certainly should work. Regarding the reverse lockout on the T-56. I did use the speed sensitive module (American Powertrain ELUN-10013) and after 2,200 miles all I can say is it just works. Reverse is always available when needed and I never have to think about it. I don't know the exact speed where it releases the solenoid. I tested it during the build and it clearly let go as soon as the wheels started moving and energized again when they stopped. But since it was on the lift, don't know the exact speeds. But whether it's 0 or 5 or 8 or whatever MPH it's not in a speed range where you'd ever have the shifter over that far to the right anywhere near the reverse gate. Obviously any time you are near the reverse gate (e.g. 5th and 6th) you're far beyond the minimum speed and reverse is locked out. Like I said, just works without thinking about it. If I ever do another T-56 I'd do it exactly the same way.
Last edited by edwardb; 04-21-2021 at 10:49 AM.
Build 1: Mk3 Roadster #5125. Sold 11/08/2014.
Build 2: Mk4 Roadster #7750. Sold 04/10/2017.
Build Thread
Build 3: Mk4 Roadster 20th Anniversary #8674. Sold 09/07/2020.
Build Thread and
Video.
Build 4: Gen 3 Type 65 Coupe #59. Gen 3 Coyote. Legal 03/04/2020.
Build Thread and
Video
Build 5: 35 Hot Rod Truck #138. LS3 and 4L65E auto. Rcvd 01/05/2021. Legal 04/20/2023.
Build Thread. Sold 11/9/2023.
-
Member

At their site, they (American Powertrain) say: "Our new module eliminates this problem [shifting to reverse by accident] by using the VSS speed sensor in the transmission to tell the solenoid you are at 0 mph". So it sounds like any speed except 0, you are locked out of reverse. Pretty nice!
-
Senior Member
-
Post Thanks / Like - 0 Thanks, 3 Likes
-
snowman are you going to ship me the wheel offset tool ? thanks and they look great
-
Senior Member
Originally Posted by
ken33
snowman are you going to ship me the wheel offset tool ? thanks and they look great
PM sent.
-
Senior Member
Short break, but back at it!
My hiatus from the forum was due to...well life I guess. The list of excuses is long, but that's the way things go isn't it? Not the least of which are these ridiculous heat waves we've been having in Cali! I moved to the mountains so it wouldn't be over 100, lol. Stupid weather! Rant over.
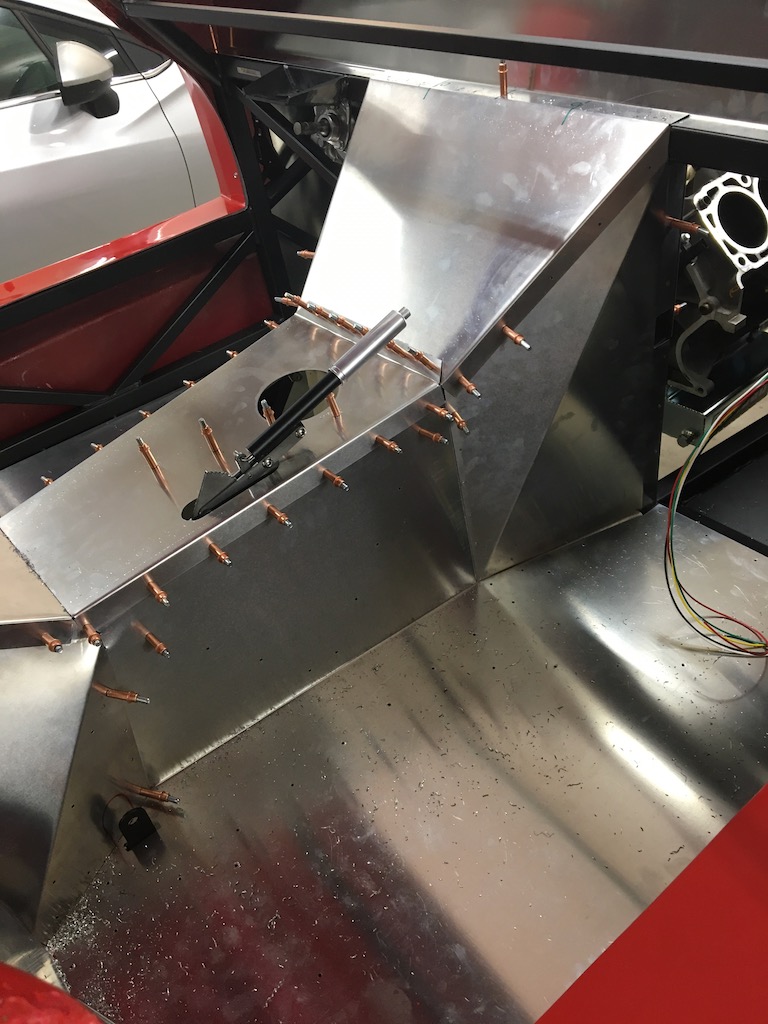
I was still doing some work in the background, but not very note worthy or picture worthy IMO. I painted a bunch of the little brackets (both kit and ones I made). I also tried painting some aluminum panels. I started with the rad tunnel...I have now reaffirmed I an NOT a painter, lol! The rest of the panels will be headed to the powered coater. They didn't turn out horrible, but I made some mistakes that I'm really not worried about since A. it's NOT going to be a show car and 2. hard to see even with the hood open.

The rad tunnel is effectively done though, minus radiator/condenser/fan since those need to be out of the way for the engine install with the standard HF hoist I (like many others) own. I'm happy with how the look is with matte black panels and the raw aluminum rivets. I'm pleased with the oil cooler too, eager to see how well that mounting location functions.
Also on the front of fun things, I picked up the coyote heads from MMR last Monday. The only engine parts I'm waiting for are the main and rod bearings. I did a short write up on the bearing selection for the mains from Ford (engine build link in my sig). I'm still surprised at how much information Ford has been wiling to share, just have to ask nicely. Ordered the bearing from Tasca and they have been great, just not the fastest. Hoping to have those in 1-2 weeks from now. Once those arrive I can do final assembly on the engine which is VERY exciting.
I'll be documenting the build in the engine section, but I'll likely cut and paste the posts to this thread. To summarize the engine build thread thus far, I started with a Junkyard F-150 which was a gamble that didn't pay off. No bad feelings about it since I have learned a crap ton about Coyote's and engine building in general. I ended up ordering a new Gen 3 block and crank, and as that was not the original plan both of those were 1300 to the door. Not too bad. The new block needed some clean up work as every machined surface had burrs left over and they like to jump out and tear your knuckles. Still need to clean up some oil passages on the block as the remote oil filter adapter holes don't line up with the ones in the block very well at all. The adapter is a Ford part and very well made. I was kind of surprised that the hole didn't line up, but it will be easy enough to correct with a die grinder and some cartridge rolls. Rings are total seal gapless and are file to fit, that task is now done. Once the block is cleaned it will get a thorough bath and then just waiting on bearings. The engine should go together very quickly.
I need to get the footbox aluminum prepped for PC and installed then the engine/trans can go in for what I'm hoping will be it's final time. Lot's of little details to knock out over the next month or so. Hoping for a first start around Labor Day. May or may not happen, but at least I have a goal, LOL.
Cheers,
Patrick
-
Senior Member
Go-kart!!
It's been quite a long time since I've been on the forum, but I had kept working in the background. Just got it to the go-kart phase this past weekend with a first start up on Friday. Apologies in advance for the crappy cell phone video, but there is a short story to follow as to why for those interested readers.
https://youtu.be/RNKEqKvKlso
As previously posted I had done a lot of surgery on the coyote harnesses. As you'll see in upcoming posts that also includes the engine harness itself. Overall I pulled almost 8lbs of wire out between the coyote and RF electrical nests!

I was a bit nervous about the first start-up with all that wiring work, and as would be expected had an issue... One of the connectors in the FPCP harness I euthanized was C146, the auxiliary inline to engine (on the right in the pic above). It was killing me, huge bulky connector with 4 whole wires in it. I replaced it with a deutsch 4 pin which worked out wonderfully up until the point at which the engine didn't start, but back to that in a moment. While trying to crank the engine on a cold Friday evening and it not firing I started running though the normal troubleshooting steps, is it air, gas or spark? Was highly confident in the timing as it's pretty straightforward if you follow the instructions from Ford, the throttle body is working, and compression seems good for new rings and cylinders...ruled out air. Gas...I can smell that in the exhaust pipes so that leaves spark. Spark...crap...I messed with a lot of wires over the course of about 10 months...which ones did I touch, this could be bad. Verified that I didn't have spark with the standard hold a plug against a ground test. Also realized after doing it the hard way the Gen 3 makes this easy on the #3 spark plug with the slightly remote coil, especially if you have a spare plug lying around.
Decided first start was not happening right then and there so went to dinner with a buddy that was helping me out and offered to video the first start. At dinner I kept running through all the different wires I fiddled with and honestly I can't remember what we even talked about that evening. Buddy dropped me off to let me "work through it" after dinner. Back in the garage, I just started starring at it, apparently this helps. I kept gravitating to the aforementioned 4 pin connector so I found my box of unneeded wires and dug out good ole' C146, about 3.8 seconds later realized I mis-pinned the new connector. Quickly got that sorted and still no start. Time to look for fuses and see what kind of damage I caused...BINGO! VPWR4 was blown!. The Jeep donated a fuse quickly and wow did that thing fire up quick!
New problem...won't shutoff!?! Panicked, since the garage door was still closed (I had lost faith that I was actually going to get it started so it surprised me completely) and the ignition switch had no effect. Easy...I hit the battery disconnect switch...still running, crap. Pulled the fuel pump relay...still running. Curiously look at fuel pressure, it was slowly going down, but still idling just fine with less than 20psi! (May need to think about that inertia switch...). Finally pull the ignition relay and of course that worked. All this happened in about 20 seconds, but felt like forever at 8pm while trying NOT to annoy the neighbors.
In the effort to attempt the first start before dinner, I had a yellow wire from the FPCP harness that I had never figured out and there is not much mention of it. It was labeled "switched 12v" so I thought maybe it needed to be attached to 12v power, that's what I did. I now know that it PROVIDES 12v switched power and since I connected it to the ignition switch output I created a neat-o do-loop. OK that's explained. Now why does it run without a battery?? That's easier, I connected the alternator to the wrong side of the battery disconnect. Both issues super easy to resolve...the next morning.
This is why there is a crappy cell phone video labeled 3rd start (2nd start was to confirm my electrical snafu's were rectified). I had to make sure there was video proof to all my friends and especially my buddy Steve since he was being as patient as possible and unable to be there on Saturday morning.
OK, so maybe that was more of a long story, but fun nonetheless and now I have a go-kart that moves under its own power!
The initial break-in is done and man does this thing sound mean! Huge thanks to Georgie for the sweet Gas-N exhaust note.
Now just need to get on Jeff Miller's schedule and keep plugging away to get it ready for its first adventure outside of my garage!
More updates to come over the next week or two showing the engine build and progress since apparently last July when I had posted last...oops.
Cheers,
Patrick
-
Post Thanks / Like - 0 Thanks, 2 Likes
-
I can hardly wait to get to this point. Congratulations!
My Type 65 Coupe: Ordered May 27, 2021. Arrived November 19, 2021.
I would like to treat my gas pedal as a binary operator. It would be nice to get the cooperation of everyone in front of me. 
-
Originally Posted by
Snowman
Small update for this, my friend 3D printed a couple of prototypes for the fob:

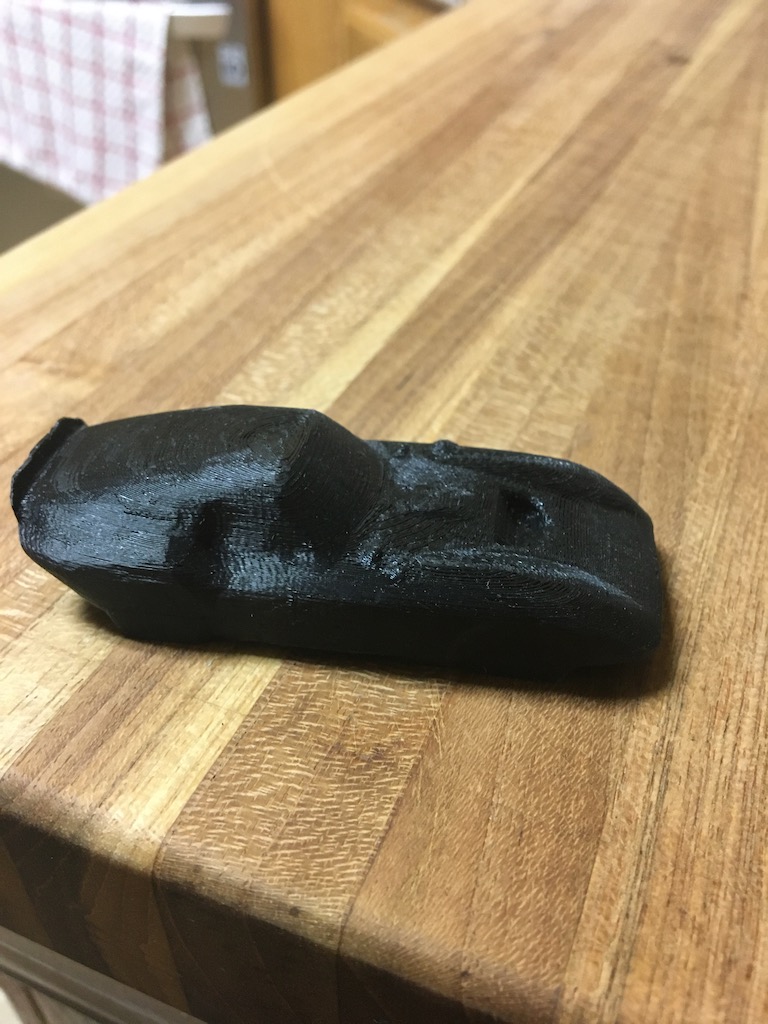

The do have the same magnets in them I used for my magnetic switch test and seem to work pretty good. If all else fails they'll be cool fridge magnets, lol.
The one that looks kinda beat up is what I was playing with for "post-processing" which is apparently the correct term for sanding, finishing or shaping a part after it's been printed. My friend tried her version of post-processing and it got a little out of hand, but she was kind enough to give them both to me to play with. I found that I could get some decent results by normal finish sanding stepping up in grit levels. The best I had was 1000 so I'm sure if I take it finer and then work it with polish I can actually get pretty darn good results. These are made from PLA which is not known for a high quality finish, it prints extremely easily is relatively inexpensive and is best for prototyping.
I need to do some research on a good material that finishes easily. Not sure what the final color will be, but I really like the first hack at this. Good to have friends that want to be part of the project and use it to refine their own skill sets in the process
Apologies for replying to a 1yr+ (14mo) post but didn't see you revisit this subject, thought I'd speak up.
ABS (and likely ASA) as the print material with post-processing in an acetone vapor bath will give you the professional finished look.
Cheap 3D printers will need the hotend upgraded to print ABS/ASA but the upgrades are relatively cheap.
ASA is "ABS with special sauce," where they add UV resistance and some other goodness that makes it easier to print.
ABS comes in a wide variety of colors. ASA only a handful -- ASA is still relatively new to the market.
I love reading build threads with pics and yours is no exception. Fine work.
Congrats on your first start!
Last edited by Windsor; 03-01-2022 at 01:41 PM.
Reason: some clarification
-
Senior Member

Really glad to see the update! Congrats on a real first start and getting those wiring things resolved.
Gen 3 Type 65 Coupe builder
-
Senior Member
Thanks all for the kind words!! Very relieved my wiring surgery has paid off.
Windsor, I have since learned a bit more about 3D printing. Still planning to execute my little fob idea, but I kind of like the rough terraced look of the 3D print. I have some copies in ASA. A friend of mine is working off of a 3D scan from a model and working to clean it up in Fusion 360 (since its free and rather feature rich). Once we get something that is much more passible then I'll share those files with the community. Also, finalizing a design for a printed bracket for the power steering control module. Once that is finalized and tested I'll share with the forum and also the epowersteering guy. They have a strong interest they way I've implemented it and looking to produce a Coupe kit modeled off that, primarily a different bracket that may offer a bolt in solution (drilling required).
-
Post Thanks / Like - 0 Thanks, 1 Likes
-
Senior Member
-
Senior Member
Engine Assembly Part 1
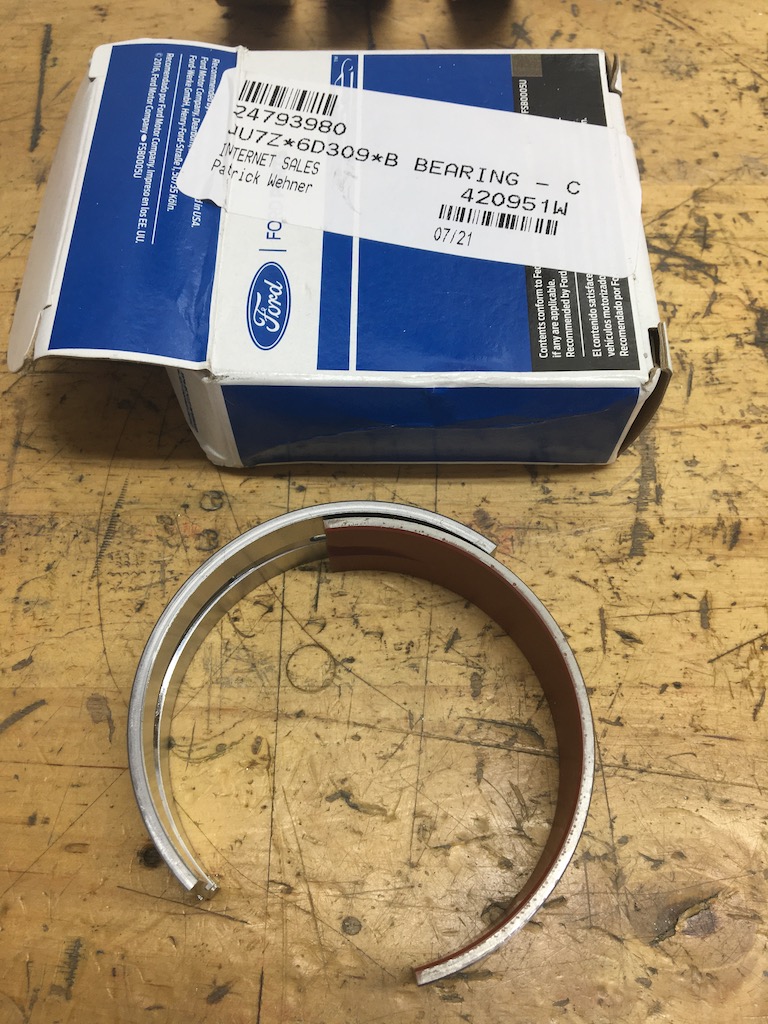
So I had previously posted about my woes with the junkyard F-150 plan. No worries, learning a ton along the way and I'm quite happy with what I was able to build. One of the last components needed before the engine could be assembled were the main bearings. This turned into a mini-fiasco, mostly because I'm stubborn, but also because I wanted to use Ford OEM bearings. They come coated and have a neat-o numbering system to control tolerances very closely. The details of how that works are in this post in the engine build thread.
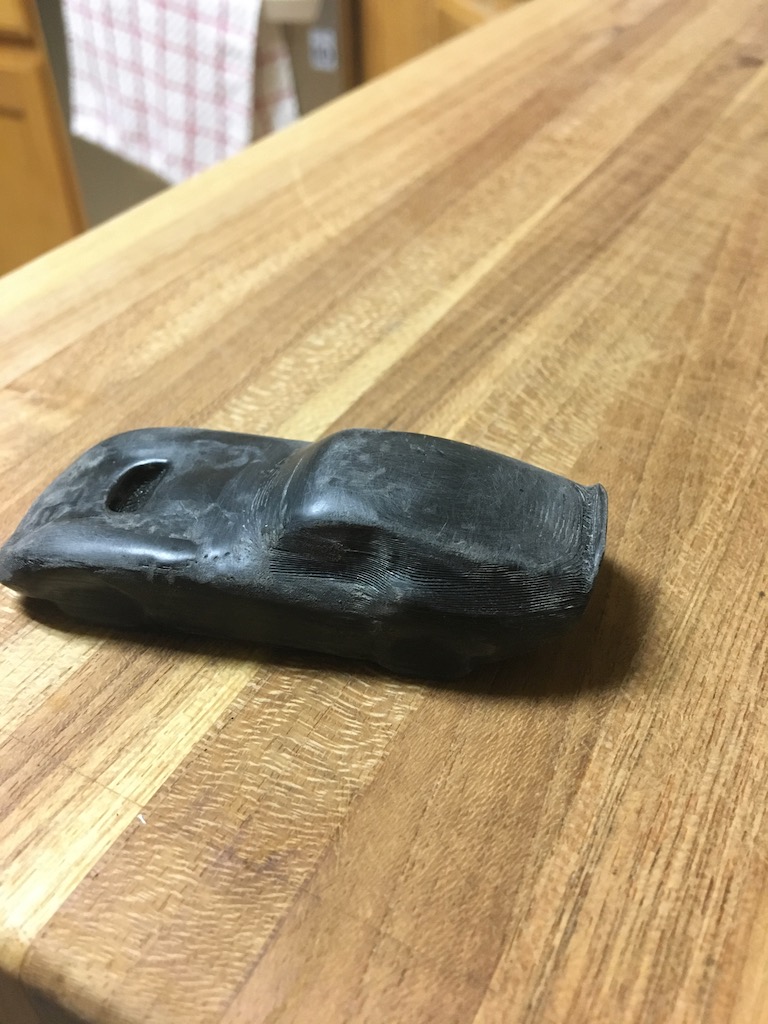
I ordered all the main and rod bearings from Tasca to start with. The rod bearings all came in with no issues. The mains were a different story. The issue boiled down to packaging which created a chewed bearing half.
This is a representation of how the damage occurred:
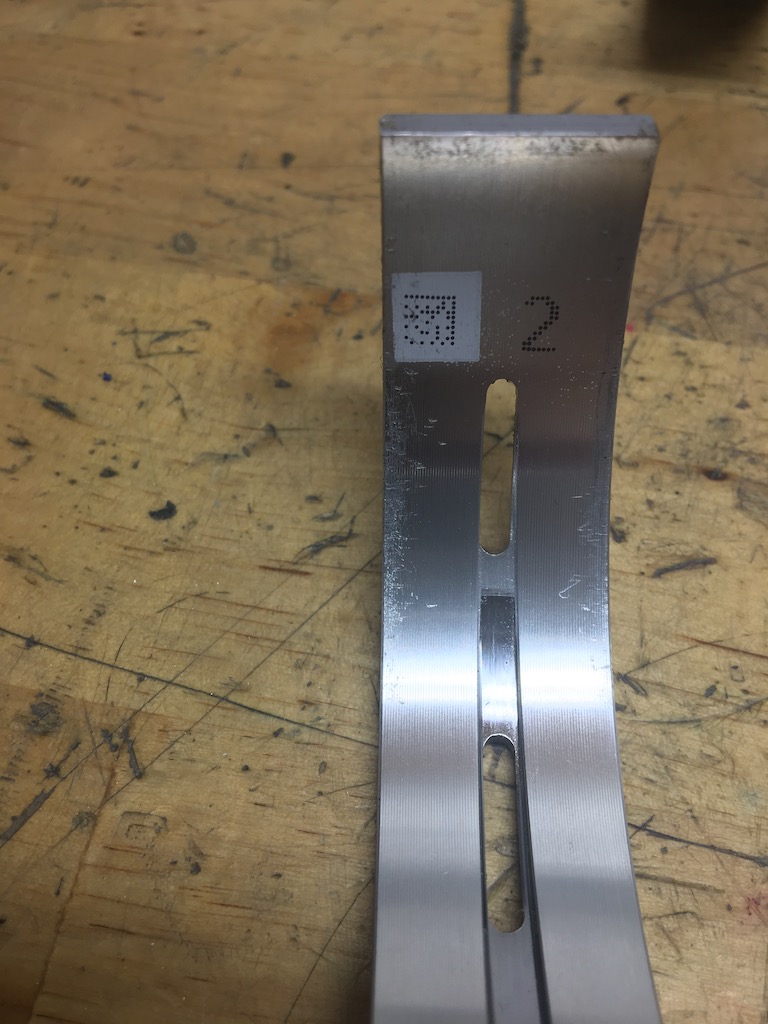
Instead of waiting to go back and forth with Tasca I reached out to the local Ford dealer who have always been outstanding for parts and they continue to be so, but still the problem was with the packing from Ford (or whoever makes the bearings for them). After ordering all of the bearings in the Bakersfield area I was able to piece together enough good halves in the correct part #s to match the clearances spelled out by the codes stamped on the crank and block. I still think that is just a really neat system they devised and the tolerances they hold to are less than .0001 inch. Ford uses metric to the third decimal and honestly there just isn't affordable equipment available to the DIY guy to measure with that kind of accuracy.
While trying to sort out this small logistical headache I continued work on the block prep. I have a brand new block from Ford and at $800 I felt that was really worth it since they come with mains line honed and cylinders finish honed. Quick recap: the junkyard block was showing a fair bit of wear in the cylinder liners so it will be saved for a future project...think sleeved for drag race prep Back on track...the first step was to clean up all of the super sharp edges on all of the machined surfaces, there are a lot of machined surfaces on the coyote block! Since the aluminum is very soft in comparison to iron and I didn't want to take much material off, just soften things so I could work on the engine without bleeding all over it, I elected to use files and 320 sandpaper. Next was to remove all of the casting flash which wasn't all that much, but there was a fair amount around oil and coolant passages, this was treated with the die grinder/carbide burr and a very light touch. Last bit was to make sure the oil pump and remote oil filter adapter passages line up with their corresponding passages in the block. Oil pump was spot on, oil filter adapter not so much.

The purple sharpie is hard to see against the blue anodizing, but you can kind of make it out. Purple is just what was handy at the moment, lol.
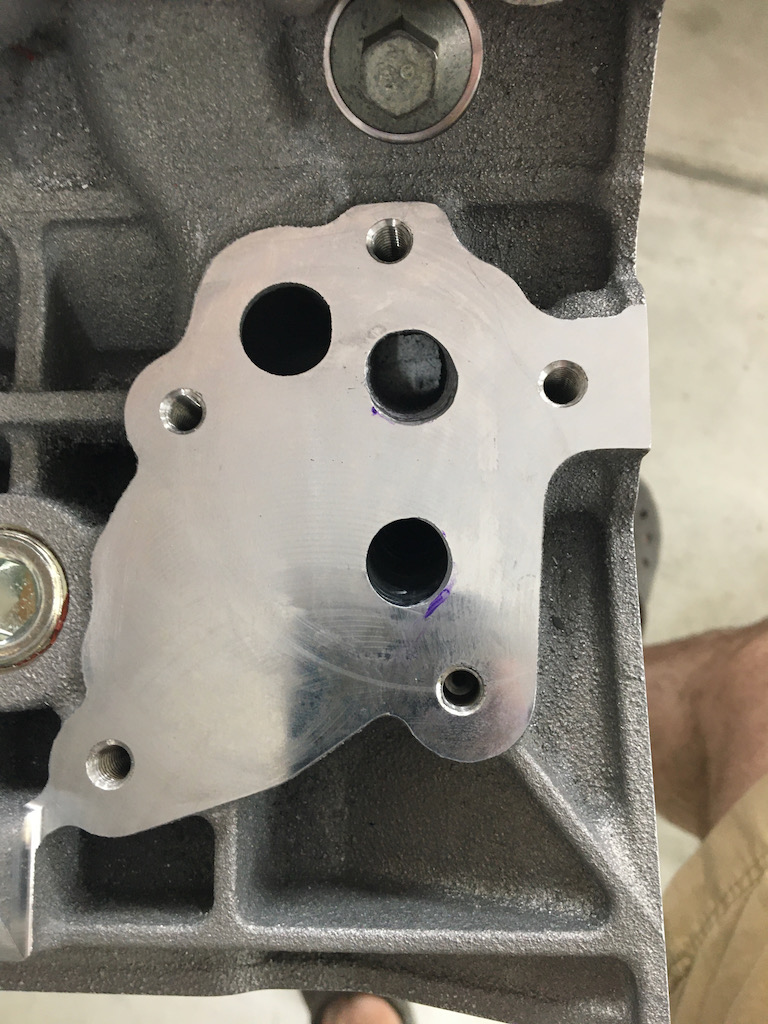
Block passages after grinding.
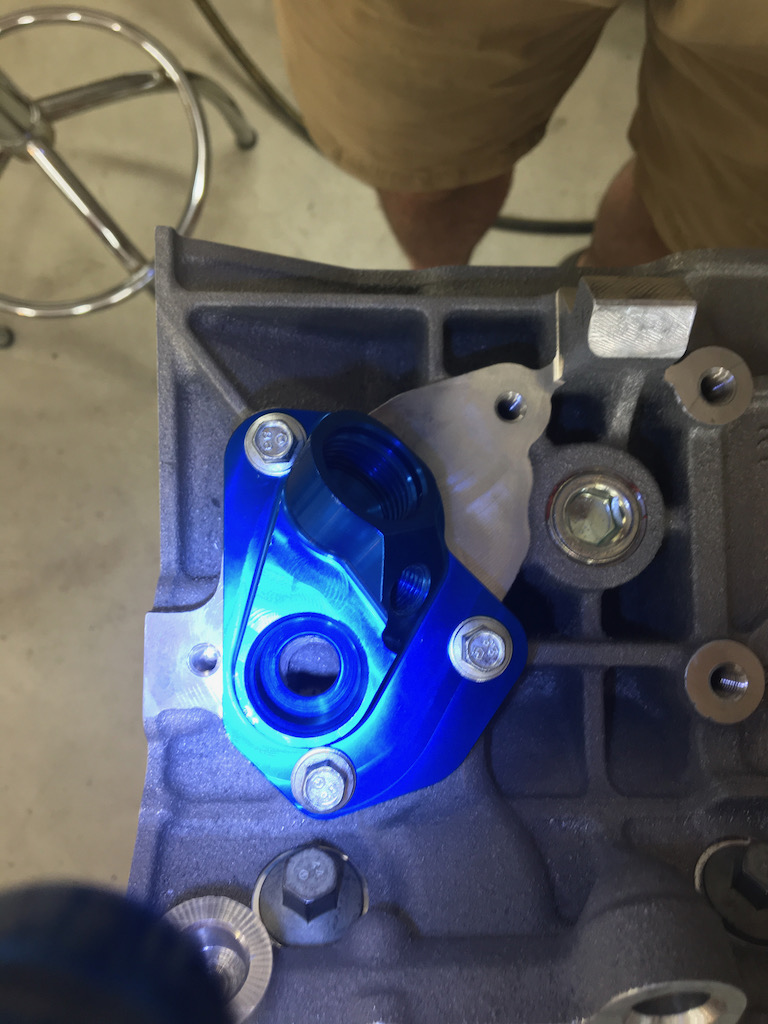
And now a very nice smooth transition from block to adapter.
Very happy with the block prep and the final step was to give the block as thorough a bath as I can manage with soap, tooth brush and bore brushes in my driveway. After the compressed air blow drying in every possible orifice the cylinders were treated to a coating of WD40, block was wrapped in plastic and awaited its new main bearings for build up.
This process took me about a week to complete by spending an hour or two on weeknights after work and then a good bit of a Saturday afternoon for the block bath. Sorry I didn't get any pictures of the block all clean and sparkly, I'm not terribly good about remembering to snap photos when I get in a good garage groove
More engine building to come...
Cheers,
Patrick
-
My son and I are planning to build a coupe next year and I like your idea of the electric steering system. Because of this you put the relay/fuse box on the right side where a glove box would normally be located. You also have the wiper motor in the same area. Are you planning a glove box?
-
Senior Member
Originally Posted by
Glen Davis
My son and I are planning to build a coupe next year and I like your idea of the electric steering system. Because of this you put the relay/fuse box on the right side where a glove box would normally be located. You also have the wiper motor in the same area. Are you planning a glove box?
No plans for a glove box due to those constraints. In hind sight I would have ditched the Ron Francis harness altogether and just wired everything up from scratch. I'm very comfortable with wiring and as it is I completely blew apart the RF harness to suit my purposes.
There are some fuse panel options from waytek that could easy work in different locations where you could preserve the electric steering in the way that I've done and also still leave the volume forward of the passenger side of the dash open for a glove box. The two locations that come to mind are a bulkhead style mount on the left hand side of the fire wall and have all of the fuses accessible from the engine bay or possibly on the lower dash corners, but I'm not too sure about what space is available there with the doors installed.
Happy to go into more details if you want to PM me.
Cheers,
Patrick


 Thanks:
  Likes:


 Reply With Quote


