-
Senior Member

I'd get those clamps off the padded/vinyl dash ASAP. There have been several posts on here over the years of clamps leaving permanent dents on that type of dash. Figure out a better way to hold the dash up.
Last edited by edwardb; 03-20-2022 at 09:08 AM.
Build 1: Mk3 Roadster #5125. Sold 11/08/2014.
Build 2: Mk4 Roadster #7750. Sold 04/10/2017.
Build Thread
Build 3: Mk4 Roadster 20th Anniversary #8674. Sold 09/07/2020.
Build Thread and
Video.
Build 4: Gen 3 Type 65 Coupe #59. Gen 3 Coyote. Legal 03/04/2020.
Build Thread and
Video
Build 5: 35 Hot Rod Truck #138. LS3 and 4L65E auto. Rcvd 01/05/2021. Legal 04/20/2023.
Build Thread. Sold 11/9/2023.
-
Post Thanks / Like - 0 Thanks, 1 Likes
-
Thank you, they have been removed. Already discovered that when I did the glove box.. fortunately it looks like they’ll smooth out. The tape helped a little bit while I temporarily held it up. Might just grab some 3m Velcro strips on the hoop until I figure out a permenant fix
MK4 Complete Kit #10315 / Coyote G3 / TKX / 427 HardTop
Build Thread Production Date: 2/26/22, Registered 5/19/22, Graduated 3/1/2023
-
Yesterday I had to pause and clean/reorganize the workshop. Its not the largest work area at 14x24 and still has all the fun things your typical shed has (lawn mowers, etc) so all the jumping around in the manual had parts of assemblies and boxes all over the place and it was just becoming a bit unsafe to work. Got the shop cleaned up and tossed a bunch of used boxes - I guess that means I'm making progress? On to the next steps... First was the radiator. I know it'll need to come back off for the engine but wanted to get it mocked up and completed. I used the breeze upper, lower, and shroud and all the pieces fit together nicely. Removed the small 3/4" tubes per the directions and put some paint back on the cross bar. I've been painting just about everything some version of black. The car will ultimately also be blacked out. Has anyone painted the radiator? I understand its primary purpose is heat exchange so I don't want to do anything that would compromise that.


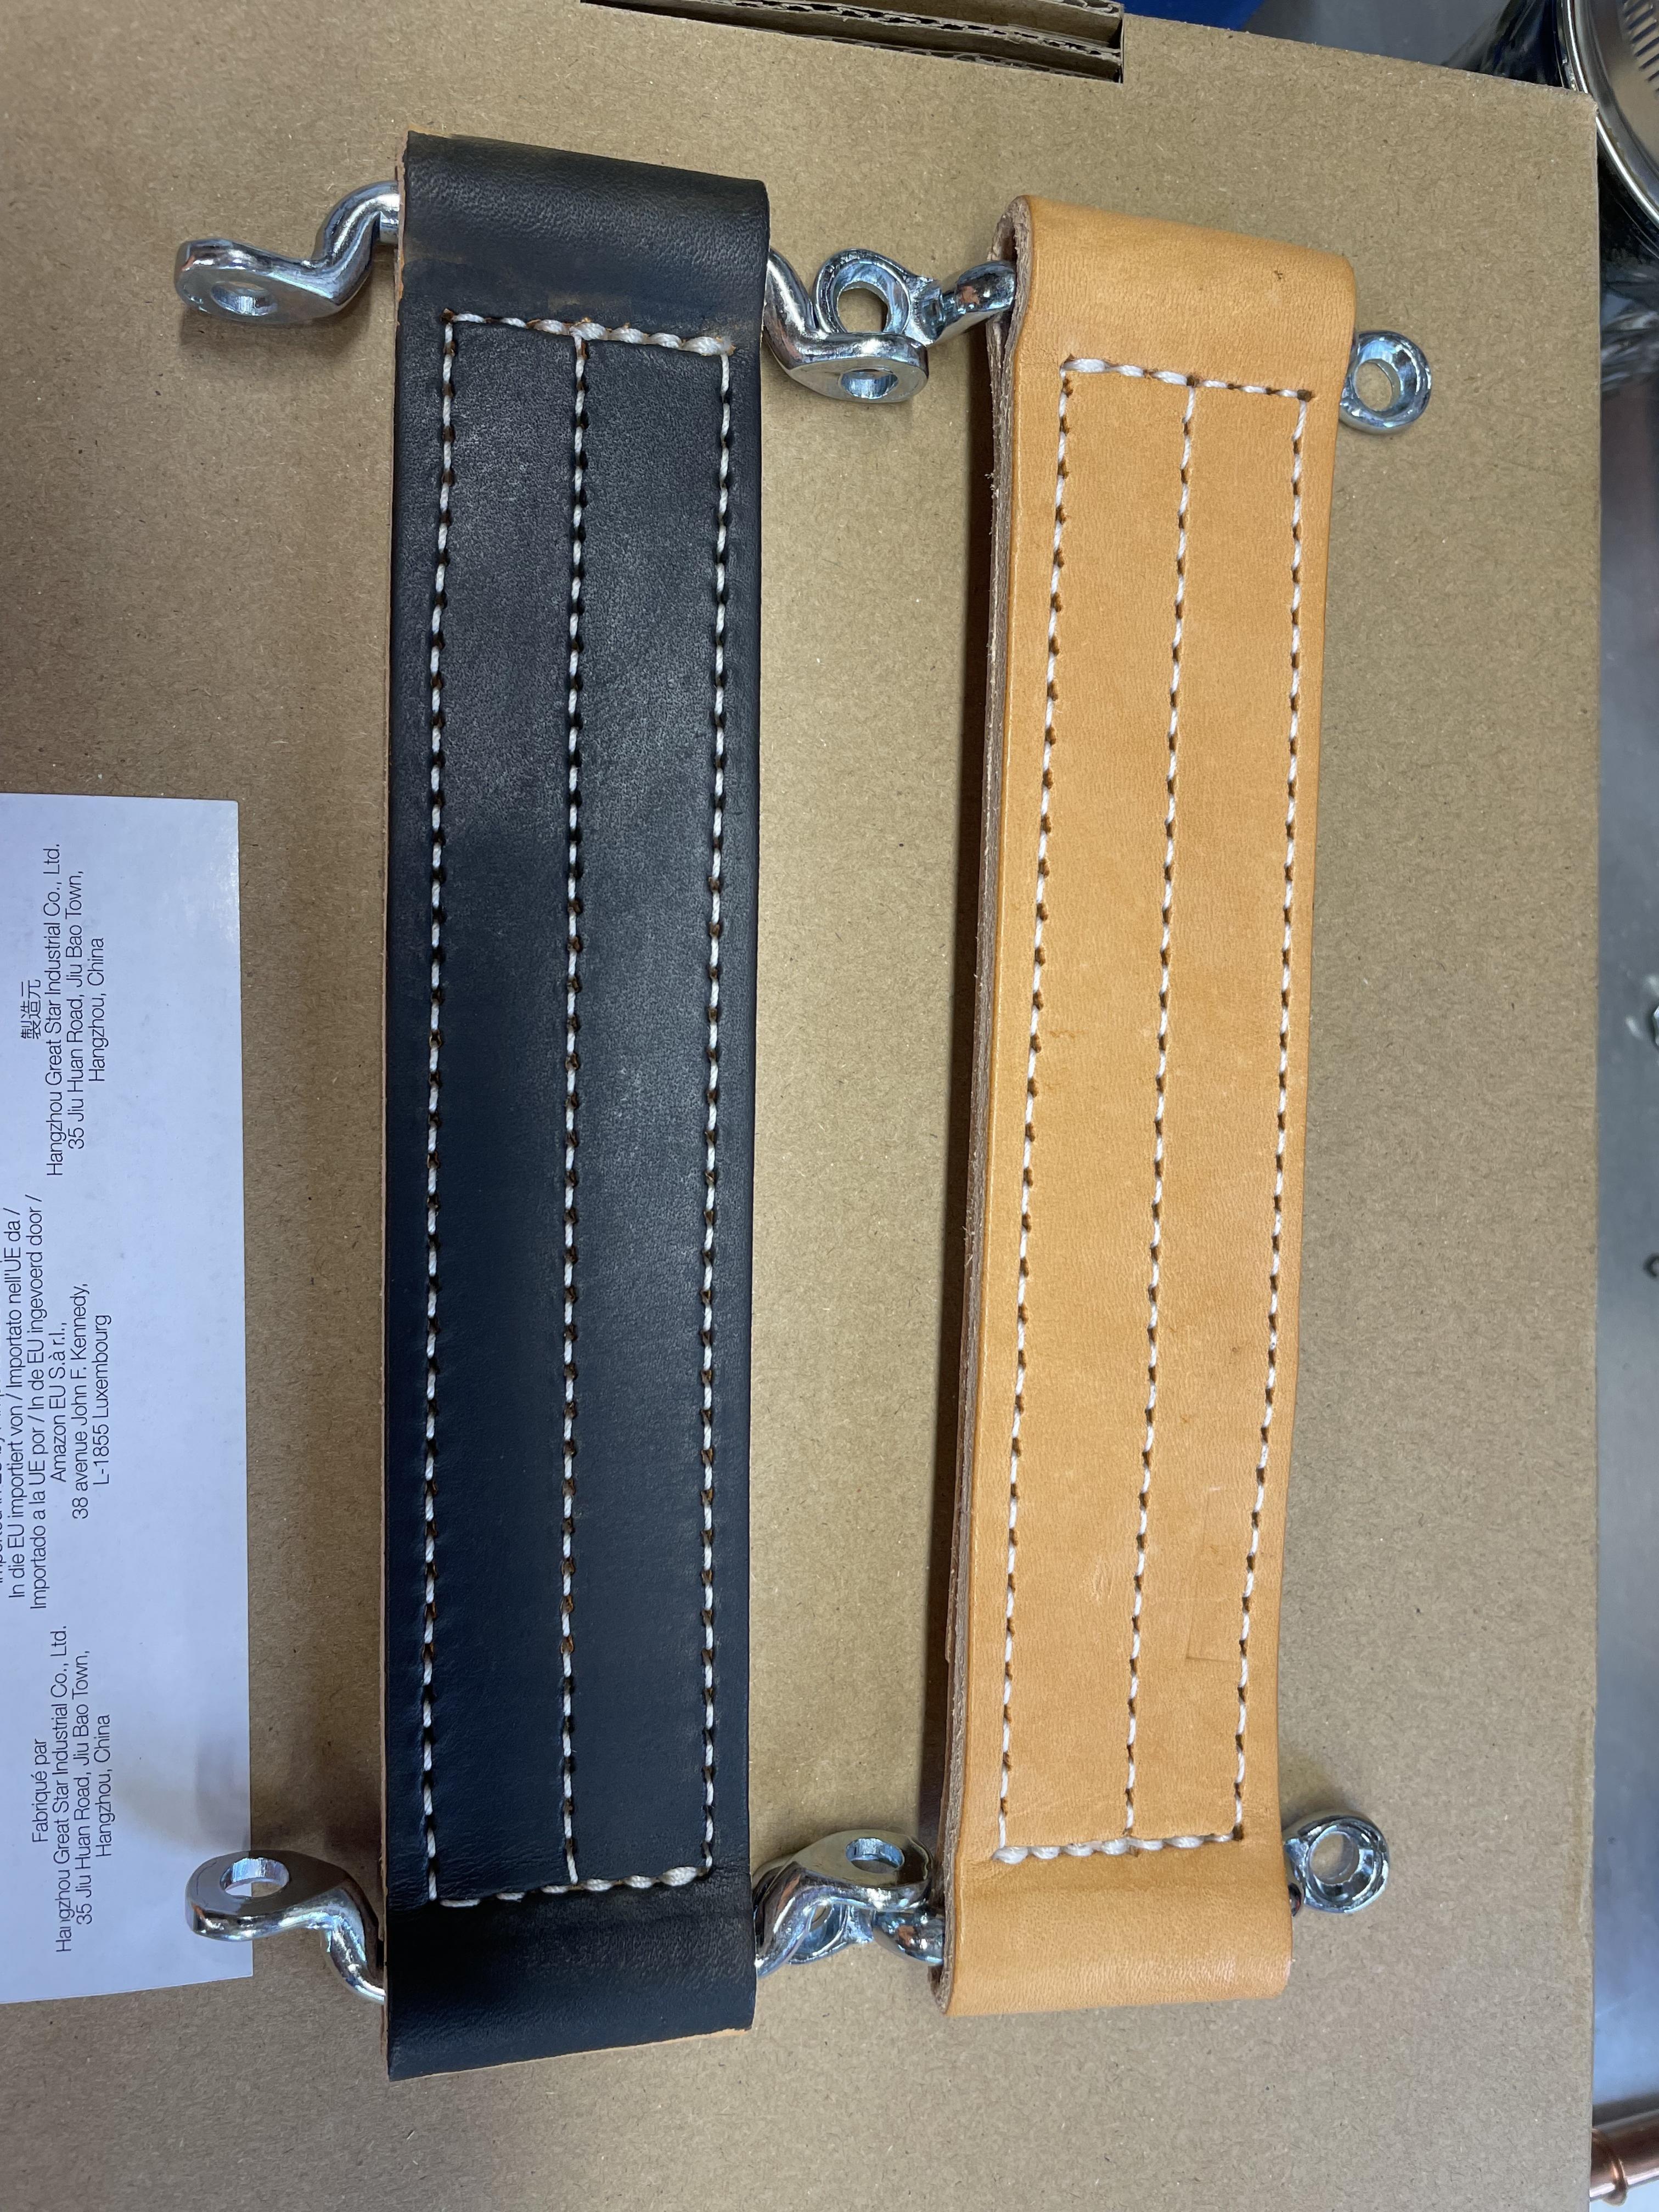
A little side project also got wrapped up. I know there are many options for dying the door straps and I went with Vinegaroon approach. It cost me nothing as I had steel wool, vinegar, and a glass jar. I put the wool and vinegar in the jar and let it sit for a few days. Poored the liquid through a filter and took the filtered solution to the straps. It worked really well and as advertised. The leather instantly turned a nice matte black and since it can't react with the thread those stayed white which I really am happy with the outcome. Washed it off after a few minutes with water and backing soda and then set it out to dry.
This was in the middle of the process - the finished straps are much more even.
Next up - Fuel Lines. I got my drivetrain from Mike Forte and he included a Holley 340LPH in take fuel pump for the Coyote. It seems the standard is 255, so I'm assuming this one should be more than sufficient. I also decided that I want to go with the larger 3/8" lines for both supply and return. I ordered a roll of 25' of the steel coated 3/8" lines which looks the same as the ones with the kit just larger. Also everything is 6AN so I'll be using all new fittings and will make my own flex lines at the ends. I'm using compression tube to 6AN for fittings on the hard lines. I also picked up a fuel filter that had 6AN fittings already on it for about the price just the fittings would have cost for me to convert and it looks a little nicer. Please let me know if you see any concerns with my routing - I only have the clamps cleco'd for now. Also the cushion clamps that came with the kit were either far to small for the 3/8" or too big. I found I could fit both lines under a single clamp and the are nice a tight (otherwise they would be very loose and don't want them raddling). If you think this is a bad idea, let me know and I'll try to order some that fit better.
Down the inside of the passenger footbox (I did modify a pair of the big ones for this step to keep the fittings seperated, but it was a PIA):

Down the outside of the 4" tube. (Not to start another debate on inside vs outside - I can see the issue with fuel lines next to drive shafts, but does anyone have concern against the fuel lines exposed to everything else on the outside? Side impact accidents? Seems much more likely than a drive shaft failure) Anyways - I went with the majority and the manual on this one:

And up the back 2x3 where they will get the flex lines. My fuel tank is POL so nothing more I can do here:

I started doing brake lines but didn't get far. I don't want a bunch of loops or odd routing to consume the excess length of the premade lines and I've done flares successfully in the past so I starting making lines that fit. Unfortunately they only rent the junk tool at the local store so i ordered a decent one on amazon. I'm putting Wilwoods all around (ordered from Forte) and 3link on the back. The kit came with the two chassis brackets for the front F-Panels, but didn't come with anything for the rear. Do I need to procure/fabricate these?
Last edited by JeffP; 03-22-2022 at 06:33 AM.
MK4 Complete Kit #10315 / Coyote G3 / TKX / 427 HardTop
Build Thread Production Date: 2/26/22, Registered 5/19/22, Graduated 3/1/2023
-
Not a waxer

Looking great! A couple of quick comments—- the radiator will actually perform (marginally) better painted black. Unless I’m using a mechanical pump I always run fuel lines on the outside of the RH tube as you show yours. You might want to put a gentle bend in them above your clamp on the foot box side to angle them rearward, basically parallel with the tube that angles down to the 4” round. The Coyote packs that area tight so if you do this it will be much easier to get your flex hose onto the hard lines. Rear brake hose tabs are not provided; you can get them (as well as the braided hoses) from Breeze or simply fab your own from flat stock.
Carry on!
Jeff
Last edited by Jeff Kleiner; 03-22-2022 at 07:56 AM.
-
Thanks! I always wondered why many builds had them angled back and that makes sense, I'm sure it would become painfully obvious when I drop the motor in so I appreciate the heads up - I'll do that before I rivit them.
MK4 Complete Kit #10315 / Coyote G3 / TKX / 427 HardTop
Build Thread Production Date: 2/26/22, Registered 5/19/22, Graduated 3/1/2023
-
-
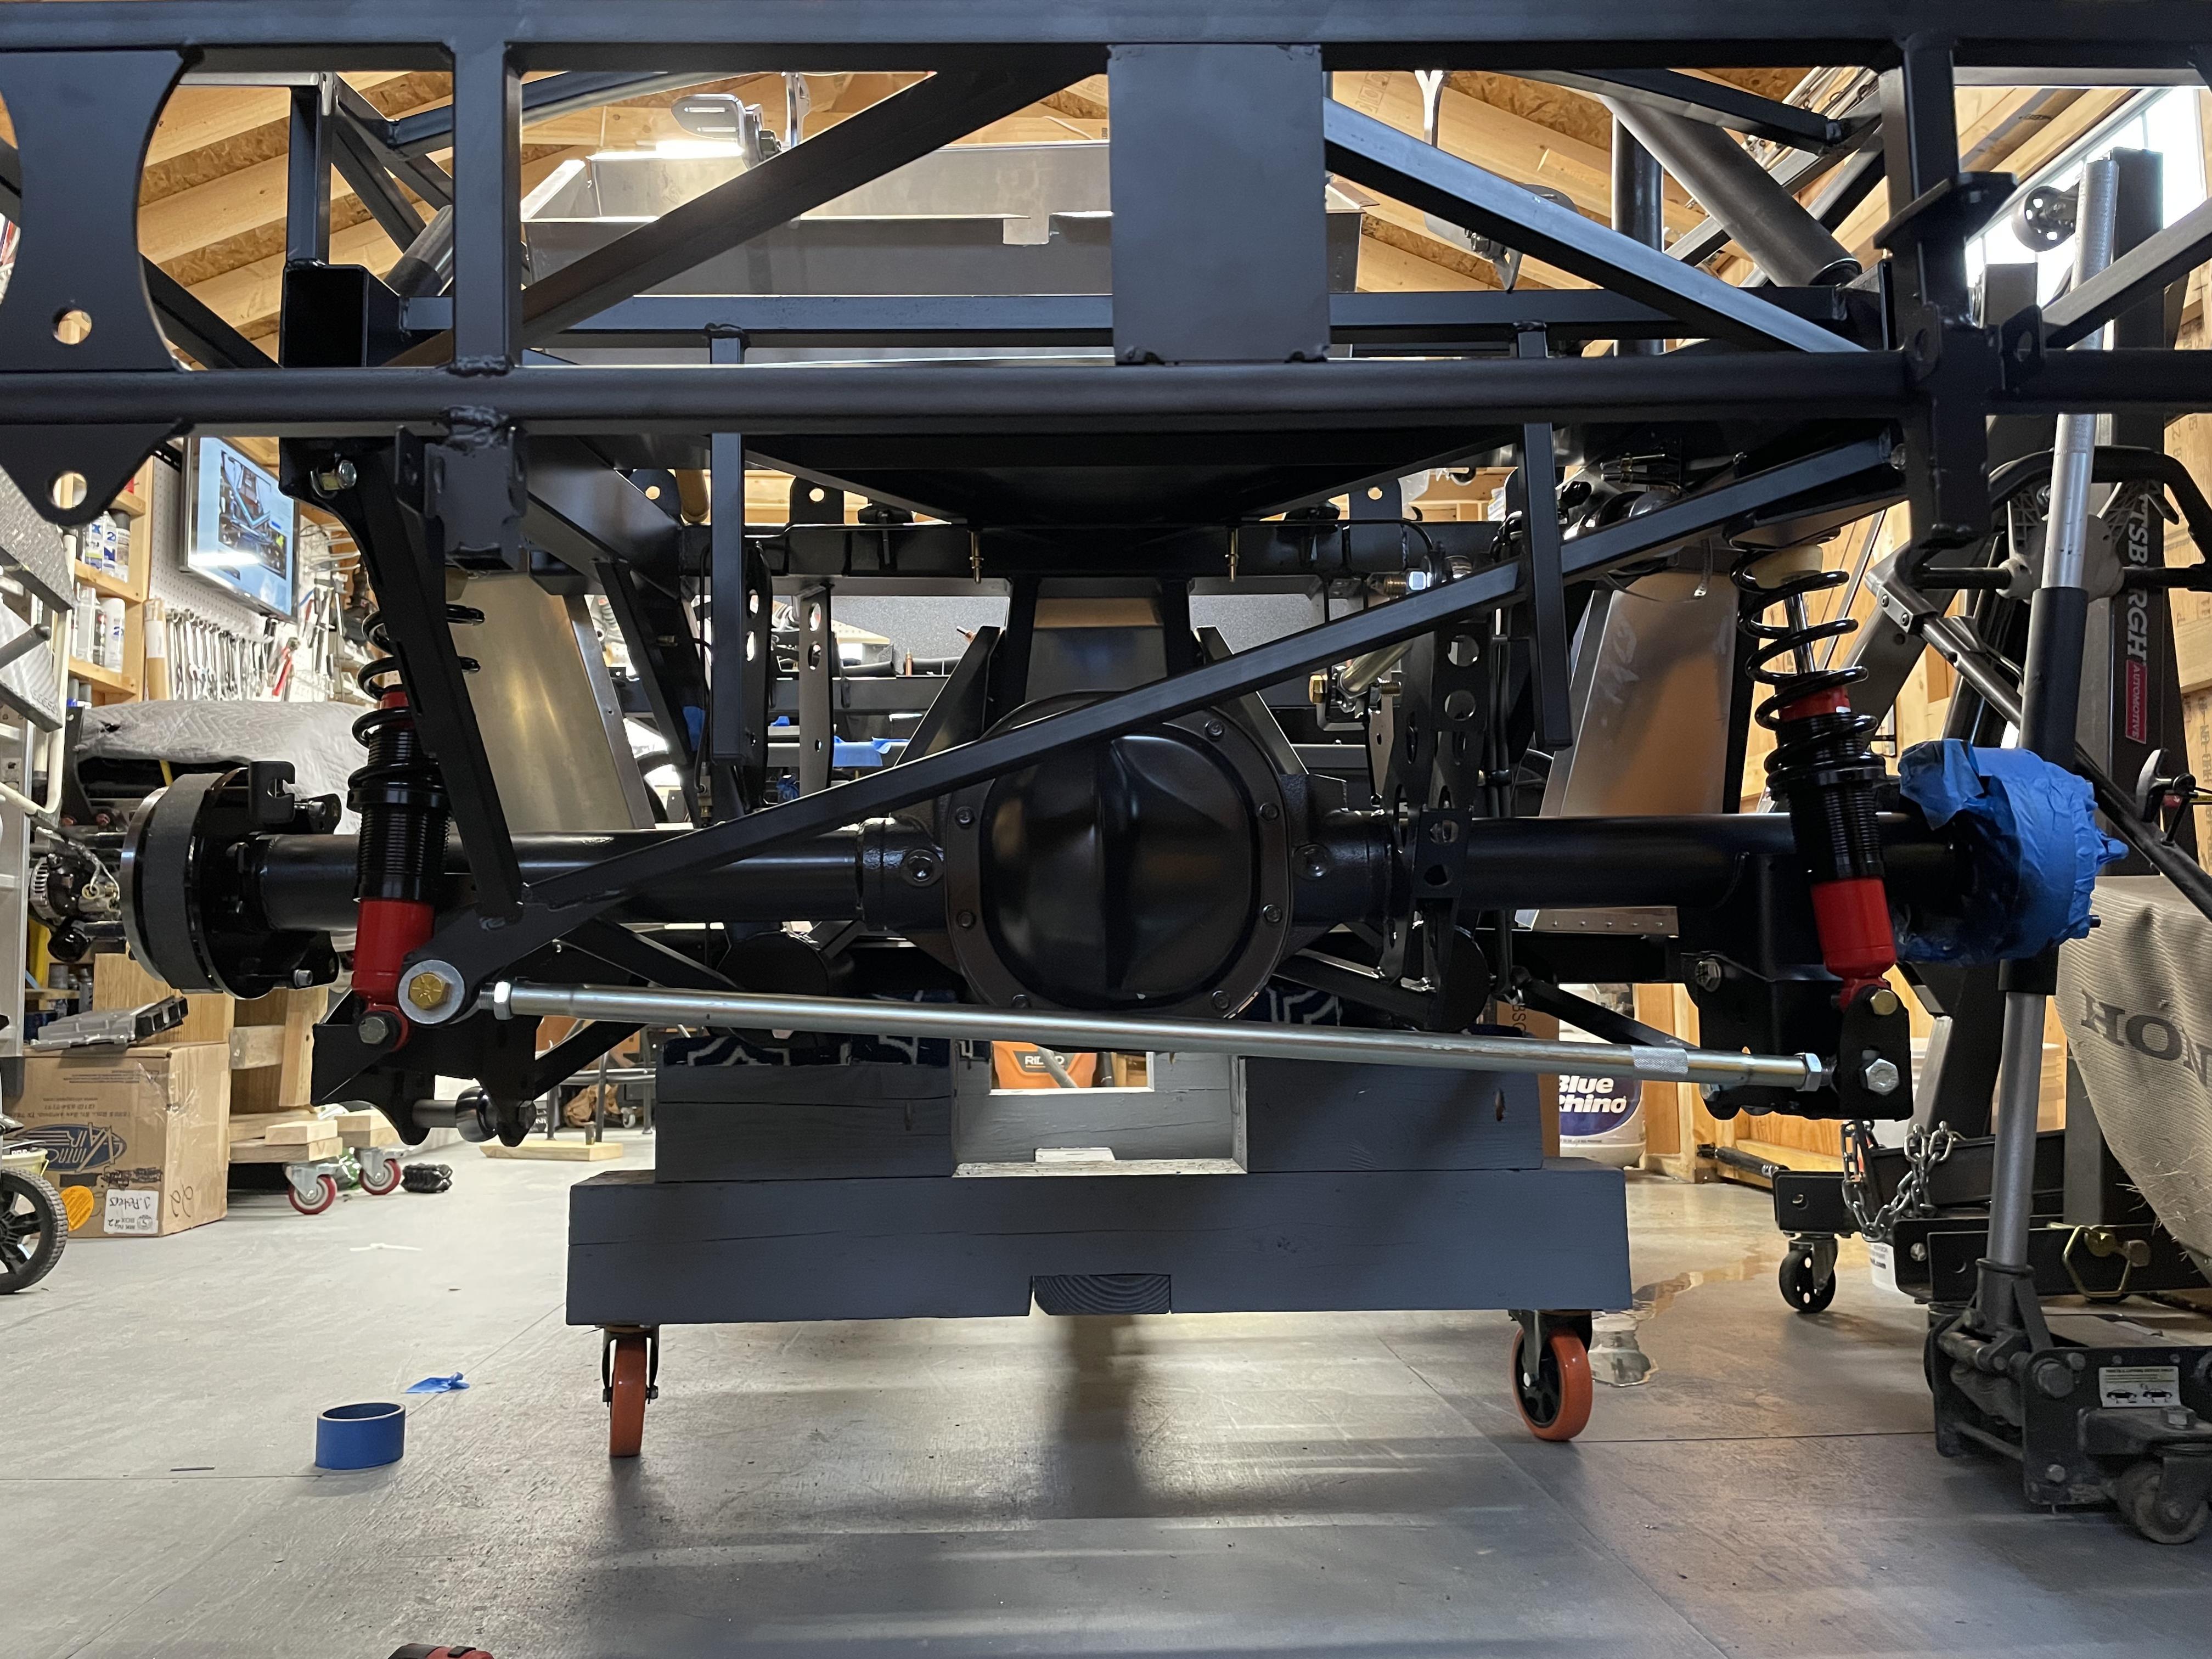
Next up the 3 Link (I have Wilwoods for the rear, but waiting on rotor so don't have them fully mounted right now) A bit frustrated at both the manual and myself on having to flip the shocks. How does FFR not realize there is absolute interference? I should have known too as I've read about it in many build threads. It would also be very helpful if the manual actually listed the fastener required for the task rather than saying "use the bolts and washer to attached the shocks" which requires you to go to the inventory, guess which of the bolts and washers they might be referring to, install them and realize you have them swapped so you get to do it twice. Sorry for the rant.. These are small details easily fixed - Maybe they could get the technical writing students at Mott to rewrite their manual.
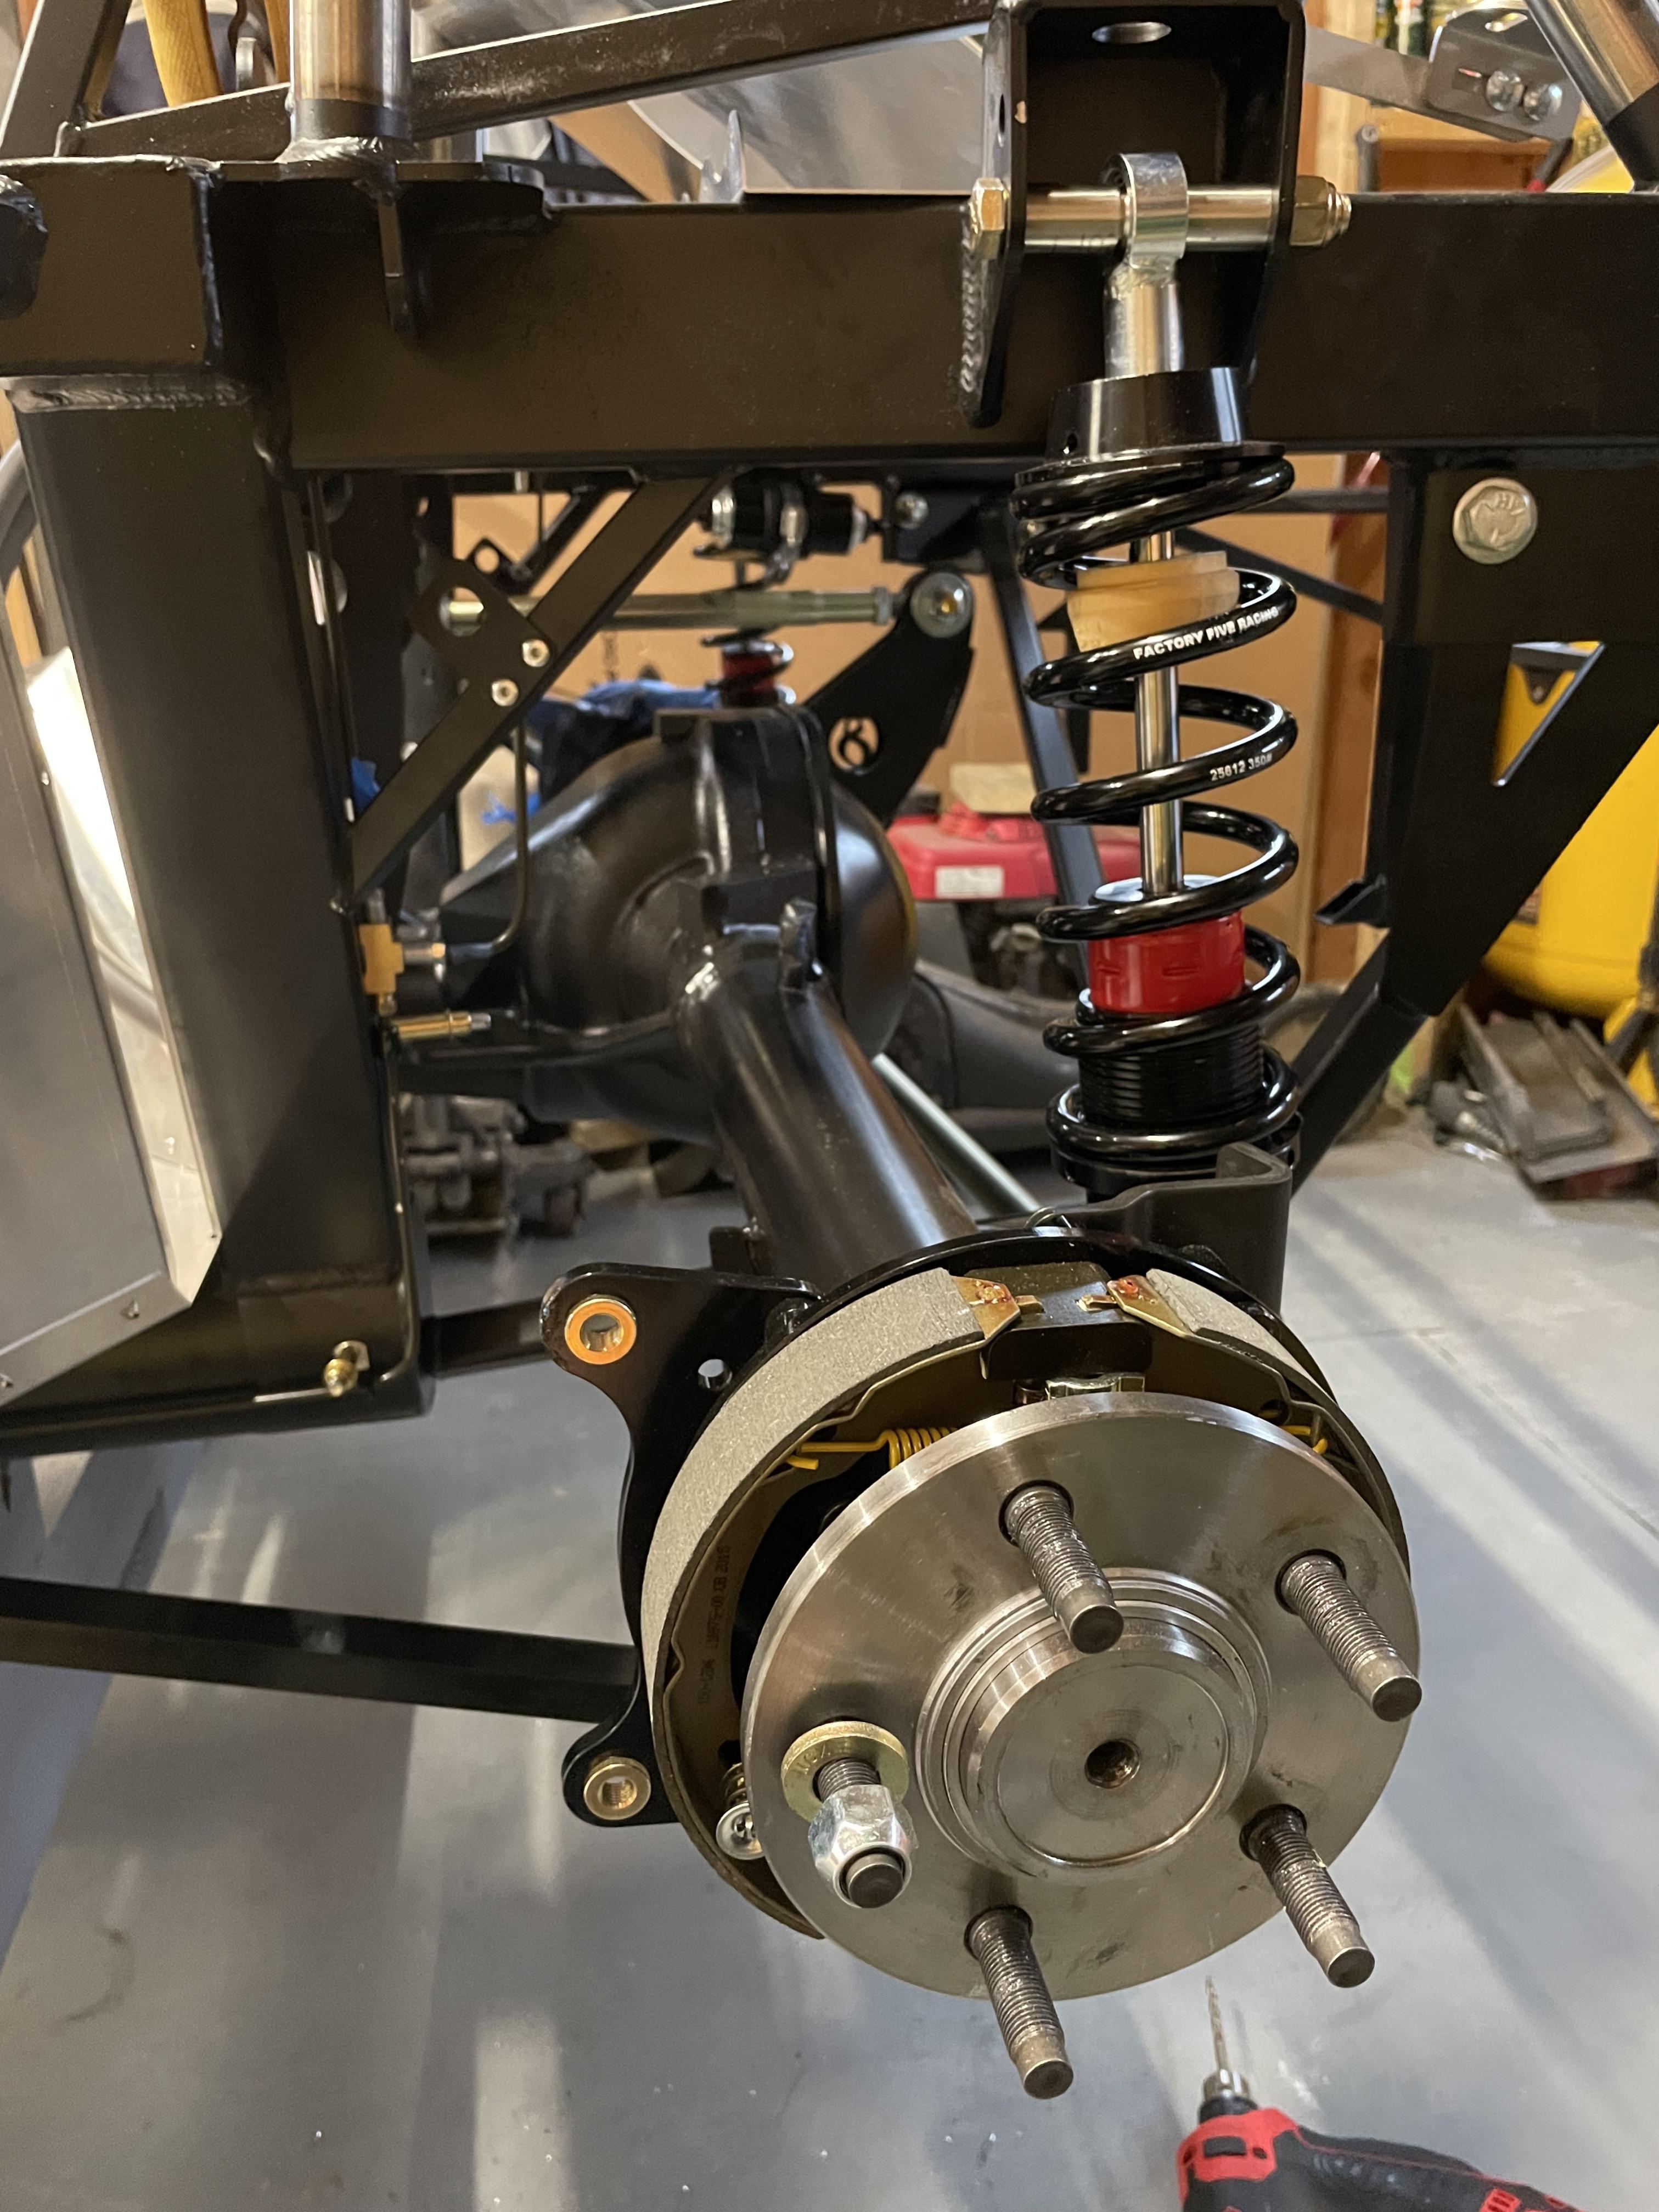
I have the Breeze LCA's installed as well:
Question for the group: I'm getting pretty close to dropping in the coyote so I can mock up my firewall for the heater, windshield wiper motor, and the fuel regulator along with e-stopp in the transmission tunnel. In the manual it references hooking up this hose from the drivers side valve cover to the intake manifold. I do not have this hose. Was this supposed to come with my Coyote?

MK4 Complete Kit #10315 / Coyote G3 / TKX / 427 HardTop
Build Thread Production Date: 2/26/22, Registered 5/19/22, Graduated 3/1/2023
-
Senior Member
I don't recall that the Coyote crate motor or control pack included the PCV hose to the cold air intake. Separate observation/question: I'd add clamps to your brake reservoir hoses at the top of the MC's. Maybe you just haven't installed them yet. Speaking of those hoses though, what type of hose is that? Can't quite make out the marking other than Gates something. Looks a little like regular fuel or vacuum hose, e.g. the 7-bar marking. It's recommended to only use hose specifically for brake fluid. Typically EPDM.
Last edited by edwardb; 03-24-2022 at 05:37 AM.
Build 1: Mk3 Roadster #5125. Sold 11/08/2014.
Build 2: Mk4 Roadster #7750. Sold 04/10/2017.
Build Thread
Build 3: Mk4 Roadster 20th Anniversary #8674. Sold 09/07/2020.
Build Thread and
Video.
Build 4: Gen 3 Type 65 Coupe #59. Gen 3 Coyote. Legal 03/04/2020.
Build Thread and
Video
Build 5: 35 Hot Rod Truck #138. LS3 and 4L65E auto. Rcvd 01/05/2021. Legal 04/20/2023.
Build Thread. Sold 11/9/2023.
-
Not for sure which side the mentioned hose working from. Probably part of the pcv. My drivers side hose was supposed to be routed to the cold air intake housing, not the intake manifold, big difference on air movement.
Cold air intake will be a clean air source for air taken into the engine crankcase. Intake manifold will be a vacuum to draw the same air from the crankcase.
On the drivers side of my Coyote the nipple was the for air entering the crankcase. I chose to put a K&N filter on it and not use a hose.
On the passenger side the hose from the valve cover does go to the intake manifold, vacuum source, and pulls crankcase air into the intake air stream.
Here are a couple of pics. Hope some of that made sense, to help.
20190220_101608.jpg20200409_123227.jpg
On lubing your flared fittings. Use brake fluid, tighten the flare nut, back off and retighten.
No leaks.
Last edited by Railroad; 03-24-2022 at 12:31 AM.
20th Anniversary Mk IV, A50XS Coyote, TKO 600, Trunk Drop Box, Trunk Battery Box, Cubby Hole, Seat Heaters, Radiator hanger and shroud.
-

Originally Posted by
Railroad

Not for sure which side the mentioned hose working from. Probably part of the pcv. My drivers side hose was supposed to be routed to the cold air intake housing, not the intake manifold, big difference on air movement.
Cold air intake will be a clean air source for air taken into the engine crankcase. Intake manifold will be a vacuum to draw the same air from the crankcase.
On the drivers side of my Coyote the nipple was the for air entering the crankcase. I chose to put a K&N filter on it and not use a hose.
On the passenger side the hose from the valve cover does go to the intake manifold, vacuum source, and pulls crankcase air into the intake air stream.
Here are a couple of pics. Hope some of that made sense, to help.
20190220_101608.jpg20200409_123227.jpg
On lubing your flared fittings. Use brake fluid, tighten the flare nut, back off and retighten.
No leaks.
Sorry yes, It is the driver side to the cold air intake - mistakenly said intake manifold. I do have the passenger side one that connects to that. Thanks for the brake line guidance - doing my own flares I need all the help I can get for good seals.
Originally Posted by
edwardb
I don't recall that the Coyote crate motor or control pack included the PCV hose to the cold air intake. Separate observation/question: I'd add clamps to your brake reservoir hoses at the top of the MC's. Maybe you just haven't installed them yet. Speaking of those hoses though, what type of hose is that? Can't quite make out the marking other than Gates something. Looks a little like regular fuel or vacuum hose, e.g. the 7-bar marking. It's recommended to only use hose specifically for brake fluid. Typically EPDM.
Is there anything special about that hose? Just find one that fits or do I need to have the quick connects on it?
I do have the clamps just haven't put them on yet for both ends of the reservoir lines. I'll try to identify the composition today, it was the line that came with the kit for their reservoir so I just assumed it was appropriate. Granted I did have to buy some more so now I'm questioning that. Seems it would be so much easier for manufactures to just make one hose that covers all the fluids.. less sku's and make it a lot easier to plumb.
MK4 Complete Kit #10315 / Coyote G3 / TKX / 427 HardTop
Build Thread Production Date: 2/26/22, Registered 5/19/22, Graduated 3/1/2023
-
I'll just let this be today's Update.
-No blood
-No parts needing replacement
-No divorce papers
I'll call it a successful install with the help of my amazing wife.

MK4 Complete Kit #10315 / Coyote G3 / TKX / 427 HardTop
Build Thread Production Date: 2/26/22, Registered 5/19/22, Graduated 3/1/2023
-
Post Thanks / Like - 0 Thanks, 3 Likes
-
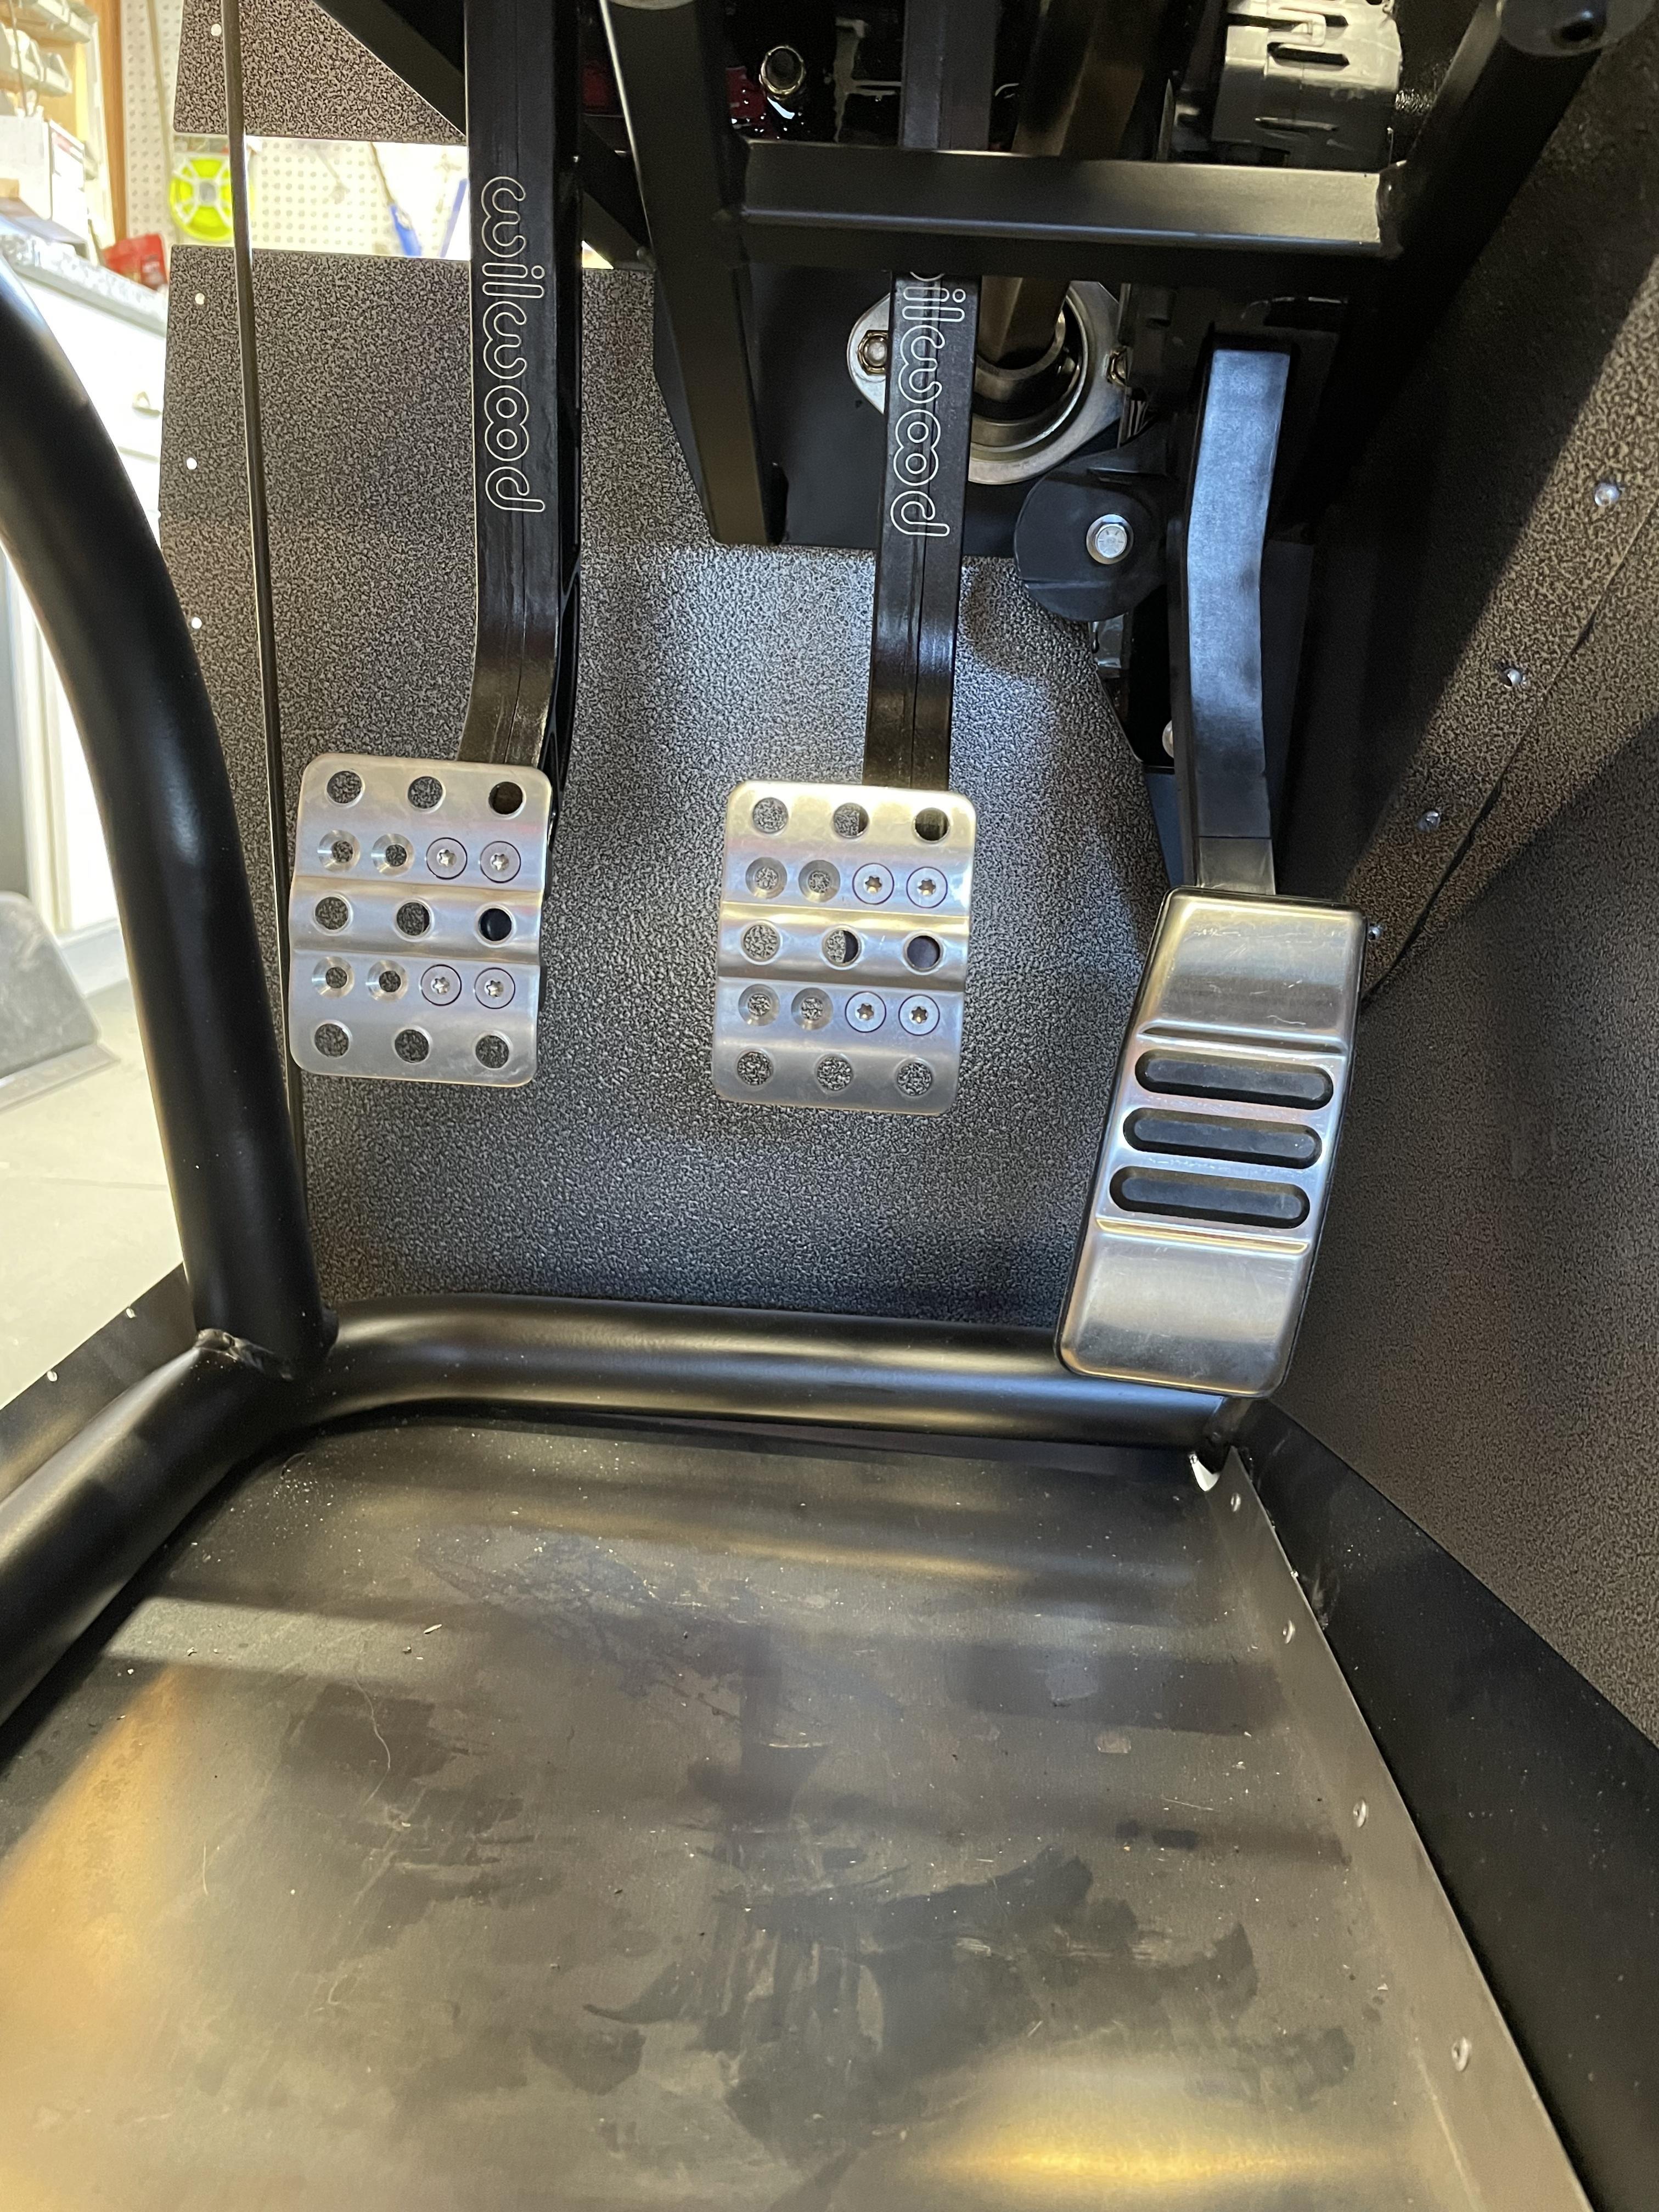
I got the brakes bled yesterday and so far no leaks so thats definitely a win. I'll give it a few more days and then rivit the lines in. While bleeding them however I discovered an interference issue with my Coyote pedal. I didn't catch it when mocking up because the side wall of the foot box wasn't on. Of course now its rivited in and the pedal is rubbing on the wall. Are there any easy fixes for this or what have you guys done? I guess I can remove the pad and try to shift it over on the pedal but its going to put it close to the brake, so I'll need to shift those over as well. To make matters worse, this pedal isn't exactly an easily servicable item in the footbox. I'm not sure I can even get it out now that some of the walls are on. I still need to make room for insulation and carpet between the pedal and the wall.

MK4 Complete Kit #10315 / Coyote G3 / TKX / 427 HardTop
Build Thread Production Date: 2/26/22, Registered 5/19/22, Graduated 3/1/2023
-
If you have not yet installed the outside wall of the footbox, you should be able to access the pedal. It'll be tight but doable. I can't tell for certain, but it looks like you used the FFR-provided bracket for the coyote pedal. I don't know of many folks that have had good luck with that thing. They've either had to modify it to work right, or (as I did) tossed it and made my own mount as shown here.
MkIV Roadster build: Gen 2 Coyote, IRS, TKO600. Ordered 10/24/18. Delivered 1/29/19. Engine installed 8/8/21. First start 9/12/21. First go-kart 9/17/21. Off to paint 4/11/22. Back from paint 12/30/22.
Build thread here.
-
Senior Member

I had to modify my FFR bracket - basically new holes and some grinding to move it away from the inside footbox wall. I mounted the Wilwood clutch and brake pedal off center to give some more room for the accelerator pedal. Others have used different pedals that are narrower - Mike Forte has some nice ones. I also ditched the Coyote pedal and modified the FFR kit pedal which is narrower. I found that I could not mount the accelerator pedal with the bracket attached with the inside footbox wall installed.. I had to unbolt the accelerator pedal from the bracket, slide them both up into the mounting location, and then refasten everything together. Good luck!
Mk4 Roadster #9974 - Picked Up 1/2021. Complete kit, Gen 2 Ford Coyote / TKX, IRS. Completed 9/2023
-
First item to tackle today - Fix the pedal issue. After looking over the pedal box and basically realizing there are only two way to fix it - modify the pedal mount points (elongate the holes) or the FFR Pedal bracket itself, or modify the Pedal pad and how it sits on the pedal. Realizing its going to be a pretty large undertaking to remove the pedal assembly itself now that its in the pedal box and at least some of the footbox walls are assembled, I focused on the pedal pad itself. Unscrewed it to see what could be done to shift it over. First idea - Flip is back right side up. Done. With the pedal back in its original orientation from Ford, it fits perfectly, has over an 1" of clearance from the wall and even lowers it outside of the same plane as the brake/clutch. Also moved those pads over a hole and now I have all kinds of room. FFR could make the Coyote install so much easier by just not modifying the pedal pad at all.
Next up was just some fun. I decided I wanted to get the Roadster on some wheels. Of course FF Rims are POL - So I found a set of mustang rims with pirelli p-zero's (Granted they're all kinds of dry rotted, but they hold air) for $50 on FB. Another $10 for some rustoleum and I have some nice blacked out rims and the car is on wheels. Its amazing how it really transformed it - starting to look like a car! And how low it sits and its still not on the ground!

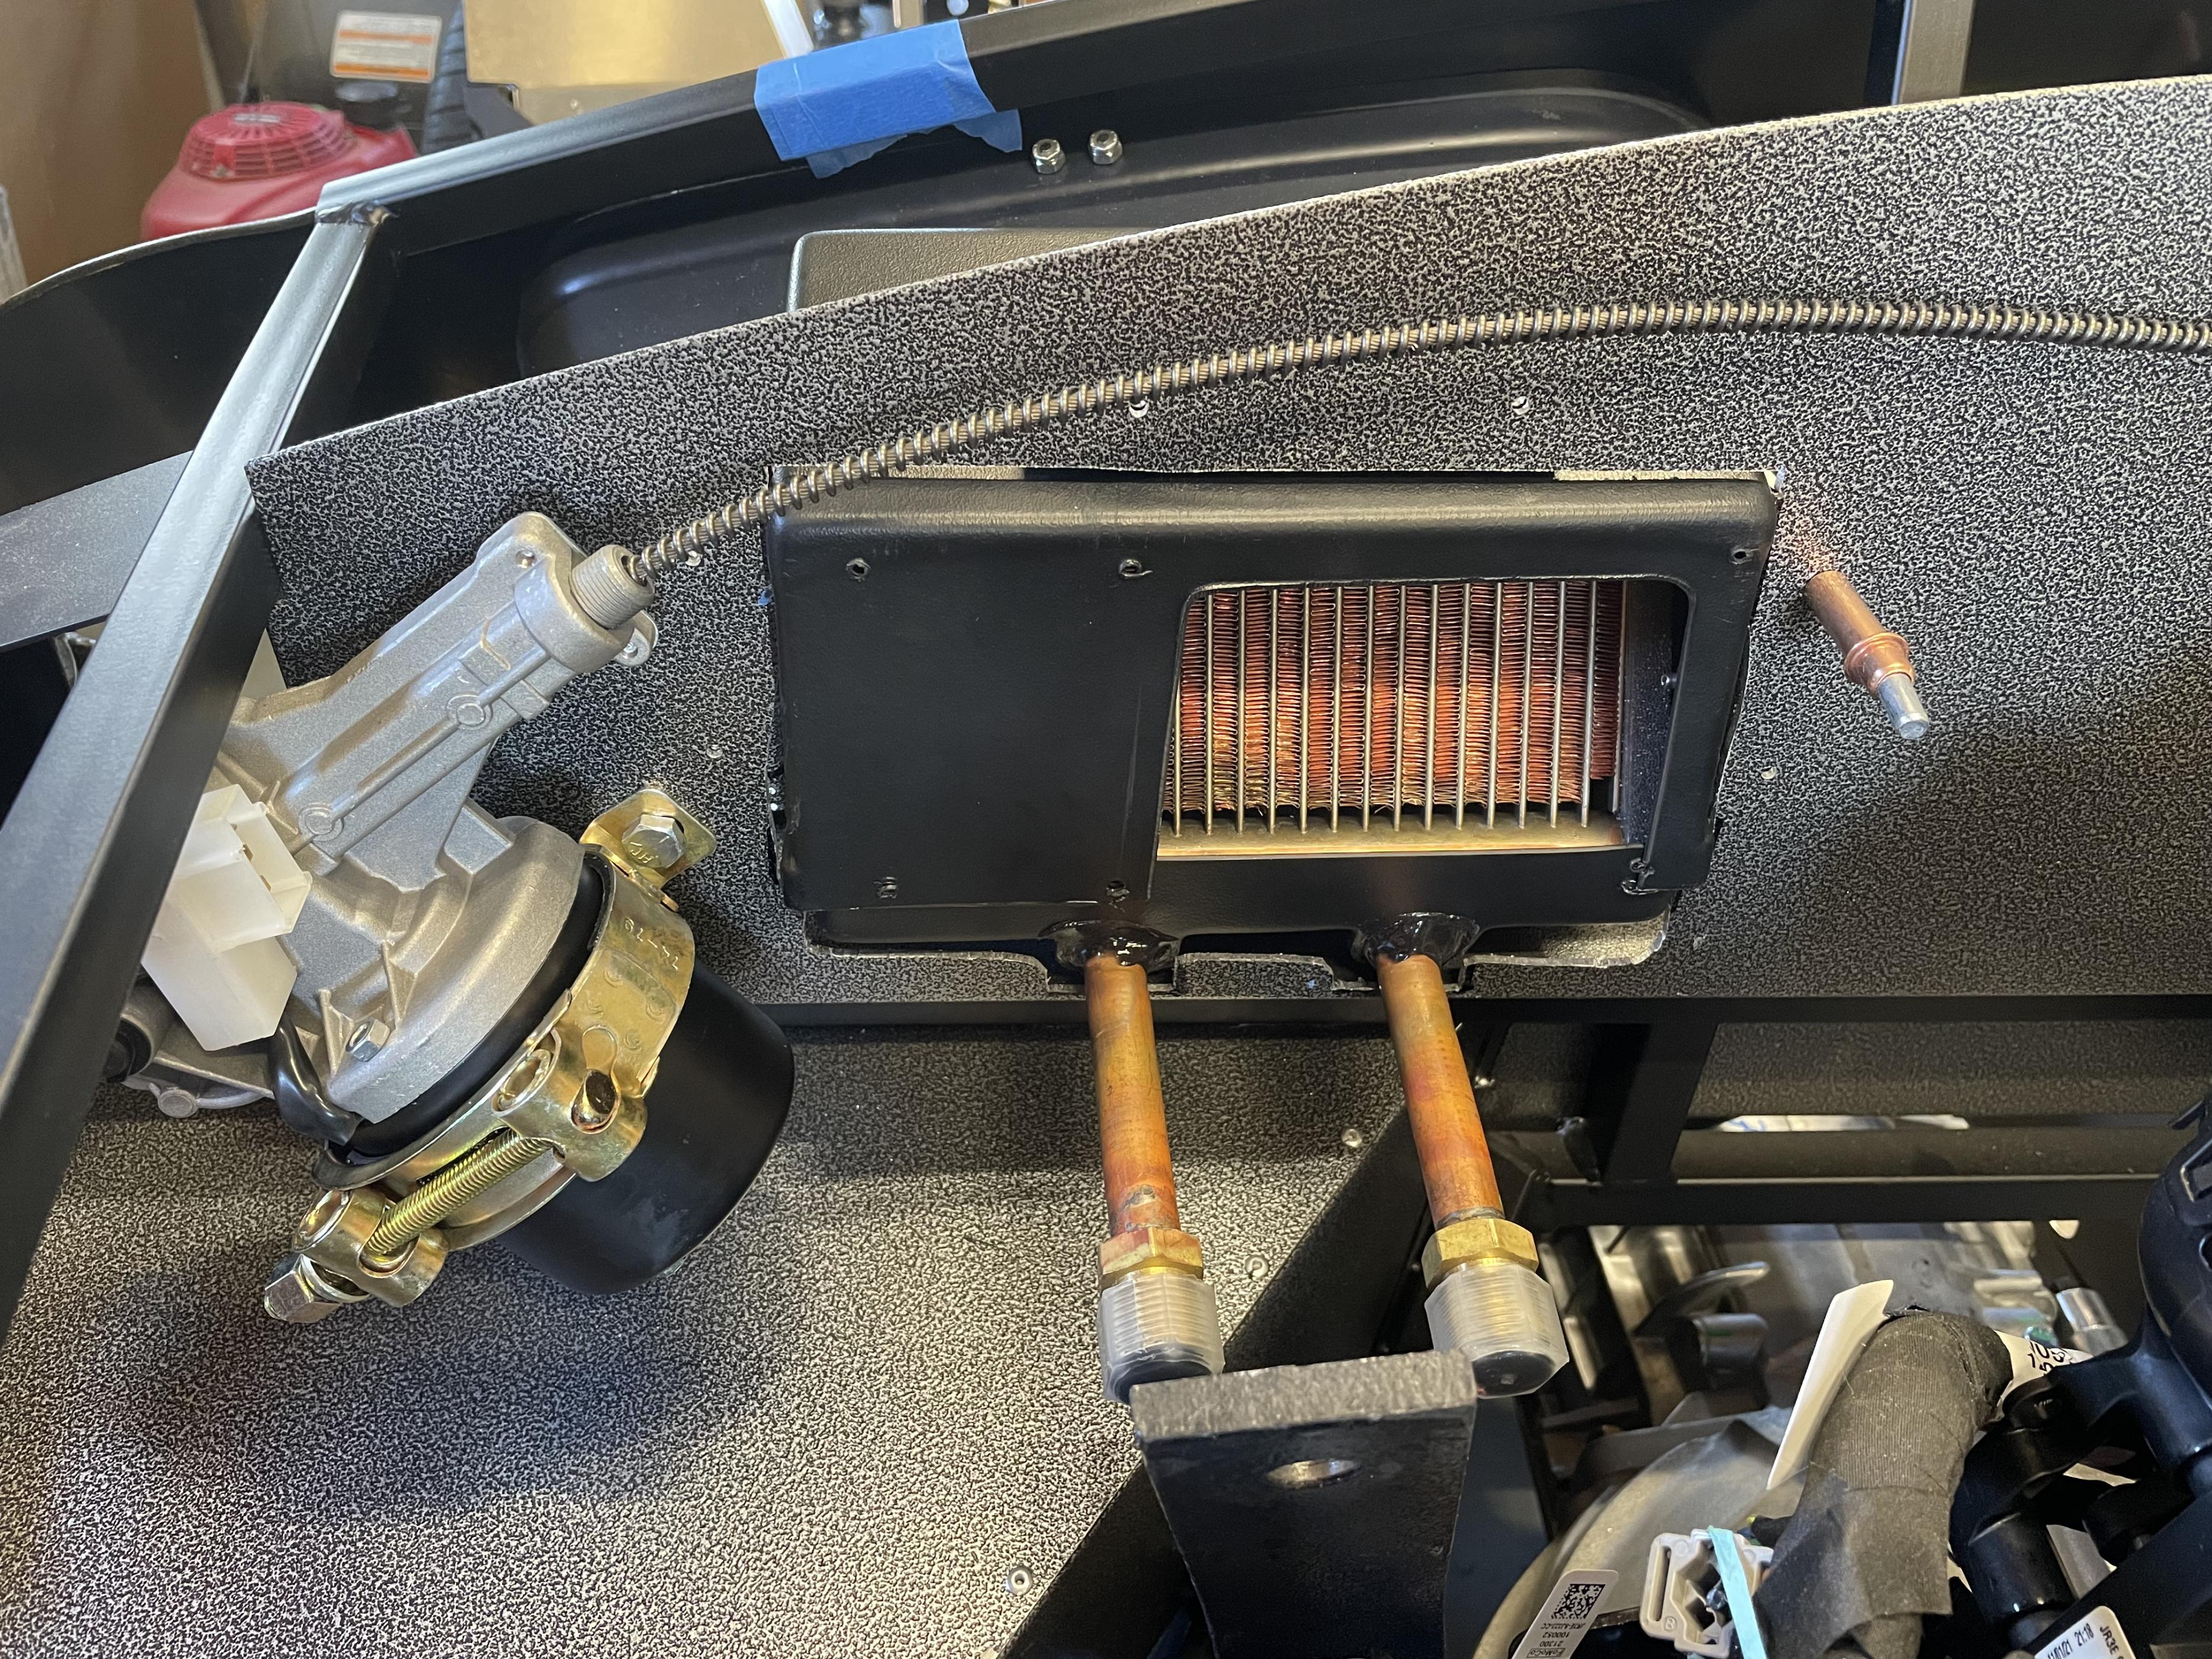
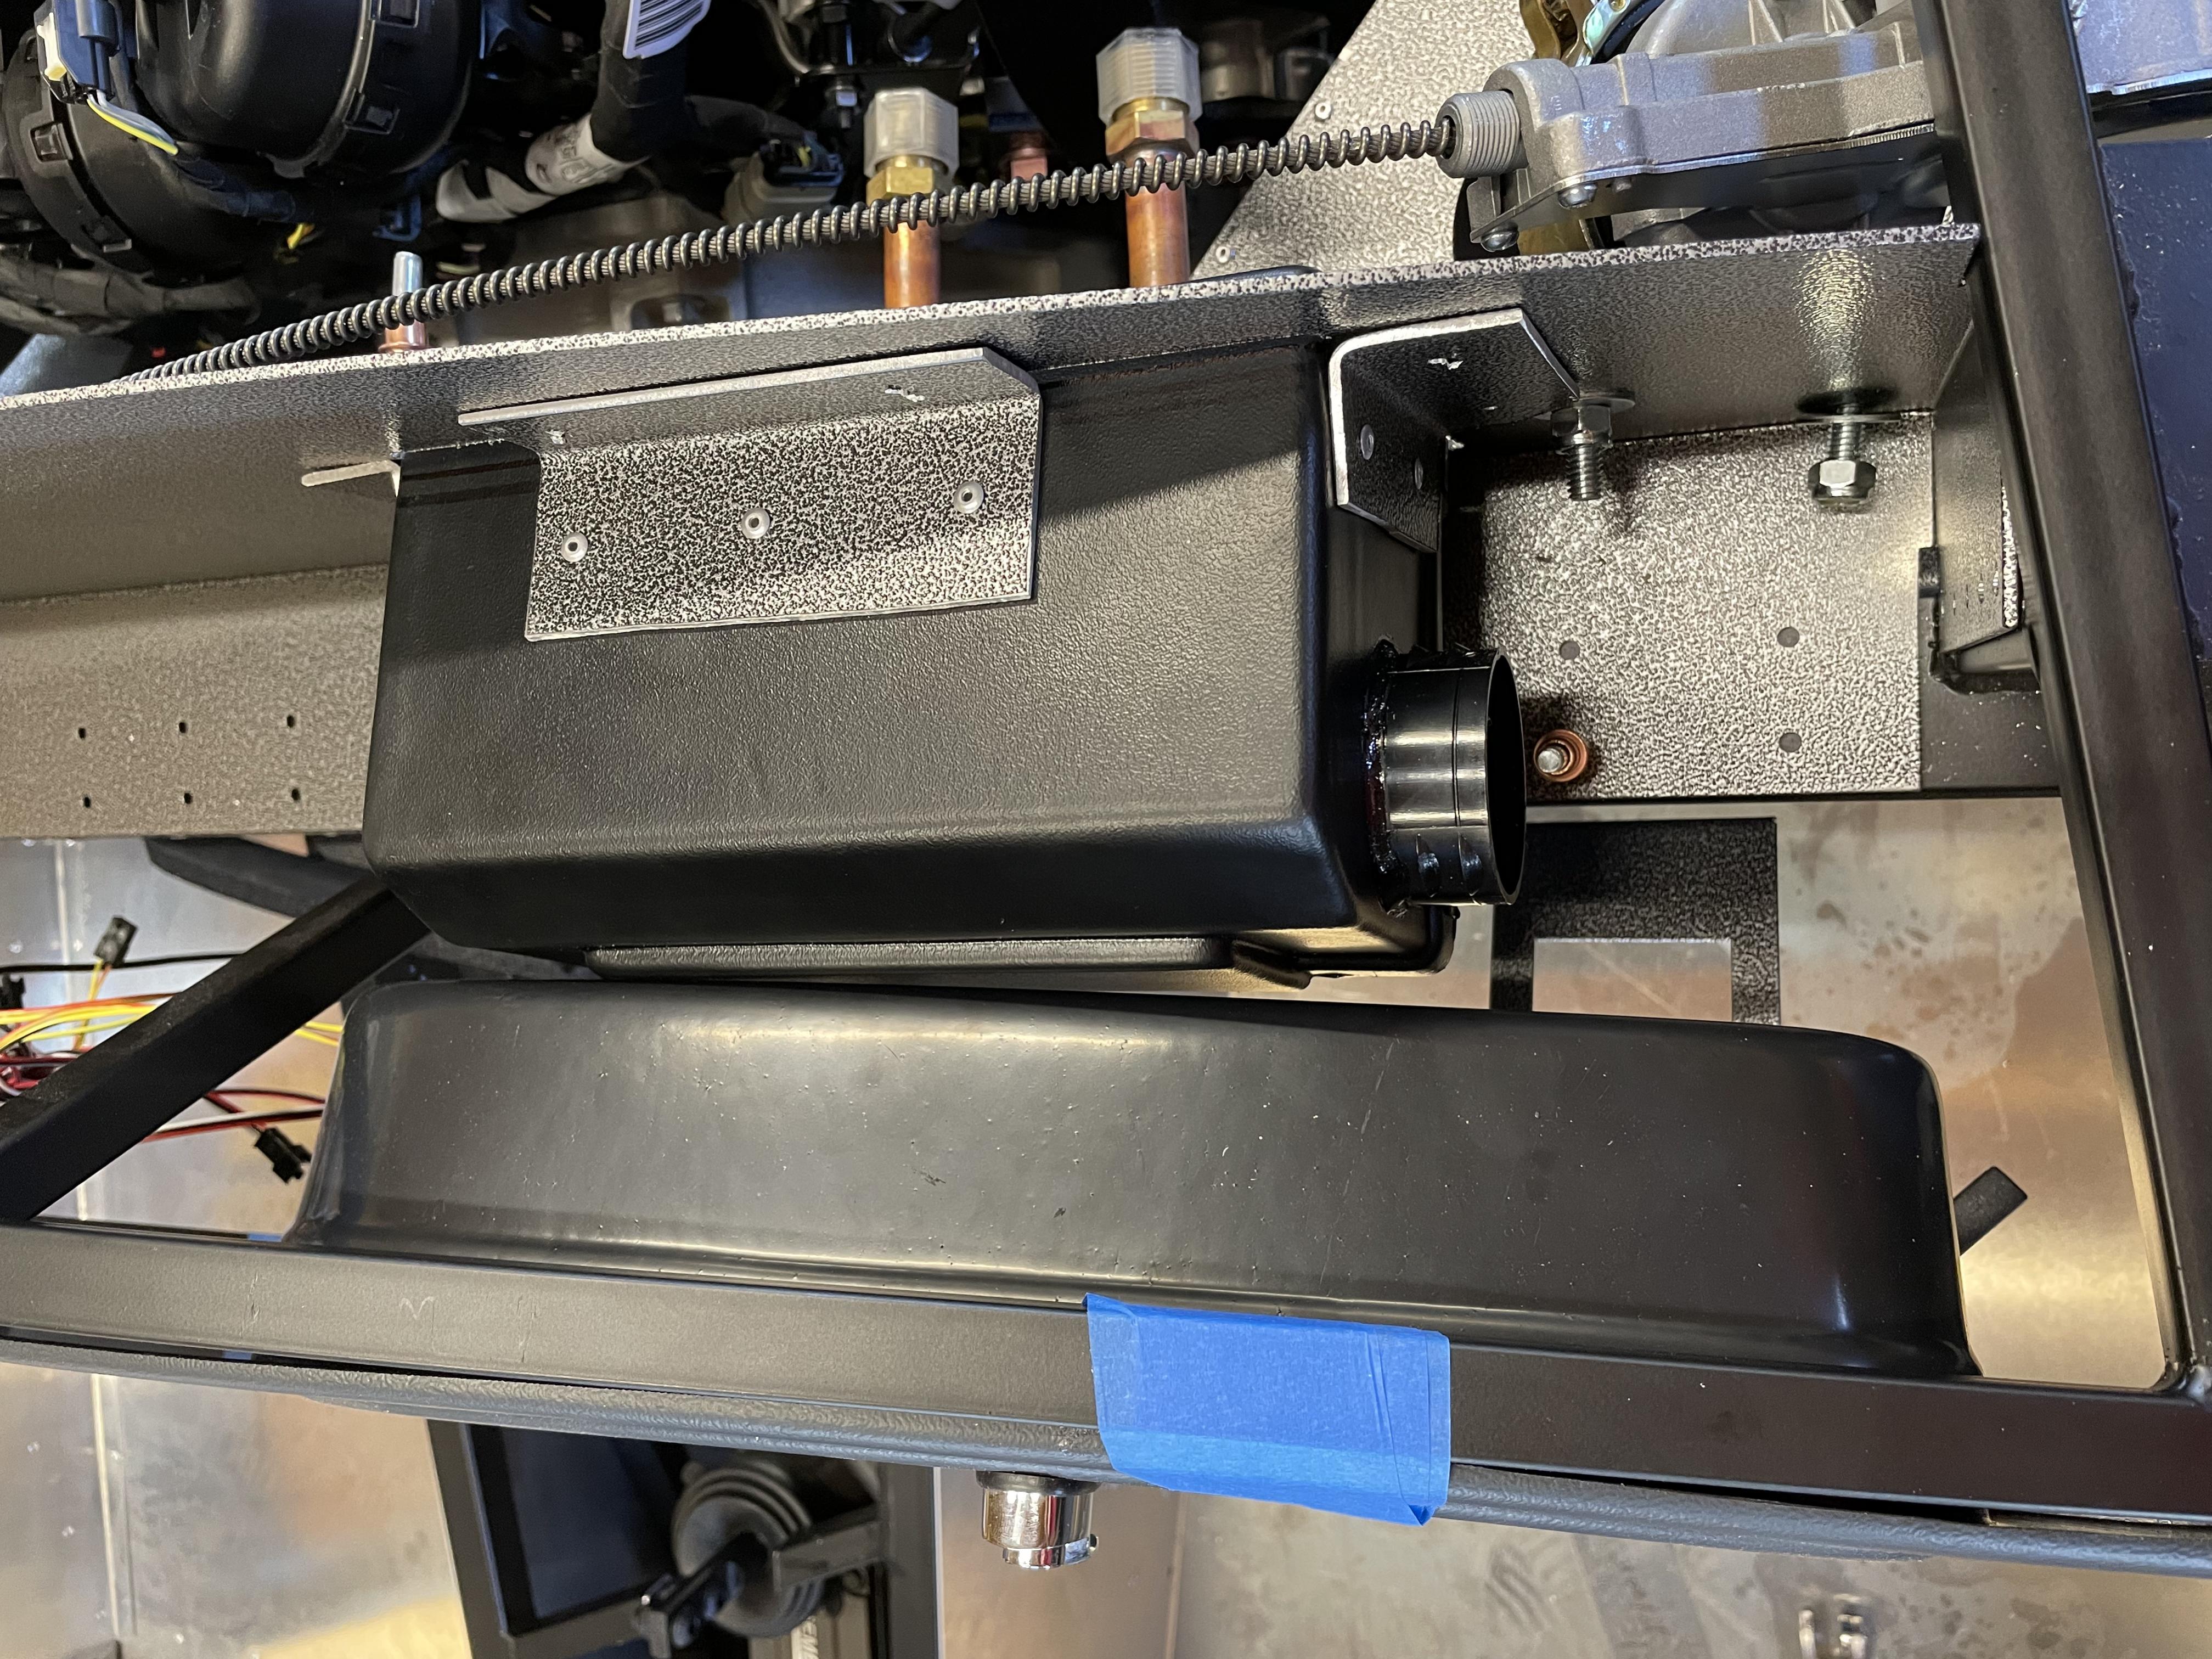
The last (and most time consuming) task for today was the Heater. I really owe GTBradley a big thanks on this one, for pioneering the Glove/Wiper/Heater/Coyote combination and some mentorship with a few questions I had. I mocked up what I thought would be the 'plane' at which the heater box passed through the FW and used that as a starting point to cut a hole. It turned out there was a lot more room behind the firewall than I anticipated. So much so I could have almost fit the entire unit in there with the glove box. I ended up pushing it back much further to make more room in the engine bay and that left my hole a little oversized. I'll need to come up with some seal around the heater to close those gaps but all in all I'm happy the way it turned out. Vinyl Dash w/Glove Box, Heater, Wiper Motor, and a G3 Coyote. I still need to figure out the plumbing but I feel like there is plenty of room for that. I used the aluminum from the cutout in the FW to make up some brackets for the inside to attach to the heater box. I then riveted them to the heater box using those washers? that you can put on a rivet to give them something more to bite on rather than just plastic. They are on very solid and didn't interfere with the heat exchanger.
Lastly I started working on the wiring. Started with the Coyote Harness and ECU. The guide suggests mounting the bracket to the frame first then goes on to discuss the hardness routing and attaching it. Wrong. I highly recommend you attach all the harnesses to the ECU first, then hold it up to the frame to see how the hard locking connectors interface with the ECU and how they may interfere with the 3/4" frame tube. Mine works, but I'm not overly happy with it. Swapping those two steps would have made for a better mount. The Coyote guide also then moves on to instruct you to drill a 2" hole in your firewall. Also Wrong. The grommet on the Ford harness that goes through the FW is much smaller than 2". I didn't measure the exact size but I'd guess 1.25-1.5". So I ordered some 2" grommets to replace it and fill the now too large hole. No more trusting the guides without first looking at the actual items being installed and measuring for myself.
As an aside, does FF have a "Feedback" option to provide feedback on bad information in the guides?
MK4 Complete Kit #10315 / Coyote G3 / TKX / 427 HardTop
Build Thread Production Date: 2/26/22, Registered 5/19/22, Graduated 3/1/2023
-
Post Thanks / Like - 0 Thanks, 1 Likes
-
First Start
I've been slacking on my updates. I need to get pictures of the little small projects that have gotten wrapped up. But to quickly bring anyone following along to the current status, I'll leave this right here.
Picked up 3/3/22, First start 4/2/22.
This technically was the "first" start.. even though there may have been one or two failed attempts prior to this. First, I had a leaking connection on a fuel line during fuel pump priming. Replaced it and then held 60psi for quite a while with no issues. Second, I made the classic elementary mistake of a reversed MAF. I was so hung up making sure it was going the correct direction, then realized the port it screws into is actually keyed (you can't install it backwards) but you can however install the entire tube backwards. Also explains why I couldn't slide my air filter up far enough to stop it from rubbing on the F Panel. Fortunately I had my ODB2 reader hooked up and it quickly through a MAF code and I knew what to do. Thats where this video starts. Ran as expected as the computer did its learning. Some oil or something must have dripped on the manifold that you can see smoking at the end but that burned off. Next start will be to run it up to temp and make sure cooling system is functioning properly and also to see the oil pressure come back down a little (its pegging at 100).
MK4 Complete Kit #10315 / Coyote G3 / TKX / 427 HardTop
Build Thread Production Date: 2/26/22, Registered 5/19/22, Graduated 3/1/2023
-
Post Thanks / Like - 0 Thanks, 8 Likes
-
Senior Member
Congratulations! A big milestone. You guys and your first starts with open headers amaze me. I started one once with open headers (back from the paint shop and took it off the trailer) and had to promise my family and neighbors I wouldn't do it again. Just crazy loud. Smoke off the headers that haven't run before is very common. Should burn off after a run or two at temp. 100 PSI on the oil pressure isn't uncommon with the Coyote when it revs. Even once it's warm. It has pretty wide fluctuations.
Build 1: Mk3 Roadster #5125. Sold 11/08/2014.
Build 2: Mk4 Roadster #7750. Sold 04/10/2017.
Build Thread
Build 3: Mk4 Roadster 20th Anniversary #8674. Sold 09/07/2020.
Build Thread and
Video.
Build 4: Gen 3 Type 65 Coupe #59. Gen 3 Coyote. Legal 03/04/2020.
Build Thread and
Video
Build 5: 35 Hot Rod Truck #138. LS3 and 4L65E auto. Rcvd 01/05/2021. Legal 04/20/2023.
Build Thread. Sold 11/9/2023.
-
Jeff-
Such sweet music!! Congratulations on your first start; you must be so stoked!
You are doing a great job, and making short work of it. Are you going to run in gelcoat this summer, then paint, or are you going to go straight to bodywork?
Thanks for letting us join you for the ride!
Regards,
Steve
-
Originally Posted by
edwardb
Congratulations! A big milestone. You guys and your first starts with open headers amaze me. I started one once with open headers (back from the paint shop and took it off the trailer) and had to promise my family and neighbors I wouldn't do it again. Just crazy loud. Smoke off the headers that haven't run before is very common. Should burn off after a run or two at temp. 100 PSI on the oil pressure isn't uncommon with the Coyote when it revs. Even once it's warm. It has pretty wide fluctuations.
Thanks!! I know I keep saying it, but would definitely not be here without the guidance and confidence I've gotten from yours and others build threads. It was pretty loud, I waited until about 11am and got a few congratulatory texts from my neighbors so it was definitely heard but we all get along pretty well! I don't have pipes (POL) otherwise they would have been on. I did run it a second time long enough to see the fan kick on and the oil pressure did drop back down to about 30 while idling and would spike when revved, so I feel much better about that.
Originally Posted by
WIS89
Jeff-
Such sweet music!! Congratulations on your first start; you must be so stoked!
You are doing a great job, and making short work of it. Are you going to run in gelcoat this summer, then paint, or are you going to go straight to bodywork?
Thanks for letting us join you for the ride!
Regards,
Steve
Thats a great question. The idea of having it completed for my daughters home coming parade in the fall is very enticing, but knowing me, i'll want to be driving it this summer (Assuming my POL items show up). I even thought about slapping a cheap coat of paint on it in her school colors for the parade and just sand it off with the body (or use plastidip and just wash it off) but that may be a bit much. If some of my POL items start stretching into long term and I get everything else done then I'll likely roll right into the body work since I won't be able to drive it anyway.
MK4 Complete Kit #10315 / Coyote G3 / TKX / 427 HardTop
Build Thread Production Date: 2/26/22, Registered 5/19/22, Graduated 3/1/2023
-
Senior Member

Jeff. Just got caught up on your build thread and you are flying through this build. It looks amazing!!! And I agree with Edward no way could I run my rig with just headers. It is loud enough with the side pipes LOL! Thanks for taking us along for the ride on your build.
FFR MK4 Roadster (9945) complete kit, delivered 12/4/2020, First start and go kart 5/7/2021. Legal 8/14/2021, Paint finished 7/18/2022 (Viking Blue). 347BPE CI, TKO600, Moser 8.8 3link 3.55, Halibrand 17x9 17x10.5, power steering. Carbon Fiber Dash. Carbon Fiber trans tunnel, adjustable Kirkey Lowback Vintage seats, Vintage gauges, RT drop trunk mod, FFmetal drop battery mod and trans tunnel, Forte front sway bar. Forte mechanical throttle linkage, RT gas pedal.
www.covespringsfarm.com
-
-
I've been slow to update but have been chugging along. I've been finishing up a many small items I either skimmed over or that needed to final touches the last week. Some of the more interesting projects I've completed are the RT Turn signals, Breeze cubby, E-Stopp parking brake, and the heater plumbing. I've also been doing a lot of wiring work. When I started this project I had dreams of this immaculate wiring behind the dash as I really enjoy the electrical side of the build. Those dreams are quickly fading as I'm just not finding an elegant way and managing the behind the dash wiring unless I really ripped it all out and start from scratch with my own harness and that isn't going to happen! So heres the mess:
Not the final state for sure, but there is quickly becoming less and less to do behind the dash.

I've using all modern switches and also installed a Push to start button. Its a pretty basic version from Amazon ($30) that uses an RFID key to arm/disarm the button and then the button works pretty standard. (Press with no clutch, ACC, Press again, ON, Press w/clutch START). I was a bit confused on my understanding of how the Coyote control pack handles the start sequence. It was my understanding that the ignition sent a start signal to the computer and then the computer began and monitored the cranking until a start succeeded. However, my P2S button sends a brief 'start' signal to the Coyote so it turns over 2 or 3 times and stops as it doesn't turn over long enough to start. I can over ride it and hold the start button as if it were a cold start and then it cranks until I let up - which gives the coyote plenty of time for the engine to start. Is this typical? Using these modern LED buttons that only come in SPDT made the hazards a little fun (not sure if I over engineered, but I just have the switch feeding two relays to keep the circuits isolated and I'm not getting any feed back, so hopefully this solution is sound).

I also got the RT Turn signal installed and wired the button to be my horn. I don't have a steering wheel so I did a little side project and made up an adapter you can see here out of aluminum bar stock to adapt the odd FF boss to a more standard 6 hole. Opens up a lot of steering wheel options.

Got the heater plumbed with a bypass value to work with the coyote. I had to buy a new cable (Home depot choke cable for a lawnmower) and modified it to work as the stock one was about 6" too short for my locations.

and Lastly, I installed my e-stopp. I was dreading this on finding a good location for it, but this worked out very well and it works perfectly. My only oversite is I had planned on placing a couple of cup holders nice and centered in the transmission tunnel and this location has completely thrown a wrench in that idea so it will need to be revisited.


MK4 Complete Kit #10315 / Coyote G3 / TKX / 427 HardTop
Build Thread Production Date: 2/26/22, Registered 5/19/22, Graduated 3/1/2023
-
Jeff,
Point/Points of curiosity. I have the same pre-fabbed dash you do and the RT Turn signal. What did you do about opening up the steering shaft hole to accept the RT tube? I'm kinda scared to cut it. Not sure what to use to prevent damaging the vinyl. Was thinking just a razor knife from the back? It also looks like in your pictures your RT mounting bracket is biased away from the centerline of the car. It seems to me there is a little wiggle room on where exactly to mount that left to right by design. I was thinking about putting a seat in and just seeing where it felt right. I assume this sort of determines the left and right alignment of the dash itself. Just trying to pick your brain a little on your thought process was so I can get mine right. Nice Looking Build!
-
Originally Posted by
IV_Joe
Jeff,
Point/Points of curiosity. I have the same pre-fabbed dash you do and the RT Turn signal. What did you do about opening up the steering shaft hole to accept the RT tube? I'm kinda scared to cut it. Not sure what to use to prevent damaging the vinyl. Was thinking just a razor knife from the back? It also looks like in your pictures your RT mounting bracket is biased away from the centerline of the car. It seems to me there is a little wiggle room on where exactly to mount that left to right by design. I was thinking about putting a seat in and just seeing where it felt right. I assume this sort of determines the left and right alignment of the dash itself. Just trying to pick your brain a little on your thought process was so I can get mine right. Nice Looking Build!
No doubt I was nervous too before cutting into that dash. I started by removing the top half of the flange that sticks out the back. I used a vibrating side cut tool with a knife blade in it. That took the back off pretty easy. For opening the hole up - i found those small sanding drums you get for a dremmel tool made real short work of it and leave a very nice clean edge. It cleans up both the plastic backing and the vinyl. I used this same tool for cleaning up the additional holes that I drilled (which were started with a step drill bit, but left it a bit ragged).
As for the alignment, I know the wheel is naturally angled towards the center of the car and as I recall the RT instructions encourage you to maintain that drive angle to eliminate any binding. So with that I pretty much slid the mount left and right on the chassis bracket and determined the center between those two points where it would be least likely to cause binding and then drilled the new holes.
MK4 Complete Kit #10315 / Coyote G3 / TKX / 427 HardTop
Build Thread Production Date: 2/26/22, Registered 5/19/22, Graduated 3/1/2023
-
Just got caught up on your build. Looks great and I picked up some ideas that I'll be incorporating into mine, too!
MKIV Complete Kit, IRS, received 11/18/21
Aim to Misbehave
-
Senior Member

Love the build so far. You are really flying through it.
-
I"ve been slow to update but fast on progress. I do have a questions about body fitting and the dash. I've read through countless threads on the subject and it seems a common problem but I can't find any that show the end result. What is the final dash/body gap supposed to look like? How much overhand is the body supposed to extend down the dash? Mine doesn't overhand the dash at all in the place, so when you look at it from sitting you can see up behind the body. I do have the FFMetal firewall forward with the bulb seal on. I'm wondering if this is keeping the body too high.

MK4 Complete Kit #10315 / Coyote G3 / TKX / 427 HardTop
Build Thread Production Date: 2/26/22, Registered 5/19/22, Graduated 3/1/2023
-
Hey Jeff, I believe in the box that the interior mirror comes in there are a couple of nylon spacers. I think they are about 3/4", they are suppose to go between the body and the 3/4" tubing. On my car the lip over the dash hangs down about 1" so I think you can expect about a 1/4" overhang in front of the dash if your dash comes to the top of the 3/4" tube in the center. Hopefully that helps.
FFR MK4 Roadster complete kit, Ordered 4/8/2021, Scheduled Ship Date 8/28/2021, Built 306, T5, Ford Motorsport 8.8 3-link 3.55 31 Spline
-
Post Thanks / Like - 0 Thanks, 1 Likes
-
I received my Windshield today which opens up a lot of doors for items to work on. Will certainly keep my busy for a while. I put it together and set it on the body without drilling anything yet. I then dropped my hardtop over it to start seeing whats going to need to be done for the roll bars. I was hoping the Breeze roll bars would be low enough that I wouldn't have to do much fabricating but no such luck. In their standard config where the rear support meets the stop naturally, they're about 13.5" from the body. For the hard top, I need them to be closer to 11.75". This is going to require them to be trimmed and then I'll need to figure out some magic for the rear support. I absolute love the look this hard top gives the roadster. Its like owning two different cars... I joke with my wife that i'm going to call it the Mullet - Business up front when its on a party in the back when its off.
IMG_5338.jpgIMG_5340.jpgIMG_5342.jpgIMG_5336.jpgIMG_5341.jpg
MK4 Complete Kit #10315 / Coyote G3 / TKX / 427 HardTop
Build Thread Production Date: 2/26/22, Registered 5/19/22, Graduated 3/1/2023
-
Post Thanks / Like - 1 Thanks, 1 Likes
-
Senior Member

Originally Posted by
JeffP
I received my Windshield today which opens up a lot of doors for items to work on. Will certainly keep my busy for a while. I put it together and set it on the body without drilling anything yet. I then dropped my hardtop over it to start seeing whats going to need to be done for the roll bars. I was hoping the Breeze roll bars would be low enough that I wouldn't have to do much fabricating but no such luck. In their standard config where the rear support meets the stop naturally, they're about 13.5" from the body. For the hard top, I need them to be closer to 11.75". This is going to require them to be trimmed and then I'll need to figure out some magic for the rear support. I absolute love the look this hard top gives the roadster. Its like owning two different cars... I joke with my wife that i'm going to call it the Mullet - Business up front when its on a party in the back when its off.
IMG_5338.jpgIMG_5340.jpgIMG_5342.jpgIMG_5336.jpgIMG_5341.jpg
Oh man, thats a shame. I was hoping the breeze rollbars would work.
Complete novice who doesn't know what he's doing.
MKIV with BPE 347 & TKX. IRS. A crap ton of mods.
Build thread
-
Senior Member

Your are just screaming along. Nice job.
Love the wheels! Lol
I agree that hard top is just the sexiest thing going. I was too far along in my build to adapt to it. I will eventually order a soft top when they start selling them again.
MK4 #10008 - Ordered 10/06/20, Delivered 03/03/21, First Start 7/22/21, First Go Kart 7/24/21
Paint by Metal Morphous 5/14/22, Legally registered 6/8/22, Graduated 7/20/22
Build Thread
https://thefactoryfiveforum.com/show...been-delivered
Complete Kit, Ford 306, Sniper/Dual Sync, T5, Hydraulic clutch
-
Senior Member

Congrats, Jeff! Way to go! You must get at least 10 minutes of sleep each night? What do you do with all of your spare time? 
Amazing progress! All kidding aside, great progress, and thanks for sharing your build experience.
P.S. Hilarious name, Mullet, for your Roadster!
Last edited by 460.465USMC; 05-06-2022 at 03:07 PM.
Chris
Coupe complete kit delivered: 4/22/24.
Build Thread. Coyote. T-56. IRS w/3.55. Wilwoods. PS. HVAC. Side windows.
MK4 Complete kit.
Build Thread Index. Delivered: 10/15/2020. Legal: 7/25/23. Coyote Gen3. TKO600 (0.64 OD). IRS w/3.55. PS. Wilwoods. Sway bars. This build is dedicated to my son, Benjamin.
Build Thread.
-
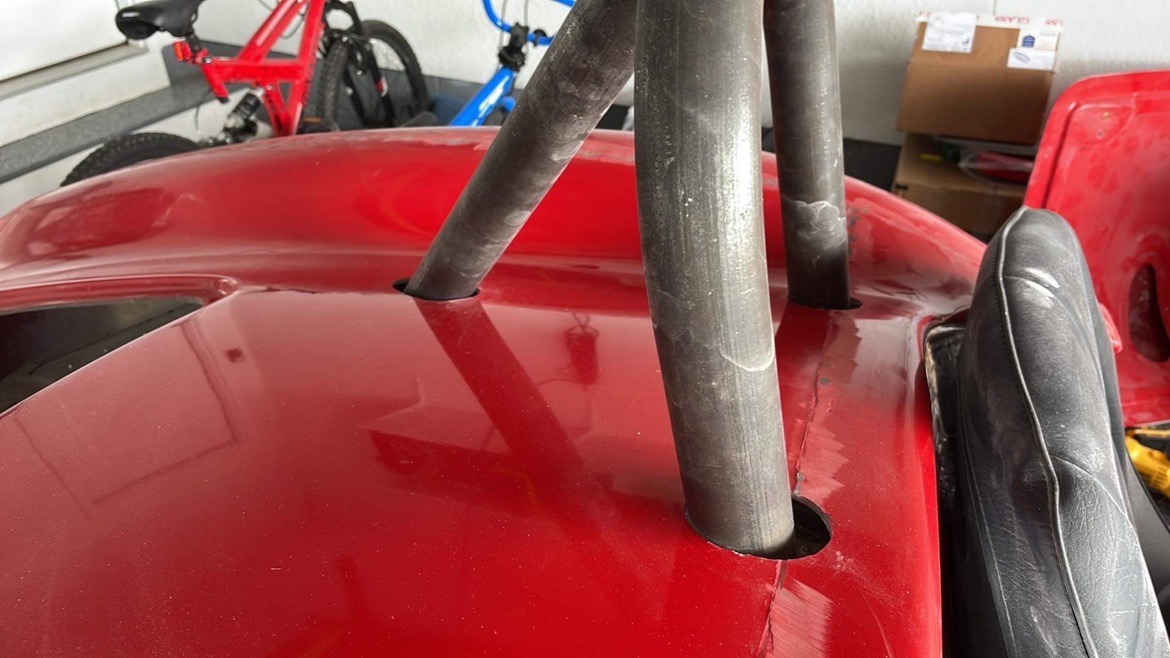
I've had a very productive weekend with my roll bars and getting them ready for the hardtop. It turned out to require less fabrication and more a heavy foot. Where the roll bars naturally align as shipped from breeze, they set about 13.5" above the body. With my hardtop, I needed them closer to 11 5/8" above the body which would allow the top to sit naturally on the body and not teeter on the roll bars. This allowed about 1/8" gap between the two. To get started, I trimmed 3/4" off of the bottom of each leg of the roll bar and this allowed for the perfect clearance with a little adjustment also. Next up was the rear leg. I started with the body off since I knew where the roll bar needed to be and found the rear leg to be about an inch high.

I talked to Mark and watched his video that suggested using the leg insert tube and cutting some slits in it to transform it into a bit of a Z bracket. I figured I'd try the simpler route of putting the leg on and seeing just how possible it might be to ever so slightly bend it down to meet the roll bar. So, put my foot on it and suprisingly the moved down right into place with what i'll call moderate force. I'm not a big guy, so I'm sure others might say little effort. Of course changing the angle meant I would need to re work my body cut outs for the rear bar. Wasn't a lot, and while I do think I'll need to back fill them with a little HSRF, overall i'm pleased with the end result. I'll be hitting Mike up for his grommets and hopefully they can accommodate this sharper angle. The last bit of modification was the length on the rear bar. Since the breeze roll bar is welded, the rear leg is designed to end just below the body so it can be installed. This required me to remove 1 1/4" off the e rear leg so it just clears the body cut out and has enough material under the body to get a bolt through the extension.

And all finished ready for PC.

MK4 Complete Kit #10315 / Coyote G3 / TKX / 427 HardTop
Build Thread Production Date: 2/26/22, Registered 5/19/22, Graduated 3/1/2023
-
Post Thanks / Like - 0 Thanks, 1 Likes
-
Hi Jeff,
Im organizing another round of 427 Hardtops group buy for the southwest region. Do you mind if I refer this build thread in the group buy postings?
Thanks,
Jason
-
Post Thanks / Like - 0 Thanks, 1 Likes
-
Sure, absolutely. I saw your fb post too, Feel free to send any questions my way either here or there.
MK4 Complete Kit #10315 / Coyote G3 / TKX / 427 HardTop
Build Thread Production Date: 2/26/22, Registered 5/19/22, Graduated 3/1/2023
-
Post Thanks / Like - 0 Thanks, 1 Likes
-
I've been making slow progress over the last couple weeks. Sent a bunch of little stuff to the P/C like hood/trunk/gas/roll bars and they are kinda holding me up on continuing body work as i'd like get all those holes drilled and pieces fitted before I seriously start doing any body stuff. In the meantime though I did get a nice POL shipment - My diamond leather seats and most importantly my MCO arrived. Since I've heard stories all over the place on what a pain registration and titling can be I decided to try my luck and grabbed my invoices and my MCO and headed for the title agency. The agent took my MCO, My invoices, handed me plates and registration and submitted my app for a title using the FFR serial as VIN. I asked her about theft inspection and she said we'll submit everything, get you your plates, and you may or may not hear from them for an inspection. I asked her if I could make the appt. anyway just to head it off and she said sure. The inspector comes to our local title office first Tuesday of the month so I made an appointment for 6/7. The next day I got a call from the officer and she stated all she'll need from me is the registration that was just issued and make sure my VIN plate is rivited on. Thats all she was looking for. So we'll see how it goes.
Needless to say with my seats on hand and legal plates, I couldn't help but put as much together as I could and go for a little cruise. With a few trips to the local farmers market for ice cream I think I have about 20mi on it already and so far all systems are working great. Coyote sounds amazing, brakes are extremely responsive, shifts smoothly and all electrical is working. Its been 95* here the last few days so anything longer than 5-10min in it and you're roasting but I'm sure that will be better once I have the opportunity to fill some of the gaps where air is still getting in from the engine compartment (around the footboxes especially).
Now just waiting for the rest of the pieces from the P/C, will get those installed hopefully this week and pause until I get the theft inspection done. We're in the middle of purchasing another property down in the Outerbanks so my attention has been easily diverted with that project and then we're heading to Italy for a week in June. That should give me a nice break before I really start digging into paint/body.
The boys are already bugging me to pick them up from school in it!
MK4 Complete Kit #10315 / Coyote G3 / TKX / 427 HardTop
Build Thread Production Date: 2/26/22, Registered 5/19/22, Graduated 3/1/2023
-
A bit slow to update but still making small progress towards the finish line. I received side pipes, fuel tank (and cover), and my power steering pump. Originally I had planned on not using power steering but based on the advice from all in the group I added it to my order at the last minute. Its been backordered until this weekend so I've been driving around with the rack installed but no pump so basically manual steering. Installed the pump and what a difference!! It was certainly 'drivable' before but man now its really nice. Highly recommend power steering!
Installed the fuel tank cover (i had already bought a tank off amazon).
I had bought a set of stainless pipes off of a forum member while I impatiently waited for my raw steel pipes from FF. I figured I shouldn't have a problem reselling them for minimal loss while I used them. I received my pipes over the weekend from FF... they shipped me the stainless. So now I have two sets of stainless and my plan is to black out the car. Right now I'm just offering the stainless set thats brand new up for sale to recoup some of my money and as much as a shame it may be to paint (cerakote) a nice set of stainless pipes thats just the direction I think i'm going. I don't want to wait for FF to send me the right ones if/when they even get them.
We took a ride down to a new investment property we bought last week (3hr round trip) and the car did great. Our ears however, did not. It didn't seem bad while driving but once we got to the new house and turned off the engine you realize just how loud it is. this was taking it very mildly the entire way, <2000 RPM for 99% of the ride. Ear plugs are now required equipment, but I've been studying other threads on how I can modify the stock FFR pipes to get them a little quieter. Looks like no matter what I want, Its going to required cutting and welding the pipes. Was really hoping I could come up with some sort of baffling I could shove in it - but I guess I'm dreaming.
I've also picked up an nGauge tuner and ordered a remote tune from Lund, so I'll update how that goes once its done. I have 500 mi on the coyote so far and no complaints on how it runs, but on the guidance of those before me it seems like its a worthwhile venture to keep the engine running in top shape. I was please to see I'm getting about 23mpg right now.
Now that the heat of summer is here, I plan on starting paint/body after the 4th of july vacation. I'll start pulling all the accessories off and begin body.
MK4 Complete Kit #10315 / Coyote G3 / TKX / 427 HardTop
Build Thread Production Date: 2/26/22, Registered 5/19/22, Graduated 3/1/2023
-
Post Thanks / Like - 0 Thanks, 2 Likes
-
Wow! What a build! That top is going to look great! Are the wheels fr500?
-
Originally Posted by
pelzerd
Wow! What a build! That top is going to look great! Are the wheels fr500?
Yes, Fr500's. I've neglected this thread horribly. So i'll add a bit of an update.
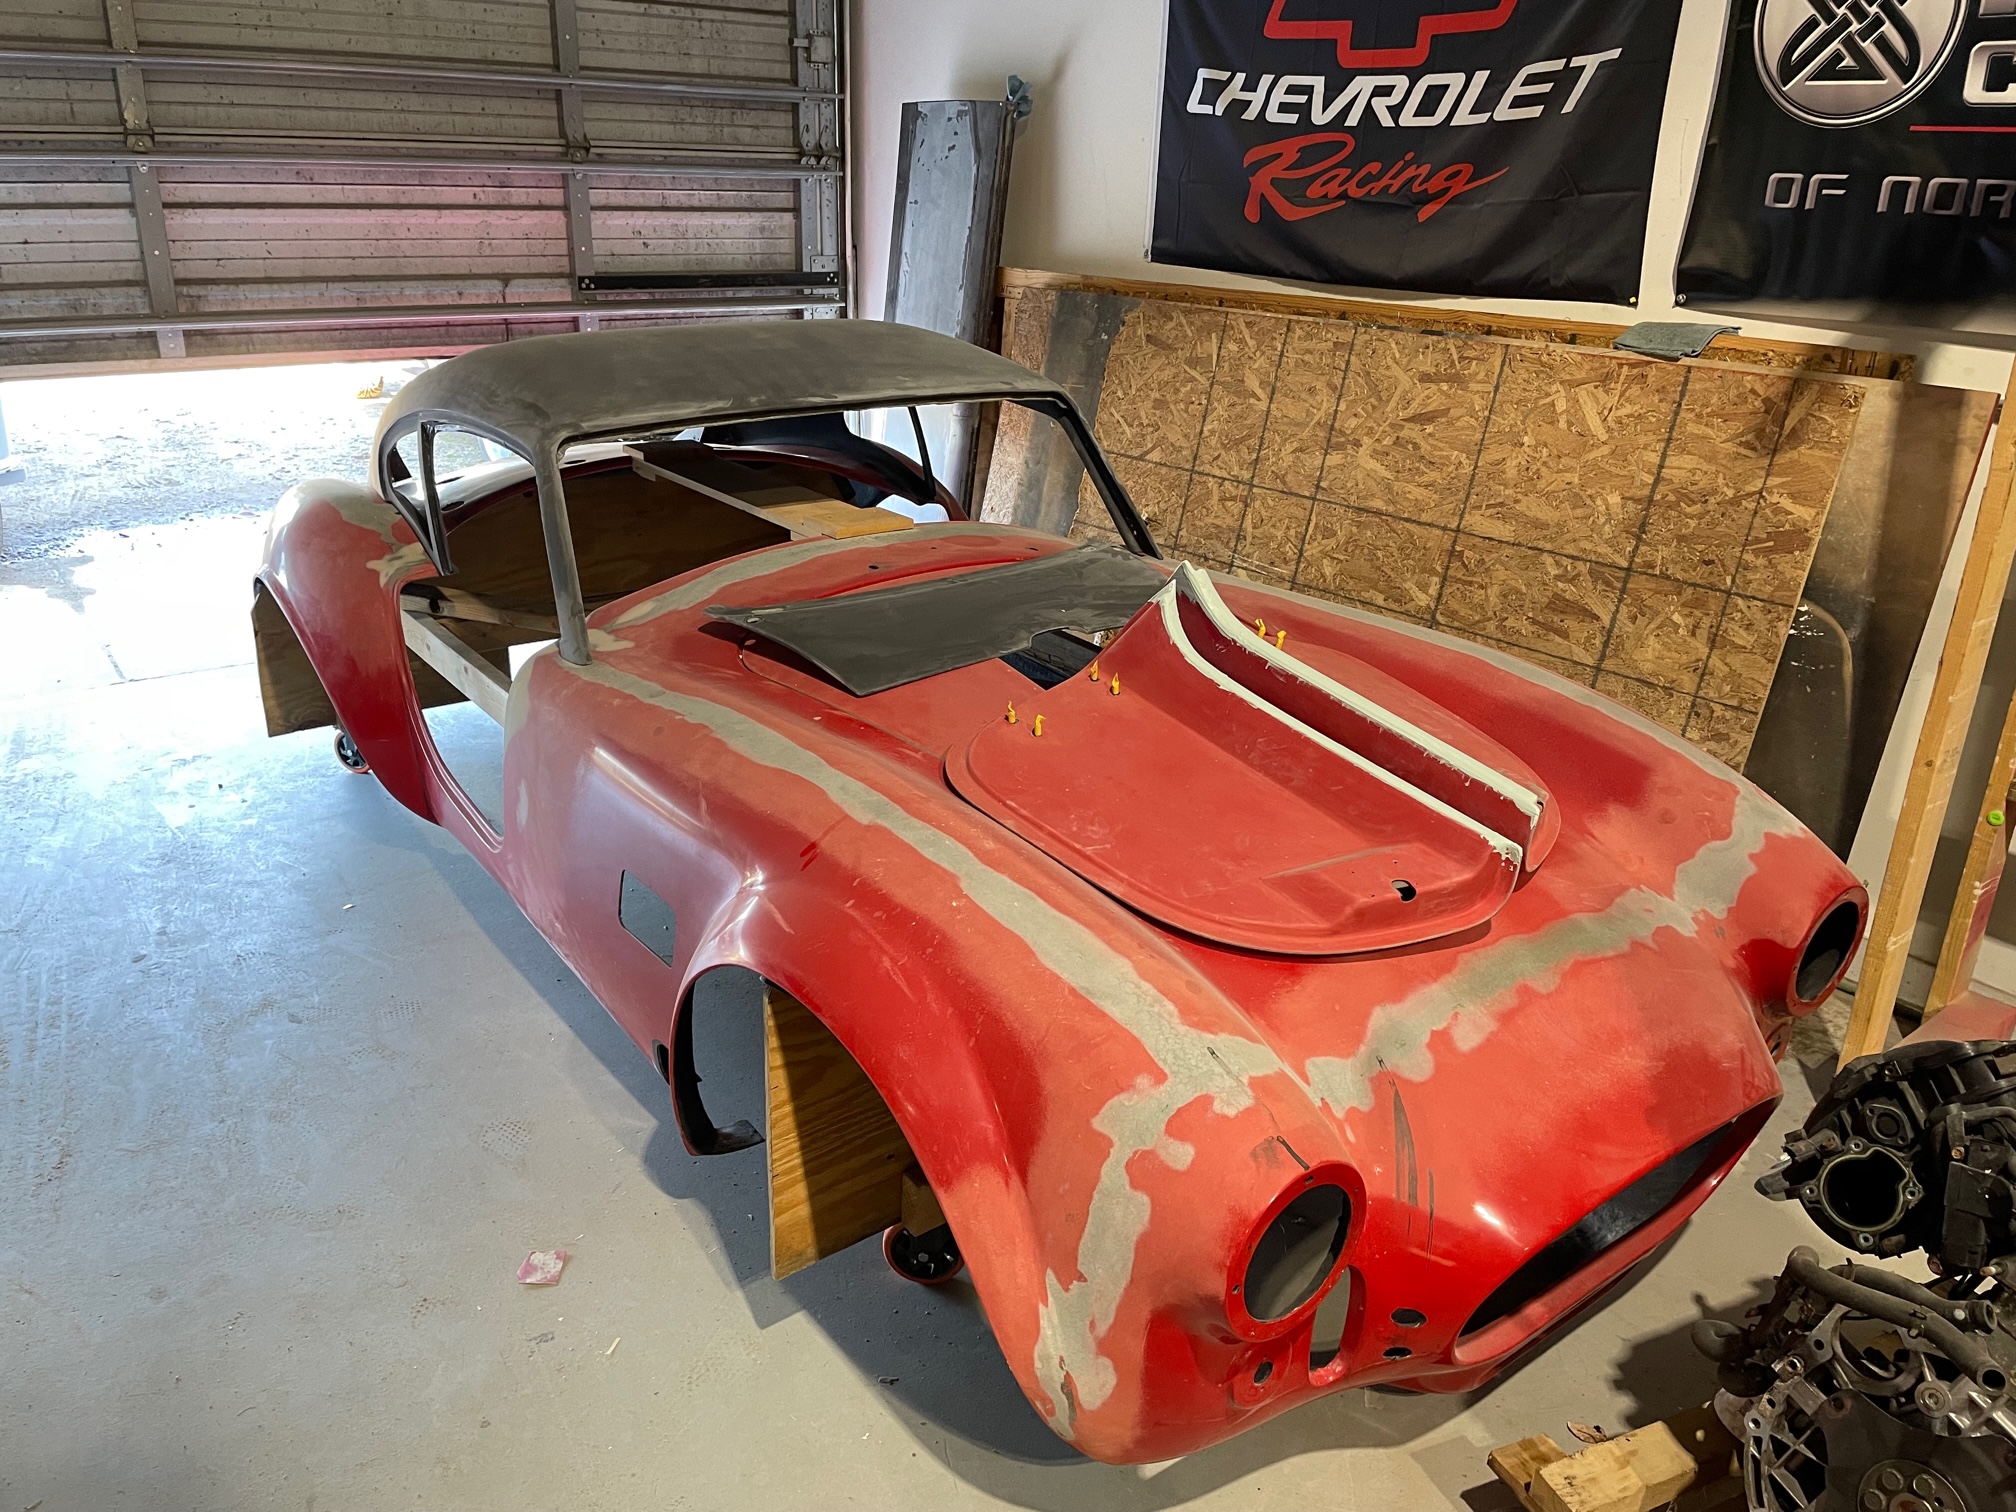
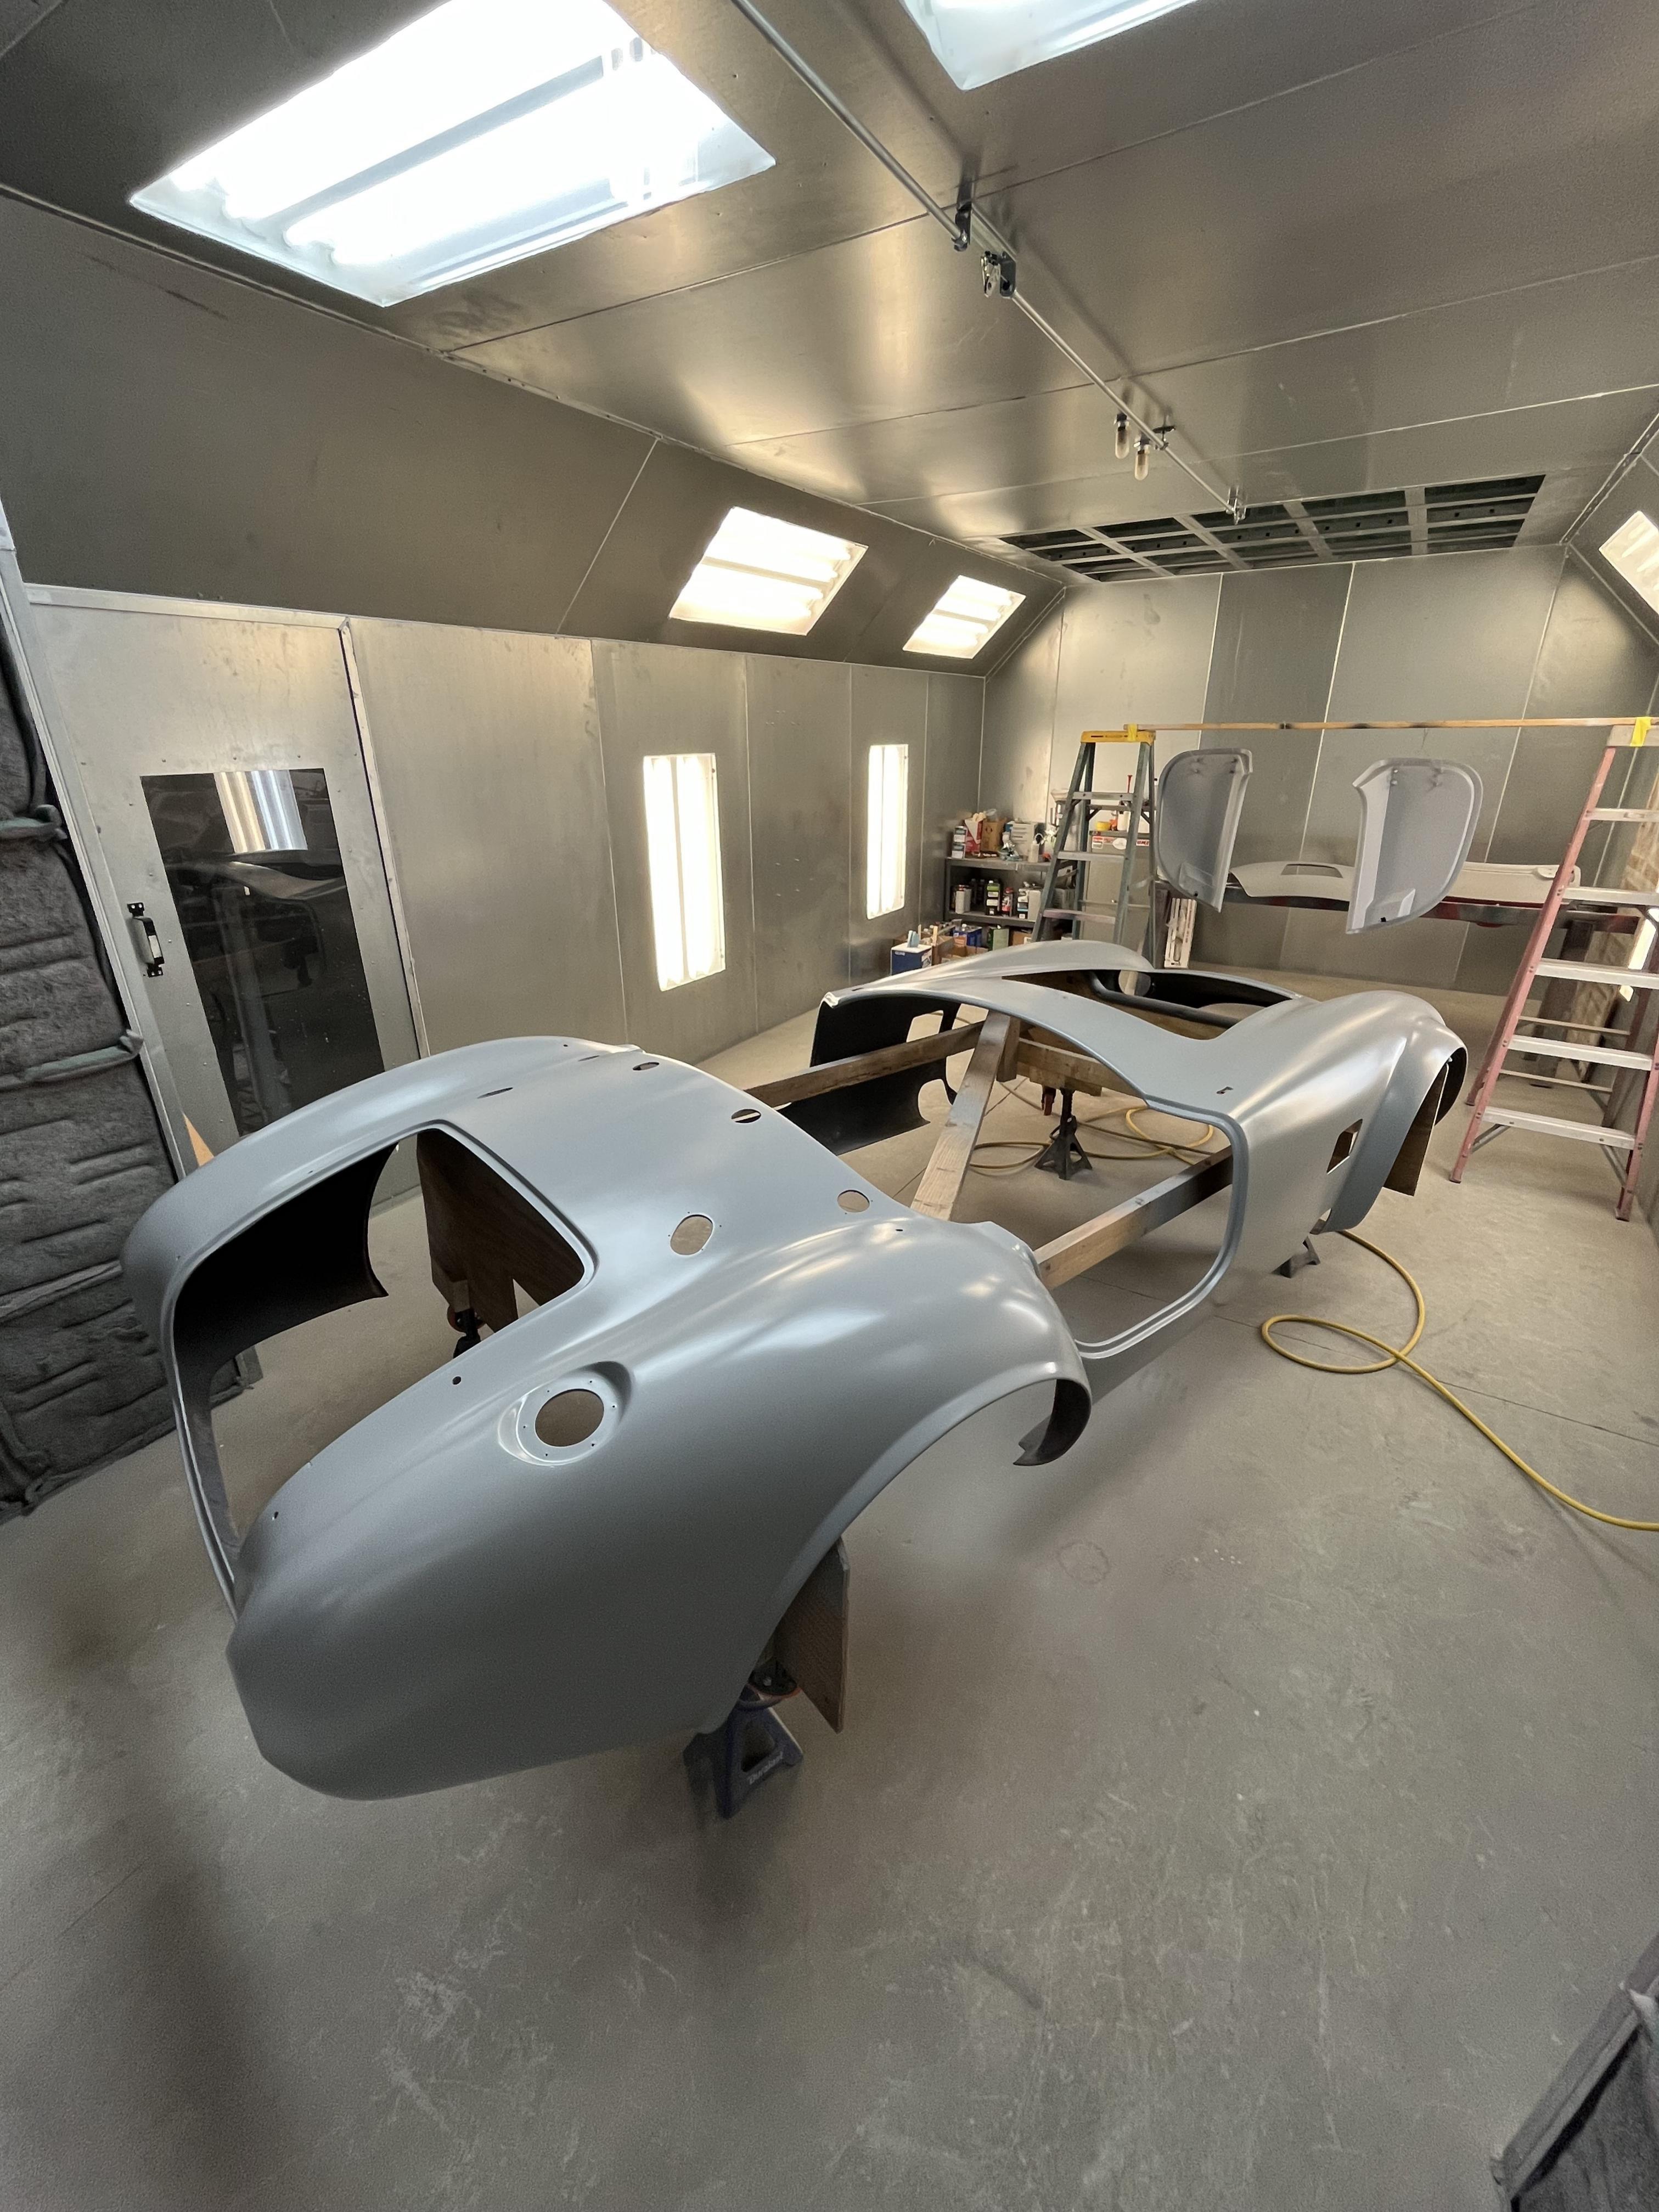
I spent most of the summer enjoying the car and driving in Gel coat - put 750miles on it so far. My original plan was to do paint and body my self but after talking to a local hot rod shop, his price was reasonable enough I couldn't justify trying to attempt it on my own. I've seen examples of his work and he is a local guy with a great reputation. I'm not looking for a high end show quality job as i expect to drive the crap out of this car. So off it went to the body shop a few weeks ago. He did all the panel fitting and initial body shaping with the body on the chassis and last week he had me pick up the chassis so he could get to the real work on the body.
now that I have the bare chassis back, I've been tying up a lot of lose ends. I decided to replace the manual heater control bypass value with the electric version. I have no idea why I bought the cable drivin one initially as the electric one was only a small amount more. The cable was always too short and too stiff that it put a lot of stress where the control knob attached to the dash board. I was never happy with this install. The electric version does end up requiring a separate knob (one to control valve position, temperature, and another to control the blower speed) but it is a much better solution.
I pulled the seats out and installed the seat heaters. nothing new or exciting on these, just a typical install. Installed all the interior carpet which was a fun task but its done and really makes the car start to look like a finished product over a project. reinstalled the seats and seat belts and trimmed for their final fit.
Today I plan on installing the gas shocks for the trunk lid and then carpeting the trunk / breeze cubby area. I also figure its about time for the initial oil change on the Coyote - or maybe a little past due.
Hoping to have it back from paint and body by the end of the year which will put me on track to have it graduated in less than 1 yr from delivery.
On a side note - I ordered the bumper grommets for the quickjacks and some trim pieces from **********, got same day shipping notice from them. I've ordered other pieces in the past with no issue, so glad to see theyre continuing a positive trend.
Last edited by JeffP; 11-09-2022 at 07:44 AM.
MK4 Complete Kit #10315 / Coyote G3 / TKX / 427 HardTop
Build Thread Production Date: 2/26/22, Registered 5/19/22, Graduated 3/1/2023
-
A few pics from the body shop - getting close!


MK4 Complete Kit #10315 / Coyote G3 / TKX / 427 HardTop
Build Thread Production Date: 2/26/22, Registered 5/19/22, Graduated 3/1/2023


 Thanks:
  Likes:


 Reply With Quote

