-
02-10-2024, 08:26 AM
#201
Senior Member

Picture of the T-56 Shifter. Maybe the crossbar will interfere, maybe it won't:

-
02-10-2024, 12:13 PM
#202
Senior Member

Nice progress! Responses to two of your activities:
That amount of slip joint showing for your build is fine. With IRS the diff doesn't move. So you don't need as much exposed joint and possible movement as with a solid axle setup. The only downside is with it that close, it may be difficult to remove the driveshaft. Mine will tip in and out without undoing anything but it has a little bit more slip joint showing. I'd leave it like it is though.
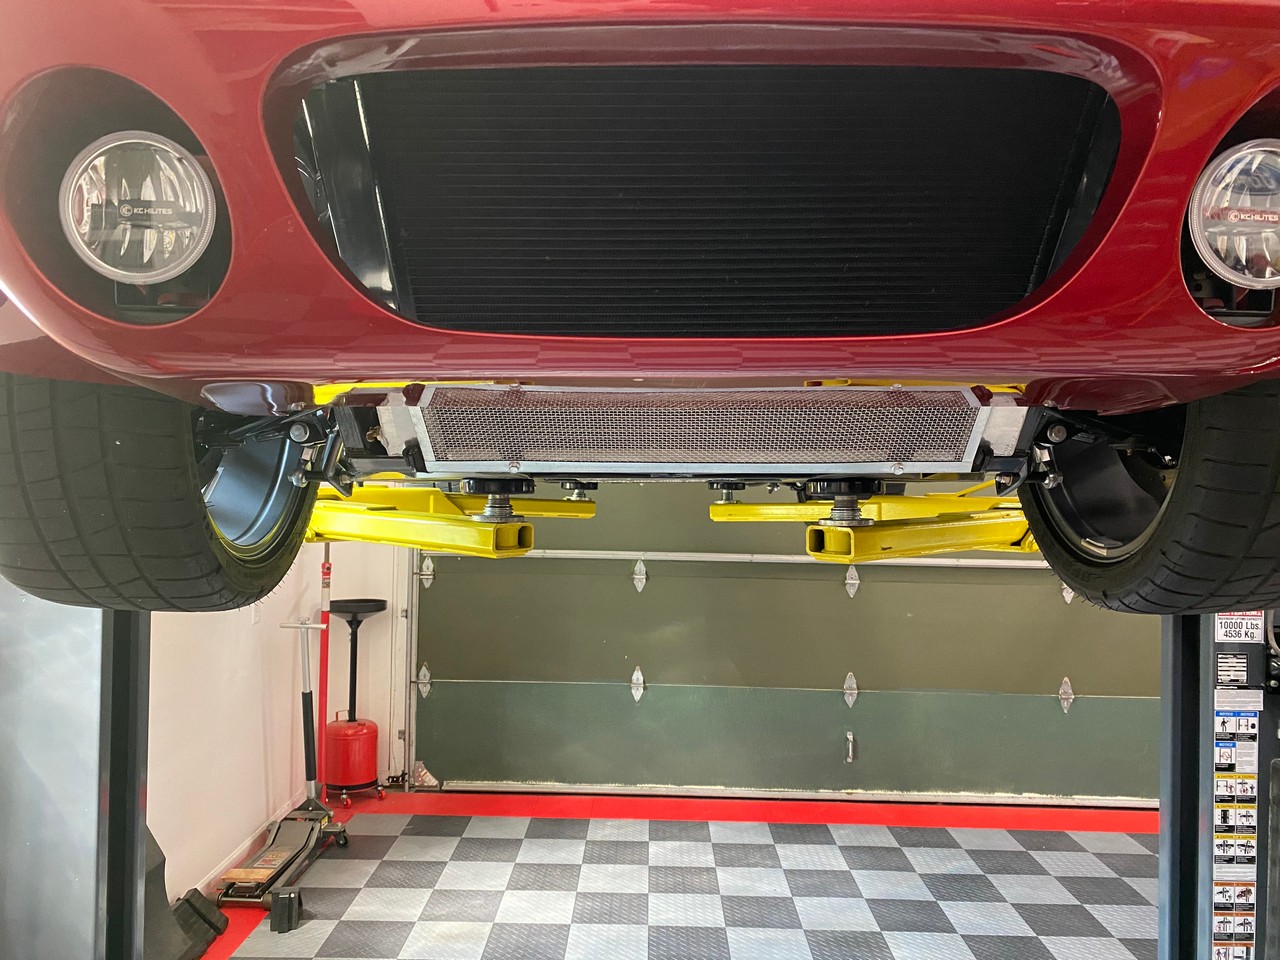
For the radiator, I've found the FF setup with the rubber hose bumper on the bottom mounts and the crossover piece on the top it's fine. There isn't a lot of vibration plus it's captured inside the tanks versus hanging on a flange like on the Roadster. As for the shield on the bottom, I agree the bottom of the radiator is exposed. The shield you're talking about in the video at least for me is a little over the top. I've seen 4-wheelers with less. Although I know he does a lot of autocross and cones can do some damage. (Just don't hit 'em.  ) For mine, I made a screen out of SS mesh and an aluminum frame. Should handle road debris, rocks, whatever. All I figure I need.

Last edited by edwardb; 02-10-2024 at 12:16 PM.
Build 1: Mk3 Roadster #5125. Sold 11/08/2014.
Build 2: Mk4 Roadster #7750. Sold 04/10/2017.
Build Thread
Build 3: Mk4 Roadster 20th Anniversary #8674. Sold 09/07/2020.
Build Thread and
Video.
Build 4: Gen 3 Type 65 Coupe #59. Gen 3 Coyote. Legal 03/04/2020.
Build Thread and
Video
Build 5: 35 Hot Rod Truck #138. LS3 and 4L65E auto. Rcvd 01/05/2021. Legal 04/20/2023.
Build Thread. Sold 11/9/2023.
-
Post Thanks / Like - 0 Thanks, 2 Likes
-
02-11-2024, 03:41 PM
#203
Senior Member

Originally Posted by
edwardb

Nice progress! Responses to two of your activities:
That amount of slip joint showing for your build is fine. With IRS the diff doesn't move. So you don't need as much exposed joint and possible movement as with a solid axle setup. The only downside is with it that close, it
may be difficult to remove the driveshaft. Mine will tip in and out without undoing anything but it has a little bit more slip joint showing. I'd leave it like it is though.
For the radiator, I've found the FF setup with the rubber hose bumper on the bottom mounts and the crossover piece on the top it's fine. There isn't a lot of vibration plus it's captured inside the tanks versus hanging on a flange like on the Roadster. As for the shield on the bottom, I agree the bottom of the radiator is exposed. The shield you're talking about in the video at least for me is a little over the top. I've seen 4-wheelers with less. Although I know he does a lot of autocross and cones can do some damage. (Just don't hit 'em.
) For mine, I made a screen out of SS mesh and an aluminum frame. Should handle road debris, rocks, whatever. All I figure I need.
Thanks Paul. The engine and transmission fit gets a little more complicated now (just bolding for people perusing this) - was playing around with the angle of the transmission and it is now sitting flush with the driveshaft universal joint. Going to try and oblong the engine mounting holes on both sides (on the mounts obviously) and possibly on the frame to see if I can find 1/2" of forward motion on the entire engine/transmission. Will see how it goes. Now the Stifflers driveshaft hoop appears too long, and is more over the U-joint at the differential and not over the driveshaft proper where it should be. Also decided to just cut out the crossmember and reinforce so the shifter plate can be easily accessed if I ever have to replace that inner seal again down the road).
I really like the screen protector you made for the lower part of the radiator. I'm going to do something (screen like you, or maybe the hex-aluminum sheets a lot of the roadster guys use). I went to the FFR open house last summer and one of the coupes had a car in front of him kick up a rock on the highway and it punctured his radiator. He made it to the show but was leaking. Unfortunately the radiators were backordered at the time and FFR didn't have any on hand. I think he had a tow home. There are worse things like cracking your oil pan or cooler, but the radiator's exposure is real.
Last edited by rhk118; 02-11-2024 at 03:52 PM.
-
03-02-2024, 05:58 AM
#204
Senior Member

OK, I am all caught up... Wheres the updates?!
Higgy
MK4 #11012 picked up 04/16/24
MK4 #10616 picked up 4/10/23
302w, 4 link, 17's, dual roll bar SOLD
MK4 #9759 picked up on 4/3/19
351C, 3 link, 17's, dual roll bars SOLD
-
Post Thanks / Like - 0 Thanks, 1 Likes
-
03-02-2024, 07:18 AM
#205
Senior Member
Originally Posted by
Higgybulin
OK, I am all caught up... Wheres the updates?!
Higgy
Haha! Thanks Higgy. Work has been a bit crazy leading up to a vacation, then vacation, then catchup week after vacation (multiple long weekends seem better than full vacations to me, the before week and after week are exhausting). Will be getting back to it shortly. Still at deciding if I need a custom driveshaft after all and working on a new transmission mount bracket. Once that bracket is made engine will be getting painted and I'll start wiring.
-
Post Thanks / Like - 0 Thanks, 1 Likes
-
03-04-2024, 03:07 PM
#206
Senior Member
Seats
OK, here's something that arrived today. Finally got my seats in. These are Stoneleigh seats custom built by Intratrim Automotive Interiors in Britain. It took about 3 months from order to arrival and I am very happy with them to say the least. I found them through a couple roadster builds I follow on Instagram, and when pricing them out they come in about the same price as all other name brand sports seats--so one thing lead to another and....well, here they are (and wife saw them, sat in one and gave her wholehearted approval). You can customize everything on these (which I did but stuck to black as thats my interior color with some white stitching to break things up a little), they are heated (I am in New England after all), and they can embroider logos.
I am very happy with my fit in the kit Cobra seats in terms of the bottom and these have a very similar fit on bottom (whew). What I found (for me anyway) is that in the kit seats the transmission tunnel and the wall up to the sill naturally bolster me side to side, so these have back and shoulder bolstering but not so much on the bottom. These are a fiberglass shell that measures 16.5 inches at the bottom width, and the seat to back angle is the same as the kit seats. So these will easily fit between the tabs, and should sit far back, which I found was my strong preference when comparing the Corbeau Evolution X to the Vinyl Roadster Seats. My car is still at my friends shop working on a custom transmission bracket so will hopefully get over there and try them in soon.


Last edited by rhk118; 03-04-2024 at 03:14 PM.
-
Post Thanks / Like - 1 Thanks, 4 Likes
-
03-04-2024, 08:43 PM
#207
-
Post Thanks / Like - 0 Thanks, 1 Likes
-
03-05-2024, 04:45 PM
#208
Wow! Those look nice.
I opted for the crack-back bucket seats, which I think are very comfortable, and I like them, as they remind me of my first car which was a '68 Firebird with the factory ram air, 400 c.i. V8 and the Muncie 4-speed fitted with a Hurst Super-Comp T-Handled shifter. THAT car had too much engine; like the Sunbeam Alpine/Tiger - more power than brakes :-)
FWIW, a key consideration for builders of "The Coupe" is head protection. With the roll cage, a minor incident with another vehicle on public roads translates to head injury. I have a Steve McQueen Bell helmet which I'll don when I am deliberately driving fast (is there any other way???), but I am second guessing whether I should have at least considered protection against "the crack back" and / or side impact protection :-)
-
Post Thanks / Like - 0 Thanks, 1 Likes
-
03-06-2024, 10:30 AM
#209
Senior Member
Originally Posted by
LateApex
Wow! Those look nice.
I opted for the crack-back bucket seats, which I think are very comfortable, and I like them, as they remind me of my first car which was a '68 Firebird with the factory ram air, 400 c.i. V8 and the Muncie 4-speed fitted with a Hurst Super-Comp T-Handled shifter. THAT car had too much engine; like the Sunbeam Alpine/Tiger - more power than brakes :-)
FWIW, a key consideration for builders of "The Coupe" is head protection. With the roll cage, a minor incident with another vehicle on public roads translates to head injury. I have a Steve McQueen Bell helmet which I'll don when I am deliberately driving fast (is there any other way???), but I am second guessing whether I should have at least considered protection against "the crack back" and / or side impact protection :-)
Bob, I imagine it's easy enough to get some kind of head pad mounted on the roll cage behind your head for this, that was my other consideration. Also on the Kirkey website they sell adhesive closed cell foam padding for roll cages that I will mount to the roll cage next to the side of my head as I can see that being a problematic point of side impact, I have a big melon, not from smarts, probably too much air up there!
-
03-07-2024, 04:25 PM
#210
I am using Longacre roll bar padding. Bought a couple extra sticks of the size for the roll bar tubing (to add to the couple of sticks that came with the build). The sticky tape needs zip tie reinforcement. The roll cage is still a "blunt impact" for any significant impact tho ... Side impact is probably the greatest risk, as most folks are using a high back chair methinks ...
If I am going to drive aggressively, I put on the Bell helmet and pretend I am Steve McQueen :-)
-
Post Thanks / Like - 0 Thanks, 1 Likes
-
03-08-2024, 07:43 AM
#211
Senior Member
Originally Posted by
LateApex
I am using Longacre roll bar padding. Bought a couple extra sticks of the size for the roll bar tubing (to add to the couple of sticks that came with the build). The sticky tape needs zip tie reinforcement. The roll cage is still a "blunt impact" for any significant impact tho ... Side impact is probably the greatest risk, as most folks are using a high back chair methinks ...
If I am going to drive aggressively, I put on the Bell helmet and pretend I am Steve McQueen :-)
Honestly I've had the same thought RE the helmet. Its going to be so loud in there that likely will help my ears haha!
-
03-08-2024, 12:20 PM
#212
I found that the open face helmet doesn't do much to knock down the dB's. This is mostly due to fit I think. A closed face helmet with the "neck gaitor" would do better.
Once you start down the helmet path, you'll likely get distracted by communication systems, particularly if you ride with a partner a fair amount.
I continue to do tweaks to cabin noise dampening. I have recently installed SecondSkin adhesive-backed noise dampening panels on the interior of my roof (where the headliner would be if I had chosen to install that). It really damps the drum head that is the roof panel, it has a nice appearance and "hand", and is very easy to install. It is quite thin / light, which translates to "it will likely not peel off the interior of the roof over time due to gravity and the characteristics of butyl." I hope ... :-)
-
Post Thanks / Like - 0 Thanks, 1 Likes
-
03-13-2024, 03:37 PM
#213
Senior Member
Originally Posted by
LateApex
I found that the open face helmet doesn't do much to knock down the dB's. This is mostly due to fit I think. A closed face helmet with the "neck gaitor" would do better.
Once you start down the helmet path, you'll likely get distracted by communication systems, particularly if you ride with a partner a fair amount.
I continue to do tweaks to cabin noise dampening. I have recently installed SecondSkin adhesive-backed noise dampening panels on the interior of my roof (where the headliner would be if I had chosen to install that). It really damps the drum head that is the roof panel, it has a nice appearance and "hand", and is very easy to install. It is quite thin / light, which translates to "it will likely not peel off the interior of the roof over time due to gravity and the characteristics of butyl." I hope ... :-)
Thought about this a lot Bob. Wondering if there is room to bow those rollcage bars out to the side a bit or up towards the roof a bit to make some room for the noggin'....posted a different thread about this on the main coupe page to see if I can get some pictures of how much space there might be, don't have my body.
-
03-13-2024, 03:56 PM
#214
Senior Member
-
Post Thanks / Like - 0 Thanks, 2 Likes
-
03-13-2024, 04:09 PM
#215
Senior Member
-
03-13-2024, 09:15 PM
#216
Hi Hank,
I'm not an expert, but I think you want a max operating angle no greater than 3 degrees and no less than 1/2 degree. This applies in any plane.
Brent
-
Post Thanks / Like - 0 Thanks, 1 Likes
-
03-14-2024, 10:28 AM
#217
Originally Posted by
burchfieldb
Hi Hank,
I'm not an expert, but I think you want a max operating angle no greater than 3 degrees and no less than 1/2 degree. This applies in any plane.
Brent
For that short of a driveshaft, a maximum of 2 degress is a better number to shoot for.
My Type 65 Coupe: Ordered May 27, 2021. Arrived November 19, 2021.
I would like to treat my gas pedal as a binary operator. It would be nice to get the cooperation of everyone in front of me. 
-
Post Thanks / Like - 0 Thanks, 1 Likes
-
03-20-2024, 05:17 PM
#218
This second photo caught my eye. It's probably the camera perspective, but the steering hub does not appear to align with your crotch - ha!
If it is any consolation, the steering shaft (and steering wheel) in my build points left. It is like Daytona (Oops, here comes another left turn :-). I am canted to my left in my build. This aligns with the foot-box, which also positions the body left and is mouse-nuts in the grand scheme of things. Haha!
FWIW ... Make sure your body is aligned with the steering shaft as you set your seats, not some arbitrary spacing from aluminum sidewall or some such.
It is great to watch this build !!
-
Post Thanks / Like - 0 Thanks, 1 Likes
-
03-21-2024, 08:30 AM
#219
Senior Member
Originally Posted by
LateApex
This second photo caught my eye. It's probably the camera perspective, but the steering hub does not appear to align with your crotch - ha!
If it is any consolation, the steering shaft (and steering wheel) in my build points left. It is like Daytona (Oops, here comes another left turn :-). I am canted to my left in my build. This aligns with the foot-box, which also positions the body left and is mouse-nuts in the grand scheme of things. Haha!
FWIW ... Make sure your body is aligned with the steering shaft as you set your seats, not some arbitrary spacing from aluminum sidewall or some such.
It is great to watch this build !!
Thanks Bob, Yes I'm aware that the seats in this tend to not point "forward". These photos just have the seats sitting in there flat. There is so much room on either side (compared to the Corbeau's) that I will have quite a bit more wiggle room to offset them or angle them in one direction or another. I also am going to put them on sliders so they will go up a little from floor height but will be positioned so they can slide all the way back. That should then fit most drivers. For me I want my seating position "dead nuts" on or as close to that as it can be otherwise that would be a reason not to take long journeys (nuts and bolts I'm screwed ") ). If I'm thinking about seating position while driving then it's wrong, if that makes sense. I am going to adjust those side upper rollbars as well...so seating position first, then see if there's enough room to adjust those around my noggin. If not I have no issues wearing a helmet.
). If I'm thinking about seating position while driving then it's wrong, if that makes sense. I am going to adjust those side upper rollbars as well...so seating position first, then see if there's enough room to adjust those around my noggin. If not I have no issues wearing a helmet.
I'm also on a non-ozempic diet haha...if I lose a few #'s I'll fit in the car better. Gained a bit of weight not being able to do my usual weight lifting/activity with the herniated disc last year. That is still bothersome (and now a "feature" of my body) but better enough that I've been able to start exercising again.
Last edited by rhk118; 03-21-2024 at 08:35 AM.
-
03-21-2024, 11:32 AM
#220
Senior Member
I need more motor pics!!!
MK4 #11012 picked up 04/16/24
MK4 #10616 picked up 4/10/23
302w, 4 link, 17's, dual roll bar SOLD
MK4 #9759 picked up on 4/3/19
351C, 3 link, 17's, dual roll bars SOLD
-
Post Thanks / Like - 0 Thanks, 1 Likes
-
03-22-2024, 09:50 PM
#221
I'm looking forward to seeing how you "bow" those side bars on the roll cage. In my car, which is dang close to the era of your kit, there is not much more than a finger width between the roll bar and the fiberglass laterally, and less in the region of the rear quarter windows. There is more room to move or bow the bars up; maybe as much as 2" near the front and maybe 1.5" at the rear hoop (due to the slope of the roof). My sense is you will need some careful measurements with the body dry-fitted. It is an interesting idea: better clearance for the noggin and a bit better visibility out the top of the window. Those upper roll bars are clearly visible through the door cutout from outside the car and not tucked as well as the A-pillar roll cage uprights, for example.
I have decided to lose the rear quarter scoops, a.k.a.: the Big Ears. They serve no function except creating drag, turbulence and noise, and pressurizing the cabin. When I say "lose", I mean filling the cutout for the scoop mounting flange and smoothing the body lines. They used to have a function in the originals (rear brake cooling), but most of us are not designing that ducting for any of our rotors. If I were, I'd use a different approach anyway.
Glad to hear you are getting past some of the problems with your herniated disc!!
-
04-20-2024, 06:20 AM
#222
Senior Member
Not much of an update as have had a lot going on the past couple months. Picking up where I left off, had to cut out the crossbar in the transmission tunnel, shortened it and placed it transversely leaving enough room that I can remove the T-56 shifter plate if ever needed in the future. With the 302 block and T-56 the shifter was too far back, even with pulling everything forward 3/4" by adjusting the engine mounts. Also removed the bracket for the parking brake as I am using an electric parking brake in my build. I then ran the rear wiring harness along the right side of the tunnel there as well and up the crossbeam at the front of the tunnel:


Started wiring. For now I have just laid out where I want the rear wiring harness to run, as well as the electronic parking brake cables and mounted P-clamps. Need to perform harness surgery and will fuse the 2 harnesses together. There is A LOT of extra wire in the parking brake harness to remove, and will also need to tap in power for the T-56 reverse lockout/backup light controller I will be using - so will run backup light wires, EPB wires, and speed sensing wires into 1 harness and fuse the 2 together. Need to shorten some things and change slightly where they exit the harness. The orange tapes are marking where I need to tie things in or pull things out of the harness. I've never done harness surgery before but figure this an easy enough harness to start with, maybe will give me confidence with the main wiring harness.
Ran it along the right side of the transmission tunnel to the back, and you can see the smaller electronic parking brake wires splitting to the left and right calipers lying on the differential as well:

Here is one of the EBP connections, sorry out of focus but you can see where the electronic parking brake module plugs in by the zip tie:

One scary part of the build was a bit of a surprise. Prepping the engine block for paint, removed the valve covers and found what we've figured out to be ceramic tumbling beads sitting on top of the engine in the corners. Inspecting the valve covers there is a little metal shelf inside and there were several more wedged in there which is where they came from/managed to hitchhike into my engine build.
The valve covers I'm using are vintage replica Shelby valve covers from Shelby American. They are stamped steel and powder coated silver, these beads must be from the tumbling process after powder coat I assume and holy crap this is scary. Not something I would ever have thought of to check for, and glad I looked under that shelf inside because ticking time bomb. My engine was dyno'ed with these valve covers on. So because of this I had to remove the oil pain and inspect and fortunately no signs of any of these or any fragments of these in the oil pan. They are slightly larger than BBs (10/32 bolt there for comparison). Have a bit of a knot in my stomach over this, was going for a vintage look of a period-correct Shelby SBF but one without the vintage look of smoke coming out the back. One of the risks of building your own engine I guess  ...once again proving that the path of least resistance with these in time, materials, angst, and money is to just put in a Coyote like FF clearly designed them for.

Last edited by rhk118; 04-20-2024 at 06:41 AM.
-
Post Thanks / Like - 0 Thanks, 1 Likes
-
04-20-2024, 01:40 PM
#223
Senior Member

Phew! Great catch, Hank! "...was going for a vintage look of a period-correct Shelby SBF but one without the vintage look of smoke coming out the back". Very funny, and couldn't agree more.
Chris
Coupe complete kit delivered: 4/22/24.
Build Thread. Coyote. T-56. IRS w/3.55. Wilwoods. PS. HVAC. Side windows.
MK4 Complete kit.
Build Thread Index. Delivered: 10/15/2020. Legal: 7/25/23. Coyote Gen3. TKO600 (0.64 OD). IRS w/3.55. PS. Wilwoods. Sway bars. This build is dedicated to my son, Benjamin.
Build Thread.
-
Post Thanks / Like - 0 Thanks, 1 Likes
-
04-24-2024, 05:41 AM
#224
Senior Member
I'm not suggesting they smoke, but don't want to be the guy with that re-creation or feature! If I wanted to I'd just tape a smoke bomb to the back and drive around that way like we did on our bikes back in the day! So glad the block wasn't painted before putting the engine together otherwise would have never seen those. Sometimes its better to be lucky than good as they say...


 Thanks:
  Likes:


 Reply With Quote


