-
01-01-2024, 06:31 AM
#121
Senior Member

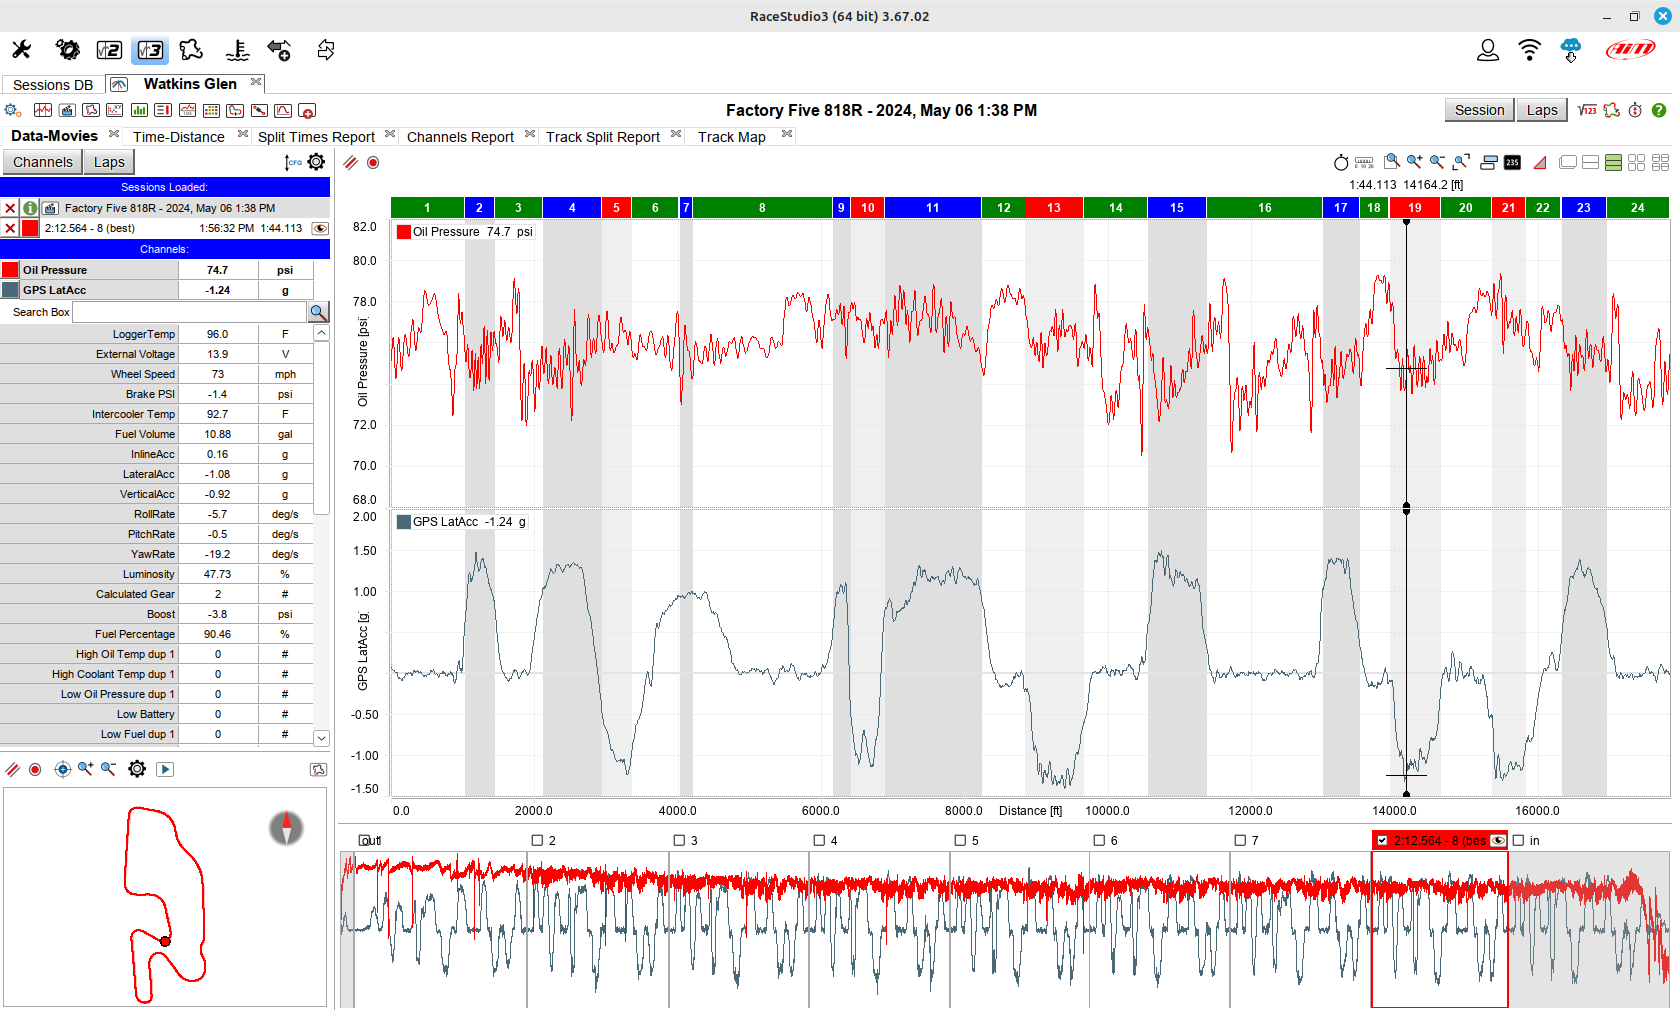
Hobby: this is some really interesting data. There is an "interesting" artifact in section 13 and 19. There is maximum sustained G's in both of those turns, yet the oil pressure starts to increase before the g-forces drop. Might that be because as the pressure drops, so does the flow, and the volume in the oil pan is actually increasing during the last part of the turn (oil flows back, but less being pumped out) enough that it is reaching the pick-up again? If that is really what is happening, might that give you a clue on how to proceed?
-
Post Thanks / Like - 0 Thanks, 1 Likes
-
01-01-2024, 08:14 AM
#122
Senior Member

I only included Oil Pressure and Lateral G force in the graph to make it easy to read, but when I also include throttle position and brake force I can see that the slight rise in oil pressure before the the left hand turn events is caused by jumping out of the throttle and onto the brakes very hard. I concluded this causes extreme front to back sloshing in the oil pan, combined with a dramatic drop in load on the engine causes those "interesting" artifacts. I do not belief there is any harm as there is no real drop in oil pressure , just some instability.
-
Post Thanks / Like - 0 Thanks, 1 Likes
-
01-01-2024, 12:57 PM
#123
Senior Member

Impressive g force numbers.
Any theory as to what was exceptional about the drop to 10 psi? The other data points were in the drop to 40+/- psi for roughly the same g pull.
-
01-01-2024, 05:38 PM
#124
Senior Member

Originally Posted by
Dave 53

Impressive g force numbers.
Thanks but I'm not near the limit yet. Still in the brake-in / testing phase. 
Originally Posted by
Dave 53
Any theory as to what was exceptional about the drop to 10 psi? The other data points were in the drop to 40+/- psi for roughly the same g pull.
Yes I do actually. That is turn #9. It is an uphill zero camber left hand corner. So basically the worst combination of factors making the oil run from the pickup!
-
01-02-2024, 05:17 PM
#125
Senior Member
I hate cutting up good (expensive) parts, but you've got to do what you've got to do to make things work.
Here I'm using a plasma cutter with a circle cutting tool to cut out a 5.5" circle under the oil pickup. Next I'll fabricate a new bottom approximately 2" lower than the original one. Think of it like putting a steel dog dish over the hole and welding it up! This will give me almost a quart of extra oil around the pickup.
IMG_20240102_160212924.jpgIMG_20240102_160434598.jpgIMG_20240102_164900150.jpg
-
Post Thanks / Like - 1 Thanks, 0 Likes
 Rob T
Rob T thanked for this post
-
01-08-2024, 09:23 PM
#126
Senior Member
Finished up fabricating the oil pan modifications today. This is the pan before I modified it. It has a nice stainless top plate that covers the trap doors and baffles. Notice how the oil pickup is cast directly into the oil pump that hangs below the engine block.
IMG_20231228_115523950.jpg IMG_20231228_110741179.jpg IMG_20231228_154157389.jpg
After cutting out a 6" section directly below the oil pickup, I fabricated an interesting extension that moves the pickup closer to the pan center. The original location favored right hand turns which would have been hard braking in a FWD Honda. The red oval represents the new pickup opening location after I weld a cover on the pickup. Note how it is oriented 90 degrees compared to the opening in the factory pickup. This corresponds to the fact that I am running the engine 90 degrees compared to the factory orientation.
IMG_20240103_160643967.jpg IMG_20240103_160635059.jpg
Finally I needed to make a short cone to connect the pan to the now deeper bottom. I used the 6" section I cut out of the pan and rotated it 90 degrees to use as the new base.
IMG_20240106_120626907.jpg IMG_20240106_122346009.jpg IMG_20240108_122134273.jpg
Tomorrow I'll add some paint to make it pretty once again.
Last edited by Hobby Racer; 01-08-2024 at 09:27 PM.
-
Post Thanks / Like - 0 Thanks, 3 Likes
-
01-17-2024, 03:14 PM
#127
Nice work. Glad you caught this before it went badly!
"Good Judgement comes from Experience. Experience comes from Bad Judgement"
Owner: Colonel Red Racing
eBAy Store:
http://stores.ebay.com/colonelredracing
818R ICSCC SPM
Palatov DP4 - ICSCC Sports Racer
-
Post Thanks / Like - 0 Thanks, 1 Likes
-
01-17-2024, 09:25 PM
#128
Nice work...
I added an accusump to my rotrex K24 RWD after seeing similar oil pressure fluctuations. Solved the problem.
There is a ton of power to be had by altering the VVT.. You will need to modify the inlet cam gear to allow about 40 degrees of advance ( pistons hit valves at 45 degrees). The AEM tuning file I sent you will give you a good starting point on the cams... I had 406RWHP from mine!
Keep up the good work.
-
Post Thanks / Like - 1 Thanks, 0 Likes
-
01-18-2024, 07:23 AM
#129
Senior Member
Originally Posted by
7ish
Nice work...
I added an accusump to my rotrex K24 RWD after seeing similar oil pressure fluctuations. Solved the problem.
Glad I found this before any damage occurred and hoping my mods solve my oil pressure issues.
Originally Posted by
7ish
There is a ton of power to be had by altering the VVT.. You will need to modify the inlet cam gear to allow about 40 degrees of advance ( pistons hit valves at 45 degrees). The AEM tuning file I sent you will give you a good starting point on the cams... I had 406RWHP from mine!
Keep up the good work.
I added the 50 degree intake cam wheel this winter. I clayed an identical spare motor I have to check the piston to valve clearance and at the full 50 degrees advance I still had 0.070" clearance so I chose not to mechanically limit the the advance as many people do. I will get to the dyno this spring to see how much more power I can get!
-
01-18-2024, 01:54 PM
#130
IMHO you should keep it @328 whp. No more than 350.
"Good Judgement comes from Experience. Experience comes from Bad Judgement"
Owner: Colonel Red Racing
eBAy Store:
http://stores.ebay.com/colonelredracing
818R ICSCC SPM
Palatov DP4 - ICSCC Sports Racer
-
01-18-2024, 09:09 PM
#131
Originally Posted by
Sgt.Gator
IMHO you should keep it @328 whp. No more than 350.
More not better?
Ed
-
01-19-2024, 08:07 AM
#132
Senior Member
Originally Posted by
Sgt.Gator
IMHO you should keep it @328 whp. No more than 350.
I want to find the safe limit and then I can de-tune to a reliable level. Plus I hate leaving free HP on the table
-
02-14-2024, 11:45 AM
#133
Senior Member
Finishing Touches
While waiting for spring I made some finishing touches to the car. I added an on board fire suppression system and finally cut the rear deck to fit the Honda motor.
Here is an overview shot with the seats out so you can see the fire suppression system and notched out rear deck lid.

There are three output nozzles for the Halon fire system. One points into the passenger compartment between the driver and passenger. There are two more nozzles in the engine bay. One on the exhaust side and one on the intake side. I designed it so that the entire system is attached to the aluminum firewall bulkhead pieces. This makes removal easy as taking out the firewall also removes the fire system without having to take it all apart.
IMG_20240214_093059885.jpg IMG_20240214_094007712.jpg IMG_20240214_094031358.jpg IMG_20240214_094043521.jpg
The rear deck lid needed 1.75" notched out between the rear humps to give enough clearance for the top of the motor to poke through.
IMG_20240214_093335488.jpg
-
Post Thanks / Like - 0 Thanks, 3 Likes
-
05-12-2024, 06:27 AM
#134
Senior Member
Oil Pressure Under Control!
Some of you may remember that I discovered a low oil pressure problem late last year while digging into my telemetry data from 2023. It showed up in hard left hand turns where the pressure would drop. It was worst in turn #9 at Watkins Glen where the pressure would dip to around 10 psi briefly.
Over the winter I redesigned the wet sump oil pan and pickup to hopefully fix the issue.
I just got back from my first track day and reviewed the data. Looks like the oil system modifications have worked beautifully. 
In the screen shot below you can see the oil pressure varies from about 72 to 78 psi everywhere on track. Highlighted is the same spot on track where the pressure dropped to around 10 psi last year and it is now 75 psi.
I'm putting this one in the win column!
-
Post Thanks / Like - 0 Thanks, 2 Likes
-
05-13-2024, 05:37 AM
#135
Senior Member
Great News. Can't wait to hear about the rest of the track day. It is such a great feeling to be able to focus on the driving.....
-
05-13-2024, 11:24 AM
#136
Kit #361, arrived 10/2015, still in progress
818C highly modified, corvette suspension
Estimated completion summer 2023!
1989 turbo Supra 5 sp
2017 Tundra
-
06-30-2024, 05:59 PM
#137
Senior Member
6 Speed Gearing, Don't Trust the Internet!
For anyone buying a Subaru 6MT and using the transmission tag to lookup the gear ratios be advised. The values listed on multiple web site are NOT always correct. A while back I purchased a JDM 6 Speed out of Legacy Spec B car (Tag #TY856WVBAA). According to RaliSpec's online PDF of Subaru transmissions it should have had the following gear ratios.
1st 3.636 / 2nd 2.235 / 3rd 1.521 / 4th 1.137 / 5th 0.971 / 6th 0.756
What my transmission really had was these ratios. While 1st was the same, every other gear was different.
1st 3.636 / 2nd 2.375 / 3rd 1.762 / 4th 1.346 / 5th 1.063 / 6th 0.842
It would not have been so bad if not for the fact that I purchased and installed a different 5th / 6th gear set based on the ratios I thought I had. Unfortunately I scrapped the original 5th / 6th gears so I had to purchase a new set  .
.
I've had this transmission apart 4 times now and never actually counted the gear teeth to know for sure the ratios. Now I know and I have put it back to stock and my gear indicator works perfectly.
These are the close ratios I wanted in the first place so I guess it's all good. Just wish I didn't have to purchase two sets of 5th / 6th gears that I didn't need!
Last edited by Hobby Racer; 06-30-2024 at 06:43 PM.
-
07-01-2024, 07:41 PM
#138
Senior Member
Per the builder (ZF Design), I've got 3.636 / 2.235 / 1.761 / 1.346 / 1.062 / 0.842 Final drive 3.9.
He took off the Subaru tag and now I'm "ZFD1273". I'm certain my ratios are different than the original gears in the case.
The 2.235 2nd gear seemed really good for autocross. I've only done one autocross, but I was able to hold 2nd gear when others had to go to 3rd gear (or I was just that much slower, but I had respectable times).
The 3rd gear 1.761 works really well for the "slow sharp" turns. With the old 5 speed, I had several high revving 2nd gear exits with a nearly immediate upshift to 3rd. Now I can take those turns in 3rd gear.
But, I'm feeling the highway gas milage drop with the 0.842 6th gear.
These at track car gear ratios! When I'm street driving, I usually skip 2nd and 4th gear.
Last edited by Dave 53; 07-01-2024 at 07:50 PM.
-
06-22-2025, 04:52 PM
#139
Senior Member
Vindication at VIR!
I finally made it back to VIR racetrack. The first time I was there was with a group of 818's and it didn't go so well. I really only got a few laps in when I damaged my transmission, ending the event for me. That was also when I was running the EZ36 flat 6 Subaru engine.
This time things went much better. The Honda swapped 818R performed flawlessly. The only issue I had for the whole 2 day event was the left rear Hoosier developed a bulge on day 2. Luckily I had a set of Continental Extreme Contact Force tires with me as backup tires and was able to quickly swap them out and continue lapping.
It was 90+ degrees both days so quite warm, especially for early June. Lap times are not anything to write home about, but as what I consider a first time here I was happy with my performance.
This is a great facility, I highly recommend it if you are able.
Last edited by Hobby Racer; 06-22-2025 at 05:12 PM.
-
Post Thanks / Like - 1 Thanks, 4 Likes
-
06-22-2025, 10:01 PM
#140
Senior Member
Nice!
You've got me itching for a track day in my 818. July 6 at Thunderhill Raceway 5 mile. Been spending most of my time this year on 24 Hours of Lemons stuff. Finished a 25 hour race a couple of weekends ago which was a blast.
-
06-24-2025, 05:52 PM
#141
Senior Member
Unloading at VIR
Thought I'd post this nice pic of the car before it got all dirty and covered in rubber streaks!

-
Post Thanks / Like - 0 Thanks, 2 Likes
-
06-24-2025, 06:12 PM
#142
Senior Member
Issues with my Hoosier 275/35ZR18 rear tires
I mentioned in an earlier post I had to swap tires while at VIR recently. My driver rear developed a bulge in the tread, not in the sidewall which is where you usually get them.
You can see in the pic below a clear bulge in the profile shot. This is with zero pressure in the tire also! Anyone have an idea what can cause this?

Also of interest is that the tire slipped on the wheel. When mounted the race shop puts a line on the tire where the valve stem is. In the pic below you can see how much the bead has slipped on the rim. This happened on both rear tires but not on the front tires.

-
06-25-2025, 06:37 AM
#143
Senior Member
Sticky tires, MONSTER TORQUE, Low pressure combined? Did both rears slip? Or just the one with the bulge?
-
06-25-2025, 09:48 AM
#144
Senior Member

In sidewall or tread, the non-elastic component of the tire is fiber or steel plies. The common failure definition is ply separation. By that one has to assume the fiber strands broke or lost bond to the rubber and the fiber is not holding the elastic material in place. Without trauma like heat or impact, the failure must be a manufacturing defect.
I expect if you request a warranty replacement, admitting to the race application would disqualify your claim.
On slipping bead to rim, was the bead installation lube appropriate? It should be air dry water-based and approved for this application. Are the wheels bead-lock type?
jim
-
06-25-2025, 12:07 PM
#145
Senior Member
Originally Posted by
Rob T
Sticky tires, MONSTER TORQUE, Low pressure combined? Did both rears slip? Or just the one with the bulge?
Sticky yes, monster torque definitely NOT, pressures were 34 hot. And yes both tires experienced the bead slip.
Originally Posted by
J R Jones
In sidewall or tread, the non-elastic component of the tire is fiber or steel plies. The common failure definition is ply separation. By that one has to assume the fiber strands broke or lost bond to the rubber and the fiber is not holding the elastic material in place. Without trauma like heat or impact, the failure must be a manufacturing defect.
I expect if you request a warranty replacement, admitting to the race application would disqualify your claim.
On slipping bead to rim, was the bead installation lube appropriate? It should be air dry water-based and approved for this application. Are the wheels bead-lock type?
jim
Wheels are not bead lock. I'm going to assume it was the bead lube. These are older tires so I'm not even going to try to get a replacement. I already ordered up a replacement used tire so I can get some more use out of the set.
-
06-26-2025, 12:56 PM
#146
Senior Member
Flip the rears left to right and they will slip back into place! Did they slip in the direction of braking or acceleration? I would think the biggest forces to cause slipping on the rim would be the fronts under braking. I'll start marking my valve stem position as you have done.
I've been screwing on oil filters for 45 years and never had one come loose. But on my last oil change, the filter was as loose as one can be without leaking! I've started marking the filter with a paint line. During my pretrack inspection I did a couple of days ago (Thunderhill 5 mile July 6) the Jesus nut that holds the rear lower lateral control arms to the spindle had loosened 1/4 turn and it had 3 drops of red. I had one of those nuts come off on track even though pretrack inspection, it passed the witness paint test. I emptied an entire tube of red on the bolt after I found a replacement nut and if I have to cut that nut off some day, so be it. They absolutely need lots of thread lock and would be better with a castle nut. Witness paint once exposed my rear axle bolt loosening 1/8 turn. When I retightened, it was 1 1/8 loose! They needed a little snugging after every session. They now have castle nuts. Worth the effort to drill the axles so that they don't need to be checked after every session.
-
06-26-2025, 02:18 PM
#147
Senior Member
Originally Posted by
Dave 53
Flip the rears left to right and they will slip back into place! Did they slip in the direction of braking or acceleration? I would think the biggest forces to cause slipping on the rim would be the fronts under braking. I'll start marking my valve stem position as you have done.
Oddly enough they are both in the direction of accelerating. There is no way my car puts out enough torque to spin the tries on the rims! The fronts didn't move a bit.
-
06-27-2025, 08:50 AM
#148
Senior Member
New windscreen shape helps!
I've always had an issue with wind buffeting my helmet around at speeds above 127 mph. It was so bad that at the end of the back straight at Watkins Glen, about 140 mph, that I could not see the braking markers. I just went by muscle memory I guess.
I decided to make a new windscreen with an extended section for the driver. The hope was that it would push the air stream up just enough to alleviate the buffeting at high speed while minimizing the drag introduced. I could not find the nice smoked poly-carbonate type sheeting that FFR made the original windscreen out of locally so I had to make do with clear acrylic easily found at your local big box home store (Lowe's in my case). After a bit of fiddling around scoring the sheet I was able to snap off the unwanted sections and arrive at my final shape.
The FFR windscreen goes straight across. I added a raised section in front of the driver. VIR was the first test of the new windscreen and it went well. I reached a top speed of 139.1 mph on the back straight and had perfect vision as my helmet was not being violently shook about as before. In mid July I'm back to Watkins Glen where I'm confident it will work well.


Any other R drivers have an issue with wind buffeting? If so, how did you address it?
-
Post Thanks / Like - 0 Thanks, 1 Likes
-
06-28-2025, 02:13 PM
#149
Senior Member
I have a slight problem with wind buffeting, but I am only getting to about 115 at CMP. I bought a Zamp helmet with chin spoiler, duck bill spoiler and a wing like part on the back. All of those things are stick on. They all help. The weirdest thing I had happen was a piece of tire rubber from the car in front of my at Buttonwillow at about 120. I saw it, but could not react, and it hit me square in the face shield. It was about the size of a quarter. Left a "skid mark" on my tear sheet....
-
Post Thanks / Like - 1 Thanks, 0 Likes


 Thanks:
  Likes:


 Reply With Quote

