Boig Motorsports

Visit our community sponsor

Thanks Thanks:  0
Likes Likes:  0
Results 1 to 31 of 31

Thread: Show me your dash

Hybrid View

Previous Post Previous Post   Next Post Next Post
  1. #1
    Senior Member LuckyWinner's Avatar
    Join Date
    Feb 2011
    Location
    Fort Huachuca, Sierra Vista, AZ
    Posts
    779
    Post Thanks / Like

    Show me your dash

    Waiting on some parts so thought I would start to work on my dash. Can you post pics of your dash and tell me what switches you put on. Thanks.
    Owner MK4 7642RD, 393 stroker, Gordon Levy Super Alloy T5, HDX Clutch, Moser 3.31 3-link with disc brakes, 17" Bullit wheels, NT05's, Seat heaters donated by WarmSeats.com, door panels donated by Herbs Door panels.

  2. #2
    Senior Member CDXXVII's Avatar
    Join Date
    Feb 2011
    Location
    Santa Clarita, CA.
    Posts
    759
    Post Thanks / Like
    Lucky

    What are you planning on doing? Are you going to use the dash supplied with the kit ( street version ). Or are you planning on making your own. I went with something in between. Kind of a softened competition layout with a glove box.

    Guage and switch layout will be pretty close to the originals.

    Here is one of my favorite threads for dash info. CobraDVM has a great layout which is pretty close to what I am doing. He was my inspiration.

    http://www.ffcars.com/forums/17-fact...your-dash.html

  3. #3
    Senior Member LuckyWinner's Avatar
    Join Date
    Feb 2011
    Location
    Fort Huachuca, Sierra Vista, AZ
    Posts
    779
    Post Thanks / Like
    Im going on the kit version. Just trying to figure out what switches I want to put on the dash and where.
    Owner MK4 7642RD, 393 stroker, Gordon Levy Super Alloy T5, HDX Clutch, Moser 3.31 3-link with disc brakes, 17" Bullit wheels, NT05's, Seat heaters donated by WarmSeats.com, door panels donated by Herbs Door panels.

  4. #4
    Senior Member Cobradavid's Avatar
    Join Date
    Feb 2011
    Location
    League City, Texas
    Posts
    517
    Post Thanks / Like
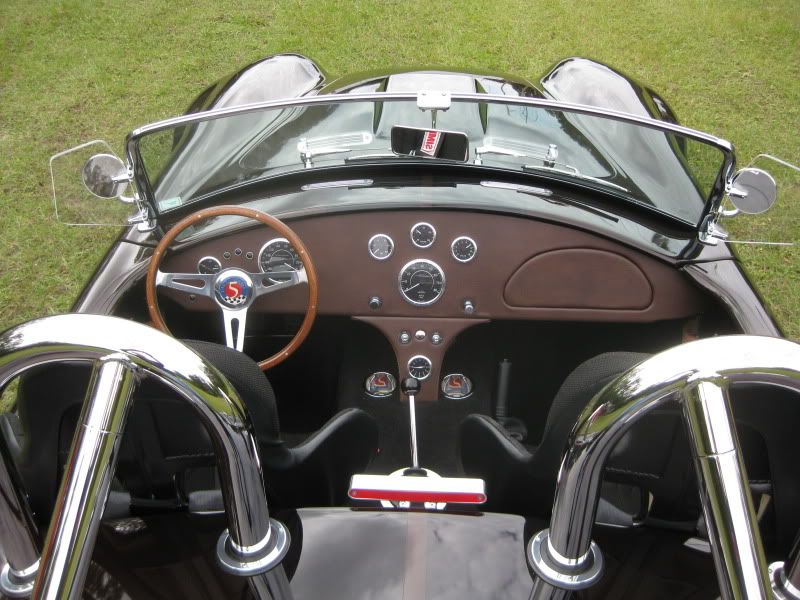
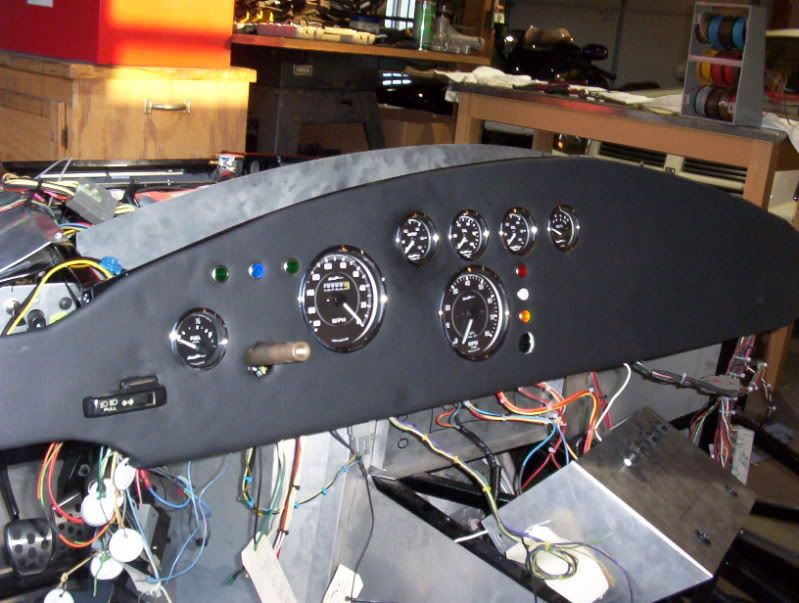
    Here are a couple of pics of my layout.


    The speedometer is to the left of the steering column and tach is to the right. Above the steering column are left and right turn signal indicators (green) and high beam (blue). Below the tach is a red charge indicator light.

    The top row of the smaller gauges are water temp, oil pressure, and oil temp. The bottom row gauges are voltmeter and fuel. Below the smaller gauges are the switches (left to right): horn, ignition, parking lights (on/off), headlights (on/off), wiper (low/off/high), and heater/defroster blower rotary switch (off/low/medium/high).

    I also have the driver's side foot box blower switch on the very far left side (curved part) of the dash. It's not visible in the photos.

    Hope this helps.

    David
    Last edited by Cobradavid; 08-05-2012 at 04:54 PM.
    My Saving Grace: John 3:16

    FFR6687, Graduate #39 in the Class of 2009
    The Factory Five Forum March 2012 POM

  5. #5
    Junior Member SlayerBill's Avatar
    Join Date
    Mar 2012
    Location
    Tucson, AZ, USA
    Posts
    5
    Post Thanks / Like
    Our dash: P5130018+copy.jpg

  6. #6
    Out Drivin' Gumball's Avatar
    Join Date
    Feb 2011
    Location
    Blackberry Township, IL
    Posts
    2,653
    Post Thanks / Like
    Smiths mechanical gauges in S/C layout with the following switches:
    Cold air pull at each end of dash;
    '65 Mustang ignition switch with red alternator light above it (to left of steering column, which has a Russ Thompson turn signal system with the lever pointing to the passenger side);
    Windscreen wash button (metal push button tractor part from local farm supply store);
    Lighter ('65 Mustang);
    Lights (FFR switch with '65 Mustang knob);
    Horn button (same metal tractor part as windscreen washer);
    Fog (Lucas toggle);
    Fan override (Lucas toggle);
    Wiper (Lucas with original style Lucas knob);
    Heat (FFR / Vintage Air pull-turn switch with Lucas "Fan - 123" knob);
    Choke ('65 Mustang pull cable version with Lucas "Panel Dim" knob);
    Map light (Lucas switch and light from MGA).

    Here are a few photos of the layout - the gauge holes and glovebox hole were cut by ASTGlenn, but I did the switch holes myself - watchout for those as it's easy to drill them too large. You have to start small, then file/cut the flats and notches that each switch requires - they're all different.


    This picture shows the dash before I replaced the FFR heater knob with the Lucas version and before I cut the hole to the right of the heater switch for the choke.


    Later,
    Chris

    "There are no more monsters to fear, and so, we have to build our own."
    Mk3.1 #7074

  7. #7
    Senior Member
    Join Date
    Feb 2011
    Location
    Tampa, Florida
    Posts
    170
    Post Thanks / Like
    Mine is different than most.


    Jeff
    Mark III complete kit ordered 12/03/2007, received #6351 1/22/2008 Homemade mods: driver footbox extension with deadpedal and dimmer switch, widened passenger footbox, brake reservoir mounting bracket, under trunk storage box, custom dash and dash extension, heater forward box, custom glove box, under dash switch panel, Explorer motor carb conversion, first start 7/10/2010, off to paint (Performance Automotive) 11/20/2010, finally home 5/7/2011, Graduated 11/22/2011

  8. #8
    Senior Member LuckyWinner's Avatar
    Join Date
    Feb 2011
    Location
    Fort Huachuca, Sierra Vista, AZ
    Posts
    779
    Post Thanks / Like
    that is the nicest dash ive seen Jeff!!!
    Owner MK4 7642RD, 393 stroker, Gordon Levy Super Alloy T5, HDX Clutch, Moser 3.31 3-link with disc brakes, 17" Bullit wheels, NT05's, Seat heaters donated by WarmSeats.com, door panels donated by Herbs Door panels.

  9. #9
    Senior Member
    Join Date
    Feb 2011
    Location
    Tampa, Florida
    Posts
    170
    Post Thanks / Like
    Quote Originally Posted by LuckyWinner View Post
    that is the nicest dash ive seen Jeff!!!
    Thanks for the compliment. It's a custom design that isn't for everyone, but it's exactly what I wanted.

    Jeff
    Mark III complete kit ordered 12/03/2007, received #6351 1/22/2008 Homemade mods: driver footbox extension with deadpedal and dimmer switch, widened passenger footbox, brake reservoir mounting bracket, under trunk storage box, custom dash and dash extension, heater forward box, custom glove box, under dash switch panel, Explorer motor carb conversion, first start 7/10/2010, off to paint (Performance Automotive) 11/20/2010, finally home 5/7/2011, Graduated 11/22/2011

  10. #10
    Senior Member CDXXVII's Avatar
    Join Date
    Feb 2011
    Location
    Santa Clarita, CA.
    Posts
    759
    Post Thanks / Like
    Here are some photos I found a while back. Good point of reference.

    left-1.jpg

    center-1.jpg

    right-1.jpg

  11. #11
    Senior Member ClemsonS197's Avatar
    Join Date
    Feb 2011
    Location
    Marietta, GA
    Posts
    346
    Post Thanks / Like
    Not done yet, but here's the layout:

    MK3.1 #7076 - Under Construction....
    Coyote 5.0/Solid 8.8/Tremec 3650
    How to:
    Coyote Power Steering
    05-09 T3650 in a Roadster

  12. #12
    Senior Member riptide motorsport's Avatar
    Join Date
    Feb 2011
    Location
    Fort Lauderdale Fl.
    Posts
    3,296
    Post Thanks / Like
    Man those are some damn nice dash's!
    FFR Daytona Type 65 Coupe
    67 427 Cobra
    57' Belair
    72 Pinto Wagon ,306" 1/4 miler
    34 5 window coupe Ford
    2003 Mustang GT
    99' ZX9
    85 Goldwing

    All toys still in the Scuderia!


    Every Saint has a past..................every sinner a future

    Don't take yourself so seriously........no one else does.

    You never see a motorcycle parked outside a Psychiatrists office.

  13. #13
    Tool Baron frankeeski's Avatar
    Join Date
    Feb 2011
    Location
    "The I.E." SoCal
    Posts
    1,358
    Post Thanks / Like
    I didn't want any switches on the dash. They are all hidden. Pretty basic competition layout with key slot and turn signal.
    Frank
    __________________________
    Factory Five Racing MKIII Super Snake Replica. Cannonball Cobra Drop Trunk Box, Horn Button and other machined Do Dads.
    i.e.427 Chromed Full Width Roll Bar with integrated LED Third Brake Light.
    I will never forget My Buddy Paul.

  14. #14
    Member JeepFlyer's Avatar
    Join Date
    Apr 2012
    Location
    Clovis, NM
    Posts
    90
    Post Thanks / Like
    Blog Entries
    5
    Can I play?
    Gauges.JPG

    My kit gets here TOMORROW!!! Meanwhile I've just been staring at these making engine noises.
    Wes

  15. #15
    Senior Member cgundermann's Avatar
    Join Date
    Feb 2011
    Location
    Chino Valley, Arizona
    Posts
    1,077
    Post Thanks / Like

  16. #16
    Senior Member Doc_FFR's Avatar
    Join Date
    Feb 2011
    Posts
    139
    Post Thanks / Like
    niiiiice! Did you come up with the gauge design?
    I'm waiting to see how the prototype turns out.

  17. #17
    Senior Member cgundermann's Avatar
    Join Date
    Feb 2011
    Location
    Chino Valley, Arizona
    Posts
    1,077
    Post Thanks / Like
    Quote Originally Posted by Doc_FFR View Post
    niiiiice! Did you come up with the gauge design?
    I did, took me a whole weekend of going back and forth ~ drove my wife nuts.

  18. #18
    Member JeepFlyer's Avatar
    Join Date
    Apr 2012
    Location
    Clovis, NM
    Posts
    90
    Post Thanks / Like
    Blog Entries
    5
    Is that solid carbon fiber, or a sheet overlayed on the aluminum?
    Wes

  19. #19
    Senior Member cgundermann's Avatar
    Join Date
    Feb 2011
    Location
    Chino Valley, Arizona
    Posts
    1,077
    Post Thanks / Like
    It is .5 CM thick and has a 3M adhesive vacuum bonded to it and then the aluminum dash. Real carbon fiber and the company that produces the sheets manufactures various thicknesses and finishes. The standard .25 sheet shows slight imperfections. If your interested, I can provide you the info and some tricks I learned along the way concerning fit and finish.

    Chris
    Last edited by cgundermann; 08-09-2012 at 08:36 AM.

  20. #20
    Member JeepFlyer's Avatar
    Join Date
    Apr 2012
    Location
    Clovis, NM
    Posts
    90
    Post Thanks / Like
    Blog Entries
    5
    Quote Originally Posted by cgundermann View Post
    It is .5 CM thick and has a 3M adhesive vacuum bonded to it and then the aluminum dash. Real carbon fiber and the company that produces the sheets manufactures various thicknesses and finishes. The standard .25 sheet shows slight imperfections. If your interested, I can provide you the info and some tricks I learned along the way concerning fit and finish.

    Chris
    Very! Do you have a thread already with the info? I'm sure there are others out there interested too.
    Wes

  21. #21
    Senior Member cgundermann's Avatar
    Join Date
    Feb 2011
    Location
    Chino Valley, Arizona
    Posts
    1,077
    Post Thanks / Like

    Carbon Fiber Dash & Speedhut Gauges

    Quote Originally Posted by JeepFlyer View Post
    Very! Do you have a thread already with the info? I'm sure there are others out there interested too.
    The thread is ~ "Carbon Fiber Dash & Speedhut Gauges", essentially:

    I live in Washington State and a company here, http://www.protechcomposites.com/ - produces a high quality CF at a great value. The .25 MM sheet is easier to cut and bend, however, it will show surface imperfections. I went with the .5 MM sheet and also had them vacuam bond a 3M adhesive to the back. They will cut it to the 65" X 10" dimensions for the dash. You can bend the .25 MM sheet under the the dash and tack it with hidden rivets to hold the adhesion or in my case, I painted the bottom in a black bed liner and used the factory precision cut edge to line up with the bottom edge of the dash. With .25 and .5 MM, if you cut with scissors or scribe cut with an Exacto knife (pretty tough and difficult for the holes), it will leave barely noticeably fissures in the edges. You won't see most of these, however, if it is a visible edge - I would cut or use a dremel cutting tip for the edges/gauge holes and create a 1/4" stand off outline (CF away from aluminum). Next, I would use the dremel sanding wheel and sand the CF standoff down to the aluminum edge (sands quickly and stops nicely at the aluminum); gives it a laser cut edge without any small burrs. I was able to bend the tip of corners to 45 degrees after I bonded the CF to the dash without delaminating. I had put a rivet at the end to tack it, but it bended nicely and really didn't need it. Don't think you can bend the .5 MM around the bottom edge, but the .25 CF sheets you can. Cut out or drill any additional switch holes before you lay down the CF sheet (if you drill aftwards there is slight shock waves in the CF). I will be using some billet aluminum trim for the steering shaft hole.

    After this thread, I trimmed the edges with rubber trim (from www.mcmaster.com) to clean it up and provide some protection.

    Chris

  22. #22
    Member Mikey_P's Avatar
    Join Date
    Feb 2011
    Location
    Bradenton FL
    Posts
    53
    Post Thanks / Like
    Dash from my Mk3.

    FFR5546 morphing into FFR7387

    Garage cam: http://mk4-cobrabuild.viewnetcam.com...gle&Language=0

  23. #23
    Senior Member
    Join Date
    Oct 2011
    Location
    greenwood sc
    Posts
    262
    Post Thanks / Like
    I did a pretty standard setup. Then realized I hated not having a self cancelling turn signal, and I added the Russ Thompson switch. So, I have a horn button (still working) and a turn signal switch that I aren't used. Think about everything you will need.
    MKIV #7619 complete kit IRS, 351 TKO 500, Delivered 11/13/2011
    First start 12/31/2011
    Gocart 01/12/2012
    completed tags/title 05/11/2012
    http://thefactoryfiveforum.com/showt...-Graduate-7619

  24. #24
    Member
    Join Date
    Jul 2011
    Location
    Newark, DE
    Posts
    35
    Post Thanks / Like
    When i was figuring out my dash layout, I downloaded a ton of pictures of everyone else's dash. I uploaded them all to photobucket..... http://s1117.photobucket.com/albums/...ash%20Layouts/

  25. #25
    cobra Handler skullandbones's Avatar
    Join Date
    Jul 2011
    Location
    Superstition Mtn foothills 5 miles west of Gold Canyon AZ
    Posts
    2,686
    Post Thanks / Like
    Blog Entries
    19
    Hey Lucky,

    Did that photo gallery do it for you? It did for me. Thanks, Crashburndie!!! WEK.
    FFR MkIII 302 (ATK), EFI 75mm TB with custom box plenum chamber, 24# injectors, 4 tube BBK ceramic, cold air sys, alum flywheel, crane roller rockers, T5, Wilwood pedals, custom five link with Watt's link, 4 rotors, coil overs, power steering with Heidt valve, alum FFR rad, driver's crash bar mod, mini dead pedal mod, quick release steering wheel hub #6046

  26. #26
    Senior Member LuckyWinner's Avatar
    Join Date
    Feb 2011
    Location
    Fort Huachuca, Sierra Vista, AZ
    Posts
    779
    Post Thanks / Like
    Quote Originally Posted by skullandbones View Post
    Hey Lucky,

    Did that photo gallery do it for you? It did for me. Thanks, Crashburndie!!! WEK.
    cant get to it at work....will try tonight at home
    Owner MK4 7642RD, 393 stroker, Gordon Levy Super Alloy T5, HDX Clutch, Moser 3.31 3-link with disc brakes, 17" Bullit wheels, NT05's, Seat heaters donated by WarmSeats.com, door panels donated by Herbs Door panels.

  27. #27
    Senior Member LuckyWinner's Avatar
    Join Date
    Feb 2011
    Location
    Fort Huachuca, Sierra Vista, AZ
    Posts
    779
    Post Thanks / Like
    So what was your total cost on this project?
    Owner MK4 7642RD, 393 stroker, Gordon Levy Super Alloy T5, HDX Clutch, Moser 3.31 3-link with disc brakes, 17" Bullit wheels, NT05's, Seat heaters donated by WarmSeats.com, door panels donated by Herbs Door panels.

  28. #28
    Senior Member cgundermann's Avatar
    Join Date
    Feb 2011
    Location
    Chino Valley, Arizona
    Posts
    1,077
    Post Thanks / Like

    CF Dash Cost

    Quote Originally Posted by LuckyWinner View Post
    So what was your total cost on this project?
    Carbon Fiber (CF) with 3M adhesive vacuum bonded roughly $165 and rubber edge dressing $10. You could save $ by going to .25 CM CF, but I would keep it a little thicker.

  29. #29
    Member RooRocks's Avatar
    Join Date
    Feb 2011
    Location
    California
    Posts
    56
    Post Thanks / Like


    The dash fabric:
    MKII
    347
    VCP Stacked Injection

  30. #30
    Senior Member LuckyWinner's Avatar
    Join Date
    Feb 2011
    Location
    Fort Huachuca, Sierra Vista, AZ
    Posts
    779
    Post Thanks / Like
    Quote Originally Posted by RooRocks View Post


    The dash fabric:
    SNAKE SKIN!!! I thought I was the only one that thought about doing that!!!! Very nice, I will show you mine when done.
    Owner MK4 7642RD, 393 stroker, Gordon Levy Super Alloy T5, HDX Clutch, Moser 3.31 3-link with disc brakes, 17" Bullit wheels, NT05's, Seat heaters donated by WarmSeats.com, door panels donated by Herbs Door panels.

  31. #31
    Senior Member Cobradavid's Avatar
    Join Date
    Feb 2011
    Location
    League City, Texas
    Posts
    517
    Post Thanks / Like
    Saw this on the photobucket link.


    Does anyone know what all those gauges are for?

    David
    My Saving Grace: John 3:16

    FFR6687, Graduate #39 in the Class of 2009
    The Factory Five Forum March 2012 POM

Posting Permissions

  • You may not post new threads
  • You may not post replies
  • You may not post attachments
  • You may not edit your posts
  •  

Martin's Dent and Collision Shop

Visit our community sponsor