Visit our community sponsor

Thanks:
0

Likes:
0
-
Senior Member

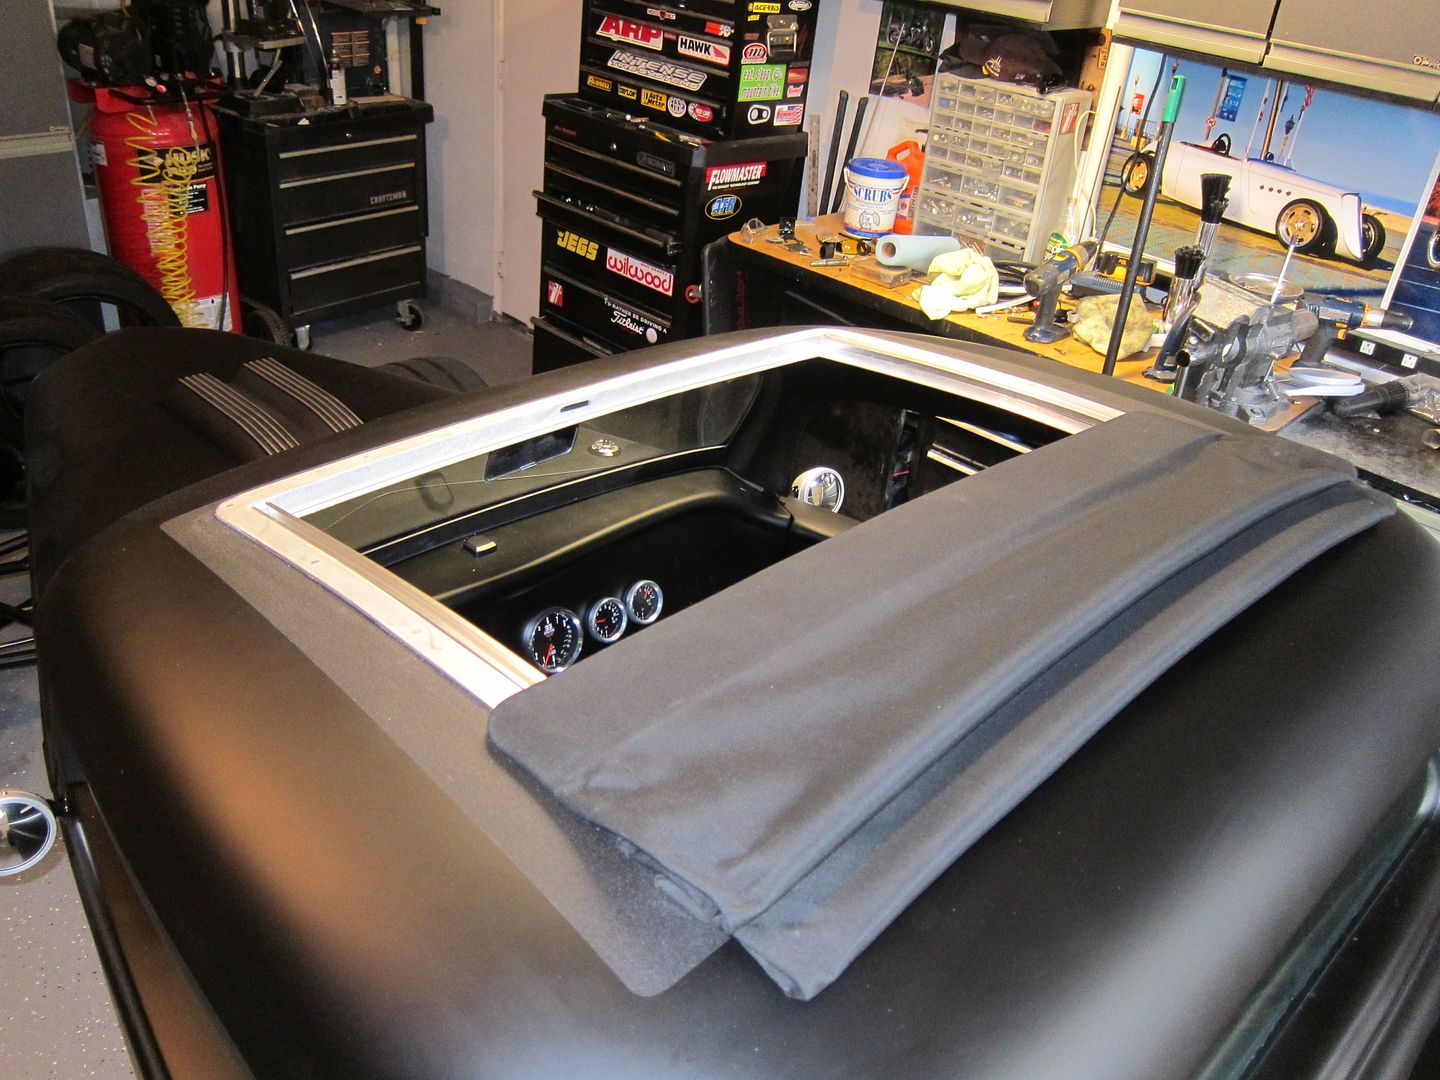
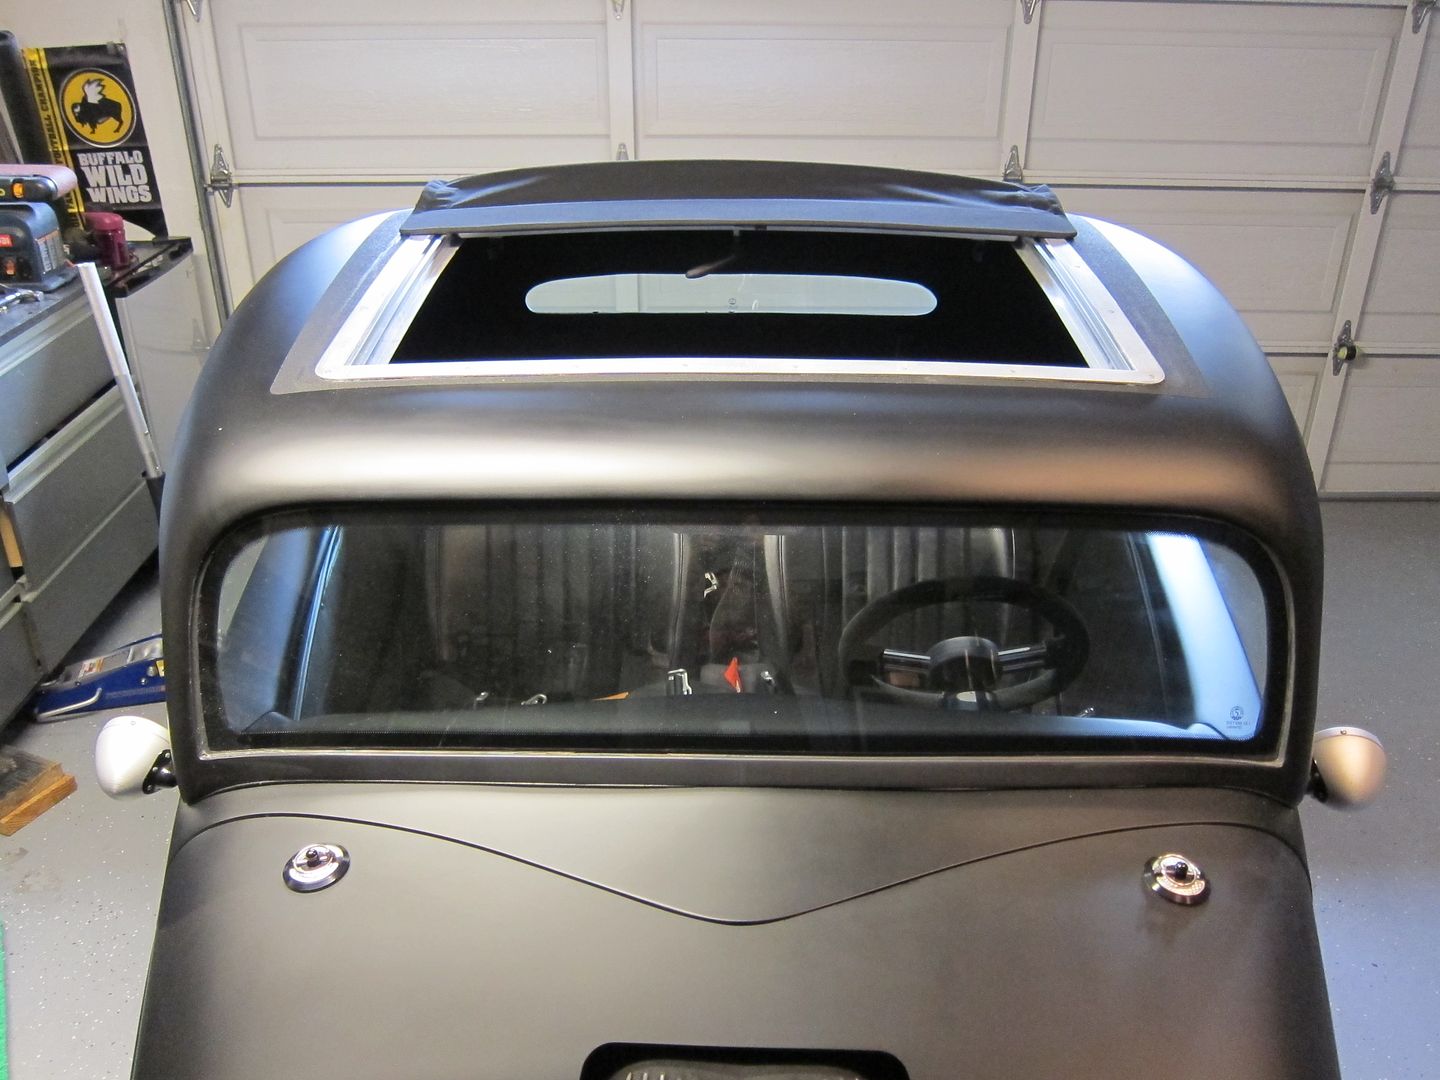
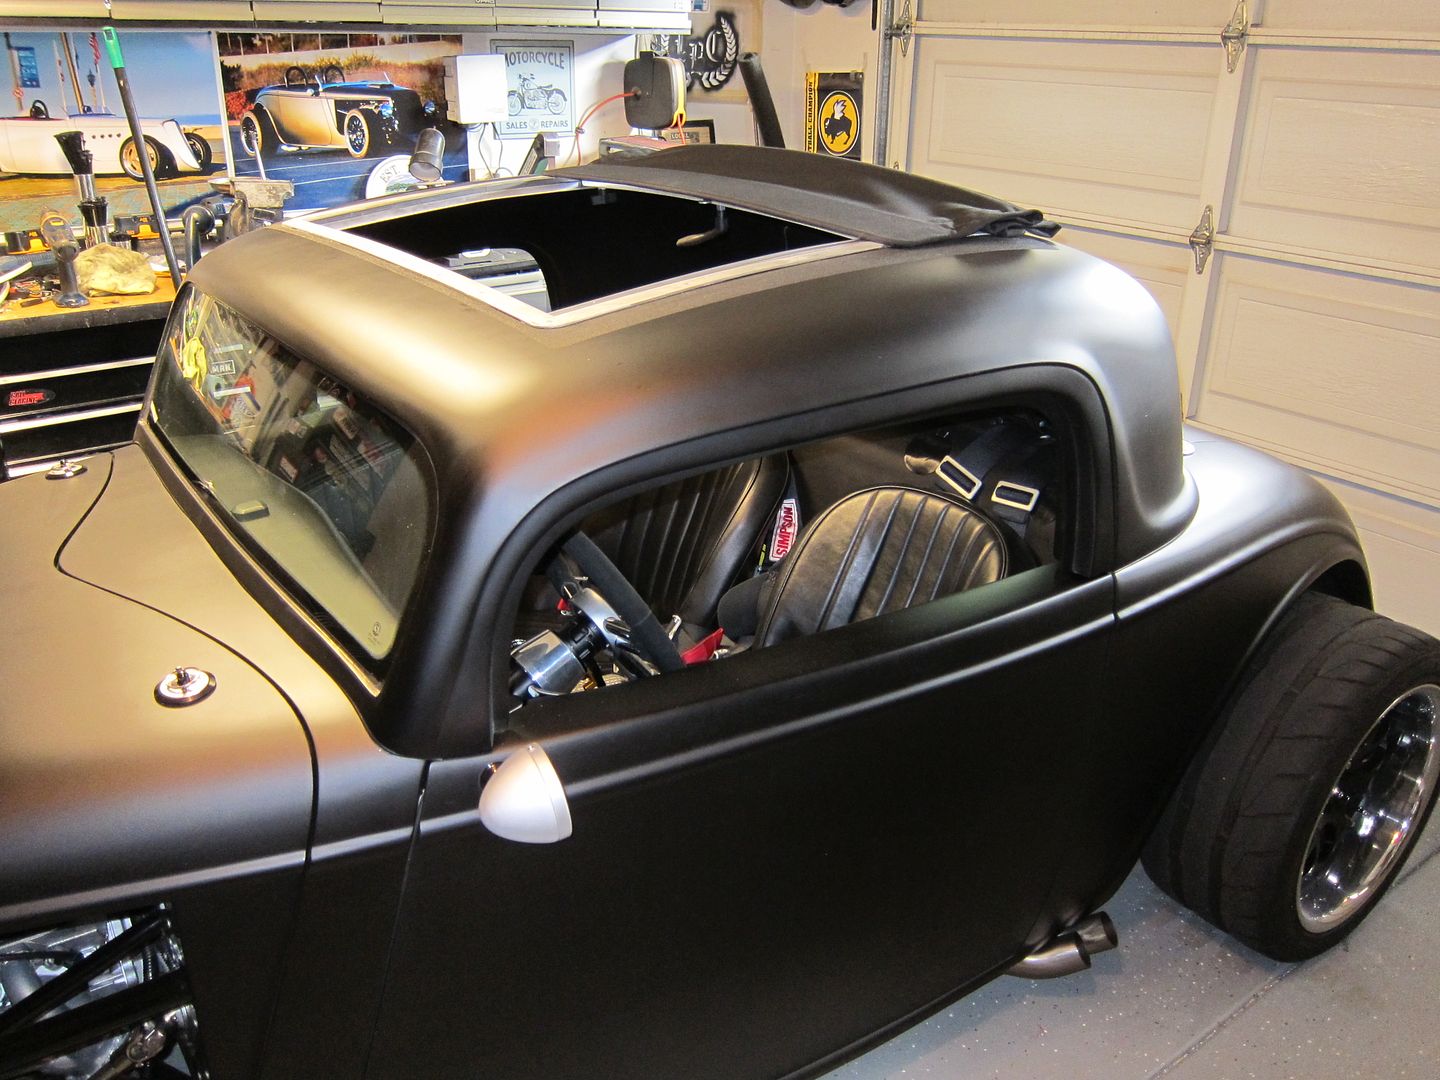
33 Ragtop installation
I wish I could say I was the first to put one in but Tony Zullo beat me to it. However, he never documented his build or the installation so for those who have thought of adding one, here's my install. Although I love the hardtop look, I had three reasons for wanting a ragtop: 1. Visibility-impossible to see stoplights out of the 33 with the hard top, even with the stoplight mirror. 2. Ventilation- with the car being carbed and having side pipes, I get a bit of exhaust trapped up inside the car. This will help a lot. 3. Who doesn't love a sunroof! Sure, i can take the top off but now I have the best of all worlds!
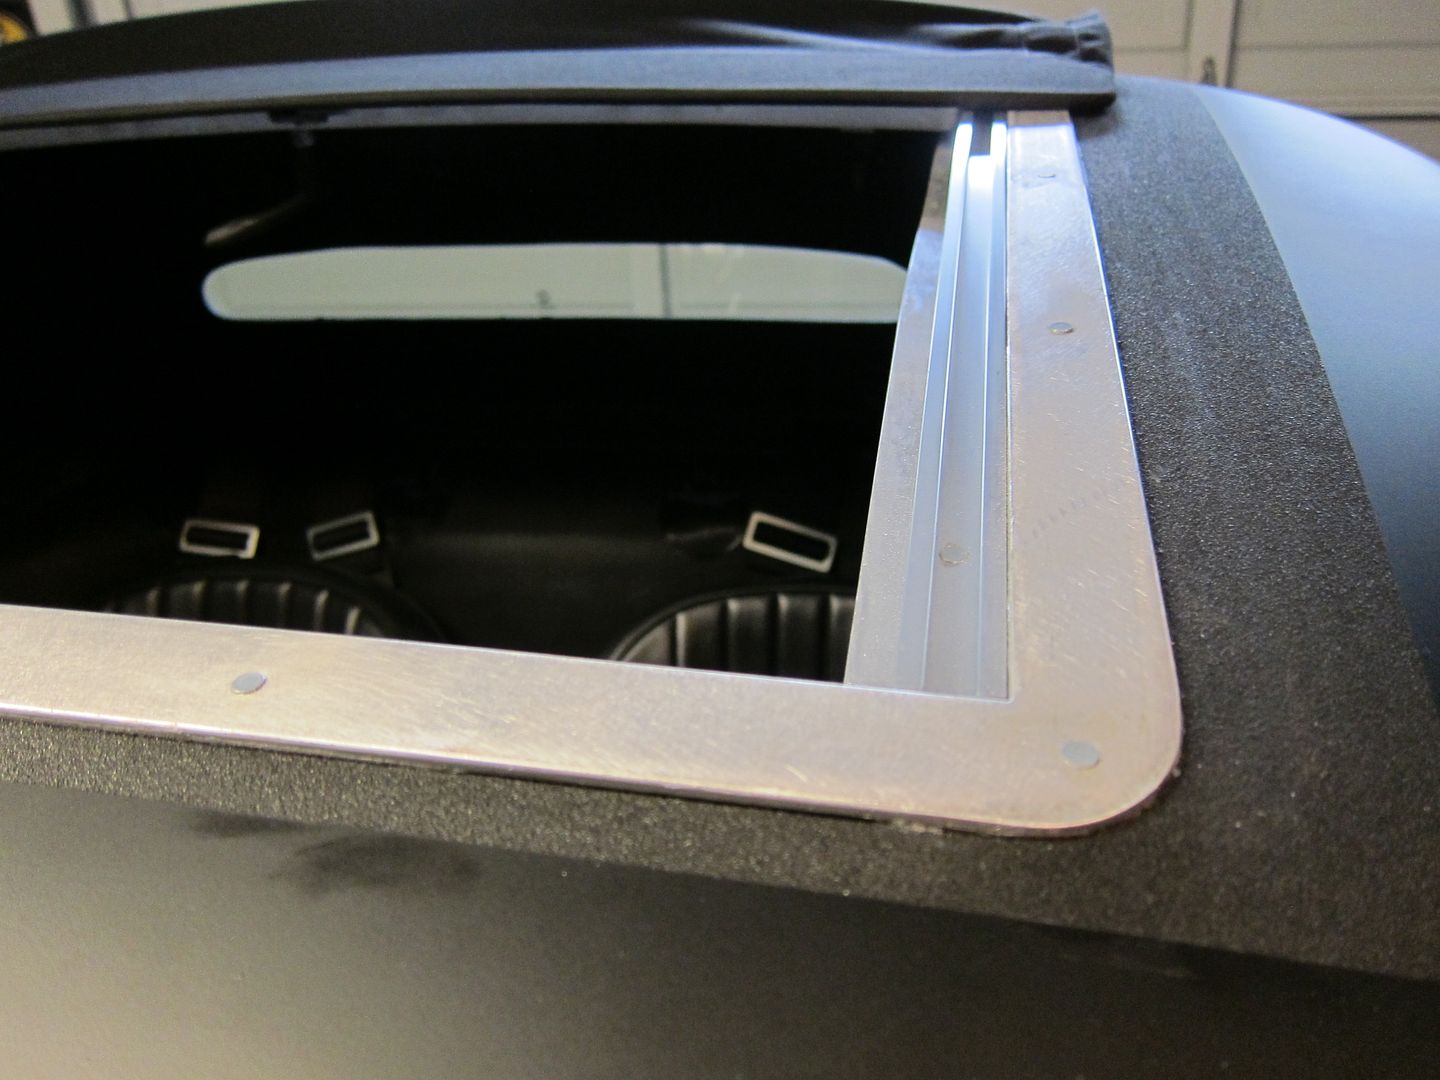
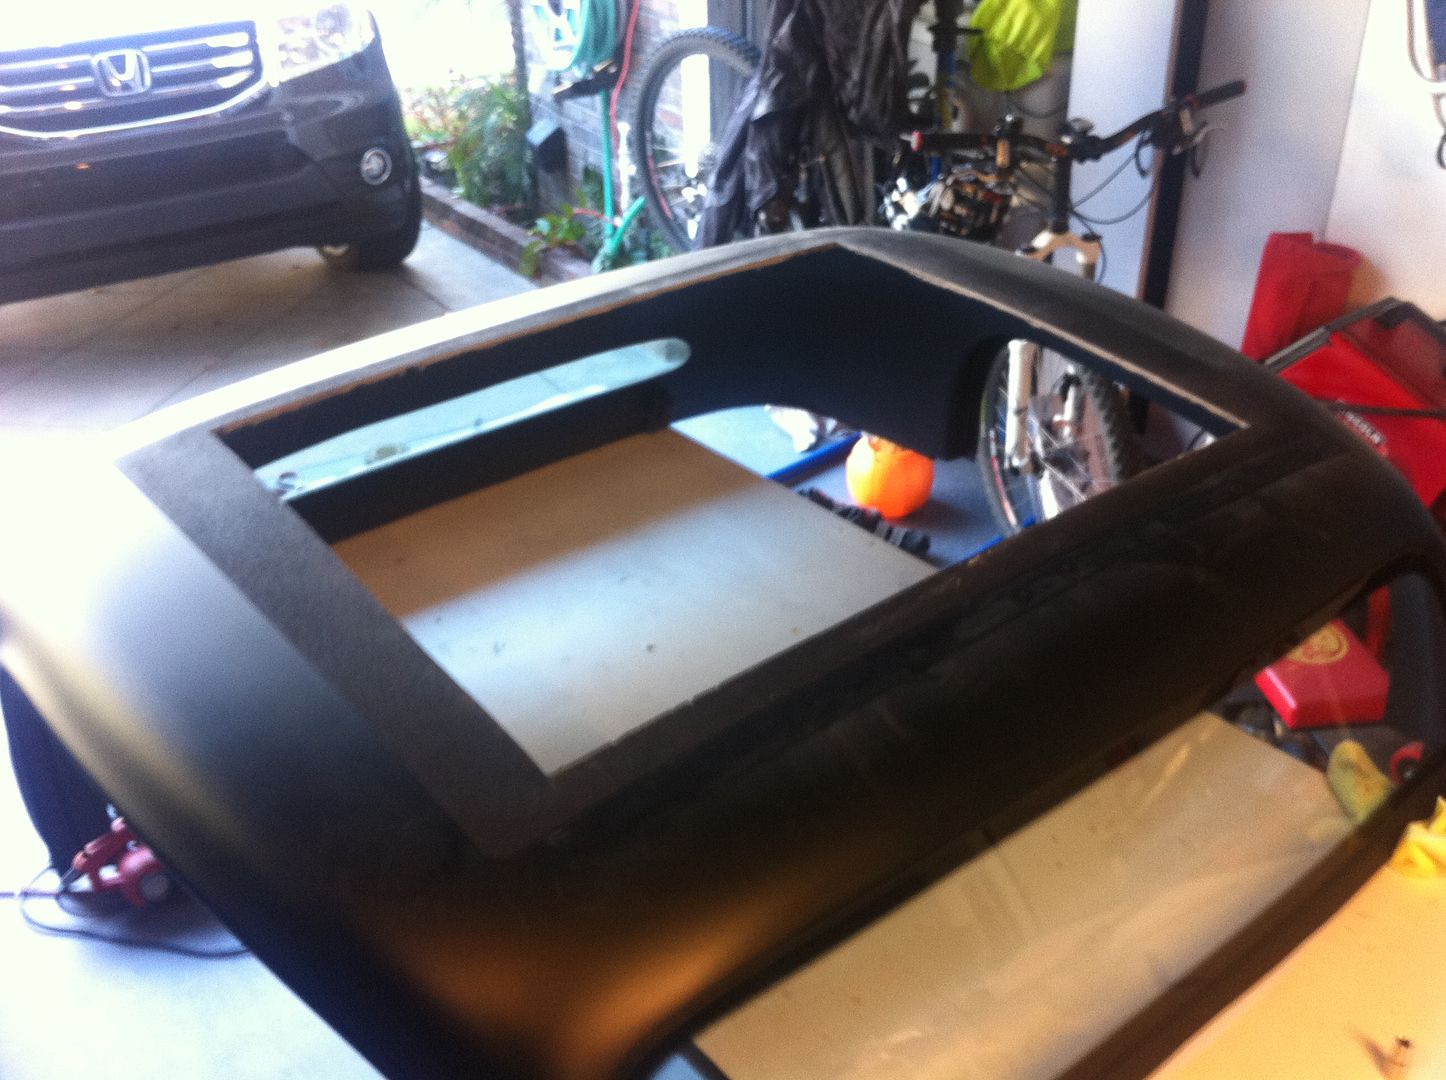
I ordered my top from http://www.slidingragtops.com. Rick is the owner and a cool guy. This is also where Tony got his so I was comfortable ordering from him. I paid $481 shipped from Phoenix and it took about 4 weeks to build and deliver it to my door. I chose to go with a 40x30 which is total size of the fabric ragtop. The hole I cut was 36.5x27.5~ish for the frame to fit in. Any bigger top is custom and the price goes way up.
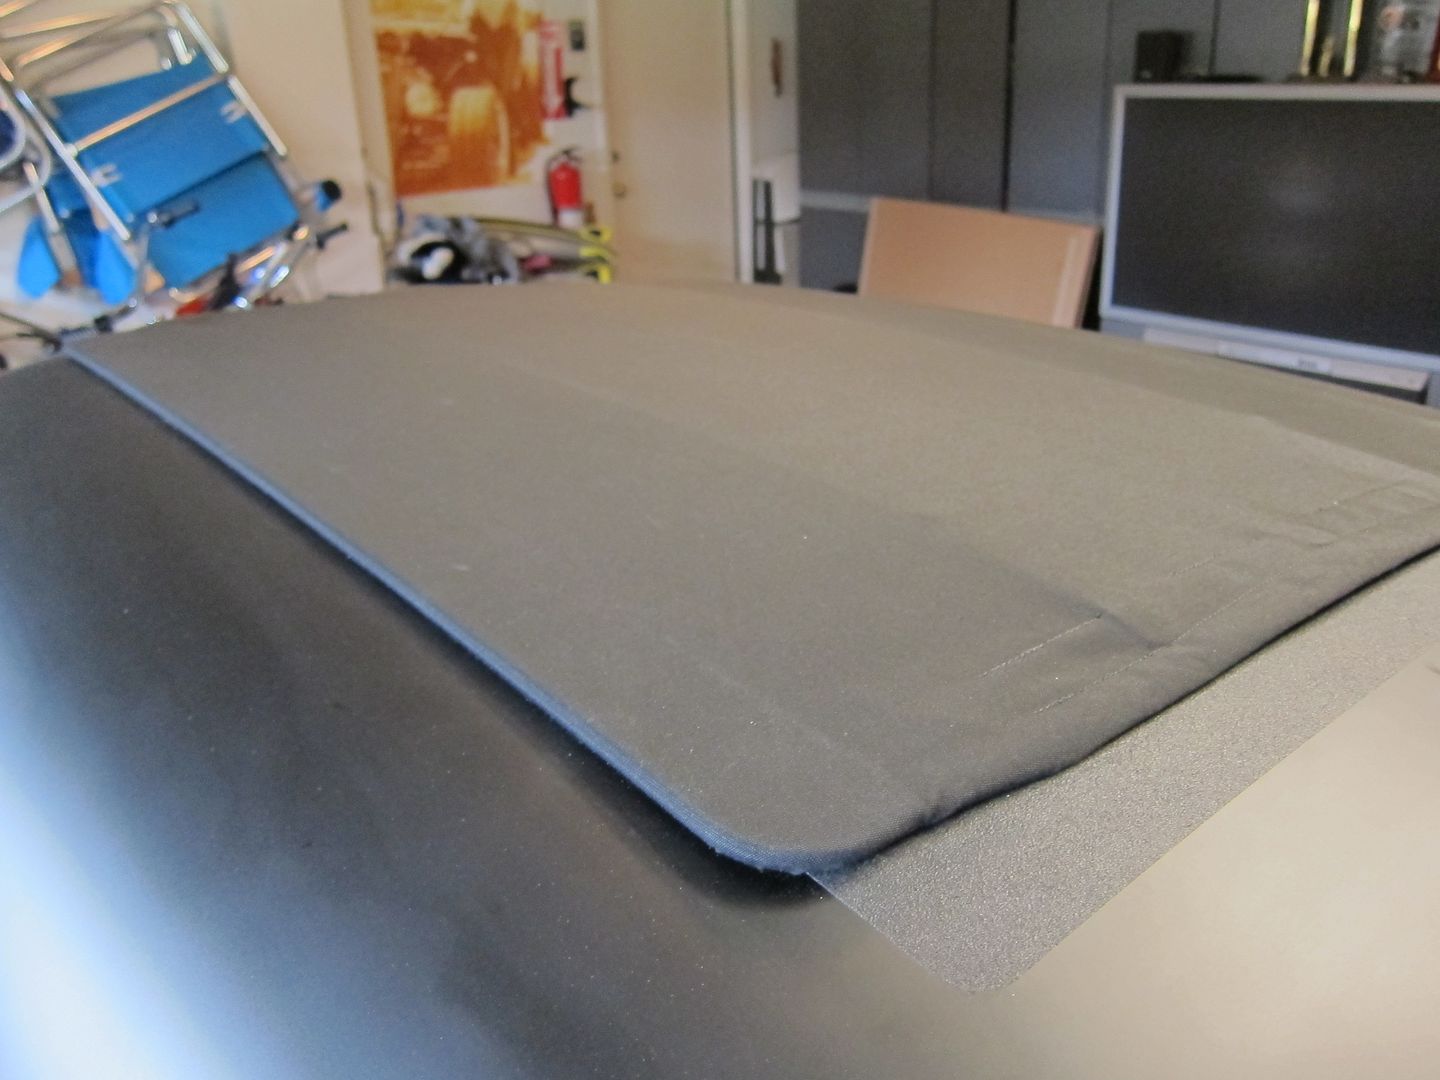
I received a large pizza box Monday and opened it to find the assembled top and a package of hardware including moldings to help seal the headliner (which I dont have yet).
After reading the instructions (for some reason they are copy protected on the site so you can't print which was frustrating) and dissembling my ragtop from the frame rails, I measured my hole, set down some protective tape and went to cutting. First by using a step bit on my corners and then using the jigsaw. I had issues with cutting because I had dynamat on the inside and that stuff is impossible to get off. So I just cut through it. The line was pretty bad but I took to it with a sanding block to even it out.

Next I went to shaping the frame to the contour of the roof. They instructions told me to cut reliefs on the inside of the frame (which is not visible if you have a headliner) but I decided to just bend it a bit to fit. This is where I made my mistake. I bent the frame over my tire to get a nice even bend and, in doing so, also bent the frame inward on both left and right sides in effect pinching it. So, if you do this, make sure the slider rails from the top fit perfectly into the frame. Once I found my mistake I simply corrected it and bent the frame outward so it was square again. The aluminum of the frame is pretty soft so it's easy.
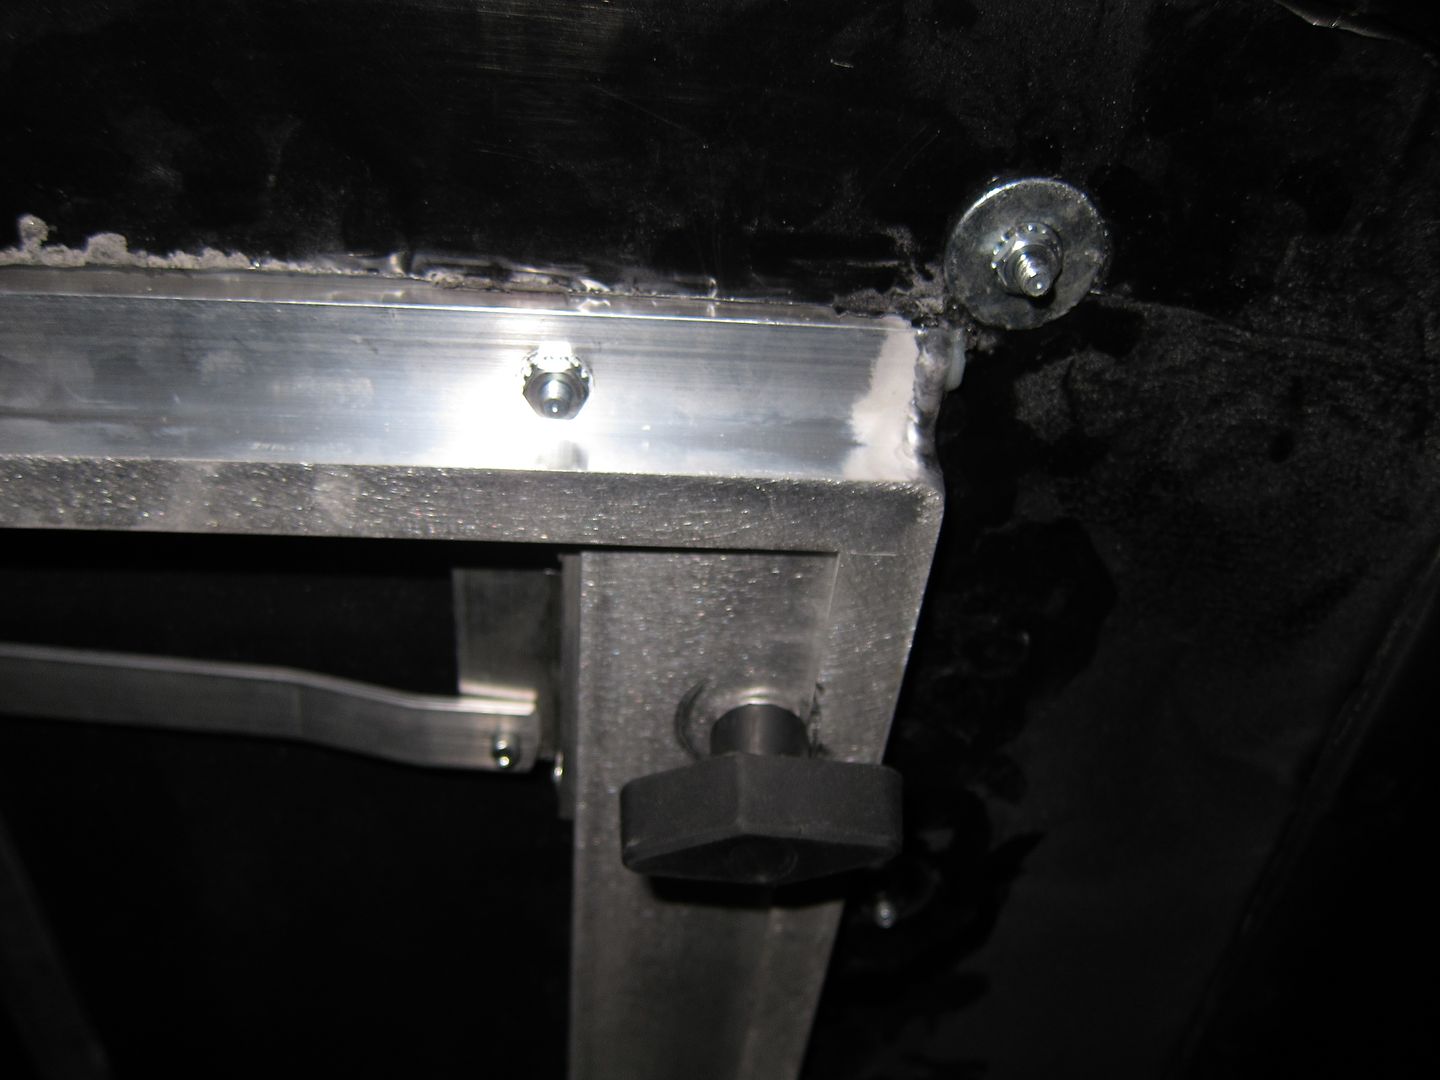
Next you need to clamp the frame down to the body and drill your holes for the top. I had the back clamped while I had a friend hold down the front and drilled. It all worked out. Once you've got it drilled, simply remove the frame, check your holes, and then silicone a small bead around the opening and set the frame back in and install the nuts. Also, you'll need to clamp the back as it dries because there are no bolts in there until you install the ragtop. If you have overflow on your silicone, just let it dry and trim it off later. Do not try and wipe it!
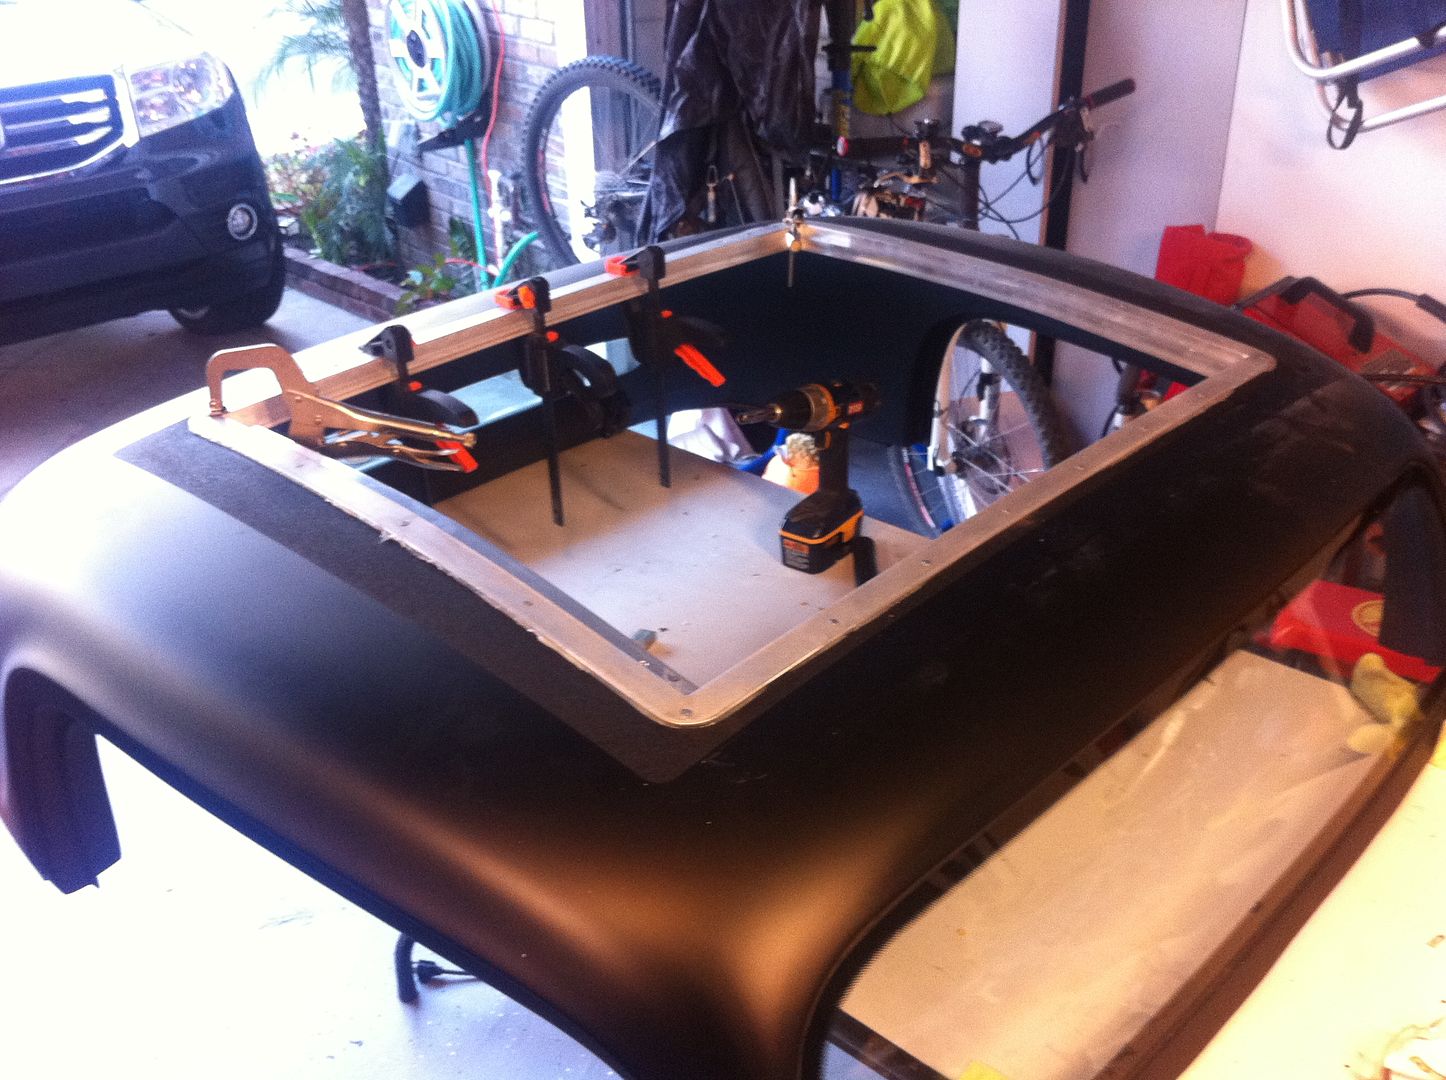
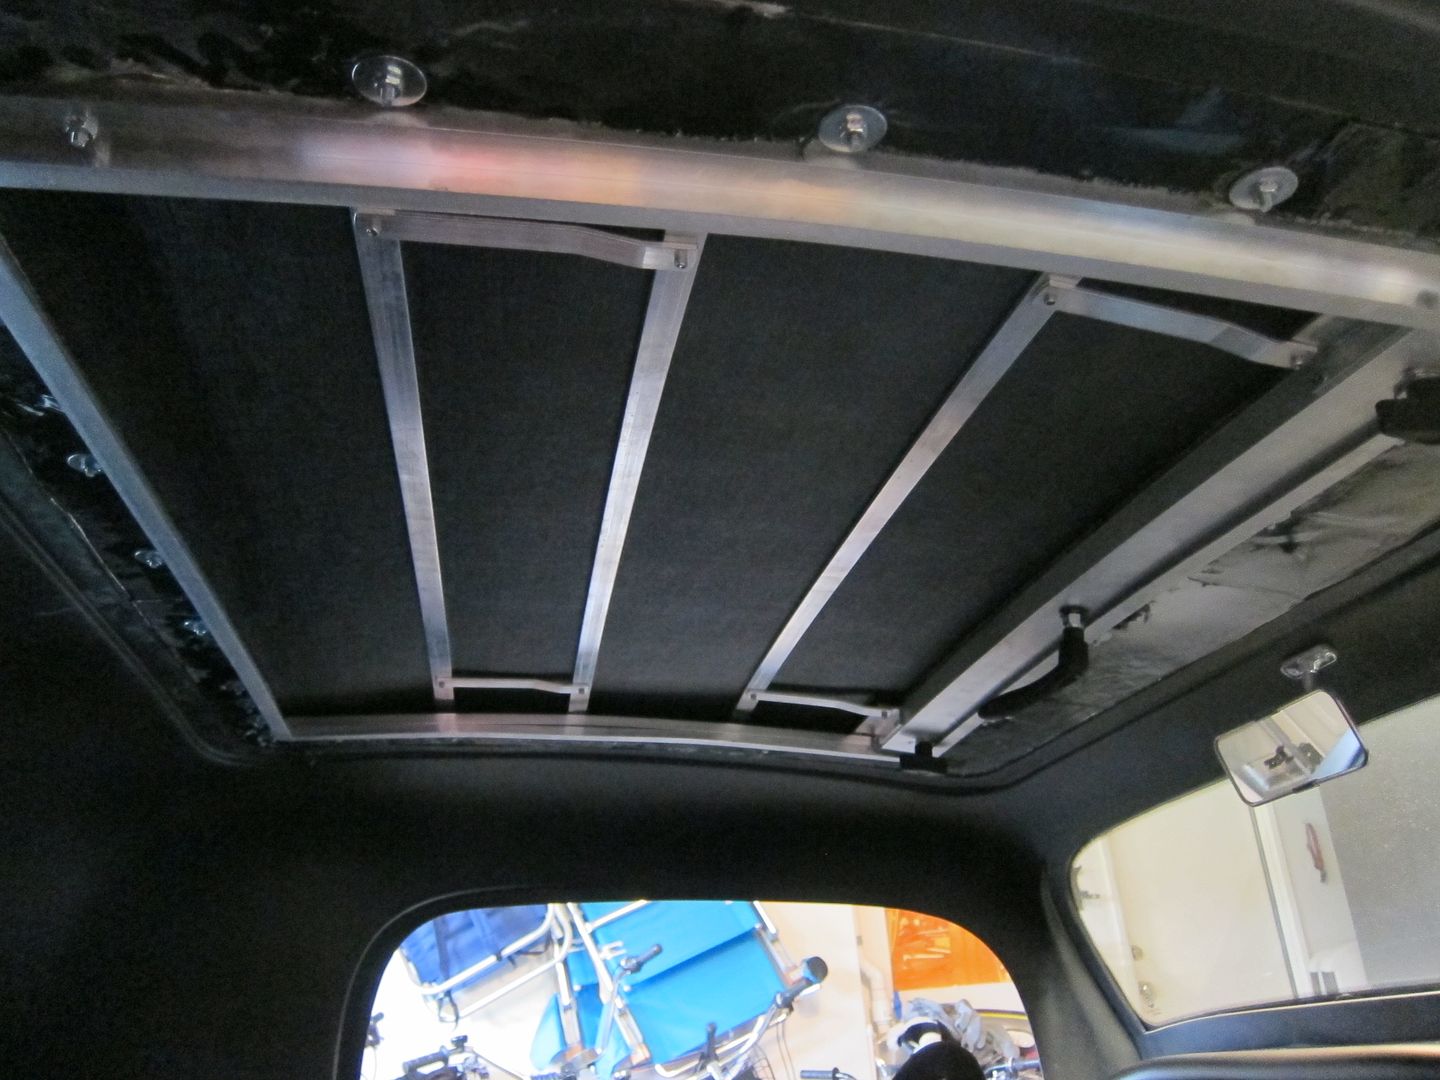
Now you'll want to bend the frame rails to fit the contour of the frame. Again, pretty easy over a tire. Once they are good, install the top as per the instructions and check the sliding. There is some adjustment to be made with the spring setup and you may need to trim some fiberglass around the latch opening area as mine had some uneven glass that interfered with the hook latch.
I hope this helps some of you. I'll report back on wind noise. I don't have windows so it won't be an issue for me and it might make it hard to tell. But now I really need a headliner!
I'm a little bummed I painted the roof with that undercoating. It looked cool by itself but now it looks weird. Oh well!
Last edited by ehansen007; 11-21-2012 at 01:25 PM.
-
Senior Member
-
 Administrator

Wow, great mod! Thanks for the writeup too, I'm sure others will want to try this as well.

FFR 5369 Pin Drive, IRS, Trigos, Torsen, Wilwoods, FMS BOSS 302 "B" cam , Mass-flo. CA SB100 (SPCN) Registered
Delivered 4/23/06. "Finished" 4/2012 (still not done!)
-
Senior Member

Nice work Erik, a great idea.
www.33coyote.com
Built with the help of my dad and sons
coyote/TKO 600, Wilwood Brakes,Boyds tank, QA1 shocks
Speedhut Gages, rag top, bike fenders, power steering
"Never let physics or common sense get in the way of a good idea"
-
Senior Member
I drove it around today during lunch and it was awesome. I could see the stoplights! It was a beautiful out too so it was nice to just drive with it open. I could hear a few little flaps from the top now and then but otherwise it was perfect.
-
Senior Member

Hi Erik, My second car was a '64 SAAB 96 GT with a sliding ragtop sunroof! I loved that feature. This brings back fond memories. Too bad I didn't save that little ringding SAAB, it was fun to drive.
I like the look and can imagine how nice it is to drive with the top open. I know my '33 would have been a lot cooler inside on hot days. For all of 2012 I drove mine as a roadster, however. I've been considering the soft top, but this has new wheels spinning in my head.
Thanks,
Tom
-
Dreamer

Damn, another thing to add to the wish list....
Looks very good!
-
Senior Member

great write up. Getting the same one for my car after talking to Tony. Saves a lot of filler work on the roof haha. We wanted to cut the hole on the car warriors car but Mark D. wouldn't let us haha
Can't find the 40x30 on the site. was that a custom size?
stack
Last edited by stack; 11-30-2012 at 10:10 AM.
FFR MKI Roadster FFR2202K Built in 2000 sold
FFR Hot Rod #39 under construction
-
Senior Member
Yes, 40x30 was custom. At first I thought I went too small but then I realized you want to have room for the the bolts to come through and have room for washers too. Still I went bigger than Tony's (30x35) You could go up to 45x34 long but I think the price goes up quite a bit and you'll have to bend it more to meet the contour of the roof. Just call the number and Rick can walk you through everything.
-
Dreamer
I see they do an electric one as well...
-
Tech Support Manager, FFR

Hi erik let me know what was you'r thinking behind the grip tape around the perimeter of the roof.....thanks bud hope all is well!!
-
Senior Member
Haven't you ever roof surfed before? You need traction! Go Teen Wolf!

What happened there was when Jack Da Bat and I were painting the roof, the SEM single stage dried too quick and striped it. We tried it twice. So basically I masked off that area and painted it with Evercoat fender coating and made it look like a canvas top. It turned out like grip tape. Still cool with it though until I put the ragtop in and discover it was smaller than he told me. Too bad I made it too big! Oh well.
 Posting Permissions
- You may not post new threads
- You may not post replies
- You may not post attachments
- You may not edit your posts
-
Forum Rules

Visit our community sponsor


 Reply With Quote